Home - Dirtbike - Dirtbike Features - Performance Ignition System Installation and Adjustment
Stock ignition systems are designed, like many other components of a recreational ATV to serve a singular purpose, and to do it economically. Why go to an aftermarket system you may ask? For those that want to go fast, there can be several reasons:
| The PVL kit comes complete with everything you need to replace the stock ignition system. |
With these things in mind, the call went to Penton Imports of Ohio who is the exclusive distributor for the German company PVL (Probosch-Vogt-Loos GmbH). PVL has been around for over three decades and builds some of the most recognized and well respected aftermarket ignition systems available. In the case of miniquads, they offer systems for Kasea, Polaris, Eton and all the flavors in between, for 50 through 90cc type machines. Your typical kit runs in the neighborhood of $400.
| Remove everything from the RH side of the engine down to the crankshaft. Make sure all mating surfaces are perfectly clean and burr-free.. |
The retrofit of a PVL system basically necessitates the replacement of the entire stock ignition system. This means that the stock coil, CDI box, stator, and flywheel are all relegated to another one of many little brown boxes collecting dust somewhere in your workshop.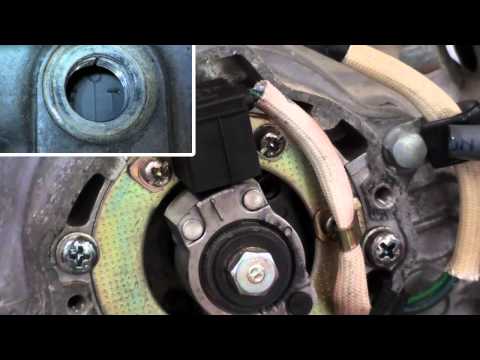 In place of these, PVL sells you a ready to go kit which includes new coil and wire, CDI box, pickup/stator, backing plate, and rotor (flywheel). They even toss in a rotor removal tool.
Step one requires that all the stock hardware mentioned above be removed and the aluminum PVL mounting plate be installed. Make sure the engine case mounting surfaces are perfectly flat with no gouges, burrs, or irregularities. When tightening the plate down, it must fit perfectly flat against the case. In our case, the oil injection blockoff plate needed to be relieved slightly to allow the plate to sit flush against the case.
| With the rotor installed and the crank positioned at the spark point, the marks should line up perfectly (at 12:00 on this configuration). |
Next, we install the stator near the midpoint of its slots and lightly tighten its mounting screws. It should be installed so that the open "U" shaped part of the stator is pointing at about the 7:00 position. This allows the wires to come out nicely through the hole in top of the case where the stock wires exited. You can even extract the case grommet from the stock stator and transplant it to the PVL wiring for a nearly water tight seal.
The tricky part to the whole process is setting the timing advance. This is done by inserting a dial indicator into the spark plug hole and setting in inches or mm how far below TDC the timing should be set. Because of the sensitivity of crank position to piston position near TDC (alot of degrees for a small piston movement), this procedure must be performed by dial indicator and not by a degree wheel and feel. The correct process requires that the indicator be zeroed at TDC, and then the crank be turned CCW until the appropriate measurement is obtained on the dial indicator.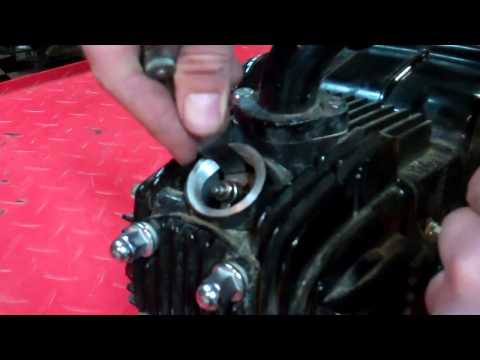 At that point, the rotor is installed on the crankshaft so that its timing mark lines up with the timing mark near the top of the stator (there are two, the top mark is the one to use). If the timing marks do not line up perfectly, a final adjustment can be made later by moving the stator plate. Lightly tap the rotor to seat it on the tapered crankshaft, and then torque the nut on the rotor.
To complete the installation, recheck that the timing marks line up at your desired dial indicator measurement, and adjust the alignment by turning the stator accordingly. What timing to use? That's the magic question, and not an easy one since it depends on many variables. A safe starting point is to set it to stock timing, or even slightly retarded (closer to TDC). On a stock miniquad, the timing is about 20º BTDC, which translates to 0.060" on a 39.2mm crank (50-70cc machines) and 0.065" on a 45mm crank (90cc machines). If you don't know the connecting rod length you can estimate it at about twice the stroke. It doesn't need to be extremely accurate. As far as adjustments go, more timing advance may get you better low end grunt and better starts, while retarded timing tends to help high rev power such as long straightaways. | ||
|
What's it all amount to? We ran the PVL system on a chassis dyno to dial in the spark timing.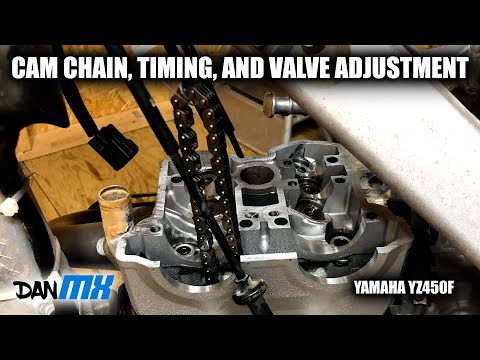 Unfortunately, due to the amount of work required to swap systems, a direct same-day comparison to the stock system was not possible. However, we were able to estimate stock performance by adjusting the timing to the stock 20º setting. Additionally, 25º, 15º, and 10º were also tested in an effort to flesh out the optimum value.
The graphs above show distance versus time. The test was ran as a 200 ft drag race simulation on a chassis dyno. Performance data such as time, distance, and wheel power were recorded every 1/10 of second until the 200 ft point. From the graphs you can see that they are all very close but that the "15º timing" run was quickest by about 0.5 second, which is huge when you consider that there are many 200 ft sections in a typical race lap, and many laps in a race. Do you need it? Only if the other guy is running it!
To contact Penton Imports, go to http://www.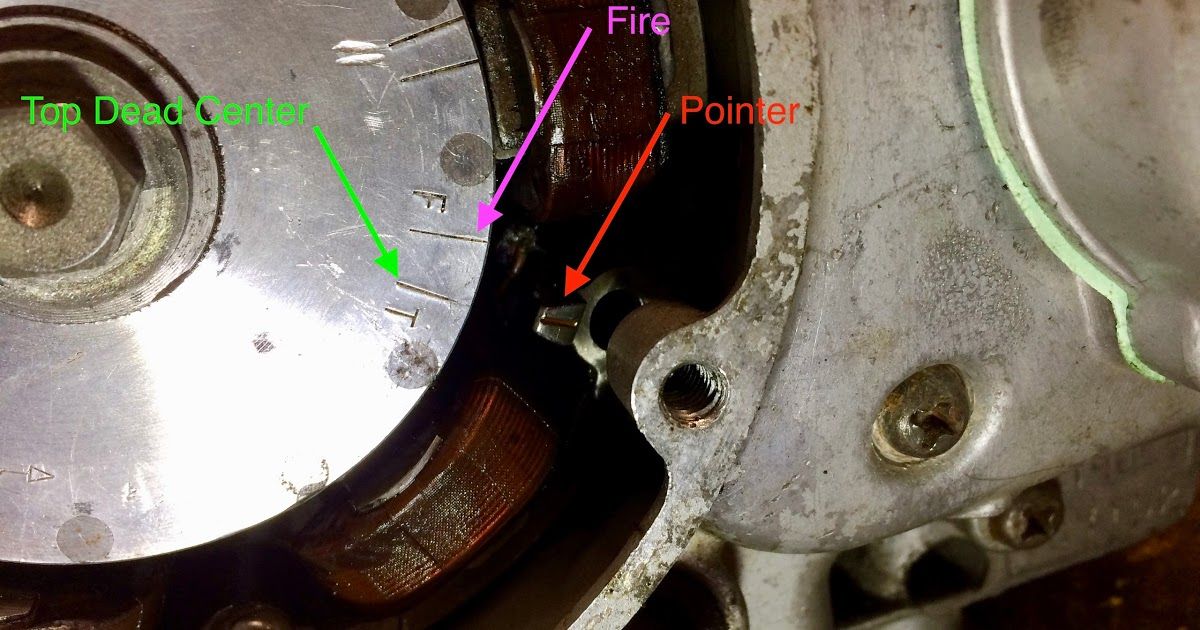 pentonimports.com or call them at 440-989-4474.
Engine timing is mission-critical. Getting this stuff wrong can spell big trouble. If you suspect timing is out, best not to run the motor.
Checking ATV engine camshaft and crankshaft timing marks is the correct way to verify timing. It’s a simple 4 step process:
By the end of this post, you’ll understand clearly how to check your ATV engine timing marks, why timing jumps and how to fix it, and also other causes of bad timing.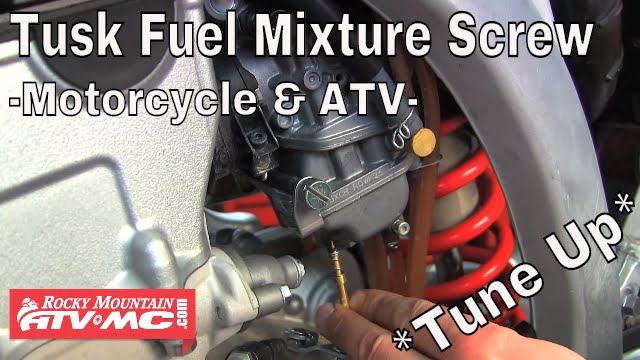
Page Contents
Timing is everything, every component of your engine has an important job to do, and some components have to do it at a very precise moment in the engine cycle. Doing their job too early or too late can make the difference between an engine on full song and no singing at all.
The bottom end of your engine (crankshaft) coordinates the top end (valve train). It employs sprockets, chains, tensioners, and guides rails to keep everything in time. The valves positioned in the cylinder head open and close sequentially, allowing fuel in and spent gases out.
The spark plug needs to fire at the correct time. Ordinarily, when the engine is idling, the plug fires when the engine is at TDC, and it signifies the beginning of the power stroke.
As the engine speeds up, though, the plug is fired earlier. Know as BTDC (Before Top Dead Center), this is because the spark plug takes time to produce a spark. Starting the process early, therefore, means the plug continues to fire at the sweet spot in the engine cycle.
The firing, advancing, and retarding of the spark plug is controlled by the trigger (aka pulse, pickup, or crankshaft sensor (CKP)) and the CDI box (Capacitor Discharge Ignition).
An ignition timing issue may be caused by a faulty CDI box or an incorrectly positioned pickup sensor.
Your ATV engine is a four-stroke simply because it has four clearly defined stages in its operation.
The piston moves down the cylinder and draws fuel mix in through the open intake valve.
The piston moves up the cylinder, compressing the air-fuel mix (valves closed).
Plug fires and the piston moves down the cylinder powering the crankshaft (valves closed).
The piston moves back up the cylinder forcing spent gases out the open exhaust valve.
And the cycle starts over.
There may be lots of reasons why your ATV engine doesn’t sound or operate like normal. Timing is not one of the first items checked unless it suffers from some of the following symptoms:
Don’t rule out some of the simple causes first and they include the following:
Checking your timing is a straightforward procedure, but you’ll likely need to remove a few items to gain access.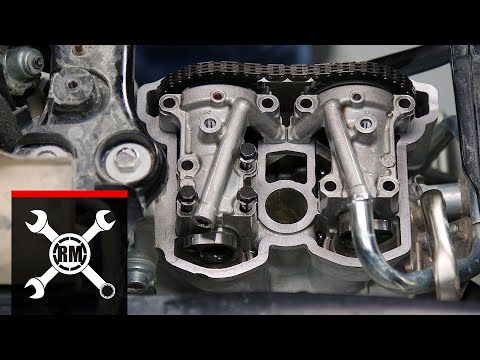 This guide guesses that your engine is an Over Head Cam found in most modern ATVs. I’ve included a single and a twin-cam, your timing markings will likely be different but not to worry, from the timing diagrams below, you’ll get the picture.
The process goes like this:
 It should align with the mark on the cylinder head.
For twin-cam engines, the process is similar, with just an extra sprocket mark to line up. Typically, both sprocket marks align with the horizon plain of the cylinder head (marked as red lines below) and some sprockets may have an additional mark (not in the pic below), and typically they point straight upwards (90°).
The timing chain and valve train are all mechanical and require adjustment and maintenance for trouble-free service.
The more usual causes of jumped timing include:
Resetting the timing can be a pain in the ass, but you do need to get it correct. If the timing isn’t correct, the piston could impact the valves, causing some very expensive repairs. Your very first job is to find a manual for your engine. The process, torque specs, and tightening sequences vary from engine to engine.
Critical information and tools
You’ll need to know your timing marks, torque specs, fastener sequences, and you’ll need a torque wrench. You’ll find a list of all the tools I use here on the ATV tools page.
This guide will give you a general flavor of the job ahead.
A full inspection of the chain, sprockets, guides, and tensioner is advised. A failing tensioner is a very common cause of jumped timing, and obviously, if root causes aren’t fixed, timing will jump again and maybe with costly consequences.
You may find these posts useful:
How often to service an ATV?
ATV parts page
ATV won’t jumpstart
Air-cooled ATV white smoke
Will ATV start with a bad stator?
To date, the ignition is installed and works perfectly on the following models of ATVs:
Suzuki Let's scooter( 2T 50CC ),Honda Dio 35 scooter,Chinese 110,Chinese 150,Bombardier Rally 200,AiE 4-cross 200,Chinese 250,PATRON-COUNTRI 250( 2 cyl),SYM250(buggy),Kawasaki KSF-250 ,stels 300,sym 300,Linhai Yamaha 300,Adly ATV CrossXOver 300,TGB-325,Yamaha YFM350,JS400(jamshut),Rys-400,TGB-425,ZiD Lifan LF 400 ST,HSUN400(Stels 450H),Yamaha Grizzly 450 Stels 500K 600,Yamaha Grizzly 600,Stels600Y(Leopard),BRP QUEST 650,Arctic Cat 650 h2,Yamaha Grizzly 660,hsun 700,dinli 700,SMC Jumbo 700,Polaris Sportsman 700 twin,Dinli 800,motorcycles:lifan 200,Mikilon d10- 250, Stels Enduro 400, forsage 450(CRF450X) .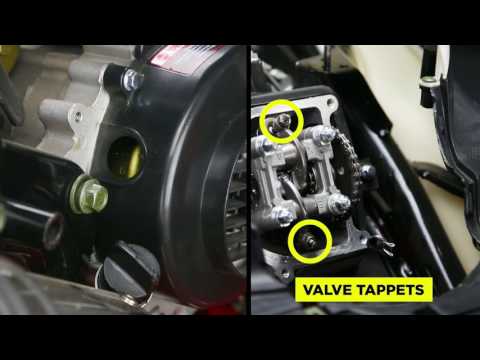 ..
..
A new development has appeared - a DC-CDI switch with an integrated microprocessor-based voltage regulator.
Keeps working capacity at power surges up to 150 volts.
in emergency mode, direct operation from the generator windings is allowed
while the engine speed is automatically limited to 4 thousand
A new development has appeared - a DC-CDI switch. So far in three versions:
1. for Kazuma Yaguar 500 ( Stealth 500K , Stealth 500GT , Panda , Polar Fox 500 )
2. for Dinli 600-800 (carburetor version)
3. Universal Scooter Switch - Suitable for almost any scooter with an inductive crankshaft sensor.
C 18 02 2013 the firmware for Kazuma (it is the same for JS-400) has changed, the method of selecting the operating mode (choosing the optimal ignition angle) has changed, the assignments of the internal dip switches have changed accordingly. The idea is this - in order to facilitate and make the selection of the ignition angle more obvious, 31 curves for changing the lead angle are stitched in the block, in increments of 1 degree. Switches 1,2,3,5,7 are responsible for selecting the mode. For clarity, we take the initial lead angle, laid down by the engine design, as 0 degrees. When all switches are off - the first curve is selected, which has a lead of 9 at high speedsdegrees. If you turn on any of the above switches, a little more will be added to these 9 degrees :), namely: 1- 1 degree, 2-2 degrees 3-4 degrees 5-8 degrees, 7-16 degrees. when several switches are turned on, their values are simply added, i.e. the maximum you can get is 9 + 31 = 40 degrees, which corresponds to the angular size of the tide on the flywheel of the "kazuma" engine. For jamshut, for example, you need 29 degrees, we get 29-9=20 , i.e. must include number 7 and number 3 . The rest of the switches work as in previous firmware versions. In the near future, similar changes will be made to the universal version of the firmware.
The assembled boards of the new version of the ignition finally came from production - model of 2013 (blue board), from hardware differences - the presence of overvoltage protection (resettable fuse + TVS diode for 18 volts), the ability to implement the function of reducing the sensitivity of the input circuit with increasing revolutions (an additional option for an additional fee), is very relevant for high-speed motors, but ordinary ones only get better from this, for example, it is automatically solved The "problem" of the Yamaha and Simov crankshaft sensors, which have a winding resistance of ~ 500 Ohm, is that you do not need to install an additional resistor. A new algorithm for calculating the lead has been written, taking into account not only the speed but also the acceleration of the motor, which made it possible to achieve greater "agility" when acceleration and reduce the effect of "early ignition" when braking. nine0004
The "multi-spark start" function is finally implemented in all versions of the firmware of the ignition unit, today they are: 1. Universal, suitable for almost any engine 2. Universal with input signal inversion, for models where the DPK is normally connected the other way around (Stealth300, HSUN 500/700, YFM660, etc.) 3. CF-188 ( CF-500 , Godzilla Z-5 etc. ) 4. DINLI ( 600/700/800 ) 5. KAZUMA (all models with Kazuma engine and "JAMSHUT" JS-400) 6. FORSAGE 450 ( HONDA CRF450X ) since each firmware has its own characteristics, in the near future separate descriptions for each version will appear on the site. nine0004
The new firmware version for Kazuma has a "multi-spark start" function - when starting the engine, instead of one spark, a multi-spark series occurs, which greatly facilitates starting, in the future it is planned to implement this function for all models.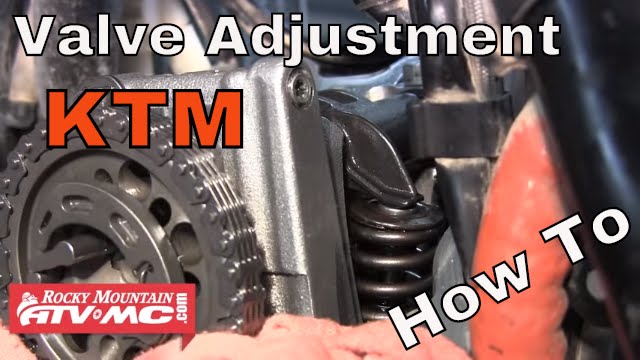
A new version of the firmware for the universal control unit has been released, the main differences from the previous version:
the correction of the initial ignition angle has been introduced, which ensures starting with zero UOZ, significantly reducing the likelihood of "kickback" (both when starting and when the engine is stopped), there are two modes - for engines with a tide of 50-60 degrees (most 400-700 cc) and for engines with a tide of 20 degrees (almost all low-cubic capacity - up to 300 cc), switching by switch number 5. Chart correction is now possible only downwards, i.e. any one can be lowered by 2.5 degrees, as experience has shown, this is enough, it is turned on by switch number 7. Due to the increase in the size of the program code, the number of graphs in memory has been reduced, now there are 7 of them, instead of the eighth - a software increase in the UOZ with an increase in speed, which something like a universal mode that will work on any engine. nine0004
In the new firmware version, the "idling indicator" function appeared, the UOZ charts were corrected (according to the results of sea trials of some models).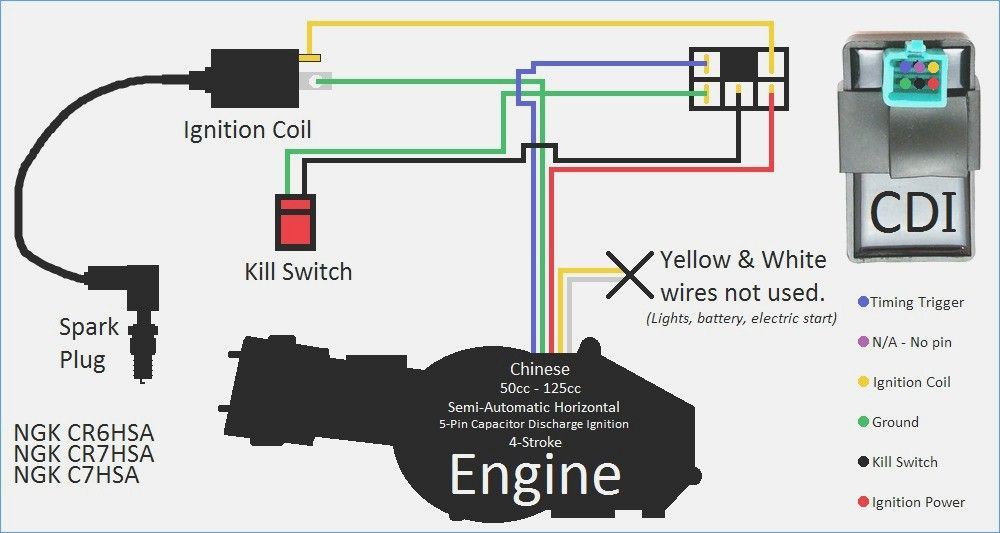
In the Reviews section, there is a large replenishment of reviews, sorted by date. In the future, the section will be modified, a classification of reviews by models will appear.
The site is finally open. The "Reviews" section will soon begin to fill up, I hope the site visitors will actively help me with this :o) Also, additional sections with a photo gallery and video will be added soon. nine0004
An incorrectly adjusted ignition system often causes the bike to stall or simply not start. And it does not matter if you took a top-end two-wheeler or decided to buy an inexpensive motorcycle. Even a small error in the adjustment will significantly complicate the operation of the equipment. So let's find out how to set the ignition on a motorcycle?
The starting system is made up of many parts that will lead to a variety of problems if they fail.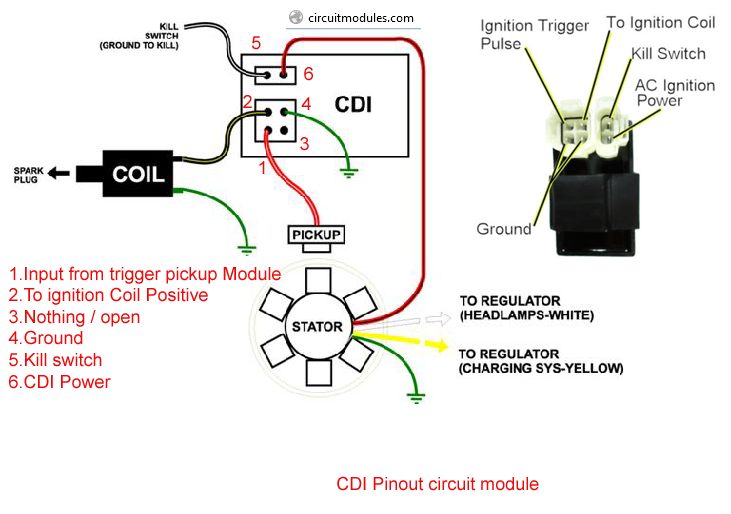 Drivers usually complain about:
Before setting up the ignition of a motorcycle, "walk" through all the components of the system and make sure they are working.
If the ignition system is not working correctly, carry out a complete diagnosis. The procedure is performed in the following sequence:
 Unscrew, clean and check the functionality of the component. Replace if necessary.
 The carburetor must also be adjusted and cleaned before adjusting the ignition of the motorcycle. The fact is that an improperly prepared fuel mixture can cause problems with starting the engine or stopping it. nine0004
Late or pre-ignition is one of the most common causes of powertrain failures. In case of untimely ignition of the mixture, the driver will notice:

And these are only the most expressive symptoms that can be used to diagnose the problem.
First you need to clean the engine of dirt and dust so that no debris enters the system during tuning. After that follows:
Note : Matching marks on rotor and sprocket can be difficult.

 Tighten it, and install the fan and shroud. Lastly, find a place to mount the CDI box using two screws. Wiring consists of connection of a tether/landyard to the red CDI wire, and ground to the black one.