Getting a flat tire is an inevitable part of cycling, and there’s only so many times you can get away with walking your bike into a shop or having a buddy on a group ride fix it for you. An essential part of knowing how to fix a flat is also knowing how to use tire levers, so there’s no time like the present to learn.
If you don’t have tire levers, don’t try using other available tools (like a flathead screwdriver) as substitutes. They could easily damage the tube, tire, or worse, the rim. Tire levers are designed specifically for removing and installing tires without damaging anything in the process, so stick with those to be safe.
Below, we explain how to use a tire lever, along with tips for dealing with tricky tires.
Join Bicycling All Access for more tips and tricks
Many tire levers are made out of hard plastic and sold in sets of two or three. You can also find levers made out of steel or with a steel core for tires that are harder to remove. All tire levers feature a curved end for slipping under the lip of the tire; depending on the brand, it could be fully rounded or squared. Many tire levers, though not all, come with a small hook on the other end so you can secure it to a spoke for leverage.
Trevor Raab
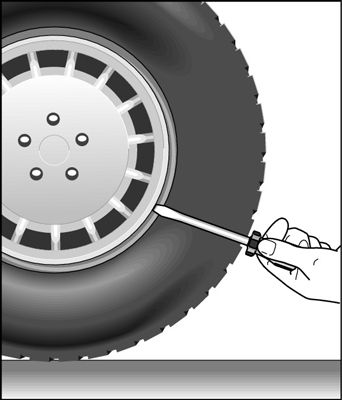
Start with the tire deflated. Pick a spot along the edge of the rim that lines up with a spoke. Pull back the tire away from the rim and fit the curved end of the lever under the edge of the tire. With the tip of the lever under the tire’s edge, press down on the lever using the rim for leverage and secure the hooked end onto the spoke. The lever should lift the edge of the tire up and over the outside of the rim and hold it in place.
Take a second tire lever and fit the curved end under the tire’s edge in the gap created by the first lever. Work the second lever along the edge of the rim by sliding it laterally with the end under the tire lip until the tire comes free of the rim on one side. This step can be hard to do with tight tires—try pushing on the second lever with both thumbs.
Trevor Raab
Trevor Raab
If the tire won’t budge using the second lever, check out our tips below. You don’t want to risk injuring yourself by using so much force that your hand slips off the lever. Alternatively, sometimes a tire can be removed using just one lever. If the tire seems loose enough after freeing the initial section with the first lever, go ahead and see if you can easily push the lever around the rim to remove the rest of the tire.
Putting a tire onto a rim is typically a bit easier than removing one, but using a tire lever might still be necessary. Fit one side of the tire onto the rim first. (If you’re using a tube, you’ll want to put that in next. ) Now, start fitting the other side of the tire onto the rim. You’ll reach a point where this becomes difficult to do because the final section of tire is too tight, leaving a small section outside the rim. You should try to intentionally leave the final section of tire to be mounted on the rim by the valve if possible.
The next step is where your lever comes in. Place the curved end of the tire lever under the remaining section of tire with the curve facing down, hugging the inside of the rim. Lift the opposite end of the lever up while keeping the curved end planted firmly on the inside of the rim, pulling the rest of the tire onto the rim.
If there’s a larger section of tire stuck outside the rim after installing what you could with your hands, you’ll have to repeat this step on smaller sections.
$20 at Competitive Cyclist
Credit: Park ToolOur go-to for stubborn, tight fitting tires
$8 at Amazon
Credit: Pedro'sAn affordable and popular favorite
$26 at Competitive Cyclist
Credit: Park ToolThese 8-inch levers are for tough DH and Freestyle tires
$14 at REI
Credit: TopeakThese dual-purpose tire levers double as chain powerlink pliers
Still having trouble installing or removing a tire? Some tires are especially stubborn. To make it easier on yourself, here are some tricks you can try (or don’t try).
→ First, what you shouldn’t do: You may have heard of some weird tricks that supposedly help with stretching a tight tire, such as throwing it in the dryer for a few minutes or using another heat source. That can end up doing more harm than good.
“Unless you know at exactly what temperature the tire’s bonding agents, rubber, and nylon start to delaminate, etc., you should not do this,” says Bicycling mechanic Joël Nankman. Instead he suggests using a little soapy water to help slip the tire into place. Just don’t get it on your hands.
→ Another pro tip from former Bicycling test editor Dan Roe: “A mechanic once showed me that you should make sure the bead core is sitting deep into the rim, rather than just resting on the hook. That makes the diameter of the rim slightly smaller and can make the difference with a really tight bead.”
→ Misplaced your tire levers? You can sometimes just use your hands with the right technique and practice, especially with tires that aren’t very tight. Seasoned pros like mechanics might hardly ever use tire levers. The trick here is to use the palms of your hands to work the tire off or on instead of your thumbs since they’re stronger, Nankman says.
Still, injuring yourself this way from slipping, especially with sweaty hands during a midride tire repair, is no fun. (Trust us, we’ve been there.) So it’s best to have a set of tire levers on hand anyway. Of all the bike tools out there, they’re one of the most affordable and easily portable options to keep in a saddle bag or in your toolbox.
Jessica CoulonService and News Editor
When she’s not out riding her mountain bike, Jessica is an editor for Popular Mechanics. She was previously an editor for Bicycling magazine.
This content is imported from OpenWeb. You may be able to find the same content in another format, or you may be able to find more information, at their web site.
Do it once, know it for life. With the right tools, it’s absolutely safe to change passenger vehicle tires on your own. Follow this guide for cars, trailers, and non-commercial vans and trucks with wheels up to 33”.
Before you jack up the car, loosen the lug nuts [2 minutes]
Now that the lug nuts are spinning free, raise the car [3 minutes]
 ¹
¹Remove the tire [1 minute]
Replace the tire [2 minutes]
Partially lower the car [2 minutes]
Finish up [2 minutes]
¹To safely lift and avoid damage to the vehicle, follow the instructions for jack placement in your vehicle owner’s manual. Many vehicle frames have molded plastic on the bottom with a cleared area of exposed metal specifically for the jack.
²These steps can be done without a Jack and Jill tire trolley through careful lifting and positioning to avoid potential injury. Make sure to consult your owner’s manual and review their specific steps on how to change a flat tire for your vehicle.
The right tools make all the difference.
Products: brake cleaners, rim cleaner.
Equipment: all modern tire systems are powered by compressed air: pneumatic guns for loosening wheels, tire changer, inflation guns. Therefore, the main tool in tire fitting is a compressor. In 99% of cases, reciprocating compressors with a capacity of 400 lmin are used. These compressors require ISO VG 46 and 100 compressor oils, depending on the compressor manufacturer's recommendations. Oil change, on average, 200-250 hours when using mineral oils, that is, about once a month during the tire season. Using synthetic oils, such as Liqui Moly LM 500, article 4076, you can increase the compressor maintenance period up to two times a year.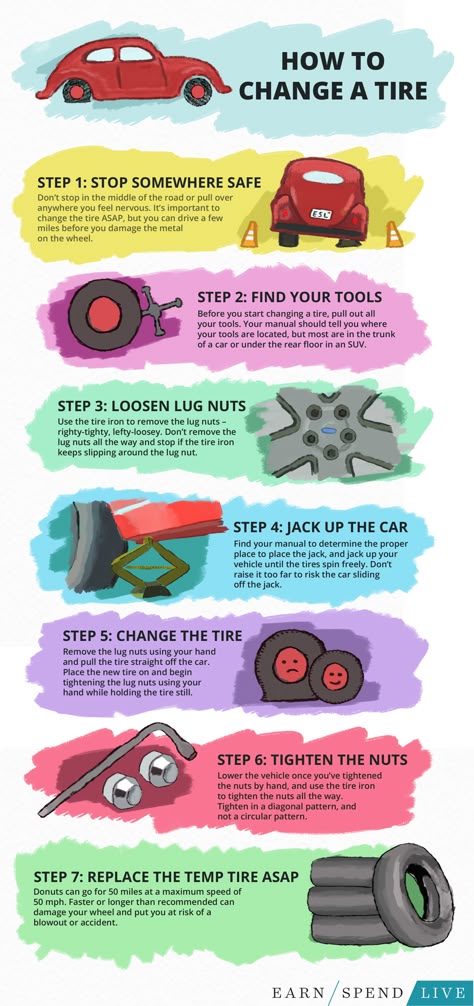
The air gun is an essential tool for quick wheel removal. It has a lubricator lubrication system, that is, oil is supplied along with compressed air using a special lubricator-lubricator. In small tire shops, they save money on lubricators and periodically bury the oil directly into the air gun. To lubricate air guns, use Liqui Moly Oil fur Pneumatikgerat, part number 7841.
| Fig 1 | Fig 2 | Fig 3 |
To carry out work, place the vehicle at the place where the brake is to be carried out. work and fix manually Raise the vehicle with a tire jack or scissor lift, unscrew the wheel fasteners and remove the wheel. Wash the wheel in a washing machine, dry it. Using the special tool, unscrew the valve and bleed air from the wheel. Remove balancing weights, if self-adhesive weights are used, then remove the remaining glue from the rim with a rag using Liqui Moly Dichtungs Entferner. It is necessary to carefully inspect the tread for stones stuck in the sipes, since wheel balancing is meaningless with a dirty tread. If you plan to install the tire back after repair, then it is necessary to mark the position of the nipple for inflation on the tire using a special marker or chalk. The tire is installed in the same position in which it was removed from the rim. Install the cleaned wheel on the tire changer and tear off the sidewall of the tire from the rim with a spatula (Fig. 1). Next, center the wheel on the clamps (1) of the machine Fig. 2, (use plastic protective pads when working with light alloy wheels) and completely separate the sidewall of the tire from the hump with a roller (Fig. 3). Before removing the tire from the rim, apply Liqui Moly Reifen Montierenpaste to the parts of the tire adjacent to the rim.
It is recommended to apply the paste with a flute-type brush, it is not recommended to use fly brushes (Fig. 4). Pry off the sidewall of the tire with a mounting spatula, bring it up by the heel of the machine (Fig. 5) and rotate the tire until the sidewall of the tire completely goes beyond the rim. Do the same with the bottom of the tire and remove the tire from the rim (Fig. 6).
| Figure 4 | Figure 5 | Figure 6 |
| Figure 7 | Figure 8 | Figure 9 |
Before mounting a new or refurbished tire, be sure to replace the tubeless tire valve (Fig. 7), clean the tire contact surface with a Reiniger und Ferdunner cleaner (Fig. 8), place the rim in the wheel balancer (Fig. 9) and check the runout of the rim .
To mount the tire, it is necessary to put the disk back into the clamps of the machine (Fig. 2). Before installing the tire, apply mounting paste to the sidewalls of the tire adjacent to the rim (Fig. 10) using a flute brush on both sidewalls of the tire. Put the tire on the disc using the machine's thrust pad (Fig. 5). Orient the tire according to the marks made earlier, in case of using a new tire, align the factory mark (yellow or white) with the tire valve by location. Inflate the tire, allow the sidewall to take the correct position on the hump of the rim, for which give an air pressure of 6-8 bar (when the tire is seated, a loud bang will occur). Check the tightness of the fit by using Leck Such Spray or immersion in a water bath. After checking the tightness, bring the pressure in the wheel to the nominal value and install it in the balancing machine. Center the wheel on the center hole and studs and balance. Degrease the rim with Reiniger und Ferdunner in places where self-adhesive balance weights are fitted.
| Fig 10 |
Before installing the wheel on the hub, treat the mating surface of the hub with your choice of (Fig.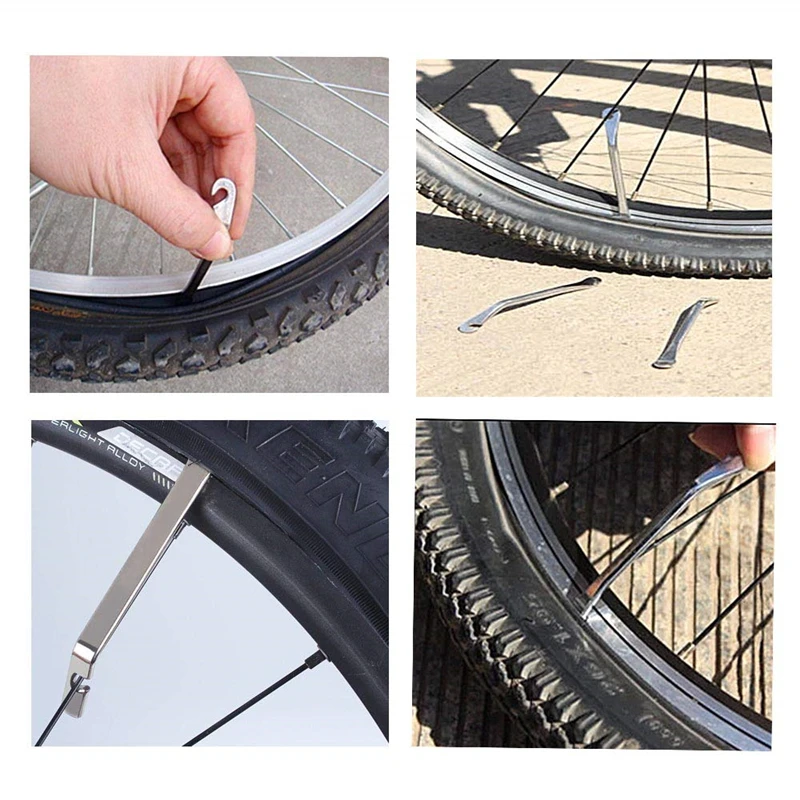 11): Aluminum Spray, copper spray Kupfer Spray or ceramic paste Keramik Paste. The same compositions must be used to treat wheel fasteners (Fig. 12), studs or bolts (if there is a corresponding recommendation from the car manufacturer). Install the wheel on the car (Fig. 13), manually tighten the fasteners, make the final tightening to the required torque with a torque wrench. Attention: Do not use pneumatic tools to tighten wheel fasteners!
For seasonal preservation of winter or summer sets of tires, use Reifen Glanz Schaum Tire Foam.
Photo www.daynightmobiletire.com
The benefits of mobile tire service are obvious. For example, an on-site crew will save you time when changing tires in the off-season, when long queues line up at stationary points. The service is also relevant in emergency cases, when for some reason there is no spare wheel in the kit. There are many more situations where a mobile specialist will come in handy. But with all the advantages, you need to take into account the disadvantages of such a service.
Ivan Flyagin
In fact, mobile tire fitting can be considered an express help in the field, but not a full-fledged repair. The first argument in favor of this statement is that the wheel balancer is most often inaccurately calibrated. After all, it must be installed on a horizontal surface perfectly evenly, otherwise the wheel balance will be of poor quality. It is extremely difficult to do this with a machine mounted on a vehicle with its pneumatic tires and suspension, so balancing the wheel will depend on the slope of the road profile. Only an experienced master can cope with balancing in such conditions, but the competence of mobile specialists will be discussed below.
Field tire service does not always guarantee a full repair, and for the reason that decommissioned worn-out equipment is often used in mobile points. And we are talking not only about machines for balancing wheels, but also about pneumatic tools. Still, this is usually seasonal work, and the best equipment is usually preferred to be used in a stationary workshop. At one of the automotive forums, several people complained at once that visiting specialists used an old jack without a protective cap and scratched the car with it.
The fact that mobile services bring the main profit in the off-season, during the mass “change of shoes”, specialists in such teams do not stay long, preferring more stable work in stationary points. And working on a tire changer requires skill and a certain skill. So there is no guarantee that yesterday's handyman-guest worker from Central Asia will not be sent to your call.
Recently, the difference in prices for regular and mobile tire fitting services has gradually leveled out, but more often than not, a field team is much more expensive. Of course, this does not apply to emergencies, when the only alternative is a tow truck.