Posted by Jefferson Bryant Know How
Flats tend to happen at the worst time in the worst places. If you are on the road or outside of normal business hours and your vehicle has a flat and the spare is missing or no good, you might feel stranded, but there is an option—a tire plug kit. This is something that anybody can do, you just need the right parts.
Liquid tire repair might get you down the road, but it will make your tire repair impossible and it could damage the TPMS (Tire Pressure Monitor System) unit inside the rim itself. The best solution is a tire plug. Made from cork and a gooey adhesive that keeps it place and seals the tire, a tire plug repair is an excellent way to get your car back on the road until you can get to a tire shop for an internal patch.
Installing a plug in your tire works for pierced tread area only. You cannot fix sidewall damage or compression breaks (from potholes, gravel roads or curbing). The most common road hazards you will find are nails and screws. Fixing these issues are perfect for the good old fashioned tire plug. Here’s how to use a tire plug kit.
You will need the following to make a tire plug repair:
Tire plug kit
Pliers, preferably needle-nosed or diagonal side-cutters
Compressed air to refill the tire
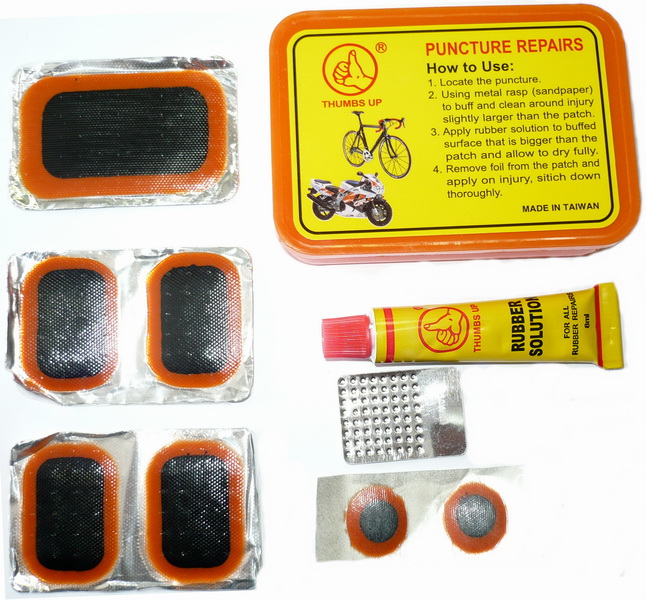
There are all kinds of tire plugging kits, but you want the most complete kit, which comes with the plugs, the install tool and the reamer tool. Some flat tire repair kits just come with the plugs and installer, but the reamer tool is a necessary component to a good repair. Some kits also come with liquid cement. You can use it or not, but the cement helps make a permanent repair.
Locate the puncture. If you don’t see or hear the puncture, spray some soapy water on the tire and look for bubbles.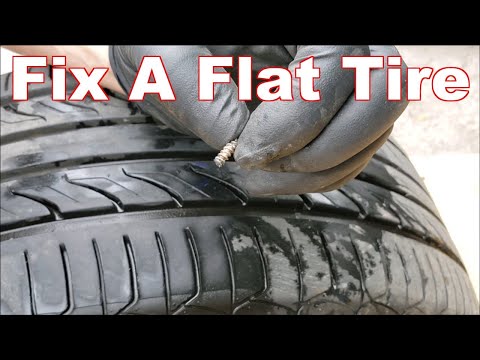
Remove the offending item. This is usually easy, but sometimes the nail or screw is worn down, making it hard to get a bite on it. This is where the side-cutters come in really handy. You will want to position the tire where you get the most leverage.
Side cutters work best for removing these items, as they can grip small round objects better than regular pliers.Insert the reamer. This will take some effort, as you have to push it through the steel belts. Use a twisting motion and push it into the tire. Once the reamer is through, saw it in and out of the tire a few times to really make a nice hole for the plug. Yes, it is counter-intuitive, but it is necessary.
The reamer requires some effort. You will hear the belts scrubbing the reamer as your break through.Push the reamer all the way and then saw it in and out a few times to make a clean hole.

Prep the plug and installer. Pull a plug off the strip and push it through the eyelet of the installer tool. The pliers will make this easier. Push a little through, grab it with the pliers and pull the plug halfway through the eyelet.
Pull a cork strip from the tire plugging kit and grab the installer tool, which looks like a large needle with a slit in the eye.Threading the sticky cork tire repair plug is not easy, but if you can get it squished into the hole, you should be able to pull it on through. The side cutters might help.
Insert the plug into the tire. If the kit has liquid cement, apply some to the plug before inserting it into the tire. Simply push the installer into the hole in the tire until the plug is about 3/4 of the way in. Twist the installer tool 90-degrees and pull it out. The plug will stay in the tire and the tool will come out nice and easy. You may trim away the excess plug or leave it to wear away as you drive.
This is what you should see when the tire plug is installed.
Once the tire repair plug is in you can now twist the handle 90-degrees and pull the tool out.
Fill the tire to the proper PSI. If you have a portable air compressor, this will make things easy. However, if you do not, you need to get air very soon.
All done. You can trim the tire plug or leave. You will need air, so don’t go driving until you have the tire aired up.Every automobile you own should have an emergency tire plug repair kit in the tool box, along with a portable air compressor. These emergency repairs are quite good, but for a long term repair, you should take the vehicle to a tire shop for a proper repair as soon as possible.
Check out all the steering & suspension parts 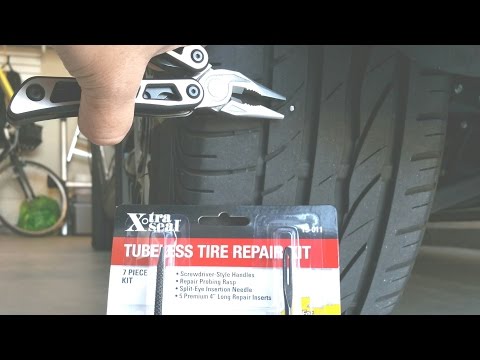 For more information on how to use a tire plugging kit, chat with a knowledgeable expert at your local NAPA AUTO PARTS store.
Categories
Know How
Tags
emergency repair, flat tire, flat tire repair, tire plug kit, tire safety, tires
A life-long gearhead, Jefferson Bryant spends more time in the shop than anywhere else. His career began in the car audio industry as a shop manager, eventually working his way into a position at Rockford Fosgate as a product designer. In 2003, he began writing tech articles for magazines, and has been working as an automotive journalist ever since. His work has been featured in Car Craft, Hot Rod, Rod & Custom, Truckin’, Mopar Muscle, and many more. Jefferson has also written 4 books and produced countless videos. Jefferson operates Red Dirt Rodz, his personal garage studio, where all of his magazine articles and tech videos are produced.
Ryder’s Slug Plug kit comes with thin (black) and fat (brown) tire plugs.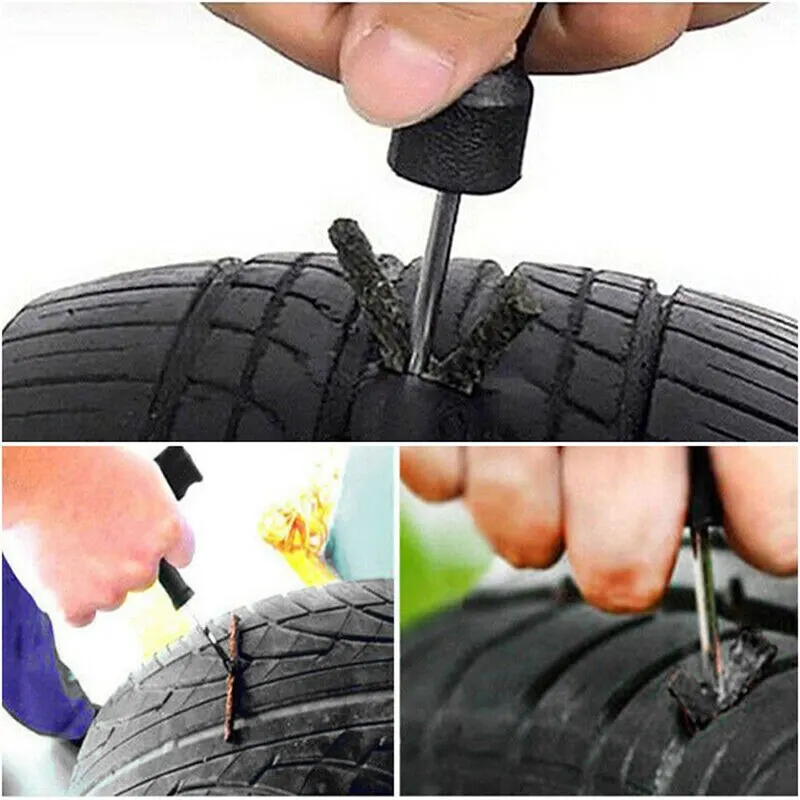
If you’ve been mountain biking with tubeless tires for any length of time, you know sealant isn’t a cure-all for punctures. For larger holes, or even tiny ones that won’t seal for whatever reason, there’s a simple, convenient solution: tire plugs.
A bike tire plug is basically just a two-inch strip of rubber designed to be inserted into a tire puncture. The idea is that the plug fills the hole just enough for sealant to do its work, while remaining flexible enough to roll with the tire. Unfortunately tire plugs are not designed to seal holes in a tube so if you’re running tubes, look into patches instead.
Mountain bike tire plugs are generally sticky on the outside, so they tend to be stored between two sheets of plastic film to keep them moist and to prevent the plugs from getting stuck to items in your pack. The rubber is irregular and often wavy to help the strip stay in place. Tire plugs of varying thicknesses can be used to seal holes of varying sizes, though a medium-sized plug should fill most holes riders will encounter.
Tire plug tools are basically fat needles with a sharp tip and a mechanism for holding the plug. They’re generally small and lightweight, often with plug storage within the tool itself.
Imagine this: You’re riding along on your tubeless mountain bike tires with two ounces of fresh sealant when you accidentally veer into a thorny cactus (or blackberry bush) on the side of the trail. Sealant immediately starts spewing out of a hole in your front tire. You slam on the brakes, jump off your bike, and lift the wheel off the ground, spinning the hole to the 6 o’clock position so the sealant can do its job. Except, the sealant just keeps shooting out.
Without tire plugs, the best you can do is keep shaking the tire around and hoping the remaining fluid will seal the puncture. If you’re carrying tire plugs and a tool, don’t just sit around and watch! Put a finger over the hole to prevent any more sealant and air pressure from escaping, and grab your plug kit.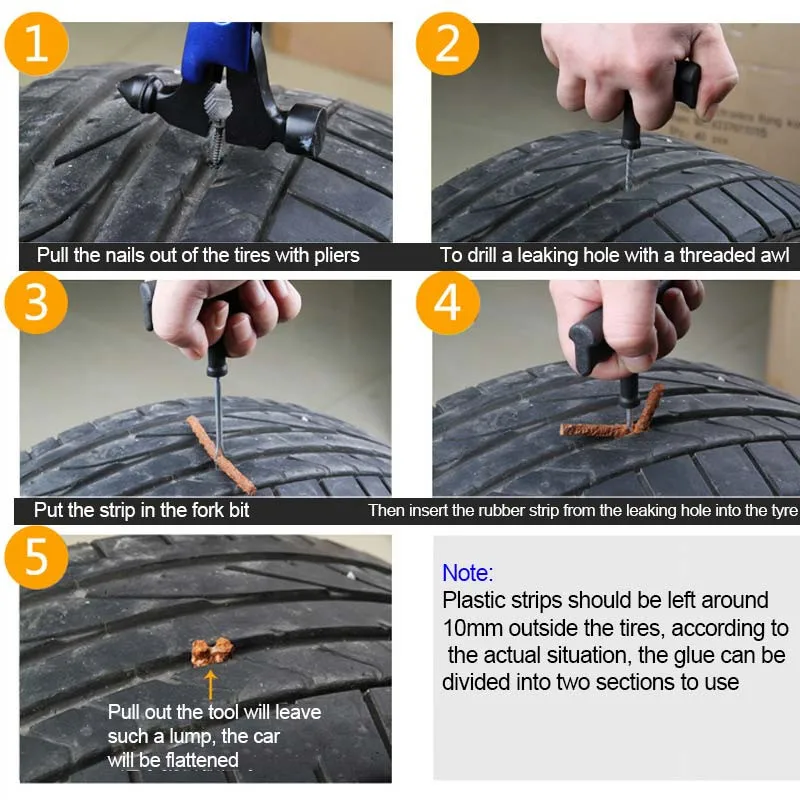
Thread the needle. This is the Ryder Slug Plug.
Thread a plug into your tool. For the Ryder Slug Plug shown in the photos above, thread either a small or large plug (depending on the size of the hole) through the eye of the tool. With other tools, like the Blackburn Plugger Tubeless Tire Repair kit shown below, insert one end of the plug into the inside of the needle itself. With either one, you’ll want to position the plug so it’s held in place at its middle.
Blackburn Plugger Tubeless Tire Repair tool. The plugs are sticky which allows you to stick the free end of the plug to the side of the tool, holding it in place.
If you’re using a tool like the Ryder Slug Plug, you’ll want to fold the plug up a bit as shown in the photo below. For a tool like the one from Blackburn, stick the free end of the plug to the side of the needle.
Tire plugs only work if you’re plugging the actual hole, and not just a spot nearby. This sounds obvious, but finding the puncture can be difficult in some cases, particularly if your tire is dry and there’s no sealant leaking out. Use your ears to hone in on the spot, then spray some water from a bottle or your hydration hose around the area and look for bubbles to pinpoint the exact spot.
Once you’ve identified the hole, insert the tool. As you can see from the photos of these tools, the needles are generally pretty stout (they’re not for sewing thread after all) and it will take a good bit of force to get them all the way through the tire. Having a decent amount of pressure in the tire makes it easier as you’ll have something to push against.
Insert the plug until it’s about halfway through its folded length, leaving a good bit of the plug exposed. If you insert the plug too far it may just drop inside your tire which doesn’t help. With the plug inserted the tool should slide out, leaving the plug in place.
Chances are some air has seeped out during this process so be sure to air up your tire before you roll away. If you’re carrying extra sealant, this could be a good time to add some more, though in my experience a plug, even in a dry tire, tends to do a good job sealing the puncture by itself.
Keep in mind that if you allow all the air to leak out of your tire following the initial puncture, there’s a good chance the tire bead will become unseated. In this case, it may be difficult, if not impossible to re-seat the tubeless tire with a mini-pump. If you have a CO2 inflator, now is the time to use it. Otherwise, do whatever you can to keep some amount of air in the tire while you’re inserting the plug to avoid an unsealed bead.
This crusty plug (left) has a lot of miles on it, and no sign of leakage.
The cool thing about using tire plugs is they allow riders to fix a puncture without having to take the wheel off, which definitely saves time. Not only that, you can ride on the plugged tire indefinitely without the need to make a more permanent repair at home.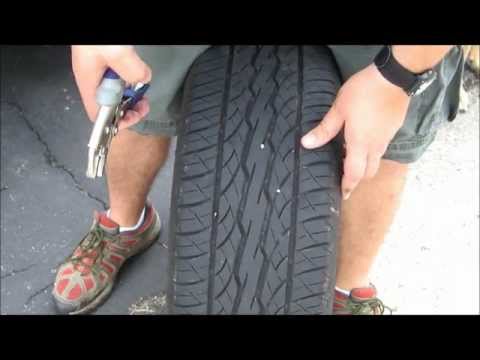 In the past my go-to trailside tubeless tire repair method involved throwing in a tube, which meant futzing with the tire again at home to go back to tubeless.
Everything fits inside the Blackburn tool.
I’ve tried the Ryder Slug Plug and Blackburn Plugger Tubeless Tire Repair kit, and both perform well.
The Ryder kit is smaller and lighter than the Blackburn kit at 19.3g vs. 27.4g. However, the Blackburn kit does have a spot within the tool to store plugs which helps keep things organized. A frame strap is included with the Blackburn kit, adding additional weight, but saves pack space if that’s important for you. The hole in the end of the Ryder tool works as a Presta valve core remover.
Strap the Blackburn to your frame if you like.
Ryder includes about a dozen plugs in two different sizes, while the Blackburn kit comes with about the same number of plugs in just a single size. Pricing is $10 for the Ryder kit and $20 for the Blackburn kit.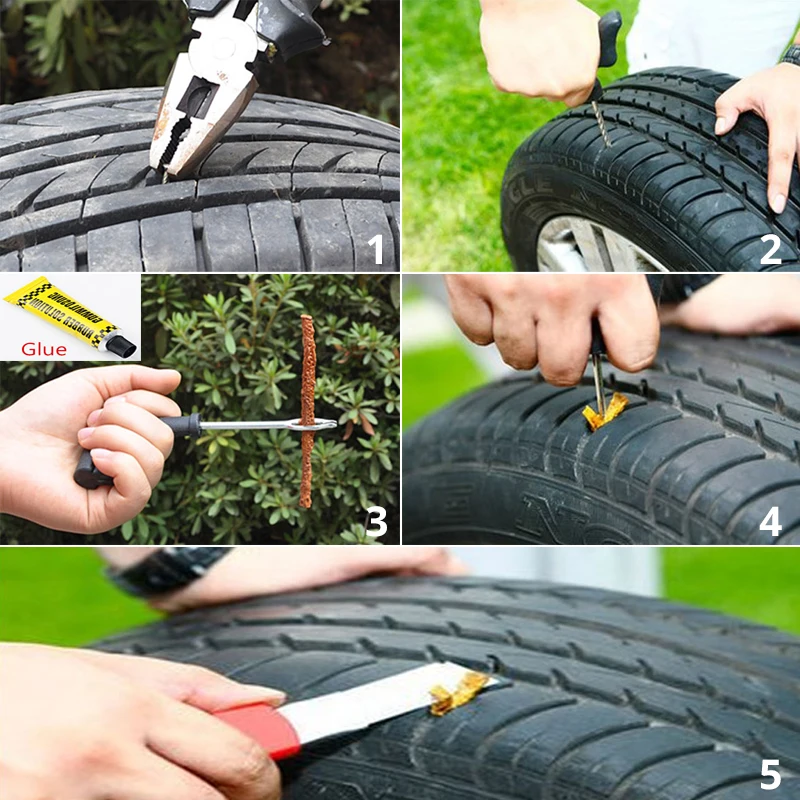 Most tire plugs are cross-compatible with tools from other manufacturers, and replacement packs are available for about $5.
Thanks to Ryder and Blackburn for providing the plug kits used in this tutorial.
Last updated: September 10, 2022 / author Sandeep Bhandari / Fact verified / 4 minutes
Cars today are made with many new technologies that can extend the life of a car. However, not all car parts will last a long time. Parts such as tires are subject to a lot of wear.
The main reason for this is that this is the most vulnerable part of the vehicle. In addition, given the condition that the tire can come into contact with any road, the case of a tire burst or leak is quite common.
In such cases, tire plugs can be used to solve a problem that can extend the life of the tire.
The tire plug is an elongated piece of rubber that is malleable. The tire plug is inserted into the tire at the point where the leak is coming from. Inserted from the outside of the tire. However, the fact remains that a plug can only be inserted into a tubeless tire.
The busbar plug is a convenient option as it has many advantages. Tire plugs are considered to be a quick solution as with a plug a tire can be repaired in minutes without having to remove the tire from the wheel. It is also comparatively cheaper compared to other forms of repair.
With all the benefits, tire plugs can easily last seven to ten years. However, how long the end cap lasts can depend on many factors such as how the tire is used, how the end cap is installed, and more.
There are chances that the tire end can also stay in good condition for only a couple of weeks. Therefore, it is necessary to have the tire plug repaired by a professional.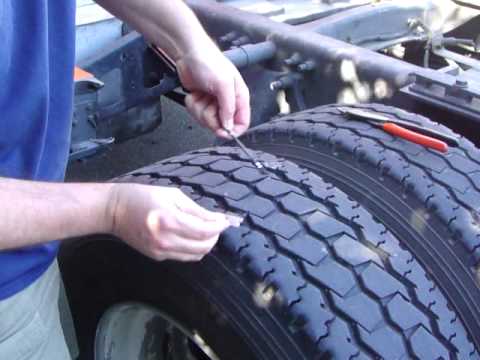
| period | The time during which the plug will last after the installation of |
| maximum time | ten years |
| The minimum time | Seven years |
A tire plug is not a complete solution when a tire leaks. It's just a device that is used for emergencies. It still takes a very long time. There are several reasons why a tire plug can last so long. The reasons are as follows:
 If you drive recklessly or frequently on rough or rocky roads, the tire stub may be damaged. Excessive stress on the tire can cause the plug to become useless even after a couple of weeks.
 Plugging a leaking tire is a solution that can last up to a decade at limited cost. You need to make sure that it is handled with care. It is always recommended to use a tire plug as a mortar only once or twice to ensure that it lasts at least seven to ten years.
Click to rate this post!
[General: 0]
One request?
I put so much effort into writing this blog post to provide you with value.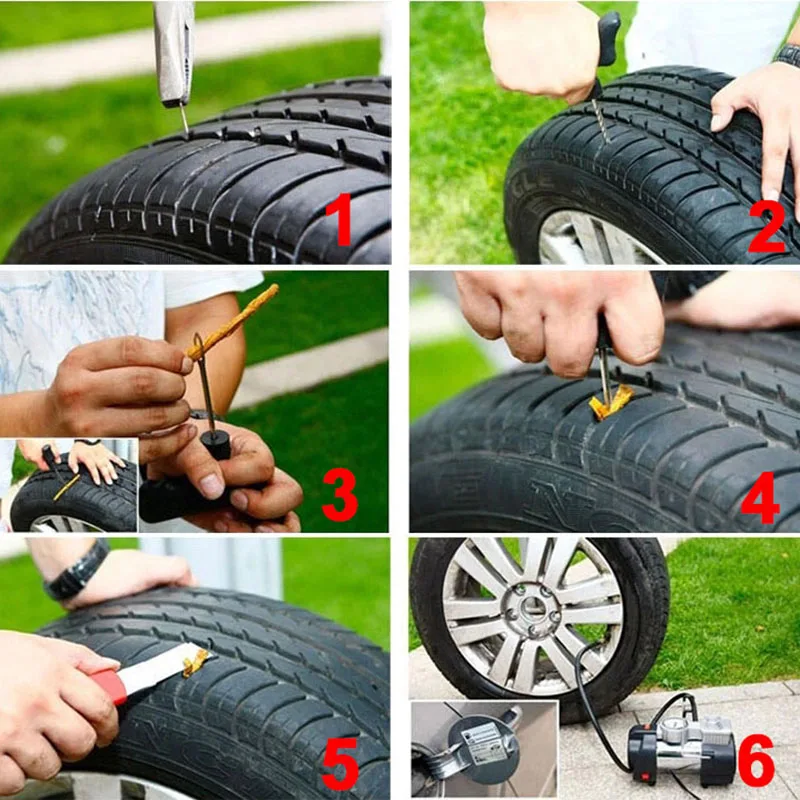 It will be very helpful for me if you consider sharing it on social networks or with your friends/family. SHARE ♥️
Contents
Buy accessories for sliding gates
Roller support is used in conjunction with the guide rail and is designed to move the gate leaf in a given direction. The support is an important element of sliding systems, it takes the load from the gate leaf and transfers it to the foundation. It is necessary to select a support based on the mass of the door leaf. The product is completely ready for installation together with the stand and does not require maintenance during the entire life of the gate. | |
Guide rail is installed on the lower part of the gate and ensures the movement of the gate along the roller bearings. It is the most critical element in the design of sliding gates and ensures the transfer of forces from the gate leaf to the foundation through roller bearings.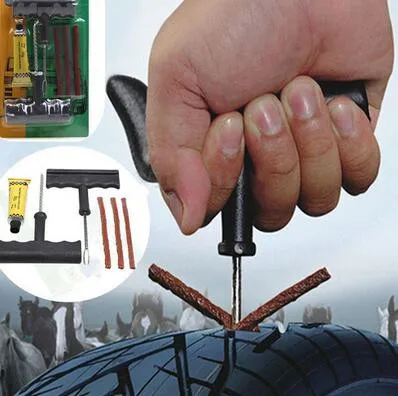 The rail is made of Steel 25, which has the necessary rigidity and bending resistance, thanks to which the smooth running of the gate always remains unchanged. Tires are used in conjunction with the appropriate roller bearings. The rail is made of Steel 25, which has the necessary rigidity and bending resistance, thanks to which the smooth running of the gate always remains unchanged. Tires are used in conjunction with the appropriate roller bearings. | |
Support roller is used as an additional support for the gate edge in the closed position. Together with the lower catcher, the roller reduces the load on the guide rail at the point of contact with the roller support. The roller is mounted on the front of the guide bar. | |
Bottom catcher takes the load from the support roller (SG.0x.300) when the door is closed. The design of the catcher allows you to close the gate with minor deviations from the working trajectory of the gate leaf movement. Rubber rollers in the design of the catcher prevent damage to the gate when closing, and reduce the load on the automation. When closed, the noise level is reduced by absorbing vibrations from the gate leaf.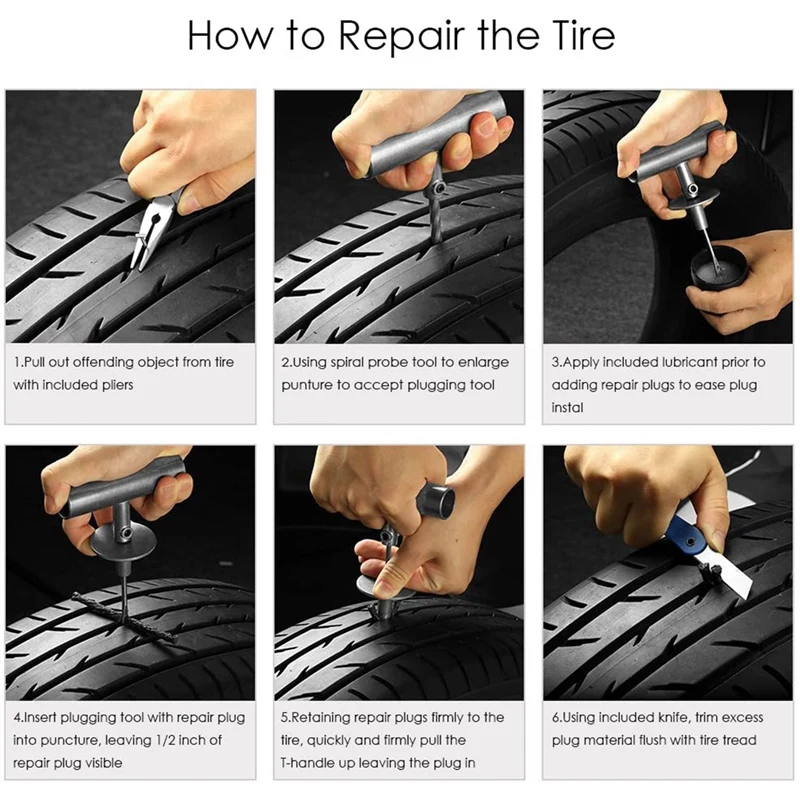 | |
Upper catcher compound designed to hold the upper edge of the gate in the closed position. Composite catcher allows you to use it in cases of non-standard width of the upper edge of the gate. For these purposes, it is made composite. | |
Bracket complete with two supporting rollers is used to hold the gate leaf in the intended position. The leaf is fixed and guided in the upper part of the gate. The bracket is attached to a pole or wall using self-tapping screws or welding. In this case, the gate leaf passes between two freely rotating rollers and does not deviate from the specified trajectory of movement. The standard bar length is 250 mm. When calculating the number of tires with rollers, it is necessary to take into account the area of the continuous filling of the gate: up to 12 sq.m - 2 rollers, over 12 sq.m. - 4 rollers. | |
Adjusting stands are used in conjunction with roller supports and are designed to: 1. facilitate the installation of roller supports, 2. ensure adjustment of the position of roller supports during operation of the gate, 3. extend the service life of roller supports by preventing contact of supports with aggressive environment ( water, snow, mud). facilitate the installation of roller supports, 2. ensure adjustment of the position of roller supports during operation of the gate, 3. extend the service life of roller supports by preventing contact of supports with aggressive environment ( water, snow, mud). | |
End caps are used to protect the end of the guide rail from foreign objects and moisture. The use of plugs allows you to extend the life of the roller bearings and guide rails. Plugs are made removable to simplify the maintenance of the gate. |
Accessories for sliding gates Alutech for 6,990 rubles. in Podolsk and with delivery in the Moscow region you can purchase at OOO "Trading House Profile". You can buy at a bargain price as a set or in retail. The kit includes: Roller support, Carrier profile, Support roller, Lower catcher, Side-rolling bracket, Composite upper catcher, Carrier profile cap, Adjusting stand included for 6.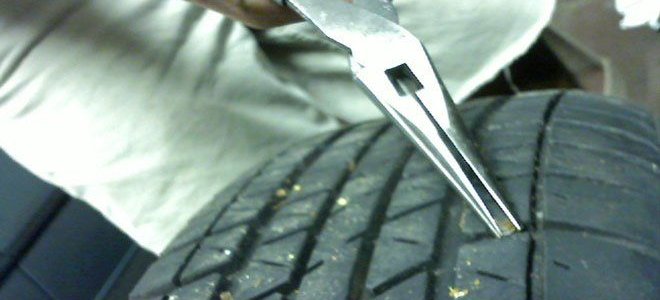 990 is not included and can be purchased separately if desired.
Buy accessories for sliding gates
ALUTECH SGN.01.150 roller support 450 kg
Price
2,290.50 RUB
Buy
ALUTECH SG.01.002 guide rail
Price
5,629.00 RUB
Buy
ALUTECH SGN.01.320 support roller
Price
470.00 RUB
Buy
ALUTECH SGN.01.420 bottom catcher
Price
326.00 RUB
Buy
ALUTECH SGN.00.500 upper composite catcher
Price
400.00 RUB
Buy
ALUTECH SGN.01.718 upper bracket
Price
200.00 RUB
Buy
ALUTECH SGN.01.200 stand
Price
550.00 RUB
Buy
ALUTECH SGN.01.600 busbar end cap
Price
100.00 RUB
Buy
ALUTECH SGN.