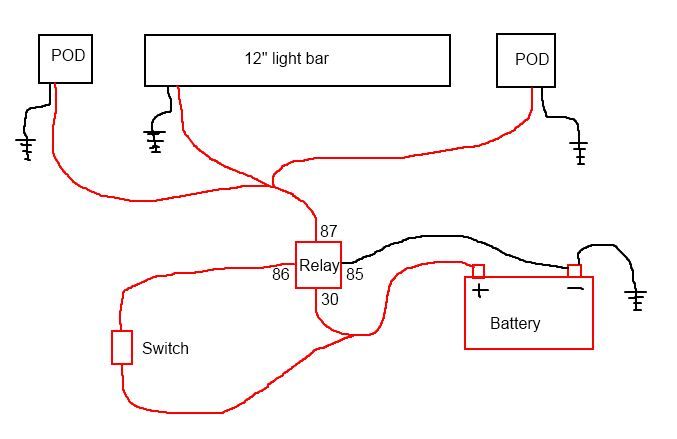
Several different reasons will cause that your lights won't work properly.
If the lights stop working completely
There is a simple way to determine whether the light is faulty, that is to connect the light to a 12v DC power supply directly. Remove the light from the harness and connect it to the vehicle's battery or to a power source with a similar voltage. If the light is on, there should be a fault with the line. Go to the next step.
Make sure the switch is still energized
Check any loose connections through the wiring harness to make sure nothing is loose.
Check that the ground/floor is still safe and properly installed.
If the light is not lit from a direct power supply, the problem is with your light.
Possible reasons for the partial working of the light bar
Poor grounding is usually the main cause of partial lighting. The best way to test whether there is defect in grounding is to change chassis grounding to battery negative terminal. It is wrong by checking the voltage of the light connector to determine whether it is improperly grounded. Maybe it is 14V + at the light connection, but the light still has bad grounding. That eventually leads to a difference in input power.
Check the voltage of your vehicle's battery: Generally, this can be caused by low voltage. Lower than what the light bar required will reduce the brightness of the light bar, or you will see alternating patterns of LEDs. This can sometimes be solved by recharging or replacing the battery. Double check whether all wiring is properly connected in order to ensure there is no weak spot in the wiring.
Why is my LED light bar flashing?
 If the sampling resistance increases, the light will darken or remain inactive, so the output voltage is very important. When current sampling, the resistor power must have a margin.
Where to mount LED light bar?
The light bar is mainly installed on the top of the car, the front and middle of the vehicle, or the position of the bumper. Using the existing hole, the front bumper is the easiest place to install the light bar. If you want to install smaller LED work lights, they usually come in pairs, either on the car's front safety bracket or in front of the rearview mirror. They are generally mounted on the roof of 3-4 rows, if there is a roof rack, they can also be mounted on the roof rack.
Can LED light bars be mounted upside down?
The light bars can be mounted upside down by mounting them on the top of the plastic bumper. The space there is completely open. When the bracket is flipped upside down, the light bar sits right between the top of the bumper and the license plate rack.
How long do LED light bars last?
According to the U.S. Department of Energy, quality LED lights should last 30,000 to 50,000 hours, some even longer. Some bulbs burn for 50,000 hours, while others don't, which depends on several factors, including the type of light fixture and operating temperature.
When used outdoors, LED lights won’t be affected by low temperatures. However, they will be affected by heat.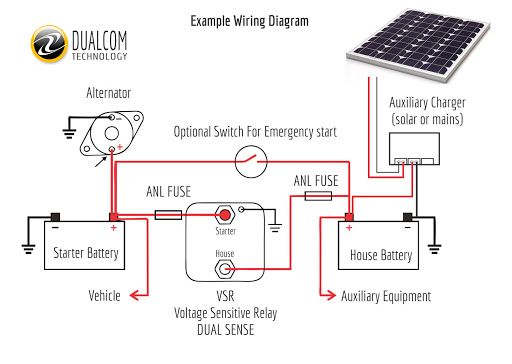 The radiator is placed at the bottom of the LED bulb to take the heat away, but when you have a closed housing, the heat has nowhere to go but back into the bulb. If you plan to use enclosed light fixtures, you’d better to look for LED bulbs designed for such housings.
The first white LED lights hit the market in the mid-90s, and since then huge improvements have been made to improve the efficiency and service life of the original design. The average life span is 30,000 to 50,000 hours, but some can last up to 100,000 hours.
How long will light bar last on battery?
If your car has a built-in 2000mAh large capacity rechargeable lithium battery, charged via USB 5V plug charger, portable power pack or computer, when fully charged, it can be illuminated for about 50 hours in minimum mode, 12 hours in medium mode, and 4-5 hours in maximum mode.
How to test LED light bar with battery?
The first step is to make sure that the battery could provide enough power to the light bar, otherwise the light bar may not turn on.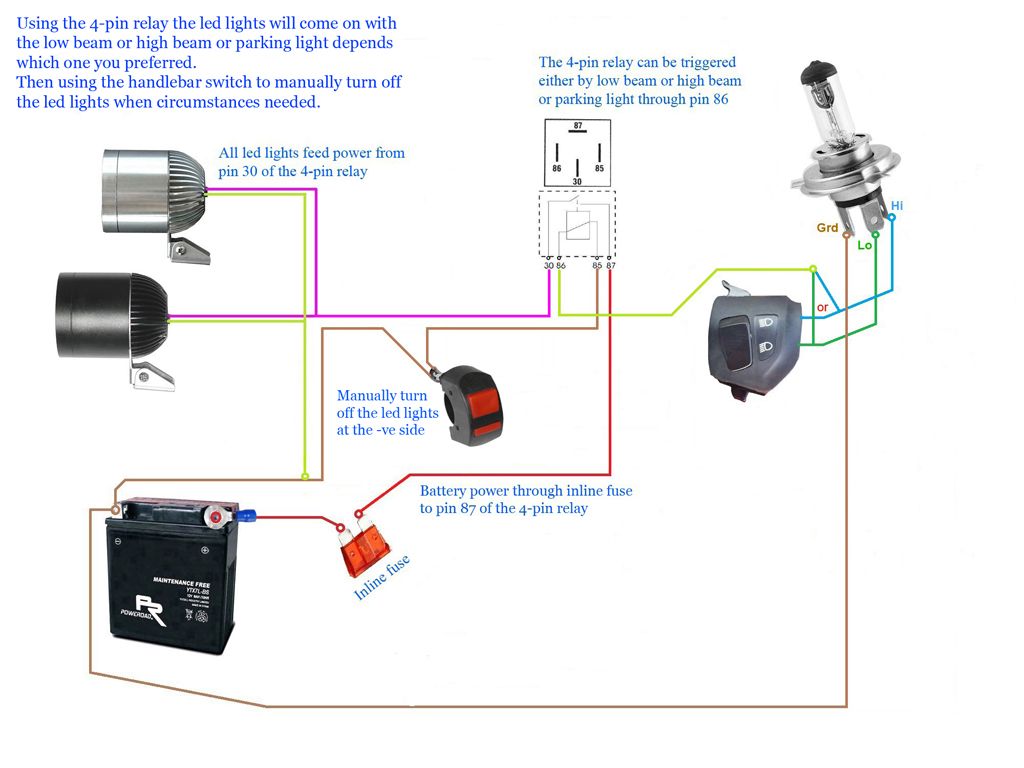 You can test your battery with a multimeter to make sure your battery has 12 volts when not working and 14 volts when working.
Battery connection: Loose battery connections can limit the power of the vehicle and light bar. Any battery terminals that can be rotated by hand should be tightened in accordance with the vehicle manufacturer's specifications.
The second step is to check the wire-harness of LED light bar
Light bar power and grounding: Find the power and grounding connections for the light bar and make sure they are securely connected and free of corrosion.
Light bar fuse: If you have a LED bar, it will be equipped with a waterproof built-in fuse. Open the fuse holder cover and remove the fuse. Point the fuse of light bars at the light source and check the metal EMI gasket to make sure it is not blown. If you determine that the fuse is damaged, replace it with a fuse with the same rating for the light bar.
Check relays: All light bars have 12 volt relays and some have 24 volt relays.
The easiest way to test a relay is to replace it with another relay that works. If you have a backup light bar relay, then use it to see if the problem is solved, and if you are sure the light bar still doesn't work, proceed to the next step. Because the relay of light bars contains a mechanical switch that completes the circuit, you can place your finger on top of the relay and press the switch of light bars. If the relay is working, you could hear that the switch in the relay connect the circuit.
When LED light bars make noise
After installing the light, the noise may be caused by the light, or it may be caused by driving too fast
1. The radio is disturbed and produces noise, which is generally caused by wireless interference.
Solution: Buy ferrite clips. Ferrite clips can repair radio interference.
2.The sound of the light bar is very loud in the process of driving. This is because in the process of driving, the wind enters the bottom of the light bar and touches the radiator of the light bar, making it sound like a musical instrument.
The solution: Buy a baseboard, cut it to the right length and size, and make a diffuser that changes the direction of the wind so it goes up and doesn't wind around the light bar and make noise.
When LED lights were invented?
As early as 1907, people found that some diodes made of semiconductor materials have the physical phenomenon of shining when positive conduction, but it has been 1969 for the production of red LED with a certain luminous efficiency.
Blue LEDs were developed in 1994-1995 and commercialized in 1998. From 2000 to 2002, LED successfully entered the mobile phone backlight market under the continuous pursuit of cost effectiveness by the R&D personnel.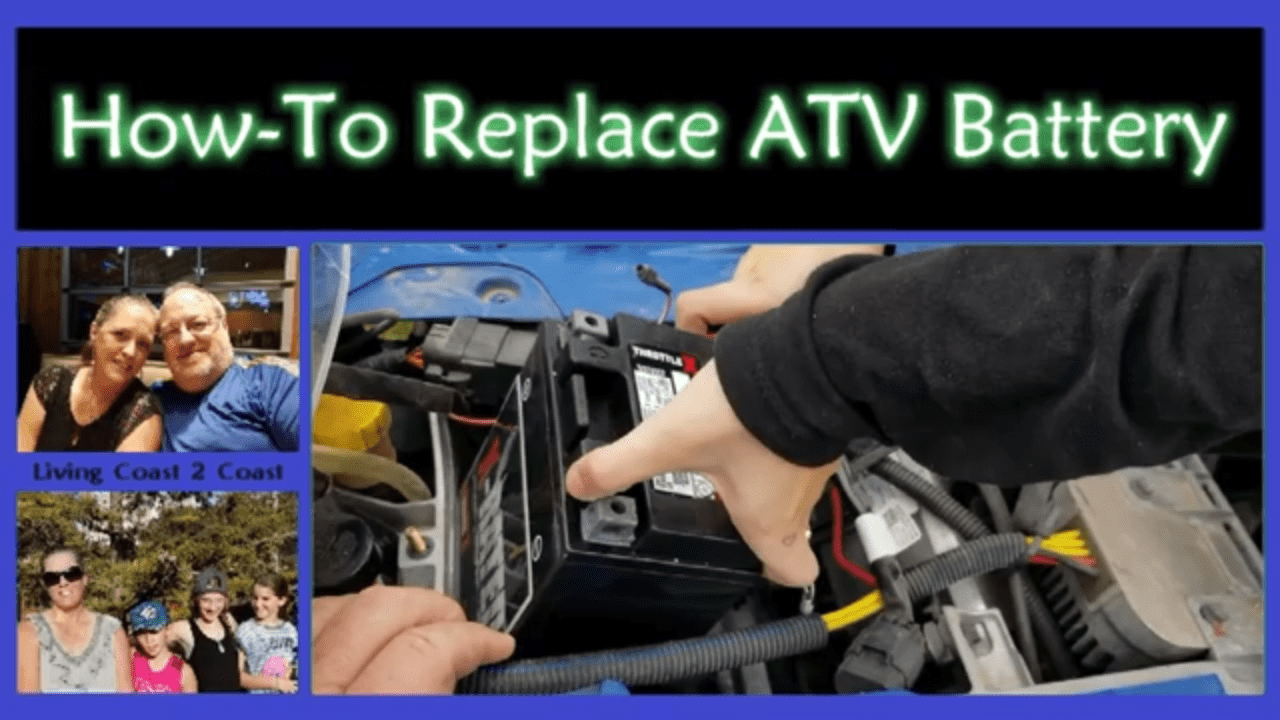
Today, LED has been produced for more than 30 years, various types of LED, products secondary developped based on LED and products matched with LED (such as white LED driver) develops rapidly, new products come into the market continuously, and has developed into a new industry.
Regarding LED technology research and development, the story most talked about is the contention between silicon carbide (SiC) and gallium nitride (GaN) when developing blue LED.
Following the breakthrough of blue LED technology, white LED officially started a wide LED application range. From display, indicator and mobile phone light source to the brewing LC-TV backlight source, the door of various new opportunities have been constantly knocked open by creativity. LED is a semiconductor device developed from the three fifth group (III-V group) compound semiconductor after silicon (Si) semiconductor technology in the 1950s.
The principle of lighting for LED is combining electrons and holes in semiconductors to give out photons, different from the light bulb which needs to operate at high temperature above 3000 degrees, also not like fluorescent lamp which uses high voltage to motivate electron beam, LED are the same as general electronic components, only require 2-4V voltage, can operate normally at room temperature, Therefore, its life span is longer than traditional light sources. The color of the LED is mainly determined by the amount of energy released by the combination of electrons and holes, that is determined by the energy gap of the semiconductor material used.
The wavelength is very similar for te same kind of material , so the light color of each LED is very pure. Compared with the traditional light source, which is mixed with many colors, the LED can be said to be a digital light source. LED chip size can be cut randomly for the purpose, the commonly used size of 0.3-1.0mm or so, compared with the traditional bulb or fluorescent lamp, the volume is relatively small.
When LED bulbs flicker
1.Zero line charged
This is a common situation. ① When the plumber wires, the alive circuit enters the LED bulb holder directly, and the zero line enters the control switch. Although the switch is off, there is still a current in a live wire.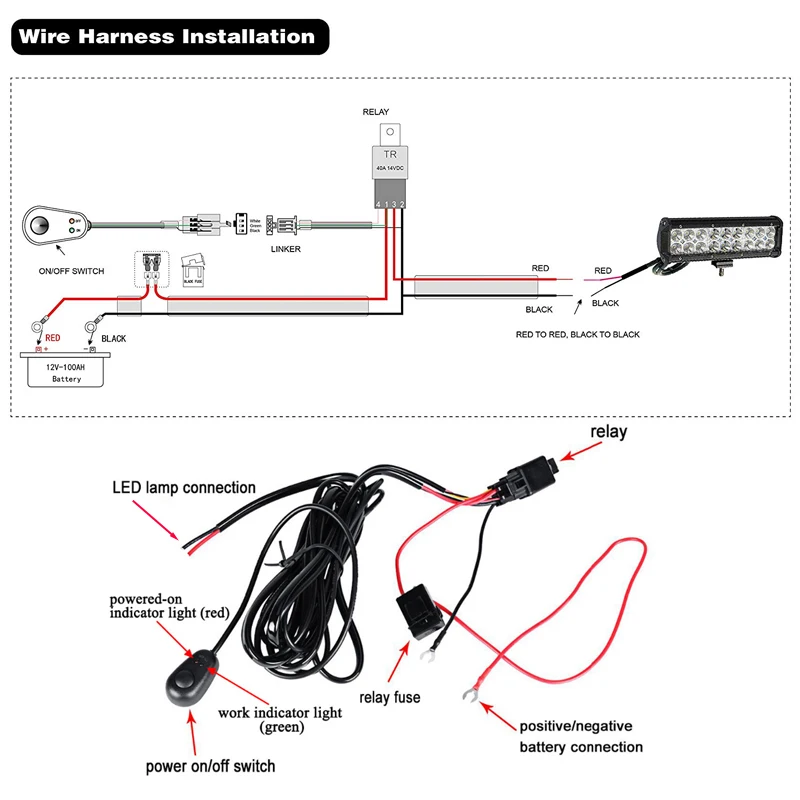 When the light reaches the switch, it still lights up slightly. Solution: In this case, adjust the wiring so that the switch controls the live wire.
The switch controls the zero line to make the current flow through the lamp.
② The plumber connected the wrong line when entering the main gate and the fire-fighting zero line was connected reversely, hence all the fire-fighting zero lines were reversed accidentally, resulting in all the switches controlling the zero line. The solution in this case is to adjust the incoming line only.
③ If the switch controls the live line, use the traditional mechanical wall switch, or the switch shines, then the zero line is charged. Zero line charged is a very common phenomenon. If the grounding of zero line is not good, three-phase load of transformer is unbalanced, the line is too long, the line diameter is too fine, or the current of zero line is too large, it will charge the zero line.
Solution:Re-ground the zero lineor perform low-voltage conversion. (This requires professionals for operation)
2.The dual control switch is connectedincorrectly.
Wrong connection, though can also be used
There are several wiring modes for dual control switches. If the wrong connection is used, traditional incandescent bulbs will not light up, but LED lights will light up slightly when turned off due to direct current. The solution to this situation is to install the normal control live wiring method and rewire.
Properly connected, any switch can cut off the power
The wiring mode for double control switches: single link double control switches, three contacts on the back, namely L, L1, L2. Firstly, connect two L1 and L2, connect the live wire to the L contact of a double control switch, and connect the control loop wire to the L contact of another double control switch.
3.Switches are equipped with indicator lights, using electronic and touch switches
There is an indicator light inside the switch. When the lights are off, there will be a weak current.
If the lamp uses electronic touch switch, such as infrared, voice control and remote switches. There is also a dim light when the lights are off. The solution to this situation is: ① Replace the switch. (2) the 500K resistor should be connected in parallel at the inlet of the lamp. However, professional and technical personnel should measure and install this method, while non-professional personnel should not operate at will. In addition, this method is not effective for low luminescence caused by the zero line charged or patch leakage.
4.Leakage of unisolated drivers, light source patches and substrates
Taking account of cost, many lamps adopt low quality resistance-capacitance to drive step-down, or the light source patch is of poor quality, and there is leakage between the patch and the substrate. The copper plating and capacitance effect for substrate can also lead to light leakage. Solution: Replace the lights.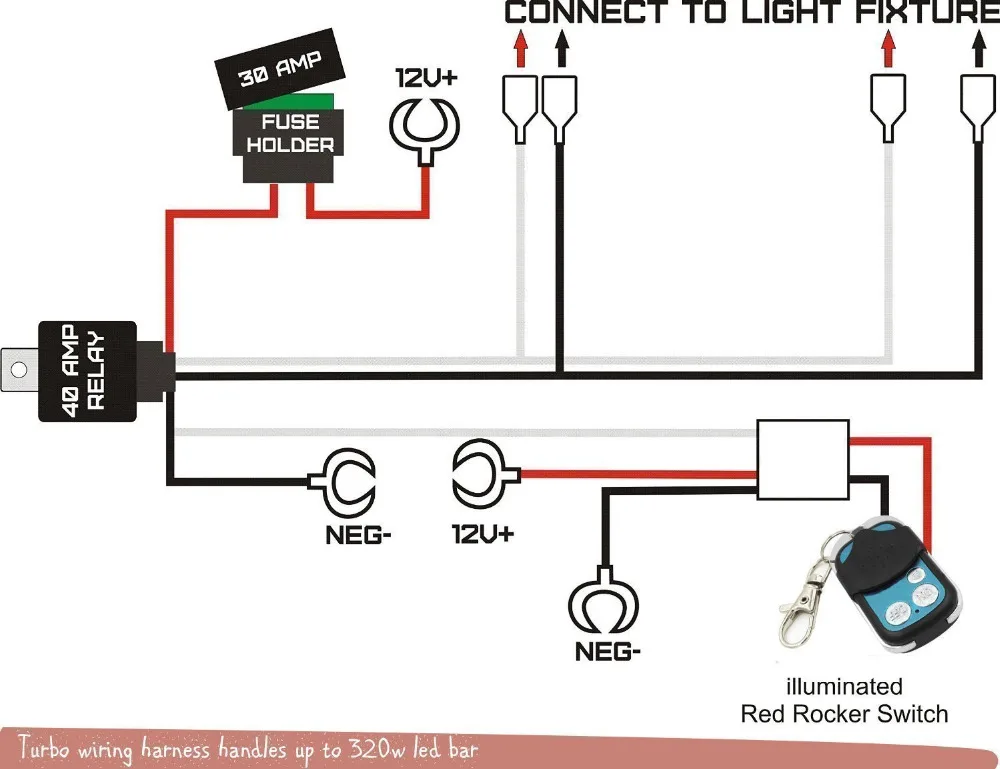
Although your UTV comes with decent lighting to serve you during night trips, investing in an aftermarket light bar is a great decision to improve your machine’s lighting. Installing a light bar means more lumens to brighten your way and see more of the road ahead when the sun is out of sight.
However, while installing a LED light bar on a UTV is something you can do on your own, not every UTV owner knows the required process for installing the bar on their quads. Hence, it is important to find the right guide for the task.
Here is a detailed guide to walk you through how to install a light bar on your UTV:
The first step to installing a light bar on a UTV is to disconnect the energy source. Installing a light bar on your vehicle draws from the available energy source, draining it faster than you might think.
Since your UTV’s energy source is the battery, disconnect the battery.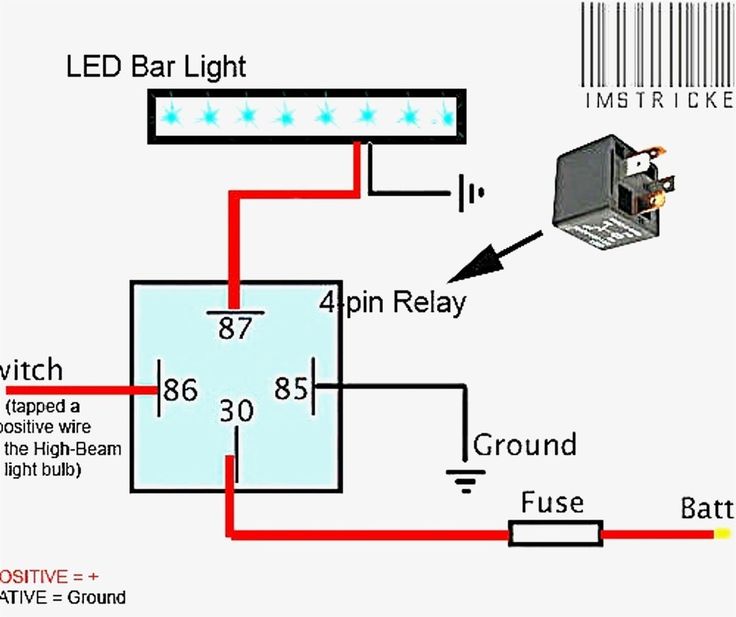 Start by disconnecting the negative terminal before moving on to the positive terminal. This will help prevent the risk of a short circuit during connection.
The next step is to look for a good position on the UTV to mount your light bar. Although you have several options when looking for a good place to mount your light, choose somewhere where the light can function most effectively.
The front bumper is a good place for most UTVs, especially for convenience. Also, mounting your LED light bar on the front bumper ensures no obstruction blocking the light from illuminating your path.
Regardless of your ideal position to mount the bar, fit your light using the provided installation hardware in your light pack. You can also invest in optional round tube brackets for your light installation.
While fitting the light, be careful not to tighten the bolts completely, as you will still need to adjust later.
Your UTV light bar requires electrical power to function, and the requirement is usually 12 volts.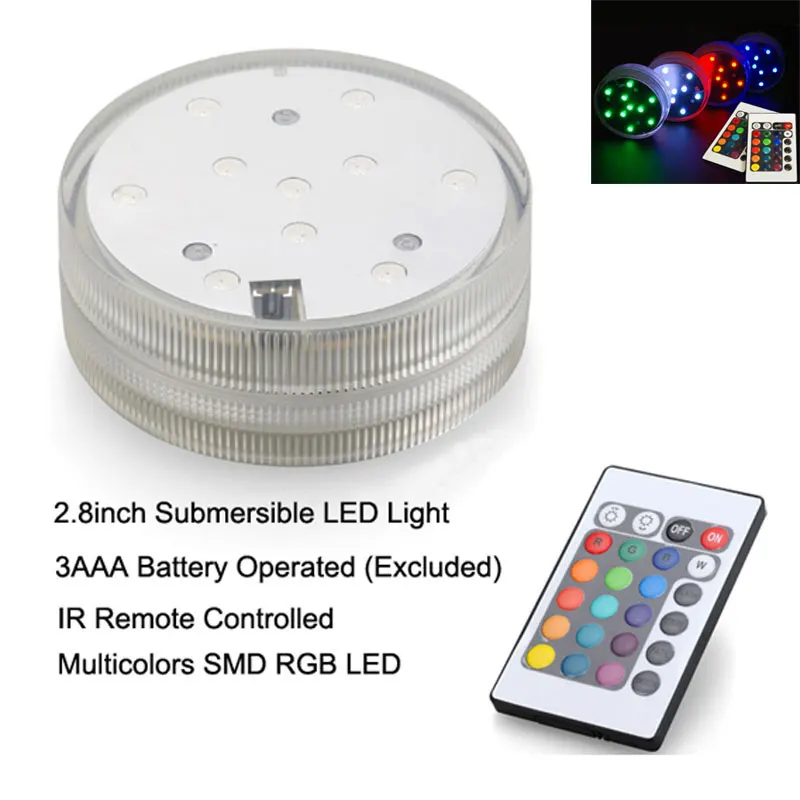 Hence, it is important to look for where to get this supply. Fortunately, you can easily get this power supply from your UTV with no hassle. The common and easiest way is to cut two wires supplying power to one of the existing headlights and connect your new light bar.
Connecting your light bar to a power source requires a harness that must be properly secured. Securing the wiring ensures it is kept away from moving parts and heat. Failure to secure the wiring lets it rub against metal parts, leading to a short circuit. Finding an existing wiring path in your UTV is best to run the new wiring.
A relay is an electromechanical device that turns a large electrical circuit on and off with a small electric current. Besides switching electrical loads on and off, a relay's major advantage is energy preservation, ensuring that your light bar doesn’t draw much energy from your battery. This helps extend your battery and device life.
For example, a light bar installation without a relay would result in a huge voltage drop from the battery to the light, generating a lot of heat due to the resistance.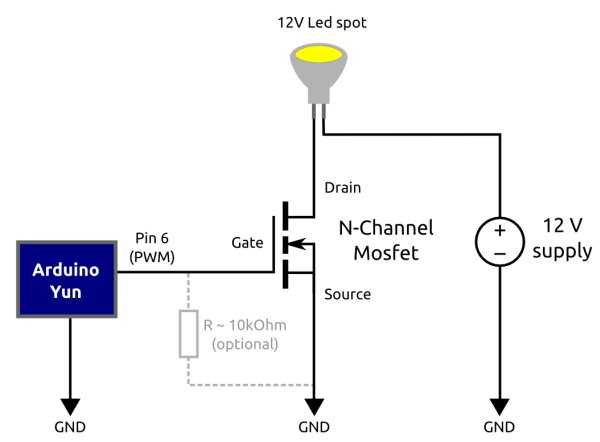 Hence, you want to introduce a relay to your installation.
However, this doesn’t stop you from installing a control switch. A control switch is integral to the installation and gives you full control of your light bar.
Once you are through installing the LED light bar on your UTV, it is time to reconnect your battery. Start by connecting the positive terminal, then the negative terminal.
Now, it is time to test your installation. Turn on your switch and watch your new bright light illuminate. If your light comes on, pat yourself on the back, as you have successfully installed a light bar on your UTV.
But wait, you are not yet through with the installation. Remember that you haven’t fully tightened your hardware. Complete the UTV light bar installation by tightening the hardware completely.
HIT
ENDURO LIGHT Graphite
the most durable
458 EUR
HIT
ENDURO Camogrey
the most durable
657 EUR
ENDURO Graphite
the most durable
279 EUR
HIT
ENDURO Graphite
the most durable
657 EUR
-28%
AQUAMASTER-ZIP LIGHT Camogrey
with central zipper
598 EUR
430. 40 EUR
HIT
ENDURO LIGHT Camogrey
the most durable
458 EUR
-12%
AQUAMASTER LIGHT Red
reliability & comfort
438 EUR
386.20 EUR
NEODRY Black
17 EUR
11.90 EUR
ENDURO Camogrey
the most durable
279 EUR
AQUAMASTER Blue
reliability & comfort
647 EUR
-20%
HIT
AQUAMASTER Red
reliability & comfort
259 EUR
207.20 EUR
-40%
HIT
AQUAMASTER Orange
reliability & comfort
259 EUR
155.40 EUR
AQUAMASTER Red
reliability & comfort
677 EUR
BELT
9 EUR
ENDURO BF Camogrey
bootfoot waders
528 EUR
ALL SEASON Black
62 EUR
ENDURO BF Camogrey
bootfoot waders
329 EUR
MUDWAY Graphite
179 EUR
MUDWAY Camogrey
179 EUR
NEOSENSOR Camoarmy
12 EUR
8. 40 EUR
Explore all
08/15/2013
The article shows the standard electrical pinout. Those. if you installed a towbar in a specialized service, and you can safely buy a new trailer for your car. If you installed the towbar yourself, then we hope this article will be useful to you.
If you need a trailer wiring diagram, towbar socket pinout, you can use the information below.
| Contact no. | Code | Wire color MZSA | Wire color GOST 9200-76 page 10 (11) | On some Ukrainian trailers | Signal | Wire size |
| 1 | L | Yellow | Yellow | Green | Left turn signal | 1. |
| 2 | 54G | Blue | Blue | Red-white | Option, fog lamp is removed in Russia | 1.5 mm 2 |
| 3 | 31 | White | White | Black | Earth (-) | 2.5 mm 2 |
| 4 | R | Green | Green | Yellow | Right turn signal | 1.5 mm 2 |
| 5 | 58R | (No wire) | Brown | Rose red | Right marker and number 9 illumination0003 (sometimes reverse) | 1. |
| 6 | 54 | Brown | Red | Blue white | Stop lights | 1.5 mm 2 |
| 7 | 58L | Black | Black | Blue-black | Left marker | 1.5 mm 2 |
Please note that nothing is displayed on MZSA trailers for the 5th signal. Accordingly, if your side lights are not on on your MZSA trailer, most likely the signal is output to the towbar socket only on the 5th contact, but not on the 7th.
Some Russian trailer manufacturers, when installing a reversing light, connect it to the 5th terminal, and leave the 7th contact behind the dimensions.
For a long and trouble-free service of the electrical outlet, we recommend that after connecting the contacts, coat them with lithol or grease, and securely treat the place where the wiring harness enters the outlet with sealant.
The wiring diagram for the 13-pin trailer socket is discussed in a separate article.
Tags: Tow hitches, Trailer maintenance, Trailer wiring and lighting, Towbars
With or without brake? How to mount an ATV?
Comments Write a commentTop
A car battery is one of the most unreliable elements in a car's design. It is enough to forget to turn off the dipped beam, leaving the car in the parking lot for the night, so that the amount of charge drops to the minimum values that are insufficient to start the engine. Battery discharge accelerates at sub-zero temperatures, so the problem is relevant for drivers who do not have their own warm garage.
If the battery is left half-discharged for a long time, its capacity and service life will be reduced. For infrequent trips, auto mechanics recommend regularly recharging from portable or stationary devices. But if the problem happened suddenly, and you need to go, you can’t do without a starting device.
It is necessary to distinguish between the functionality of starting devices and chargers. The first group allows you to start the engine regardless of the battery charge, the second one replenishes the battery condition, but does not give a starting impulse. Combined starter-chargers have a wide range of capabilities, but their use requires increased attention from the owner: an incorrectly set mode can damage the battery.
The ranking of the best starters of 2023 includes models of different classes. The ranking decision was made based on Yandex. Market data and real feedback from a specialized audience.
One of the most popular starter chargers with a lot of reviews, which will help you start your car in any weather. Its battery capacity is 14000 mAh, it will take 5-6 hours to fully charge. In addition to powering a car battery, this ROM can also charge laptops, smartphones, other gadgets and household appliances. To do this, the kit includes 8 adapters that are suitable for most modern devices.
The device is protected against short circuits and overheating, erroneous energy consumption, overcharging, is certified according to the International Transport Standard and can be transported as hand luggage. The manufacturer has added to the functionality and its own latest development AVRT - this is the automatic adjustment of the necessary starting current to start the engine and protect the on-board network of your car. The case also has a flashlight and a strobe that can work in SOS mode.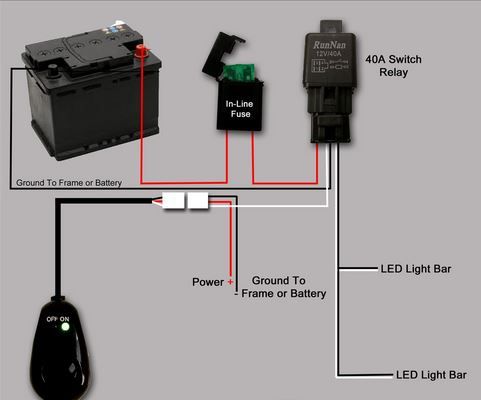 So in case of an emergency situation on the road, you can further protect yourself and your car with the help of light signals. Supplied in a handy carrying case with space for all accessories.
Guaranteed engine start, two devices in one, battery capacity is fully consistent with the manufacturer's declared, rich equipment and functionality, intelligent protection against short circuit and reverse polarity, well thought out ergonomic appearance, affordable price
not identified
Editor's Choice
Artway JS-1014
Portable Charger & Jump Starter
JS-1014 will start the battery even if it is completely discharged and is perfect for recharging gadgets
Ask for priceAll products
Advertising. OOO Novator. LjN8K5h28
The Hasvik JP-300Max starter charger takes first place in our rating. At an affordable price, it perfectly copes with all the tasks assigned, and even does more. The device has a built-in super-bright flashlight, which can help out in various difficult situations on the road.
This starter fits compactly into a case made of impact-resistant plastic and lined with abrasion-resistant fabric. In this package, you can safely store the device without fear of damaging it.
Hasvik JP-300Max will quickly start the engine on your car even in the most critical situation. Moreover, its work will be effective even with a completely dead battery, including if the frost is -30 ° C outside. We can safely say that this is one of the most stable devices that do not fail and do not fail.
Battery capacity - 26800 mAh. The peak current is 2500 A, and the starting current is 1500 A. This is designed to start gasoline engines of 8.0 liters or diesel engines of 6.0 liters. Plus, the package includes special "smart" wires with an intelligent protection system. You can be 100% sure that nothing will happen to the device, even if you accidentally reverse the polarity.
What else can be said about the Hasvik JP-300Max? For summer residents, it will help start a generator or garden equipment, and when the lights are turned off, it will become an excellent nutrient for a smartphone, laptop or tablet. Well, for those who love tourism and cannot have a day without adventures, it will help to launch an ATV or a motorcycle, a snowmobile, an ice drill, a boat without any problems. In a word, this is really an indispensable device in any field, forest, rural or even urban environment.
Hasvik JP-300Max can rightly be called the best in its niche. Efficient, designed for more than 1000 cycles, outwardly concise and stylish, thought out to the smallest detail - this is how satisfied owners of this booster describe their new purchase.
100% engine start guarantee; advanced functionality; the ability to charge from the cigarette lighter; the presence of a remote outlet for 12 volts; the presence of protection against short or accidental circuit, reverse polarity, overcurrent, overvoltage or low voltage, reverse charging, overheating; stylish and concise design; 2 years warranty
NOT DISCIALLY DISCIALLY
KP recommends
Hasvik JP-300MAX
The engine will launch the engine in the most critical situation
Effective, designed for more than 1000 cycles, outwardly laconic and stylish, thought out to the very small things
Comple the price of the
characteristics price Artway JSS-1018 Artway JSS-1018. Photo: yandex.market.ru
 With the help of this unique portable model of a starter-charger, you can start an engine up to 6.2 liters (gasoline). In addition, the device provides a 220 V socket, a 12 V socket, two USB sockets and a large number of adapters, which allows you to use it to recharge tablets, laptops, smartphones and other equipment with batteries, as well as a full-fledged power source (for example, , turn on a lamp or TV through it).
The device has a low weight - 750 g and small dimensions, so it can easily fit in the glove compartment of any car or in a bag. The charger can make up to 20 car engine starts in one session, and it can be charged more than 1000 times. All this is possible thanks to a powerful battery of 18,000 mAh and a starting current of up to 800 A. You can charge the device both from a car cigarette lighter and from a 220 V network at home.
The body of the device is made of durable plastic with an anti-slip coating, which makes it easy to use. The manufacturer also took care of the reliable protection of the device and car electronics, providing Artway JSS-1018 automatic intelligent system that protects against short circuit, output voltage overload and incorrect connection to the car battery terminals. In the event of an unforeseen situation, the gadget turns off and signals a problem with a light indicator and a sound signal.
The JSS-1018 has a built-in flashlight with three modes of operation: normal flashlight, strobe and SOS mode.
| Type of battery | LI-on|
| Battery volume | 18000 MAH/66.6 BTT-h |
| PROSKOUS TOK | |
| DC-per constant current 900 V-12. /10a (MAX) | |
| AC output | 220V/50HZ 100 watts (MAX) |
| Operating temperature | -30 ° C to + 60 ° C |
| Weighing | 0.75 Kgg |
| Size | 200X100X40 mm |
Can be used to recharge digital equipment and as a power source, compactness, light weight. Anti-slip housing, protection against short circuit, poor contact and incorrect connection. Flashlight with 3 modes.
Not Found
Editor's Choice
Artway JSS-1018
Portable Power Supply
The device allows you to start the car engine, recharge gadgets, and also serve as a full-fledged power source
Find out the priceAll products
Advertising. OOO Novator. LjN8K62V4
The main feature of the starting device is the use of lithium-ion batteries. They hold the discharge longer, and are also able to give the maximum impulse to start the engine. The same power sources are used in the production of electric vehicles.
Aurora Atom 40 is a universal device that can work with gasoline and diesel engines 12/24 V. The declared overall capacity is 40 thousand mAh. Several tens of consecutive launches are allowed.
The design provides 2 USB-ports for charging mobile devices, there is also an LED flashlight. Permissible temperature mode of operation is from -20 to +40°С. The device cannot be attributed to budget accessories, but it is in demand among professional truck drivers, as well as taxi drivers. The long full charge time (about 7 hours) is compensated by the 2000A peak current functionality.
Versatility, increased capacity, recommendations and positive feedback from professional drivers
Long charge
The starting device is designed for diesel engines up to 5 liters, but can also be used to start gasoline engines. Starting current - 600 A, peak - up to 1500 A. Large battery capacity (25 thousand mAh) and battery features (4 modules for high peak currents) are designed for use in extreme weather conditions (up to -40 ° C).
Additional features include USB ports for charging mobile electronics and car accessories, as well as a USB Type-C 60W output for connecting a laptop. There is a LED flashlight with 3 modes of operation.
Device for trucks and special vehicles operating in extreme conditions, Functions Powerbank for mobile devices
Functionality is redundant for an ordinary city car enthusiast
A budget line of starters that differ in built-in battery capacity and maximum starting current. The design uses classic lead-acid elements, so the devices are sensitive to the operating mode (the operating range does not include sub-zero temperatures). Depending on the engine size and battery capacity, several successive attempts to start the engine are allowed.
As additional functionality, connectors for mobile devices are provided, as well as a flashlight. The advantages include small dimensions and low weight of the equipment: the devices can be used as standard Powerbanks.
Price in the budget range
There are restrictions on the mode of application
Multi-charger of domestic manufacturer. It is positioned as a universal lithium-polymer battery that allows emergency starting of a car engine. The battery capacity is 12 thousand mAh, which will provide a starting current of 300 A. The kit includes wires, plugs and car clips.
Affordable price
- Low battery capacity
Battery charger for any type of battery. It is charged from a stationary power supply, provides a maximum charge current of 4 A. It is protected from overloads and erroneous user actions, it is equipped with an auto-off function.
Suitable for garage use
No emergency engine start function, the device cannot work with the onboard power supply system
 Inspector Charger Inspector Charger. Photo: yandex.market.ru
 A classic portable start-up charger with a maximum starting current of 900 A. It can only charge the battery from the on-board network, which narrows the permissible scope. It can work with a battery voltage of 12 V. There is a digital charge indication, a built-in protection system against misuse and micro-USB connectors.
Compact
Not suitable for mains supply
Portable charger with a battery capacity of 11 thousand mAh. The starting current is 200 A, the maximum current is 500 A. The manufacturer claims the ability to work at low temperatures. The possibility of recharging mobile devices is provided, there is an indicator of charging the built-in battery. Visually it is no different from the classic Powerbank, the package includes wires and adapters, including automotive terminals. Protection against reverse polarity connection is not provided, the user must carefully study the instructions and follow them.
Store the battery in a warm place to prevent battery discharge. This model can hardly be attributed to the best starting devices in 2023, but as an autonomous power source on country trips, the device may be indispensable.
Compactness
Low battery capacity, No safety features
The trigger is a simple device, but the devil, as you know, is in the details. Andrey Tabolin, R&D specialist at Artway Electronics , told Komsomolskaya Pravda about the details that must be known and taken into account when choosing starting devices.
When choosing a starter charger, first of all, you should pay attention to the following three parameters:
1. Engine size and fuel type of your car
2. Starting current.
3. Output voltage
Normally, the specifications for a car battery indicate the starting current. But it is usually higher than required to start the engine. For example, on a car with a 1.6-liter gasoline engine, a battery with a starting current of 500A can be installed. But in fact, 200-300A is required. Diesel engines with the same displacement require more starting current. In general, the larger the engine size, the higher the starting current the device will have to produce.
The voltage of the on-board network in most cars is 12 volts. It is this voltage that ROM should give out, with which it is planned to start the engine of a “passenger car” in cold weather.
Along with these important parameters, we also advise you to pay attention to the capacity of the built-in battery, the level of charging current and additional features of the device, for example, the presence of control devices, a charge indicator, a flashlight and other useful functions.
Starter chargers suitable for all batteries. And in order to insure yourself against the problem of a dead battery, experts strongly recommend purchasing start-up chargers in advance. They will be especially relevant during the cold season.
Specific terms for replacing a car battery depend on the conditions in which it was used. With proper maintenance and under gentle working conditions, the battery can last up to 6 years. But, as a rule, the frequency of its replacement is 3-4 years.
We advise you not to take the situation to the extreme, and not to wait until it finally "dies", but to attend to its replacement in advance. The condition of your battery can be checked at a car service. You can also determine the incorrect operation of the battery yourself, focusing on the following indicators:
1. Difficulty starting the engine, especially in cold weather;
2. Flickering or dimming of lights and bulbs;
3. Mechanical damage to the battery case;
4.