Delivery options and delivery speeds may vary for different locations
Sign In
or enter a zip code
Email * Password *
REPAIR & HOW TO
MAINTENANCE
TROUBLESHOOTING
GUIDES
TIPS & TRICKS
ALL ARTICLES WATCH VIDEOS ABOUT US SHOP PARTS CONTACT US
You've been riding all afternoon, and now it's time to shut it down. But what happens when your ATV won't turn off?
We came across that problem on our 2007 Yamaha Grizzly YFM700 and needed to get in there and do a little electrical system troubleshooting. Unless you have this particular model, the access points may differ. Watch the video above and read on below for what you need to check when your ATV won't shut off.
It all began when we had starting problems on our Yamaha ATV. We replaced the battery on our unit, and in the process of cleaning up the electrical system, we may have done something to trigger this problem. When we turned the switch off, the ATV's electrical system was still live.
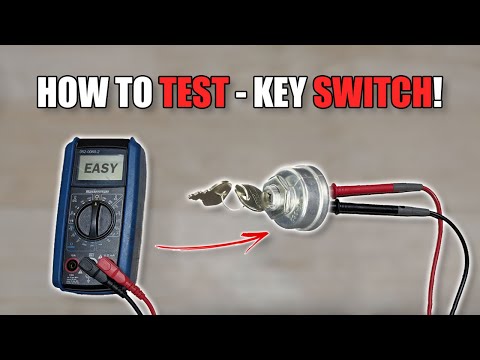
Diagnosing a Bad Switch on an ATVWe heard a relay clicking on the right front of the ATV, so we ran a few tests to see what's triggering it.
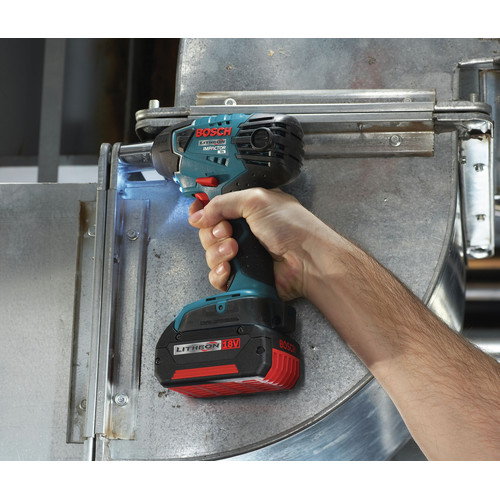
First, we checked to see if there had been any water intrusion due to a seal failure. The screws here holding the power steering control unit assembly in place were tight, so we used an impact driver to remove them. The electronic control unit (ECU) is underneath the steering unit.
Once the power steering unit was out of the way, we accessed the ECU. You can pull it up and then unplug it to inspect it for water intrusion. Check to make sure the seal around the connections is dry and that the underlying electrical connections are also dry. While we didn't find any problems there, our display was still on, even though the switch was off.
Testing the Power Switch on a Yamaha ATVWe started off by just feeling the wiring that runs from the switch itself back to the connection circled in the image below.
The wire was warm, which may explain the problem, and might also explain why the battery kept draining out before, prompting us to replace it.
We took a closer look at that switch wiring. To do this, we disconnected the wire from the gray connector above, and then hand-loosened and removed the locking ring holding the actual switch in place. Once we did that, we pulled the wiring from under the right front fender to remove it.
Once removed, we saw the problem. Apparently the previous owner had stripped back the sheath protecting the wiring and made another connection for some electrical accessory. With the wires exposed inside this electrical tape, a connection was made when we pressure washed the unit.
The moral of this story: If you buy a used unit, ask the previous owner if they installed any accessories. The connections, if not done properly, can lead to all sorts of problems down the road.
How to Replace the Switch Assembly on a Yamaha GrizzlyStep 1. Remove the storage box to have more room to snake the wiring behind the plastic. Start by removing the two Phillips screws, then use a screwdriver to pry the snap ring assembly out of its channel and walk it off.
Step 2. Push on the rim of the storage box a little and it should drop straight down.
Step 3. From behind the plastic, insert the key-end of the switch assembly into its opening. There's a notch on the switch. Make sure it aligns with the cutout for the notch in the switch opening shown below.
Step 4. Hand-tighten the lock ring, then use a set of channel locks to get it snug. Don't over-tighten it. They're plastic threads and you'll strip them easily if you do.
Step 5. Thread the plug end of the cable up from behind the plastic and into the bay with the electronics.
Step 6. Reconnect the new switch into the electrical system.
After following these steps, your Yamaha ATV should power off and on like normal again. Now that you know what to do when your ATV won't turn off, check out the video below to see what to do if your Yamaha YFM700 won't turn on.
body
However strange it may seem, having problems shutting off the engine on an ATV is more common than you may think.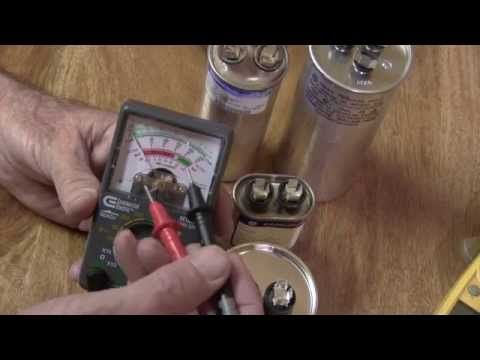 The bike may run as usual, but when you turn off the key or hit the kill switch, the engine keeps running. What may be causing this strange and potentially dangerous behavior?
When faced with an issue like this, the problem is more often than not electrical. To support this presumption, let’s have a look at what the ignition key or kill switch does to turn off the engine.
Any gasoline engine needs three components to run; fuel, air, and spark. When you take away any of these elements, the engine will shut off.
When you turn off the ignition key or hit the killswitch, the ATV should take away the spark. The spark plug will no longer ignite the fuel, effectively shutting off the engine.
The Ignition key and killswitch are both parts of an electric circuit that, when active, sends an electric signal to the CDI or ECU, telling them to power the coil that then sends a high voltage charge to the spark plug.
When you turn off the key or press the kill switch, it is no longer supposed to send a signal to the CDI or ECU. In a case where the engine won’t shut off, there is usually an issue somewhere in this circuit that causes an electric signal to be sent regardless of the switches’ position.
Here are the basic principles of how the ignition key stops the ATV and what components are involved in the circuit.
Please note that these are general guidelines. Your ATV may be wired differently. Your user manual’s wiring diagram will always be your best source of learning how your bike is built.

Focus your troubleshooting on these components, and you have a good chance of finding the cause of your issue.
Look up an exploded parts diagram on a site like partzillla.com. This will help you get an overview of what the different components look like and where they are located on your machine,
In some cases, you will be able to identify the problem without any tools. Still, to make troubleshooting a bit easier, it is recommended that you have the following tools and resources at hand:

Now, let’s begin troubleshooting by having a closer look at typical issues that may prevent your ATV from shutting off the engine.
It’s a good idea to start your troubleshooting by inspecting the ground wires and connectors. They are relatively easily accessible, easy to repair, and do not require expensive spare parts.
When the grounding in the ignition system is bad, the ignition switch or killswitch aren’t able to short the signal to the CDI to ground as it should.
Start by your ignition switch and trace the ground wires via the kill switch, the CDI, and the ignition coil.
Make sure all connectors are correctly fastened to their grounding spots and have proper contact with bare metal. If you notice any corrosion sign, disconnect the wire and clean both the connector and connection point with some sandpaper to ensure a solid connection.
Please make sure no pins in the connector plugs are loose, causing them to back out when you connect the plugs. It can be a bit hard to see whether the pins are in place or not. By gently pulling on each pin from the back of the plug, you can verify that they are correctly seated.
Also, inspect the main engine ground connection as it’s a commonplace for corrosion, causing a bad ground.
You can use a multimeter to verify that there is ground present at both the ignition, kill switch, and the CDI box.
Another way of testing if the grounding is good is by connecting a piece of wire from a bare spot on the frame and directly to the ignition or kill switch Caution! This tip should only be performed with extreme caution as there is a chance of getting electrocuted if you are not careful. Never touch bare metal parts and use a pair of insulated pliers to hold the wire as a precaution.
If the ignition wires become pinched or otherwise get damaged so that a hot wire comes in contact with either a ground cable or a grounded portion of the ATV, you will have a so-called ground fault.
This may prevent the ground cables from shorting to ground as they should.
A previous owner may have tapped into the wiring to install accessories but didn’t do a proper job either when installing or when removing the accessory before selling the ATV. It’s quite a common mistake just to wrap a couple of rounds of electrical tape around a hot wire or connector. While this may work as a short term fix, the tape may eventually come loose due to dirt, water, and vibrations.
Trace the wires coming from the ignition switch and kill switch to see if there is any visible sign of damage or tinkering, such as damaged insulation, DIY electrical tape patch jobs, or burnt wire.
Repair any damaged wiring or replace the whole switch and cable assembly if you are not comfortable with your wiring skills.
If your wiring seems to be in good condition, your next best bet will be to look at the ignition switch / key cylinder or killswitch.
An ignition switch or kill switch can fail due to internal wear or corrosion. If there is an internal short inside the switch, the CDI-wire may be hot at all times, continuously telling the CDI to run the engine.
Typical signs of a bad switch are when:
Disassemble the switch to look for corrosion. Note that not all ignition switches can be opened without ruining it.
If you notice only a slight corrosion sign, it may be worth a shot to clean the contact points and spray the whole assembly with a proper dose of electrical cleaner. Pack the unit with di-electric grease to protect the internals from further corrosion.
If you have access to a multimeter, you can test the switch for continuity. Depending on your ATV’s wiring design, you should get a positive reading when the key is off, and no reading when it is off or vice versa.
If all else fails, you can replace the whole switch assembly. A complete ignition switch assembly will set you back around $20 to $50.
When you are positive that the ignition wiring and switches are ok, it’s time to address the CDI or ECU/ECM module.
The ECM on my Polaris Sportsman Xp1000 is hidden in front of the ai filter box. Some disassembly is required to reach it.The CDI stands for Capacitor Discharge Ignition and controls the spark.
An ECU (Engine Control Unit) or ECM (Engine Control Module) does a lot more than just controlling the spark such as controlling fans, power steering, lights, transmission, and more.
These boxes may fail due to water exposure, heat, or old age, but they are not easy to troubleshoot. They are not something you replace unless you have to, as they can be quite expensive.
Before you spend your hard-earned cash on a new unit, there are a couple of things you can do to look for signs of damage.
Disconnect the connectors from the box to see if there is any sign of water or corrosion. Make sure the seals are undamaged and seated properly. If you see any sign of water getting into the unit, it’s a good chance it is failing.
If you shut off the ATV, but the engine keeps running for a few seconds after turning the key, you are likely experiencing a phenomenon known as “overrun” or “dieseling.”
What happens is that the cylinder and spark plug is still hot enough to ignite any fuel that is still present, even after the ignition is turned off.
This may happen on carbureted ATVs as there is no effective way to turn off the mechanical fuel pump and carb.
This problem may be caused by the timing being off, the bike running too lean, or not using the right spark plug.
Suspension. Shock absorbers must be free of oil, and CV boots must be free of holes through which moisture can enter. To check the condition of the wheel bearings and hub bushings, you need to raise the ATV with a jack and shake the wheels vertically and horizontally - if there is play, one of these parts is worn out. Most often these are bearings. You also need to check all the suspension arms for play - perhaps ball bearings or silent blocks need to be replaced.
ATV with working shock absorbers lowers and rises evenly - when pressing on the rear or front, one of the sides should not sag.
Transmission. Gearboxes must be free of oil leaks and cracks. The oil in them can be checked by lowering a plastic clamp into the filler neck or unscrewing the drain bolts: it’s bad if the liquid is opaque, it contains chips or other foreign particles. To check the modes of operation of the transmission, you need to jack up the front of the ATV. When all-wheel drive is on, when turning the left wheel, the right wheel should rotate in the opposite direction, and vice versa. When the differential lock is engaged, both wheels rotate in the same direction. Transfers should be included without effort and crunch.
Engine. It must be free of oil. A serviceable motor starts in 2-3 seconds and works without a metallic rattle, an arbitrary increase and decrease in idle speed.
Bad sign - black oil or with foreign particles. Normally it is transparent.
A malfunction is also indicated by black, white or blue smoke from the exhaust pipe, as well as a burning smell. At idle, the exhaust gases of a serviceable ATV are almost transparent.
It is advisable to measure the compression in the cylinders - this will require a compression meter with adapters for different threads of the candles and knowledge of the normal compression value in the cylinders of a particular ATV model, taking into account the decompression meter.
Coolant . You need to check with a cold engine. The antifreeze level must be between the minimum mark "LOW" and the maximum "FULL". The liquid should not be cloudy. If there is sediment or dirty “flakes” under the radiator cap, the motor was poorly maintained and may have overheated.
Air filter . If there are oil stains on it, most likely the ATV turned over.
Electrical . It is necessary to check the operation of the parking lights, high and low beams, turn signals, alarms, horns, heating, winches. Error indicators - for example, an electric booster - should go out when the engine is started.
Electric power steering . With the ATV running and jacked up, turn the steering wheel left, right, then center. With a working electric power steering, the steering wheel does not turn on its own.
Frame. Cracks, extensive corrosion, welding spots, stripped or fresh paint in the places where the suspension arms are attached, on the arms themselves and on the bottom of the frame - a reason to refuse to buy. Cracks or welding in the cargo platform area are not critical.
The difference in one or more bolts of the engine, variator or bridge, as well as traces of sealant on the crankcase connectors, indicates that the assembly was disassembled to fix the breakdown.
ATV in good working order does not pull to one side. When moving back and forth with the wheels fully inverted, there is no cod. The start of movement and acceleration without jerks and bumps. When you turn on the four-wheel drive and differential lock, it becomes more difficult to turn the steering wheel.
Every ATV owner sooner or later faces a breakdown. And it doesn’t matter if you decide to buy an inexpensive ATV or a branded device. Of course, this is an unpleasant situation, but most problems can be fixed by hand. So let's figure out what to do if the ATV does not start.
Constant driving to the limit and improper operation of the equipment often causes a number of breakdowns. Due to high loads, it can fail:
But most often, problems arise due to some little thing, such as low-quality gasoline, lack of oil or improper preservation of equipment.
The first thing a motorist needs to do if the ATV does not start or stalls is to check the gas tank. If the fuel is idle for a long time, it may evaporate, and if the tank is empty, gasoline should be added. But if there is fuel in it, it is advisable to drain it. Very often, low-quality fuel comes across, which after a while simply ceases to ignite.
Don't forget the oil. If a low-quality liquid was poured into the system, the device will lose dynamics and may even stall. This problem is especially relevant for four-stroke quads, since their power unit must literally “float” in oil.
Another reason why the ATV does not start is improper preservation of the equipment. Even if you leave the device for a day in the garage, it must be prepared for downtime, otherwise starting the engine will be a real test.
Preservation required:
 You can also remove the battery of the device if the outside temperature is low.
 Many riders ignore this simple procedure, but it is the one that most often causes starting problems. For example, it is almost impossible to immediately start a “cold” engine. Therefore, the driver begins to methodically press the "start" button, and at this time the battery is discharged. After 10-15 attempts, the battery runs out, and it becomes unrealistic to start the equipment.
Important: In severe frost, it is imperative to carry out conservation of the ATV. If this is not done, condensation will collect at the bottom of the carburetor, and the quadric will have to “warm up” for several days.
ATV won't start due to starter or bad contacts. In this case, you should:
 Oxidation may also appear here. Although the part is sealed, moisture can enter the device through microcracks. If the problem is in the relay, then it must be removed, cleaned of corrosion and oxidation. After that, the contacts are lubricated with a special grease. However, if the damage is severe, it is better to replace the part.
 But what if the Chinese ATV won't start due to problems with the starter in the field or away from home? In this case, the rider needs to close the relay contacts with a screwdriver. Thus, the rider will be able to start the device bypassing the faulty starter.
No spark is another simple but annoying failure. It usually occurs due to damage to the coil or a break in the wires that go to the candle. Solving the problem is easy. The rider just needs to unscrew the candle, insert it into the cap, attach it with a metal part to the motor and press "start".
Even a slight downtime can prevent your ATV from starting, especially if it has been improperly preserved.