Every editorial product is independently selected, though we may be compensated or receive an affiliate commission if you buy something through our links. Ratings and prices are accurate and items are in stock as of time of publication.
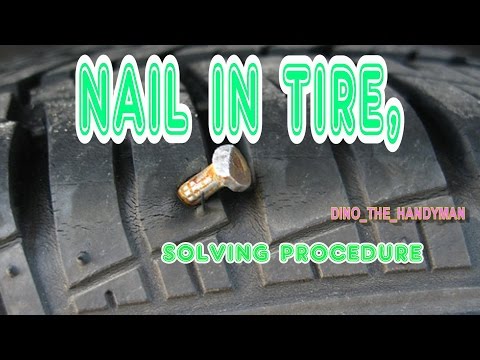
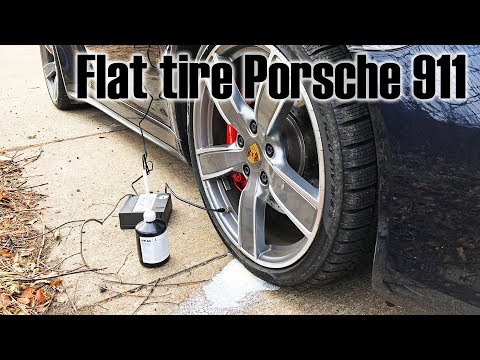
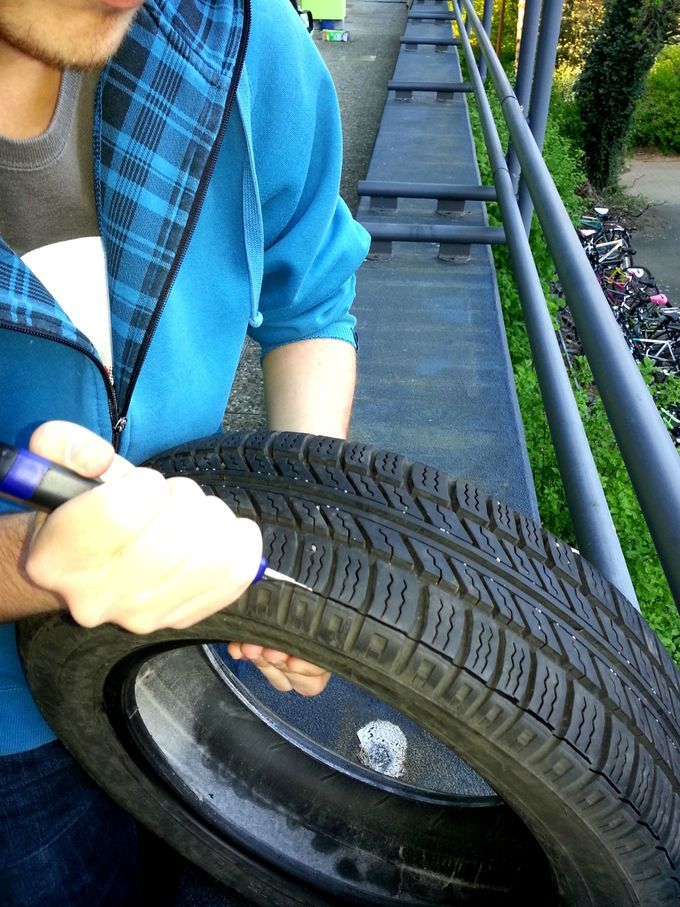
Modern vehicle tires are tough, standing up well to rough terrain and thousands of miles of driving. Trouble is, tires are not invincible. Every so often car tires spring leaks. Air can start leaking from anywhere on a tire, and the location of the leak determines whether or not you can fix it yourself. And if you can't fix it yourself, the location of the leak will also tell you if you need a professional repair or a new tire.
Whether or not your tire is tubed or tubeless affects things, too, because only tubeless tires can be repaired using the technique of plugging that we'll show you here. The good news is that modern vehicles always have tubeless tires, and this means that repairing with a rubber plug is often an option.
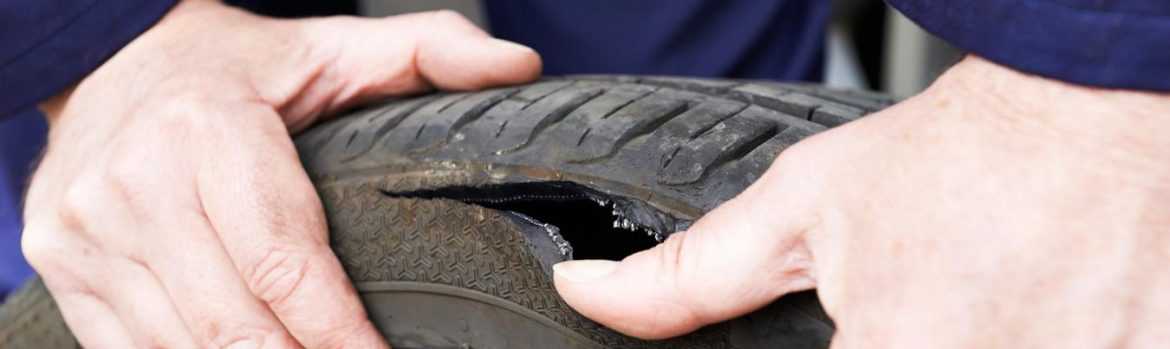
Plugging a tubeless tire is only a possibility when your puncture is in the tread area. If the air leak is where the sidewall of the tire meets the rim — this is called a "bead leak" — you'll need to visit a mechanic with a tire machine to dismount the tire from the rim and remount it with sealing liquid applied to the bead. If your sidewall has been punctured, you need a new tire, because damage there can lead to a blowout at highway speeds, even after repair.
Learn exactly how to plug a tire so next time you spring a leak between your treads, you'll be able to get up and running again in record time.
Total time completing the repair is about 15 minutes. Doing the work yourself will save you about $20 and the time spent driving to the garage and waiting.
Steve Maxwell for Family Handyman
Complete DIY projects like a pro! Sign up for our newsletter!
Do It Right, Do It Yourself!
Originally Published: August 27, 2020
Tire plugging is the fastest method to repair a punctured car. Tire plugging uses a cord to prevent the airhead from escaping. If you are an experienced person, you can avoid damage to your car with simple tips.
So, how long does a tire plug last? Most manufacturers say that plug versions can last 7-10 years if installed correctly.
Yet, this number is meant as a reference because you can’t always fix it perfectly. The article gathers useful knowledge and some of the most frequently asked questions about tire plugs. Let’s scroll down to read more information!
Buy Best Tire Repair Kits at Amazon.com
What Is A Tire Plug?It is the primary tool in the repair by plugging method. From the outside, it looks like a standard wire, and the structure is quite remarkable; it is a sticky object; depending on the case, the item can expand or contract to match the size of the hole.
Its working principle is also quite simple: after being inserted into the tire, the plug wire will sense the pressure, determine the shape of the wound, and then automatically expand to adapt.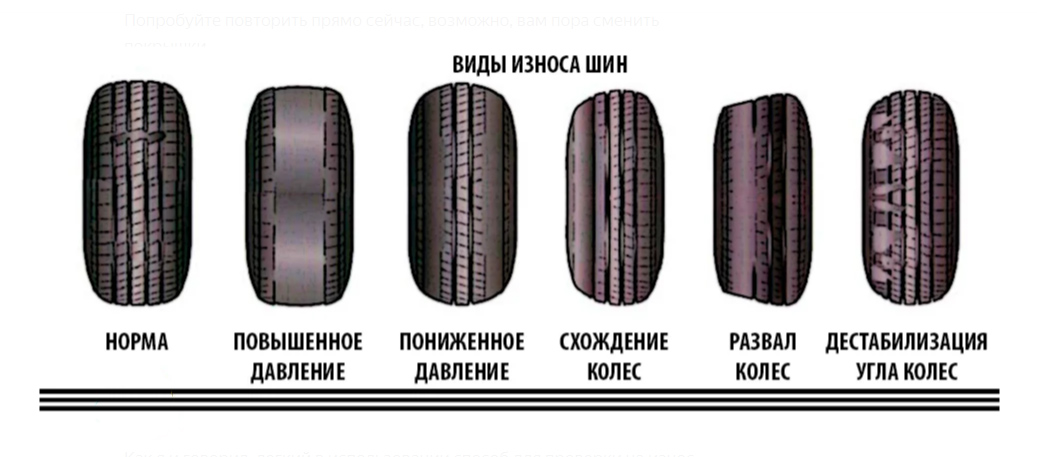
In addition, the material that makes the wire must be guaranteed to meet the standards, confirming the certainty so that after the air is pumped in, there will be no problems.
There is no denying the convenience that the plug method brings, and you can even repair it without removing the tire from the rim. You can even plug in the tire in some exceptional cases, even when the wheels are connected.
How Long Does A Tire Plug Last?When a vehicle is repaired correctly and maintained, a plug’s life span can last up to 7-10 years. It is an unbelievable number for a wheel that has been repairable.
However, manufacturers advise users not to overdo patching like this in practice. When using too many repair measures, the impact will affect the inherent functions, causing deflation and explosion.
When traveling on the road, the car’s wheels have problems, do not rush to decide when the experience is not proficient; the best way is to take the car to a repair center to have expert advice on the appropriate repair method.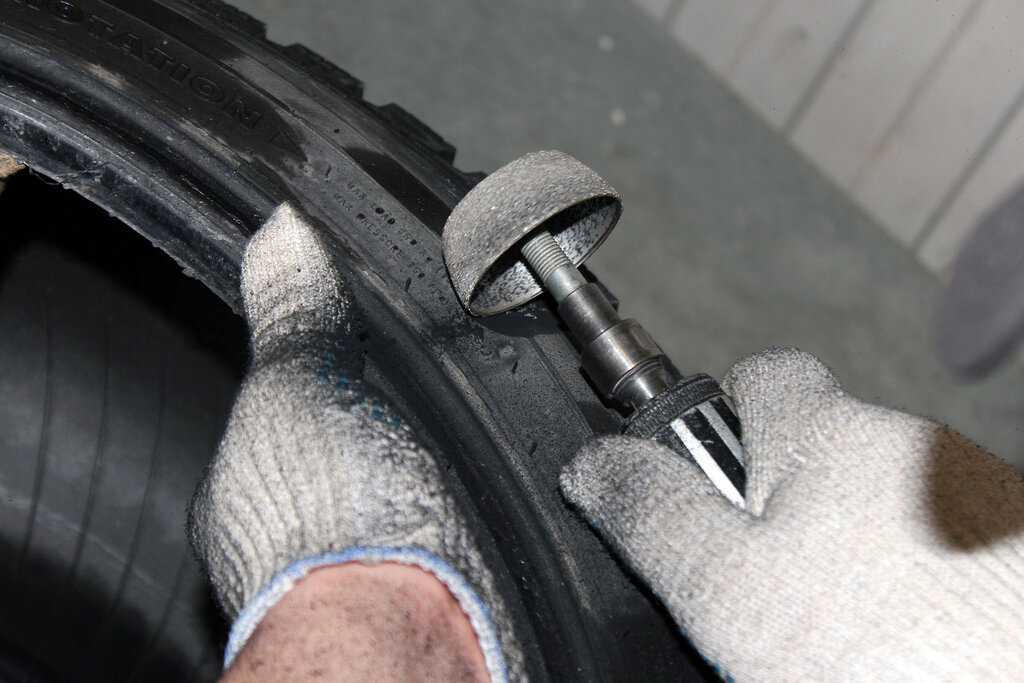
Buy Best Tire Repair Kits at Amazon.com
Plugging or patching is only a temporary measure before you have enough time to change into a new tire. The life of a tire after plugging can last from 7-10 years or 25,000 miles; no one can be sure that there will not be any problems.
Plugging in tires will be a good idea, even effective if the wheel is in an emergency that needs to be moved.
Is It Safe To Plug In A Tire?You can safely use your plugged-in tires when traveling in a specific section of the road. Unlike a spare tire, which has a short life, it is possible to prevent air from escaping through a previous puncture completely with a plug repair method.
Via many surveys, experts think there is a better measure than a plug – radial patch. It is a suitable method available on almost all popular tires on the market.
The process takes about 30 minutes while using a wire to insert the air hole takes up a few minutes.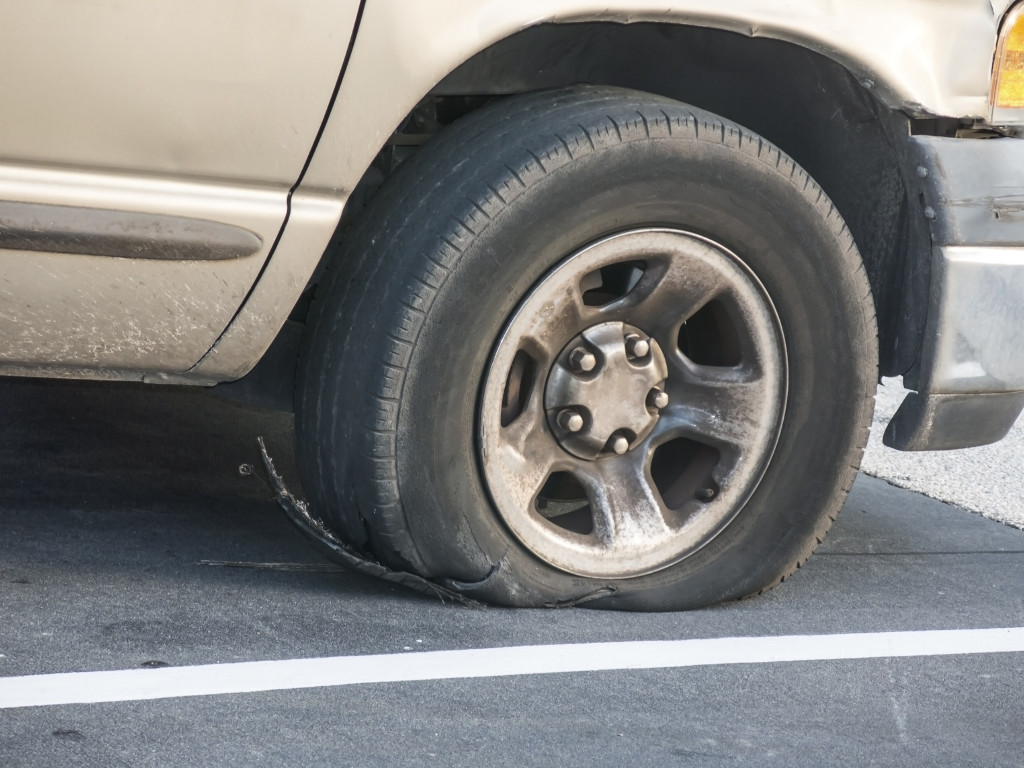 Both must be vulcanized to reinforce and increase the rubber surface’s certainty.
As long as the wound has adequately been reinforced, you are entirely safe traveling by car with tires. The safest time to use is not too long from when you repair using the above method.
Besides, some notes have also ensured stability when operating this type.
However, do not drive when there is a wound near the wall or on the side of the wheel; if the plug diameter exceeds ¼ inch, it is best to replace the tires.
Finally, the body’s weight, do not use plug tires to carry heavy objects; this inadvertently puts pressure on the wheels when the tires are weak.
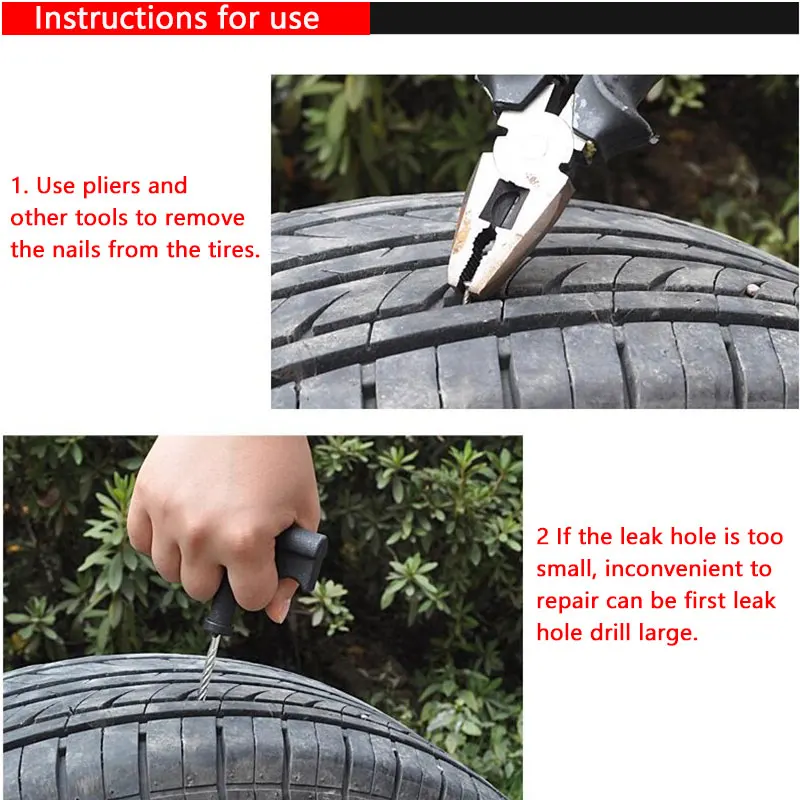
How To Plug In A Tire?Here are some ways to help you better understand the plugging process.
Step 1: Locate the leak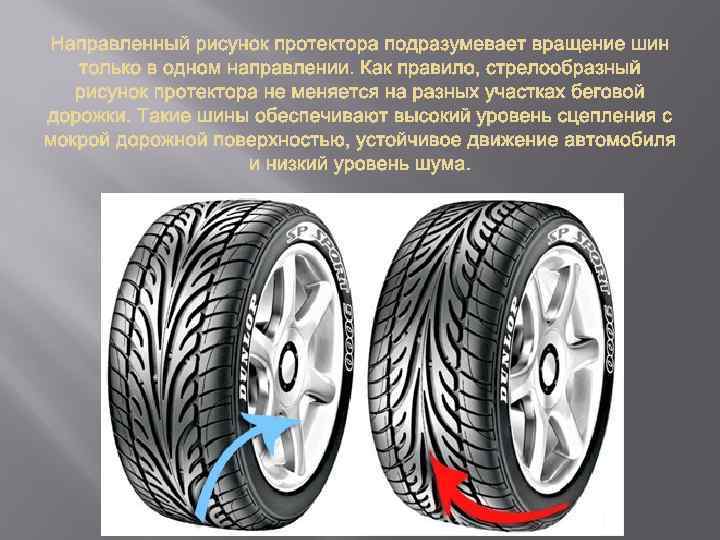
This step does not require you to remove the wheel altogether, but you can use a jack to support the wheel’s weight, so it is pretty easy to do the following steps.
The above article has provided you with knowledge related to plugging or manipulations to perform this process. Hopefully, it will help you when you encounter a similar situation.
This post was last updated on
These tips will help you change tires properly. We will talk about the advantages and disadvantages of replacing the basic rubber sizes with alternative ones.
Tires are replaced in several cases, for example:

The most important criteria to consider when changing tires:
door sills).
2. Vehicle manufacturers allow wheel outer diameter variations ranging from 2% to 3.5%. Thus, if it is necessary to install discs of a larger diameter, the ratio of the width to the height of the profile should be reduced in order for the absolute dimensions of the wheel to change within the normal range.
3. Also, before making changes to the chassis design of your car, you should remember that the manufacturer guarantees the appropriate running parameters of the vehicle, provided that the basic wheel sizes are used.
Benefits when fitted with larger tires:
 For example, a larger rim diameter, combined with a lower profile height, improves the car's cornering stability and also increases the speed at which corners can be entered safely. Due to the lower profile, the rubber deforms significantly less.
Disadvantages when choosing larger tires:
 Manufacturers try to compensate for this component with a directional herringbone tread pattern or with asymmetric grooves that are independent of each other.
 In order to calculate the range of possible interchangeable sizes, it is necessary to know the allowable nominal and actual dimensions of the wheel diameter as a whole. Wheel replacement options for your car can be found in the next section of the site , or calculated using a special formula below:
1. Basic (recommended) outer diameter of the wheel
2. Nominal rim diameter
3. Difference (subtract the nominal rim diameter from the outer diameter)
4. Add an average of 3% to the difference, we get the required value of the nominal tolerance.
Reducing the size of the rim
The installation of smaller wheels, motorists resort mainly in winter. The calculation applies the same principles as discussed in the formula above. However, it is worth checking the compatibility of the size of the brake disc, caliper in relation to the smaller rim. There is an opinion that a smaller wheel width contributes to better traction in winter, since it provides more pressure per square centimeter of the contact patch.
And finally, remember that the declared technical characteristics of the car specified by the manufacturer are true, provided that the recommended wheel and tire sizes are used.
| What winter tires to buy? Expensive or cheap? To begin with, it is worth knowing the division into classes of car tires. It is useful to know when to buy expensive premium tires and when to choose cheaper analogues from the economy segment... 06 September 2022, 10:06 | |
| Tires for electric vehicles - which ones to choose? Driving an electric car is different from driving a car with an internal combustion engine. 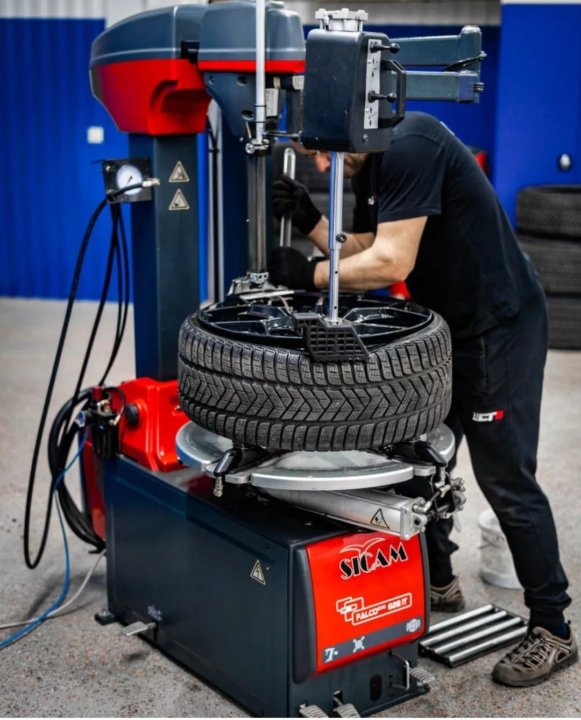 This is felt by both the driver and passengers. For tires, another type of drive is also important. Rubber on.. This is felt by both the driver and passengers. For tires, another type of drive is also important. Rubber on.. August 09, 2022, 11:58 | |
| Who are low profile tires suitable for? Car wheels are the first thing that comes to mind in the context of visual tuning. Not every car will be better after installing a tailgate spoiler. And big.. 18 April 2022, 15:42 | |
| What are UHP (HP) tires? Best choice for summer High Performance and Ultra High Performance tires are becoming increasingly popular all over the world. Our cars are getting faster, more efficient, accelerate better and provide more confidence.. February 28, 2022, 15:06 | |
| Date of manufacture of Belshin wheels Recently, cases of distrust on the part of customers have become more frequent, regarding the date of manufacture of products of the Belshina trademark. 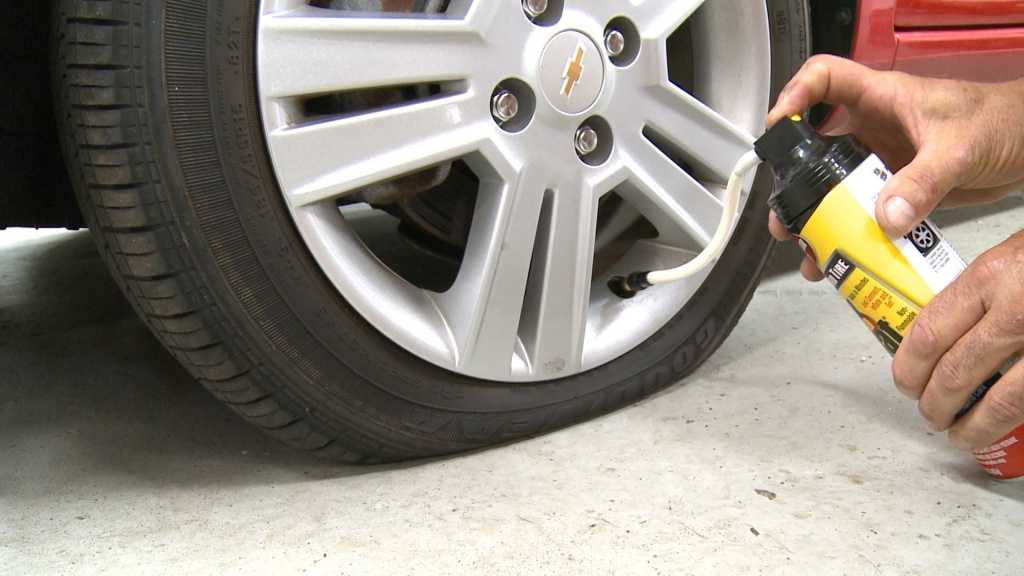 Indignation is caused by not quite neat standard forms indicating the week and .. Indignation is caused by not quite neat standard forms indicating the week and .. 16 February 2022, 12:59 | |
The annual replacement of winter tires, as a rule, follows a similar scenario - with the onset of frost, the first snow and ice, drivers take their winter tires from balconies or garages and massively are sent to tire centers or just the nearest tire fitting points.
Winter is coming very soon! It's time to prepare for it properly.
But will the work performed in a nameless service be of high quality and safe? How to change summer tires for winter?
Winter tires Nokian Tires and the first snow
Here are some tips from Vianor's experts to make sure you've done everything you need to drive safely on winter roads!
Drivers who have lost control of their car in icy or snowy conditions are frequent customers of car services.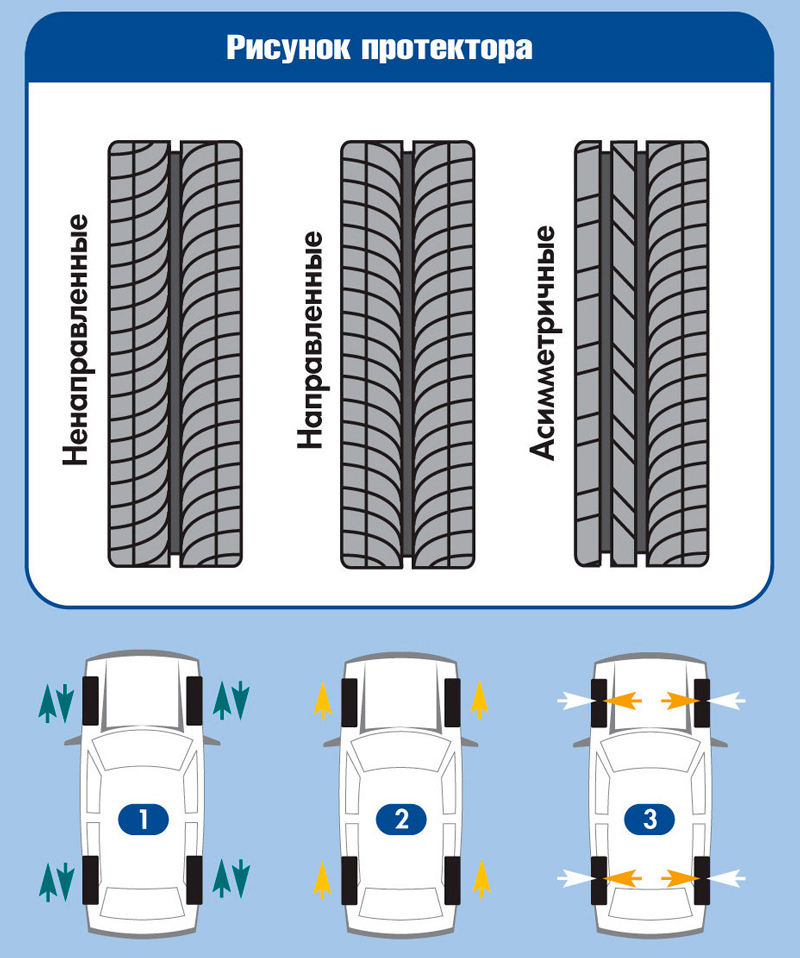 Both tire fitting and body shop. However, winter tires do not require changing them only when frost sets in. The design of winter tires is such that they begin to work effectively even at an average daily temperature of plus 7 degrees Celsius. And summer tires at this temperature already begin to work incorrectly: the rubber compound hardens and does not provide proper grip.
And don't be put off by the smiles of your neighbors or colleagues who put off changing tires until the last moment - they say, "it's too early." All this was described by the legendary Aesop in ancient Greece in his fable "The Beetle and the Ant", known to us from the translation of I.A. Krylov of her remake from Jean La Fontaine (in the Russian version - "Dragonfly and Ant"). “Summer red sang; I didn’t have time to look back, As winter rolls into my eyes.
It is better to make an appointment at the Vianor tire center in advance, and you will be received at the agreed time and without the need to waste precious time in line.
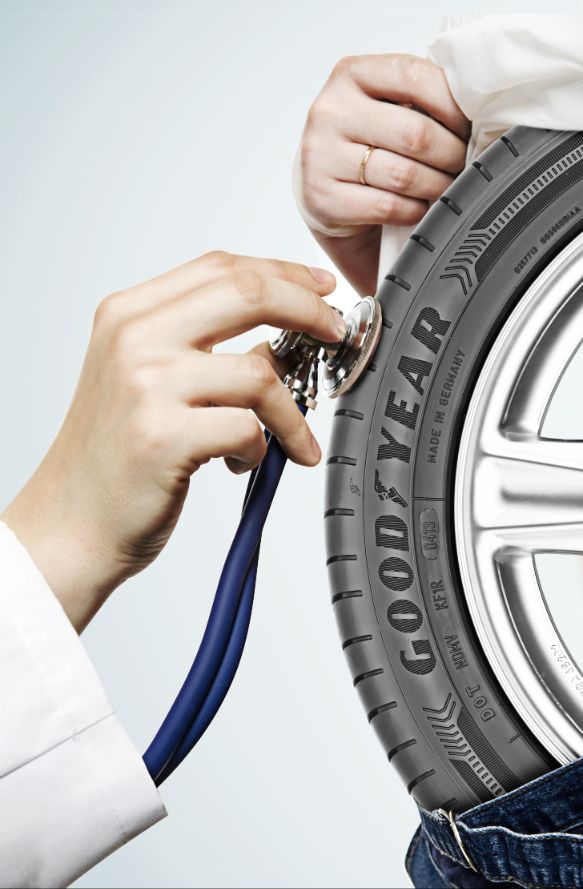
In Vianor tire centers, the technicians carefully check the condition of the winter tires brought by the customer before starting the replacement. In some cases, we recommend replacing tires with new ones. In some tire shops, unfortunately, they often put the tires brought by the client on the car almost without looking - just pay the money. It is not safe! After all, there is a whole set of signs that the tires have already exhausted their resource and can seriously let you down on the road - up to the complete destruction of the tire, followed by an accident and other sad consequences.
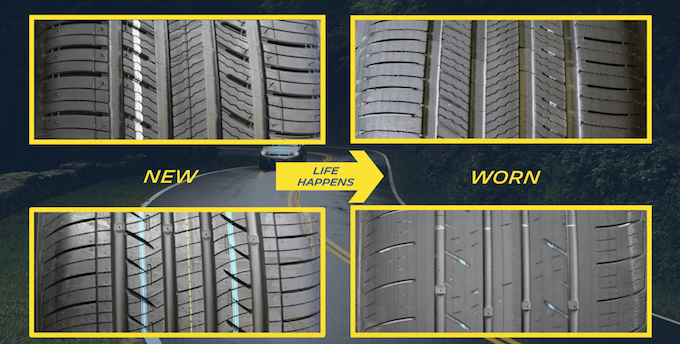
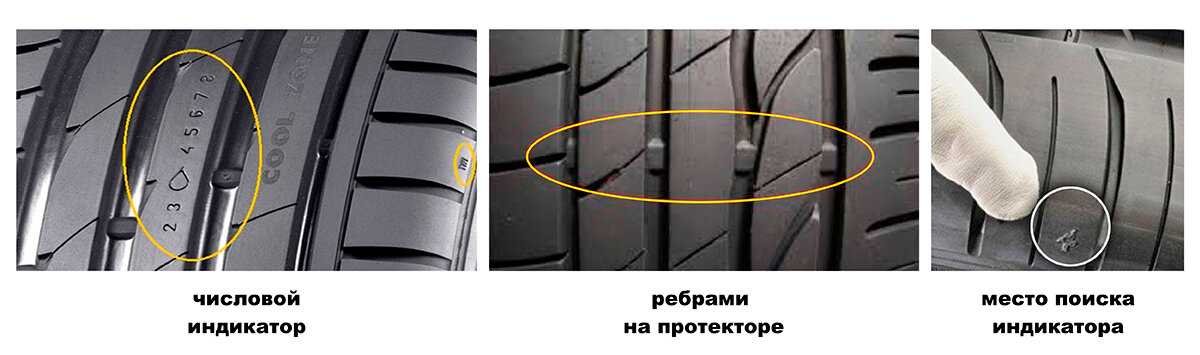
The very first parameter of tire wear is the remaining tread height. According to Russian legislation, for winter tires it must be at least 4 mm. You can check this not only with a caliper, but also with a simple match, the height of the sulfuric head of which is 3-4 mm.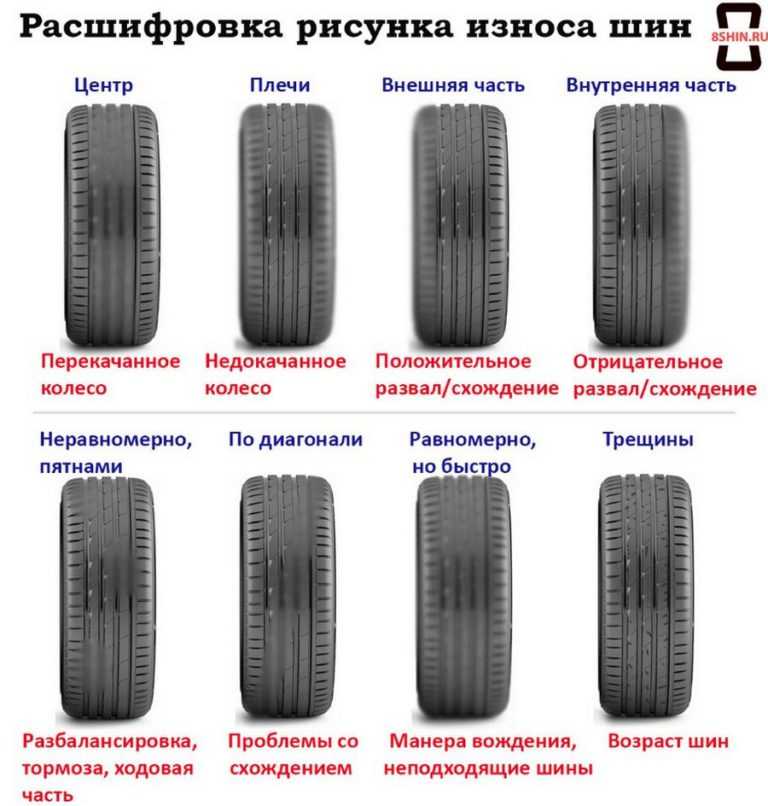 When immersing a match between the tread lamellas, the sulfur head must be completely hidden from view.
Most modern tires have built-in wear indicators. Nokian Tires, for example, have a DSI (Driving Safety Indicator) wear indicator on the central block of the tread, showing the value of the residual tread height of the tire in millimeters. The initial tread height of new Nokian Tires winter tires is on average 8-9 mm.
Tread height is not the only thing to consider. Damage such as splitting or cracking of the tread, bulges or other damage to the sidewall of the tire is a clear indication that it needs to be replaced. But if a self-tapping screw is suddenly found between the tread blocks, it can be easily repaired. The exception is run flat tires, most manufacturers of which exclude the possibility of repair.
Uneven tread wear should also attract your attention - when the shoulder area is worn much more than the central one and vice versa. In such a situation, variants with incorrect tire pressure or “left” wheel alignment angles are possible - wheel alignment may be required.
In the centers of Vianor, if such a service is available, they will always help you to make a high-quality wheel alignment
Nokian Tires experts, however, emphasize that a slight difference in the nature of tread wear is acceptable, because tires on a drive axle wear out more in the central part of the tread, while in freely rotating tires, the shoulder part. That is why the company recommends rearranging the wheels from one axle to another every 8 thousand kilometers. Another recommendation from Nokian Tires is that tires in the best condition (with the least wear) should always be mounted on the rear axle of the car and not on the front, even if your car is front-wheel drive.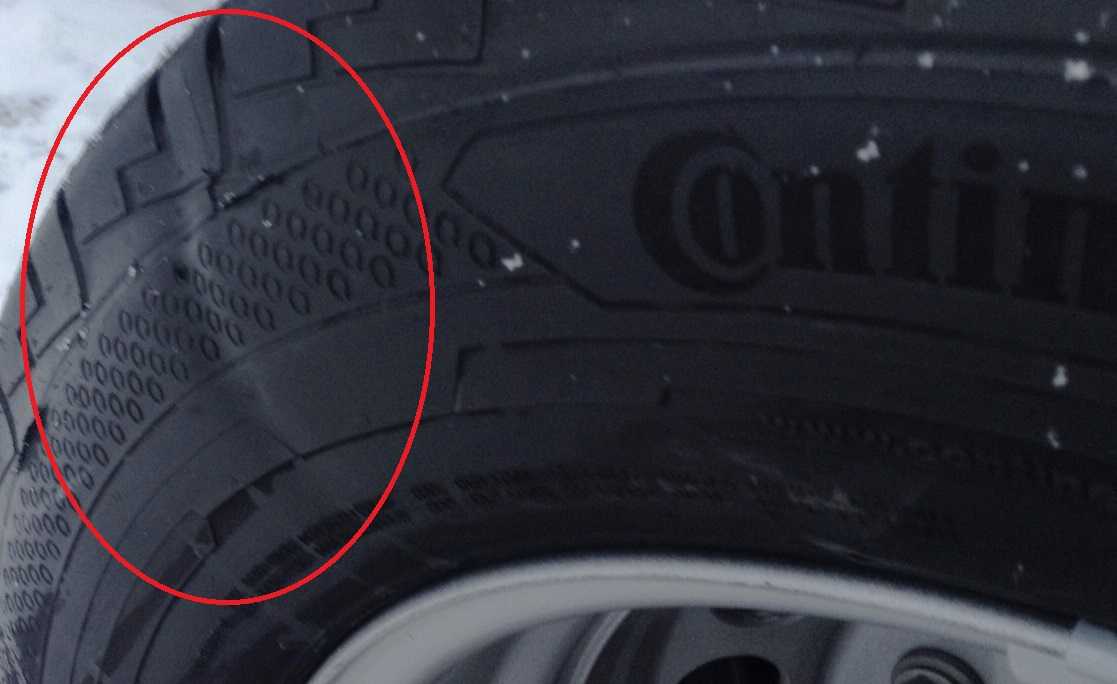 Finnish experts explain this by the fact that in an emergency it will help to avoid skidding of the rear axle associated with loss of traction, which is much more dangerous than skidding of the front axle.
On studded tires, pay attention to the number of loose studs. For example, according to the experts of the tire research and development center "Kama", the loss of more than 10% of anti-skid studs, especially in one tread area, will no longer allow the tire to demonstrate its original characteristics. The company recommends replacing such tires with new ones. Other manufacturers have similar recommendations.
The tire fitting process looks simple, but it is only at first glance - there are a large number of nuances that only a professional can take into account. “By eye” it is not easy for an ordinary person to determine the performance of tire fitting equipment or the qualifications of a master. Therefore, we will show you how a regular winter tire change takes place at one of the Vianor tire centers.
Tire Center Vianor in Moscow at Varshavskoe Shosse, 150
First of all, the car is installed on a hydraulic lift using high rubber buffers to prevent damage to the elements of the bottom of the car. Using rolling jacks is, of course, much cheaper for the service, but unsafe and inconvenient.
Vianor tire centers use modern equipment
Craftsmen use pneumatic tools to unscrew the wheels, passing them to the washing area.
Tire washing. In the largest Vianor tire centers, one lift has its own individual car wash, tire changing and balancing machine, as well as a complete set of tools. This means that work can take place simultaneously at several posts.
Specialized automatic car washes, which use a special shampoo, allow you to clean the wheel from reagents and other contaminants - so the customer's summer tires will be clean and the wheels will be maximally prepared for tire fitting work.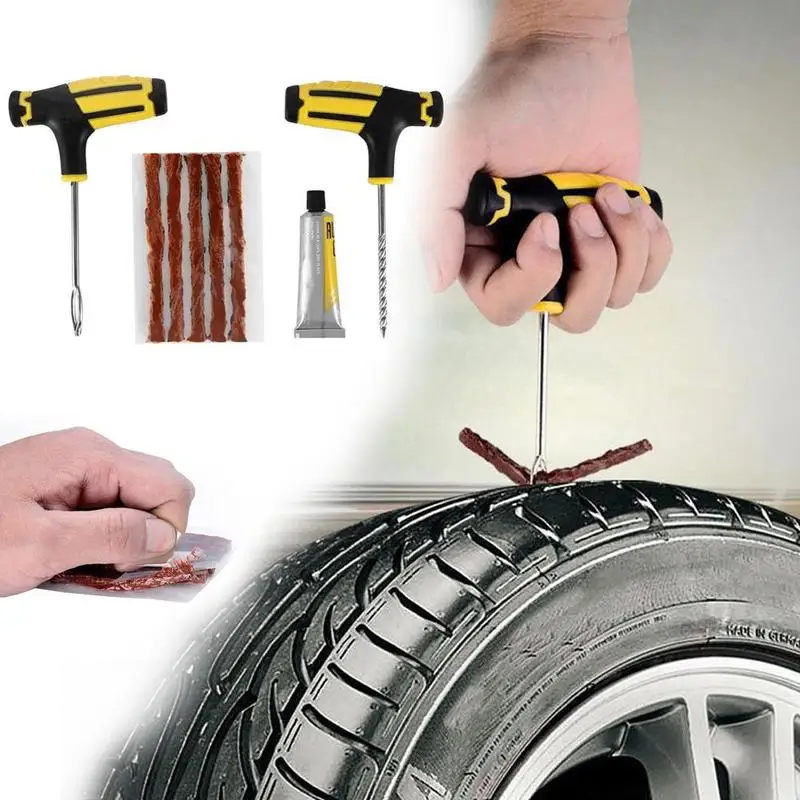 Even a small piece of adhering dirt or bitumen can adversely affect tire balance.
After washing, the wheels are dried with compressed air and transferred to the tire changer. The wheel is carefully disassembled. The valve is changed to a new one - far from all tire shops do this, however, the poor condition of the valve is especially often the cause of a “sudden” loss of pressure in the tire.
Replacing the valve with a new one
We recommend changing the valves every time you change tires - it's not expensive at all. By the way, valve replacement is sometimes included in the free tire fitting service, which we offer to customers during the promotion period, when purchasing a number of tire models.
The next step: a new tire is installed on the disk, taking into account the direction of its rotation, if the tire is directional.
Installing a winter tire on rim
The assembled wheel is then sent to the balancing machine.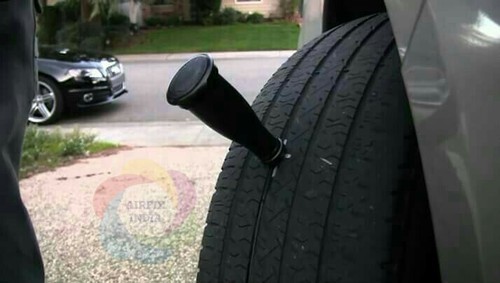 In the Vianor tire center on Varshavskoe Shosse, the most modern and efficient machines are precise and easy to use.
Depending on the design of the rim, as well as the existing imbalance, the master sets the weights of the required type and weight.
Wheel balancing
The contact surface of the spoke and stud is cleaned and lubricated with special grease. It protects the connection between the hub and the disc from corrosion and sticking. The wheels are pre-spun using pneumatic tools.
The so-called copper grease protects the hub-rim connection from corrosion
The tires are set to the pressure recommended by the vehicle manufacturer. Please note that some winter tire manufacturers advise increasing tire pressure in winter - they recommend keeping winter tires at 0.2 bar (20 kPa) more pressure than summer tires. The tire pressure must always be checked with cold tyres.
The last step, if you do not take into account the neat packaging of summer tires in branded bags and then in the trunk of the client, is the final tightening of the wheel nuts. This process is carried out with the car standing on the floor of the workshop strictly using a torque wrench adjusted to the correct tightening torque.
Hand tightening of all wheel nuts with a torque wrench is very important.
This eliminates two possible serious problems at once - overtightening of the studs, and, conversely, insufficient tightening of the threaded connection. The first option can lead to the breakage of the stud, the second - to the loss of the wheel on the go. When performing tire fitting work in Vianor tire centers, you will not encounter such problems.
To prolong the life of your new winter tires, we recommend avoiding sudden acceleration, braking and cornering, as well as high speed driving, for the first 500 kilometers. This is especially important when using "studs" - the seats for studs on most of these tires are designed in such a way that for the final "landing" of the stud, the tire must be "rolled" to avoid premature loss of studs.
It is possible to get into an accident on a slippery road with good tires, if you do not take into account the decrease in the level of grip with the surface, speeding, not keeping your distance and making dangerous maneuvers. We encourage careful driving all year round.
Careful driving after tire fitting has another hidden meaning - adapting the driving style to the road conditions that have changed after the cold snap. Most of the so-called "tinsmith days" happen for two reasons - the driver delays the moment of changing tires until the last moment, and the loss of winter driving skill, which implies a much lower base level of grip on the surface.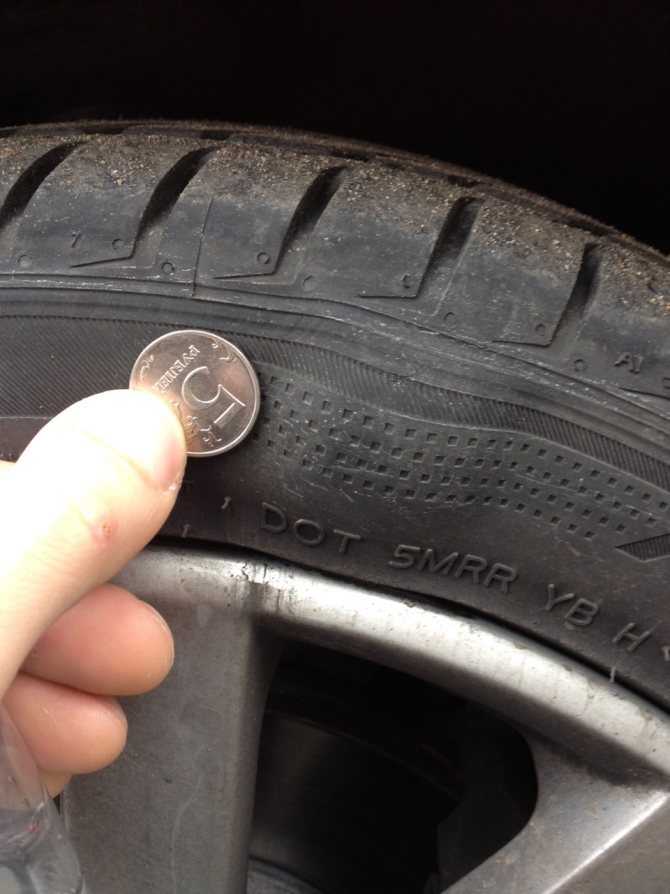
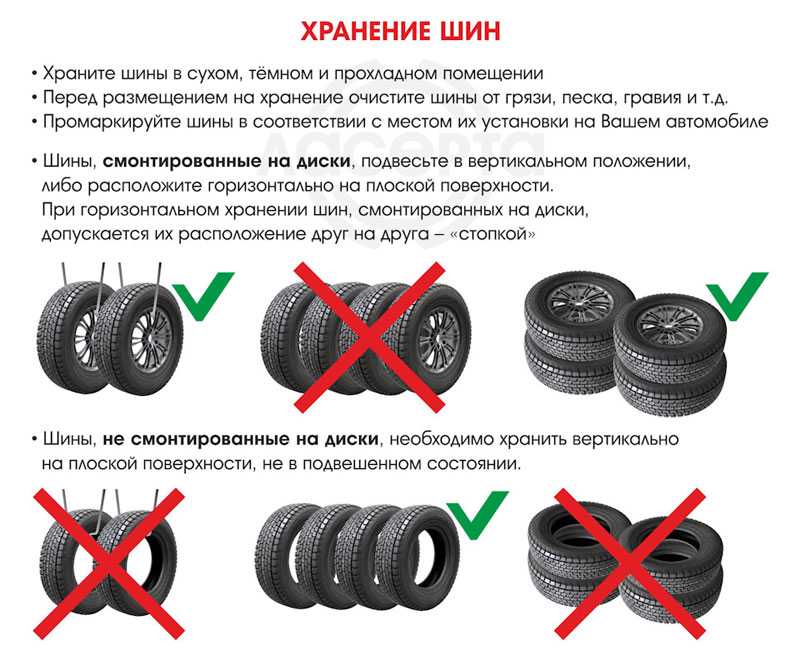
Unfortunately, not all car owners think that storing winter tires on the balcony is not the best possible idea. Temperature fluctuations, direct sunlight and storage of dismantled tires in a pile can quickly destroy even the best tires.
Proper storage of tires looks like this: tires without rims are stored on a rack or a special wooden stand; once every two weeks they must be rotated by 90 degrees (quarter of a turn) for protection against deformation. Long-term storage of tires in a stack or hanging is unacceptable. Complete wheels, on the contrary, cannot be stored standing up - only in a stack or suspended. When stored in a stack, tires should be repositioned once a month.
Tires must be kept clean, a special tire preservative may be used. Tires should be stored in a cool, dry place at temperatures between 0 and 15 degrees Celsius. Exposure to direct sunlight and moisture is excluded, placement of tires near heating radiators.