Calculate Out-The-Door Price
close
× ‹
All fields are required
Submodel
Select TPMS OptionTPMSTPMS: NOTPMS: YES
WHAT IS TPMS?Enter Zip Code WHY DO WE ASK ABOUT YOUR ZIPCODE?
ZIP code is needed for local pricing.">Why?
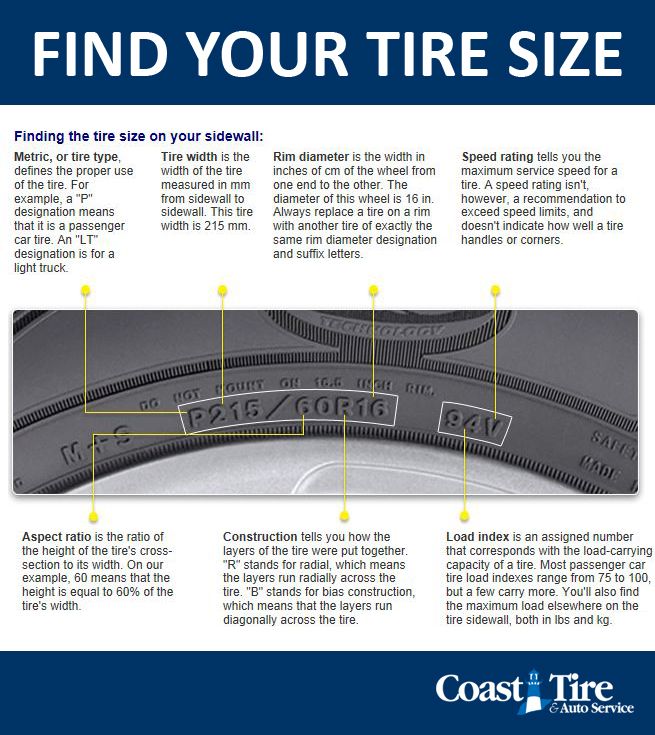
Cross Section
Aspect Ratio
Rim Diameter
Enter Zip Code Why?
7980 S Broadway
Littleton, CO
303.515.7308
Most stores are open nights and weekends
Directions
Store Hours:
| Day(s) | Hours |
|---|---|
| MON-FRI: | 7:00am-7:00pm |
| SAT: | 7:00am-6:00pm |
| SUN: | 9:00am-5:00pm |
| CHRISTMAS EVE: | 7:00am-4:00pm |
| CHRISTMAS DAY: | Closed |
Store Details Change Store Find a Store
Schedule An AppointmentLearn more about Oil Changes
7980 S Broadway
Littleton, CO
303. 515.7308
Most stores are open nights and weekends
Directions
Store Hours:
| Day(s) | Hours |
|---|---|
| MON-FRI: | 7:00am-7:00pm |
| SAT: | 7:00am-6:00pm |
| SUN: | 9:00am-5:00pm |
| CHRISTMAS EVE: | 7:00am-4:00pm |
| CHRISTMAS DAY: | Closed |
Store Details Change Store Find a Store
Schedule An AppointmentLearn more about Brake Service
All fields are required
Engine
Enter Zip Code Why?
All fields are required
Submodel
Enter Zip Code Why?
FIRESTONE HAS BEEN THE NATION'S LEADING TIRE PROVIDER FOR MORE THAN A CENTURY.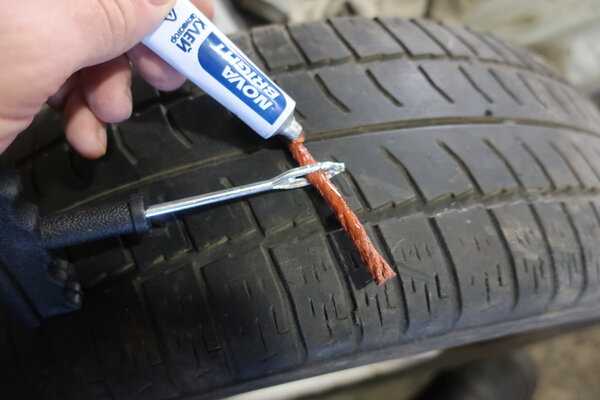
It's a tough road out there, and your tires bear the brunt of potholes, broken glass, nails, screws, and anything else that can puncture a tire. Firestone Complete Auto Care's flat tire repair services are the best in the business. We've been repairing tires since 1926, and we take pride in repairing America's tires. When tire damage strikes, come to Firestone Complete Auto Care–the tire repair shop you can trust.
If you suspect something is wrong with your vehicle's tires, don't hesitate to come into a Firestone Complete Auto Care near you. If your Tire Pressure Monitoring System (TPMS) light is on, you've hit something on the road, your tire is losing air, or maybe something just doesn't feel quite right, bring it in. One of our expert technicians will take a look and tell you if you need to repair or replace your tires.
Driving on a damaged tire can lead to additional (and more costly) rim damage and repairs, so it's best to have your tires examined at the first sign of trouble.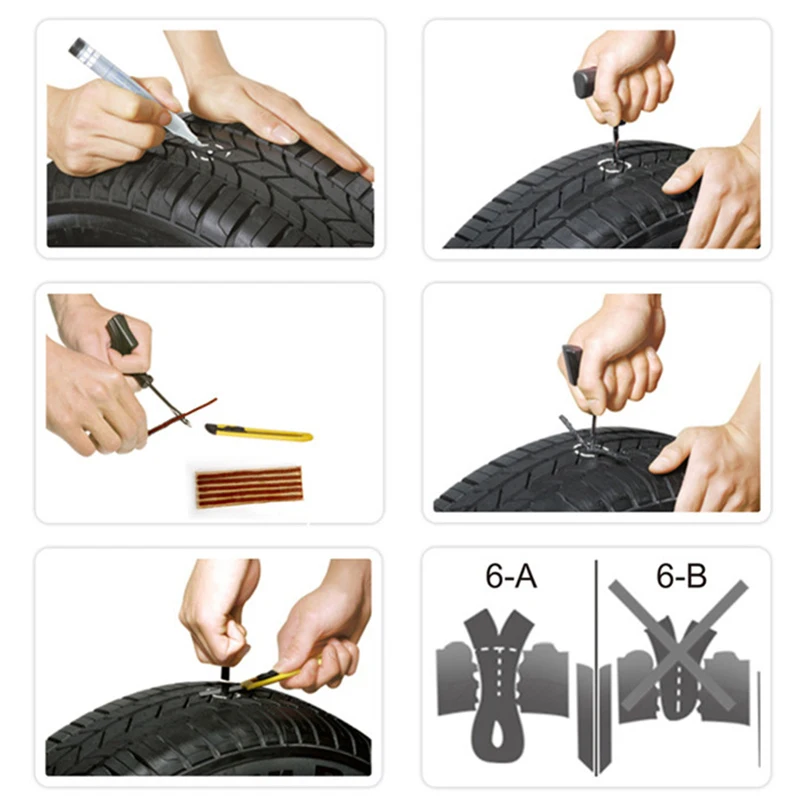 The solution might be as simple as needing one of our patch plugs if the tire puncture is addressed early on. In other cases, a leaking valve stem or valve core may need to be replaced with a new one or the TPMS sensor needs to be reprogrammed or replaced. Visit your nearest Firestone Complete Auto Care, and we'll take care of you and your vehicle tire repairs.
Schedule An appointment
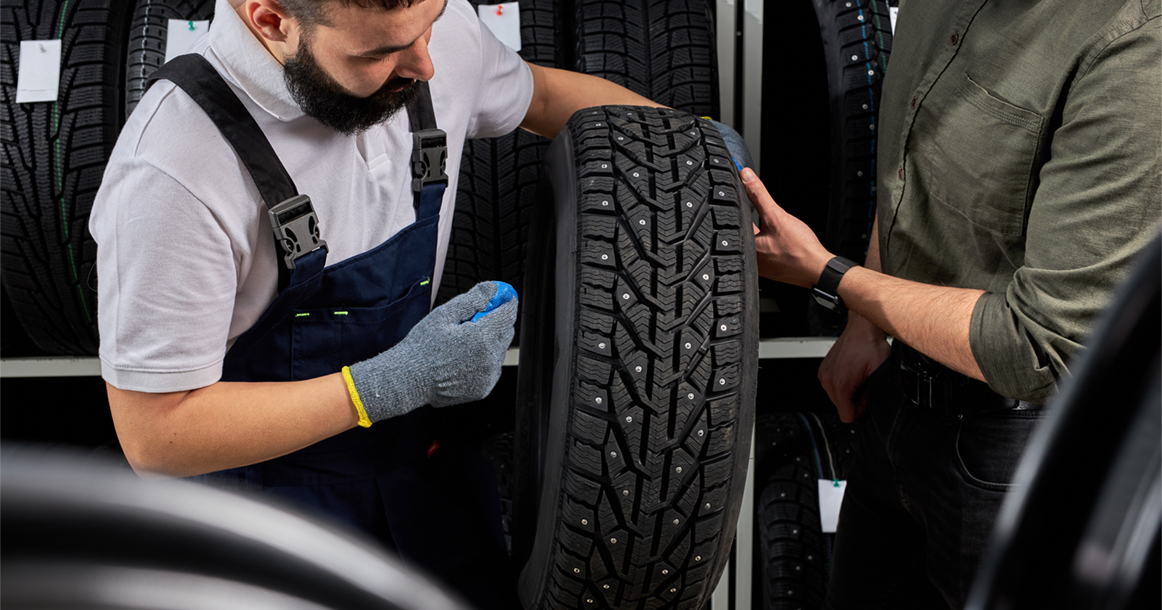
Tire Repair & Patching/Plug
If your tires still have life left in their tread and are not over 10 years old, Firestone Complete Auto Care maybe be able repair or patch & plug them to get you back on the road quickly. Keep in mind not all tire damage can be patched if the puncture is too big.
Tire Replacement
Over time, the tread on your tires wears down, leading to compromised traction on the road and potentially dangerous driving conditions. Tires generally need to be replaced every 25,000 to 50,000 miles, depending on vehicle manufacturer recommendations and driving habits.
Tire Rotations & Balancing
When you have your tires rotated, you help increase the life of your tires by helping reduce uneven wear. Most vehicle manufacturers recommend a tire rotation about every 5,000 miles or at the manufacturer-recommended mileage. Tire balancing helps ensure weight is evenly distributed around your tires. It's necessary about every 5,000 miles or as recommended by your manufacturer. Balancing can lead to a smoother ride, less tire wear, and reduced strain on the drivetrain. When you think tire balancing, think safe, smooth, and efficient driving.
Wheel Alignments
It's best to have your alignment checked every 6,000 miles or twice a year. Even one misaligned wheel can cause the steering wheel to be off center and can lead to premature wear and tear on your vehicle over time. Keeping everything properly aligned ensures a smoother ride for you and a longer life for your tires.
Flat Repair
A flat or leaking tire can leave you stranded on the side of the road or lead to a situation where you lose control while driving. Take care of flat or leaking tires as early as possible to extend tire lifespan and ensure your tire doesn't leave you stranded.
Schedule An Appointment
All fields are required
Engine
Zip Code Entry Why?
Flat tires rarely happen at ideal times. Let Firestone Complete Auto Care help you with these answers to frequently asked flat tire questions.
To ensure a safe drive that doesn’t damage your rims or create more expensive repairs, change your flat tire with your spare tire before coming into your local Firestone Complete Auto Care center for flat tire repair.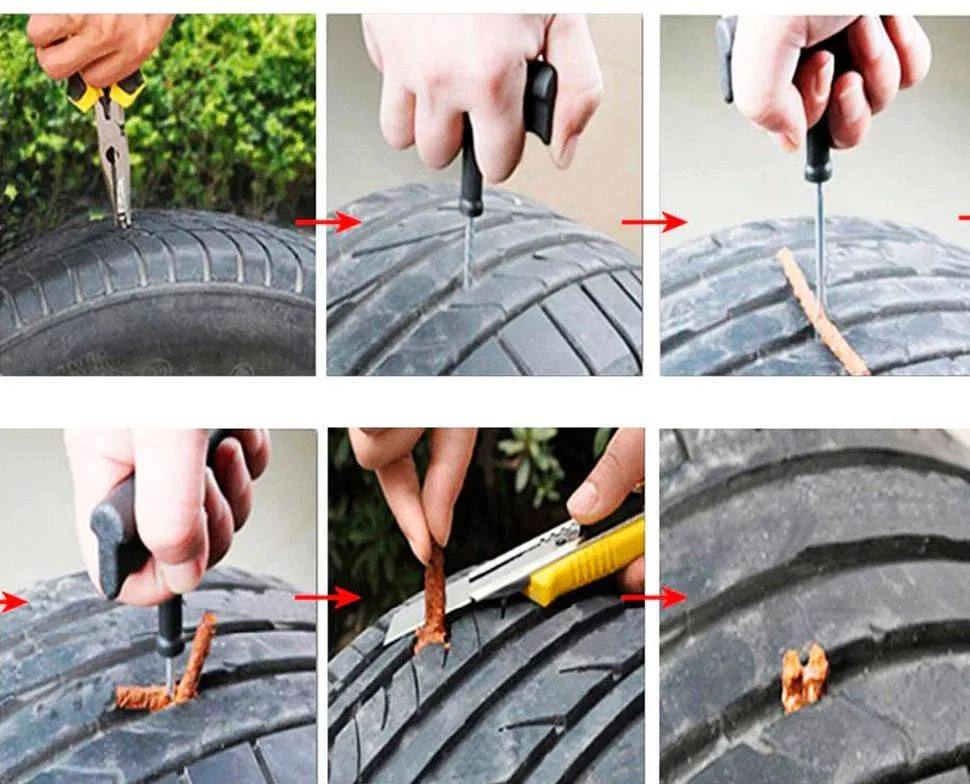
It’s tempting to replace just the tire that's damaged, but replacing one tire at a time can present challenges down the road since the one tire will have a different tread depth and thus different accelerating, braking, and cornering abilities than all of the others.
Few things are more inconvenient than a flat tire —except back-to-back flat tires. Learn the reasons why you keep getting flat tires and what you can do to help prevent flat tires from deflating your spirits!
If your vehicle hits a pothole in the road, you may experience steering and suspension system misalignment and/or damage, tire punctures, bent rims, and more. When your vehicle experiences a sudden jolt from a pothole run-in, timely inspection is highly recommended.
Pothole damage may not be obvious right away, but it can wreak havoc on your entire car if it’s not addressed quickly and fixed right the first time.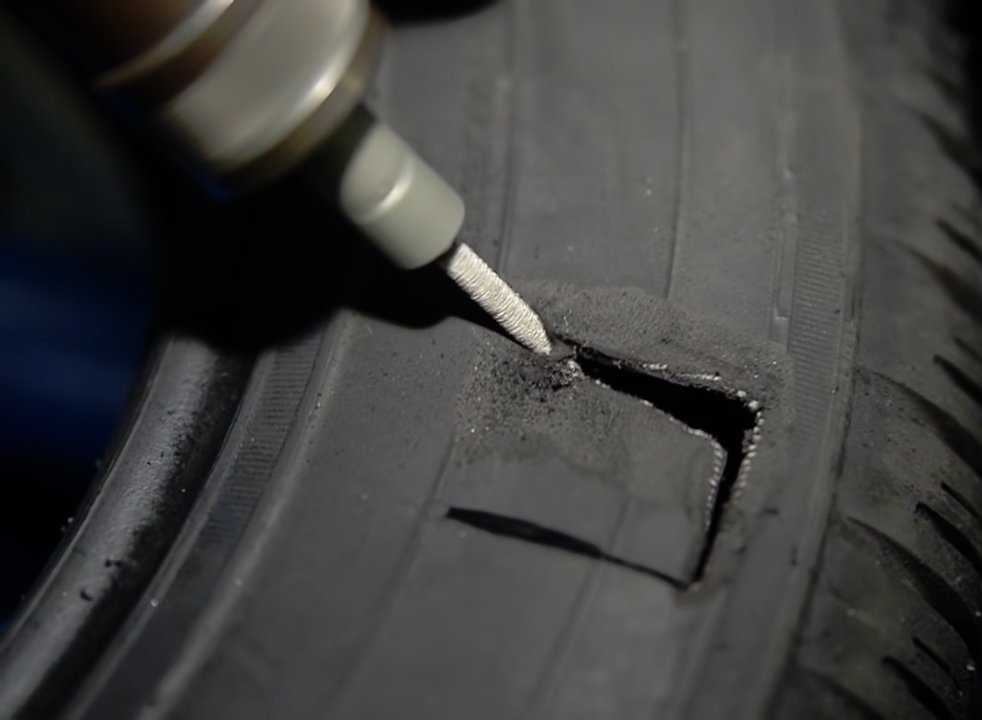 If you've had a recent run-in with a pothole, head to your local Firestone Complete Auto Care for a Complete Vehicle Inspection to check for any issues.
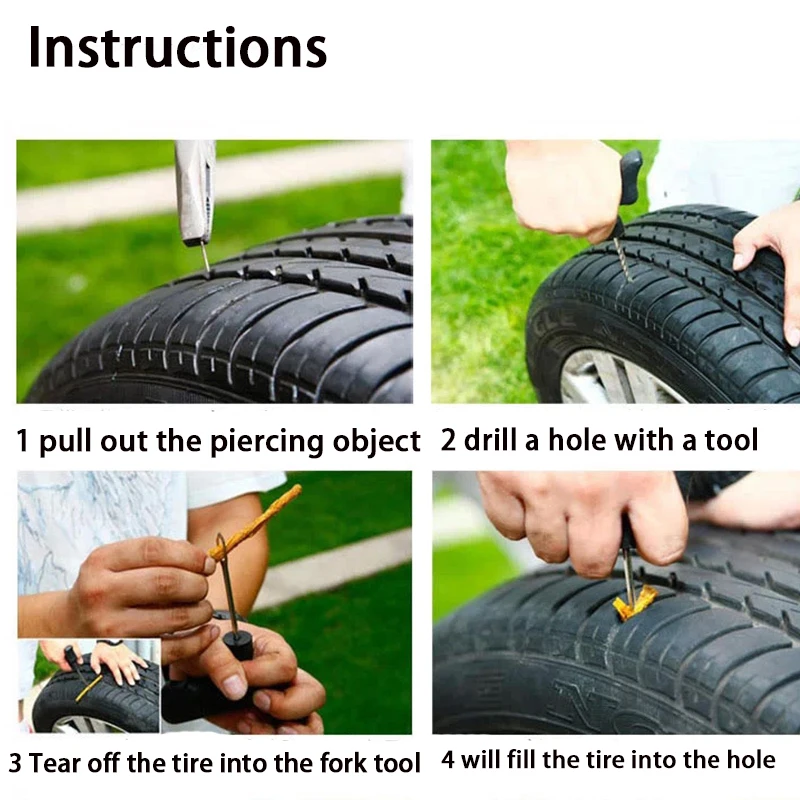
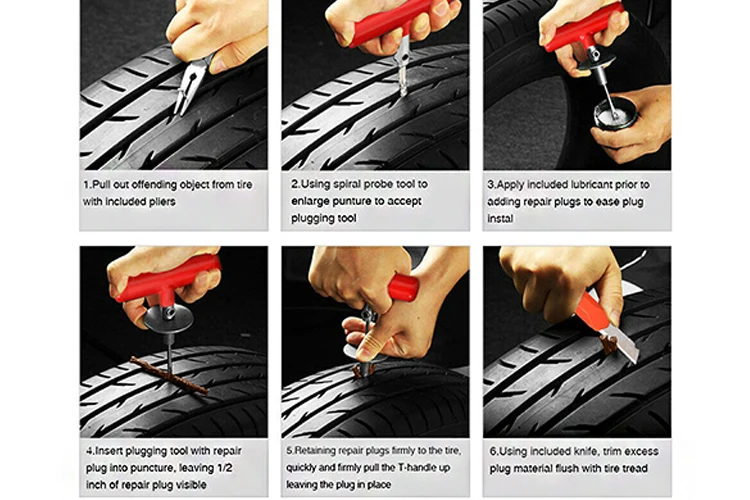
A tire plug is a quick fix for a tire that's leaking air from a nail or similar object that has punctured the tire. A tire plug fills the hole of the tire but is not reliable without a tire patch and not recommended to use alone. A patch is applied to the inside of the tire to further prevent an air leak and helps hold the plug in place. This allows a tire with ample useful life left in it to hold air reliably and keep you on the road for longer.
Run flat tires allow you to drive on a flat tire for a limited time with lesser risk than non-run flat tires. A Run Flat tire could be repaired if a nail or object is caught before tire damage occurs. However, if the tire is permanently damaged, it is required to replace a Run Flat tire with a new one.
The Tire Pressure Monitoring System light will illuminate if tire pressure is too low or part of the TPMS system has malfunctioned. Important TPMS warning light behavior:
Looking for the closest flat tire repair shop? Come to Firestone Complete Auto Care for a tire plug & patch or other tire repair service today!
Read More
Regular tire rotations can help prevent uneven tread wear and help your tires last longer. Schedule a tire rotation appointment at a Firestone Complete Auto Care near you today.
Read More
Knowing when to replace tires is as easy as measuring tire tread depth. Learn more about this important measurement and visit Firestone Complete Auto Care!
Read More
Tires
Nov 14, 2022
Need a fresh set of winter tires but don’t know what to look for? We have you covered. Read on to learn about tread patterns, tire compounds, ratings, and more!
Read More
Tires
Sep 19, 2022
What is backspacing in wheels? What about offset? Are they the same or completely separate things? Firestone has the answers you're looking for.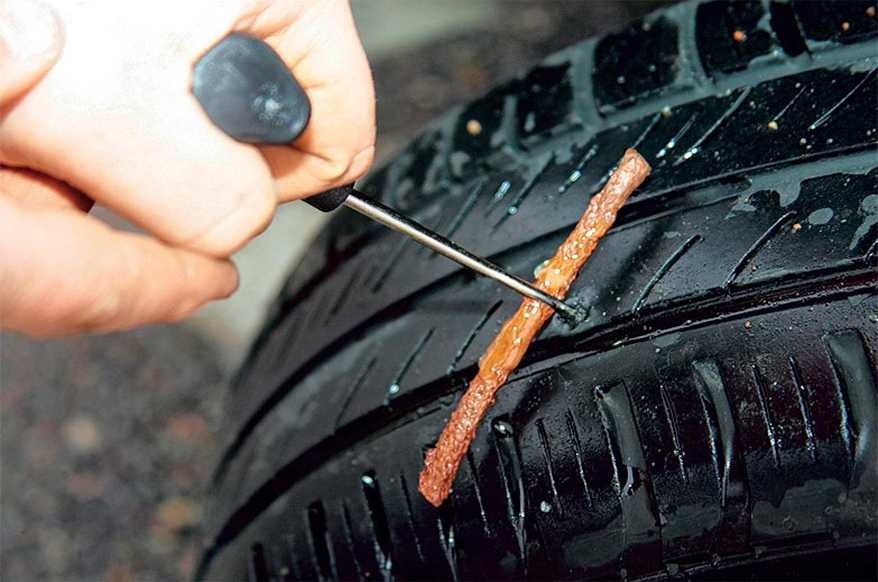 Learn more.
Read More
Tires
Aug 19, 2022
What are the symptoms of unbalanced tires, and do yours need balancing? Learn everything you need to know about this often-overlooked aspect of car maintenance.
Read More
LOAD 3 MORE
SHOWING 6 OF 12
View More Articles
{{storeNumber}}
{{storeName}}
{{link-icon "Call Us" mobileCallLink null "call-cta"}} {{link-icon "Directions" directions "_blank" "directions-cta"}}
{{address}}
{{city}}, {{state}} {{zip}}
{{#if activeFlag}} {{#ifCond mystore "or" myPreferredStore}} {{#ifCond storeType 'eq' "TPL"}}
*Call store for appointment {{phone}}
{{else}} {{#if onlineAppointmentActiveFlag }}
{{#if myPreferredStore}}
{{else}}
*Call store for appointment {{phone}}
{{/if}} {{/ifCond}} {{else}} {{#ifCond storeType 'eq' "TPL"}}
*Call store for appointment {{phone}}
{{else}}
Schedule Appointment {{#if onlineAppointmentActiveFlag}} {{else}}
*Call store for appointment {{phone}}
{{/if}}
{{/ifCond}} {{/ifCond}} {{else}}
*Temporarily Closed Due To: {{temporarilyClosedReason}}
{{/if}} {{#if isMilitaryStore}}
*This location is on an active US military base. You may need military ID to access the location.
{{/if}}
{{#ifCond count 'eq' "3"}} Show More Stores {{/ifCond}}
915 South Kirkwood Road
Kirkwood, MO 63122
(314) 965-1207
Monday 7:30am - 6:00pm
Tuesday 7:30am - 6:00pm
Wednesday 7:30am - 6:00pm
Thursday 7:30am - 6:00pm
Friday 7:30am - 6:00pm
Saturday 7:30am - 4:30pm
Sunday Closed
Schedule an Appointment
Get Directions
Plaza Tire Service offers a complete array of routine maintenance services.
Skip link
With the biggest selection, the best service and the lowest prices, Plaza Tire Service is your source for the best deal on tires. We have tires in stock and ready to install for most cars, trucks, SUVs and crossovers. No appointment is required for a tire purchase, and our goal is always to get our customers back on the road quickly with our 4 Tires 1 Hour guarantee. If you're looking for other types of service for your vehicle, Plaza Tire Service offers a broad range of maintenance services, including oil changes, brakes, suspension repairs, transmission flushes, cooling system flushes and more.
According to history, one day in 1888, an English veterinarian and cyclist, John Dunlop, tired of shaking through the countryside of Britain on molded rubber tires, glued a piece of water hose with a ring and pumped it up with a football pump - this is how the first pneumatic tire appeared.
History is silent when it was pierced for the first time - but most likely it happened in the same year.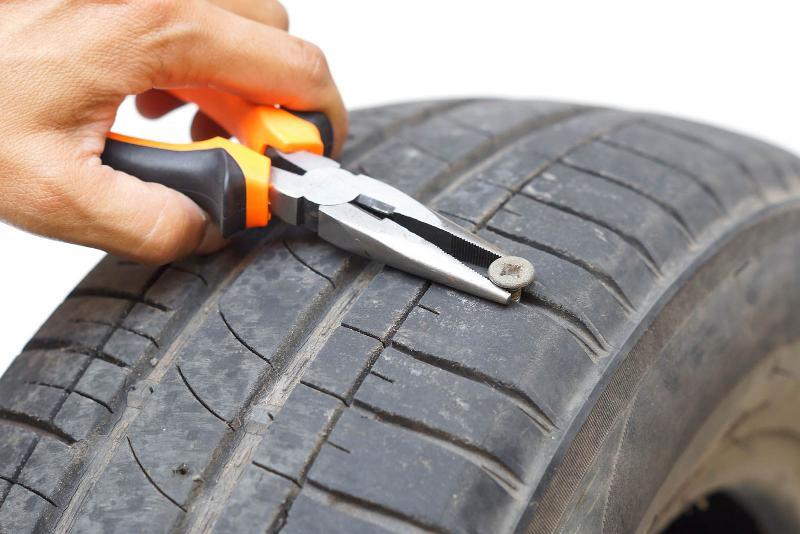 So the need for tire repair appeared simultaneously with their appearance.
Over the past 124 years, tire repair technology has been brought to almost perfection. For several decades (after tubeless tires in the vast majority have given way to tubeless ones), the procedure for repair has practically not changed.
This procedure is outwardly quite simple - and car owners (as well as part of the workshop workers offering this service) have the false impression that it is not particularly important to follow the prescribed technology exactly - they say, "it will do." And many "specialists" do not really know the technology. And therefore they sincerely believe: why do we need all sorts of "extra" actions? Why take the tire off the rim when you can keep the wheel off the car at all? The client is in a hurry - so you can plug a puncture (and a cut) with a cord, as they say, “on the go”. Does not poison the air, and everyone is happy. By the way, some workshops that promise “repair of punctures and cuts” do not have anything at all, except for cords and an awl for their installation.
In fact, each stage of tire repair technology is, as they say, "written in blood" - like military regulations and safety instructions. And this is not an exaggeration: what threatens a sudden rupture of a wheel at speed is not worth saying - if people do not die, then they are very lucky ...
We asked our expert, one of the heads of the Russian representative office of the German company "REMA TIP-TOP GmbH" Alexander Akhapkin, to talk about tire repair technology and those common mistakes (or even outright hack work) that car owners have to face.
- Tire repair, in general, comes down to a simple and understandable action: you need to plug the resulting "hole" in it. It sounds simple - like the instructions for skydiving: stepped out of the plane and pulled the ring. Only now, no one jumps with a homemade parachute, especially one packed according to rumors and advice from neighbors. Although the consequences of such a jump and improper tire repair are quite comparable.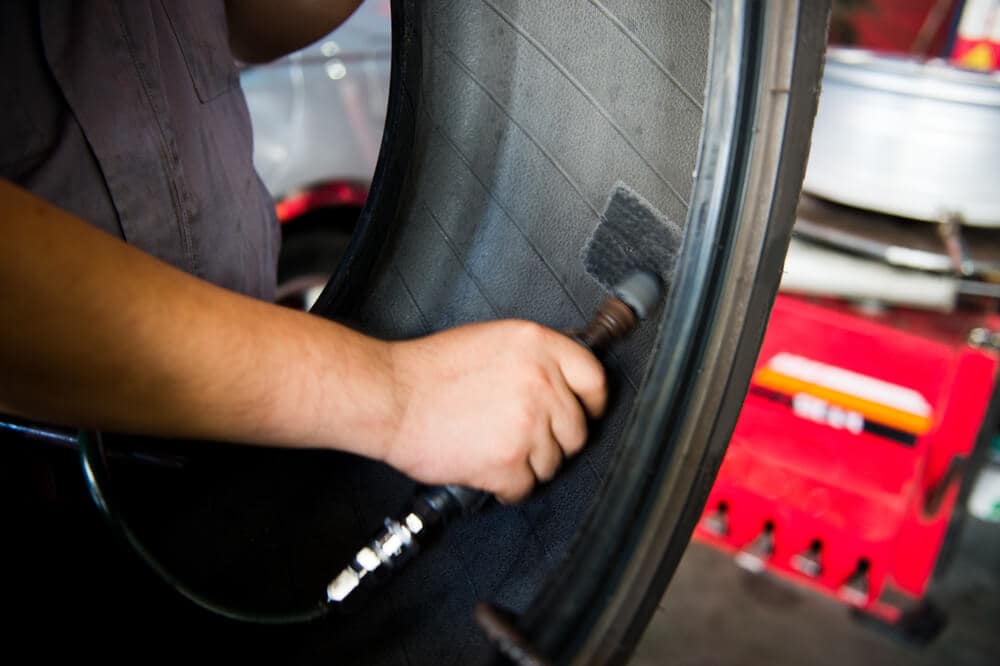
So let's go in order: how to do it!
So, the first step: determine the type of damage - is it a puncture or a cut?
The difference, of course, is in size. Roughly speaking, if no more than 1-2 cord threads are damaged, then this is a puncture. Anything more is a cut.
If it is a cut, it is important to determine its size. Tires have speed categories - and the higher it is, the smaller the amount of damage that can be repaired. For example, it is allowed to repair the tread of a category Q tire (not higher than 160 km/h) if the damage is not more than 20 mm. If the tire category is S (up to 180 km / h), then the size of the permissible damage is not more than 12 mm. And on a category H tire (up to 210 km / h), only a puncture with a diameter of not more than 3 mm can be repaired.
In general, damage limits depending on their location, size and speed category of the tire are given in special tables RemaTipTop, compiled according to the results of tests and tests.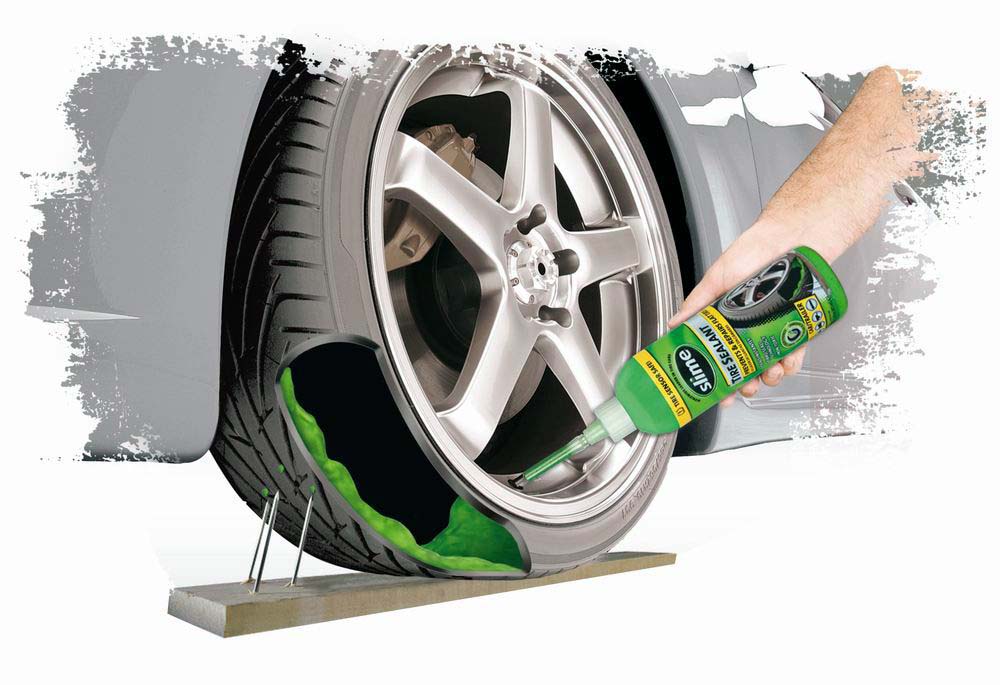
For example, regarding damage to the shoulder of a category Q tire (up to 160 km/h), repairs are allowed if the “injury” does not exceed a diameter of 8 mm. And damage to the sidewall can be repaired if it is no more than 35 mm long (along the side height) and up to 20 mm wide.
Second step: what kind of repair is needed? To get there - or capital? The fact is that the most common repair of a puncture with a cord is actually exclusively temporary - just to get to the station and overhaul the tire. And often the car owner asks to fix an expensive tire with a cord, which he puts on an expensive car - and stops there. And at the stations they “go forward” to him: they say, the consequences are at the expense of the customer ...
But even with such a repair, some "masters" manage to cheat. The cord, before placing it in the puncture, is not even smeared with glue. There is a category of cords made of "raw" rubber (they are also called "snotty"). And it is mistakenly believed that glue is not needed for them. No - it's a must!
In addition, when repairing with a cord, it is necessary to form a hole with a burr to enter the repair material. And this is very often not done (on the principle - and so it will do!). For ten kilometers, maybe it will “get off” ...
Step three: puncture overhaul, after which the tire will reach its physical wear.
Fungi are installed at "vertical" puncturesHere the choice of repair tactics depends on the location and area of damage. If the puncture axis runs perpendicular to the tread surface, then it is preferable to seal it with a fungus. If the puncture axis runs at an angle of more than 12 degrees from the surface, then a plug must be used.
Tire repair fungus is preferred, but if the puncture is at an angle, the fungus head will not be able to fit snugly against the inside of the tire. And over time it can come off - which, of course, is unacceptable.
In principle, all actions of the wizard when using both fungus and cork are the same.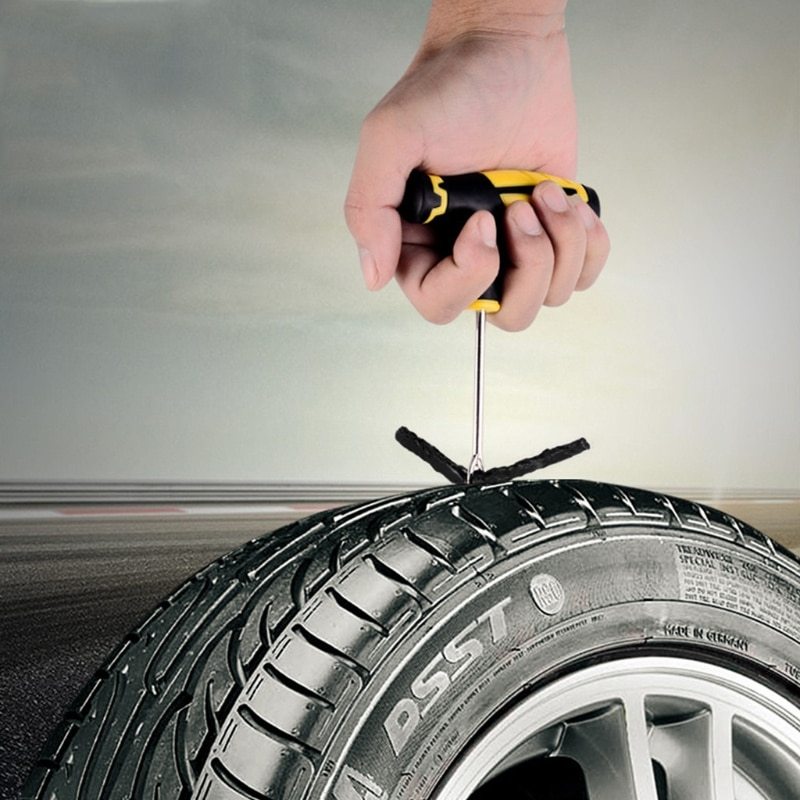 The puncture is drilled with a burr with a diameter of 3 mm or 6 mm. The repair area from the inside of the tire is processed with a roughening tool - this is done so that the glue applied to the fungus cap or patch (if cork is used) firmly adheres to the surface of the tire.
But this is followed by an outwardly simple but obligatory operation - the dust formed after drilling and roughening is carefully removed with a brass or coconut brush, and then vacuumed. Moreover, simple “blowing” or brushing with a rag is unacceptable!
Processing with a special solution - required! Then the repair area is smeared with glue (the Germans call it "cement" - that's what it says on the containers with it. In fact, this is a high-tech adhesive system) and a fungus or cork is introduced into the hole - from the inside of the tire! Moreover, until the moment of installation, it is impossible to remove the packaging from the fungus or cork - it can be easily removed when they are introduced into the hole to be sealed. After installing the cork, its excess is cut off - and the repair area is smeared with glue. A patch is applied on top.
Next, the fungus cap or plaster is rolled on. And it remains only to cut off the excess fungal stem or cork from the outside of the tire.
It is very important to use materials from only one company for temporary repairs with a cord and a major fungus or plug! The fact is that the adhesives themselves are spilled: there are those produced on the basis of hydrocarbons, and there are those based on trichlorethylene. In addition, adhesives from different companies, even on the same basis, differ in composition. And therefore, in case of confusion, a reliable connection will not work - at best, it will last for some time. But - a little time ...
Fourth step: overhaul of large damage. Let me remind you that damage that exceeds a puncture, but does not exceed the maximum allowable, is considered large. With such damage, the tire is only scrapped - it is no longer possible to achieve the necessary reliability.
The technology of such a repair is simple - but there are no "extra" steps and steps in it. Outside, the place of damage is cut "under the funnel" - part of the damaged rubber is removed, the remains of the cord. From the inside, the place under the patch sticker must be roughened.
The plaster is a high-tech articleThen the dust must be carefully removed after processing with a vacuum cleaner - and this operation must not be skipped!
Next, the “funnel” is treated with a special solution: in the case of using the “Tip Top” technology, this is “MTRThermopress”.
And filled with raw rubber of the same brand as on the tire - heated strips or a special extruder. Raw rubber is treated with the same solution. And immediately closed with insulating foil for subsequent vulcanization.
Please note - do not skip a double treatment with mortar, nor cover the vulcanization site with foil!
A plaster is applied from the inside of the tire to the damaged area. And be sure to roll with a special rolling - this stage also cannot be skipped.
Something about Band-Aids: Don't try to save money by replacing your branded Band-Aid with the first piece of rubber you find! In fact, a patch is a rather complex rubber product reinforced with synthetic or steel threads that coincide with the direction of the tire cord threads.
Patches are produced separately for bias and radial tires. For their correct orientation (it is very important!) Arrows are applied on each of them, which are directed to the sides. You cannot cut the patch "to size" - it cannot be cut at all due to the complex internal construction of the cords. Companies produce several sizes of patches - and you need to choose from them using the Type Top damage table.
There are also inexpensive vulcanizers - for example "Junior" Naturally, the use of patches and adhesives with which they are glued, produced by different companies, is unacceptable - “cement” is applied to the surface of the patch, which needs to be smeared on the surface from the inside of the tire: only in this case the connection will be reliable and durable.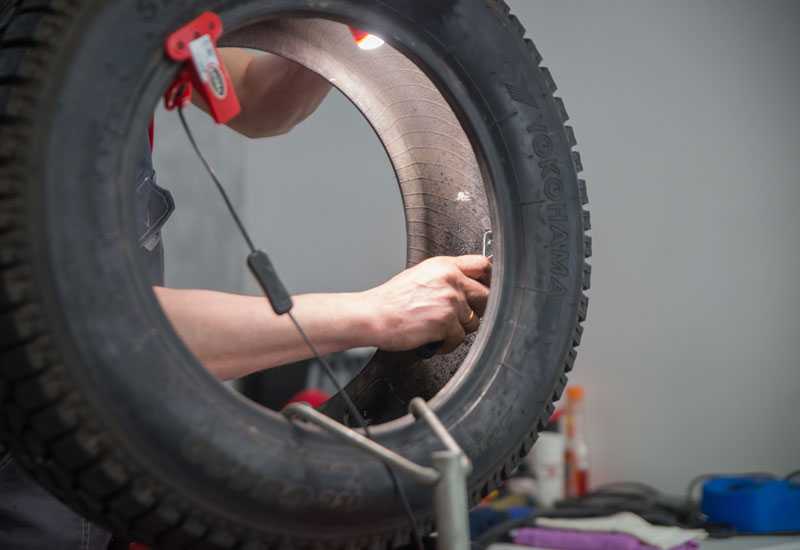
Step five: vulcanization. In order to vulcanize a “sandwich” of raw rubber, a tire and a plaster, it must be heated. But the problem is that vulcanizers, whose power allows you to warm up the entire volume of the repaired area, are expensive and consume a lot of electricity. In addition, they are bulky - the area of \u200b\u200bthe heating plate must exceed the size of any patch. So not every workshop can afford such a vulcanizer.
There is another solution - the so-called "two-stage" repair method. This is when a vulcanizer that is more affordable and consumes less electricity is only the site of damage. Its size is not enough to vulcanize the connection of the patch and the tire.
But it's okay - there is an effect called "cold vulcanization". Glue BL and the coating of the plaster from Tip Top are just capable of such a "cold" vulcanization.
However, if after a one-stage - “hot” - vulcanization, the tire can be mounted on wheels and installed on a car, then after a two-stage one (when only raw rubber warms up, and the patch is glued “cold”), you will have to wait at least 24 hours before mounting.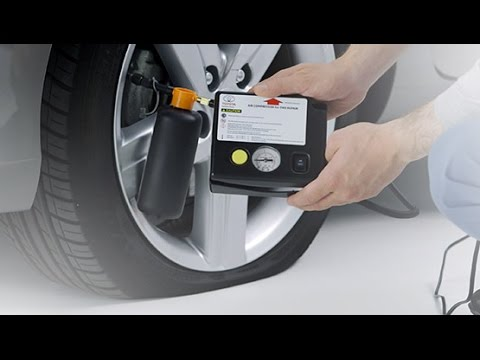 It is these days that constitute the second stage - the time is required for the cold polymerization of the connecting layer to be completed.
So, to summarize, the “main secret of tire repair” is not in some particularly complex nuances of the technology - it is simple. The secret is in the accuracy and meticulousness of following simple instructions. In which, I repeat, there are no “extra” stages
tire service
| 1. Inspect the tire completely, inside and out, to determine its maintainability. The area to be inspected must have good lighting inside and outside the tire. | 2. If the damage is in the non-repairable zone A-B, then the tire cannot be repaired. | 3. Mark chalk damage on the inside and outside of the tire. | 4. Remove damage object. |
5. To determine the size of the damage and possible delamination, examine the damage using a spiral Awl Tech #915 outside and inside the tire. To determine the size of the damage and possible delamination, examine the damage using a spiral Awl Tech #915 outside and inside the tire. | 6. From inside the tire, measure the area cord damage and refer to the BP Limitations Chart to determine maintainability. | 7. If the tire is repairable, process damage site using Tech Rub-O-Matic No. 704 degreaser. | 8. Currently under repair area is still damp, remove dirt with scraper TESN No. 933. |
| 9. Using low speed drill (max 5000 rpm) No. S-1036, and spherical knife No. S-2045, S2046, remove the rubber in the damaged area. Attention: During the uninstallation process rubber in the area of damage, it is important not to damage the entire cord. | 10. Using TECH knife nos. 940, 941 remove all damaged material from the damaged area tires. Attention: it is important not to damage the whole cords. Using TECH knife nos. 940, 941 remove all damaged material from the damaged area tires. Attention: it is important not to damage the whole cords. | 11. Using abrasive pencil ( No. RH - 625 ) and a low speed drill, remove all irregularities along the edges of the damage. This will prevent the damage from growing after the repair. | 12. Slightly groove the tread for good grip on wet rubber, using a slow speed drill and an RH-625 abrasive pencil. |
| 13. Treat the damaged area at an angle of 45° to the tread plane to give it the shape of a funnel. Take advantage abrasive ring No. RH-300, RH-308 and a low-speed drill. | 14. Same abrasive ring slightly clean the rubber around the perimeter of the damaged area at a distance of up to 40mm. | 15. Using an abrasive hemisphere No. RH-106 and a low-speed drill, clean out the damage from the inside of the tire. | 16. Measure the depth of damage at the thinnest point. Mark it on the tire. |
| 17. Do not measure overall cut damage, measure only the size of the through damage. Determine the tire ply rating. | 18. guided by the BP Chart. | 19. Write the size of the selected patch on the tire. | 20. Outside and inside vacuum cleaner clean the repaired surface from crumb rubber. |
21. For correct placement tires in the vulcanizer, mark the damage with two perpendicular lines, intersecting at the center of the injury. For correct placement tires in the vulcanizer, mark the damage with two perpendicular lines, intersecting at the center of the injury. | 22. Treat repair area outside and inside the tire using TECH Rub-O-Matic No. 704 degreaser and lint-free fabric. Let the surface dry completely. | 23. Apply cement Tech #760 or TECH Temvulc #1082 over the entire sanded area and let dry 3-5 min. | 24. On the inside of the tire apply a blank of raw rubber TESN No. 850 with overlapping of the edges of the damage by 25mm. |
| 25. Cut into several strips raw rubber TESN No. 850 and heat them up to a temperature of 49-55 ° C. | 26. Press the workpiece with your finger to the tire.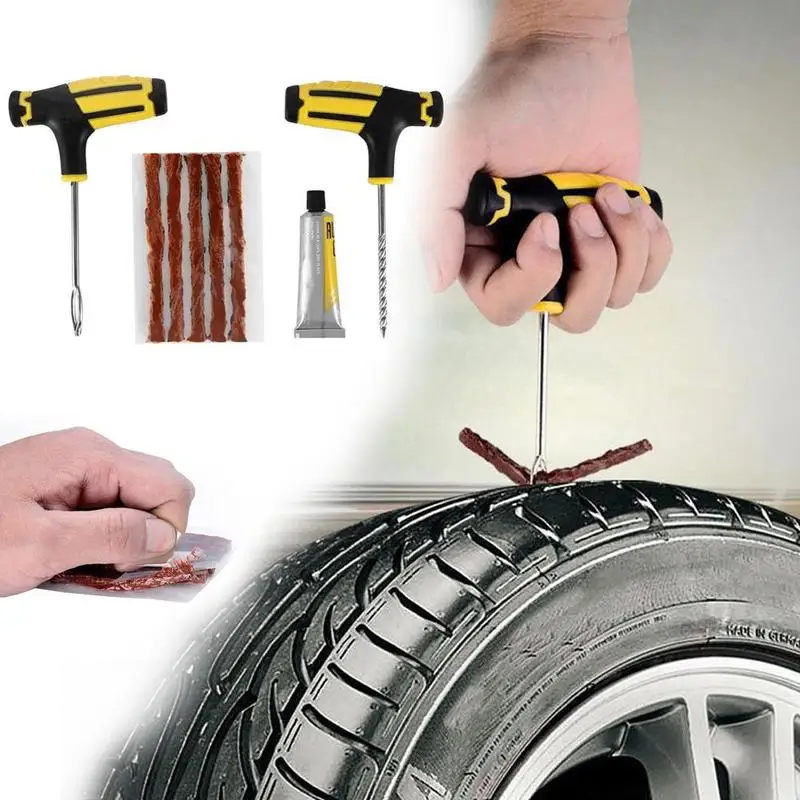 | 27. Roll the workpiece using rolling TESN No. 936. | 28. On the outside of the tire, put fabric threads inside the damage, fixing their ends at a distance at least 75mm from the edges of the damage. |
| 29. awl TESN No. 986 fill the damage with prepared strips of raw rubber, evenly laying strip after strip, without allowing air to enter between layers. | 30. Complete filling process damage with the help of rolling TESN No. 936. | 31. strips of raw rubber so that it protrudes from the outer surface of the tire by 3-6mm. | 32. Tread grooves adjacent to the welding zone, fill with rubber inserts to prevent leakage they contain raw rubber when vulcanized. |
| 33. Remove the protective film from blanks. | 34. Determine the time required for vulcanization of damage, at the rate of 10 minutes for each 3mm of thickness rubber, preheating the vulcanizer to operating temperature. | 35. Place the tire in the vulcanizer. | 36. Attach air clamps vulcanizer to the air line with a pressure of not more than 35 p.s.i. At using a manual (not pneumatic) vulcanizer, it is necessary to tighten clamp every 5-10 minutes. |
| 37. After curing remove the vulcanizer and allow the tire to cool. | 38. Guided by markings apply the pre-selected plaster and mark the stripping area by 25mm larger than the patch. Guided by markings apply the pre-selected plaster and mark the stripping area by 25mm larger than the patch. | 39. Pre-treat marked area using Tech Rub-O-Matic No. 704 degreaser. | 40. While the surface is still damp, remove dirt with a TESN #933 scraper. |
| 41. Using low speed drill (max 5000 rpm) and abrasive hemisphere RH-106, roughen the marked area, removing all irregularities. (Be sure to use protective goggles). | 42. Use a vacuum cleaner to remove the rubber crumb. | 43. Treat marked area using Tech Rub -O-Matic #704 degreaser from center to edges. Give dry for 3-4 minutes. | 44. Apply #760 cement all over surface of the treated area. Let dry for 3-5 minutes. (At repeat twice for tube tires.) Let dry for 3-5 minutes. (At repeat twice for tube tires.) |
| 45. Peel off the blue protective film from the selected patch, leaving it around the edges. It is important not to touch the gray layer by hand. | 46. Center the patch damage, guided by the markup. Warning: arrow on patch should point towards the tire rim. Press the patch against treated surface. | 47. roll the patch over the entire surface from the center to the edges. | 48. Remove the entire blue protective film and roll the edges of the patch. |
49. Remove the transparent protective film from the surface of the patch.  |