Repairing your ATV tire is simple. Your ATV tires are prone to rips, punctures, and holes after being constantly attacked by rough surfaces. An ATV tire is an expensive part that owners might need to replace often. But there is a way to patch them instead.
Similar to normal car tires, ATV tires can be patched. They could even last long before they need to be replaced. Ideal for those that want to save money, plus you can do it yourself at home.
Patches may last a while, but they are not a permanent fix. The harsher terrain your ATV is exposed to, the likelihood the patch will end up breaking and then you will need a new tire.
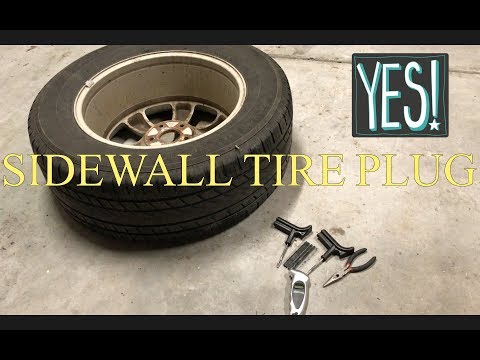
When repairing your tire, it’s not uncommon to patch it. Patching is the process of fixing holes inside of the tire or splits from the sidewall. Plugging is from the outside of the tire and is better for smaller or sharp punctures which needles, nails, and screws cause. It is much easier to plug your ATV tire than patching, providing you have a plug kit.
When dealing with tubeless tires, it is simple to repair from the outside using a patch. Keeping the wheel on your ATV, you need a tire repair kit and CO2 cartridges.
Tire repair kits include tire reamers, tire pluggers, plug strings and rubber cement.
To use the ATV tire repair kit on big holes, you need to find the hole and remove any objects that pierce the tire. Be wary of sharp rocks.
Push the tire reamer in the big hole and move it up and down your ATV tire. This prepares it for the plug by cleaning and abrading the hole.
Thread a single plug string into the tire plugger, covering the ATV tire with rubber cement. Make sure to centrally align the plug ring inside the eye of the tire plugger.
Push in the plugger and plug string two thirds into the hole, without twisting.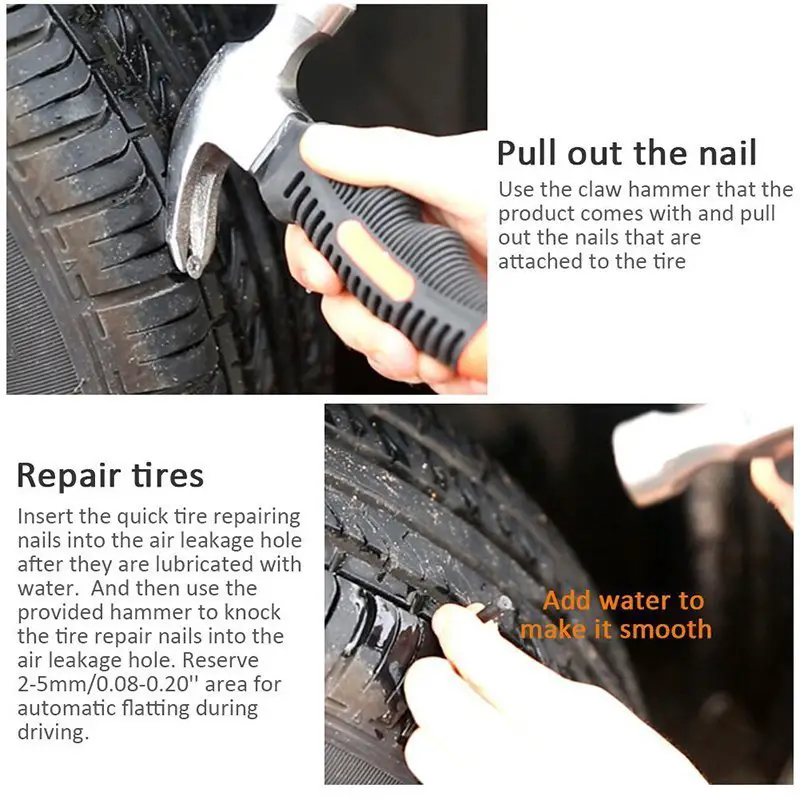
Pulling out the plugger quickly you will see the plug strings are now on the ATV tire and are plugging the hole.
Remove any additional plug material using scissors or a knife.
Use your CO2 cartridges to refill the tire. Once pressurized, use some water to pour on the plug to see if there are any air bubbles. If the bubbles are present, add additional cement on top of the plug for sealing. If you do not have access to water, feel the air with your finger to check for leaks.
If this has worked, you’re ready to get back on adventuring on your ATV!
If this hasn’t worked or your hole is too big, patch the ATV tire from the inside.
Off-road are the core piece of riding gear for ATV & UTV riders
Find out the best look for you
Repairing your ATV tire from the inside is better, as repairs on the outside increases the chance of rubbing occurring.
Start by taking the tire off the ATV wheel. Repairing from the inside is best done at home (or at least practice at home beforehand) so you will know what to do.
Use two tire irons that have flat blades. Here you can maneuver the tire off the rim. First deflate the tire if it is not sufficiently deflated by pushing the center of the tires valve.
Push one flat blade between the ATV rim and tire.
Do the same with the other blade on the other side of the tire, directly in line with it.
Go around the rim and remove the tire away from the edge using the blade until it meets back at the other blade.
Repeat this on the other side of the tire with the other blade.
With big holes in your ATV tire, it’s important that this step is performed correctly.
An ATV tire patch kit comes with a tire marker, scuffer, rubber cement, tire patches and buffer tools.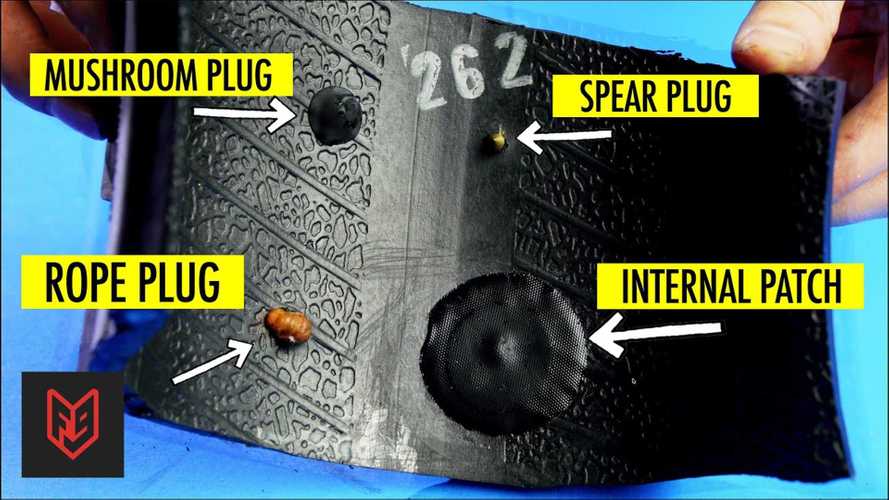
Mark the spot on the ATVs tire that needs patching by using the tire marker.
Using the scuffer, rub the marked area to prepare it for the new patch. Make sure to remove the rubber pieces if any arise from rubbing.
Use the cement to spread over the scuffed area and hold on until it becomes sticky.
Take off the label from the rear of the patch. Stick it down to the area which you scuffed and added cement to earlier.
With the buffer tool, smooth the edges of the patch and remove any air bubbles. No gaps should be between the patch and the tires surface.
Leave for the cement to dry and the patch is safely installed before putting the tire back on the rim.
Once you are confident the big hole in the tire has been repaired, re-install the tire onto the ATVs rim. This is just the opposite of taking it off the rim. Use the tire iron and lever one side on to the rim, repeat for the other side as you slide the tire back on the rim. Re inflate using CO2 cartridges and enjoy the rest of your adventure!
HIT
ENDURO LIGHT Graphite
the most durable
458 EUR
HIT
ENDURO Camogrey
the most durable
657 EUR
ENDURO Graphite
the most durable
279 EUR
HIT
ENDURO Graphite
the most durable
657 EUR
-28%
AQUAMASTER-ZIP LIGHT Camogrey
with central zipper
598 EUR
430.40 EUR
HIT
ENDURO LIGHT Camogrey
the most durable
458 EUR
-12%
AQUAMASTER LIGHT Red
reliability & comfort
438 EUR
386.20 EUR
NEODRY Black
NEOPRENE SOCKS
17 EUR
11.90 EUR
ENDURO Camogrey
the most durable
279 EUR
AQUAMASTER Blue
reliability & comfort
647 EUR
-20%
HIT
AQUAMASTER Red
reliability & comfort
259 EUR
207. 20 EUR
-40%
HIT
AQUAMASTER Orange
reliability & comfort
259 EUR
155.40 EUR
AQUAMASTER Red
reliability & comfort
677 EUR
ENDURO BF Camogrey
bootfoot waders
528 EUR
ALL SEASON Black
HIGH-ACTIVITY THERMAL UNDERWEAR
69 EUR
ENDURO BF Camogrey
bootfoot waders
329 EUR
MUDWAY Graphite
RELIABLE JACKET
179 EUR
MUDWAY Camogrey
RELIABLE JACKET
179 EUR
NEOSENSOR Camoarmy
SEMI FINGERLESS GLOVES
12 EUR
8.40 EUR
MUDWAY Red
RELIABLE JACKET
179 EUR
Explore all
Select a country
United States | Canada | Germany | Lithuania | Latvia | Estonia
Afghanistan
Albania
Algeria
Andorra
Angola
Anguilla
Antarctica
Antigua and Barbuda
Argentina
Armenia
Aruba
Australia
Austria
Azerbaijan
show more
Bahamas
Bahrain
Bangladesh
Barbados
Belarus
Belgium
Belize
Benin
Bermuda
Bhutan
Bolivia
Bosnia and Herzegowina
Botswana
Bouvet Island
Brazil
British Indian Ocean Territory
British Virgin Islands
Brunei Darussalam
Bulgaria
Burkina Faso
Burundi
show more
Cambodia
Cameroon
Canada
Cape Verde
Cayman Islands
Central African Republic
Chad
Chile
China
Christmas Island
Cocos Islands
Colombia
Comoros
Congo
Cook Islands
Costa Rica
Cote D'ivoire
Croatia
Cuba
Cyprus
Czechia
show more
Denmark
Djibouti
Dominica
Dominican Republic
East Timor
Ecuador
Egypt
El Salvador
Equatorial Guinea
Eritrea
Estonia
Ethiopia
show more
Faeroe Islands
Falkland Islands
Fiji
Finland
France
French Antarctic
French Guiana
French Polynesia
show more
Gabon
Gambia
Georgia
Germany
Ghana
Gibraltar
Greece
Greenland
Grenada
Guadeloupe
Guatemala
Guinea
Guinea-bissau
Guyana
show more
Haiti
Heard and McDonald Islands
Honduras
Hong Kong
Hungary
Iceland
India
Indonesia
Iran
Iraq
Ireland
Israel
Italy
show more
Jamaica
Japan
Jordan
Kazakhstan
Kenya
Kiribati
Korea (North)
Korea (South)
Kuwait
Kyrgyzstan
show more
Laos
Latvia
Lebanon
Lesotho
Liberia
Libya
Liechtenstein
Lithuania
Luxembourg
show more
Macau
Macedonia
Madagascar
Malawi
Malaysia
Maldives
Mali
Malta
Marshall Islands
Martinique
Mauritania
Mauritius
Mayotte
Mexico
Micronesia
Moldova
Monaco
Mongolia
Montenegro
Montserrat
Morocco
Mozambique
Myanmar
show more
Namibia
Nauru
Nepal
Netherlands
Netherlands Antilles
New Caledonia
New Zealand
Nicaragua
Niger
Nigeria
Niue
Norfolk Island
Norway
show more
Pakistan
Palau
Palestine
Panama
Papua New Guinea
Paraguay
Peru
Philippines
Pitcairn Islands
Poland
Portugal
Puerto Rico
show more
Reunion
Romania
Russia
Rwanda
Saint Helena
Saint Kitts and Nevis
Saint Lucia
Saint Vincent and the Grenadines
Saint-Pierre and Miquelon
Samoa
San Marino
Saudi Arabia
Senegal
Serbia
Seychelles
Sierra Leone
Singapore
Slovakia
Slovenia
Solomon Islands
Somalia
South African Republic
South Georgia and the South Sandwich Islands
Spain
Sri Lanka
Sudan
Suriname
Svalbard and Jan Mayen Islands
Swaziland
Sweden
Switzerland
Syria
show more
Taiwan
Tajikistan
Tanzania
Thailand
Togo
Tokelau
Tonga
Trinidad and Tobago
Tunisia
Turkey
Turkmenistan
Turks Caicos Islands
Tuvalu
show more
U. S. Virgin Islands
United States
Uganda
Ukraine
United Arab Emirates
United Kingdom
Uruguay
Uzbekistan
show more
Vanuatu
Vatican City
Venezuela
Viet Nam
Wallis and Futuna Islands
Western Sahara
Zaire
Zambia
Zimbabwe
{{#DETAIL_PAGE_URL}} {{SECTION_NAME}} {{NAME}} {{/DETAIL_PAGE_URL}}
Color: {{COLOR}}
{{#IS_SIZE}} Size: {{{SIZE}}} {{/IS_SIZE}}
Quantity:
Only {{AVAILABLE_QUANTITY}} left
{{#SHOW_DISCOUNT_PRICE}}
{{{SUM_FULL_PRICE_FORMATED}}}
{{/SHOW_DISCOUNT_PRICE}}
{{{SUM_PRICE_FORMATED}}}
{{/GIFT}} {{#GIFT}}
{{/GIFT}} {{/EMPTY_BASKET}} {{#EMPTY_BASKET}}
Your basket is empty
{{/EMPTY_BASKET}}
{{/FREE_SHIPPING}} {{#FREE_SHIPPING}}Free shipping available
{{/FREE_SHIPPING}}{{^FREE_SHIPPING}}
{{{FREE_SHIPPING_PERCENT}}}%
{{/FREE_SHIPPING}}
{{{FREE_SHIPPING_PRICE}}}
CHECKOUT {{{PRICE_FORMATED}}}
{{/EMPTY_BASKET}} {{#EMPTY_BASKET}} {{/EMPTY_BASKET}}Continue shopping
Your cart:
Your basket is empty
Photo: Mikhail Tereshchenko / TASS
adv. rbc.ru
See also
Nail, rebar or sharp stone - sometimes you can damage a tire almost from scratch. First of all, the scale of damage is important, and often rubber can still be repaired. Most often, motorists turn to tire shops for repairs in the middle of autumn or spring - just in the season of replacing summer tires with winter tires and vice versa. In order not to stand in lines, it is worth knowing exactly when to go to the tire shop and when to go to the store.
The most common "injury" to rubber is a puncture, and it can most often be repaired. Professionals in the nearest service will do it much faster, and your hands will remain clean. But if the puncture caught you in a deserted place, and there is a pump and a tire repair kit with harnesses in the trunk, you can patch up the tire yourself. Most often, when repairing the front tires, the wheel can not even be removed, it is enough to turn the steering wheel in the right direction and find the puncture site.
First, the hole is cleaned with a helical awl, the repair harness is smeared with glue and tucked into the eye of the awl, after which it is inserted into the tire hole. With a sharp movement, the tool is removed, and the tourniquet remains inside and securely clogs the hole. The tails are cut with a knife, but it is recommended to leave about 20 mm. After that, the tire can be inflated and the pressure checked.
Repair with tourniquets is not considered long-term, because after some time they dry out and begin to let air through. A more advanced puncture repair method is vulcanization. The hole is sealed with an elastic patch, and the funnel at the puncture site is filled with a special compound. A vulcanizer is put on top, which heats the patch and solders the excess.
Under service conditions, the puncture is also repaired with cord fungus. The puncture site is processed and drilled to roughen. Everything is smeared with glue, after which a fungus is introduced from the inside of the tire, its cap is rolled, and the excess legs are cut off from the outside.
Photo: PA Images / TASS
A puncture can also be repaired with sealant. Many car manufacturers with run flat tubeless tires put compressor repair kits in the car instead of a spare tire - a bottle of pressurized sealant. The car is raised on a jack, after which the sealant is pumped into the damaged wheel through the nipple. Next, you need to spin the wheel and pump it up. After repair, the car should be driven a couple of hundred meters to check the tightness of the tire. If it has not recovered, the procedure is repeated.
It happens that a self-tapping screw or a nail closes the hole in the tire, remaining inside. Do not rush to pull it out - until the pressure drops, you can safely get to the service for vulcanization. Sometimes the wheel begins to blow off a few weeks after the self-tapping screw got into it. Therefore, it is better to check tire pressure periodically, and if the pressure sensor lights up, you should at least visually inspect the tire for a nail head.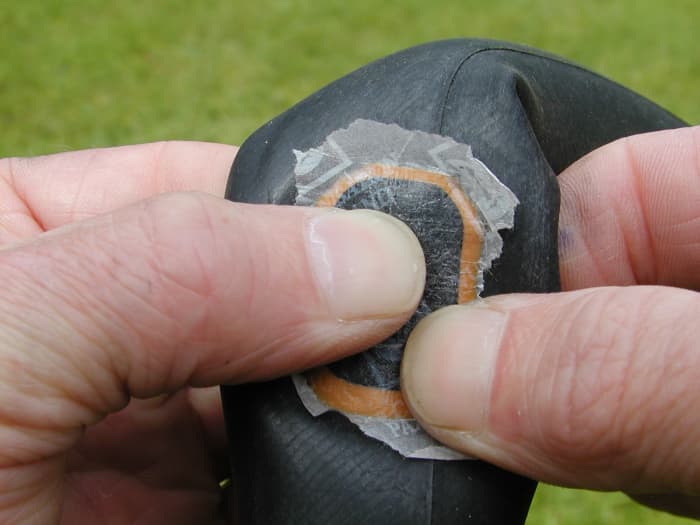
A bump or bulge most often occurs on the side of a tire after hitting an obstacle or hitting a hole at speed. From the impact, the sidewall carcass threads are damaged, the tire ceases to hold the load and pressure, swelling appears. Any small bump eventually turns into a larger one, and with such a defect, the wheel can burst at any time. This is a direct safety hazard because a sudden flat tire can cause loss of control and a road accident.
Some bulges can be repaired, but no patch will ever restore a tire to factory stiffness. The ideal option in this case is to replace the tire. If a hernia has appeared on the tread, then you can extend the life of the tire with the help of cord patches - ready-to-use patches with an adhesive layer. But if swelling is found on the sidewall, the likelihood of repair is minimal, the wheel is easier to change. Blisters on low profile tires are generally not repairable.
Only car service professionals can repair a side cut. Cord patches will be needed to repair the damage, but after some time the wheel will still have to be changed. This method will work only if the gap is not in the shoulder area of the tire, then no one will repair it.
In general, cuts or punctures, unlike punctures, are considered non-repairable, since the integrity of the frame is violated. And breakdowns do occur on the go, when the tire abruptly loses pressure and has time to make only a few turns “on the rims” before it comes to a complete stop. In this situation, the cord breaks and the layers of the tire are destroyed. Even if it is possible to close the hole, it is not recommended to use such a weakened tire.
Photo: Mikhail Pletsky / Russian Look
Cracks, sidewall abrasions and unprofessional tire fitting can also lead to tire problems. Cracks can occur as a result of improper storage of tires. Their danger is that moisture begins to flow to the cord, and this already renders the frame unusable. Air can also escape through cracks. Cracks cannot be repaired and tires will not last long. A tire with cracks is deformed, blistered, and may even break while driving.
Rubbing against curbs or driving on uneven roadsides can damage the tire sidewall. When driving like this, it is worth inspecting the tires for damage regularly. If a slight wear is found, the wheels can be swapped, which will slightly extend their service life and allow you to delay the purchase of new ones.
Improper fitting can damage the tire bead. In this case, the tire will lose its geometry and sit on a disc with a bevel, “eights” will be visible during rotation, and the driver will feel vibration while driving. It is impossible to repair this defect, the wheel must be changed as soon as possible, otherwise there is a risk of damage to the suspension.
How to Tires
October 19, 2018
In the last article, we discussed what to do when an ATV tire is punctured, but punctures and cuts are different.
Side cuts are considered the most unpleasant, as their recovery is complicated by the specific structure of the tire. The sidewalls of the tire must be elastic, as they take part of the road load.
A common puncture in the sidewall of an ATV tire is rare.
Tire sidewalls are more likely to be cut than punctured. In case of a side puncture or cut, the tire must be changed, as its reliability is significantly reduced, and it will not withstand the loads for which it is designed.
But what if you are far from civilization?
There is a method that will reliably repair a tire, but it will be a longer procedure than a simple ATV tire puncture repair.
Side cuts often occur in the mountains where there is kurumnik, since ATV tires are designed to operate at low pressure, the tire bulges very much when riding and can go under a sharp stone, which will create a side cut.
So, what is required for repair:
ATV tire side cut repair sequence: