Having the right PSI in your bike tires can make a world of difference. However, it would be an oversimplification to say that less air offers a more comfortable ride and more air makes you go faster. While this is true in many instances, the fact of the matter is that proper inflation for optimal performance depends on the individual rider and his or her bike.
Every tire has a recommended psi printed on its side close to where it touches the rim. This is usually written as a range (for instance, "90 to 115 psi") since there are reasons why you'd want to be on the higher or lower end, which we'll get into shortly.
Basic rule of thumb if your tires happen to not indicate a recommended pressure: pump them up until they're firm but still slightly squeezable. Alternatively, there are generally-accepted ranges based on bike type:
| Bike tire type | PSI range |
| Kids' bike tires | 20–40 PSI |
| Narrow tires / road bikes | 80–130 PSI |
| Medium tires / hybrid bikes | 50–70 PSI |
| Thick tires / mountain bikes | 30 PSI (off-road) 50 PSI (on-road) |
Road bikes and tires are built for speed over smooth surfaces. Higher air pressure lets them roll easier and faster. A typical range for these would be between 80 and 130 psi, although racers can sometimes go as high as 160 psi. Quick tip if you're caught inflating a road tire without a gauge and need to ballpark it: at 100 psi, a tire can barely be compressed with your thumb.
Unlike roadies, mountain bikes are flying over loose, bumpy terrain. Tires with too much air lead to too much bounce, making for a jolty ride. Lower pressure helps with shock absorption while also giving you more traction since more of the tire comes into contact with the ground. MTB manufacturers recommend between 30 and 50 psi on most of their bikes since this is a nice balance between on-road (closer to 50) and off-road (closer to 30) riding.
Hybrid bike tires require pressure levels between those of road and mountain bikes. This is usually in the 50 to 70 psi range. Kids' bikes have the lowest recommended inflation, typically 20 to 40 psi. Keep in mind that these are called "recommendations" for a reason, though. A number of factors go into the inflation process beyond just your style of bike.
Which leads us to…
Because nothing in life is ever as simple as it should be, we've included a few more things to ponder when it comes to making sure everyone's tires are in good shape for their next ride.
As a general guideline, more weight = more pressure. Whether you're competing in the Tour de Whatever or shredding up the backcountry, heavier riders should use a higher psi than lighter ones to see the same performance in their tires. For perspective, someone weighing in at 200lbs will probably want to pump in around 20 more psi than someone who's 160. There's no real slide rule for this, so just play around with the pressure and see what feels best for you. Also keep in mind that rear tires tend to carry more weight than those in front, so adjust accordingly as necessary.
We know through physics that temperature affects air pressure. So, all else being equal, people biking in Miami in August are going to have higher pressure in their tires than people biking in Boston in January. In addition to weather, sustained deceleration using rim brakes generates friction that can increase temperatures inside the tube significantly. Fortunately, they also cool off relatively quickly, but it's something to keep an eye on during long descents. It may also be worth mentioning to your burgeoning roadster as he or she is learning the basics of hand braking.
In short, don't do either. If you overinflate, you run the risk of blowing the tube either while pumping or while riding due to sudden or constant impact. If underinflated, the low pressure could cause pinch flats. This occurs when the tube becomes squeezed between the rim and tire casing by hitting a bump with an underinflated wheel.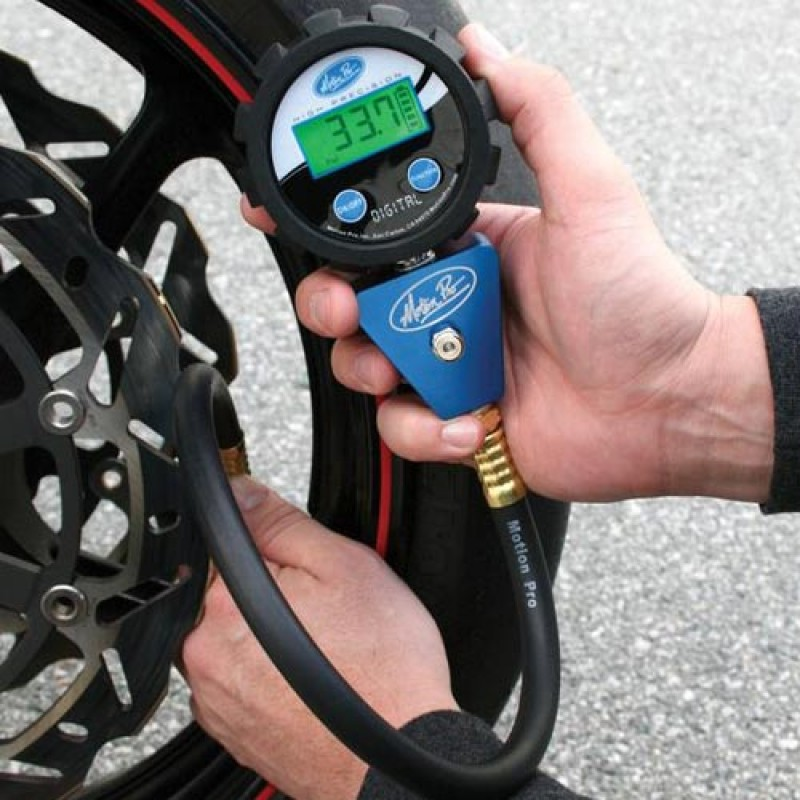 Not only does this damage the tire, it can also hurt the rim. Plus, flat tires slow you down and make you pedal harder, which is just no fun.
"How often should I inflate my tires?" is a common question among many casual bikers. The answer depends on how often and how hard you ride. Some people break out the pump every few days, others once a week, and still others even less regularly than that. Even if you or your kids have left your wheels in the garage for months, air tends to seep out slowly, anyway. Therefore, as a bike-safety best practice, just like a car it's certainly never a bad idea to check your tires before each ride. Especially if it's been a while.
The pro's choice, floor pumps do a great job. They are easier to pump and attach, and will pump your tires up much quicker than a hand pump will. Some come with gauges, which eliminate 1) the need to switch back and forth between a pump and standalone gauge, or 2) if you're really lazy, outright guesswork.
However, some expert cyclists are cautious of floor pumps with gauges, as the accuracy of the gauge can svary and may be off by as much as 10 PSI. On the plus side, if the gauge is consistent you can calculate the difference and adjust your target PSI to compensate.
It may be tempting to simply use the air compressor at your neighborhood Exxon, but these are less than accurate and can often overinflate your tires (it's a gas station, they're meant for cars). For serious riders whose circuits take them far from home, a small hand pump can help you change a flat on the fly. Carbon dioxide inflators accomplish the same thing if you're an air-in-the-can kind of guy.
Essential for any enthusiastic cyclist, hand pumps are harder work to fill the tire with, and aren't as quick. But they're transportable, so you always have your pump with you. It's simply foolish to embark on any long distance bike ride without your trusty hand pump and puncture repair kit.
So there you go, we hope this quick guide to bike PSI pressure was useful. To recap: figure out what feels most comfortable based on your particular cycling style. Go with that. Keep an eye on your pressure, and check it before every ride. You'll get a feel for it over time. Like, literally.
Here’s a riddle: Your bike has a component that costs nothing and weighs nothing. But it is essential if you want to go ride. What is it?
Well, this story’s headline probably gave away the answer. It is the air in your tires.
Depending on your experience level, you might be able to gauge your bike tire pressure with a quick pinch of the tire. Or, you might be a little surprised to hear that bike tire PSI needs to be checked far more regularly than those on your car. This how-to guide is geared toward the latter group of cyclists, beginners. But hopefully, riders of every ability level can learn a little more about the precious pressurized air that keeps us all rolling.
[button]SHOP ALL BIKES[/button]
Pneumatic tires on any vehicle are supported by pressurized air in an airtight chamber. Higher PSI (pounds per square inch) makes the tire harder. Lower PSI makes it feel softer. Bike tire pressure has a huge impact on how a bike performs. Checking your tire pressure is the simplest and most important piece of regular maintenance you can perform.
So where do you begin if you’re new to cycling and just got a road, mountain, gravel, or cyclocross bike? Conveniently, every bike tire has recommended PSI stamped into the rubber on the sidewall. (Pro tip: If you’re mounting a tire, align that pressure rating next to the valve for easy reference.)
“Recommended tire pressure is about the intended use and the best range for that use,” says tire expert Johs Huseby, WTB’s Director of Global OEM Sales and Product Vision. “You need to find the sweet spot for a tire and figure out where the high pressure doesn’t have any risk of blowing off the rim and the low pressure won’t burp or rip off the rim.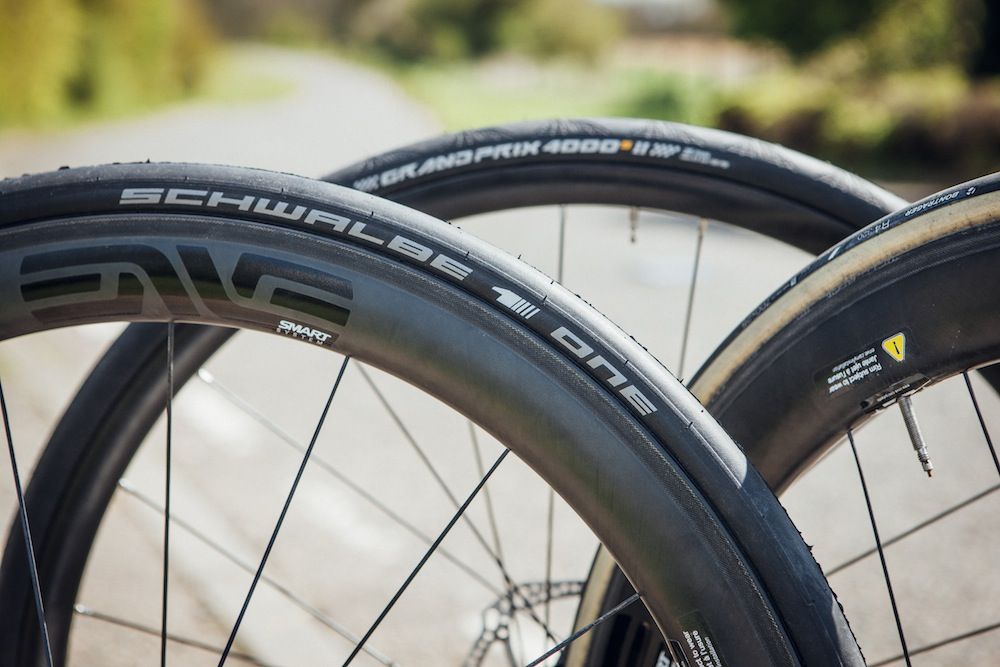 ”
”
Most mountain bike tires are rated for 25-50 PSI. Road tires are usually 80-120 PSI. Gravel tires are often 40-80 PSI. While they are a good starting point, those ranges are too broad and conservative for most riders.
| Tire type | Tire width (approximate) | Recommended tire PSI |
| Mountain bike | 2.1-2.5" | 25 PSI |
| Gravel bike | 33-42mm | 40 PSI |
| Road bike | 25-32mm | 90 PSI |
| TT or triathlon bike | 25-28mm | 100 PSI |
These pressure suggestions are based on an average-sized male rider (about 160 pounds) riding moderate terrain. Heavier riders may prefer higher pressures and lighter riders may prefer lower pressures. Read on to learn about the variables that might lead you to add more PSI or take a little out.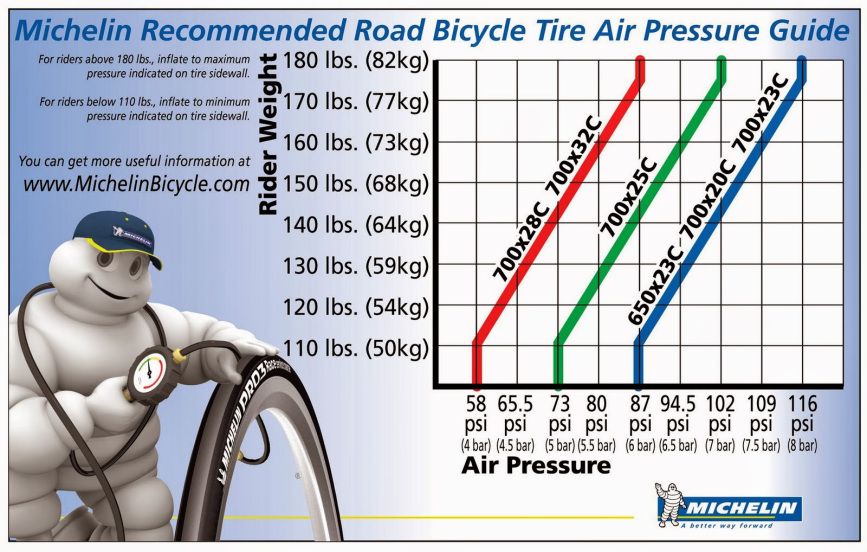
[button]SHOP PUMPS[/button]
Having an easy-to-read tire pressure gauge is key to setting up your tire pressure. A lot of pumps will have built-in gauges. There is a chance these gauges are a bit inaccurate. If you suspect yours is off, that is fine, as long as you know what to expect and are consistent in checking your tires before each ride. If you’re really concerned, try comparing it with a pump that you know will read true, like one at your local shop or an accurate digital tire pressure gauge.
Ready to start tweaking your tire pressure for optimal performance? Let’s start with the basic principles of tire pressure so you can determine the right PSI for your bike. The key considerations are tire width, rider weight, terrain, and tubeless.
Generally, narrow tires, heavier rider weight, and rougher terrain require a bit more PSI. On the other hand, wider tires, lighter riders, smoother terrain, and a tubeless set-up make for lower tire pressure. Here’s why.
[newsletter]
All tires require a certain amount of air pressure to prevent them from bottoming out on the rim. Wider tires have more air volume. This makes it possible to ride them at lower pressures for more comfort and traction. Conversely, a narrower tire, like a 28mm road tire has comparatively much less volume so it needs more air pressure to prevent bottoming out. If you have a 2.5” enduro tire on your mountain bike, you’ll be able to ride at pressures close to 20 PSI. Rolling out on the road bike with 28mm slicks? Anything less than 80 PSI would be risky.
You don’t have to be a physics Ph.D. to understand how your body weight interacts with tire pressure (heck, I didn’t even take a physics class in high school). Just sit on your bike’s saddle and watch how the tire compresses and deforms as more weight is applied. The idea is to strike a balance so the pressure supports your weight but doesn’t end up rock-hard. Therefore, more rider weight requires more tire pressure. For example, I weigh about 150 pounds and ride 30 PSI on my gravel bike. A rider who is 20 pounds heavier should definitely consider another 3-5 PSI of air.
[product-block handle="silca-pista-floor-pump-red"/]
Tire volume and rider weight are nice and predictable, but the terrain you’ll ride is not. This takes some trial and error to learn and mostly applies to mountain biking, gravel, or cyclocross. Eventually, you’ll be able to look at your local trails and tell which might require a little more air pressure (think: chunky rocks that might pinch your tire and smash your rim), and which are smooth enough to be ridden with softer tires for better grip in corners.
When you’re out riding, try to monitor the way your bike feels on bumpy terrain. Can you feel a harsh clunk when your wheel strikes a sharp rock? Your pressure might be too low. Does your bike seem skittish in loose corners and bouncy on rough stretches? Perhaps try dropping your PSI a bit.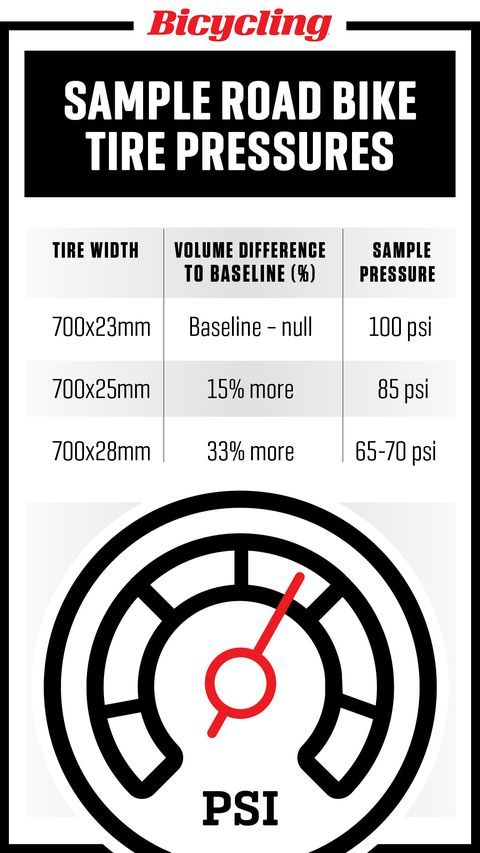
For road riding, tire pressure won’t vary as much. However, the conventional wisdom of pumping up tires to a rock-hard 120-130 PSI has been debunked. Unless your pavement is glass-smooth, pressures in the 90-100 PSI range will be faster. The tire will absorb slight bumps and vibrations, which is faster than an unyielding, hard tire. You’ll also get more grip in the corners. If you ride in wet weather, slightly less pressure would also be prudent to improve traction.
“Over the last few years, we’ve dropped our PSI ratings even on the narrower tires by 10-15 PSI,” Huseby says. “WTB, coming from the dirt side of the spectrum, we’ve always erred on the lower side.”
Tubeless technology is now widespread in the cycling world, with the exception of some road wheels and tires. This can also affect your tire pressure. Because tubeless systems don't rely on an inner tube, you will be able to run a little less pressure and not worry about pinch-flatting your tire. You’ll get better traction and comfort with less pressure which is beneficial for mountain bike trails and gravel roads. To learn more about tubeless systems, see our Beginner’s Guide to Tubeless.
The final consideration when it comes to tire pressure is worth its own section in this article, and even that won’t be enough space to truly explore every nuance of how tire pressure influences a bike’s performance. The primary factors are traction, rolling speed, and comfort. Ride with the correct tire pressure and you’ll be able to maximize all three variables. Too much or too little pressure can compromise tire performance.
As hinted at earlier in this article, lower tire pressure usually improves traction. This is because it increases the tire’s contact patch on the ground. A tire at lower PSI better conforms more to the ground it is rolling on, also improving grip.
Traction is essential in many situations, from cornering to climbing to braking. In each case, better traction lets you overcome your bike’s inherent tendencies. Forward momentum makes cornering more difficult, but if your tire grips well on a loose dirt corner, you’ll be able to change direction with the right technique and rider input. Momentum also works in opposition to braking forces. With the right tire pressure to achieve grip on loose surfaces or wet pavement, you’ll be able to stop or slow down quickly and more safely.
[button]SHOP TIRES[/button]
Your bike will feel more comfortable with the correct tire pressure. Like traction, this performance quality improves with lower pressure. The comfort afforded by lower pressure can be noticed on all of your bike’s touchpoints, from your feet to your saddle to your hands and shoulders.
There is a limit to how soft we’d want our tires to be, though. We love the increased traction that comes with low PSI, but eventually, a tire gets so soft that it has too much rolling resistance, making our bike feel slow. This will be most noticeable on hard, smooth surfaces like pavement. Too-low tire pressure can also hamper bike handling by making the front end resistant to steering input or causing the tire to roll excessively on the rim during cornering.
The first step you can take toward totally geeking out on tire pressure is to adjust your PSI mid-ride to tinker with how your bike feels. This is something that’s most applicable to mountain, gravel, or cyclocross riding, but there’s always a chance you might encounter a surprise rain shower on a road ride that will necessitate a little less pressure.
It’s always easier to take air out of your tires during a ride than to add air back. When in doubt, start a ride on the high end of the PSI scale and let out air little by little, going off of feel. See if you can notice an improvement in traction. Be careful not to take too much out if you’re riding rough trails.
Mountain bikers often like to run slightly less pressure in their front tires, and that’s something you can experiment with too.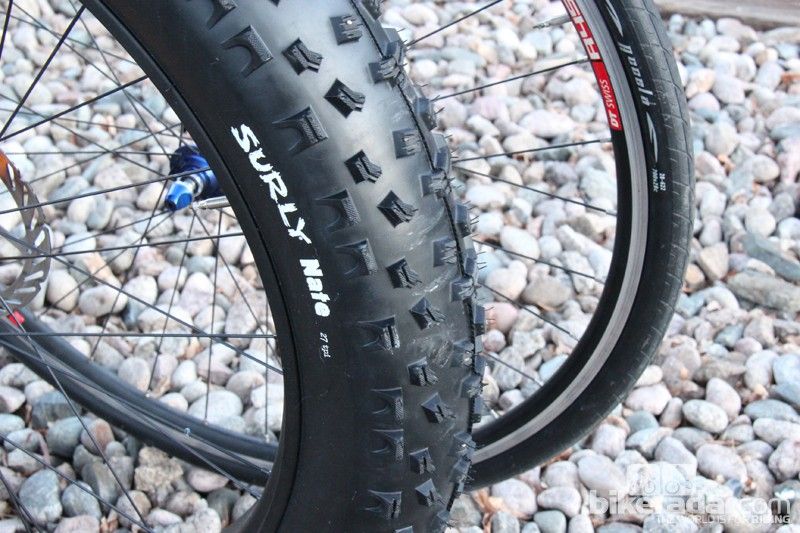 The idea is that, due to body position, you have less weight on the front tire, so you can get away with lower PSI, thereby enjoying more traction for cornering. With more air volume in a 2.2-2.5” mountain bike tire, pressure can be fine-tuned with great effect.
“On a drop-bar bike, I tend to run pretty similar pressure, maybe in the front, I have two to three PSI less if I can even control that,” says Huseby. “On a mountain bike, I definitely run less in the front than in the rear, up to five PSI.”
The last thing mountain bikers can consider when playing with pressure is a new technology generally called a tire insert. The category’s “Kleenex” brand is CushCore, so you might hear fellow riders refer to inserts that way. No matter the brand, the general idea is to put a foam ring inside a tubeless tire, which will reduce air volume and protect your rim from damage. Inserts allow you to run lower pressure with fewer drawbacks. If that rabbit hole looks enticing, check out our recent article on tire inserts.
[product-block handle="cushcore-pro-tire-insert-set"/]
You might be the type to tinker with your PSI, or you might prefer the set-it-and-forget-it approach. Either is fine if you have a grasp of the fundamental balancing act that goes into deciding on how much to pump up your tires. You find that balance point by going low enough to maximize traction and comfort without risking flat tires or sacrificing rolling resistance and handling.
Compared to most vehicles, a rider on a bike is very lightweight and slow-moving, making the correct tire pressure far more important from a performance standpoint. Remember, air is free, so make sure to use it to your advantage whenever you’re headed out for a ride!
When buying a bicycle for themselves, many do not even think about the fact that the convenience and comfort when riding it is achieved by properly selected tire pressure. The service life of the bicycle, the speed of riding, the degree of tire wear, safety, control of the two-wheeled friend depends on how the wheels are inflated.
Many cyclists believe that inflating the tires is only necessary for a good bike ride. However, flat tires have a wider area of contact with the road, which means that grip will be better, but it will be very difficult to accelerate to a speed of 30-35 km / h on such tires.
When inflating your tires, you should always consider the type of terrain or surface you will be driving on. If the walk is supposed to be on an asphalt road, the tire pressure of the bicycle should be close to the maximum allowable value. Elastic wheels on a flat surface will provide a smooth rolling and high speed of movement.
For cross-country riding with unpaved paths, it is better to set the tire pressure to medium tolerable, so that you can ride long distances in comfort and convenience. At high pressure, the grip of the wheel with the road will be minimal, respectively, all holes, pebbles, and bumps on the road will be sensitive. And with flat tires, the likelihood of damage to the wheel or puncture of the chamber increases.
In order to protect yourself on the road, as well as to keep the bike or its individual parts intact, you need to know exactly the lower and upper limits of permissible values, to what pressure the bicycle wheels can be pumped.
Information about tire pressure gives you an advantage when cycling:
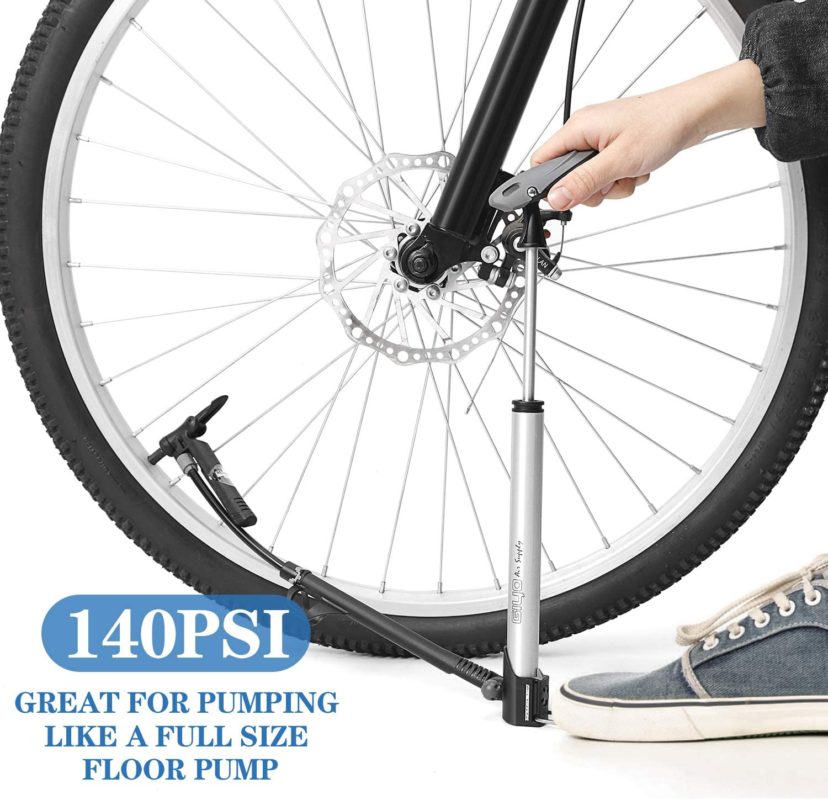
Forget the old "grandfather" way to check the wheel with finger pressure. No need to rely on tactile sensations, trying to feel with your hand the degree of rubber penetration on the tire. The air leaves the wheel gradually, through the pores in the rubber. Within 2-3 weeks, the pressure decreases by 0.1-0.2 atmospheres, but you cannot determine this with your fingers. The exact value at any time will help determine the pressure gauge that every cyclist should have in his arsenal. With its help, it is simple, with a minimum error, the level of pressure in bicycle tires is measured. A pump with a pressure gauge (floor or manual) will become an indispensable tool for cyclists.
There are three standard values in which bicycle tire pressure is measured.
kPa = 14.504 PSI
All these units are used to some extent - in different countries, by different manufacturers. For residents of Russia and the post-Soviet space, the change in bars is more familiar, since this unit is clearly associated with the pressure of the 1st Earth's atmosphere at ocean level. In America and Western Europe, a popular unit is PSI, as they actively use pounds and inches in measurements. Pascals are the least used unit of measurement, but the most modern. Some bicycle manufacturers write data on the wheels about the allowable pressures in all three systems.
Manufacturers indicate on the sidewall of the tire how many atmospheres to pump the bicycle wheels. Specifies the range within which the owner of the "iron horse" determines the desired values, depending on the specific factors of riding his bike. Values in the range are labeled from min to max, in two or all three dimensions. Numbers up to 10 are atmospheres (or BAR), tens-hundreds are PSI, and six-digit values \u200b\u200band with the prefix “k” / kilo are Pascals.
When inflating a tire, you must strictly follow the manufacturer's recommendations and try not to go beyond both the minimum and maximum pressure levels indicated on the tire.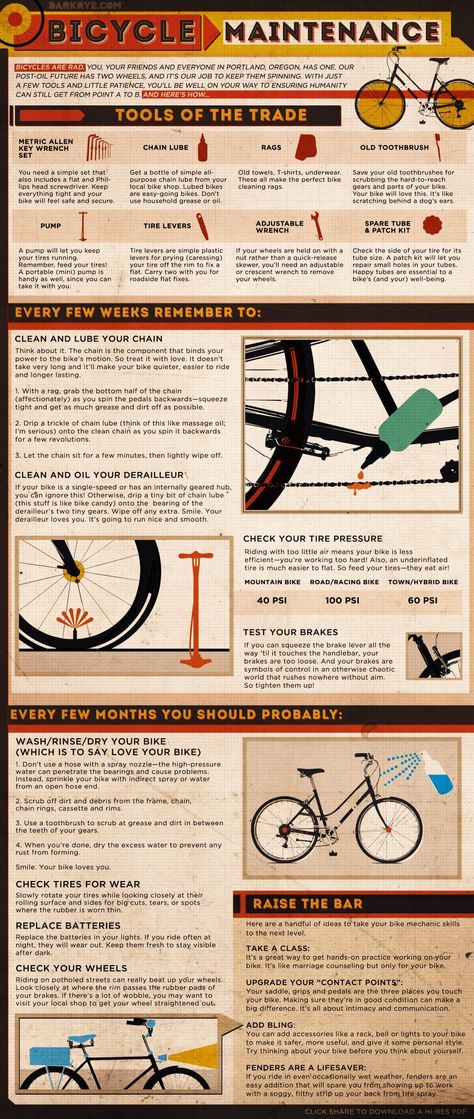 Moreover, it is better to leave a small margin of 0.2-0.5 BAR, both in one direction and in the other, so that the tire does not burst.
The pressure in the wheel is kept by the tire, not the tube, so there is no single standard for its value. There are several significant factors that determine how much you need to pump the wheels on a bicycle.
Tire type is determined by the surface of the track that the cyclist will predominantly ride on. Accordingly, the level of inflation of the bicycle wheel will be different. There is a direct dependence on the roughness of the tread and the width of the wheel - the more lugs and the wider the wheel, the lower the pressure should be. Empirically, cyclists quickly determine how many atmospheres should be in the tires of their bicycle
Many cyclists do not think about the fact that air temperature affects the pressure level in bicycle tires.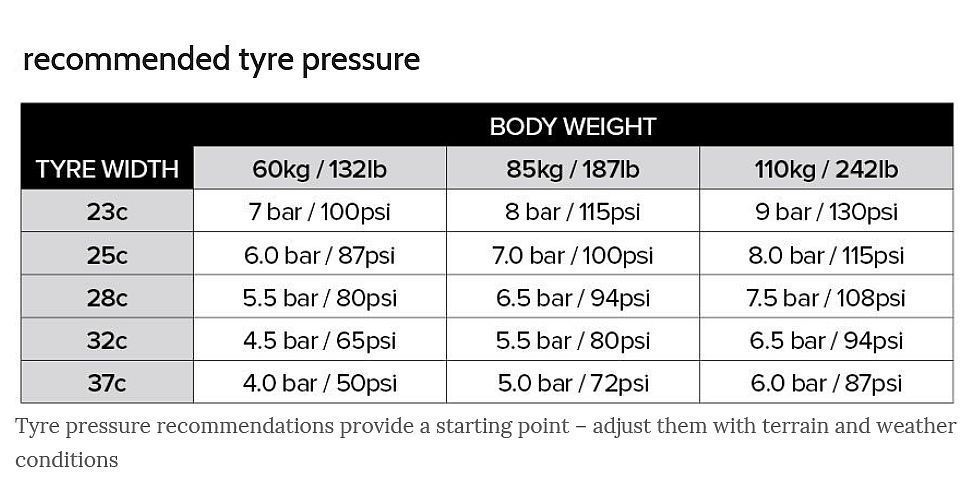 From the course of school physics, we recall that when heated, bodies expand. This means that in hot sunny weather, the pressure inside the air chamber will increase without additional pumping. Conversely, on cold winter days, a decrease in tire pressure is quickly felt due to low temperatures. So, when going for a bike ride in the cold season, the pressure indicators need to be adjusted a little higher than usual, and in the summer heat, let the air out a little. It is worth noting that when going on a bike ride, you should always take into account the weather conditions.
It is important to consider the load on the bike created by the weight of the rider, especially the fact that most of it is on the rear wheel. Therefore, the degree of its pumping should be slightly higher than the front, the optimal difference is 10%.
To calculate the optimal tire pressure for a bicycle, given the weight of its rider, you can use the table:
Rider weight (kg) Pressure (atmosphere) Pressure (PSI)
The nature, riding style and type of bicycle also affect tire pressure. Buyers who prefer an active pastime often opt for mountain bikes with 26-inch wheels, which ride well both on city streets and in rough terrain.
To understand to what pressure to inflate the wheels of a bicycle, it is necessary to take into account the features of both the bike itself and other, at first glance, weightless factors. For example, weaving threads on a tire, rim thickness, driving style. The likelihood of a tire coming off a wide rim is much less than a narrow rim, because a wider rim will hold the tire better than a thin one. Mountain biking already by its name suggests the presence of a difficult surface on the track, with possible obstacles and bumps. The driving style is more aggressive than on a smooth, calm trajectory, it obliges you to increase the tire pressure to a level slightly less than the upper limit.
The diameter of the wheel will also influence the selection of the optimal pressure value, since the larger it is, the higher the volume of air pumped will be.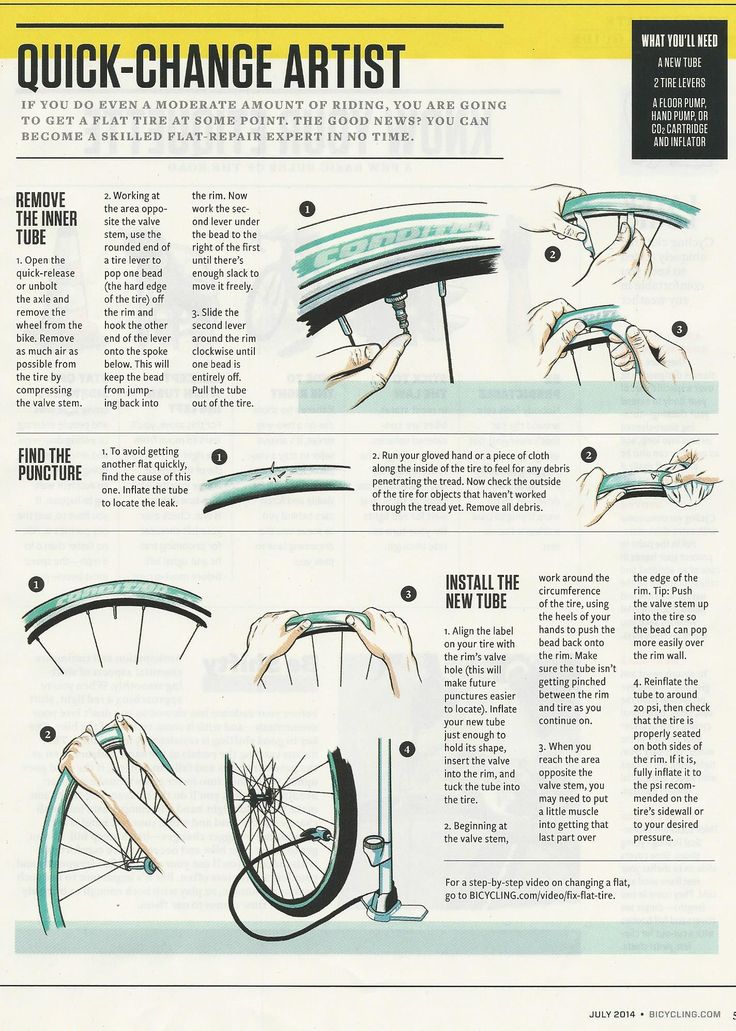 However, for mountain bikes it is not so important whether the wheel diameter is 26 or 29 inches, it is much more necessary to pay attention to the parameters of the rider's weight and the type of track.
There are no hard and fast rules about how much you need to inflate the wheels on your bike. There is common sense, experience, practice. Manufacturers can recommend certain values, but only the owner himself will determine exactly which road he will ride, in what weather conditions he will drive, take into account his weight parameters or not. The decision, what pressure in the wheels will be ideal, is sure to be found.
content
| type bike | Cover width | Tire pressure in psi* |
|---|---|---|
| bike hike | 35 mm | 65 |
| bike hike | 40 mm | 58 |
| bike hike | 50 mm | 44 |
| road bike | 25 mm | 100 |
For example: " 26 ×1.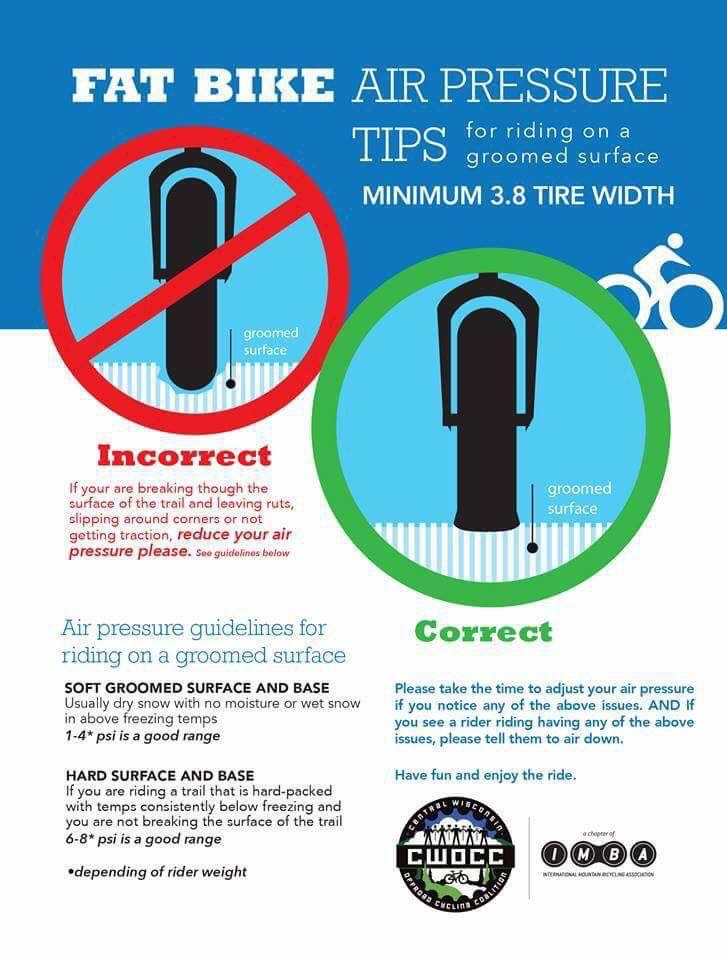 5 45-60” PSI , indicates that this wheel is aro 26 (inches) with a width of de 1.5 (inches) and a pressure of de recommended air de 45 to 60 PSI .
Road tires typically require 80 to 130 psi (5.62 to 9.14 kgf/cm2), mountain tires 30 to 50 psi (2.11 to 3.52 kgf/cm2 ), and hybrid tires from 50 to 70 psi (3.52 to 4.92 kgf/cm2). trainer and writer Lee McCormack, who writes for Bicycling magazine.
The correct pressure will be no more than 9.5 bar, which is the maximum value that we must inflate our tubes. A pressure of around 8-9 bar is what maximizes our ratio between friction and grip.
Road bike tire pressure chart
| Tire width (in millimeters) | ||
|---|---|---|
| Rider weight (in kg) | 23 mm | 30 mm |
| 50 kg | 6 bar / 87 psi | 3 bar / 43 psi |
| 60 kg | 6.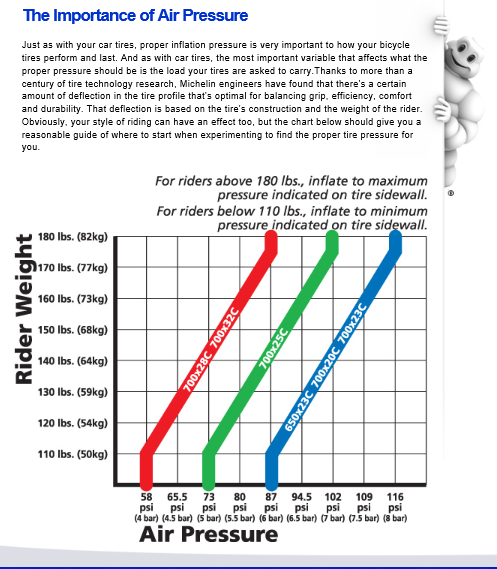 | |