Knowing how to adjust an ATV chain helps you maintain and operate your ATV at its best. It also saves you a trip to a shop to deal with something easily managed at home. All it takes is some knowledge, focus, and enough time to get the job done.
First, to know how to adjust an ATV chain, you must understand what the chain is and why it’s there. An ATV drive chain looks similar to what you would find on a bicycle. Some modern ATVs don’t have a drive chain, so consult your manual if you can’t find one.
When an ATV engine turns over, the transmission causes a front sprocket to rotate. That turning sprocket pulls the drive chain, which in turn pulls the rear sprocket. That makes the rear axle turn, which spins the wheels and propels the ATV forward.
If you hear a strange, almost crunching noise while rolling an ATV forward in neutral or feel resistance outside of the norm, you might have chain problems. A jerky feeling, or power loss and clicking noises while driving, is a sign that your chain is loose. Of course, if the chain falls off, it’s clearly too loose.
It’s wise to check your chain routinely. This part can stretch and become loose through regular wear and tear. Trying to drive with a chain that is too loose can pull off sprockets, break cases, rip gears out of the motor, and otherwise cause problems.
How to Adjust an ATV ChainYou will need some wrenches or sockets, a measuring tape, and a screwdriver. Check your ATV’s user manual to learn the recommended slack. It is usually one to one and a half inches.
Start by putting your ATV on level ground and shutting off the engine. Have someone sit on the ATV to see what tension the chain is usually under with a rider aboard. Measure from the skid plate or chain guard near the center of your swingarm. Take note of the measurement where the chain rests on its own, then pull up the chain and note the measure at the highest point. The difference between those two points tells you what your slack is.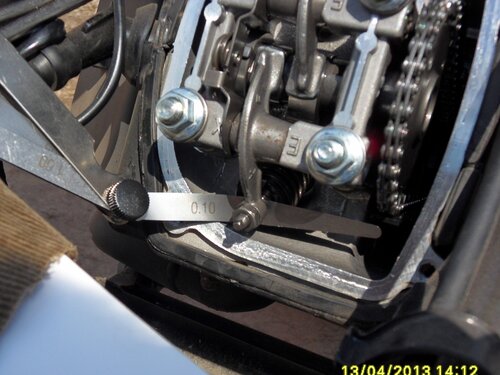 If it’s outside of what the manual says, you will know if it’s too loose or too tight.
To tighten the ATV chain, loosen the bolts on the bearing carrier. Then loosen jam nuts on the adjuster bolt(s). Tighten the adjuster bolt to tighten the chain. Go through the measurement process again, with weight on the ATV. Keep measuring and tightening until you are within the range of the user manual. Once the slack measurement is correct, tighten all of the hardware and jam nuts again.
What if you don’t have adjuster bolts on your ATV? The process is similar, with a few differences. You will still loosen the bolts on the bearing carrier. Then, you will find a hole that allows access between the carrier and sprocket. This is where you will insert a screwdriver or Allen key. Put the Allen key or screwdriver in place, then rotate the rear wheels forward to tighten. The screwdriver or Allen key ensures that the chain adjusts while the bearing carrier is rotated. Again, put weight on the ATV and take measurements. Adjust until it is within the right range. Tighten all of the hardware once that process is complete.
An ATV chain that is too tight can wear out sprockets prematurely. While a loose chain is reasonably obvious, it can be trickier to determine that your chain is too tight. One method is to use your hands. If the chain doesn’t give much when you press down on it, it needs more slack.
You can also use your hands as a preemptive measurement tool before every ride. Stack three fingers on top of one another and place them behind the chain slider. With the chain draped across the top of your index finger, it should be taut overall. Anything looser or tighter calls for adjustment.
Luckily, the process to fix it is the same as tightening, in reverse. Instead of tightening adjuster bolts or rotating the bearing carrier forward, loosen. Measure for slack as you would when tightening the chain.
If the chain is still too tight and you cannot loosen it further by adjuster bolts, you may need to lengthen the chain. That requires taking the chain apart and adding a master link to it. You can also shorten a chain if need be by removing portions and using a master link to put it back together.
Disclaimer: While we endeavor to keep the information on our blog up to date and correct, Maxtrade (Coolster) makes no representations or warranties of any kind, express or implied about the completeness, accuracy, reliability, suitability, or availability with respect to the website or the information, products, services, or related graphics contained on the website for any purpose. Any reliance you place on such material is therefore strictly at your own risk.
Picture this: You’re cruising down the trail on your quad. You’re blasting the latest Swift jams and loving the freedom of the outdoors. Then, kablammo! Your ATV stops and your chain is laying on the ground. You really should’ve learned how to tighten the chain on your ATV before you blew it. At least you’ve still got Taylor.
That hasn’t happened to you yet (we hope), and we’re here to make sure it doesn’t. We’ll also give you a few extra pointers to make sure your ATV’s chain is off the chain and running smooth.
What to Consider Before Tightening the ATV’s ChainFirst of all, are you even sure you need to tighten your ATV chain? Overtightening your chain can cause just as many problems as undertightening.
Let’s look at the symptoms of a loose chain:
If you notice any of these things happening while you ride, you need to tighten your chain ASAP. In fact, you shouldn’t let your chain get this bad in the first place.
Instead, you should compare the slack in your chain to your manuals guidelines before it gets bad.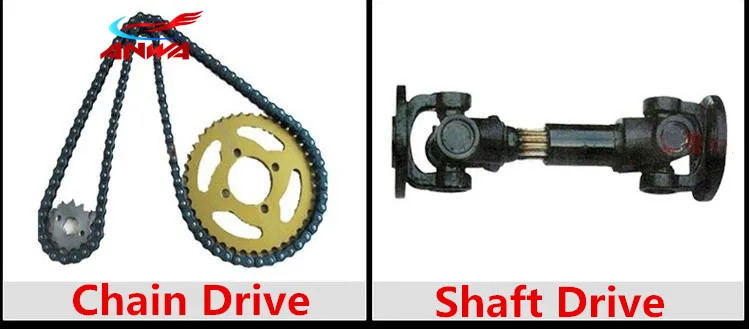 Once you start noticing these issues, you’ve already subjected your drivetrain and sprockets to excessive wear and tear.
You might be experiencing some issues that you’re pretty sure are chain related, but it might be because your chain is too tight.
Having a too-tight chain can cause:
So don’t just assume your chain problems are due to a loose chain. Improper maintenance and overtightening can cause similar drivetrain issues. Check your manual and measure your slack to see what your chain needs.
How to Tighten the ChainIn order to tighten the chain on an ATV, you just need a few wrenches or sockets, a measuring tape, and, for some ATVs, a screwdriver.
Here is how to tighten the chain on your ATV.
Now that you know how much slack is in your chain, you know if it’s actually too loose or if you’ve got some other issues going on.
 This works because the centerline of the axle does not match the centerline of the carrier bearing. So rotating the carrier moves the axle centerline front or back, moves the sprocket, and tightens the chain.
If you don’t have adjuster bolts, the process is a little bit different:
That’s it. Easy peasy. Your first time should only take you a few minutes as long as there’s not too much dirt or rust keeping your bolts tight. After doing it a few times, you’ll be a chain tightening master.
Sometimes tightening your ATV chain isn’t enough. Sometimes that chain is kaput and it’s time to say, “see ya!” and toss it in the trash. But how can you tell?
There are a couple telltale signs: rust and stretching.
Rust is the enemy of your chain. If your chain is rocking that dusty red patina, don’t bother cleaning it up. You need to replace it. It means your chain is weak, and it likely has some damage to it already. Sooner or later, your rusty chain is gonna break. Ditch it for a new one.
Stretching is natural and happens to every chain eventually. This can be difficult to check, though. You can check to make sure the links are resting nicely on the sprocket. If you have a new chain to compare it to, you can measure the new chain (as long as it has the same number of links) and compare to the old one. Too much stretching causes wear and so a stretched chain should be replaced.
Changing an ATV chain is a piece of cake. The only complication is if you have a rivet-style master link on your chain. If you do, you’ll need a master link rivet tool. Be sure to follow the instructions included with the tool to remove your chain.
Clip-style master links are much more common on ATVs, and they make removing and replacing the chain simple.
This rusted-over chain needs replaced. The clip-style master link is clearly visible in the center and replacing this chain is as easy as popping the link off, matching the link count to the new chain, and putting the new chain on. This easy job is more than worth the trouble.Here’s how to remove a chain with a clip-style master link:
And that’s all it takes. There’s no reason to put it off, so get it done today.
Changing your chain won’t necessarily solve all your problems. One of the persistent issues some people have with ATV chains is that the dang things keep falling off. Don’t worry—if you can identify the cause, you’ll be able to solve this problem, too.
Why an ATV Chain Might Keep Falling OffThere are three reasons your ATV chain might be falling off:
You’ve let it go too long without tightening it up again. Tighten it up right away to avoid other damage.
An old stretched out chain might get booted off the sprocket if it doesn’t fit quite right. No amount of tightening will fix this and it’s likely to brake soon. Replace it.
Do you have a skid plate or chain guard? If not, sticks, rocks, and bumps can knock your chain off at any time! Not to mention, they can permanently damage your sprockets and other drivetrain components.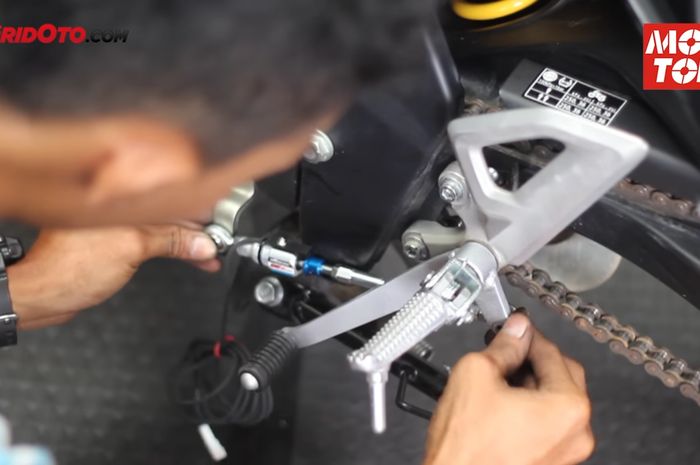 Do not ride again without adding a skid plate or chain guard.
If you need more information about the bits and bobs that make your ATV purr, check out some of our other articles. Keeping your ball joints in working order is key to making your suspension run smooth. Another central part of any ATV’s reliability is the winch. If you don’t have one, you should get one and then check out these 5 ways to use an ATV winch—they’re not just for getting unstuck.
Feel better about this whole chain thing? You should. Maintaining your ATV chain is easier than changing your oil and should be checked just as regularly. Just remember: happy chain, happy life! Yeah, we know it doesn’t rhyme.
Despite its simplicity, the motorcycle chain requires regular maintenance and checking the tension.
Chain life on the same motorcycle can vary greatly depending on operating conditions and care. Hard accelerations, rear wheel riding and dirt reduce it quite noticeably.
Chain life on the same motorcycle can vary greatly depending on operating conditions and care. Hard accelerations, rear wheel riding and dirt reduce it quite noticeably.
After work, I often visit an old friend's workshop. A pleasant atmosphere and the opportunity to tinker with the hardware on your own are very tonic. One day, a new snow-white R6 stops at the entrance and a young guy asks if the service is still running. As usual, he needed to check the chain tension and lubricate it. After 10 minutes, satisfied service workers were shaking hands with the no less satisfied Yamaha owner. “What a wonderful client,” I thought then, never understanding why he did not do such a simple procedure himself.
Manufacturers of modern goods purposefully turn us into whitehands. We don't wash cars, we don't do laundry, we don't sew our own clothes. Many people no longer cook at home. And they are unlikely to cook something edible if all the restaurants in the area are closed. Simply because they have never done it. Moreover, some believe that wasting time on such nonsense is beneath their dignity. Maybe so, but I am sure that a person should have a choice. I can not do something because I don't want to, but not because I don't know how. And it's worth knowing! Be able to ride a horse, be able to cook deliciously, be able to look after your own house, be able to drive a car and motorcycle well and be able to serve them.
The chain drive is one of the busiest components on a motorcycle. In powerful motorcycles, the forces arising in it reach several tons. And when accelerating and when braking, they change direction. Often this happens very abruptly, and at this moment the chain is under severe stress. If the chain is loosely tensioned (strongly sagging), then at the moment of changing the load, this excess supply of the chain will first be selected, and then, when its free play ends, a sharp blow will occur, harmful to all transmission elements. By the way, it’s also unpleasant for the driver to drive such a motorcycle that twitches at any opening and cover of the “gas”, especially in a sluggishly creeping traffic jam. The second minus of a sagging chain is that with a weak tension, its unloaded arm tends to move in a straight line due to inertia, which is why it does not fit perfectly on the sprocket teeth, thereby wearing them out and itself.
Is it possible to tighten the chain so that it does not sag at all? No, because when the rear suspension is working, the distance between the drive and driven sprockets changes. And the tensioned chain will be subjected to huge loads (stretched in the strongest way), if you do not leave it with a small sag, which will be selected during the operation of the suspension. (Yes, and shafts with bearings with a tight chain, I note, will have a hard time.) The reason is that the axis of the pendulum and the axis of the drive sprocket on most motorcycles are at a distance from each other, so the maximum tension occurs approximately at the middle of the suspension travel - when the axles of the secondary the gearbox shaft, swingarm and rear wheel lie in the same plane.
There are many ways to adjust chain slack. Shorten or lengthen the chain itself, increase or decrease the diameter of the sprockets, move the swingarm mounting point... All these methods are used during the tuning of racing motorcycles. But the easiest way to change the chain tension is by moving the rear axle attachment point along with the driven sprocket. It is this solution, familiar from the bicycle, that is used on all motorcycles.
There are basically two ways to move the axle attachment point. The first one is linear. The swingarm of a motorcycle has longitudinal slots along which the axle moves. Tensioners are additionally installed. They come in various designs, but they have a common principle: you turn a screw or a nut - the axis moves along the slot, respectively, loosening or tightening the chain. You just need to figure out the direction. It is also important to understand that while the nut on the wheel axle is tightened, the tensioners should not be turned - they can only be damaged by breaking the thread (however, after the adjustment is completed, it is harmless to tighten them so that they do not unwind on the road).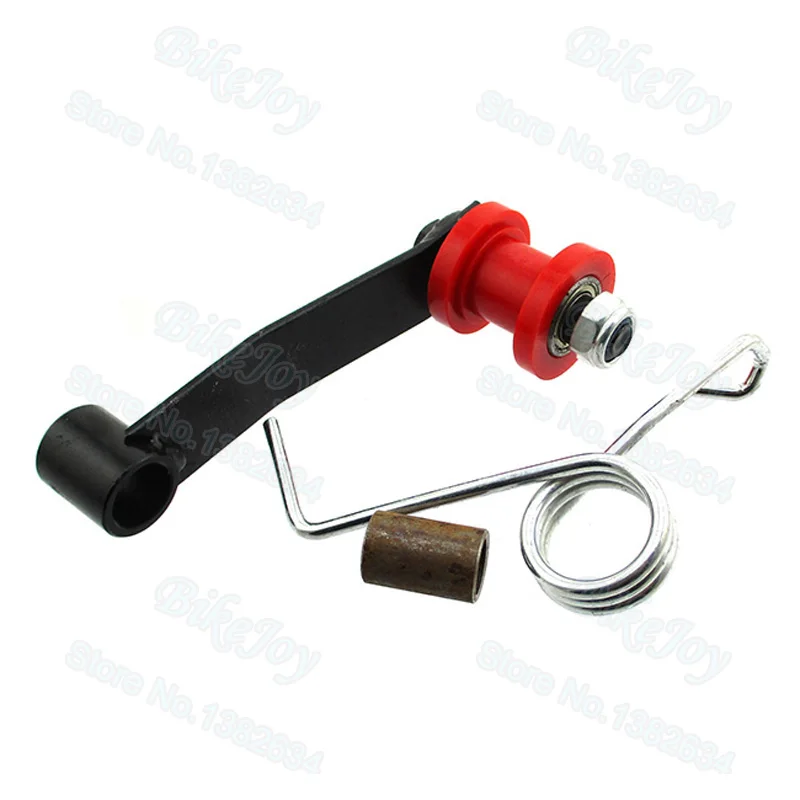 Therefore, the axle nut must be unscrewed first. There are always marks on the swingarm and tensioners to help maintain wheel alignment. But in any case, I recommend tensioning the chain more or less synchronously, gradually twisting either the right or the left tensioner a little at a time.
If you ride your motorcycle aggressively, like to lift it on the rear wheel, brake hard, then the chain may stretch unevenly. Therefore, before checking the tension, hang the rear wheel and spin it in neutral gear. If the chain slack doesn't change as the wheel spins, good. If the chain either stretches, then weakens, it means that it is stretched unevenly and is dear to it in ferrous metal. Well, if there is a need to “drive” it for another hundred or two kilometers, adjust the sag according to the “most tensioned” position.
The second version of the chain tensioning system is eccentric. A round hole of a sufficiently large diameter is cut in the pendulum, inside which a sleeve rotates with an eccentrically drilled hole for the wheel axle.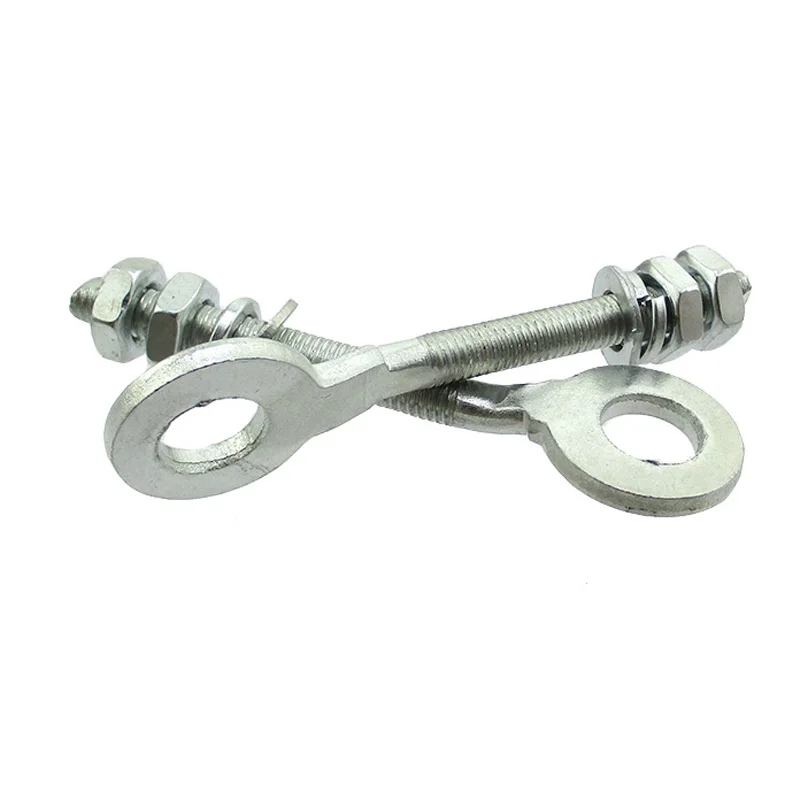 Turning the eccentric shifts the wheel axle, allowing you to change the chain tension. More often this option is found in cantilever (one-sided) pendulums, but it also happens in ordinary ones. These systems require a little more dexterity. Adjustment usually requires a large diameter hex key. On older motorcycles, it happens that the eccentrics stick to the pendulum. It is important not to spoil them with the application of excessive force, but to patiently spill them with kerosene and try to move them using not too rough percussion instruments.
One of the most frequently asked questions is what position the motorcycle should be in when measuring chain slack. Stand on the ground under its own weight, with the rear wheel hanging (on the center stand) or under load (with the driver and passenger seated)? And what should this sag be? The recommendation of the vast majority of manufacturers is to evaluate the sag when the empty motorcycle is standing on two wheels (on the side stand) and the rear shock absorber is loaded only by its weight.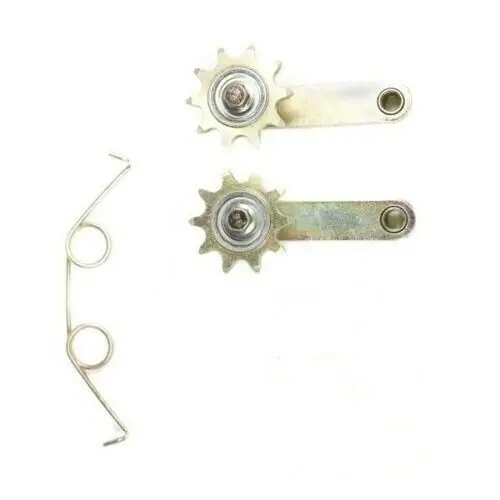 Sag for road motorcycles is usually in the range of 30-45 mm, and for off-road with increased suspension travel it can reach 55 mm.
After the adjustment is completed, it is necessary to check whether everything turned out as it should. If the wheel is straight, the marks on the tensioners on the right and left show the same thing, and the chain has the desired slack, then everything is done correctly. It remains only to lubricate the chain. Here's how you like it more. If there is no center stand, then the easiest way is to hang the rear wheel by tilting the motorcycle towards the side stand, start the engine and shift into gear. When the wheel starts to rotate, direct a jet of lubricant from the bottle to the inside of the lower branch of the chain. The main thing is to lubricate the inner rollers and seals. Lubrication on the connecting plates only collects dirt and, in general, is not needed for the operation of the transmission. The main thing is not to direct the jet from the cylinder past the chain - onto the rim or tire. Hardened grease is very poorly removed from the rims, but there is probably no need to talk about why it is not necessary to lubricate the tire.
There were also automatic lubrication systems that allowed you to lubricate the chain on the go, but on modern motorcycles they did not take root, giving way to relatively expensive, but also durable lubricants.
It is worth choosing a lubricant, of course, in accordance with the type of motorcycle and, most importantly, with its operating conditions. For example, an expensive race bike lubricant will not perform well on the off-road. By the way, the most difficult chain is in mud and sand baths. Therefore, a good lubricant should not only easily penetrate into all cracks, but, upon drying, form a strong and not too dust-collecting film. In the event of force majeure, of course, any oil is better than dry friction, but remember that, depending on the operating conditions and care of the chain, its service life on motorcycles of comparable power can vary significantly - from 5 thousand km to 30-40 thousand .
Another pressing question: to clean or not to clean the chain before lubrication, and if so, how. Of course, only those who have a chain lock with a latch can afford to remove the chain and wash it in the bath with a brush. It is hardly worth removing the pendulum for this, and there are aerosol cleaners on sale that make it possible to simplify this procedure to the limit: it is enough to rinse the chain from a spray can abundantly and dry it. But for off-road motorcycles, this is often not enough. It is only a bath with brushes that helps to clean the chain well, through which the chain passes, poured through the nozzles with diesel fuel or a special washing liquid. The liquid, as a rule, is run in a circle, through a fine filter. However, few people have such a device even in the workshop, not to mention the journey. Therefore, many are generally limited only to lubricating the chain - and with regular care, the transmission lives for a long time. The main criterion for good care is that each link of the chain should move freely, without jamming (this is easy to check by slightly loosening the chain). And it is better to do all operations with the chain immediately after returning: the lubricant impregnates the warm chain more easily, and somehow protects against rust.
Well, that's it. To be honest, reading this article will probably take longer than adjusting and lubricating a motorcycle chain, so think for yourself whether it makes sense to go to a service with such a thing or take care of yourself to the envy of those who don’t know how to do anything themselves.
We determine the chain tension by pressing the branch with your finger, according to the difference in readings on the scale of the ruler (tape measure). In this case (in the center of the chain) 58 - 17 = 41 mm.
We determine the tension of the chain by pressing the branch with your finger, according to the difference in readings on the scale of the ruler (tape measure). In this case (in the center of the chain) 58 - 17 = 41 mm.
Recommended tension settings are usually found on a sticker on the swingarm.
Recommended tension settings are usually found on a sticker on the swingarm.
The screw tensioner requires at least two wrenches - with one we loosen the axle nut (you may have to keep the axle from turning with another wrench), and with the second we adjust its position.
The screw tensioner requires at least two wrenches - with one we loosen the axle nut (you may have to keep the axle from turning with another wrench), and with the second we adjust its position.
After tightening the axle, always check that the tensioner screws are tight. Otherwise, they can spin on the go.
After tightening the axle, always check that the tensioner screws are tight. Otherwise, they can spin on the go.
The volute tensioner is simpler and more convenient: only one key is needed, positioning accuracy is ensured by fixed notches on the volute and stamped dots opposite each number. In addition, the required chain tension is provided automatically if the “snail” is turned only by hand, without a key. One division roughly corresponds to one link in the chain. That is, in the case shown in the photo, you can easily take the chain 2 or 4 links longer.
The volute tensioner is simpler and more convenient: only one key is needed, positioning accuracy is ensured by fixed notches on the volute and stamped dots opposite each number. In addition, the required chain tension is provided automatically if the “snail” is turned only by hand, without a key. One division roughly corresponds to one link in the chain. That is, in the case shown in the photo, you can easily take the chain 2 or 4 links longer.
When choosing a chain, pay attention to the size of the links (a), their number (b) and the type of seal (c). More details in "Moto" No. 3–2010.
When choosing a chain, pay attention to the size of the links (a), their number (b) and the type of seal (c). More details in "Moto" No. 3–2010.
How to check wheel alignment? First, look at the motorcycle from the front and, turning the handlebars, ensure that the front wheel is exactly in the center of the rear (if you look along the sides of the front wheel, you can see the equal thickness of the rear tread).
How to check wheel alignment? First, look at the motorcycle from the front and, turning the handlebars, ensure that the front wheel is exactly in the center of the rear (if you look along the sides of the front wheel, you can see the equal thickness of the rear tread).
When the front wheel is out, look again, but at a less acute angle, so that you can see both sides of the rear. On the left and on the right, this angle (it can be clearly seen from the front wheel) should be approximately the same. The photo shows that the rear wheel looks to the left (in the direction of the motorcycle).
With the front wheel out, look again at a less acute angle so you can see both sides of the rear. On the left and on the right, this angle (it can be clearly seen from the front wheel) should be approximately the same. The photo shows that the rear wheel looks to the left (in the direction of the motorcycle).
The package shows the assembly order with a lock, sag reference values and care recommendations.
The packaging shows the order of assembly with a lock, sag reference values and care recommendations.
When installing a new chain, it is important that the lower strand does not rub against the chain trap. When tensioned, the chain always moves away from the trap, so if there is a risk that the chain will touch it, choose a longer chain when buying. In general, if in any doubt, take a longer chain: cutting links from it is much easier than building them up.
When installing a new chain, it is important that the lower strand does not rub against the chain trap. When tensioned, the chain always moves away from the trap, so if there is a risk that the chain will touch it, choose a longer chain when buying. In general, if in any doubt, take a longer chain: cutting links from it is much easier than building them up.
To make sure that the trap does not touch the chain, disassemble it and assemble only the insert with the frame - this way you will immediately see all the gaps.
To make sure that the trap does not hit the chain, disassemble it and assemble only the insert with the frame - this way you can immediately see all the gaps.
To clean and lubricate the chain, it is convenient to put the motorcycle on the center stand (or hang it on the side with the help of an additional support), start the engine and engage first gear. We spray the compositions on the inner surface of the lower branch of the chain, making sure that they do not fall on the rim and tire.
To clean and lubricate the chain, it is convenient to put the motorcycle on the center stand (or hang it on the side with the help of an additional support), start the engine and engage first gear. We spray the compositions on the inner surface of the lower branch of the chain, making sure that they do not fall on the rim and tire.
A worn chain is a death sentence for the stars. In order not to mix up the sides when installing, remember: worn teeth are "tilted" in the direction of rotation, and not vice versa.
A worn out chain is a death sentence for the stars. In order not to mix up the sides during installation, remember: worn teeth are "tilted" in the direction of rotation, and not vice versa.
Tension: Tensioning the chain
Tension Force: Tensioning the Chain
Chain maintenance (oiling and tensioning) is one of the key elements of ATV maintenance. If the rider ignores this procedure, the component will begin to wear and sag, and the sprocket teeth will fail. This will all lead to serious problems and break the element. Therefore, the motorist needs to figure out how to pull the chain on the ATV.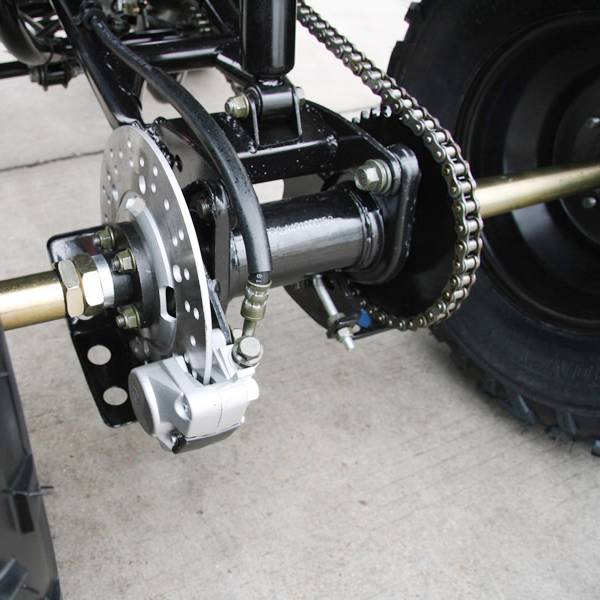
Inspection of the unit is recommended every 2-4 weeks, depending on the operation of the machine. It may seem like this is quite common, but ignoring the procedure can lead to serious problems. For example, if the chain breaks far from the garage, the rider will have to push the quad home. But this is a trifle, in comparison with the fact that if a component breaks, the crankcase may suffer or the axle may jam.
The critical problem for the chain is:
But how do you know when you need to tighten or replace a chain on an ATV? Everything is simple. The rider needs to grab one link of the chain in the region of the rear sprocket and pull it towards him. If it turned out to pull off more than 4-5 links, then the node needs service.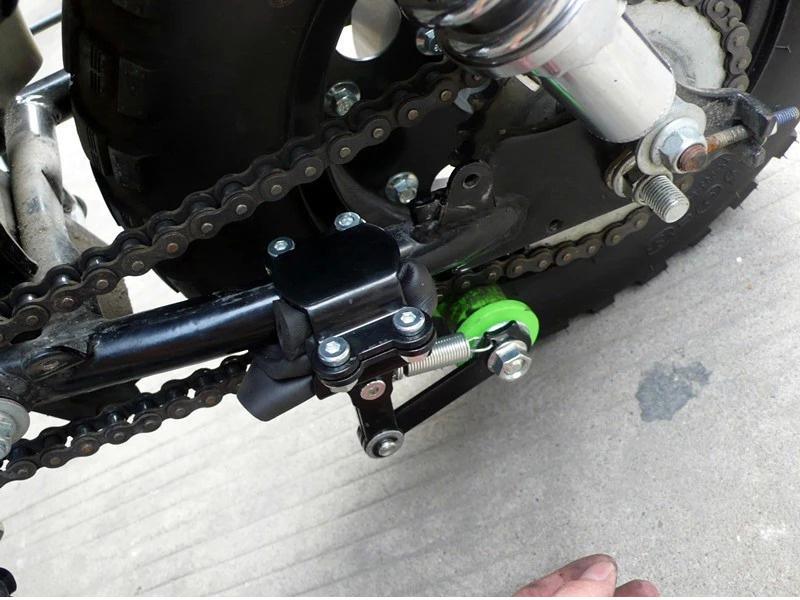
Even if you have bought a reliable ATV, it is recommended to service the component every 300-400 km. This will not only increase the life of the circuit, but also detect the problem in a timely manner.
Since the quad is used for off-road driving, dust, dirt and moisture are constantly deposited on its nodes. All this leads to increased wear of the elements. By the way, experienced riders advise cleaning and lubricating the chain after each race.
First you need to find the right oil. In principle, even inexpensive lubricants can be used, but they will have to be applied more often. The oil marked "off-road" is best suited for an ATV. Such compounds are designed for off-road driving, and perfectly protect the assembly components from dirt and moisture.
Before putting the chain on the ATV, it must be completely free of dirt. However, for this it is highly recommended not to use aggressive chemicals, hard brushes, solvents or high pressure washing. All this can lead to damage to the rubber seals.
Cleaning can be done:
After the dirt has been removed, the chain must be thoroughly wiped with a soft cloth and dried. Only then can you start lubricating.
It is worth noting that it is recommended to apply oil on a warm chain. But the removal of excess lubricant is carried out with the same soft brush.
ATV chain is recommended to be changed every 500 km. But what to do with an old part that is slightly worn or torn? You can make a spare wheel out of it, after shortening it by 1-2 links. Of course, this "modification" will increase the likelihood of its rupture, but in an emergency, such a spare tire will allow you to get home.
To shorten the chain:

Important: Remember that an old shorter chain will increase the wear on the sprockets.
To tension the chain, the vehicle must be parked on a level surface in neutral. After this, the rider should: