Don’t know how to break a tire bead by hand? No problem. We have you covered with all the information you will need in this step-by-step guide.
We break down the procedure from knowing what the tire bead is to successfully breaking it. Read on to save yourself from a trip to the auto shop!
The tire bead is a steel cable covered in rubber that holds the edge of the tire to the wheel. It prevents the tire from shifting out of position when it rolls.
When the wheels are fully inflated, the bead is secured in place within the grooves of the rubber by the air pressure inside.
A couple of reasons you might want to remove the bead yourself are saving money and keeping up the maintenance. Breaking down the bead helps keep the rubber surface clean because it allows you to remove any dirt or debris that would otherwise be locked in the surface.
A mechanic can do the removal but will charge you for a simple task easily done in your driveway. So, let’s learn how you can do it yourself.
Before you can get started on how to break a tire bead by hand, the first step is to position the tire on the ground.
You want the wheel to lay down flat on a hard surface. Working on concrete will be easier than on grass or dirt, where the surface may be uneven. You will need to release the air evenly before moving onto the following steps that will require you to have a good grip on the tire.
Releasing air from the tire will bring down the PSI or pounds per square inch, so the pressure against the wheel’s rim will decrease. This will make it easier to separate the bead from the rest of the rubber. In any other circumstance, you want to make sure your wheels are properly inflated.
One method is to rotate the cap on the valve stem counterclockwise to expose the metal pin located in the center of the valve. Use a screwdriver, a pair of needle-nose pliers, or a similar small tool to press down on the metal pin.
Once enough air has been released, lift the tool off the pin, and the wheel will stop deflating. Replace the cap when finished.
If you want to deflate the tire entirely, you can also unscrew the metal pin with a pair of needle-nose pliers. Air will escape much quicker.
Whichever method you choose, do not lose the cap for the valve stem or the metal pin. Keep them in a safe place until you are done.
The next step leading to the action of how to break a tire bead by hand is to prepare the area around the inner circle of the wheel. When the PSI is below the necessary level for keeping the bead secure, the rim will be easier to pull off. If the tire bead is stubborn, you may need to either deflate it some more or apply more pressure by standing on the tire as you pull it apart.
Since the bead is held firmly against the rim by steel cable and glue, you need to use a lot of force to break the connection. Applying an automotive lubricant along the edge of the rim will make it easier to slide the rubber out from around it.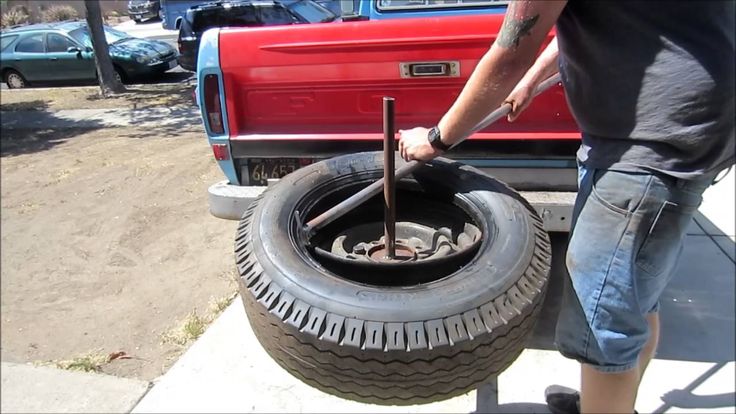 To prevent the metal from being scratched, you can tape it before adding the lubrication.
You want to push the rubber downward as hard as possible so the bead can pop out. Be careful to follow the seam to avoid damaging the metal rim. If you follow the prepping step above, the metal should be well protected.
The lining should be easy to grip and loosen until it can be pulled out from around the rim. The rim can also be removed without requiring additional tools or a machine. When the bead pops out, it will tear away from the rim.
Consider checking: How To Break Bead On ATV Tire
When learning how to break a tire bead by hand, realize that there’s a chance you can cause harm to yourself or the metal rim. Remember to stay safe and follow our step-by-step instructions.
If you ever have doubts, feel free to reach out to a certified mechanic.
Did you find this guide helpful? Then feel free to check out:
How To Set The Bead On A Tire
Trash and debris get inside tires quite often, particularly on off-road trips. To be more specific, the dirt and trash travel inside into the tire, making it important to break tire beads from time to time. Breaking a tire bead isn’t exactly the easiest repair you can perform on your car, especially if it is your first time trying to do so. When your tire bead is clogged with trash and debris, it’s time to break it to clean the gunk. Here’s how to break tire bead without breaking yourself!
There are a few approaches to breaking a tire bead; multiple tools you can consider such as tire mounting machines, lever bead breaker, clamp and ram bead breaker, and plier bead breaker. All you need are the proper tools, a correct guide to break tire bead, and the patience to follow through the steps. Doing it right to make sure the rim and tire are not damaged will also protect you from unwanted injuries.
In today’s article, we talk about how to break tire bead the correct way. Stick around till the end because we will also provide some general maintenance tips to keep your car’s tire beads clean and functional.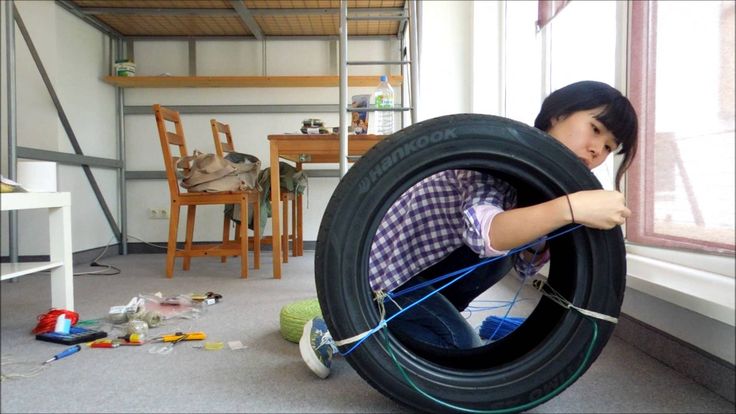
The tire bead is a fortified section of the tire that is in constant contact with the rim. It is tasked with the important duty of making and retaining a seal between the tire and wheel for it to hold air.
The friction between the bead and wheel is what creates the seal. A copper, steel, or similar robust bands in the rubber bead help it keep its shape, retaining the seal when the tire experiences vibration and distortion.
The bead can be found on the inner lip of the tip that meets the wheel, opposite of the tread of the tire. Think of a tire without the wheel. You can easily spot the bead on a dismounted tire because it sits at the sidewall’s base and has a wider profile. Moreover, like the sidewalls, two beads are there on the tire to meet the wheel.
You will not be able to notice the bead of the mounted tire if everything is in decent shape.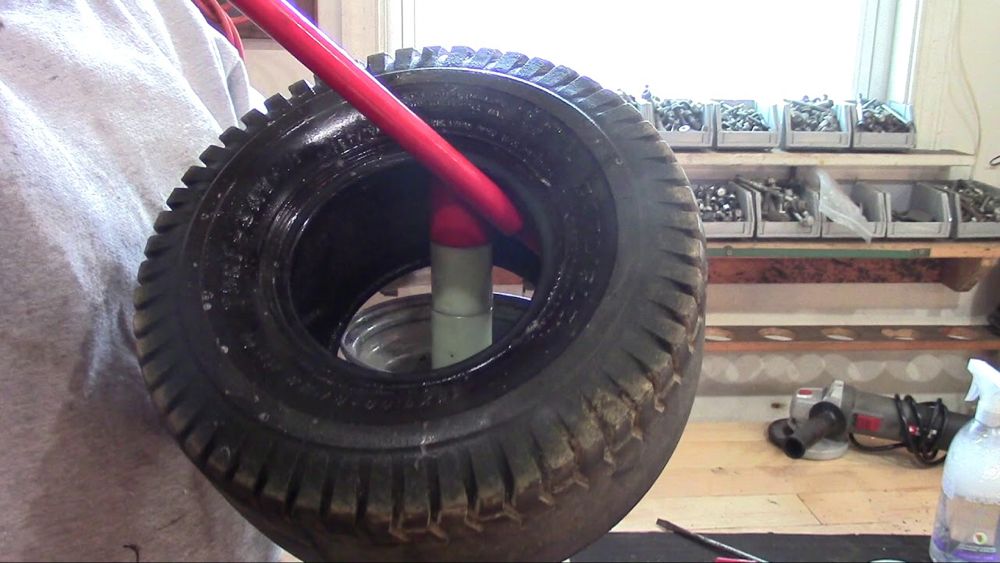 Then, it is hidden behind the lifted edge of the wheel. The only time it will be in plain sight is when it has sustained damages in the assembly – also your cure to have the tire and wheel repaired or replaced.
Bead damage can be caused by driving on under- or overinflated tires that make the bead slip, eventually damaging the bead. In addition, smashing off-road obstacles or curbs with the sidewall can result in bead damage.
All the issues mentioned above are avoidable. However, the curse of a subpar installation may not be avoidable. If the installer relies on the wrong equipment and does not clean the surfaces properly, your vehicle’s tire beads can get damaged faster.
Fortunately, tire beads are made to last for a long. So long as you are taking care of the tire, have a good driving style, and ensure the tire is mounted correctly, you will not run into any problems with the bead.
How would you tell there is a problem with your car’s tire beads? Leaks.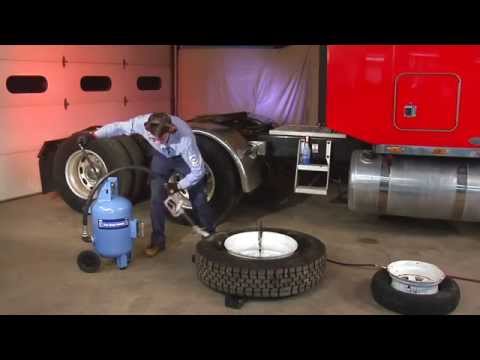 The moment there is a leak that cannot be designated to a hole in the tire, leaky valve stem, or a crack in the wheel, rest assured, there is probably a problem with the tire bead.
Leaks come in all forms, sizes, and shapes. It can be anything from a slow leak to a complete blowout. When the bead comes out of the tire, there is no question that there is an issue.
Depends. Mostly if there is a slow leak, the bead might simply have to be reseated. This also works for scenarios where the tire is knocked loose on a rim. You can reseat the bead as long as there are no serious damages that need to be repaired.
Although, the chance that the bead is damaged is always there. For instance, the chords inside might be broken, a rough edge inside the wheel may have chewed this part of the tire, or the rubber seal might be compromised. If you are facing problems with the bead, it has to be replaced. Check out how to re-bead a tire here.
We also suggest consulting a professional first who can assess the situation and determine the best course of action.
You may want to break tire bead of your vehicle by yourself to save money and keep up the maintenance. What breaking the bead does is remove any debris or dirt that would otherwise be lodged in the surface.
A mechanic can perform the removal but will charge some money for it. Breaking the tire bead is a task that can be completed on the driveway – with the right instructions, of course.
How do you break tire bead, you ask? You break the seal between the tire and the rim. You might have to do that to place a patch on the interior of the tire, change the inner tube, or swap tires.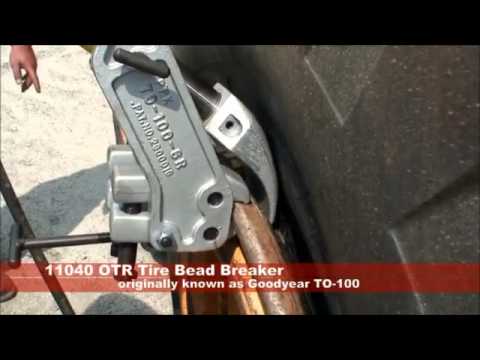 Breaking the bead is a fairly simple concept.
The bead has to be driven off its seat. You can do that with special machines, special tire irons, or a dedicated bead-breaker, all of which require special steps.
In some cases, yes it is. Those who have performed tire repairs before and are somewhat comfortable with it can do it in their home garage. We recommend bringing truck tires to a professional, though.
These repairs are quite cheap but don’t try to attempt one if you don’t have the right equipment or have not tried something similar.
So, let’s know more about how you can do it yourself.
Before talking about how to break tire bead, we would like to introduce you to a set of tools that will make your work easier and safer. A bead breaker is a tool that is made to separate tires from rims. Various kinds of bead breakers have to be used in different ways. There is also a specific tire mounting machine that can help.
Tire mounting machines can be found in local tire shops and are very common. This option seems to be the safest one. As long as you abide by the operational manual, you can do the job with ease.
The only issue is that we do not generally have access to this type of machine at home or places where we may need to break a tire bead. These machines are surely not cheap but we would say they are well worth the investment if you think you will be needing them often.
A bead breaker like this uses a plier-type tool to apply force between the lip of the rim and the bead. There is a spike in the tool for this task. More precisely, this spike puts some pressure on the sidewall of the tire and bead to separate them. Thus, it weakens and exhausts the connection. This mechanism is very effective and can do the job pretty fast. However, it isn’t without its disadvantages.
The spike acts as a double-edged sword and it may leave scratches on the wheels and the surface. Furthermore, the mechanism is quite big and heavy, so you have to exert your full body weight to get good results.
Much like the name suggests, the shoe and lever mechanism features a shoe-shaped tool that can exert pressure on the sidewall of the tire. To break the connection between the rim and the bead, car owners have to push the sidewall.
Without a doubt, this is the most popular bead breaker available in the market today, as it works great on new passenger vehicle tires, motorcycle tires, and trailer tires.
There are quite a few advantages of this bead breaker. Firstly, it is relatively cheaper, so anyone can buy one for their ride. Secondly, it is easy to use so no one is likely to struggle with the usage. Finally, it is designed for passenger car tires.
Conversely, it does not go well with hard-to-change and old tires. As the shoe and level mechanism carries significant weight and size, this breaker is only compatible with some specific types of tires.
Without a shred of doubt, the most efficient and quickest working bead breaker of all time is the clamp and ramp mechanism. If a plier type or a shoe and lever mechanism cannot solve the issue with a difficult-to-replace tire, you can rely on a clamp and ram mechanism to do the job.
To do that, this machine is equipped with a pointed foot tool which it uses to exploit the space between the rim’s lips and the bead. The bead breaker also comes with a padded clamp. Little effort is needed to enter this part into the sidewall.
In summary, only this machine will work with every kind of tire with minimal manual labor. Plus, it does no damage to the tires or the sidewall. However, the downside is that it is costly.
Since you are already familiar with all the available tools, let’s get onto the key topic of today which is “How to break tire bead?”. You can also perform this without any tools and we will get to that soon. For now, these are tools you need to execute this task:
You don’t go into war barehanded. Prepare your tools beforehand.
You start by taking off the valve core to release the air pressure. This step has to be performed both before and during the primary stages. Once the valve core has been removed, place the wheel under the brace. This will facilitate the release of the air and you can easily remove the wheel from the rim. Wait for a little for all the air to seep out of the wheel or it will be another problem.
Tip: Press your hand against the surface of the tire to check the tire.
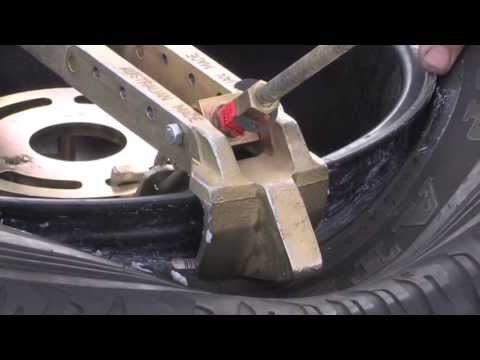
For this step, the car owner has to lay the tire on a rigid surface. Position the bead breaker between the tire and the rim.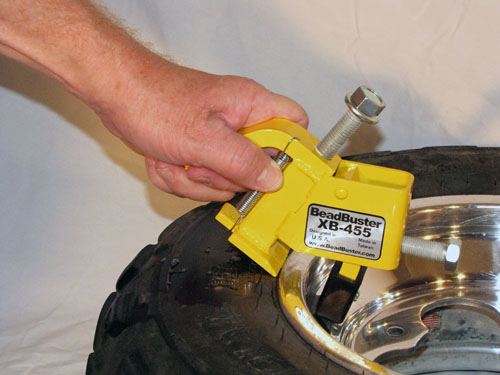 Before moving on to the next step, we suggest checking if the tapered edge of the bar is facing the tire, not the rim.
Additionally, a solid surface is required to progress as can handle the pressure you will apply on it in the future steps.
The following step is to slip the breaker bar between the tire and the rim. Make sure to ensure the pointed edge of the bar is pointing away from the rim of the tire. The reason behind this is that the edge is super sharp and may scratch the insides.
Once the breaker starts steadying in the distance between the tire and the rim, it is your sign to hit it with a hammer. This should break tire bead. But don’t be too forceful or you may end up destroying the tire.
The idea is to push the breaker insider. Keep on pushing and hitting the breaker bar in the direction of the ground until you can hear a small pop sound – indicative of a broken bead.
The final step to how to break tire bead with breaker bad is to remove the tire from the rim. Turn the breaker around the inside of the tire while hammering it from the top. Continue doing this until the tire slips off the rim, then do the same with the other side of the tire.
As mentioned above, this is an effective way to break tire bead. Below we will teach you how to do that with this tool. You will need a handful of extra tools:
All of these materials serve a purpose. Lubricant is to loosen the rim and bead contact; the valve wrench to take out the valve stem; good tire spoons remove the tire off the rim; and nut tightening tools to loosen/tighten the tool nut.
You don’t need tools to break tire bead. Here’s how to do it by hand.
Before you can do anything to the tire bead, you have to place the tire flat on the ground. You want the wheel to be laying down on a hard surface. We recommend going for concrete instead of dirt or grass as the surface could be uneven for the latter two options.
As usual, start by releasing all air from the tire evenly before proceeding to the next steps. You will need to have a strong grip on the tire for what’s next.
What does releasing air from the tire do? It reduces the PSI, or pounds per inch square, decreasing the pressure against the rim of the wheel. This makes it easier for you to remove the bead from the remaining rubber. In all other circumstances, you want to ensure that the wheels of your vehicle are fully inflated.
One technique is to turn the cap of the valve steam counterclockwise. This exposes the metal pin found in the core of the valve. Using a screwdriver, two needle-nose pliers, or a small tool of similar design, push down on the metal pin. When the wheel has released enough air, lift the mechanism off the pin and this will stop deflating the wheel. Change the cap once done.
You could also want to deflate the tire completely. For those instances, unscrew the metal pin using a pair of needle-nose pliers. You will find the air escaping much quicker.
Next, you have to prep the area close to the inner circle of the wheel. When the PSI is too low to keep the bead secure, you will find that pulling off the rim is easier. If the tire bead does not want to budge, you might have to either deflate the tire completely or exert more force by standing on the tire when you pull it apart.
As the bead is securely held against the rim by glue and steel cable, you will require a lot of pressure to break the connection. Applying a bit of automotive lubricant by the rim’s edges will facilitate the process of sliding the rubber from around it. Tape it before applying lubricant to protect the metal from sustaining scratches.
You have to push the rubber downward with as much force as you can muster to make the bead pop out. Be careful and follow around the seam to prevent damaging the metal rim. The metal should be protected well if you followed the preparation step mentioned above.
The lining will be easy to grip and detach until it can be pulled out entirely. You can also remove the rim without any additional machines or tools. After the bead pops out, the rim will be separated from it easily.
You should not ignore the tire bead simply because it isn’t prone to failure under general circumstances. There is a lot of scope for things to go wrong.
Like we said, ignoring air pressure can be rather damaging for your vehicle and is usually the biggest offender of damage to tire bead. Underinflation can be particularly dangerous since there isn’t adequate tension to maintain things in place. The seal made by the tension will do its job only to a certain extension. The tire’s air pressure is just as important in keeping it in place.
Overinflation can raise the bead from the wheel and give rise to issues with bead slippage. Maintaining tire pressure is once again essential to protect the bead. The sudden shock to the sidewall is enough to push the bead off, causing significant problems. What to do if you still manage to hit one and the bead stays in place somehow? Check the tire and wheel just to be safe. Even if the bead remains where it should be, it isn’t a pass. The seal can still be cracked or broken.
A tire bead can be broken in more than one way. The conventional ways are existing alongside the modern method of doing it. The most common method nowadays is one that uses the clamp and ram mechanism. You can buy brands of this tool in the market.
Whatever method you go for, as long as you are comfortable handling the equipment, you should be okay. If you are not feeling confident with the job, however, get help from professionals. Bring the tire(s) to a shop where they will use machines to break tire beads effortlessly.
These tools have been tried and tested by our team, they are ideal for fixing your car at home.
Tags: Ad/care/damage/diagnosis/DIY/Guide/maintenance/repair/repair cost/Service/tips/tips and tricks/tire/tire change/tires/troubleshooting
Author News Read 4 min
Contents
Tires on a trailer, like on a car, have wear properties.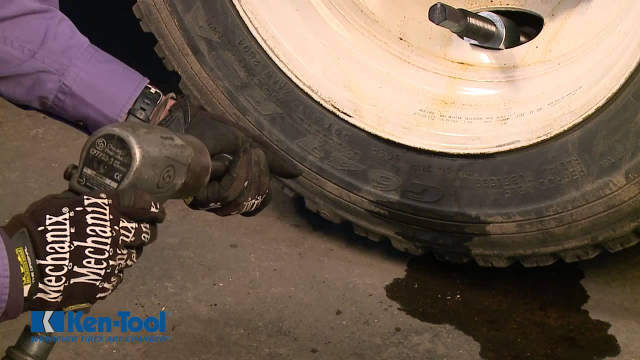 With a long use of one set, flaws will definitely begin to appear in the rubber. In addition, incorrect storage during their downtime can also affect the “life” of tires. Poor assembly and dismantling can also cause rapid wear of a set of tires on a trailer for a passenger car. Well, banal punctures or other mechanical damage can also force you to look for new tires.
Trailer shoes are not worth saving. For the sake of the safety of the cargo, and yours too, it is worth spending a little money than regretting it later after the tire explodes. Our company offers you quality tires to buy in Samara at the official KamaTyres.shop online store at affordable prices. Let's analyze the main components that should be considered when choosing tires for a car trailer.
First, determine how often, where and what kind of cargo you transport. If you often use a trailer, ride on uneven surfaces and carry heavy loads, then you should consider purchasing specialized tires with more bearing capacity.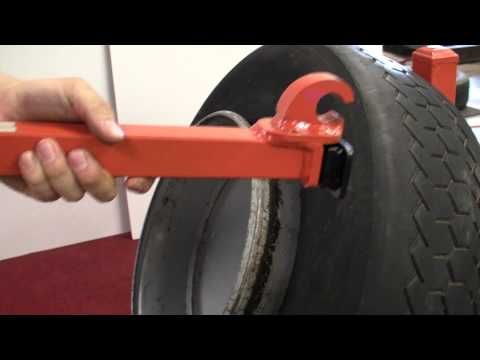 And vice versa. If your trailer is often idle, and transportation takes place on smooth asphalt, then you should not spend money on a specialized option.
Second, determine how much lifting capacity you need. You can see this index on tires. For example, if it is equal to 100, this means that one wheel can withstand a load of 800 kg. Accordingly, a two-wheeled trailer will be able to withstand the carriage of a load equal to 1600 kg, but no more.
Third, determine the amount of money you are willing to spend on tires. It is usually cheaper than a kit for a car. But at the same time, cheap options often turn out to be of poor quality and do not have a long service life.
If you are not sure that the new tire you have chosen will fit the trailer, you can compare its performance with the characteristics that are specified in the trailer's passport. If not, then you can simply take similar wheel models that you decide to replace.
If you are not satisfied with the price of trailer tires in the store, then you should not look for cheaper options.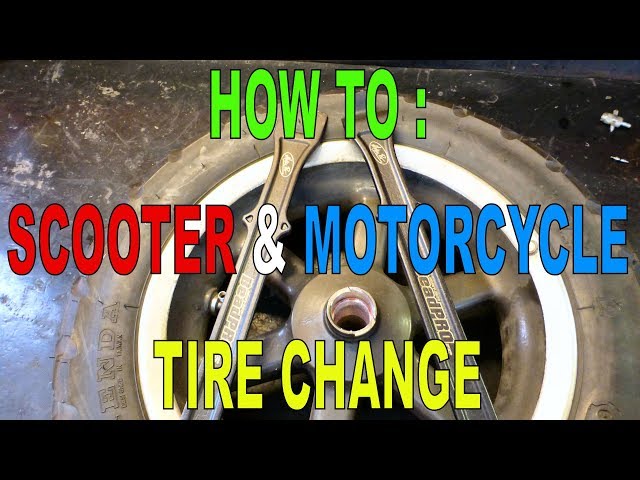 It is better to take high-quality tires and save their resource on the road or at home. This option will cost you the most over time. But how to extend their "life"?
Using all of the above recommendations, you can significantly extend the life of your trailer tires. In the same amount of time, you would most likely change several cheap and low-quality tires.
You can also save money on changing tires yourself. Here is a step-by-step instruction:
After installing the wheels on the trailer, inflate it to 3 atmospheres, and then gradually lower it to the recommended value (2-2. 2).
2).
AGROMASH trailers
are aggregated with tractors of any brand
Not so long ago, a new group of products appeared in the AGROMASH equipment line - universal tractor trailers and semi-trailers. They are developed and produced at Lipetsk Trailer LLC, created only two years ago on the basis of the former frame cabin workshop of the Lipetsk Tractor Plant.
At one of the exhibitions where the semi-trailer AGROMASH - LPT 10-2P was demonstrated, the correspondent of the magazine "Agromash" inquired in detail about the novelty of the head of the commercial service of LLC "Lipetsk trailer" Alexander MURATOV.
The old gives birth to the new
- Alexander Viktorovich, trailers - they are trailers. You can hardly imagine anything extraneous here. Nevertheless, Lipetsk trailers cannot be confused with others. Does the company's products that you represent here have much in common with trailers from other manufacturers?
– Of course, any novelty is not one hundred percent new solutions.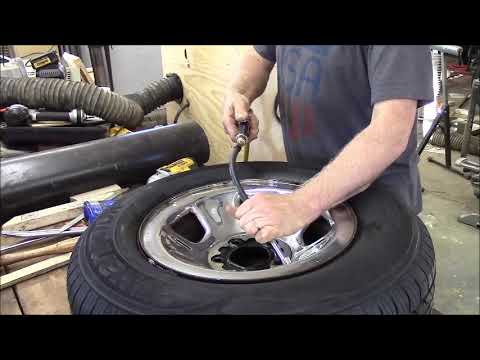 But not completely a repetition of the old. Here are our designers with machine builders and managed to combine a lot of things that justified, proven from the practice of trailer building, with advanced technical and technological solutions. With which - I will try to briefly talk about this.
– And how long is the line of Lipetsk trailers?
- Not very long yet. After all, our plant is quite young. Now we produce trailers and semi-trailers with a carrying capacity of 5.5; ten; 12 and 14.5 tons, which are used in tandem with the most common tractors with a traction class of 1.4 - 3 and above. But a number of models with a carrying capacity from 4.5 to 20 tons are already being developed and implemented - both universal and specialized. I will name some: hermetic (monolithic), “Power push” type, bunkers-loaders, with the “multi-lift” system, timber carriers, bale carriers, etc.
Wherever you turn, it will come out
– And now let's talk about the presented AGROMASH model – LPT 10-2P. The trailer probably starts with a drawbar. It is immediately clear that it is not the same as we are used to seeing on other trailers ...
- Our drawbar is a swivel hitch type that rotates. This is necessary in order not to break the coupling devices of the tractor and trailer when driving on uneven terrain.
Assume that when a tractor is driving up a hill and a trailer is following it, even on a slight slope the trailer's thrust vector deviates from the tractor's thrust vector as the trailer leans. If the loop is not swivel, then the hitch of the tractor or trailer breaks, and even failure of both is possible. In many cases, when the hitches can withstand a large load, the tractor falls on its side. Nothing like this will happen with AGROMASH trailers, as the drawbar will rotate.
– Will the drawbar handle the load? The trailer is designed for 10 tons!
– Easy to handle! The maximum force on our loop is 11 tons.
- That is, to load 12 tons and don’t even think about it?
- No, the force on the eye and the weight of the trailer are completely different concepts.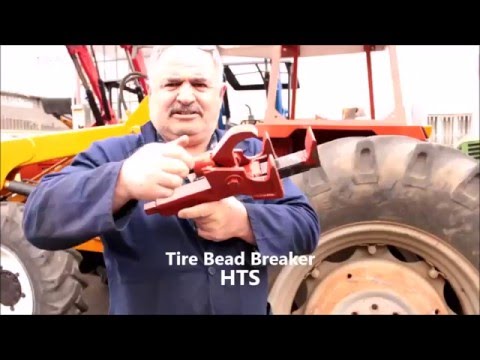 In our case, with the help of a loop, you can lift an 11-ton weight. Very few models of Russian-made trailers have such a mechanism, a swivel loop.
– What other modern solutions did the designers use?
– There are many. Drawbars of trailers of AGROMASH models are adjustable in height and have three positions: lower, middle and upper. What is it for? The trailer must always follow the tractor's thrust vector. Different types and models of tractors have different hook or hitch heights. And you can choose the optimal hitch using the height-adjusting drawbar mechanism.
There is also a support that allows you to manually change the height of the inclination of the main beam to speed up and facilitate hitching the trailer to the tractor.
The design of the trailer, in the complete set presented by us, also provides for a rear coupling device with two outlets for pneumatics, hydraulics and electrics. This allows you to create a so-called "tractor train" of several trailers and transport more than 20-30 tons at once, or even more cargo.
A good brake is not a brake on work
– Something new, interesting is used in the braking system that ensures the safe operation of equipment?
– The trailer of this model is equipped with plastic wheel chocks, which are used during parking, especially when the trailer is not aggregated with a tractor. On the new modifications, more compact folding stops are provided, which are easily "hidden" in special pockets under the equipment frames.
Our models are equipped with a two-wire braking system with power and control circuits, with the ability to connect to domestic tractors with a single-wire system, as well as American and European tractors with a two-wire system. The dual-circuit device has tangible advantages in terms of controlling the trailer braking force.
Depending on the load, the AGROMASH trailer brakes differently. Suppose we are traveling with you with an empty trailer, We press the brake, and the trailer slows down earlier, because our tractor starts to brake sharply, it may even slip.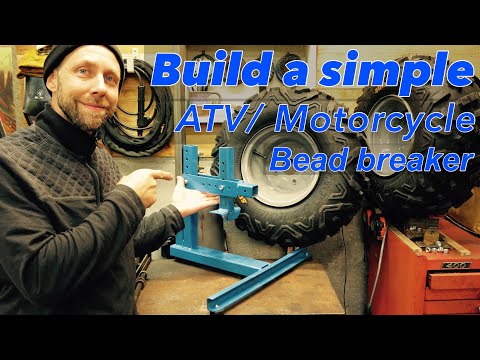 This is not good. The air distributor is equipped with a brake force adjustment system. A special handle can change the position depending on the load of the trailer. There are four positions: empty trailer, half full, full trailer and brakes off.
With a flick of a finger
– As far as I noticed, visitors to the exhibition are interested in the peculiarities of unloading the cargo…
– The AGROMASH trailer is equipped with one hydraulic cylinder, which stands in the center and makes it possible to tip the body on three sides: left, right and back. How does this happen? The trailer has a set of pins. They are located, for example, at the back - in this case, the trailer tips over backwards. To tip the trailer to the side, we rearrange the fingers in the brackets of the desired tipping side. There are always two fingers, and four grooves. This is the so-called "fool-proof".
For unloading grain, some bulk materials, the tailgate is equipped with a chute valve, or a window.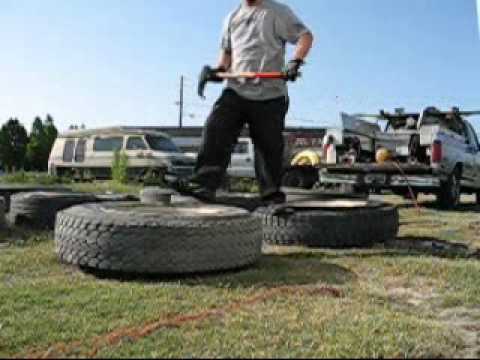 Any standard unloading mechanism can be installed to it. As practice shows, very often the window is clogged with the remains of grain, manure or something else. Therefore, problems arise. The designers of the AGROMASH trailer took this circumstance into account. The window on our equipment has a powerful long lever with a reliable design for opening.
– And how reliable, durable, safe are the mechanisms of unloading systems?
– Here, too, there are fundamental innovations. I will stop at just one position. At the back, the tipping device is equipped with a special ball around which the glass wraps. It contains a special fluoroplastic spherical sleeve. Our ball is made of 40X steel with heat treatment. By the way, almost all similar trailers, including the European one, have a ball made of ordinary non-hardened structural steel. So, in five years it will fail. Ours will last almost forever. Unless you have to occasionally, not earlier than 1 time in 5-7 years, change the bushing gasket.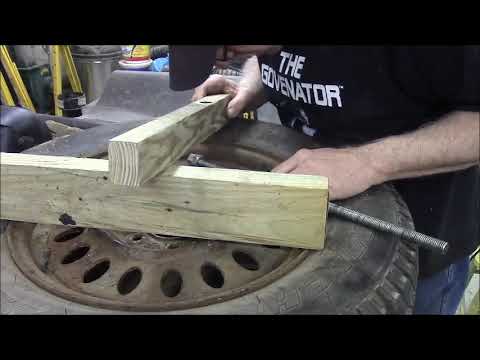
Board - from the rolling mill
- The board of the AGROMASH trailer is made at the rolling mill. It's not a cheap pleasure...
– And who said that the production technology of good equipment is low-cost? The side of our trailer has a special shape, taking into account the design load. What does it give? The board at our camp is already closed in a “box”. It is sealed and sealed from the inside. This means that moisture does not get inside the profiles, the service life is extended up to five times in comparison with the usual trailer sides.
Now we have three modifications of the trailer with different types of sides. The first is ordinary welded, that is, the sheets are welded to profile pipes. The second is profiled welded, which is welded from three parts: lower, middle and upper. This does not affect the durability of the board, but reduces its cost. And the third equipment is the European type of board.
– Is there enough body space to carry goods? Indeed, in agriculture, it is often necessary to transport large volumes of goods with a low specific gravity - straw, grass, etc.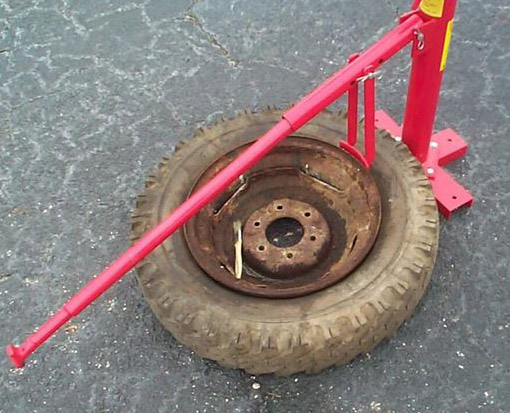
– This model of the AGROMASH semi-trailer, as well as trailer models, can be equipped with extensions, which increase the volume of the body at least twice - up to 13 "cubes". Moreover, the sides can recline both up and down. For his? For example, when unloading grain, if the side is opened from above, a person may be injured. Our design allows you to open the side from the bottom, raise the trailer. In this case, the grain by its own weight opens the board and spills out.
In addition, the trailer is equipped with a side tie. This prevents the sides from bursting when transporting, say, grain. It also allows for easy unloading.
Why invent the wheel?
- There are really a lot of new, modern technical and design solutions in the trailer. On the wheel, something new, I hope they didn’t come up with it?
– Domestic wheels 16.5/70-18 are used on the entire line of AGROMASH trailers with a carrying capacity of 5.5 tons. These are the most common KF97 wheels. Buy them and change - no problem. Compared to imported counterparts, which have a fairly long delivery time, Russian tires are several times cheaper.
The type of suspension on the presented trailer is tandem, that is, with two axles located side by side. This is a big plus for maneuvering and deployability. 30 percent of the weight is on the drawbar, 70 percent on the axle. In the case of the presented model, the declared carrying capacity is 10 tons, but according to our calculations, it can actually hold up to 13 tons.
Profile for the future
– Channels are used on almost all known trailer models. And here, as they said, profile pipes of rectangular section are used. Explain, Alexander ...., for what?
- They are closer to the center of the trailer. This allows for maximum rigidity with minimal metal consumption. Almost all domestic analogues use bent sheet metal, a channel or a rolled channel welded into a “box” - a rather “liquid” structure is obtained, which often cannot withstand the load, breaks.