Last Updated December 2, 2022
TireHungry.com is reader-supported. When you buy through links on our site, we may earn an affiliate commission at no added cost to you
Whether for proper tire disposal or for recycling into ornamental, farming, or gardening purposes, cutting tires in half is the most sensible thing to do with your old, scrap tires. However, tires are built with durable rubber to withstand extreme abuse and are wrapped inside with high-tensile metal belts, so you’ll need to be equipped with the right tools to get through them.
To cut tires in half, you can opt to choose between two easy-to-follow processes: First is by removing the sidewall with a knife or any sharp and pointed tool through the seam found in the sidewall just below the tread. The second is to reduce them into more manageable pieces with the use of power tools such as a jigsaw, circular saw, or Dremel tool equipped with metal cutting blades.
What's In This Guide?
Before you proceed with cutting tires, you must first check with your community if there are specific regulations on tire handling and proper disposal. Because tires are made with man-made rubber, they are non-biodegradable and their chemical composition can seep into the ground. That is why some local ordinances are very specific on this aspect.
RegulationSince scrap tires or old tires are considered solid wastes, they are regulated primarily by state governments. As of writing, there are already 48 states that have specific laws or regulations in dealing with scrap tires management.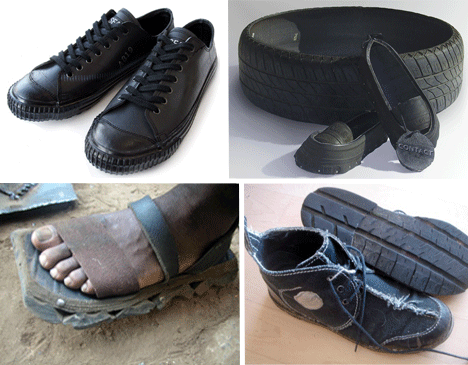 While each state’s program is unique, proper delegation on handling, disposal, and recycling are the common themes.
If you will cut tires just to easily dispose of them, without the consideration of reusing or recycling, you should also consider your local or municipal regulations. Some municipal ordinances have tire disposal guide requirements. For example, some specific guidelines mention that tires should be cut into a minimum of two pieces.
SafetyWhen cutting tires in half, you’ll be dealing with sharp and pointed tools for piercing through the sidewall and/or cutting through the tires’ tread. That is why safety must be observed at all times, keeping the tools away from the body is a good start.
Additionally, rubber fragments left after cutting tires vary in size, from considerable chunks to clouds of dust. This may have a chance to go through your nose or eyes which will cause irritation. On the other hand, the emitted fumes which resemble burning rubber can be toxic at moderate levels. Lastly, the exposed portion of steel belts is very sharp, so take extra precaution when handling cut tires.
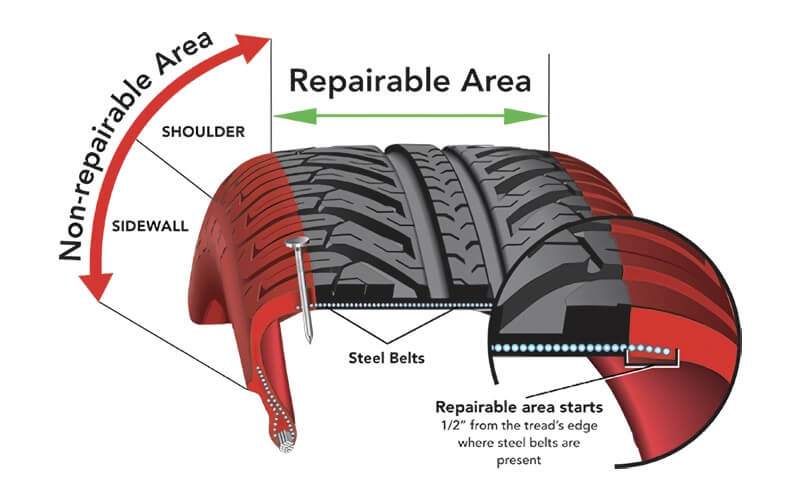
The ‘sweet spot’ of the sidewall is the softer and smoother part about one inch near the tread. This is the weakest point in the tires with virtually no reinforced belts. Having said that, avoid cutting too close to the tread nor too close to the rim as these portions are saturated with steel belts.
To do this, strike the sidewall with the tip of the blade forcefully. If you’re having trouble, or unsure that the blade will just slide through, an awl, ice pick, or any similar pointed tool will help.
The tire will likely roll or move while you’re slicing through the sidewall. To prevent this from happening, lay the tire flat on the ground, then step on the opposite section of the tire, away from where you are cutting. Another way is to keep the tire upright, locking your foot or thighs to prevent it from rolling. However, you should practice extra caution in this position and make sure that you are cutting in the direction away from your body.
Step 3: Cut through with a sawing motionYou can gain momentum if you are cutting with a sawing motion. Some tires have seams running through the sidewall, one near the tread and another near the rim. Make use of them as your guide while cutting through. When cutting along the sidewall, there will be a point that the blade will be harder to cut through the rubber. This is naturally brought about by friction, you can spray the blade with a lubricant and you’ll immediately notice the difference.
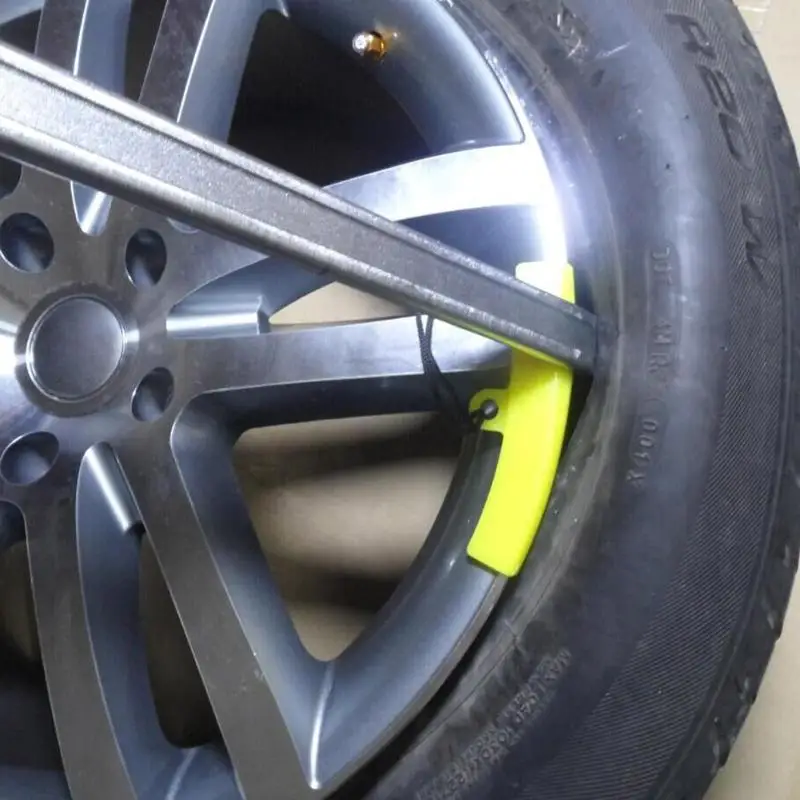
Wooden dowels keep the cut area open, making it easier to cut through the rubber. These dowels pry apart the rubber on both sides, preventing the blade from being stuck.
Step 5: Continue cutting until the sidewall detachesIf you’re already halfway through, rotate the tire a little half to get a new position to continue. This will make the process easier. You can also use your free hand to pull the other side of the sidewall to help you slice through.
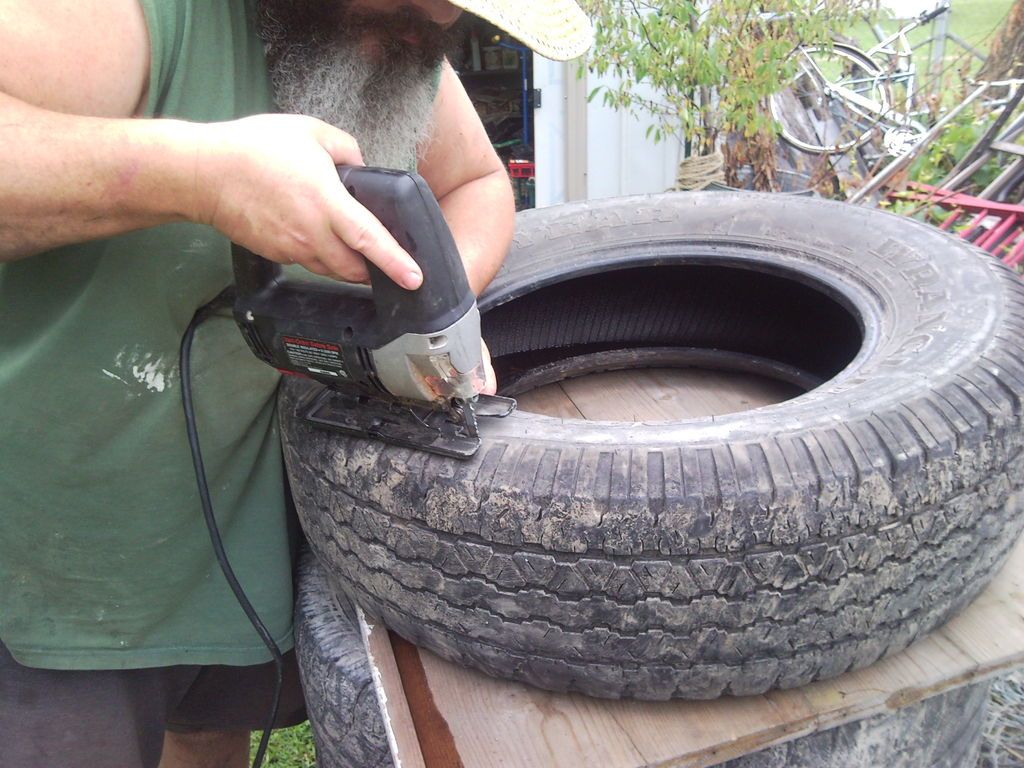
How to Cut Tires In Half Method 2: Slicing into Small PiecesTools you’ll need:Cutting tires with power saws will leave behind lots of rubber and metal fragments, not to mention the fumes cut tire will emit during the process. Work in a secured location with proper tools and equipment to promote a safe, efficient, and neat tire cutting activity. If you will be working outside with no power outlets available, ensure that the extension cord you are using is rated for high-voltage applications.
Any tire, regardless of its size, is stuffed with high-strength steel belts, with larger tires equipped with more reinforced steel. This is why it is necessary that the blade you’re using has the capability to cut through metal. Ferrous-metal cutting blades or metal grinding wheels will safely and efficiently do the task.
Also, wear your personal protective equipment such as safety glasses and a dust mask. The use of protective arm sleeves and gloves is also recommended to protect your limbs against metal shards flying out of the tire.
Step 3: Cut widthwise through one sideAs your tire is laid flat on its side, press the blade laterally across the sidewall, working your way slowly from the tire’s inner lip to the edge of the tread.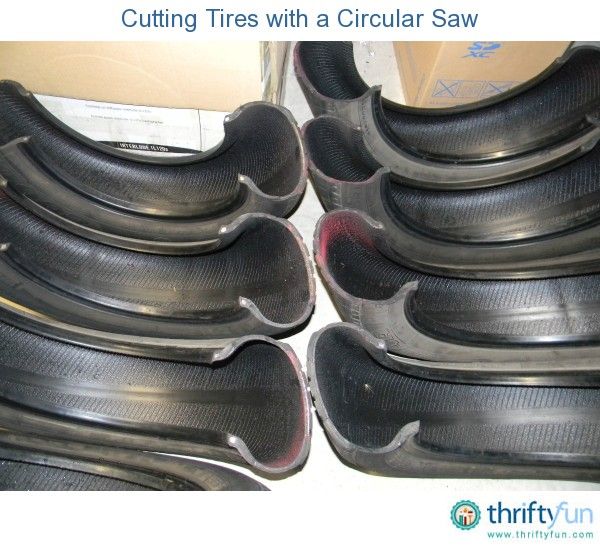
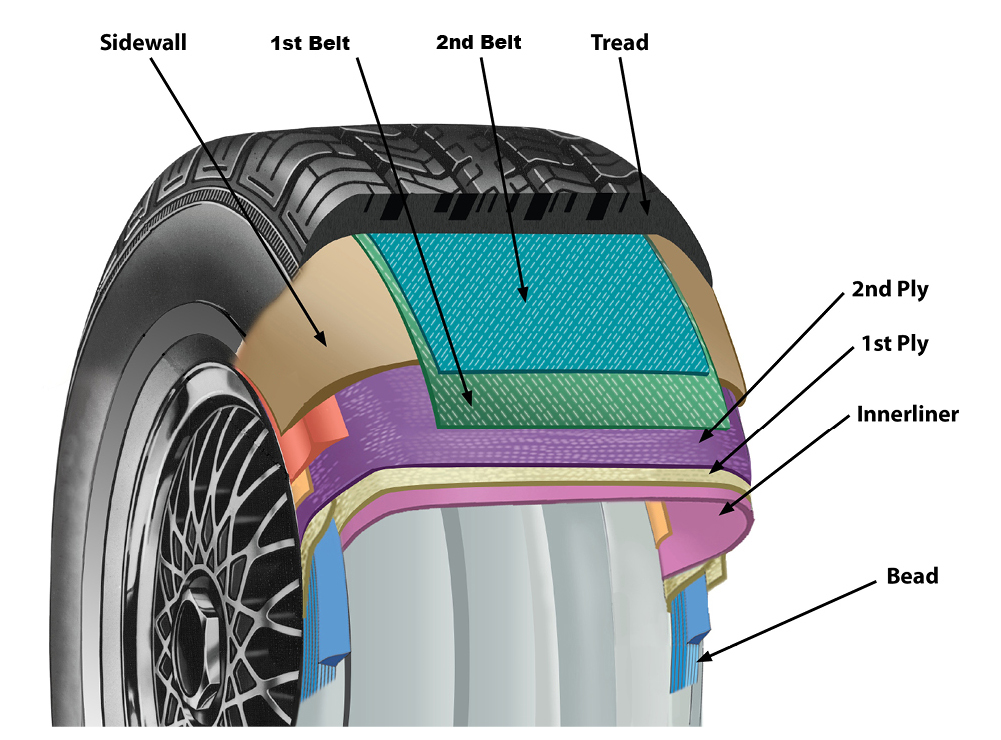
Keep in mind that the innermost tough part of the tire, called a bead, has a bundle of high-tensile steel wires wound into a rubber band. You may feel a slight resistance on this part but there’s nothing to worry about if you’re using the right type of blade.
Step 4: Complete the cut from the opposite sideFlip the tire over to cut on the second side, applying the same trick done in Step 3. Then, cut across the tread to completely separate each end of the tire. Next, turn the tire 180-degrees and repeat the process to have a tire neatly divided in half.
This technique will save you a significant amount of time and energy as cutting this way reduces strain brought by the resistance of inner steel belts holding the tire together.
Step 5: Continue cutting in halvesLike slicing a pie, continue cutting each pair of the tire equally into smaller sections until you’ve reduced it to quarters or eights. As the pieces become smaller, they’ll be prone to moving and sliding due to the reduced weight, keeping them in place with a vise or similar clamping tool will help.
Tire cutting, if not planned correctly, will entail additional yet unnecessary time, not to mention the extra effort that can be prevented in the first place. There are a few recommendations to consider such as starting the cutting process by piercing the sidewall with a pointed tool instead of the same cutting tool and avoiding cutting directly through steel belts manually.
Make a strong start by piercing a hole in the sidewall with a pointed toolUse an awl, ice pick, or any similar tool that can be used for poking into the tire. This way, you’ll reduce the pressure you’ll exert into striking the tire if you will be using a knife or box cutter.
Cutting directly through steel belts is time-wasting if done manuallyUnless you’re using a power tool, cutting directly through steel belts by hand requires too much effort, let alone your tool could dull or get damaged blades. Leave the cutting of tread and bead to a jigsaw, circular saw, or Dremel tool.
If you will be working with car tires, the process will be the same regardless of the size, as you will deal with the same steel reinforcements. If you don’t have any power tools in hand, you can use a good old hacksaw or a big pair of steel shears, though be prepared for a more tedious task, you’ll probably hurt your hands too.
Can I cut a tire off a rim?Yes, it is possible. In fact, with the right angle, you can cut through easily and as close as possible to the rim. However, the challenge is to keep the angle of the blade correct, as you don’t want the blade hitting the rim.
ConclusionThe tire cutting process may look intimidating at first. This thought may be brought about by the use of high-powered tools and patient dealings with tough tire rubber materials. However, if done correctly, and equipped with the right tools and equipment, you can get through with this process with ease. Just remember to put your safety first at all times.
Top Tire Retailers
Sometimes cutting tires is necessary for prompt disposal.
These are tricky beasts to tackle—so arm yourself and prepare for a potential struggle. You’re going to need several sharp tools, patience and strength.
Here’s how you cut your tire in half:
To cut tires in half, you’ll need a power tool—for example, an industrial chainsaw or circular saw. It needs the ability to cut through metal.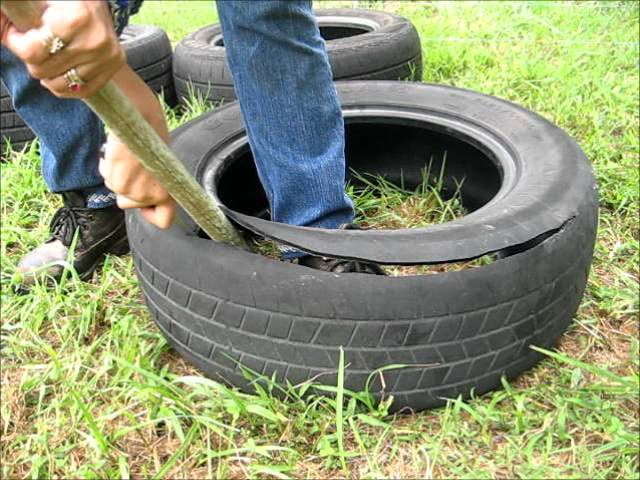
If you need to remove the sidewall first, you’ll also need a sharp blade, and dowels.
Before we get started, there are precautions you need to take. This will help you avoid mishaps and discomfort.
Manufacturers often thread tires with steel, so protective clothing is a must. Try to avoid overly flammable clothing, in case of sparks. Make sure you also wear:
If possible, look into purchasing a welding apron too. It’s not vital, but an intuitive precaution to take.
Not all tires contain steel, and there’s no guarantee it’ll spark. But it’s better to be prepared than cause an accident.
Try to stick to areas lacking flammable shelving, or nature. You can work in or outdoors—just do it smartly.
If indoors, remove everything from your workspace that you won’t use in your task. If you have wooden shelving or otherwise immobile and flammable objects, cover them with a flame proof tarp.
In an enclosed workspace with wood or drywall, hang these tarps from your walls, too. Steel and concrete walls and flooring are safest, though.
Similarly, try working on concrete outdoors. Avoid grass and trees—even small sparks can be disastrous.
As you tear through the material, it’s going to get hot, and burning rubber stinks and produces fumes.
This is another reason to consider working outdoors. If that’s not possible, keep all the windows open, and a door to the outside open too if possible.
Make sure you take a break if the smell becomes overwhelming. Inhaling a little won’t hurt you, but burning rubber can be toxic.
Cutting up tires is easy in theory, considering their strength, and their metal content, though, it looks more arduous.
Luckily, there are simple steps to take that make the journey far easier.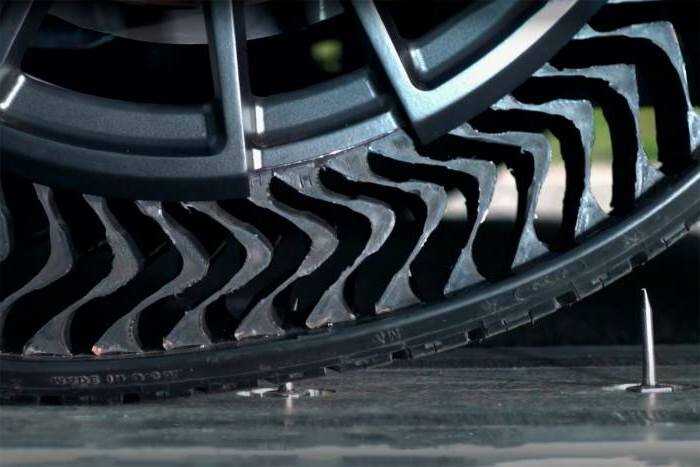
When combating a tire with a saw, the sidewall can get in the way. It’s much simpler to attack the thickest piece of the tire directly.
There are only two steps to removing the sidewall but, of course, you can skip the removal and get right to cutting, if you need your halves or parts to have sidewall.
Grab a sharp blade that won’t bend. An awl is best—but any sharp blade will suffice.
Create several puncture holes, an inch deep, near the tread, but avoid getting too close to it—there may be steel reinforcements in place. If you tackle the steel with a blade, you’ll damage the blade and waste time.
You can create punctures all around, or in one spot. Creating them in one spot will help you get a wider blade (consider a saw, electric or manual) inserted smoothly.
Puncturing all around the tire will make those areas a little easier to get through.
Once you have a puncture area large enough, work a saw or other blade of choice into the gap. Now follow a generally rounded pattern as you go.
If desired, you can lubricate your blade and tire as you cut. This will help eliminate the stench and heat caused by blade-on-tire friction. Regular WD-40 will suffice.
It’ll be easier to keep cutting if the tire isn’t constantly rubbing your blade. Place dowels every few inches to keep the tire separated.
Your blade has more wiggle room as you progress. so you’ll be able to remove one dowel, shove your fingers down the gap, and pull the sidewall out when you finish cutting.
Once you remove the sidewall from your car tyre, the rest is easy—in theory. You only need one tool: an electric blade that cuts through metal.
Let’s go through this in steps, too.
Before you start cutting, ensure your tire is secure. You may wish to clamp the sides if you work indoors. It’s best to use old clamps you don’t care about, on a metal table that you’re fine with scratching or denting.
Outdoors, consider securing the tire to the ground with rope.
Now you can get to work straight away. Double-check your tire is secure, ensure you have help nearby in case of a mishap, or you requiring assistance, and arm yourself with the electric saw of your choice.
Ensure this blade can cut through metal. Tires often contain steel belts, giving them more stability.
It’ll take some strength, but fire up your saw and cut straight through the tire—tackle one side at a time, cutting down into material.
Walk around to the opposite side, and make a cut there. Now your tire is in two pieces, and you can cut it into more if you wish. Remember, the smaller the pieces, the easier they are to transport and dispose of.
If you want to cut your tire as small as possible, consider turning it into scrap. You can use this scrap for future projects, or discard it with ease.
For this, you’ll want to cut the tire into quarters, or smaller sections. Now you’ll need an adjustable clamp or vice.
Here’s the gist of it:
This should leave you with small, curved strips of thick rubber.
If you choose not to repurpose your tires, you can search for a facility that recycles them.
There may be no facility close to you—research online, or call the appropriate department in your city’s services. They’ll be able to advise you.
Please never burn your old tires as it has a detrimental effect on the environment. Also avoid taking them to a landfill—rubber bio-degrades, but it’s a slow process, which is far from ideal.
If you can’t find somewhere to recycle your tires, you could give away or use the scrap. There are many DIY enthusiasts who’d put it to excellent use.
If you or someone you know enjoys DIY, there are uses for your old tires—whole and cut.
If the tire cutting intimidated you, there are plenty of ways to repurpose your old tires. You can turn them into an item to use in your home, or someone else’s. Consider:

Here are some ideas for if you went through with the cutting, but can’t find anywhere to dispose of your cut tires.
Finally, here are some ideas you can use for putting cut scrap rubber to excellent use:
Cutting tires in half is a tricky business, but gets easier after the first time. Ensure you take the necessary safety precautions, and nothing should go wrong.
Please don’t attempt to substitute any of the tools used in this process and dispose of your cut tires responsibly.
If you lack a place of disposal, why not turn your tires into something new and exciting? It’s a fantastic activity for you, or someone crafty in your family.
Home » Miscellaneous » How to cut a car tire
I think it will be clear from the picture: why cut the tire. Indeed, they do not rot and do not spread from the sun-frost. Accidental blows, unlike asbestos-cement sheet, do not harm them. After all, there are many applications for rubber bands. Even if you don’t turn over the beds, like mine. Even if not cut tire on the tape, the hoops obtained from it can be used as a compost box or a vertical bed. Yes, one hears a lot that, they say, it’s harmful, terrible and all that. Don't know. But my ants, it is near the rubber, that they arrange their summer masonry-incubators, where they keep their pupae. Whether from rubber harm - I do not think that they would have worked like that. And if they are not afraid, then I somehow do not fit.
OK. Everyone decides this question for himself. But who decided to cut the tire for their needs - so a few tips:
Start cutting the tire with a shoe knife. We carry out several times on the same cut, pressing on the board so that the cut diverges and cuts through. Now we insert a good knife into the cut, sharpening towards ourselves (I made a special cutter from an industrial hacksaw blade) and cut with an “up-and-on” movement, simultaneously bending the cut to the side. Cut the tire like cutting bread - no need. Rip up the rubber. And it is not necessary for a knife to be razor-sharp: a slight sawtooth burr is only good.
I recommend turning the tire inside out for the winter and letting it mature. Otherwise cut, it will become a wave. It is necessary to remove the trough shape, which will give a long aging of the hoop. And you can do it differently. Make a bunch of cuts on the inverted tire.
You can cut hoops into ribbons with an ordinary, small grinder. Just take care that the wind is not on the neighbors, otherwise you cannot avoid an untranslatable pun (in one of the local dialects) because this is a stinky business. BUT! The rubber is nicely cut off by a grinder, the metal cord is also striped by it. In general, cutting a tire is a quick business if you see how once. And to make it completely clear - here's a video for you, where the tire cutting takes place in real time.
When processing and manufacturing products from old tires, there are pitfalls that are hidden from view, and appear only directly in the process. This article is devoted to these stones.
The tire must be firmly fixed, or at least the part that is currently being cultivated must be fixed. In our case, an original technique for cutting tires has been developed. Based on this, it is necessary to cut the tread first of all while the tire has maximum rigidity.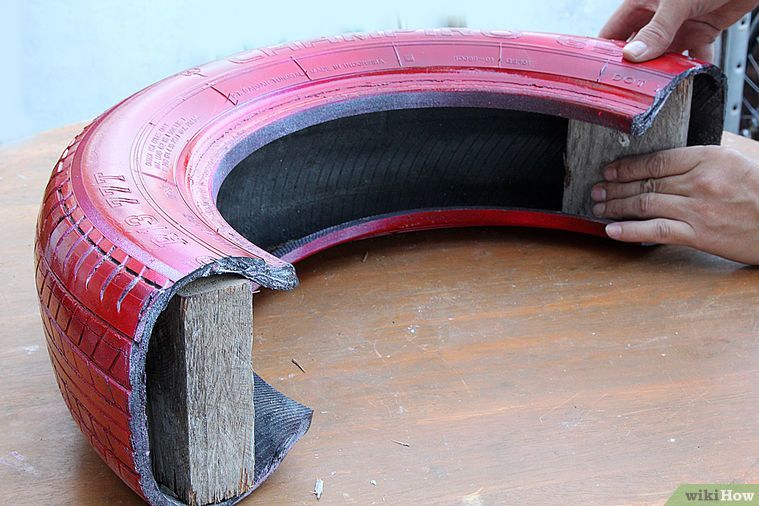 If there is, you need to cut the protector and not rest against anything, a bull glass jar will come to the rescue, although after sawing 5-6 centimeters, the jar needs to be moved.
The threads of old and new tires are different and the results i.e. the properties of the cutting elements are different. For clarity, if you make a swan from a bald tire, then the head of the swan falls into the front, and if from an almost new one, on the contrary, the head is thrown back.
The metal cord is located only over the entire area of the rubbing surface. The metal cord, together with the thickness of the tread itself, creates additional difficulties when cutting the tire.
It is very, very difficult to cut a tire with a hacksaw, and in some places it is completely impossible.
When processing the main rubbing surface, use:
 Having tried several jigsaws, I was surprised that not every jigsaw can cut a tire.
 But the sides of the wheel are easily cut with an ordinary knife. Rarely, but aptly, there are tires without a metal cord at all - probably 1 out of 40.
The ring is a hardened stranded metal rod bent into a ring. Cutting with a hacksaw for metal is unrealistic, but it can take a long time. The only way out is to use Balgarka. I think it's called the seat ring. Many immediately want to get rid of the ring in some cases, the rigidity of the ring is used in the design.
Wheels can be painted with any paint. Nitro enamel dries quickly, and allows you to immediately place and use the figures. But since rubber has to be painted, which deforms during transportation, the paint also cracks and bursts - regardless of the type of paint. Since the chemical reaction goes on constantly, therefore the colors fade, the white becomes with a yellow tint, so it is better if it is possible to repaint the figures every year.
Since the cord is a metal mesh, therefore, metal hairs are formed on the cut, which strive to cut through the skin. Metal shavings are not a pleasant splinter. Be especially careful with the eyes when sawing with a jigsaw.
I would like to immediately warn, but not to scare or dissuade, that the tire weighs quite a bit, and working with a cord and a metal nozzle ring implies the presence of male hands. On average, wheels of 13, 14, 15 radii - the most popular ones weigh an average of 5 to 8 kilograms, and if you judge that one cutting can take about 1 hour, then you will have to turn the wheel more than once.
For processing, cutting of an old tire, you need:
 3) - in a word, you may need everything;
 if you cut ALONG (along the circumference) then . FIG knows he did not cut. perhaps a sharp knife and soap as advised above or a jigsaw.
is again - if you don’t run into a cord.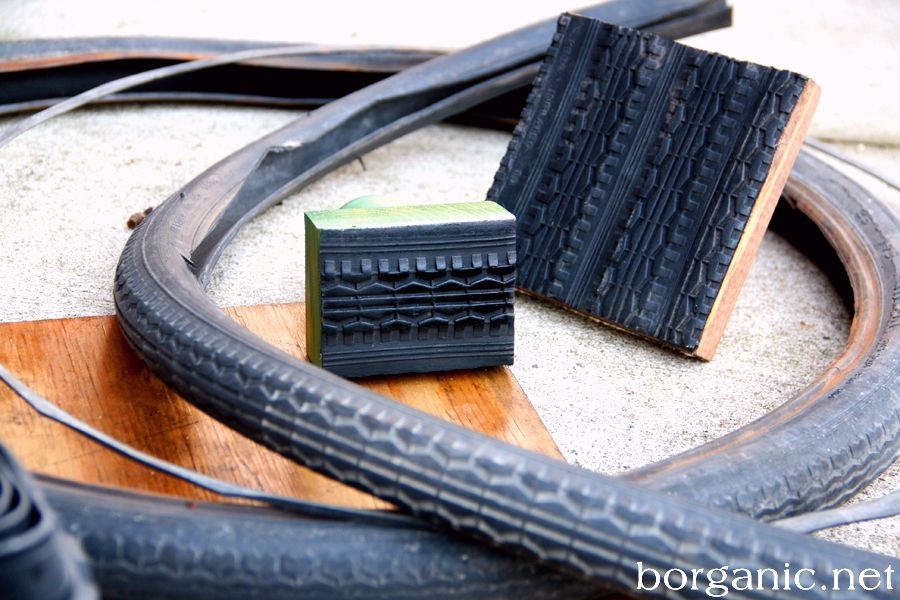
A video of how to cut the tire can be viewed here for .
Source mastedom.ru
Because the surface where the tire touches the ground is more difficult to cut because there is a metal cord.
To do this, you can use it like a hand saw, lubricating it with oil or soapy water, or a grinder with a metal disc.
I must warn you, if you have never used a grinder before, it is better to use a hand saw, since it is not difficult to catch the disc clamping when cutting the tire.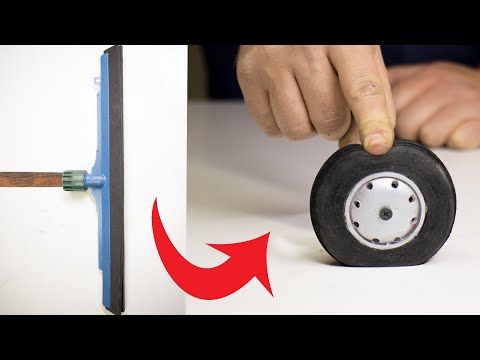 For this procedure, you need to firmly hold the tool and be able to cut correctly.
Since cutting is carried out with a sharp knife, which is constantly moistened with soapy water, oil, or at least water.
When cutting, it is best to pull back the cut piece to reduce the resistance to the knife.
This procedure is indispensable in the manufacture of various homemade products from tires, from flowerbeds of various designs to original garden figures and sculptures.
Source sam0del.ru
Modern industry produces many different types of rubber used in the most unexpected industries. Quite simply and quickly, you can find the right rubber gasket or the necessary rubber blank at the nearest bazaar. However, if you still need to make a rubber product with your own hands, then a couple of simple tips on how you can simply and accurately cut rubber will come in handy.
Rubber can be quite diverse in its properties, ranging from a very elastic and rather pliable material to elastic, durable rubber plates. The use of rubber can be found in a wide variety of ways, for example, cutting a suitable plumbing gasket, a heel for boots, or a non-slip support under a glass surface. Many carve out various kinds of animals from car tires, swings, or make interior items. You can make flower beds from car tires, but for this you need to know how and with what to cut a car tire.
The secret is very simple, in order to neatly and simply cut a piece of rubber, you need a sharp knife, of course. and ordinary water.
A piece of elastic rubber, a sharp knife and water.
First you need to mark the line of the cut (it was enough for me to simply set the knife blade evenly).
Start cutting rubber with a knife.
Cutting thick rubber with a knife becomes quite difficult as the blade goes deeper into the thickness. Rubber starts to become viscous, and if overzealous, the rubber can even melt. To prevent this from happening, and the knife went through the rubber like clockwork, it must be moistened with water (and not with oil, in no case should it be moistened with oil).
Wet rubber with water and cut with a knife.
The rubber becomes slippery when wet, and the blade of the knife will not get stuck and melt the rubber, so you get a smooth and quality cut without much effort.
Water-cut rubber block.
Sometimes there is a need to cut rubber circles, for example, for non-slip feet under a stool, heels, or for spacers between two glasses. In order to cut rubber mugs of an even shape, you need to choose a metal pipe of a suitable diameter, you will also need a piston that is suitable for the diameter of the tube.
A - metal tube, B - piston
You need to sharpen the edge of the iron tube with a sharpener or file.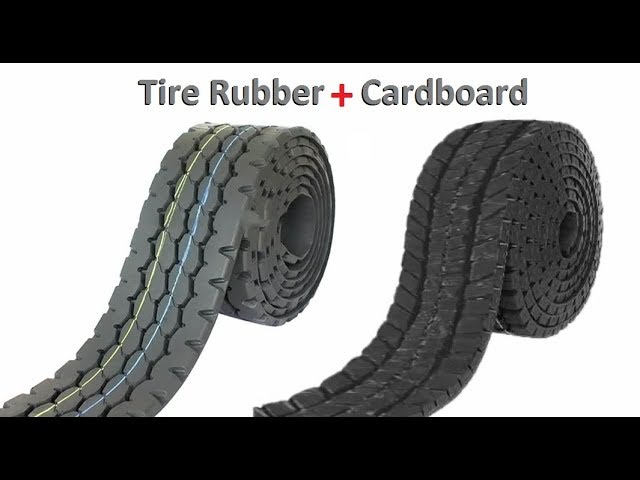
Sharpened iron tube
After you have sharpened the tube, you need to insert it into the drill chuck, moisten the rubber with water and simply start drilling holes, after laying the piece of wood.
Drilling round rubber pads
Using this simple tool and water, you can drill as many smooth, neat rubber rounds as you want (I use them to make non-slip feet for appliances). The sharpened tube acts on the principle of a drill, but as the circles are drilled, it is filled with them, and in order to pull them out, a special piston is needed.
You then simply push the rubber rounds out of the sharpened tube.
Squeezing the rubber out of the tube with a piston
The main thing is not to forget to moisten the rubber with water when drilling or cutting. It should be noted that cutting a circle using a sharpened tube is much easier and more convenient than using a drill in the classical way. However, if you need to drill through the rubber with a drill, it is also quite simple to do this by first sharpening it sharply, and periodically dipping the drill into the water.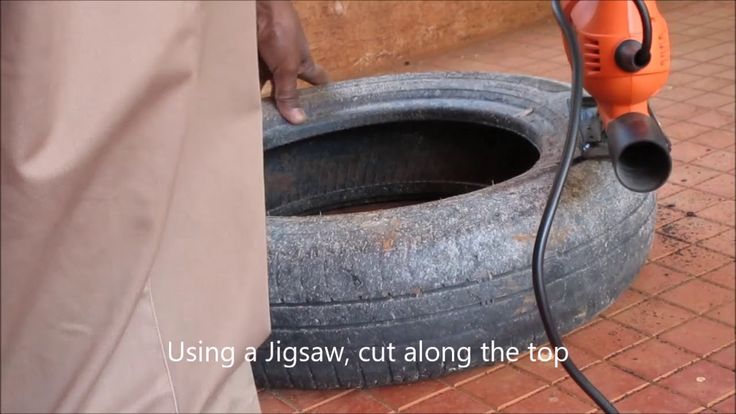
It is necessary to drill rubber at low speed and periodically wetting the cutting edge. However, if you need to drill through a large block of rubber at high RPM, you may want to submerge it completely in water.
Drilling rubber in water with a drill.
In the most extreme case, holes in thin rubber, as well as in plastic, can be melted by heating the drill shank or iron tube with a lighter.
Holes fused in rubber
Above all, be careful when working with hot metal. Also remember that rubber can release toxic substances when overheated, so melt holes under a hood or in a well-ventilated area. Follow all safety regulations even when drilling rubber.
When you need to cut a car tire (tire) with your own hands , it is better to know some tricks that will not only help make this process more enjoyable and less laborious, but also help protect yourself from injury and make the cut better.
Because the surface where the tire touches the ground is more difficult to cut because there is a metal cord.
To do this, you can use it like a hand saw, lubricating it with oil or soapy water, or a grinder with a metal disc.
I must warn you, if you have never used a grinder before, it is better to use a hand saw, since it is not difficult to catch the disc clamping when cutting the tire. For this procedure, you need to firmly hold the tool and be able to cut correctly.
Since the cutting is carried out with a sharp knife, which is constantly moistened with soapy water, oil or at least water.
When cutting, it is best to pull back the cut piece to reduce the resistance to the knife.
This procedure is indispensable in the manufacture of various homemade products from tires, from flowerbeds of various designs to original garden figures and sculptures.
Category: Auto repair instructions
Characteristics of the car: Dimensions of the car are as follows, length - 3826, width - 1100, height - 1323 mm. The wheelbase is 2382 mm. Ground clearance 211 mm. The car is equipped with a hybrid powertrain. The 2-cylinder engine is equipped with a system that provides the output power of the motor. There are 4 valves per cylinder.
Single cylinder diameter 72 mm, stroke 70 mm. The engine crankshaft and accelerates to 8000 rpm. The maximum torque is maintained up to 3000 rpm.
Posted by admin: at the request of Aristarchus
Watch the VIDEO about how to cut tires from Kamaz.
The reasoning of a car owner named Viktor: The price is 309 thousand. A trouble-free simple car. Everything is repaired with a hammer and some kind of mother))) many people complain about the stove, but I have no complaints
Release date: 10/18/2013 years
Laughter in the topic: Grandma gets on the bus and everyone immediately became interested in looking out the window.
uazbuka.ru > Technical > General technical questions > What is the best way to cut a tire?
View Full Version : What is the best way to cut a tire?
For some purposes (when I'll show you) I need a piece of tread from an old tire.
What is the best way to cut a tire?
1. Bulgarian? (cuts, but stinks and everything is covered in soot)
2. With a jigsaw?
3. With a knife?
Who had experience share!
For some purposes (when I'll show you) I need a piece of tread from an old tire.
What is the best way to cut a tire?
1. Bulgarian? (cuts, but stinks and everything is covered in soot)
2. With a jigsaw?
3. With a knife?
Who had experience share!
Solzhenitsyn in "The Gulag Archipelago" writes that convicts made boat shoes from car tires called "chuni from ChTZ" by cutting tires with 2 axes (one as a chisel, the second was beaten). And sewn with copper wire. 🙂
🙂
When operating a grinder, you do not have to do physical education. Thus, it is possible to remove worn-out rubber from the rims.
The disc diameter for the grinder is smaller and OK.
Do not cut with a jigsaw - longer.
A well-sharpened strong knife (in the sense the handle is thicker than a table knife). )
I made myself a container for water, I cut a balloon from K-700 with a knife quite successfully. And balloons from cars are generally easy. If only the cord is cut, then the metal of the knife.
Do not cut with a jigsaw - longer. A well-sharpened strong knife (in the sense the handle is thicker than a table knife). You pierce the sidewall with a knife and forward a little wetting the knife in water (you can practice it, but then try not to freeze the handle of the knife - it will slide)
K-700 is quite successful. And balloons from cars are generally easy. If only the cord is cut, then the metal of the knife.
+1. I cut the sidewall with an ordinary table knife with salidol or lithol. the mother-in-law remained satisfied with the flower beds.
A sharp knife and lubricated with glycerine, you can use perfume — it glides like clockwork and then is easily washed off with water. The method is recommended in the Chemist's Handbook for cutting rubber stoppers, and they are very hard.
Thank you!
I realized that it's better with a knife!
I'll try today.
Ideal for cutting with vibroknife, with lubrication just do quickly, it is better to use silicone grease. Only if there is a metal cord, then the knife instantly becomes dull and stops cutting, metal cord only with a grinder
If for the purpose of cutting the tread - then with special tungsten staples - in the form of staplers and a special straightener ... ... the result - as from the factory ....
you need to ask the rally drivers, or even better, the autocrossers. somewhere I even saw for sale knives for cutting rubber.
If for the purpose of cutting the tread -
That's what I did about 15 years ago. :) In the garage somewhere, there must still be a soldering iron tip with a U-shaped sharpened tip implanted in copper made of some kind of cool steel.
It is necessary to cut with a jigsaw, a rough saw, a grinder is much worse, it cuts more slowly and it stinks, be healthy and the klzhukh will shit all at once. Checked;)
It is necessary to cut with a jigsaw, a rough file,
Thank you very much!
Moreover, it is a rough file with a large tooth. At first I tried with a metal file with a small tooth (I cut the tire along the tread, and there was a metal cord, so-so-so little wires :), but there are a lot of them :confused :). A metal file with a fine tooth cuts wires, things go slowly, the file quickly sits down. And the file with a large tooth - it tears the wires, things are going much more fun. In order to strip the tire, it took 2 files with a large tooth and 10 minutes of time.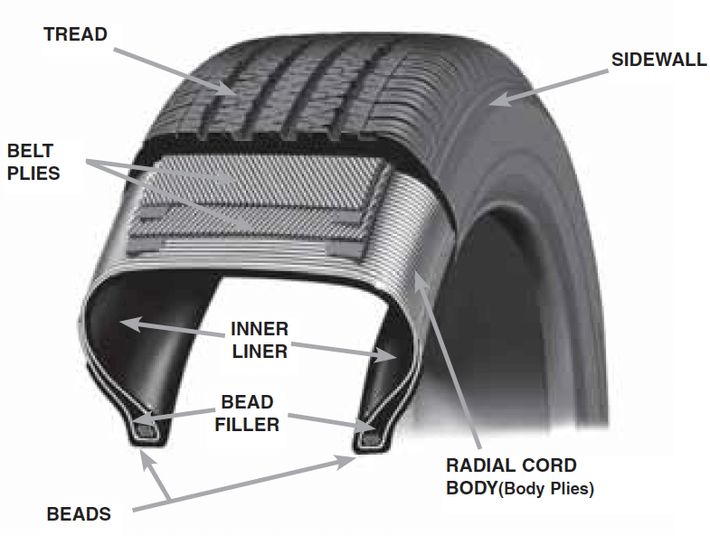 Sticking wire tatters are perfectly polished together with rubber with a grinding (thick) grinder disc.
vBulletin® v3.8.11, Copyright ©2000-2018, Jelsoft Enterprises Ltd. How to change a tire
Sooner or later this should happen to most of everyone. You're driving with your mind through an important meeting agenda, and suddenly your car pulls to the side and you hear that terrifying flat tire popping sound.
Many drivers these days have roadside assistance services that will fix your apartments, but it's always smart to know how to change apartments yourself. Since this is a fairly common occurrence, car manufacturers have tried to make the process of changing tires something that just about anyone can do.
Keep the following items in the vehicle for tire changes:
Spare wheel , Jack , Wrench and are vital and must be supplied with your vehicle. If any of these three are missing, replace them immediately with . Keep your vehicle owner's manual in your car at all times, as it will contain detailed information on where to find replacement parts and instructions for changing tires.
In case your tire blew while you were on the road, will slow down, , will turn on the hazard lights on , and will find a safe place to change your tire. If you are driving on a freeway or a busy city street, It's best to drive as far away from traffic jams as possible.
Ideal tire change locations include:
If you can, try to get off on a flat road and not on a slope. Also, changing tires on a paved road is ideal. If you cannot safely maneuver your vehicle in one of these areas, pull as far to the right as possible to increase the distance between your vehicle and traffic.
Once your vehicle is in a safe and stable place, parked with the parking brake applied , follow the steps below to replace a flat tire.
 This will help keep your vehicle safe while it is on the jack.
Once your spare vehicle is securely attached to your vehicle, will deliver the flat tire to the repair shop. High speed driving is not recommended, so try to replace or repair a flat tire as soon as possible.
Changing your own tire can be a cost effective option if you don't have emergency roadside assistance.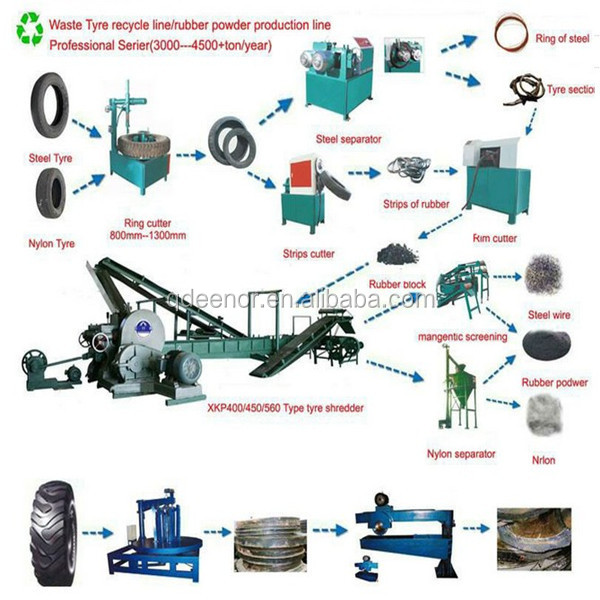 But safety should always be your top priority. Keep the following in mind when deciding whether to DIY or call for help.
Consider whether you can exit your vehicle in a safe place, away from oncoming traffic, and onto a flat, level surface. If you are on a busy freeway, narrow shoulder, dirt road, slope, or slippery surface, think carefully before pulling out the jack.
If it is raining or snowing, if the wind is howling and you could lose control of any equipment, or if the blazing heat could endanger your health or safety, consider calling for a tow.
If you are traveling with family, friends or even pets, consider the environment and their safety. If conditions are not ideal, play it safe to save a few dollars.
To ensure proper preparation, make sure your replacement material is inflated and in good condition. If you lack any other equipment, if your jack is rusty, even if your flashlight batteries are dead, don't try to be a hero - call a tow truck and get the help you need.
Knowing how to change a tire is an essential skill for all drivers. If you rely on your mobile phone to save you in a roadside emergency, there's always the possibility that you'll forget to charge it, be out of range, or leave it at home. Flat tires can happen anywhere, and a cell phone is no substitute for knowing how to change a flat tire.
Luckily, changing a tire is not that difficult! Just stick to the following guidelines to be prepared if you have an apartment.
These items should have come with your vehicle:
 Remember to check the pressure every month and before long trips or carrying extra loads.
 Here are some items that are not included with your vehicle, but you should put them in the trunk or glove box in case you need to change a flat tire:
As soon as you realize you have a flat tire, do not brake hard or turn. Reduce your speed slowly and scan the environment on a flat, straight road with a wide shoulder. An empty car park would be ideal. Flat ground is good because it will prevent your vehicle from moving. Also, straight sections of road are better than curves because oncoming traffic is more likely to see you.
Never attempt to change a tire on a narrow shoulder near oncoming traffic. Keep moving (slowly) until you find a safer spot. While driving on a flat road, you can ruin the rim, so changing the rim is better than hitting an inattentive driver.
Be sure to consult your owner's manual for specific steps for replacing a flat tire on your vehicle.
Your hazard lights or flashers will help other drivers see you on the side of the road. To avoid an accident, turn them on as soon as you know you need to stop.
After stopping, always apply the parking brake in preparation for changing a flat tire. This will minimize the chance of your vehicle rolling over.
Wheel chocks are placed in front of or behind the tires to ensure the car will not roll while you fix the flat tire. If you are changing the rear tire, place it in front of the front tires. If you have a flat tire in the front, install wheel chocks behind the rear tires.
Bricks or large stones will work just as well as "real" wheel wedges. Just make sure they are big enough to stop the car.
.
If your vehicle has a cap that covers the lug nuts, it is easier to remove it before jacking up the vehicle. If your mounting nuts are exposed, you can skip to step 6.
Use the flat end of a wrench to remove the cap. This will work for most vehicles, but some hubcaps require a different tool. Refer to your owner's manual for the correct hubcap or wheel cap removal procedure.
Using the handpiece wrench, turn the handpiece nuts counterclockwise until you break their resistance. You may have to use force, and that's okay. Use your leg or full weight if necessary.
Loosen the clamp nuts about ¼-½ turn, but do not remove them completely yet. Save this for when it's time to remove the tire/wheel from the car.
The correct place for the jack is usually under the frame of the car next to the flat tire. Many car frames have molded plastic at the bottom with a cleared area of exposed metal specifically for jacking.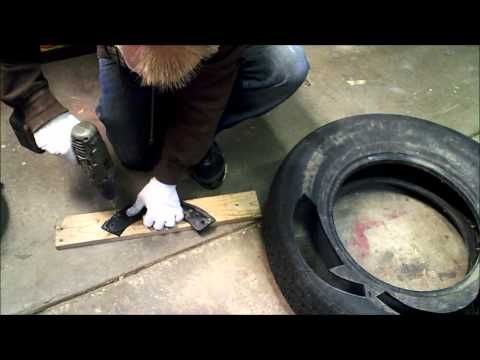 To safely raise and avoid damaging your vehicle, follow the jack placement instructions in your vehicle owner's manual.
Place a small 2 x 6 inch piece of wood under the jack before attempting to raise the vehicle. This tactic is particularly useful on tarmac.
With the jack correctly positioned, raise the vehicle until the flat tire is about six inches above the ground.
Never place any part of your body under the vehicle during or after the vehicle has been jacked up.
Now it's time to completely remove the lug nuts. Since you have already loosened them, you should be able to unscrew them mostly by hand.
Grasping the tire by the treads, carefully pull it towards you until it is completely free of the hub behind it. Place it on its side so it does not roll.
Now place the spare on the hub, aligning the rim with the eye bolts.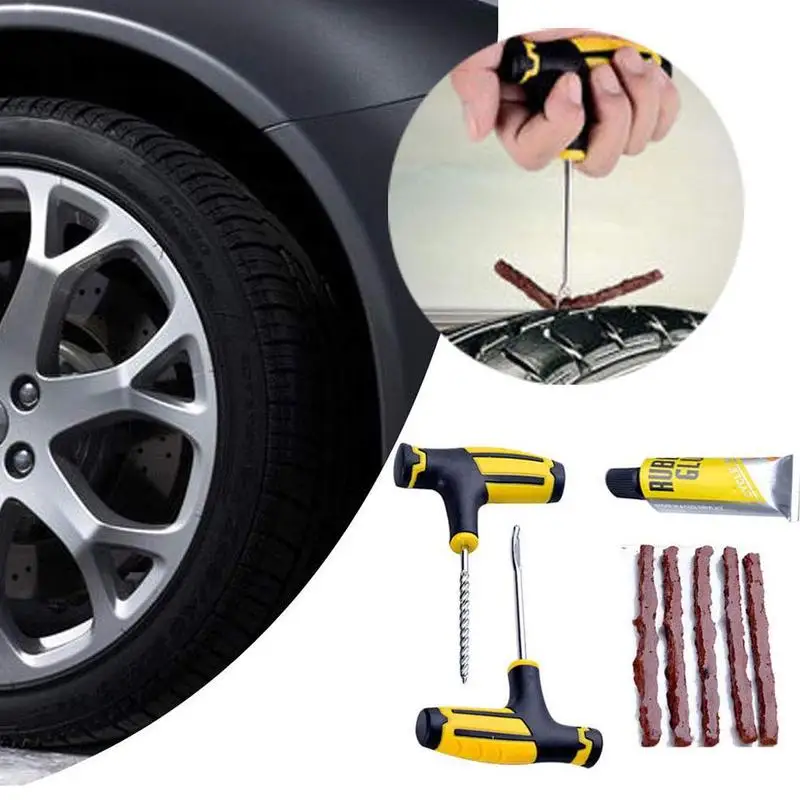 Gently press until the eyebolts are visible through the rim.
Install the flare nuts on the bolts and hand tighten them completely. Once they are all on, test each one again, tightening as much as possible. You will tighten them with a wrench after lowering the car to the ground.
Use a jack to lower the vehicle so that the spare wheel is on the ground and the full weight of the vehicle is not completely on the tire. At this point, you should tighten the nuts with a wrench, turning clockwise as much as possible. Click on the wrench with the full weight of your body.
Drive the vehicle to the ground and remove the jack. Tighten the mounting nuts again with a wrench until they are as tight as possible.
If the cap you removed from the flat tire fits your spare tire, replace it the same way you removed it originally. If it doesn't fit, put it away with the tire when you put away your equipment.
Here is a jack, wrench, wheel chocks, a flat tire and possibly a hubcap. Don't forget to put them all in your car before you leave.
You should check the tire pressure on the spare wheel to make sure it is safe. Type T Temporary Spare Parts, also referred to as "Mini Spare Parts", require 60 psi. Inch (420 kPa). If the tire needs pressure, drive immediately (slowly) to a service station.
Temporary spare tires are not designed to be driven long distances or at high speeds, so drive carefully until you can visit a tire repair technician. A professional should be able to determine if your tire needs service. repair or it's time to replace it.
In addition to taking your tire to a professional, the above procedure should take no more than 15-30 minutes to change a tire. Just make sure you don't miss a single step.
It is useful to change a tire in the garage or on the driveway to make sure you are prepared to deal with this situation should it ever happen to you.
It's good to know how to fix a flat tire, but regular tire maintenance is even more important. In addition to regularly reviewing this guide, be sure to do the following:
All of these precautions will extend the life of your tires and reduce the chance of flats. proper care can improve the performance and longevity of your tires.
,
Old car tires are of no value, so they just get rid of them - most often thrown into a landfill.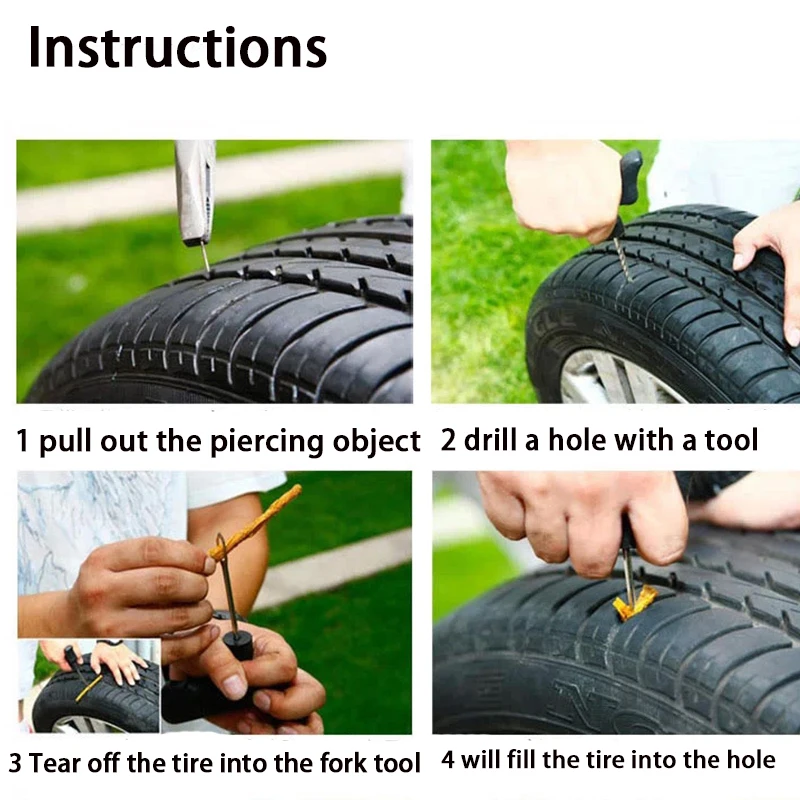 But why litter the environment when rubber can be put to better use?
Content
 1 The main stages of work
 The author shared his experience and will show how to make an indestructible shoe sole out of an old car tire.
Read also: How to make knife handle fasteners from ordinary nailsBy increasing the thickness of the sole, the shoes will, of course, gain a little weight, but there are pluses: the sole will be very durable and will last much longer.
The first step is to cut off a layer of rubber from a car tire (cut off to the cord).
As a result, we get a wide strip of rubber, which is quite enough to “change shoes” for several pairs of shoes.
Next, using a metal brush, the master makes notches on the inside of the rubber strip and on the sole of the shoe itself (for better adhesion to each other).
Read also: How to make a bird feeder: 10 interesting solutions
At the next stage, the master applies glue to the prepared rubber surface and to the sole.
Glue the sneakers to the rubber strip, press it with something heavy.
Read also: How to cut a laminate so that there are no chips
After the glue has dried, all that remains is to cut off the excess parts of the rubber with a knife.
Details on how to make a shoe sole from an old car tire can be seen in the author's video. This article is based on a video from the YouTube channel Ban bekas & kerajinan .
Make the bottom of a strong shoe with used car tiresAt the summer cottage, it will look quite appropriate. Just enough to give it a more presentable appearance.
Lay the car tire flat on a table or any other horizontal surface. Then we draw petals using the template.
Next, we arm ourselves with a construction or clerical knife and cut out a ring with petals.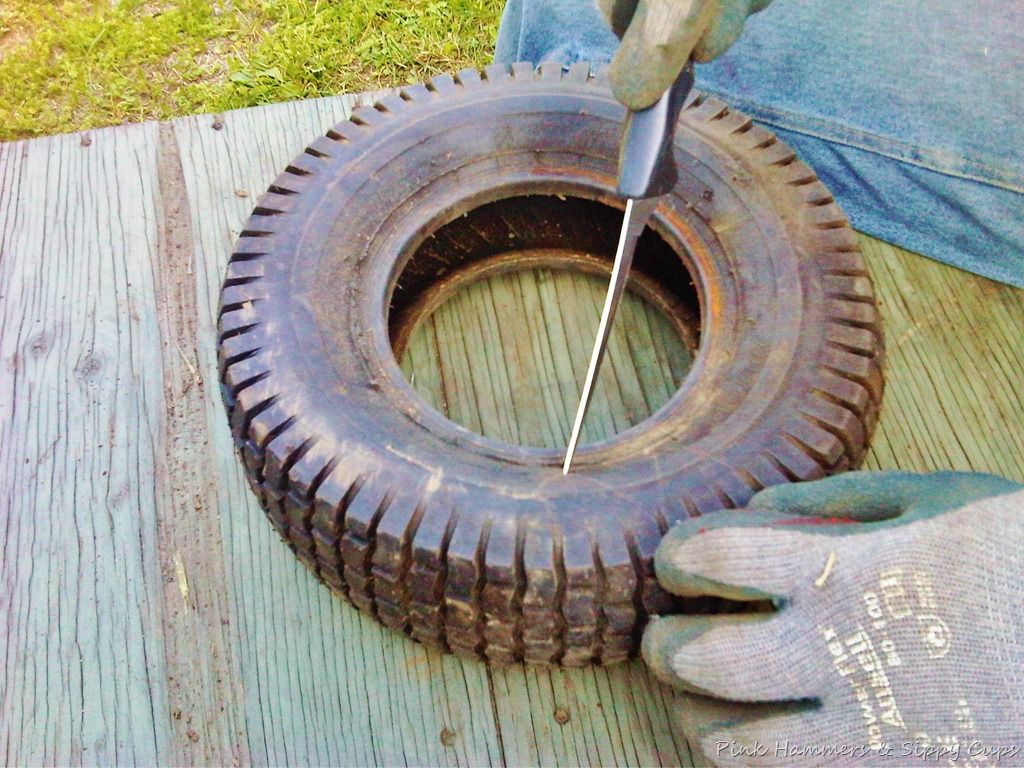
Cut out a circle from a piece of sheet rubber, and make drainage holes in the central part with a punch.
The next step is to nail the rubber circle to the petal ring.
Be sure to bend the tips of the nails on the reverse side to avoid injury. The result was the foundation of a garden bed.
Next we need a motorcycle tire. She needs to cut out a part of the rubber on the side. After that, turn the tire inside out.
In the upper part of the motorcycle tire, we cut out petals of arbitrary shape for decoration with a knife (but it is desirable that they be the same size). Then we install it on top of the base.
We connect both parts of a homemade garden bed with nails.
At the end, it remains only to paint the finished product with paint. Better than aerosol. Paint color is up to you.
In this review, the author will share with us a fairly simple (but most importantly, working) way to cut a rubber tire from a car into strips.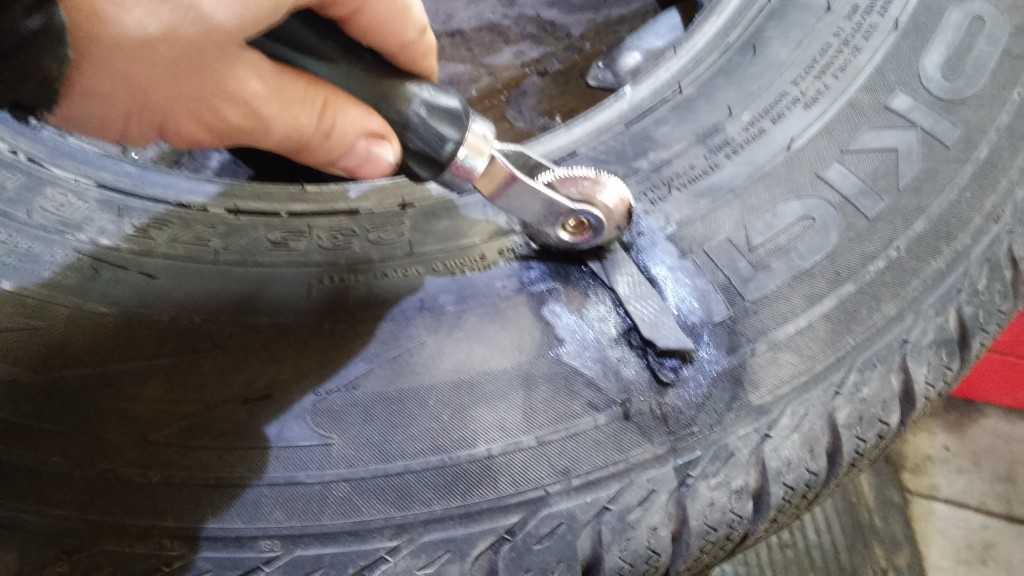 What they (bands) may be needed for, we will tell later.
The first step is to cut off the sides. Actually, it is these parts of the tire that we will dissolve into stripes.
You might also be interested in reading: what can be done with the old step drill .
Rubber can be cut with an ordinary knife (the main thing is that it is sharp), but in this case the craftsman used a construction knife with interchangeable blades.
It is enough to moisten the knife blade itself in water, and it cuts rubber like clockwork.
In general, if you are going to cut a tire, try using a craft knife with some water. You will not regret.
We advise you to also read: how to make a tool for removing the bearing from the crankshaft.
Next, you need to make a device with which you can dissolve the rubber into strips.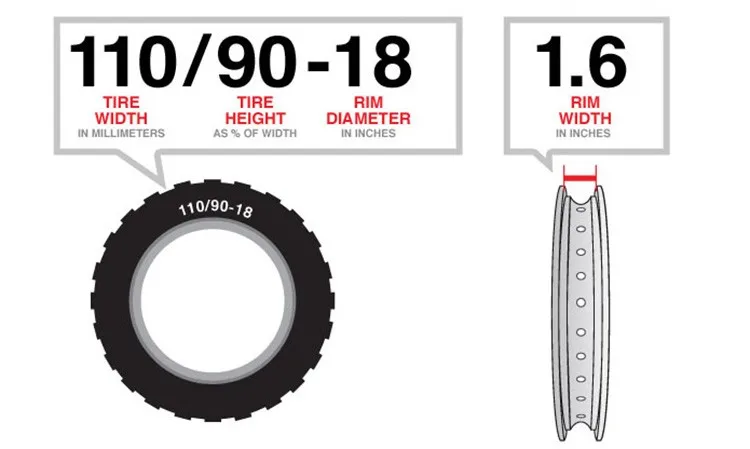
To make a tool for cutting tires (let's call it a tire cutter), you will need the most common materials that can be easily found in any garage:
You will also need the main structural element - a cutting knife. In its role is a replaceable blade for a construction / clerical knife.
Bend the metal plate into a U shape.
Make a kerf at the end of the prepared board and insert the plate into it. We fix it with two nails, as shown in the photo below.
We insert the blade into the plate, and next (at the required distance - depends on the desired strip width) we drive in a nail.
Our homemade device is ready. Now you can try it at work.
In general, anyone who has worked with a bottle cutter at least once will figure it out without problems - the principle is the same..jpg)
"Bait" the edge of the rubber on the blade, then pull it towards you. Thus, we quickly and easily dissolve the entire tire.
By hammering the nail closer to the blade, you can spread the cut strips along, reducing their thickness.
The cut rubber strips can be used to make the bottom of a flower bed or for other purposes, for example, to make an upholstered seat for a chair.
This article is based on the author's video from the Ban bekas & kerajinan YouTube channel.
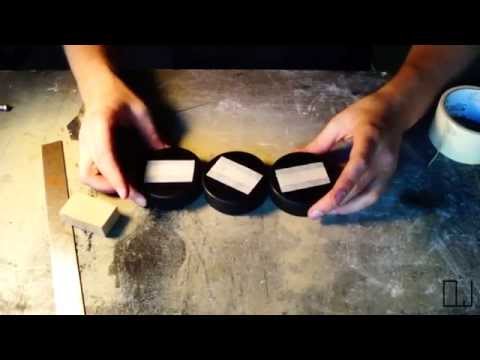
Manual tool for splitting tireA simple homemade wall punching punching bag made from an old car or truck tire, ideal for practicing hard hitting at home.
Wall pear can be hung in the room, garage or workshop.
The base is attached to the wall cushion using dowels. As a platform for tires, you can use plywood, OSB, a wooden shield.
The wall-mounted “cushion” for hitting can be fixed in only one position (on the same level) or made universal in order to adjust its height for practicing punches not only with hands, but also with legs.
First of all, we cut off a piece of plywood or a wooden board that fits the size.
Then we make a marking on the tire, based on the length of the platform, after which, using an angle grinder, we cut off a suitable piece of rubber for the wall “cushion”.
The next step is to mark and drill holes in the base for wall mounting.
Using self-tapping screws with large washers, fasten the tire itself to the platform. To do this, you need to make cuts along the edges.
Then all that remains is to drill four holes in the wall to screw the wooden base.
You can watch the detailed process of making a home-made wall-mounted “cushion” for whipping in the video on our website.
In this review, the author will share an idea on how to make a water tank from a tire from a Kirovets tractor.
A self-made container is useful for watering plants and trees in a summer cottage. From the main tool you will need:
We advise you to also read: how to make an original concrete path for a garden or cottage.
Using a drill, drill a hole for the file, then cut out the cord with an electric jigsaw.
We find a suitable place on the site, and you can start installing a homemade water tank.
We level the area where the container will be located, cover it with plastic wrap. Then we put the cut tire from the tractor on top, and set it to the level.
At the bottom of the tire, you will need to drill a through hole with a diameter of 21 mm.
Next, we install a water pipe with two lock nuts, a ball valve and a fitting (for connecting a hose).
The hole in the bottom of the tank will need to be concreted. For better adhesion of the solution to the tire, the author screws in the screws and ties them with steel wire.
We prepare the concrete solution and pour the bottom of the tank.
After the concrete had dried, I painted the bottom with homemade waterproofing, which can be made from Styrofoam and xylene (or gasoline). How to prepare waterproofing, read here .
The process of making a water tank from a tractor tire can be seen in the video below. This idea was shared with us by the author “ Anatoly Stupin "(video source - YouTube).
Container for water from the Kirov cylinder. Rubber water tank is a great option for giving. It is very strong and at the same time lightweight.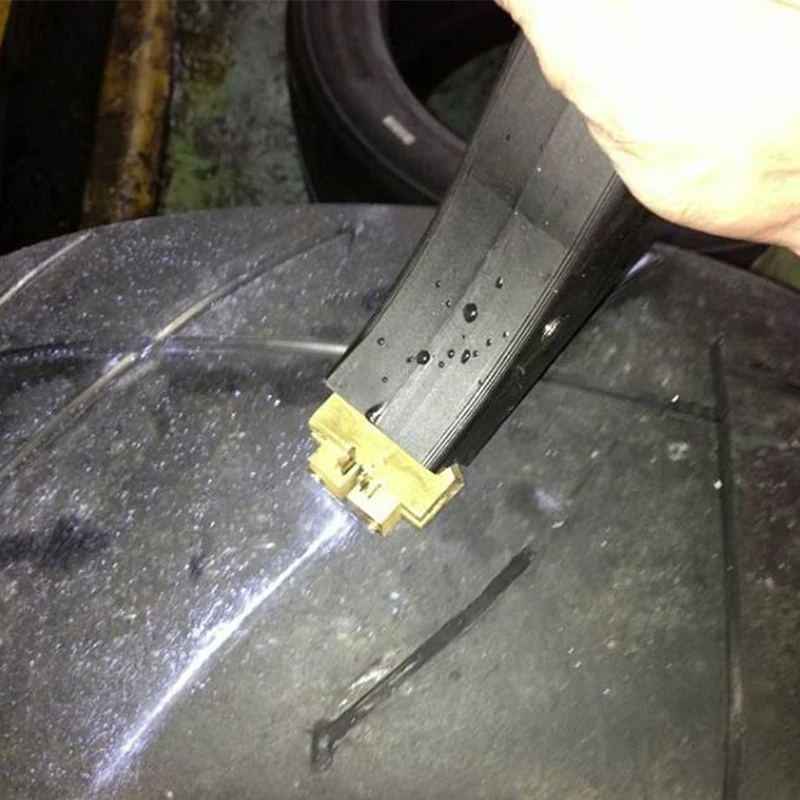
The container is also resistant to sunlight, making it suitable for outdoor use. And it doesn't rust like a metal barrel. You can make a rubber container from an old car tire.
The idea of making a homemade product belongs to the author of the YouTube channel Ban bekas & kerajinan.
You might be interested in reading: how to make your own hydroponic plant growing system.
First of all, we select a car tire of a suitable size. Using a knife, cut out a ring on one of its sides.
Turn the tire over on the other side, and nail a piece of thick rubber onto the nails. This will be the bottom of the container.
The tire itself and the previously cut ring will need to be turned inside out.
A rubber ring will serve as a base. We install a tire on it, after which we nail it.
Next, you need to make the handles. The author cut off two pieces of rubber, and nailed them to the sides of the container.
At the last stage, all that remains is to paint the outer surface of the tire with black paint - the water in it will heat up faster.
It is clear that drinking water cannot be stored in such a container. But collecting rainwater or, for example, heating tap water to water plants is the right thing.
Details on how to make a water tank from a car tire can be seen in the author's video below.
Make a water bath from used tiresThere is never too much water in a summer cottage. Especially if the central water supply is not carried out. To store water, we suggest using a homemade container from an old car tire.
Rubber as a material is in many ways better than metal or plastic.
Firstly, it absorbs the heat of the sun better, as a result of which the water warms up quickly (and plants need warm water). At the same time, rubber retains heat better. Secondly, rubber is more durable than the same metal. Thirdly, it is a cheap and affordable material.
The author of YouTube channel Ban bekas & kerajinan shared his personal experience of making a homemade water tank from an old car tire. Take note.
First of all, using a clerical knife, you need to cut off a part of the car tire - cut out a ring that will later be used as the base of the container.
From a piece of rubber, cut out a circle of suitable diameter and use small nails to nail it to the car tire.
We bend the protruding ends of the studs. This is the bottom of the container.
The next step is to turn the tire inside out. We attach the previously cut ring to the bottom of the container.
In the end, all that remains is to make handles so that you can carry the container from place to place.
To do this, use a drill or screwdriver to drill through holes in the tire and insert a rope into them. From the inside of the tire we make knots, after which we cut off the excess. We lightly melt the ends of the rope with a lighter.
Then it remains only to wash the car tire well with water and detergent and paint the outside.
For details on how to make a container for storing water from an old tire, we recommend watching the author's video below.
How to make a leak-proof water tank with used tiresDisposal is a hot topic around the world. The Vietnamese, for example, went the right way - they began to reuse old tires from trucks, but in the form of baskets and buckets for household needs.
The tread layer is removed from the old worn car tire and all parts containing steel wire are cut off.
Next, the inside of this tire is exposed.
Unlike the outer one, it does not contain as many rubber strength additives as the cord and tread portions. That is why the inside is so elastic.
After thoroughly washing the rubber from dirt, you need to set the shape of the future basket. Having bent the workpiece to the state of a cylinder, we fasten it with temporary brackets.
Cut out from a wide piece of elastic part a circle with a diameter equal to the diameter of the inner part of our cylinder. We also fix it on the brackets.
Next, we proceed to the final assembly of the basket.
We drill holes at the seams of our temporary joints and sew everything with threads.
For ease of transfer, we attach handles opposite each other along the upper edges of the cylinder. Fasten with staples and drill holes. With the help of rivets and washers we rivet our fasteners for handles.
In the same way, but with a smaller strip, we can make a lid for our basket.
In this review, we will tell you how to make a cool country table using different materials at hand. The neighbors are sure to be jealous!
When finished, the outdoor coffee table looks very cool. You can't even tell that it's made of rubbish.
For the manufacture of the table we need:
It will also be necessary to prepare a chain-link metal mesh (a small piece) and a polyethylene film.
If your dacha is not only work in the garden, but also a comfortable outdoor recreation, then you will surely need a comfortable chaise longue made of wooden pallets.
First of all, lay the metal mesh on a flat surface (eg concrete floor). Then it will be necessary to lay a plastic film on the mesh, and rubber tires are already laid on it.
We mix cement mortar from cement, sand and water. We fill them with the inside of the tires, reinforce with a plaster mesh.
Insert a piece of plastic pipe into the flower pot.