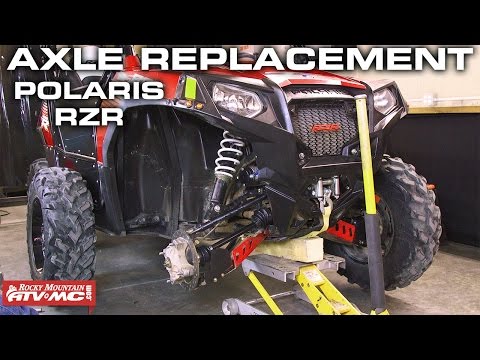
Most ATV owners will at some time have to repair or change a tire on their bike. Recently, I decided it was time to stop being depended on a tire shop to do this job for me. I set out to find the best way to do this job myself.
I did the research, I did the testing, and have found a method that works quite well. This guide will tell you what you need to know to change an ATV tire by hand.
You can get the job done without breaking the bank on expensive specialist tools. But some basic hand tools are required to be able to do the job safely and efficiently.
Page Contents
Before will get into the actual guide, we’ll have a quick look at what many consider to be the hardest part of changing an ATV tire; breaking the bead.
On the inside of the rim, close to the lip, there is a small bump called the “bead retainer”. This little bump goes all the way around the circumstance of the rim.
Then, on each edge of the tire, you find the so-called tire bead. This part of the tire contains a strong steel cable that goes all the way around the tire as well, creating a strong steel inforced loop.
Close-up of the tire bead section of the tire.The tire is beaded when the tire bead has been pressed over the bead retainer and rests against the inside of the lip of the rim. When in this position, the tire is prevented from sliding sideways on the rim itself.
So the primary purpose of the bead retainer is to keep the tire in place. Aggressive riding would otherwise force the tire sideways and it would lose its seal.
It’s not, however, what makes the tire airtight. That’s mostly achieved by the air pressure inside the tires.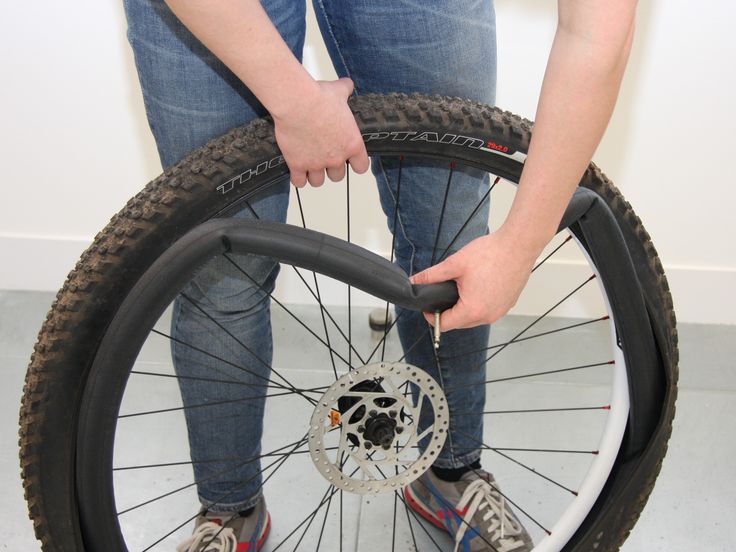 The air makes sure that the tire is always being pushed outwards against the lip of the rim.
Off-road and trail riding will often involve extreme sideways forces and impacts being inflicted to the wheel. Riding steep side-hills, hitting stumps and landing jumps are often when you are most likely to involuntarily break the bead.
On-road tires will not be faced with challenges like these under normal circumstances.
In addition, off-road tires usually run at a much lower tire pressure. As a result, there is a lot smaller force that pushes the tire outwards against the lip of the rim.
This means the wheel on off-road vehicles has to do a better job at keeping the tire beaded so that you don’t end up with a flat all the time.
To achieve this the tire beads on ATV tires, UTV tires and other off-road tires are extra heavy-duty. Also, the bead retainer bump is usually a bit bigger.
This is great for keeping the tire seated when riding. But it’s also that much more challenging when you want to break the bead.
There are many ways to break the bead of a tire.
What most of the methods have in common is that they involve some sort of tool. Some of which are quite expensive, while others are almost free.
At the higher end of the scale, you have the several thousand dollars tire changing machines that the tire shops use. These are very effective, but usually way out of budget for the average home mechanic.
At the other end, you have some more-or-less effective, almost free, and sometimes downright dangerous DIY solutions.
Underneath are the most common options, good and bad.
I’ve included my top 3 recommendations which are the ones I consider to be the most effective and least risky.
That’s “least risky”, not risk-free. You can still mess up. If you want risk free, take the tire to a tire shop.
This may sound brutal, and that’s exactly what it is. The method is completely free, as long as you already own a truck, and don’t break anything in the process.
The idea is that you lay the wheel flat on the ground, and drive your truck over the tire part of the ATV wheel.
While there are several reports of people successfully performing this method, it’s not one that I recommend. There is a great chance of bending or damaging your rim with this method. Its effectiveness is also quite questionable.
Lay the wheel flat on the ground with a small amount of air (about 3-5PSI) still left in the tire. Then place a piece of 2×6 lumber on top of the tire, as close to the rim as possible.
The idea is you slowly drive a truck up the piece of lumber until the weight of the truck breaks the bead. It may be necessary to reverse, reposition the tire and apply weight several times before the bead will break.
Then back off, refill with 3-5 PSI of air to stiffen the tire and do the other side.
This method is fast and may work fine in most cases. But it’s not something I would suggest for anyone as their go-to method for de-beading a tire.
There is a lot that can go wrong, and no guarantee it will work. If you forget to leave some air there is a great chance of damaging the tire. The piece of lumber fill just slides down the tire sidewall.
And if you leave too much air the tire can blow. Or if you use a car without enough of clearance, you will rip the bumper right off on the way down.
I wanted to find the best, almost free DIY method for breaking the bead on an ATV tire. Not all ATV owners have access to welding machines, so I decided it had to made from wood.
I made 3 different models before I found a design that performed ok. I had good faith in this first design. The idea, found on a motorcycle forum, is really clever. It should work fine with motorcycle tires and such.
But the ATV bead was too strong. The hardware or the wood itself kept breaking on all three versions I built.
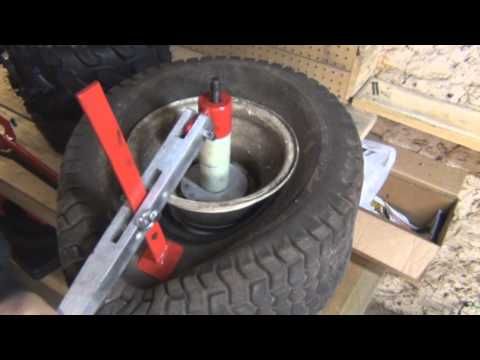
I ended up with a really simple design. All you need is a few feet of two by four and a couple of relatively strong hinges. The tool has to be mounted securely to a wall or a post as I did
Two pieces of wood and a couple of strong hinges give you a decent bead breaker in no time. Remember to cut the short piece of wood at about a 15-degree angle.This is the most effective and reliable solutions I have found. That is, for those that do not want to spend a lot of money on tools or don’t want to spend a lot of time on complex fabrication.
You’ve probably seen this tool or a variation of it at some point. You can get them at almost any auto supply or hardware store. They are relatively cheap and works really good on many types of small to medium sized tires.
This portable tire changer is my go-to tool whenever I need to de-bead a tire at home.
The tool needs to be bolted to the floor or some other heavy object to be operated effectively. And, it does require some getting used to.
But many users struggle to successfully break the bead of ATV tires with these things. The bead may be seated so well that the tool instead of breaking the bead just slip and slide down the sidewall of the tire.
When this happens you not only risk damaging your tire but will also build up quite the frustration from each failed attempt.
Despite its flaws, I’ve still listed this tool as recommended. Why? Well first off, they are relatively cheap. And when they do work, they are actually quite effective.
More importantly, there is a little trick you can use to make them work a lot more effective on ATV tires.
To prevent the tool from sliding down the sidewall of the tire, you should leave just a little air in the tire. Do not use more than 3-5 PSI. This will allow you to apply a lot more pressure by the bead before the tool wants to start sliding.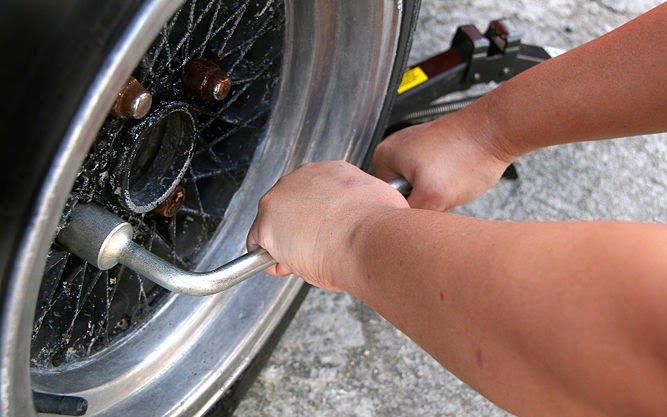
Often this is what makes the difference between a successful and a failed attempt.
It’s also a good idea to spray the bead with some soapy water before you try breaking the bead.
But even when applying these tricks, you may find that this tool will struggle to break the bead on the most stubborn ATV tires. If you are looking to change tires on your 10 years old OEM 400EX wheels, you may have to upgrade to the best tool on the list.
A company called BeadBuster sells a tool that clamps onto the rim and forces a wedge in between the rim and the tire. By rotating a bolt you force the bead down and over the bead retainer.
This tool has one main advantage over the tools we have looked at so far. It does not press down on the thin sidewall of the tire, but directly onto the tire bead.
This reduces any chance of damaging the wheel and tire. The pushing force created by turning the tightening-bolt should be powerful enough to break the bead on almost any ATV tire.
They are the most expensive among the tools I recommend. But if you accept the cost, they are the best option, next to getting a professional tire changing machine.
Another tool that seems to be just as effective as the portable tire changer, are the so-called “Tire Plyers”. These also work by the principle of jamming a wedge in between the rim ant the tire but uses a long handle to lever the wedge down.
It will work on most ATV tires, but some users report breaking the tool because how tight their ATV tire was beaded. This is why I cannot give them a recommended badge by now.
I have not, however, tested these myself. As soon as I get my hands on a pair I will give them a test and consider adding them to the recommended list.
The second most tricky part of changing an ATV tire by hand is mounting it back on the rim again and having it bead properly.
With a couple of tire irons and some soapy water, you should be able to get the tire onto the rim without any big issues.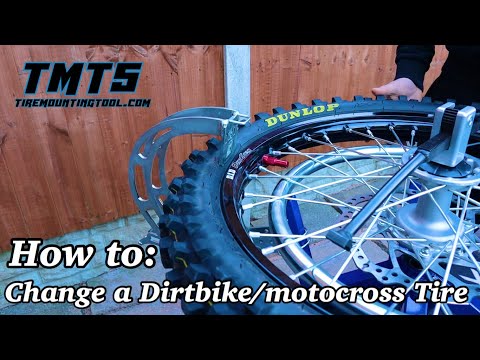 Just take your time and work systematically.
As for beading the tire, this can be a bit tricky on tubeless tires. But in the guide, I’ll show you a simple trick I have learned that should help you succeed.
This guide is for tubeless ATV tires. The procedure for tubed tires is very similar. But then you also need to release the tire-valve and make sure you don’t damage the tube when removing the tire.
 They are very powerful and I’ve seen more than once how quick they can snap a bolt.
I recommend getting a valve stem core removal tool for this part. They are cheap and saves you a lot of time.
While it is possible to deflate the tire just bu pushing the tire valve pin, it will take forever. With a valve stem tool, you can remove the valve stem which will deflate the tire in seconds.
Lefty-loosey, righty-tightly. You know the drill.
Keep two fingers on the valve when unscrewing it so you don’t lose it when the air starts flowing.
Remove the valve stem core, using a valve stem core tool.As soon as the air is out, put the valve stem core back in so you don’t lose it. Do not over tighten, as the threads on these are quite thin.
Choose between one of the recommended procedures for breaking the tire bead;
The DIY de-beading tool.
Portable tire changing tool
Bead buster
If none of these methods breaks the bead, it’s time to take the wheel to a tire shop.
You need two tire irons or a couple of big screwdrivers to perform this step. It’s also recommended that you get some plastic wheel protectors, or use tire irons with protective plastic so that you won’t damage your rims.

Before you can begin installing the new tire, you need to make sure that the bead of the rim is smooth and clean.
Wash off any dirt, sand or other debris. You may need to use a wire brush to get a good result.
If there is any rust, this has to be removed before you install a new tire. Tools you can use to remove the rust:
Ideally, you want to remove all rust. It’s important that the surface is smooth, so you get a proper airtight seal between the tire and the rim.
After removing the rust you will be left with exposed metal that will start rusting immediately if left untreated.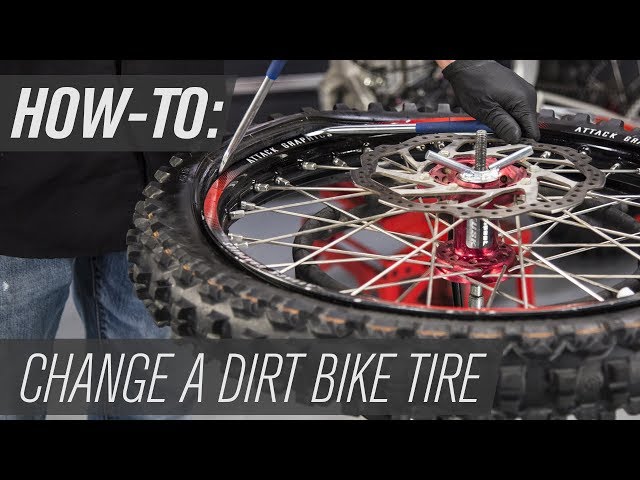 I recommend that you paint it with a quality rust inhibiting paint before installing the tire.
By doing so, you will likely be able to maintain an airtight seal for much longer, and the bike will look a bit healthier.
If your rim and tire are completely free of any damage or nicks by the bead, you may skip this step if you want.
But, as you may know, ATV tires are prone to having tire leak issues by the bead. This happens because the way they are used.
When you ride off-road, sand, dirt and other debris will be caught in the little gap between the rim and tire. This will wear down the paint, creating corrosion issues over time.
There’s also a good chance that you will damage the rim at some point by hitting a rock.
Therefore, I recommend that you always apply a coat of bead sealer on the tire bead before installing the tire. Consider it a cheap insurance against problems down the road.
A good alternative for using purpose made bead sealer is using some silicone.
Be aware that both of these products come with the disadvantage of making it a bit harder to break the bead the next time you need to change the tire.
Spray some soapy water on the bead retainer. Again, this is so that the rubber will slide more easily against the metal rim.
An even better alternative is using a light coat of baby powder on the lip of the rim and tire bead. Give it a try if you struggle to get the new tire back on the rim.
Do not use WD-40 as lube as this may deteriorate rubber over time.
Now it’s time to reinstall the tire.
 The tire bead should be placed in the drop-well or you will struggle to get it over the lip of the rim.
Now you’ve got the tire onto the rim, but it’s still not completely mounted. You need to re-bead the tire to the rim, using air pressure.
But if you try putting air into the tire as it sits right now you will likely get no result.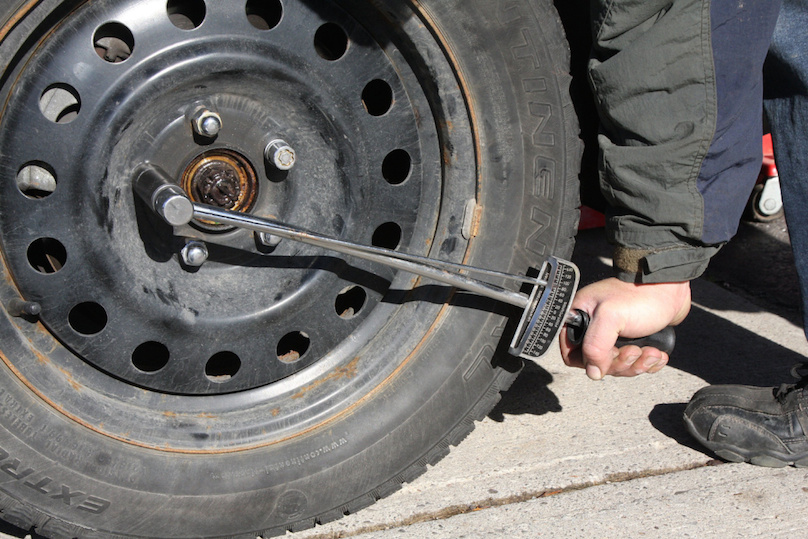 This is because you have a gap between the tire and the rim that is too big.
The air compressor alone won’t be able to supply enough airflow to get it to seal. The air just escapes.
If you happen to have a specialist tool like a “shock-filler” or similar standing in the corner of your garage, now would be a good time to get it.
But most of us don’t have tools like this. And for the occasional tire job, there is not really a need for one neither. There is a simple trick you can use to get the job done.
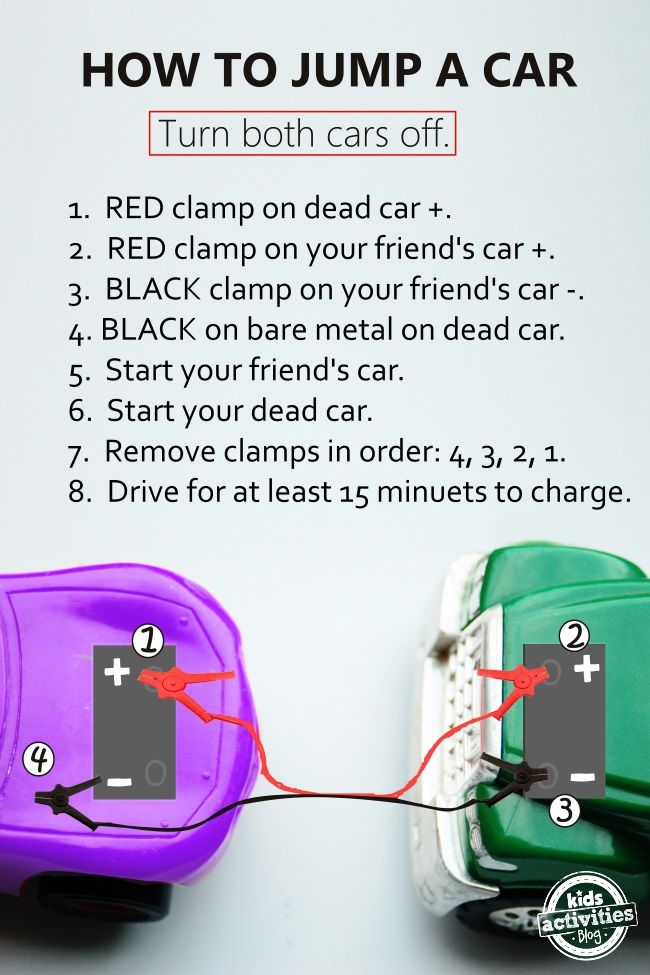
No, it’s not the one where you put starter fluid inside rim and light it on fire. While this may work, there is another way that is safer, and just as fast.
All you need is a ratchet strap. If you don’t have one, now’s the time to get one. Use the strongest strap you can find. If the strap breaks, it does so with great force!
 Make sure the rim is centered in the tire.
All that is left now is to put air back into the tire until it beads. I recommend using a tire-inflator that has a gauge for this part.
Can you change ATV tires at home?
With a few tools and some basic mechanical skills, it’s very doable to change ATV tires at home. But be aware that air under pressure is potentially very dangerous, so necessary precautions must be taken.
How hard is it to change ATV tires?
ATV tires and other off-road tires have stronger beads than on-road tires. This makes them a bit harder to change. But when you know the steps, changing tires is about as hard as replacing brake pads or installing a new exhaust system.
Changing the tire on your ATV or side by side is a pretty straight forward process. There are some specialty tools that can make the job easier, but you can also accomplish a tire change on your own with some cool little tricks.
The hardest part about mounting a tire is getting the old tire off the rim and the new tires on. There’s a couple ways to go about this and some tips to make your life easier. Balancing the ATV tire is really only necessary if you’ll be getting up to speeds over 45 – 50 mph.
Here’s the steps you’ll use to remove the old tire and mount the new tire, don’t worry I’ll go into more detail on how to do each of these step by step.
Always start with safety when performing maintenance on your machine. It’s best practice to wear gloves and eye protection when working on your quad.
First off, get the wheel off the quad and deflate the tire. It’s easier is loosen the lugs a little bit before you jack the quad up. Loosen and remove the lugs in a criss-cross pattern, the same way you would install them. Once you have the wheel off the ATV it’s time to deflate the tire for removal.
To deflate the tire, remove the cap and release all the air in the tire. Most tire pressure gauges will have a little notch on one side, that you can use to push in on the valve stem to release the air in the tire.
Or you could always use a screw driver or punch tool, basically you just need to push down on the valve stem to release the air somehow. Once all the air is released from the tire, you can use a valve remover tool to get the valve cores out.
Here is a link to a Tire Valve Stem Tool Remover & Installation Kit on Amazon. This kit has everything you need to deal with the valve cores of the tires. I highly recommend getting a tool like this if you ever plan on doing any type of maintenance to your tires.
You can try to remove the cores yourself with a wrench or something similar, but that option usually leads to damaging the valve cores beyond reuse. In fact, I’ve never seen this done successfully without a valve stem removal tool.
Once the tire has been deflated, it’s time to break the bead seal. This is sometimes the most difficult part of the entire process because the bead is set into the rim a lot more firmly on off-road tires than it is on car tires.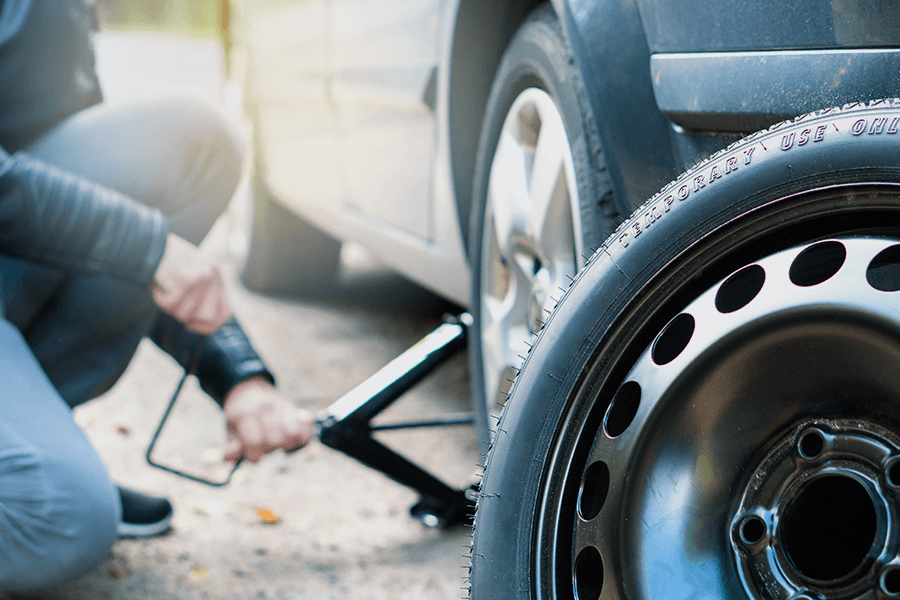
And to top it off, a lot of times there is some sort of bead sealer on the bead to keep the tire from popping off.
If you plan on changing a lot of tires, I suggest looking into getting a tire changer tool. This PowerLift Manual Tire Changer Base on Amazon is only about 55 bucks and makes this step so much easier. If you don’t want to spend the money, that’s ok, this can be done with basic garage tools as well.
A popular option to break the bead is to put the tire on a piece of plywood, or something so the tire doesn’t dig into the dirt.
Then place a jack on the tire near the bead, then simply jack up into something heavy like a truck bumper or hitch.
Repeat this process around the tire on both sides in places where the bead is till set.
Or you could build your own homemade bead breaker with a couple 2x4s like in this picture here.
I would use a chain or something connecting to a piece of wood underneath the tire instead of a car as leverage, but that’s the fun of doing it yourself, use your imagination.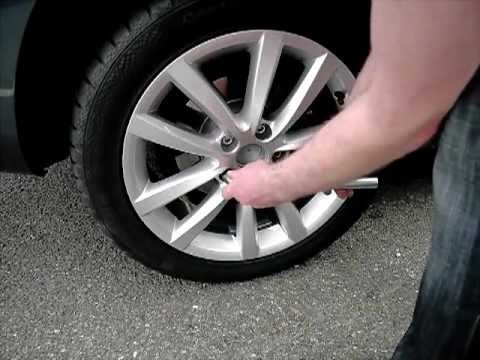
The whole goal of this step is to get the bead off the rim so you can remove the tire.
However inventive you’d like to get is up to you. I’ve seen people use a giant clamp to pop the bead off the rim before. You could use two pieces of 2×4 on each side of the tire and a ratchet strap to pull them together to press the tire off the rim.
Now that you’ve got the bead of the tire unseated from the rim, it’s time to get the whole tire off the rim. This is sometimes called peeling the tire off the rim.
You’re going to want to take extra special care to peel the tire off the short side of the rim.
You can find the short side of the rim by looking at the depth on both sides of the wheel. The short side has a shallower depth and will be the easiest side to pull the tire off on.
The best tool for this step is a set of tire spoons or a tire changing tool set, like this Fasmov Tire Iron Tire Changing Tool Set.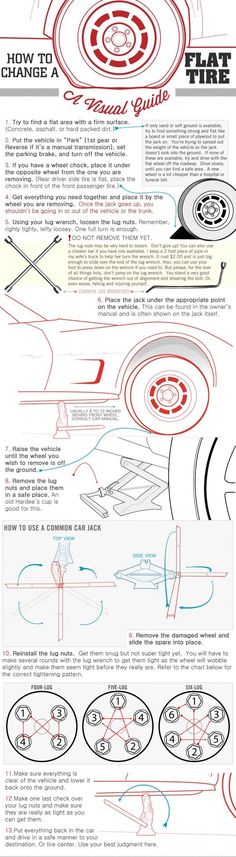 If you don’t have one of these, not to worry, they’re pretty cheap to buy a set, or you could just use a couple pry bars or something similar instead.
I would advise against a screw driver though, the larger ones may work pretty good, but be extra careful not to damage the tire or rim. Well, I guess you can damage your old throw away tires, but you need to do this later on to put the new tires on too.
Start by pushing the tire down into the open area near the rim. Use your tire tool or pry bar to pull the tire up over the rim. It’s best to use the the tool like a lever, sticking the tool down so that just a piece is under the tire and pressing down to pop it over the rim.
Hold that piece of tire over the rim and use the tire tool piece with a lip to work your way around popping the rest of the tire over the rim. Like you see in the picture above. It’s easiest when you use all three tools in the kit because the middle tool will get freed up with each new section of tire you pop over the rim.
Eventually you’ll get to a point where you can just pull the tire off by hand. Then you’ll use one of the tire tools to simply pop the tire off the other side of the rim.
Now that you’ve got the old tire off, you’re going to want to clean the lip of the rim where new tire bead will sit. It’s important to clean this area really well to be sure you get a good fit with the new tire.
You won’t always need to use a bead sealer, but will always want to clean the lip of the rim. You will only need to use a bead sealer if you think the tire bead won’t seal well enough on the rim on it’s own.
This is usually only a concern if the tire is real beat up around the bead or if the rim is bent up and gashed to the point where the tire won’t seal on the rim.
If you can get away with not using a bead sealer, than I wouldn’t use it. It makes it harder to remove the tires next time you do a tire change anyways.
You will have to clean and lube the tire bead to help with mounting the tire on the rim. To clean it, just make sure the bead is free of debris and gunk. Usually a new tire won’t have dried up sealer or other stuff in the bead yet.
After you’ve made sure the tire bead is clean, it’s time to lube it up and put the tire on the rim. They do sell nice and fancy expensive tire lubes, but I’ve found that some soapy water works just as good. Lube both sides of the bead, inner and outer, if you don’t, it’s going to be really hard to get the tire on the rim.
Now’s a good time to check tire direction. Most ATV and UTV tires will not be directional, but they do make tires that should only be put on a certain way. This is because the tires is designed with groves facing a certain direction to help with traction.
You could look at the side wall of the tire for an arrow, or just decide for yourself by looking at the tread which direction you want the tire to be mounted on the rim.
Now to get the tire on the rim, remember to start with the shallow side of the rim. Place the rim on the ground, on something that will keep it from sliding away from you, with the shallow side facing up. Now poke the bead part of the tire into the shallow side of the rim and press down on the tire until it pops onto the rim.
Ok, you’ve popped the tire onto the rim, now you need to get it seated and the bead lined up correctly. You can kneel down on one section of the tire and use the tire tool or pry bar to seat the rest of the tire into place, as you can see in the picture.
Try using your knee to keep the tire from popping back up on the other end, your free hand will help with this as well. After you get to a little more than half of the tire pryed onto the rim, it will be easy to just push it the rest of the way on.
Now that the new tire is on the rim, it’s time to set the beads on both sides of the tire. If you have a small portable air compressor for airing up tires, that might not be enough to seat the beads.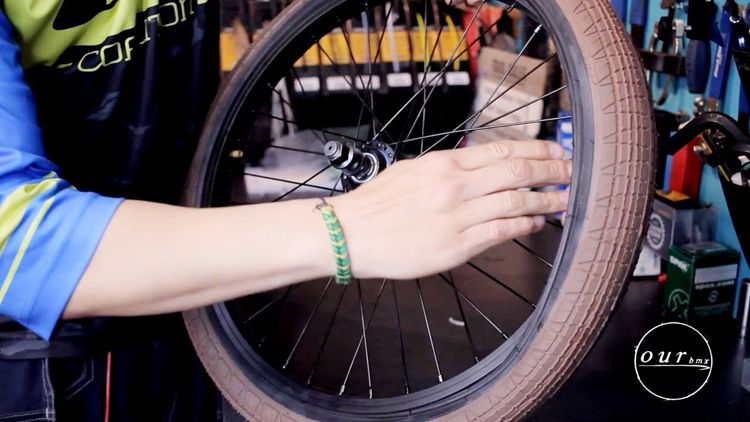
You can try inflating the tire with the core out, to help you get more air in the tire more quickly to seat the beads. Then once the beads are seated, put the cores, or valve stems in and inflate the tire.
You will usually need a higher powered air compressor to seat the beads. The even make special designed Tire Seating Blaster Inflator Air Compressors made specifically with enough power to seat the bead of the tire. That’s because a compact portable air compressor doesn’t have enough power to do it.
Another popular option you could try is to spray starter fluid into the tire and light it with a lighter. The starter fluid burns all the air out of the tire and pulls the bead into place. To legally cover myself I am going to say to never do that. But, I’ve used this method plenty of times and it works like a charm.
Then once the bead is set, put the core back in and inflate the tire like you normally would using any air compressor you have. If you plan on riding at speeds over 35 mph, it’s a good idea to balance the tires at this point.
Check out my How To Balance ATV Tires article for the step by step instructions on how to balance your tires.
Sharing is caring!
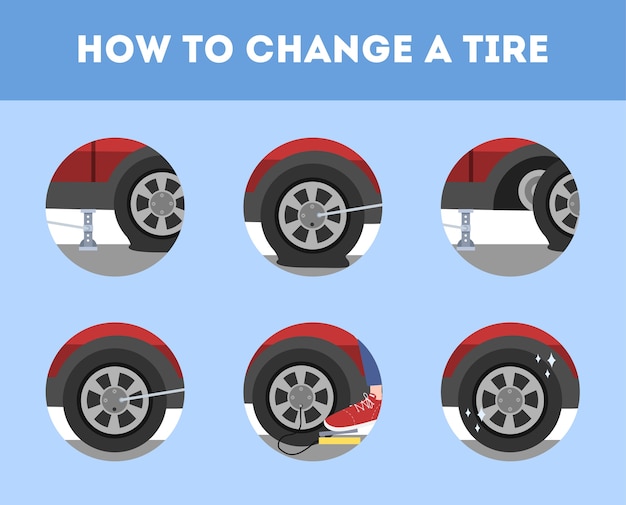
Changing shoes is the hottest topic for motorists during the off-season. In spring and autumn, queues traditionally line up at tire fitting points. But not everyone wants to participate in this ritual: having collected a second set of tires and wheels, many car owners change the wheels themselves. Let's talk about how to do it right - especially since every driver has to change a wheel on the road sooner or later.
To remove a wheel from the car, you first need to get it off the ground - make sure you have a good jack for this. A regular factory jack is in any car, but still it is intended for emergency replacement of a flat tire, and not for regular tire fitting. If you change all the wheels yourself twice a year, it is better to buy a jack more convenient and reliable than a regular one.
The rolling jack is a great solution if you have a garage; you will immediately appreciate its convenience. It is rolling jacks that are used at tire shops, where the speed of work comes first. A few moves and the wheel is already in the air! After a little practice, with the help of a rolling jack, simultaneously hang out two wheels at once - but you must definitely use wheel chocks (stops).
Learn more about how to choose a car jack.
Drivers often ask the question: why is the car's standard wheel key so inconvenient? The answer is simple: the length of the wrench is chosen so as not to exceed the tightening torque of the wheel nuts (100-110 Nm for passenger cars). But loosening stuck nuts often requires more force! In addition, the driver is different for the driver: for example, it will be difficult for a girl to tighten the wheel nuts to the nominal torque with a regular wrench. And don't say you haven't seen girls changing wheels.
In order not to have to kick the wrench or jump on it (which threatens to break the wheel studs), buy a reinforced wheel wrench: elongated or telescopic. When tightening nuts with such a wrench, you do not need to be zealous - remember the maximum tightening torque. And it will be much easier to unscrew the nuts.
When changing tires, don't forget to rotate them to ensure even wear. Usually tires with a large tread remain on the drive axle, because there they wear out more intensively. If the car is all-wheel drive, proceed from the design features of 4WD: the original front-wheel drive car with a connected “rear” wears out the front tires more, and the original rear-wheel drive car wears the rear tires.
Tire rotation is more competently performed according to the instructions for the car - but for this you need to mark each of the wheels in advance (for example, with a marker on the inside of the disk). Examples of standard rotation patterns are shown below, and it is recommended to swap tires for even wear every 10,000 km.
On rear- and all-wheel drive vehicles, the front tires are moved to the rear axle diagonally (diagram A) or are changed crosswise (B).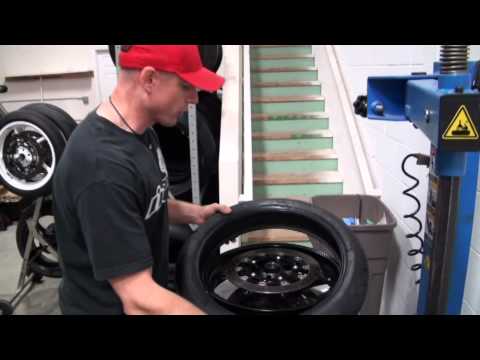 On machines with front-wheel drive, the opposite is true: the rear tires are moved diagonally forward (diagram C).
Tires with a directional tread pattern cannot be turned without overbeading. To rotate them without removing them from the disks, the front wheels are simply swapped with the rear wheels on each side of the car (Diagram D).
If the car is equipped with a full-size spare tire, not a spare tire, and you have bought a set of five new tires, be sure to include the spare tire in the rotation (diagrams E and F). This will allow you to use the kit longer and easily replace any of the main ones with a spare wheel in case of damage, because their wear will be the same. Thanks to this scheme, buying five tires is more profitable than four, due to the longer operation of the kit.
After removing the wheel, clean the wheel studs with a wire brush and brake cleaner. You also need to clean and grease the mating surface of the hub with graphite grease so that the rim does not stick to it.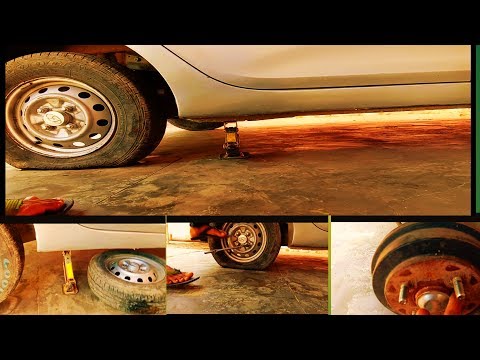 Graphite is chemically neutral, does not interact with nickel and chromium, therefore it does not oxidize and does not damage rims.
Whether it is necessary to lubricate the studs themselves is an open question: some automakers recommend it, while others directly prohibit it. If you use standard wheel nuts with a cone, which attract the disk well, and observe the tightening torque, then there will be no harm from a small amount of graphite grease on the studs - most importantly, do not use other types of lubricants (for example, lithium) in this assembly.
The wheel mounted on the hub is tightened crosswise (4 studs) or with an asterisk (5 and 6 studs), moving from each nut to the opposite one, and not to the next one - this way the even tightening is achieved.
The wheel nut tightening torque for most cars is 100-110 Nm, SUVs: 120-150 Nm. The exact parameters for tightening the nuts are indicated in the instructions for the car, and to withstand them, use a torque wrench.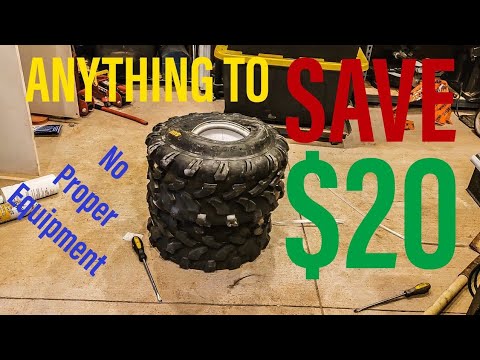 Of course, not all motorists have it. Without a “speaker”, be guided by the length of a regular wheelbarrow wrench and common sense: do not use the pipe as a lever and do not press on the wrench with your foot.
Tire pressure may change after six months of storage - be sure to check it after installing all the wheels using a manual pressure gauge. Pressure is always measured with cold tires. If the pressure in the tires is different, equalize it with a compressor, otherwise the car will pull to the side when driving.
Learn more about tire pressure: how and why to measure it.
The removed set of wheels must be properly stored until the next season. This requires a well-ventilated, dry area, protected from the sun and precipitation - for example, an indoor heated parking lot. Private garages are not always suitable: if the roof leaks after every rain, then the humidity will destroy the paint on the rims in six months. Too dry air is the other extreme: rubber in such conditions ages intensively, cracks and cracks. Optimum humidity for wheel storage: 55-65% at 20-25°C. Such indicators are maintained all year round in the Tire Hotel Giperavto, a special warehouse for seasonal storage of wheels.
Tires and assembled wheels (tires on rims) are stored differently. Without disks, tires are stored vertically: they are placed in a row, periodically turning over to change the fulcrum. Tires on disks are placed in horizontal stacks of 2 wheels or suspended. Improper storage can lead to tire deformation and serious problems during further use.
The main thing when changing tires yourself is not to rush anywhere: expect the process to take 1.5-2 hours. If you want to change the shoes of the car faster, welcome to the Hyperauto tire fitting with an appointment - they are guaranteed to do everything right.
Related materials
Tire inflation with nitrogen and 7 more wirings at the tire fitting
The tire manufacturer's instructions say to change shoes when the temperature drops below +7°C.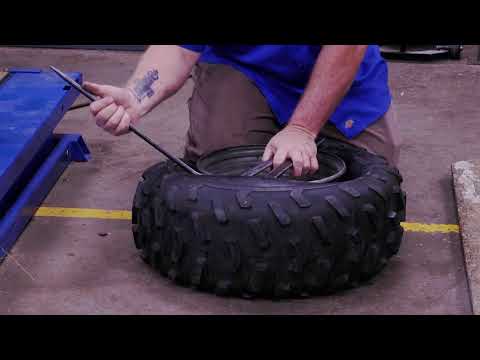 In my opinion, it's too early. There are still a lot of cars with summer tires on the roads around. And at this temperature, the braking distance on studded tires may be even longer.
I advise you to change the wheels to winter ones when the temperature drops below zero at night. That's when it really is time, because in the morning an icy area may come across on the roads. At the same time, out of habit, it will seem very slippery.
Precisely in order to do it at the most correct and convenient time. The vagaries of the weather are unpredictable. Residents of the Rostov region, for example, say that sometimes during the winter period they rearrange the wheels from winter to summer and back several times.
Dismantling wheels (that is, dismantling a tire from a rim) at home is a difficult task that requires appropriate skills and knowledge. We will describe a simpler job that, in theory, any average motorist who does not have special tools and experience in tire fitting should be able to handle. And therefore we mean that you have a complete set of serviceable winter tires mounted on disks. You remember that in the spring they did not lose pressure, there are no cuts on them, and a couple of self-tapping screws do not stick out of the tread in addition to the spikes. And, most importantly, the tread height is more than 4 mm. These are the modern requirements for winter tires. If at least one of the conditions is violated, then it is better to solve the problem before the onset of the hot tire season.
Related materials
If I change wheels, do I need to balance them every season?
There are car owners who meticulously balance tires before each season. In my opinion, this is not justified by anything. I recommend installing the wheels on the car, then drive at different speeds, but not higher than your usual ones. If the imbalance (it is manifested by vibrations on the steering wheel or seat) is not felt, then balancing can be postponed until future seasons.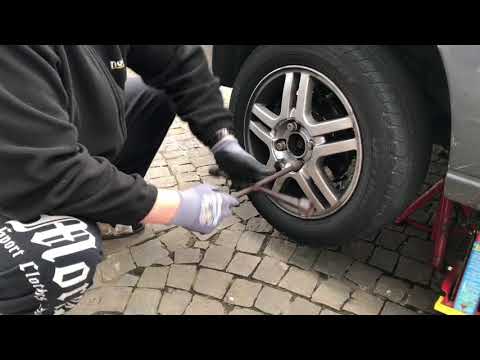 In principle, winter tires can be balanced before being stored for storage: after all, the spring period for changing wheels in tire shops is more extended in time compared to autumn, and therefore the queues are noticeably shorter.
So, we take the wheels out of storage. For one, this is the corner of the garage, for the other, a balcony, for the third, the warehouse of the nearest car service that provides a wheel storage service. Depending on storage conditions, tires may have different temperatures. Wheels removed from a warm room, having cooled down by 20 ° C, will lose about 0.2 bar of pressure, and gradually, as they cool down. Well, the cold ones have nothing to lose! Therefore, cold ones can be immediately pumped up to the nominal pressure, well, maybe 0.1–0.2 bar more, given that it will only get colder further. And warm tires must either be inflated with a large margin immediately, or set the pressure at the end of all work, when the air in them cools down.
If you use a standard jack, it is better to place a special stand under the car for insurance. Well, or at least place the spare wheel so that when it falls, the threshold lies on the rim, and not on the tire. Please note that this will most likely damage the disc. Therefore, it is better to use an old unnecessary wheel.
If you use a regular jack, it is better to place a special stand under the car for insurance. Well, or at least place the spare wheel so that when it falls, the threshold rests on the rim, and not on the tire. Please note that this will most likely damage the disc. Therefore, it is better to use an old unnecessary wheel.
Related materials
Which jack is better? — expert examination of the ZR
We find a flat area with a hard surface. If you change wheels yourself twice a year, then I strongly advise you to get a convenient jack. At least small and inexpensive, but rolling. It is noticeably more reliable and durable than the regular one that was equipped with your car. It is advisable to use a balloon wrench with a cruciform or with an extended handle - it is more convenient than the standard one attached to the car.
Prepare a wheel stop - yes, at least half a brick. Inspect the secret key for damaged code elements and clean the secret nuts/bolts on all wheels.
If the winter set of wheels has different disc characteristics, remember if spacers are needed between the disc and the hub lug - they should be prepared in advance.
The wheel jack is based on a hydraulic cylinder. Raises quickly, and lowers even faster.
The wheel jack is based on a hydraulic cylinder. Raises quickly, and lowers even faster.
 The arrow on the sidewall will help us. For installation on the front axle, we try to choose less worn tires.
  We clean the mating surface of the hub from dirt with a metal brush and apply a thin layer of lubricant. Better special, copper.
 Just in case, after the first ride, check the tightness of the wheel fasteners, and the next morning, the tire pressure.