Here's the donor car for the tire and rim
The car had locking hubcaps. Luckily, the key to remove them was in the glovebox
Now that we've seen the donor car, let's take a look at the wheel and tire that were removed from it.
The tire is junk due to a couple unrepairable gouges in the sidewall. I had read on the internet that it's possible to cut a tire off the rim, and was intrigued. I looked around for my sawzall, but couldn't find it so out comes my angle grinder instead
And a small rotary dremel tool with a reinforced fiberglass cutoff wheel
A drywall knife
A long prybar
A large 8" C-Clamp
All the tools laying side by side.
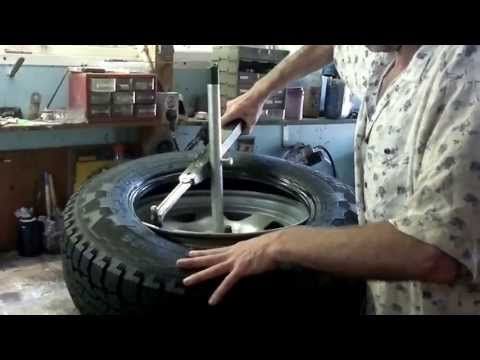
Looking at how a tire changer machine like the hunter tc3500 works, you'll notice that it squeezes squeezes the two sides of the tire sidewalls inwards. Backyard mechanics don't usually have access to one of these machines, but a large c-clamp can provide similar compression.
You could get more uniform load distribution by placing a block of wood in between the c-clamp and the tire sidewall on each side
Do note that there is no hydraulic assistance with like a professional tire changing machine, so you might have to really push hard on the c-clamp handle to get it to move.
With a fully inflated tire that hasn't been cut in half like this, you'll want to remove the valve core from the valve stem first. This will allow air to freely flow in and out of the tire. If you don't have the proper valve stem tool, a pair of fine tip needle nose pliers can be used to spin the valve core out. Or you could just cut the valve stem off all together.
The tire is held to the rim by an area called the bead. This is a thick peice of rubber with a bundle of wires inside it. Tire shops use a special long prybar called a tire spoon to compress the rubber enough to lift it over the rim flange. Since most shadetree mechanics don't have this tool, the tire bead wires are going to be cut instead.
During this process, the prybar pictured above was used to keep the tire far enough away from the rim that a dremel could get in. The prybar was not used to brute-force the uncut tire bead over the rim flange because this would have left numerous tool marks on the rim.
The sidewall in between the bead and tread surface is relatively weak on steel belted radial tires. You can cut though it with a the drywall knife pictured.
You will however need a saw blade or cutoff wheel for the bead wires. That bead wire is strong stuff, and there were 16 individual wires in this particular tire.
You'll also want something other than a knife to cut through the tire tread surface.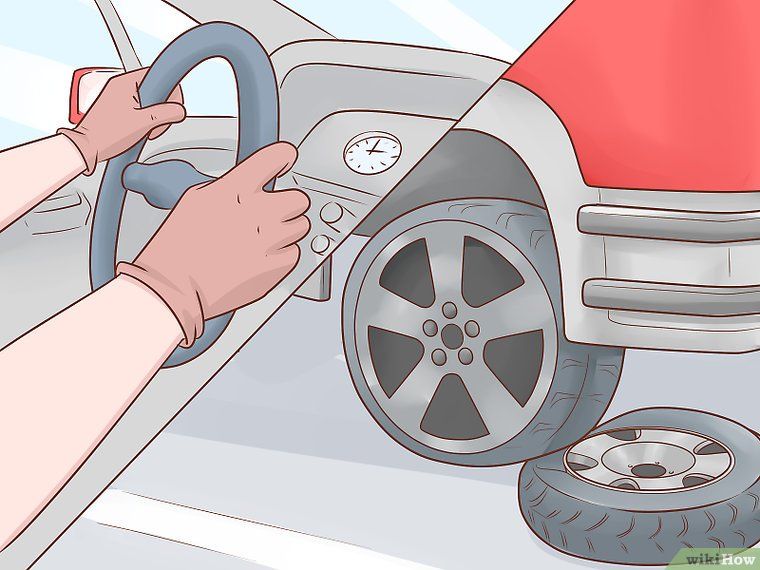 The rubber in this area is quite hard and is really thick which would take quite some time to carve out. But the big thing is that there are two layers of steel reinforcement belts here too. So you'll need a saw blade or cutoff wheel again.
The steel belts and bead wires are the silver colored reflective dots in the picture.
The nylon overlays are easy to cut through with a knife. It's the steel belts underneath that you won't be able to cut through with this tool
Even if the two peices of the tire are placed back onto the rim, it seems unlikely that the tire will ever hold air or be able to be balanced again.
Here are more pictures of one of the tires that I cut in half
Most modern production cars will have a "drop center" rim similar to this. Notice how the rim is raised on each side, and there is a lowered portion in the middle?
This was a cordovan brand tire manufactured by cooper tire in georgia.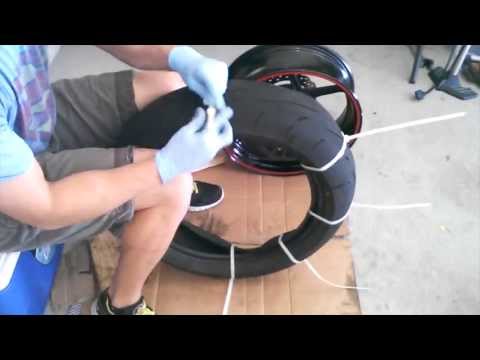 It had an "S" speed rating.
TBC Brands is the owner of the cordovan trademark
This centron model tire had a dot code of DOT 3DX0 TMT 0806. This means the tire was manufactured by cooper tire on the 8th week of 2006.
Tire Cutting Notes:

Tires are just as crucial as the engine when it comes to maintaining your car’s safety and performance. At some point, however, tires wear out and this compromises the car’s efficiency, especially in traction and braking ability which can potentially lead to fatal road accidents.
If any of your tires exhibit a pattern of excessive wear, it’s about time you change them. Changing tires involves taking off the rubber tread that is tucked inside the wheel’s rim, a grunt work that many would rather pass and hand to a mechanic.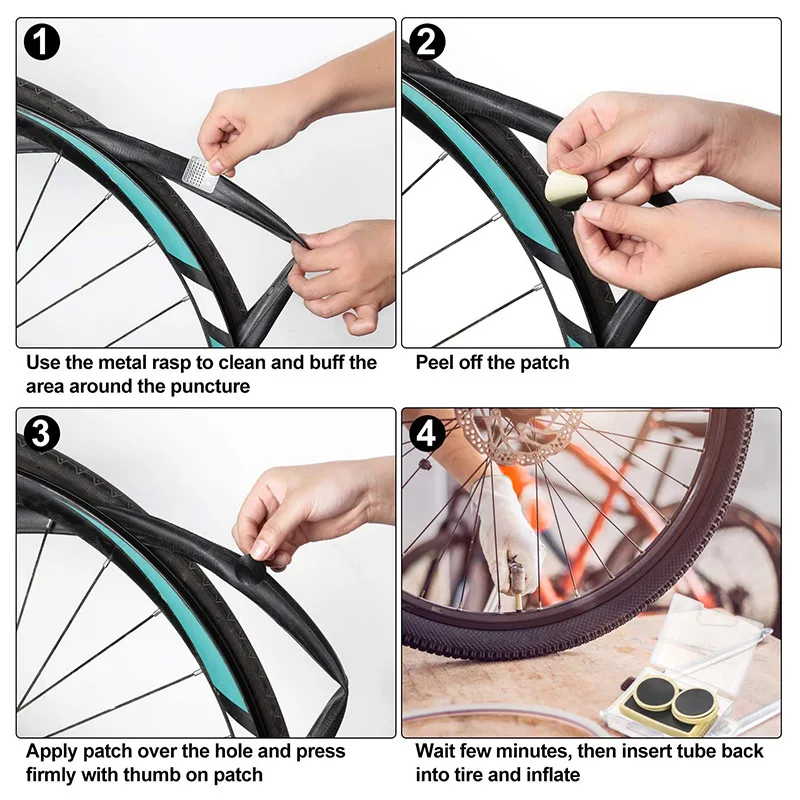
But what if we tell you, popping the bead out of the rim is not too much of a mundane job if you are armed with the in-depth information on how to do so. Doing your own tires will save you a lot of money from costly repairs that should be otherwise spent wisely spent on other car-related maintenance.
With few hand tools and tricks, you can remove the bead off the rim yourself. But the easiest and quickest way to do it is by using a tire-changing machine. This article will cover both of these methods.
Prying the tire loose from the rim might sound intimidating especially if you are a novice or new to tire maintenance. But you don’t really have to be an auto mechanic or expert to do the task. All you need is the right tools, basic mechanic skills, and know-how. The following is an easy guide to carry out the goal.
What you will need:
● Lubricant (Alternative: liquid dish soap or oil)
● Crowbar, Prybar, Tire Levers, Tire iron (any of these)
● Presta or Schnader or any Valve Core Removal Tool (Alternative: Pliers)
● Screwdriver
● To break the bead manually, you need either one of these things: a Jack, a Knife or any other sharp cutting tool, a vehicle
● Optional: Tire Bead Breaker, Tape
The Procedure:
 The air cap or valve core is a small pressure sealing device made of either rubber or metal cylinder located on the core which is where the tire is inflated from. You will need a Schrader or Presta valve tool to extract the air cap from the rim.
Thread the tool inside the valve stem and twist it in a counterclockwise direction. This should loosen and remove the cap off the tire. Then release and allow the air to exhaust.
A valve core removal tool is a small metal that resembles a small screwdriver. It is a handy tool that is relatively inexpensive and often available in a set for different valve sizes like that of the Awpeye 4 Pack Valve Core Remover Tool.
 There are three methods and tricks you can use to break the bead bundle between the bead and the rim.
● Drive and run over the tire you are working on. The aim is to force the rubber down so its easier for the bead to pop out. Hence when driving your vehicle over the tire, make sure that it is the rubber part you are driving onto and not the metal rim. You may need to run the car over it a few times to break the rubber part.
● Put the whole weight of the vehicle on the tire via suspension. The method involves raising the vehicle using a jack and partially lowering it. Once the vehicle is lifted, place the tire underneath the jack. Adjust the jack and lower the vehicle onto the bead part of the tire. Warning: Do not attempt this method if you are new to the process of car suspension unless there is an expert or professional supervision. The procedure requires lifting a car and working underneath it which is can be really dangerous to you and to your vehicle especially if you don’t know what you are doing.
● Cut the bead off the rim. You can cut through with it using a saw blade or a drywall knife. To cut it, follow the seam running alongside the bead, carefully not touching the metal rim. Be cautious as you cut because you don’t want to damage the metal rim To avoid the blade veering towards the tread, insert a wooden towel in the sections that are already cut.
If you are really having a hard time with the bead, you can easily get away with a bead breaker tool. A tire bead breaker is a handy tool designed to dismount the innermost diameter of the tire interfacing the wheel. The operation is so fast and easy it’s basically like opening a canned good! It’s also the safest way to de-bead without damaging the rim. To make the most of your purchase, invest in a well-designed bead breaker like that of BeadBuster XB-450. To date, this is the most affordable and efficient bead breaker.
 Once you have managed to break the bead, grease the edge around the rim as well as the bead by applying the lubricant. This will prep the area when prying the tire later on. You will find it easier to pop the bead off the lip of the rim easily once everything is lubricated. Use as much as a lubricant as necessary. To avoid accidentally scratching the metal easily while prying, you can also tape the edge of the rim prior to lubrication.
  At this point, it is only the bottom half that is loosened, you still have to work on the other half of the tire. So to do this, flip the wheel over on the other side and pry in the wheel off in the same fashion as you were prying in step 4. Use as many pry and screwdriver alongside lubricant as necessary.
If you find taking a tire off a rim by hands too much of a task, time to pull out the big weapon. A tire changing machine skips most of the lengthy process of manually separating the tire from the rim.
Note that the tire changing machine we are referring to differs from that of the actual heavy-duty tire changing equipment technicians used in the shop.![]() The manual tire changing machine is a rather portable and handy tool that requires no power hookups to operate. While the machine will mostly do the job, you will still need the help of a few hand tools.
The manual tire changing machine is a rather portable and handy tool that requires no power hookups to operate. While the machine will mostly do the job, you will still need the help of a few hand tools.
What you will need:
● Plywood Board (Alternative: any strong wood surface that is at least ¾ inches thick)
● Manual Tire Changing Machine
● Tire Changing Rod (Alternative: any metal rod or tube with a pointed tip)
● Screwdriver
● Bolts (preferably 5 inches long and ½ inch wide)
● Presta or Schnader or any Valve Core Removal Tool (Alternative: Pliers)
● Marker or Pencil
● Lubricant (Alternative: liquid dish soap or oil)
● Optional: rug or paper
The Procedure:
 Using a marker, trace the machine’s base on the platform. Do put a mark on the holes or the location of the bolt as well.
Some prefer a block of concrete as a base because they are sturdier and stable. Others drill the machine directly on the floor. But note that you will need a mason drill to engage the bolts into hard cement. Nonetheless, the bolting process is the same as with the wood material.
 You will use it to expose the rim of the tire. Start the process by sticking the rod’s pointed end into the rim-tire joint. Using your hand or your foot, apply pressure on the wedge by pushing it down. This will gradually exposed the rim.
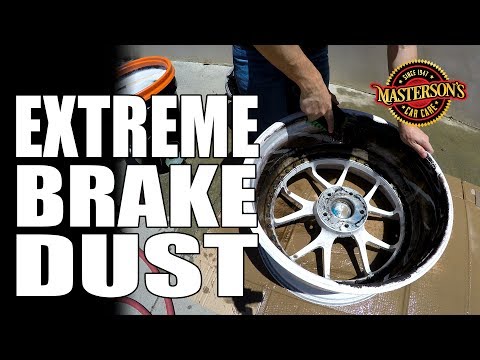 To avoid scratches on the rim while inserting the rim, you can wrap a rug or any cloth (a paper may do) around the spoke.
 Apply generous amount lubrication as necessary.
You may not be able to pry a certain section in one shot and that is fine. If this happens, simply go back by lifting the foot pedal using your foot to turn the rod counterclockwise.
Related video:

This article has thoroughly discussed the process of disengaging the tire from the rim and now it’s your turn to take the wheel. Sure, the entire process of changing your own tire– from removing the wheel of the vehicle to fitting new tires might seem lengthy and complicated but hey at least we have taken down one of its processes, namely removing the tire off the wheel. Doing your own tires will save you money and soon enough, you will be reaping the satisfying feeling of your hard work.
90,000 here are you yourself (and you can’t) - the magazine for the wheel ofLADA
UAZ
KIA
Hyundai
Renault
Toyota
Volkswagen
Skoda
Nissan
BM -Benz
Mitsubishi
Mazda
Ford
All brands
Most often, we ourselves are to blame for the fact that tires become unusable. But this can be avoided.
Related materials
You have never seen such tires: even the police were surprised
In the process of using a tire, a variety of damages can occur, most of which are the fault of the driver. As a result, rubber is wasted, and since the law prohibits the use of different tire models on the same axle, you have to spend money on replacing the second tire.
The most common damage is puncture . This is the most harmless type of damage, but only if you notice it in time and repair it right away. It is absolutely impossible to drive on a flat tire, even a couple of meters! The damage caused by running on a flat tire or with low pressure is catastrophic. This causes the sidewalls to deform more than they should, which causes the tire to overheat, delaminate, and the carcass becomes unusable due to broken cords. As a result, the tire will have to be thrown away. In addition, the edge of the rim can also be damaged. nine0003
Punctures are of two types: with and without cord damage. To determine this, it is necessary to remove what pierced it. If the edges of the puncture tightly converge, then the cord is not damaged and it will be possible to repair the tire without removing it from the disk. Otherwise, if the edges do not converge, you will have to disassemble the wheel and make repairs with strengthening the frame from the inside. Alternatively, in the field and in the absence of a spare wheel, such a puncture can be repaired without removing the tire from the rim, after which you can carefully drive to a tire fitting or garage and make a full repair. nine0003
Related materials
Is it possible to pump up a wheel without a compressor - the experiment "Behind the wheel"
When repairing, the puncture site should be cleaned and marked. Further, it all depends on what kind of repair kit you have - as a rule, instructions are attached to them. There are sealants that are poured into the tire through the nipple, after which the wheel turns with the puncture down and the substance seals the hole. Repair using a tourniquet or insert is somewhat more complicated, but also more durable: the edges of the hole are polished with a special tool, after which the tourniquet treated with a special compound must be inserted into the tire through a puncture with a special awl, pulled out (not completely) out and cut flush with the surface.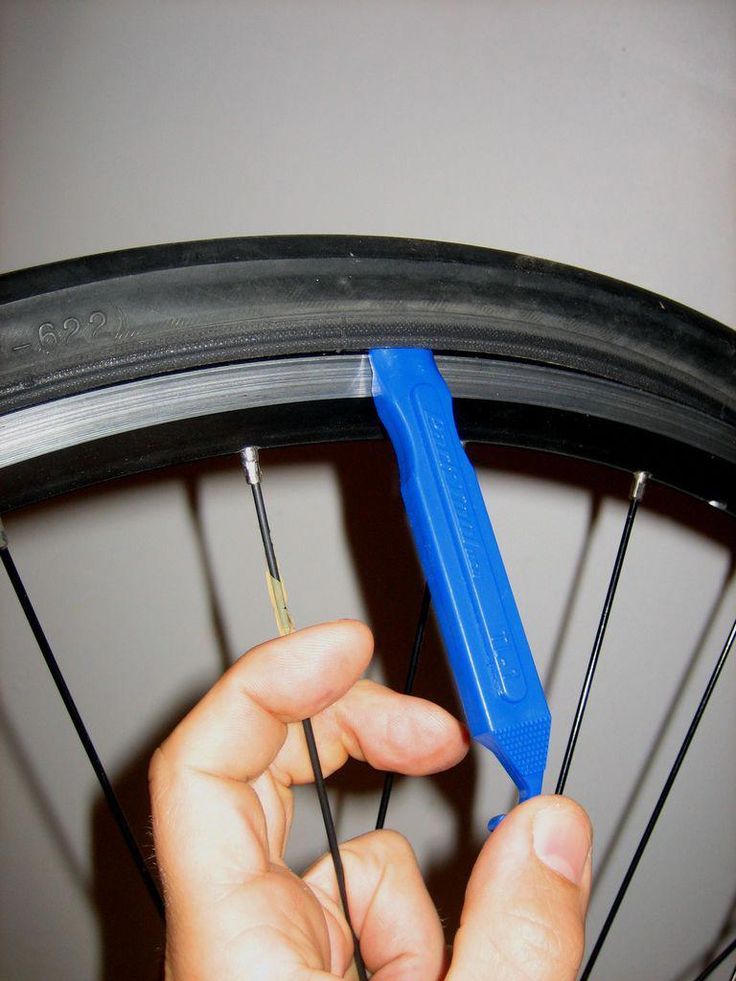 nine0003
In case of damage to the cord due to a puncture, the tire must be removed from the rim in order to install a reinforced patch with an additional cord on its inner surface. One of the sides of such patches has an adhesive layer that promotes cold vulcanization. After such a repair, wheel balancing will be required. To seal punctures from the inside, patches in the form of a mushroom are also used, with a leg that goes into the puncture. Such patches are also covered with a special adhesive for cold vulcanization. nine0003
Cuts or holes , unlike punctures, are not repairable, as they violate the integrity of the frame, which can no longer be strengthened. In addition, breakdowns are always sudden and occur on the go: the tire abruptly loses pressure and before the car comes to a complete stop it has time to make several revolutions “on the rims”, which breaks the cord and destroys the layers. It is not recommended to use such a weakened tire, even if it was possible to repair and strengthen the place of the rupture or cut, in the future.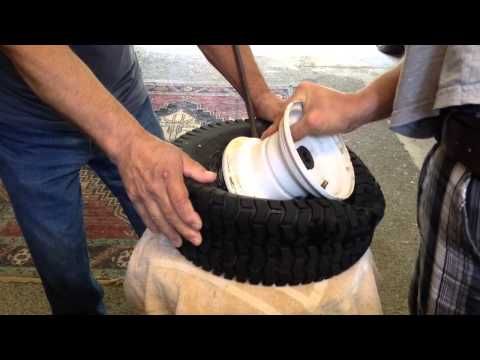
Related materials
8 tire storage rules - do you follow them all?
Incorrect storage of tires can cause cracks . The danger of such damage is that moisture enters the cord through cracks, which renders the frame unusable. In addition, air can escape through cracks. Unfortunately, cracks are not repairable, and tires with them will not last long: sooner or later they will deform, become covered with swellings due to rusted and torn cord or because of driving with pressure below the recommended one. nine0003
Blisters or bulges can appear on a tire for a variety of reasons - it always happens due to a broken cord or delamination in the carcass. In the first case, an obstacle was hit and the impact broke the cord or the cord was cut through with a sharp object. In the second case, there is no damage on or near the hernia, which means that it appeared either due to a factory defect, or due to frequent driving with pressure below the recommended one. The danger of hernias is that they can explode at any moment and provoke a skid, which will lead to an accident. If there is nothing to replace a tire with a hernia, then it is better to rearrange it to the rear axle and drive very carefully. Like cracks, a hernia cannot be repaired. Sometimes small blisters resulting from impacts or cuts are reinforced with reinforced patches, but there is no guarantee that the tire will not explode. Therefore, tires with hernias are recommended to be replaced immediately. nine0003
Related materials
Tire blackening - 6 ways to polish. Inexpensive!
Tire sidewalls can be damaged by rubbing against curbs or the asphalt edge when pulling over. If you are prone to such a driving style, then it is recommended to inspect the inner and outer sidewalls from time to time and, if abrasion is found, swap the wheels in order to prevent the cord from being exposed - the rubber thickness on the sidewalls is small (1.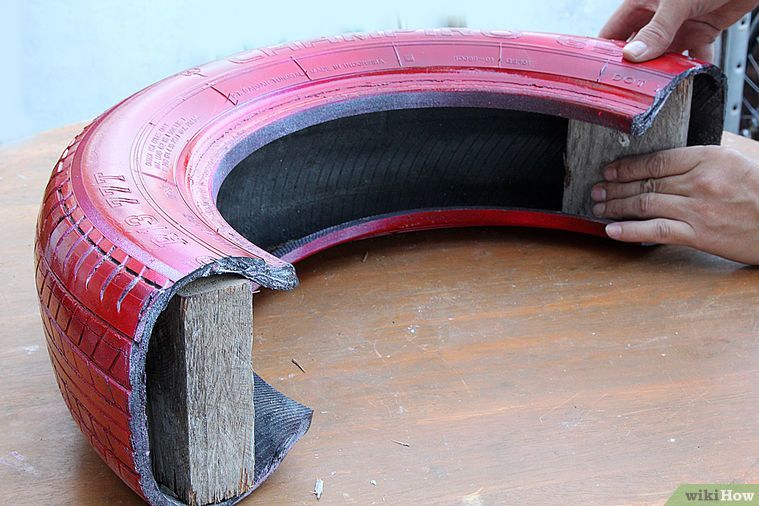 5–3 mm), and it can be rubbed to the frame very quickly. nine0003
Often the cause of tire damage can be poor-quality tire fitting , during which the bead ring was damaged. In this case, the tire loses its geometry and “sits” crookedly on the disk - it writes out “eights” during rotation, and lateral vibration appears during the ride. It is impossible to repair such a tire - you need to replace it with a serviceable one as soon as possible before it damages the suspension: rods, hubs and bearings.
You can find out whether you are using tires correctly and what invisible damage they have received by the characteristic wear of the tread, the varieties of which are collected in the table for convenience:
Double side shoulder wear
Driving with lower than recommended tire pressure.
Inflate the tires to the pressure recommended by the automaker (a plate with recommendations is attached in the driver's door opening) and find the cause of the fall: puncture, cracks, hernia, nipple, rust on the disc rim in the place where the tire fits, etc.
Center wear
Tire pressure too high.
Reduce the pressure to the recommended (indicated on the tablet in the driver's doorway)
In the form of rings and furrows
can be found on trailers or rear wheels of pickups and vans due to vibrations and vibrations and vibrations due to vibrations and vibrations bouncing at high speeds.
Changing wheels on a loaded axle to equalize wear, driving with a heavier load. nine0003
Chipped wear with cuts
Frequent wheel spin on rocky surfaces.
Move the wheels to a non-driving axle, use the gas pedal more carefully when starting to move.
Photo: Petr Urbanek / Unsplash
Our new video
Newcomer "Chinese" against experienced "Japanese" - a common test with unexpected results
Sollers Argo and Atlant from Elabuga: the Chinese could not do without
Test Haval Dargo and Mitsubishi Outlander Liked 0203 the note? Subscribe and you will always be in the know!
Driving in Zen
News smi2.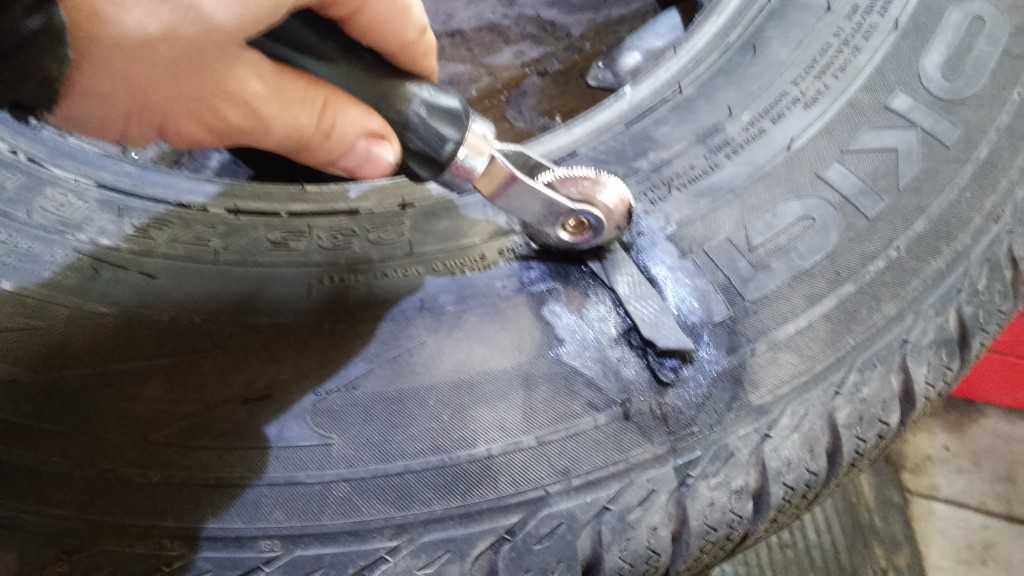 ru
ru
Tires are the only thing that connects a motorcycle to the road. Handling, dynamics, comfort, motorcycle cross-country ability ... and the safety of the driver himself depend on their design and condition. And his concern is to monitor the health of tires and be able to repair them, often in the field. nine0003
THREE SIDES OF THE ONE MEDAL. Any tire is a more or less successful attempt to combine the incompatible. Or, in other words, the conscious deterioration of some tire properties for the benefit of others. This is precisely the difficulty for designers when creating a tire. This is also the difficulty of choice for the consumer. Here are the three main properties that a road tire should have.
The first thing is to provide reliable traction. On asphalt, soft rubber has the best grip (which is especially important in corners). But it quickly wears out, losing its properties.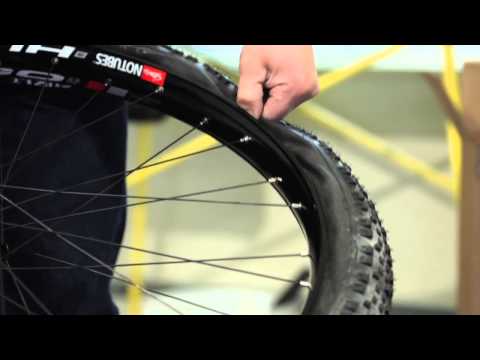 Moreover, tires with a soft compound are very demanding on their own temperature and seriously lose in a cold state. nine0003
The second (for the rear wheel) is to realize a large moment. It is because of this that the rear tires on modern motorcycles are at least thirty percent wider than, say, motorcycles twenty years ago. But again there was a minus - due to the increased width, the maneuverability of the motorcycle worsened.
Third (more for the front wheel) - informative. The tire should “inform” the driver about the state of the roadway, which is especially important for those who like to drive fast. The disadvantages of "detailed information" are an excess of vibrations transmitted from the road and discomfort. The choice of a specific tire for a particular motorcycle depends on many factors - the rider's riding style, his skills, and finally, the budget. Practice shows that the more experienced and skillful the driver is, the less attention he pays to a specific brand (all world-famous manufacturers mainly offer products of a similar level) and more to the condition of the tire and the pressure in it. Of course, if you are the owner of a sportbike, you should not install purely tourist tires on it, but sports pseudo-slicks for driving on wet city streets are not suitable either. nine0003
MOTORCYCLE TIRE CONSTRUCTION. By design, motorcycle tires are radial and diagonal. Radial tires are marked with the letter "R" (for example, 180/55 R17), diagonal tires with a "-" sign (100/90 - 19), and diagonal tires with a stiffening belt with the letter "B" (150/70 B17).
On road and sport motorcycles, radial (RADIAL TYPE) tires are mainly used. They are the most resistant to deformations that occur at high speeds and loads, provide a more regular contact patch and lower internal rolling losses. The carcass threads of a radial tire are located in planes passing through the axis of rotation of the wheel and, accordingly, do not cross. Above the frame is a strong, usually multi-layer breaker with a base of steel or synthetic threads, which perceives and distributes loads. A radial tire has less internal friction, hence less heat. nine0003
Bias (BIAS TYPE) tires are much simpler and therefore cheaper to produce than radial tires. They are more durable on bad roads, but heavier and have greater internal friction losses compared to radial ones. "Diagonals" have proven themselves well on enduro and motocross bikes.
In a diagonal tire, the carcass threads are at an angle to the direction of travel and cross, in contrast to a radial tire. The number of plies in a carcass is often indicated on the tire label (usually 2 to 6). The larger it is, the more load the tire can withstand. There are also BIAS-BELTED tires. They have an additional reinforcing belt on top of the carcass, just like radial tires. nine0003
The first two digits in the oval indicate the week, the last two indicate the year the tire was manufactured.
The first two digits in the oval indicate the week, the last two indicate the year the tire was manufactured.
TIRE FIT AND DIMENSIONS. It is believed that rubber stored for more than a year loses its hermetic properties. In fact, this layer is not. Thomas Bischoff, Market Development Manager for Eastern Europe at Metzeler, explained that in the past, rubber did crack quite quickly when exposed to sunlight. But for more than twenty years, thanks to special additives, the tire can be stored without loss of properties for at least five years. Even on the street. The only type of tires that this does not apply to are racing slicks. It is believed that they do not stand on a motorcycle for a long time, and there is no sunlight in the warehouse. Therefore, “extra” components are not added to their compound. nine0003
Each tire has tread wear indicators. As a rule, these are visible “bulges” (bridges) in the tread grooves. On the sidewall opposite these indicators are the letters TWI (Tread Wear Indicator). If the indicator has begun to wear out at least in one place, the tire must be replaced immediately. Without regret!
Each tire has tread wear indicators. As a rule, these are visible “bulges” (bridges) in the tread grooves. On the sidewall opposite these indicators are the letters TWI (Tread Wear Indicator). If the indicator has begun to wear out at least in one place, the tire must be replaced immediately. Without regret! nine0003
HOW MUCH TO DOWNLOAD? On any production motorcycle, you will find a plate that will indicate the pressure when driving alone and with a passenger. In everyday life, you can safely follow these instructions. But in some cases, recommendations will have to be deviated from. First of all, this applies to multifunctional motorcycles - enduro. Typically, indications on them refer to road tires. When replacing tires with off-road tires, the pressure is usually lowered. As a rule, it should not exceed 1.8–2 atm (for light enduro there are hard tires in which it is recommended to maintain 1 atm). Off-road tires with a pressure above 2 atm behave disgustingly both on asphalt and on a country road! But on them you can carefully get to the place of repair and in case of a puncture - if the tire does not turn on the rim. nine0003
When using sports bikes on the track, the pressure must also be reduced. A "stove" for light vehicles can be considered 2.0 atm in the front and 1.8 atm in the rear wheel. Reducing the pressure allows you to increase the contact patch of the tire with the road, which is especially important in corners. And don't forget to inflate the wheel after training on the track! Driving with low pressure on the motorway will lead to increased tire wear and may be unsafe (after all, the tire heats up on the track, due to which the pressure still rises). When traveling on a loaded road bike, to increase the life of the rear tire, the pressure in it can be increased to 3 atm.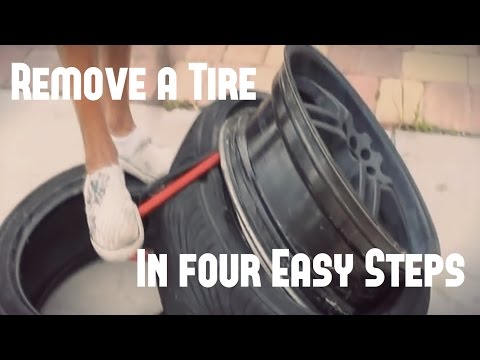 But don't do this if your route is through winding mountain roads or if you are traveling in cold weather. nine0003
Replace tires that are unevenly worn from long freeway driving. Tires that are flat in the middle and virgin along the edges behave very insidiously in turns and on uneven roads (especially in ruts and on longitudinal sections of asphalt), and in the rain they generally cease to hold.
Replace tires that are unevenly worn from long freeway driving. Tires that are flat in the middle and virgin along the edges behave very insidiously in turns and on uneven roads (especially in ruts and on longitudinal sections of asphalt), and in the rain they generally cease to hold. nine0003
REPAIRING A TUBELESS TIRE. Flat tire. If this happened while driving at high speed on the highway, you will not notice that the pressure has dropped. Centrifugal force at speeds over 160 km/h will prevent the tire from being pressed to the rim. (On the other hand, the same force can release air from the wheel by “squeezing” the valve of the nipple inward. Make sure that the cap with a sealing rubber gasket is always screwed on the nipple!) Trouble will show up at the most inopportune moment - during braking. Most often, the culprit of a puncture - a nail, a screw, or a piece of glass - gets stuck in the tire. If you do not have a special kit for repairing tubeless tires with you, it's bad, but do not rush to remove the self-tapping screw from the wheel. All is not yet lost. You can try to ask a good car enthusiast for a pump, pump up the wheel to the maximum pressure and rush to the nearest tire service. (You need to find out about his whereabouts before you start pumping a leaky tire, because you will have no more than seven minutes on the road.) Focus failed? We call a tow truck. nine0003
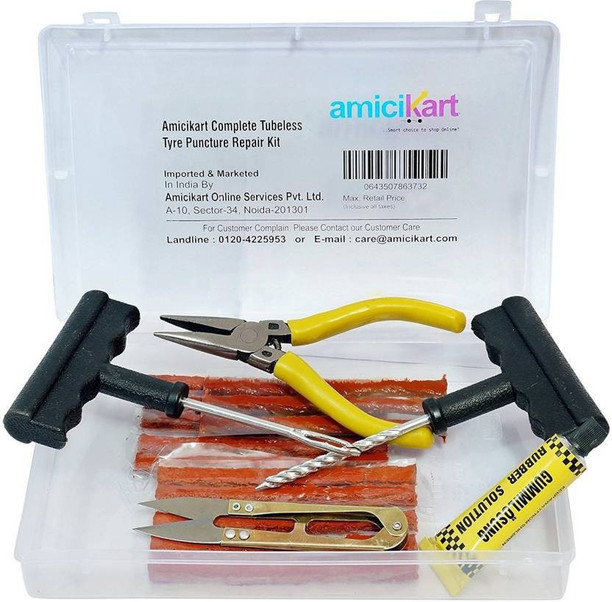
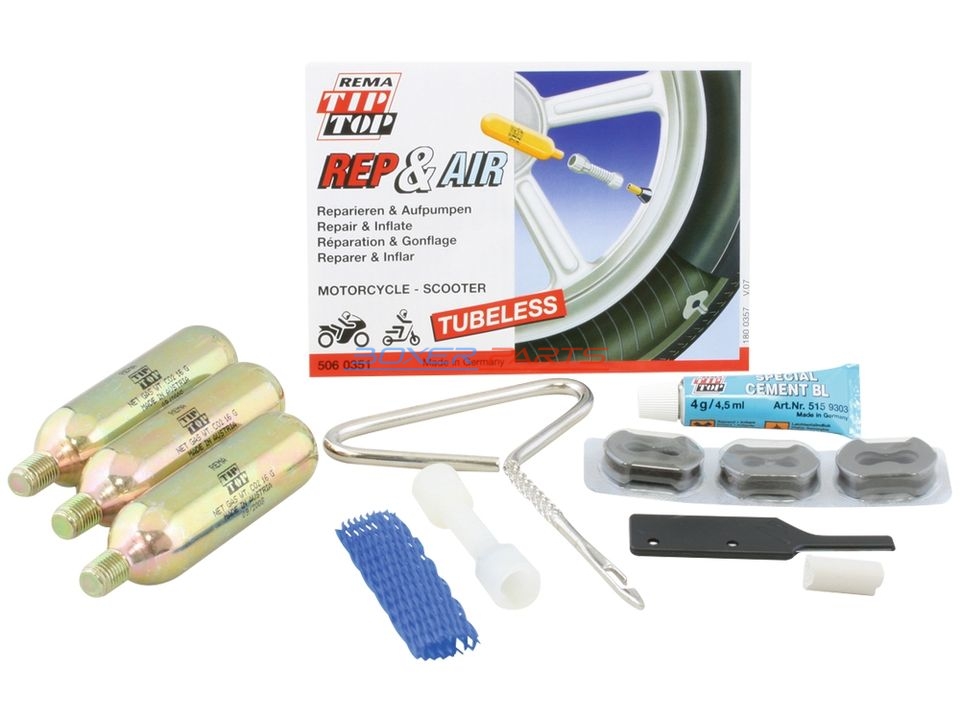
Tubeless tire repair kit.
Tubeless tire repair kit.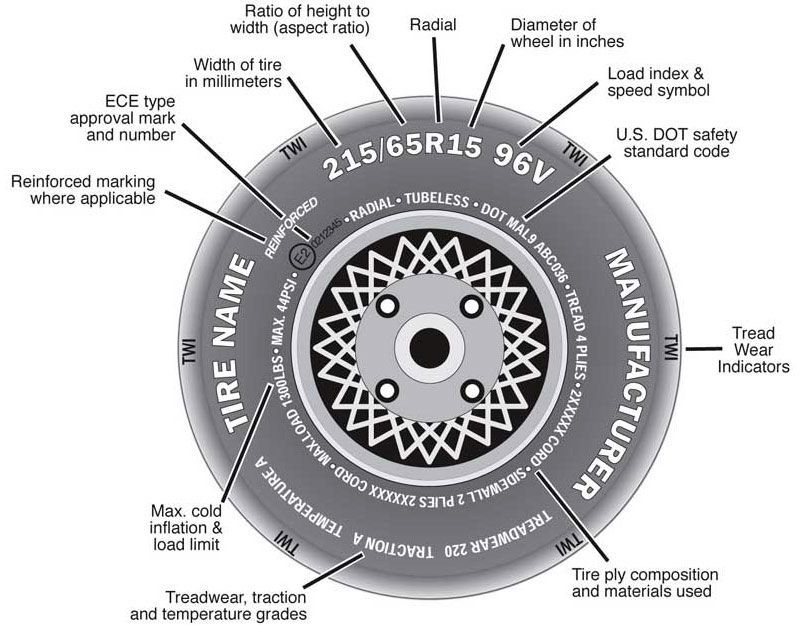
If you did not hope for a chance and stocked up on a repair kit, there is a chance to leave on your own.
Carefully remove the self-tapping screw (nail, glass) from the hole. We take a special hook from the set - a needle file and insert it through the hole into the tire cavity. We process the inner surface of the hole with reciprocating movements. We don't get carried away! The tool should pass into the hole with a slight but perceptible resistance. Squeeze out the glue from the kit into the hole. nine0003
Carefully remove the self-tapping screw (nail, glass) from the hole. We take a special hook from the set - a needle file and insert it through the hole into the tire cavity. We process the inner surface of the hole with reciprocating movements. We don't get carried away! The tool should pass into the hole with a slight but perceptible resistance. Squeeze out the glue from the kit into the hole.
We take a rubber band (they are both round and in the form of a figure eight), also coat it with glue, hook it onto the hook of a universal tool and insert it into the hole with a confident movement. nine0003
We take a rubber band (they are both round and in the form of a figure eight), also coat it with glue, hook it onto the hook of a universal tool and insert it into the hole with a confident movement.
The further process is a real art, the culmination of the whole action, and each master performs it in his own way. Someone pulls smoothly, gently swaying, someone drags boldly and sharply. The point is to remove the tool from the hole so that the inserted tourniquet remains inside. A few crampon workouts in the garage will help a lot, and on the road you will effortlessly handle repairs. nine0003
The further process is a real art, the culmination of the whole action, and each master performs it in his own way. Someone pulls smoothly, gently swaying, someone drags boldly and sharply. The point is to remove the tool from the hole so that the inserted tourniquet remains inside. A few crampon workouts in the garage will help a lot, and on the road you will effortlessly handle repairs.
After removing the tool, cut off the sticking out residue of the flagellum.
After removing the instrument, cut off the protruding remnant of the flagellum.
Now it remains to inflate the wheel from cylinders with compressed gas. You need to carry at least two of them, since one is not enough for the rear wheel. Remember, when inflating a tire, the balloon cools down - do not touch it with bare hands. In Europe, it is generally accepted that a repair with a flagellum does not give a 100% guarantee, since under the action of centrifugal force at high speeds, the flagellum can leave the tire. And despite the fact that I have not seen this in practice, I advise everyone to listen to the opinion of European colleagues.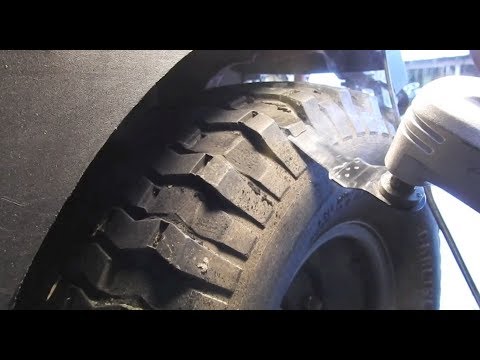 Look into the service and ask to change the tourniquet for a more securely fixed “fungus” or patch from the inside of the tire. But it is useless to repair a puncture with a diameter of more than 5 mm either in the side part of the tire, or a “hernia”. It's a shame, you will have to part with such a tire. nine0003
HOW TO BALANCE? When picking up a motorcycle from a tire shop, it is worth checking the work of the master. First of all, make sure that the arrow drawn on the side of the tire corresponds to the direction of rotation of the wheel. At the same time, the type and shape of the tread should not confuse you in any way. It is also important that the marking of the lightest part of the tire (usually a bright circle painted on the sidewall of the tire) is near the valve. Otherwise, the wheel will have to be weighted with additional balancing weights that spoil the look of the motorcycle. nine0003
Too many motorcyclists torment tire workers in an effort to achieve perfect dynamic wheel balance.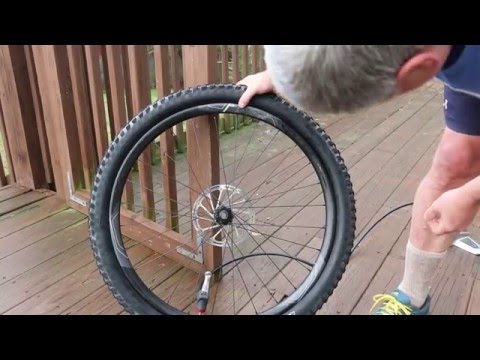 In vain! First of all, the width of the motorcycle rim (even the rear one) is relatively small, as is the possible dynamic imbalance. Moreover, it has been experimentally verified that a motorcyclist cannot feel a weight less than 50 g on the rear and 25 g on the front wheel. That is why, in many motorcycle factories, regular weights are attached to the middle of the rim, and not to the rim, like in cars. Moreover, even in world-class competitions such as WSBK, tires are manually balanced by rotating the wheel in special cones and gluing a weight against the rim that is below. An imbalance of 10–15 g can be considered normal and the balancing should be stopped at this point. nine0003
REPAIRING A TUBE TIRE. A tire puncture should not embarrass a true endurist. After all, he has with him everything necessary "for autonomous navigation", including the tool needed to remove the wheel and tire fitting, as well as strength, dexterity and experience. In the absence of the latter, this article will be of help.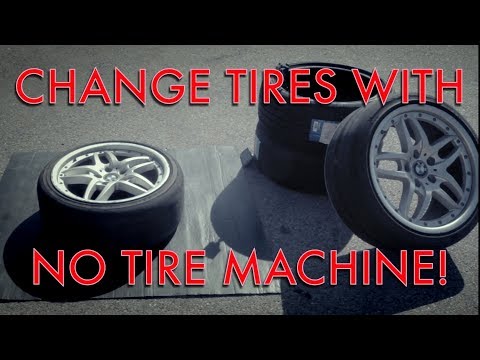 In addition to the tool, you will need a spare chamber (if you take one, it is better to take the front one - it can also be used in the rear wheel, but the opposite will not work) and a pump. On a long trip, it is better to take patches and glue, and now special patches are sold that are designed for a long service life (cut out from the chamber are considered temporary, that is, not very reliable, especially at high loads and temperatures). There are also special cans for tire repair, including tube ones, on sale. Their advantage is that they seal the damage and inflate the tire at the same time. Cons - "disposability", the inability to repair a large puncture and the price. Sometimes you can do without tire fitting by pouring water into the chamber (50-100 ml is enough). With luck, you can drive this way for several hours. And if a rigid diagonal tire is installed on the rear wheel, then on a flat road it allows you to move with a puncture, especially for one driver on a light motorcycle.
 You just need to balance the speed with the heating of the tire - otherwise it can exfoliate from overheating. Such a trick will not work from the front - the motorcycle will be uncontrollable. nine0003
It is very important to have the right mounts - not too long, "hooky", but also without sharp edges. Experienced travelers sometimes make their own mounts from wrenches for axle nuts.
It is very important to have the right mounts - not too long, "hooky", but also without sharp edges. Experienced travelers sometimes make their own mounts from wrenches for axle nuts.
To remove the rear wheel, we need a wrench for the rear axle nut; the second key (to hold the axis) is usually not needed. Sometimes the nut sticks to the thread or is simply tightened with a long wrench, and it cannot be touched with a frail regular tool. When tightening the axle, do not overdo it - a torque of 8–10 kgcm is sufficient.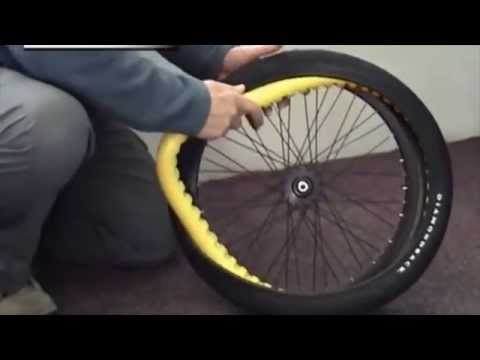 By dragging, instead of getting a reliable connection, you will simply ruin both parts. To remove the rear wheel on an off-road motorcycle, it is not necessary to loosen the chain, but it is still good to have keys with you to tension it (on some motorcycles, the chain is tensioned by a “snail” that does not require keys). When collecting a set of tools for the road, try in the garage to do the procedures for which you take them. After all, in an open field (or a dirty swamp) there is nowhere to wait for help! nine0003
Be sure to loosen the pinch screws on one of the fork legs before removing the front wheel axle. On some motorcycles (where there are two brake discs) you will also have to unscrew the brake calipers, otherwise the wheel cannot be removed. It is advisable to place a set of tools not on the ground, but on a spread cloth.
Be sure to loosen the pinch screws on one of the fork legs before removing the front wheel axle.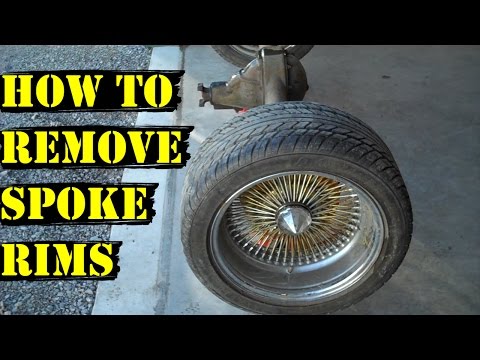 On some motorcycles (where there are two brake discs) you will also have to unscrew the brake calipers, otherwise the wheel cannot be removed. It is advisable to place a set of tools not on the ground, but on a spread cloth. nine0003
Loosen the rear axle nut...
Loosen the rear axle nut...
... and remove the chain from the sprocket.
...and remove the chain from the sprocket.
Light enduros do not have center stands. Therefore, to remove the wheel, you can lean the motorcycle on a stump or bump. If they don't, no problem. We find a clearing more evenly, close the gas valve and lay the motorcycle on its side so that the axle is pulled up. If you're looking after a motorcycle, the axle comes out easily. But woe to those who are lazy! If the axle is rusted to the spacer bushings (or inner rings of bearings), you can't get it out of there without kerosene (WD-40) and a decent-sized mallet.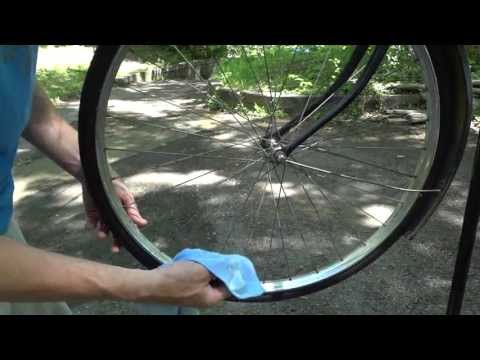 nine0003
Light enduros do not have center stands. Therefore, to remove the wheel, you can lean the motorcycle on a stump or bump. If they don't, no problem. We find a clearing more evenly, close the gas valve and lay the motorcycle on its side so that the axle is pulled up. If you're looking after a motorcycle, the axle comes out easily. But woe to those who are lazy! If the axle is rusted to the spacer bushings (or inner rings of bearings), you can't get it out of there without kerosene (WD-40) and a decent-sized mallet.
It is important not to mix up the bushings (they are not the same everywhere) and not to stain them.
It is important not to mix up the bushings (they are not the same everywhere) and not to stain them.
If a large nail does not stick out of the wheel, the search for a puncture should be postponed. We put the wheel with an asterisk on the underlying fabric (or with a rim - but not with knitting needles! - on two logs) so that dirt and sand do not get into the bearings. We unscrew the “shoe” fastening nut (if any), press on the bolt so that the “shoe” moves away from the edges, loosen the nipple. Now you need to press the tire from the rim. The longer a tire has not been changed, the harder it is to do so. We boldly step with the heel of the motorboat on the sidewall closer to the rim and ... bounce. nine0003
If a large nail is not sticking out of the wheel, the search for a puncture should be postponed. We put the wheel with an asterisk on the underlying fabric (or with a rim - but not with knitting needles! - on two logs) so that dirt and sand do not get into the bearings. We unscrew the “shoe” fastening nut (if any), press on the bolt so that the “shoe” moves away from the edges, loosen the nipple. Now you need to press the tire from the rim. The longer a tire has not been changed, the harder it is to do so. We boldly step with the heel of the motorboat on the sidewall closer to the rim and ... bounce. nine0003
Sooner or later the tire will come off. (Sometimes the sprocket is far enough away from the edge of the rim and does not allow you to firmly press the wheel to the ground. In this case, you can put the edge of the wheel on the motorcycle swingarm, using it as a stop.) Now we need to squeeze both tire beads so that they dive into the recess in rim. This makes it much easier to remove the opposite side of the bead from the rim.
Here and below, in the green frame - the correct position, in the red - incorrect. nine0003
Here and below in the green frame - the correct position, in the red - incorrect.
We begin to remove the tire bead from the nipple so as not to damage the rubber around it by the tire bead (yes, it will not drown properly at the nipple). If the edge of the tire cannot be pulled over the bead, then the opposite edges have not fully entered the recess.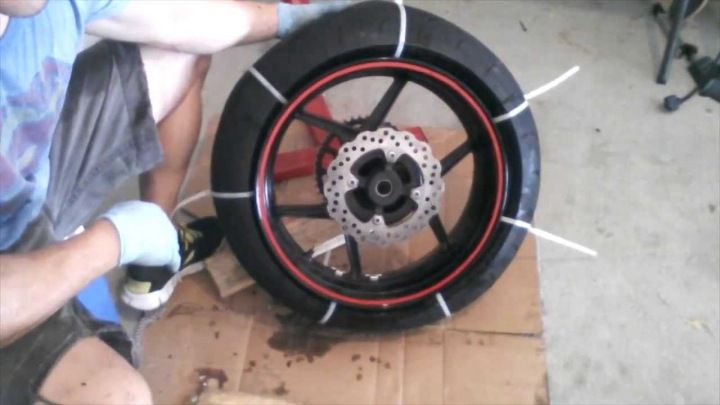
We start the first mount under the tire, hook the edge, turn it out.
We start the first pry bar under the tire, hook the edge, turn it out. nine0003
Now, if the length of the mount allows, we bring its rear part under the brake disc. If the mount is short, you will have to hold it with your knee.
Now, if the length of the mount allows, we bring its rear part under the brake disc. If the mount is short, you will have to hold it with your knee.
Then, with the second mount, we sequentially pull out the edge of the tire.
Then, using the second pry bar, pull out the edge of the tire in sequence. nine0003
After one side of the tire is completely removed from the rim, you can remove the tube. It is worth noting which side it was installed inside the tire.
Once one side of the tire has been completely removed from the rim, the inner tube can be removed. It is worth noting which side it was installed inside the tire.
After examining the chamber, we find a puncture.
After examining the chamber, we find a puncture.
When removing a nail or a screw from a tire, it is important not to injure yourself. To make it easier to find tire damage, we combine the chamber nipple with the hole in the rim.
When removing a nail or a screw from a tire, it is important not to injure yourself. To make it easier to find tire damage, we combine the chamber nipple with the hole in the rim.
Sometimes sticking out ends of the spokes or burrs on their nipples are the culprit for a puncture. This usually happens when the special rubber seal is torn or dislodged, exposing the spokes.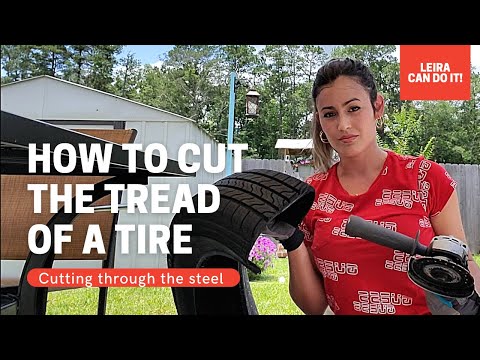 If we put a regular patch on rubber glue, we cut it out with an allowance of 15–20 mm from a puncture. We sand the camera and the patch, degrease it (with gasoline or glue, removing the dried layer), apply a thin layer of glue, dry for 5-10 minutes, and then press with all our might (you can even wash it with a motorboat) - you're done! If the camera is rubbed against a defect in the tire, during installation we put a piece of an unnecessary camera there. It’s enough to get home, but it’s better to throw away such a tire. nine0003
Before inserting the tube into the wheel, it must be slightly inflated.
Before inserting the inner tube into the wheel, it must be slightly inflated.
This will help the camera to correctly orient itself inside the tire and reduce the likelihood of hooking and tearing it with a mount or squeezing it with a “shoe”.
This will help the tube to properly orient itself inside the tire and reduce the chances of it getting caught and torn by the pry bar or squeezed by the “shoe”. nine0003
Having installed the nipple in the hole, screw the outer nut onto it without tightening it.
After installing the nipple in the hole, screw the outer nut onto it without tightening it.
Let's help the camera lie down inside the rim by adjusting it with your fingers. The edges of the chamber must not stick out.
Let's help the camera lie down inside the rim by adjusting it with your fingers. The edges of the chamber must not stick out.
Now you can insert the tire bead - first with your knee, then with a pry bar, with a small step.
The tire bead can now be inserted, first with the knee, then with the pry bar, in small increments.
It is very important not to “bite” the camera when working with mounts. To do this, only grip the edge of the tire and never raise the mount more than 90°.
It is very important not to “bite” the camera when working with mounts. To do this, you need to grab only the edge of the tire and never raise the mount more than 90°.
We finish the installation again at the nipple.
We finish the installation again at the nipple.
Since the rubber is thicker in the nipple area, the tube in this place can get under the edges of the tire. If the nipple pin does not go inside the wheel, then this is what happened. After making sure that the chamber lies freely inside the tire, we inflate the wheel.