Posted on by Alan Thrall
Published on January 13th, 2016
How to flip a tire.
This article will cover how to correctly flip a tire for strength training purposes.
Whether you’re a strongman competitor, a crossfitter, an MMA athlete, a rugby/football player, or just someone looking for an unconventional way to train; the tire flip can be an excellent movement for getting stronger.
Why Flip A Tire?
If you are a competitive Strongman or Crossfit athlete there will come a time when the tire flip will be an event in a competition. Knowing how to flip a tire will leave you better prepared. As a combat athlete (football, wrestling, rugby, mixed martial arts) or a member of the military it might be wise to include some form of unconventional training into your routine. Moving objects on the field, mat, or in the ring will not always be as convenient as an evenly weighted barbell with a knurled handle to grab onto. You might just be someone who trains at home in your backyard looking for different tools to get stronger.
How To Acquire A Large Tractor Tire
Believe it or not, you can acquire a large tractor tire for free. Here’s what you need to do:

One man’s junk is another man’s gym equipment. 800+ lbs (right) and the “unflippable tire” (left)
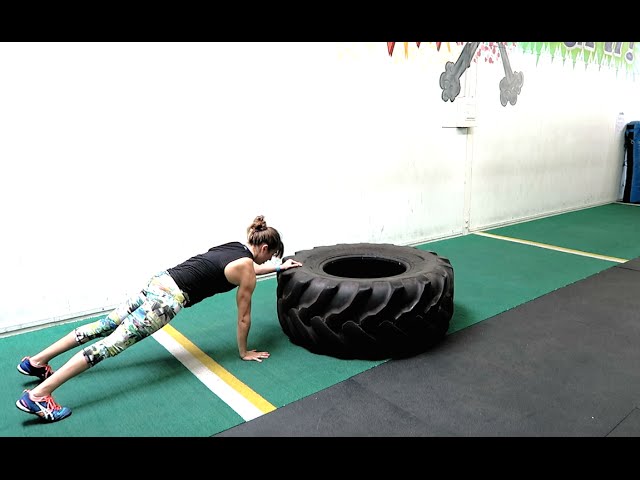
How To Flip A Tire
Knowing how to flip a tire will prevent injury; mainly in the back and the biceps. I’m going to teach you how to flip a tire with your legs rather than your back. With the correct technique you can learn how to move the tire with your body rather than your hands and biceps.
The first thing you want to do is lay the tire flat on the ground. Rolling the tire on its side will not be allowed in a competition and it will not make you any stronger…
Step By Step
 This is how you use leg drive to move the tire.
Common Mistakes
Exceptions To The Rules
 Work on your squat mobility and/or blame your parents for tall genetics.
I hope this article helped you. Watch the “How To Flip A Tire” Music Video
TRAIN UNTAMED!
Posted in ArticlesSign Up For Our Newsletter Today
We'll be sending you exclusive coupons, notifying you of our newest videos, and sending the very best of our articles.
BROWSE ALL ARTICLES
Alan Thrall
Owner of Untamed Strength
LEARN MORE ABOUT ALAN
24 HR Access
Membership
Couple's
Membership
BROWSE ALL MEMBERSHIPS
Over the last decade, athletes and coaches have ventured away from the standard barbell to mix up the way they load their nervous system, to alter the biomechanics of a movement, and to simply add variety. One popular method that has come to the forefront of strength and conditioning communities is the tire flip.
There is a lot to be said about variety. The sequence of muscular activation will change in comparison to the conventional deadlift. Variety can break a standstill in a lifter’s progress, and allow further strength development and hypertrophy. When you utilize tire flips in your training protocol, you may see improvements in your deadlifts.
My favorite aspect of tire flips is the distribution of the load. Unlike a conventional squat or hinge pattern, tire flips involve pulling, then pushing the load away from the body. I feel that this mimics acceleration nicely, if it is done at a high speed.
You can find almost any type of athlete flipping tires these days, from the elite athlete who wishes to dominate their sport to the middle-aged mother who just wants to lose a few pounds. But should everyone be doing them? My answer is no.
No exercise is perfect, and tire flips are no exception. Consider that, unlike deadlifts and squats, we are not lifting the tire vertically, also displacing the load forwards. This places our lower back into a much more vulnerable position.
During tire flips, fatigue is highly possible. Tire flips are gross compound exercises that require loaded, full range of motion in the ankles, knees, hips, and thoracic spine. Abuse this exercise and push your body to exhaustion at your own risk. This may very well result in loss of technique, and therefore injury.
Before performing tire flips, you should be able to perform primary movement patterns correctly, especially the squat. Tire flips provide variety, but they are an advanced pattern of the squat and deadlift that are risky if fundamental mechanics in the basic versions of those movements are flawed. Can you squat without your heels elevating off the floor? Can you squat to full depth without the dreaded “butt wink?”
The tire flip does not require good deep squatting capabilities.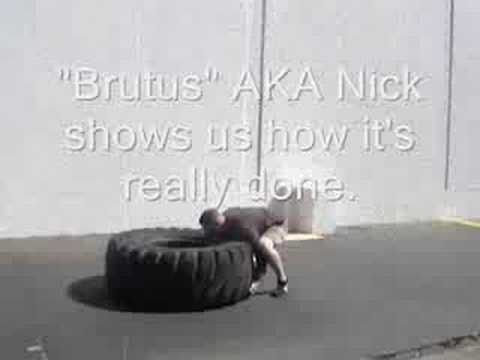 It requires outstanding deep squatting capabilities. To embed your body in the correct position around a tire, you must have great glute activation and brilliant flexibility around the groin. Without these prerequisites, an athlete will not be able to place himself into a position of great biomechanical advantage to perform the exercise.
I’m sure you’re aware that tires come in all shapes and sizes. There are two distinct grips that I teach athletes when flipping tires. These grips do not just involve the hands, and are designed to take pressure away from the biceps tendon.
Grip #1: For Lower Tires
A shorter tire that doesn’t come up as high as your elbow as you grip it does not require the mobility that a taller tire does. The setup is as follows:

Grip #2: For Higher Tires
When an athlete earns the right to flip heavier, taller tires, the technical demands are different. The setup requires wedging the tire between the fingertips and the chest.

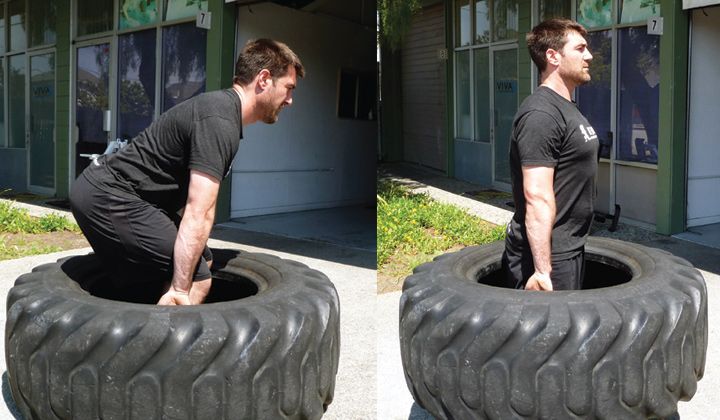
Now you’re ready for action. Do not lift straight up. Biomechanically, this is weak. Drive forward as if you’re tackling. Your hips will extend and the pivot between the tire and the floor will help you to stand tall.
Maintain your posture from the very beginning to the very end of the movement. Under no circumstances should you bend or over round your back. Once the tire the up, push it over the top with a powerful chest pressing motion. If it is a particularly heavy tire, you may wish to do this rapidly to prevent it from swaying in the wrong direction. Be forceful.
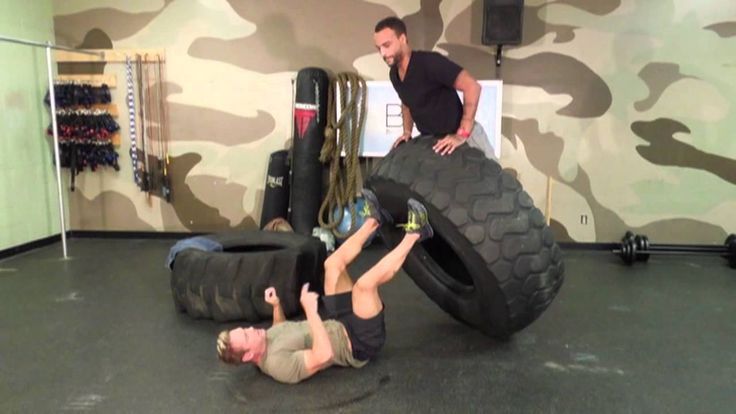
Technical failure is the stopping point for tire flips, not pure physical failure. Tire flipping past good technique can substantially damage your back. Avoid bad technique at all costs. Tires are resilient. If you feel your technique failing, let it go immediately.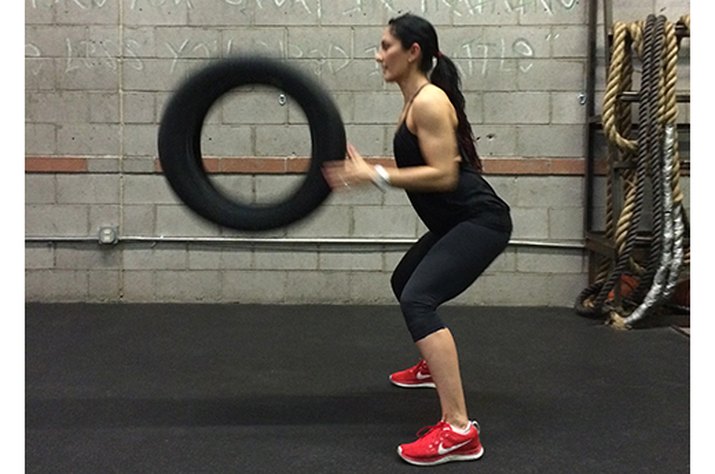 It may make a loud bang as it crashes to the ground, but it won’t get hurt. You will, if you try to stay under a failed tire flip.
I’m a big fan of Dan John’s “power of 10” when it comes to rep ranges for tire flips. In a workout with a heavy tire, only 10 repetitions should be used, in sets like 2×5, 3×3, 3×5-3-2, or 5×2. The maximum number of repetitions is always 10. This rule usually applies to drastically heavy loads, mainly above 80% of max. Of course, this is hard to calculate with tires as it’s rare to find tires with consistent, incrementing loads. So I recommend using intuition. Rate the exhaustion on a repetition on a scale of 1-10. If the difficulty of lifting a tire is a solid 8 out of 10, you know that you found the right tire for you. Just so you have an idea of what an 8 out of 10 feels like, here’s a few quick markers to follow:
This method can be used to help select a lighter tire for faster flips, as well.
Large bilateral movements like tire flips are best positioned early in a workout. The more exhausting exercise should fit closer to beginning, before fatigue has an opportunity to set in. To reinforce good mechanics, I like to add tire flips after squats. I also use plyometrics as a warm up exercise for the squats, so a tire flip would often be the third exercise in a training session. Below is a brief overview of a leg workout that features tire flips.
Notice that I end with unilateral work to avoid muscular imbalances. The human body tends to favor the dominant side, so single leg work is crucial for avoiding injuries and asymmetries. The taxing routine will require a well-structured post workout ritual. This will limit delayed onset muscle soreness (DOMS), prevent injury in a later training program, and increase recovery rate.
When you choose to add a new piece of equipment, exercise, or method to your training, always be analytical and always have the end goal in mind. Many people may have no reason to perform the tire flip and some will not have the right to until they have mastered the squat. It’s good to be critically minded in exercise.
This weird but fun exercise can improve both your upper and lower body strength and increase your endurance.
Petr Yastrebov
Tags:
Question answer
Power training
Trainer's Tips
pressfoto / Freepik
Many people are looking for fun and creative ways to get in shape and diversify their exercises. But it is important to understand that it is the strength training routine performed year after year that will give you exactly what you need. But if you want to improve your strength and fitness while doing something new, get a big tire.
Splint workouts add a variety of elements that other exercises can't provide. And although this projectile is familiar to us, first of all, thanks to strongman competitions, every athlete can benefit from working with him.
Strongman competition has become more popular in recent years, and since then the training methods used by these strongmen have been introduced into the daily workouts of gym goers. Since only a tire is required to flip, it has become an inexpensive and effective way to really increase the effectiveness of training by introducing new elements into it and taking performance to a new level.
Tire Flip consists of several movements: crouching, lifting and then pushing. As a result, for each of these movements, you engage different muscle groups in the upper and lower body. This exercise targets the posterior chain, which includes the back, glute, and hamstrings, to increase lower body strength.
Being a challenging exercise, it uses the stabilizing muscles of the entire body. Maintaining good posture forces the upper body to work at the same intensity, and while the lift is important, it should be noted that one should not lift straight up.
Keeping your core tight will give you a good ab workout. As with many other exercises, the core serves as a base for support, keeping the body in tension to avoid extra movements that can lead to injury.
However, being a physically demanding exercise, flipping the tire will improve your heart rate and build endurance. This exercise has been used in various obstacle races and competitions to test strength and endurance abilities. Your power output will increase because it is an explosive movement. It's great for boosting fast athletic performance, once you get the hang of it, you'll immediately understand why strongmen love flipping tires so much.
After a good warm-up, you can start the exercise with a tire flip. Place the desired size tire on the ground, making sure there is enough room to turn it over and continue the exercise. Sit next to her, bending your knees and lowering your pelvis down and back. With a tight core and a neutral spine, grasp the splint and lift your hips up as you lift the splint. It's not so much a straight up lift as it is a movement that uses the lower body for support and strength.
Once the bar is in the desired position (near the abdomen or chest area), change the position of the hands so that they are now in the pushing position. This is a good time to check your posture and make sure your torso is still tense and your spine is in a neutral position. Push the tire to make it roll over and fall. Squat down to the starting position to repeat, or take your time and take a short break to rest. The choice is yours.
( See also: Who is a spotter and why you need one: 3 reasons to train with a safety partner)
Gone are the days when training was limited to the same old traditional gym.
Although originally used in strongman and strongman competitions, tires have become a staple in well-equipped gyms around the world.
They provide unique strength and conditioning training that can be easily transferred to different sports.
This article introduces the best splint exercises, the muscles they work, and an example splint circuit to get you started.
The key to performing splint exercises is to select the correct size and weight of splints for your level of strength and experience, and to avoid injury.
Start with a smaller, lighter tire and progress to a larger, heavier tire as you develop strength and skill. Women are advised to start with a 100–200 lb (45–90 kg), while men are recommended to start with a 200–300 lb (90–135 kg) tire.
As a general rule, you should do 2-5 repetitions of the exercises below in sequence. If you can't, the tire is probably too heavy.
Tire weight estimation is not an exact science. However, there are some average values depending on the size (1, 2).
| Tire size | Average tire weight |
| Automotive tire | 25 pounds (11 kg) |
| Commercial cargo tire | 100–200 pounds (about 45–91 kg) |
| Tractor bus 17.5 X 25 feet | 9007 3 ( 136 kg), maximum|
| Tractor tire 20.5 x 25 feet | 400 500–181 227 pounds (xnumx xnumx - xnumx kg) |
Tires 23. 5 x 25 feet 5 x 25 feet | 400-800 pounds (181 - 181 - 181 - 181 - 181 - 181 - 181 - 181 - 181 - 181 - 181 - 181 - 181 - 181 - 181 - 181 - 181 - 181 - 181 - 18 363 kg) |
| Tractor Tire 26.5 x 25 ft | 1,000 lb (454 kg) |
It can be hard to know how much a tire weighs because it's hard to put a large tractor tile on the scale. If you are transporting it by truck, you can drive up to the CAT scale, measure the weight of your truck with the tire, and then subtract the weight of your truck to find the weight of the tire.
Some specialty tires allow you to add or remove weights, making it a little easier to add resistance.
Conclusion
Tires can be difficult to weigh and are often estimated. Choose a tire size that allows you to consistently perform at least 2-5 reps.
Tire availability depends on where you live.
Those who live in rural areas may find it easier to find old tires from agricultural equipment, which is also the most cost-effective source.
You can check your local classifieds online for listings of people selling used tires, as larger new tires tend to be quite expensive.
While car tires may be suitable for some exercises, you will need a slightly larger tire to perform most movements better, especially as your strength and skill increase.
Fortunately, many gyms now have indoor or outdoor areas with turf and tire access.
Conclusion
Tires are best found by searching local listings online or by contacting a farm that has agricultural equipment. In addition, many gyms now have a turf area with different tire sizes for members to use.
Splint Flip is a classic splint exercise that develops explosive strength from head to toe.
The key to this exercise is choosing the correct tire size and weight for your level of strength and experience, and avoiding injury.
Muscles worked: glutes, hamstrings, quads, calves, lats, traps, biceps, triceps, forearms, abs (for stabilization)
Farm Walk Tire Deadlift is a unique tire exercise that provides all the benefits of the traditional deadlift with the added aspect of conditioning.
This movement requires excellent body strength and traction to stabilize the tire while the farmer is walking.
Muscles worked: glutes, hamstrings, quads, lats, traps, biceps, forearms, abs
This move can also be done without the farmer's step as a deadlift for only a certain number of sets and reps.
Tire hit is an excellent exercise for developing upper body strength and endurance in various planes of motion.
This exercise requires a sledgehammer or mace as a practice tool for hitting the splint.
You must use a tire that is large enough to absorb the shock of the impact without moving too much.
Tire hitting can be done in timed intervals where you hit the tire for a set amount of time, or in sets where you hit the tire for a set number of repetitions or hits.
This is a dynamic exercise that combines two popular splint exercises to maximize your training adaptation.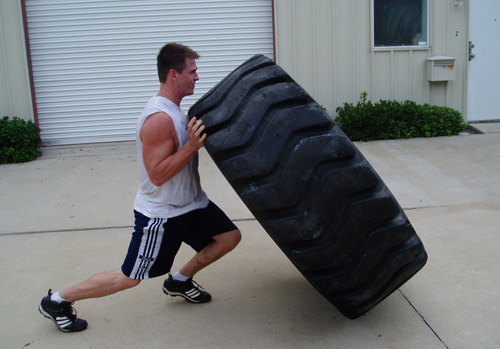
For this exercise, it is best to choose a lighter tire that you can comfortably jump over several times.
Muscles worked: quads, hamstrings, glutes, calves, lats, traps, biceps, forearms, abs
Box jumps are a common plyometric exercise in which your muscles exert maximum force over a short period of time.
This variant uses a tire instead of a box, which creates an additional level of difficulty as you will need to stabilize yourself on landing due to the flex in the tire.
Choose the right tire height for your skill level.
Two tires can be stacked on top of each other as you get more advanced.
Muscles worked: quads, hamstrings, glutes, calves, abs
Tire Dips are a versatile upper body exercise that can be customized to your desired level of difficulty.
Beginners should do elevated torso pushups to reduce resistance, while more advanced trainees may try leg elevated pushups to increase resistance.
Muscles worked: pecs, anterior delts, triceps, abs
The plank is a challenging exercise that engages the abdominal muscles.
In this variation, you will use the tire to increase or decrease the level of difficulty.
To make the exercise a little easier, you will do the plank on an incline bench, or if you want to do something better, you can do the plank on an incline bench.
Muscles worked: abs, obliques (side press), lower back
For this movement you will need a tire large enough to support your body weight without tipping over.
Muscles worked: triceps, chest, shoulders

The Tire Squat & Press is a dynamic exercise that works multiple muscle groups simultaneously.
Muscles worked: quads, hamstrings, glutes, triceps, shoulders, chest, abs

This high intensity tire movement is sure to get your heart racing.
Side-to-side jumping provides excellent physical fitness while simultaneously engaging several major muscle groups.
Muscles worked: quads, hamstrings, glutes, shoulders, chest, triceps, abs
The splint circuit strategically combines a series of splint exercises to provide a high intensity full body workout.
The purpose of the lap with splints is to maintain an elevated heart rate by performing back-to-back movements with short rest periods in between.
Tire laps can be done as a standalone workout or added to a strength training program as an additional conditioning job.
Here is an example of a tire pattern to start with, including the above movements.
Start with a 5-10 minute warm-up to get your blood flowing and relax your joints. Some suggested warm-up methods include jumping rope or exercising on a treadmill, elliptical trainer, or exercise bike.
Then do some dynamic stretches to prepare your joints for the high intensity movement ahead.
This track with tires is not for beginners. You must ensure that you can perform each of the movements individually before attempting the pattern.
If you are using a heavy splint, start with a maximum of 10 reps per exercise. This can be achieved with 2 sets of 5 reps or 3 sets of 3 reps. If you are using a lighter splint, you can do 3-4 sets of 6-10 reps each.
Feel free to change a move if you can't do it. Always start training with more complex complex exercises.
Do some general stretching to speed up the recovery process and cool down after your workout.
Conclusion
This intense splint circuit will combine all the exercises presented earlier to give you a full body workout that promotes both strength and fitness.
Splint exercises are unique in that they provide muscle stimulation unlike most other movements.
Regular exercise with splints has several potential benefits.
There are three movement plans in which you move during daily activities and exercises. These include frontal (side to side), sagittal (front to back), and transverse (rotational movements).
Many traditional exercises only work on one plane of motion, while most splint exercises use multiple planes of motion at the same time.
This makes splint exercises more effective for a variety of sports that also require you to move in multiple planes.
Thus, athletes in their sport may benefit from incorporating splint exercises into their training regimen.
Another notable benefit of splint exercises is their ability to provide strength and conditioning at the same time.
Strength training, also known as resistance training, refers to the movement of muscles against external resistance as a means of increasing muscle mass, metabolic rate and bone mass, and to prevent injury.5).
Conditioning, on the other hand, refers to performing high-intensity movements specific to your sport that improve aerobic endurance, speed, skill, agility, and balance.
Most splint exercises fit both, providing enough resistance to increase strength as well as providing high-intensity movements that improve fitness across a wide range of sports.
However, other strength training methods should also be included in your training program to maximize muscle and strength gains (6).
Power, or the ability to quickly develop maximum strength, is an important aspect of athletic training.
Research shows that strength development is best trained with explosive movements of 30–50% of your 1RM or the weight you can lift in one rep of the movement (7).
Many splint exercises fit into this category, making them excellent for strength development.
To further enhance the effect of training with splints for strength development, perform movements in an explosive manner, applying maximum effort in each repetition.
Conclusion
Splint exercises provide a unique muscle stimulus that provides several benefits. These include providing movement in multiple planes, contributing to both strength and conditioning, as well as accelerating power development.
While splints are a great tool to increase the intensity of your workout, there are some precautions you should take to avoid injury.
Splints can be awkward to work with, especially large ones, and training with splints requires a lot of skill to perform correctly. Thus, it is important to focus on good technique in all movements.
One of the most common splint-related injuries is a ruptured bicep (8).
This often occurs during the lifting part of a tire rollover, during which the bicep is in a stretched and compromised position.
To avoid tearing your biceps during a splint roll, be sure to keep your shoulder against the splint at the bottom of the movement and use stronger hamstring muscles (glutes, hamstrings, back muscles) to generate momentum. Do not lift the tire with your hands only.
Other common injury-prone areas include the lower or middle back, shoulders, and knees.