Have you ever noticed that your bike tires have little cracks along the side? If you have, you need, or will eventually need, to do something about it. Ride through this article to see what a cracked tire means, what to do about it, and even ways to prevent them from cracking.
Most of the time, you can’t blame yourself for having a cracked tire. These rubber accessories are exposed to different and even extreme conditions. Excessive heat, direct sunlight and dry air, or sudden changes in weather may cause tiny cracks to form.
But it’s not all about the weather when it comes to this phenomenon. Let’s not forget that tires are in constant contact with the roads we choose to ride on and, even though those cracks tend to appear at the sides, the pressure of us bikers and the soil affects tire elasticity, contributing to cracks. In addition to this, cleaning chemicals also damage the material
.
Last but not least, age is also a key factor. An old tire, even in disuse, can show signs of cracking. Time is a big factor in tire degradation, no matter how careful you may be when riding.
One of the most dangerous consequences of tire cracking is a blowout. However, even if you do not experience a blowout, cracked tires will affect the control you have on your bike. Your tire may start to get slightly deformed from cracking.
Regardless, there’s no need to panic, as a cracked tire is only the first symptom. As long as you take proper measures in time, you’ll be out of danger.
So, what now? Does this mean you can’t ride on rough soil, or on a rainy day? Of course, it doesn’t! Even though we said extreme weather or soil conditions might be the cause for a cracked tire, this does not mean it will always happen.
We obviously can’t stop a tire from aging, but we can help it age better.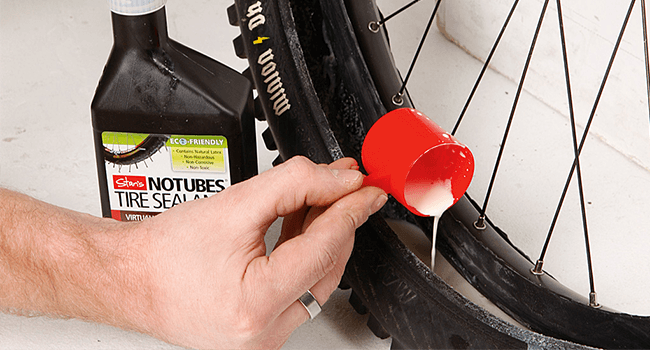 Keeping our bikes away from direct sun exposure when we are not riding them, or even indoors if possible, is an excellent way of doing so.
Make sure you use tire-safe products when cleaning them. Finally, the periodic use of your bike is also a great way of preventing tire cracking.
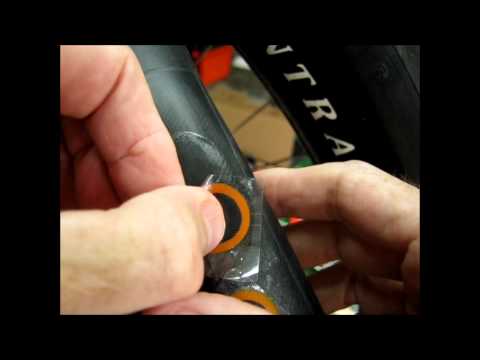
You can fix a cracked tire with an elastic cement. It is very important to first clean the surface where the fissure is. Make sure it is dirt-free and dry, and then apply the elastic cement.
Use your fingers to spread the cement completely into the crevice and around it, too. After letting it dry, you can hop on your bike again. Remember to check the repair once in a while, just to make sure it’s working.
There are other homemade ways of getting out of this issue. For instance, Park Tool’s TB-2 Emergency Tire Boot is a good solution when you are on-the-go.
We hope you’ve benefited from today’s article on fixing your cracked bike tire.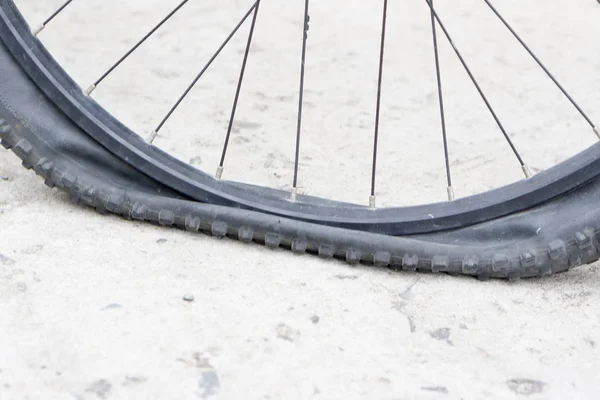 Make sure to maintain your tires well, and change them when they eventually become too worn out to use!
The sight of cracked tires can ruin your day.
It’s a condition that affects your car’s movement and general safety if left unfixed. Unfortunately, cracked tires are inevitable. As your car begins to age and the tires are exposed to extreme temperatures, they start to show cracks.
To avoid putting your safety in jeopardy, it’s imperative to learn how to fix cracked tires. In this article, you’ll learn to identify cracks, their causes, how they are fixed, and how you can prevent them.
Table of Contents
It’s fairly easy to notice cracked tires. The following are signs that appear when there are cracks on your vehicle’s tires:
The rubber parts of tires are protected by oils and antioxidants. Frequent usage can make these protective compounds wear away. This makes your tires appear dry and brittle when felt.
Ever noticed splits and cracks on the sidewalls of your tires? They can appear on both sides and are the clearest sign that you have cracked tires.
Cracks can also appear on your tire tread’s outer edges. This is usually caused by dry rot at an advanced stage. The cracks might look small, but they can compromise your car’s handling even when the tread still has enough depth.
When your car tire’s black color begins to turn grey, there’s a chance it’s due to dry rot. Sometimes, the color starts fading before cracking happens. However, they can both happen at the same time as well.
Dry rot doesn’t happen overnight. It’s caused by several reasons including:
Storing your car in a garage and leaving it unused for a long period can leave the engine in a bad condition. But it can also suffer further damage due to dry rot. As earlier mentioned, tires are protected by oils and antioxidants.
When left unused, these protective compounds can evaporate or leach into the ground. This effectively removes your car’s protective layer, making it vulnerable to cracking
Like humans, cars age with time. The older they get, the less efficient their parts become. This is also true for car tires. After a while, the rubber begins to age, and dry rot sets in. The aging process can also be accelerated by heavy use.
With your tires running for many miles every day and being exposed to various elements, it will start to crack.
Extreme temperature and humidity are some of the elements that can cause your tires to deteriorate. While this process is gradual under normal conditions, it accelerates when the temperature is particularly high.
When the temperature is low, the rubber becomes rigid as it dries out.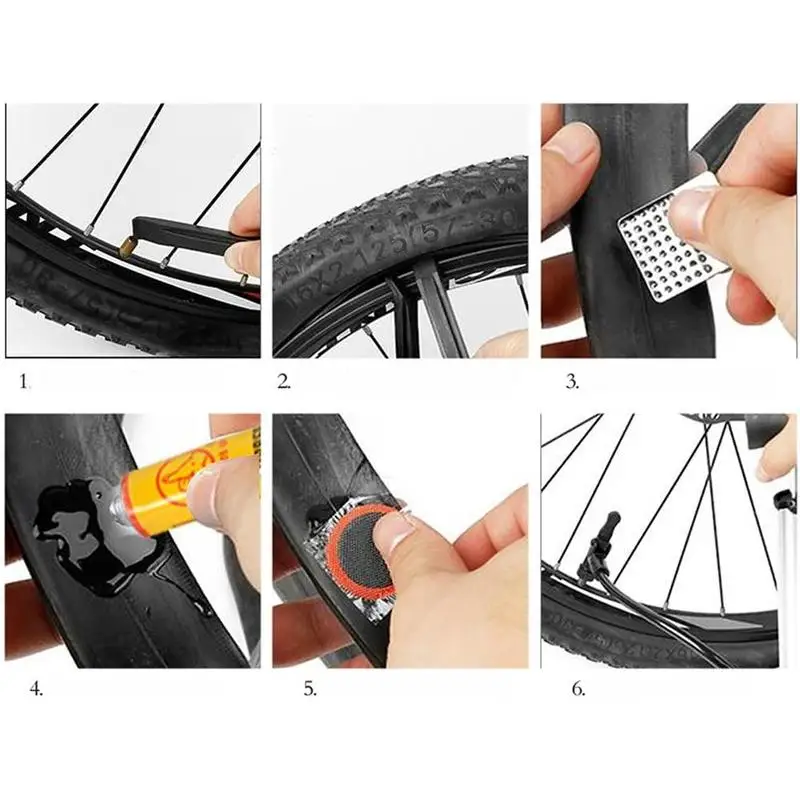 This allows dry rot to set in faster. Similarly, when the temperature is high, sunlight breaks down the rubber’s protective compounds causing tires to crack rapidly.
If your tires are made with low-quality materials, you can bet on dry rot to set in easily. Tires face different elements as well as static friction between them and the road. If the rubber and other components are substandard, the cracking process will happen much faster causing your tires to deteriorate at an alarming speed.
It’s crucial to get your car’s pressure right to avoid the effects of under or over-pressurized tires. One such effect is dry rot. When the tires are over-pressurized, there’s additional stress on the walls which may lead to bulging and eventually cause cracks. On the other hand, under-pressurized tires experience more friction with the road. This causes dry rot.
See Also – Tire Pressure Sensor Fault (Causes and How to Fix)
When dry rot sets in, you have the option to change your tires. But If you’re not too thrilled with the idea of replacing your tires every year, it’s best to learn how to fix them. Below are steps to fix your cracked tires.
You can fix your cracked tires with sealants when the cracks are small and not obvious. To ensure this method is done right, you need to buy a sealant that’s suitable for your tires.
Here are the tools you need:
● Dry rot sealant that suits your tires
● Tire inflator
● Tire pressure gauge
● 1/2” Socket wrench or Lug wrench
Follow the steps below to fix your tires with a sealant:
As you may have noticed, your vehicle naturally heats up when driven. For tires, the heating up is a result of the friction between them and the ground. If you’ve recently driven your car, allow it to cool down before you fix the cracks with a sealant.
The next step is to jack up your vehicle and remove the affected tires. You can’t fix tires properly if they are not attached to your car. Therefore, you’ll need the lug wrench or the 1/2” socket wrench to take off your tires to allow you to fix them properly.
The level of damage will confirm if your tires are fixable or they need to be replaced. This inspection also allows you to see the area that’s damaged. With a clear idea of the situation, you can come up with a good plan to fix the tires.
Depending on the kind of sealant, you might need to prepare it according to the instructions. However, some sealants don’t need any special preparation. You can apply them right away. To apply the sealant on the insides of your tires, insert the injector into the valve stem.
With the sealant applied, your tires may have lost some air. Therefore, you need to re-inflate them. Use the pressure gauge to ensure you get the pressure right.
With your tires fixed, re-install them on your car. Some sealants require you to drive your car around immediately after installing. This helps the sealant to circulate and seal the cracks adequately.
For visible cracks, this method is ideal. A protectant can fix cracks and help protect the rubber from UV rays.
● Water hose
● Large sponge
● Water-based tire degreaser
● Tire protectant
Like the first method, you need to wait till your tires are cool before taking them out to examine. The inspection will show where the major problem is and if it’s fixable.
With the large sponge, apply the degreaser to your tires. Be sure to apply it to every area of the tires while focusing on the cracked areas. Scrub thoroughly to get the degreaser on the tire’s entire surface.
After applying the degreaser, allow your tires to dry. When dry, wipe down with a clean cloth and rinse with the water hose.
When the tires are dry from rinsing, apply the tire protectant. Following the instructions on the protectant, spray it across the tires’ entire surface.
When you’ve sprayed your tires, the cracks should be fixed. You can re-install your tires on your car. If you still see signs of dry rot, repeat the process for better results.
Your tires can’t stay new forever, but with the following measures, you can keep extending their lifespan and keep them from cracking too soon:
● Don’t buy low-quality tires
● Clean regularly
● Cover your car when parked outside
● Maintain ideal tire pressure
● Examine your tires regularly
● Apply protectants frequently
The average life of car tires is six years. After a few years, dry rot is bound to set in. But if you’re quick to fix them, you can easily extend your tire’s lifespan.
See Also – What Are Radial Tires?
Tim Miller
Editor-in-Chief at GmundCars.com
Tim is a mechanic and car blogger from Denver, Colorado. He has over 10 years experience in car repair.
Latest posts by Tim Miller (see all)
Unfortunately, the soles of the shoes occasionally crack. As usual, the overlays installed on the crack do not give the desired result - the shoes continue to get wet, and the “patch” rapidly falls off. How do you repair a cracked sole?
You will need
1. Carefully clean the soleplate from dust and dirt. Scrupulously process the inner surface of the crack with sandpaper. Wipe with acetone or gasoline to degrease.
2. Cut off the edges of the sole around the crack to a width of 5-7 mm using a shoe cutter. The depth of cut should be one millimeter. nine0003
3. Carefully measure the depth of the crack in millimeters. Add 15 mm to this value. Take a dilapidated bicycle tube and cut out a strip from it, the width of which will correspond to the resulting result.
4. Sand down the sandpaper backing strip. Degrease using gasoline or acetone. Coat the strip with rubber glue on 2 sides. At the same time, on the one hand, the glue should cover the entire surface completely, and on the other, dry edges should be left. The width of these edges should be 5-7 mm. nine0003
5. Take a shoe that needs repair and bend it so that the crack in the sole opens up as much as possible. Gently apply glue to the damaged area and let it dry for 10-15 minutes. The crack should not be closed.
6. Take a strip of rubber and fold it in half. Gently insert into the cracked sole and straighten the shoes. Firmly press the edges of the strip protruding from the crack to the sole. Put the shoes under the load for 24 hours. Shoes repaired in this way will serve you for a long time. nine0003
7. It is allowed to fill a broken sole with melted nylon. Dry, clean and degrease the crack. Heat up the soldering iron and run it over the inside of the damage. In this case, the leather or rubber from which the sole is made will begin to bubble and become sticky. Take a small piece of nylon, attach it to the crack and press it with a soldering iron. Rub the melted nylon into the damaged area. Repeat this procedure until the crack is completely gone. It should be noted that it is necessary to straighten the molten nylon not with a hot tip of the soldering iron, but with its handle. nine0003
Of all the combined parts of the shoe, the sole is especially susceptible to damage and wear. The method of repair depends entirely on what material it is made of and how it is attached to the top of the shoe.
You will need
1. Remove dust and dirt from the area where the polyurethane sole came off and degrease with gasoline. After that, in the same area, remove the colored layer of skin with a flat needle file and degrease again. Heat up an electric soldering iron and smooth out the polyurethane slices cut off from the worn out sole at the place of gluing on the skin. Compress shoe upper and outsole and, passing between them with the heated part of the burner, process the bonding area. At the same time, deepen the heated element to the lining. Here it is significant to correctly endure the heating temperature of the device and the pressure between the top and the sole, which will require a certain skill. nine0003
2. If the edge of the polyurethane sole is placed on top, apply a layer of adhesive to the cleaned and degreased area. After that, take it out for 15 minutes, press the sole to the top of shoes and sew on with a rubbed shoe tar. The seam should go at a distance of 5 mm from the top edge. If the peeled off sole is rubber, then glue should be applied to the degreased repair site and after 15 minutes of drying, the shoes should be pressed.
3. nine0006 If the rubber sole has worn out, it must be leveled with a shoe rasp and degreased with gasoline. Also degrease the outsole made of fine-pored rubber. Cover trail and outsole with a thin layer of adhesive and, after holding for 10 minutes, glue using the rolling method. Protruding outsole cut the edge of the mark with a knife, smooth with a rasp and smooth with abrasive paper.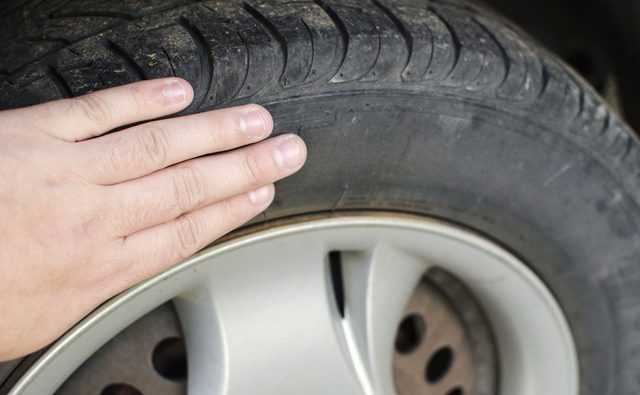
4. To repair the leather sole , a similar material outsole will be required. Lay the outsole on a metal surface, say, a cast-iron iron or an anvil, upside down. With a heavy hammer equipped with a wide inlay, knock it out, starting from the middle. Lay the embossed outsole at sole and temporarily secure it with a pair of nails. Trim the edge and sew, cutting a groove in advance by a third of the thickness in which the seam will be hidden. Sew on the outsole with shoe needles rubbed with shoe pitch. At the end of sewing, coat the slot with glue and hammer so as to close it.
A soldering iron is needed in every household. It is used both for repairing electrical devices and for connecting different metal parts together. If the soldering iron is out of order, it is not invariably required to purchase a new one. Occasionally it is enough to repair it, restoring its working capacity. More often than not, repairing a burner involves replacing the heating element.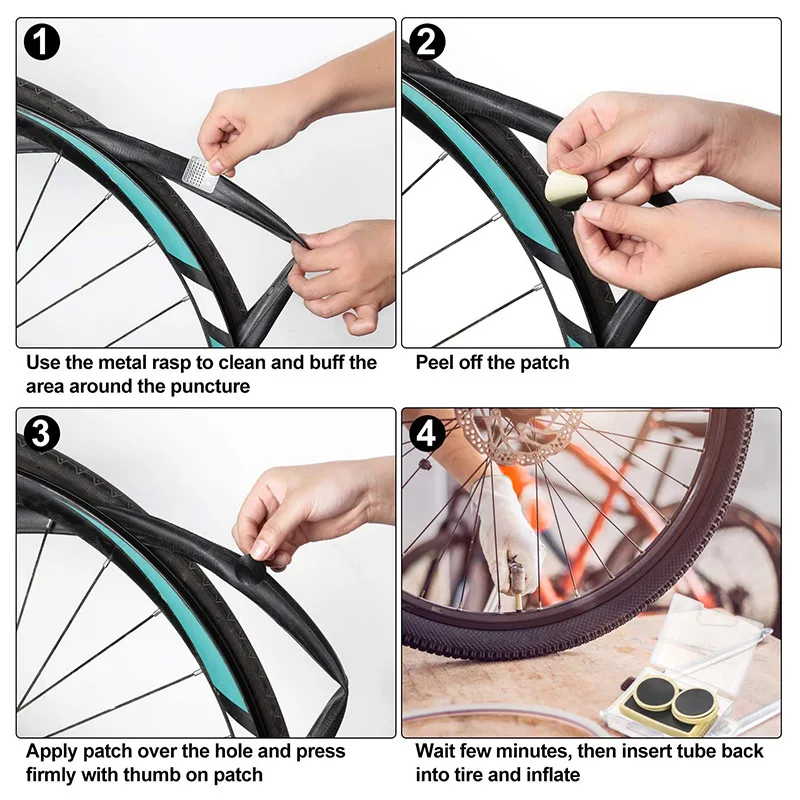 nine0003
You will need
1. For example, it is enough to see the sequence of actions when repairing an electric soldering iron with a power of 40 W, designed for a voltage of 220 V. To replace a faulty heating element, prepare a ceramic resistance of the PEV-10 type with a rating of 1.0 to 1.5 kOhm. The hole, located in the center of the resistor, has a diameter that easily fits a soldering iron tip, with no additional adjustment required. nine0003
2. Remove old burnt heating element. On the body, from the side of the longitudinal seam, make a transverse cut approximately to the middle. Step back from the edge by 40 mm. Now unfold the sawn sides of the tube and cut off the corners of the resulting nest. This is required in order to avoid contact of the body with the results of the resistance.
3. Insert a resistor that will act as a heating element into the socket. Bend back the petals of the body, surrounding the nest with them and secure with a clamp. nine0003
4. Now you need to connect the power wires to the updated heating element. Cut off approximately 150-200 mm of insulation from the electrical cord. Traditionally, a typical cord has double core insulation that must be removed.
5. Wrap the freed ends of the wire along each length tightly with asbestos thread - coil to coil. Such a thread can be taken, for example, from a faulty heating pad. Pull the ends of the wire insulated with a thread through the channels of the handle and connect to the results of the new heating element. For the convenience of mounting the legs of the resistor, bend, insert the pre-stripped end of the wire into the bent part and crimp it with pliers. nine0003
6. Insulate the heater ends with the same asbestos thread, tightly winding them round to round.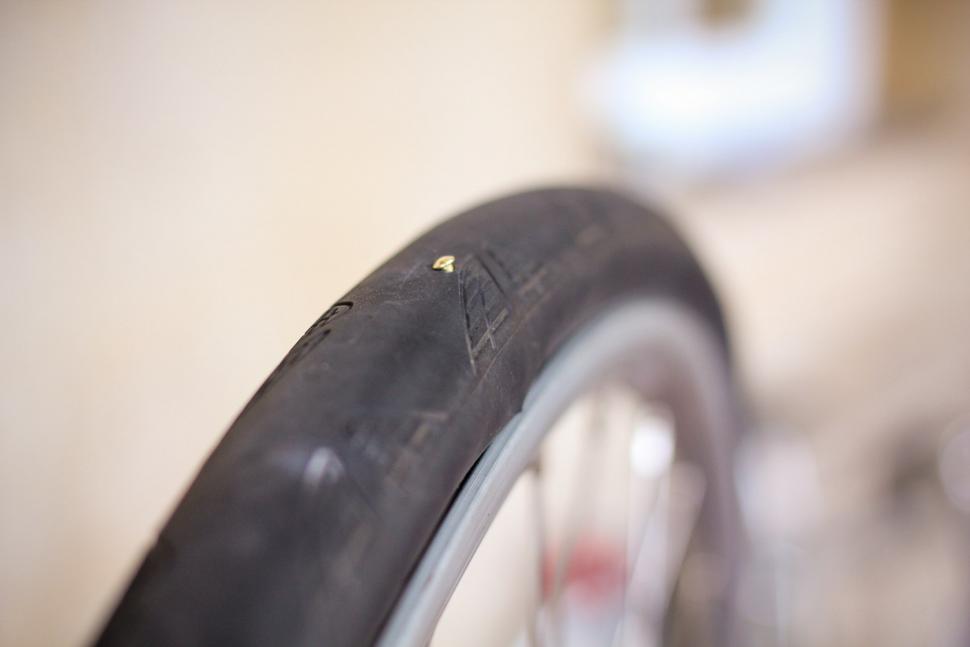 The wires must be laid so that they do not come into contact with the body. Rewind both conductors with thread, fastening them together. Collect the pen. Now the repaired soldering iron is ready for work again.
How to fix a crack on the sole of the boot, there will be this article. It’s good when favorable conditions are created for the repair - and the crack is small (it must be sealed and then stitched with threads), and the thickness of the sole is just right, and there are no deep depressions on it, which especially complicates the work. To do this, remove a layer of material that is no longer good for anything, cut out the workpiece, glue it and fix it with threads or nails. There is another one in stock, but I must warn you, a more tricky way is to replace the entire sole. Moreover, you will have to repair a pair, even if only one sole is damaged. But this is done as a last resort. Let's still try to sew up the crack. nine0003
I can't guarantee complete success, but I'm sure it won't do any harm.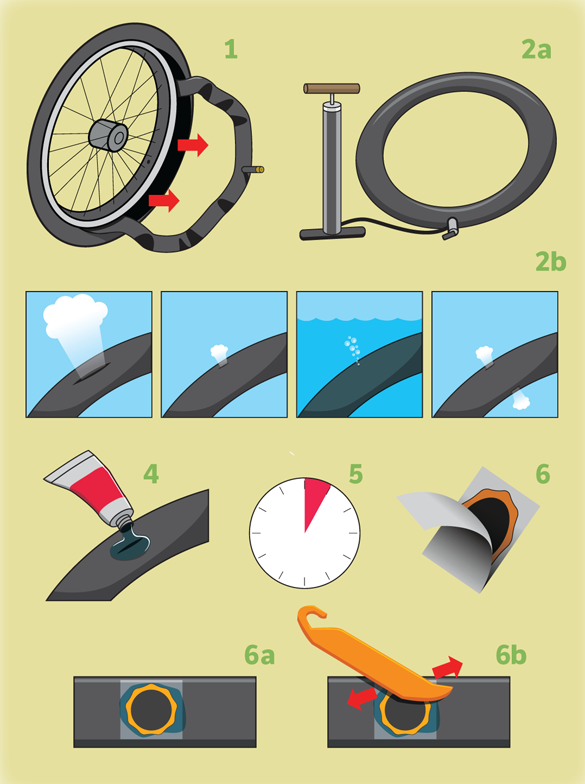 And if you are lucky, and even the material near the crack is strong enough, then the shoes repaired in this way will serve you for more than one season. And if you are not lucky, then sooner or later a new gap will appear next to the sewn crack. But who does not take risks, as they say, he does not drink champagne. And there is a way out. In this case, a layer of material is cut off and a regular outsole is put on or the sole is replaced.
It all depends on the extent of the damage. Worse, if it suddenly turns out that the thickness of the sole at the site of the crack is less than 7 mm, and the outsole has protrusions and depressions. Still, let's go back to the first case, which is simpler. If: the material is strong enough and the crack is no more than 20 mm.
Before starting work, you need to thoroughly clean the crack from dirt, even wash with soap and dry. We degrease cracks: with acetone, white spirit, gasoline or P647 solvent - this is a must. If you want to know how to flash the sole nine0003
We apply it on the surface of the crack walls in a thin layer, leaving not a drop of excess. Part of the work is behind. Now take a short break, and after 15-20 minutes, connect the surfaces and leave the boot in a bent position for about a day.
Time has passed. The work can be continued. Now we mark the seam line with a ballpoint pen, and make cuts with a depth of 2-2.5 mm with a shoe knife. At the intersection points of the incisions, we pierce holes through the sole and the main insole. It is through these incisions that you need to lay a seam. But not one, but two, even three. The second and third stitches, which will lie on top of the first, are needed in order to press the crack walls against each other more strongly. The stitches will protect the first line from damage by small pebbles, glass fragments, and other household debris that we will step on. nine0003
When laying the seam, you must be extremely careful and ensure that the stitches are completely immersed in the cuts.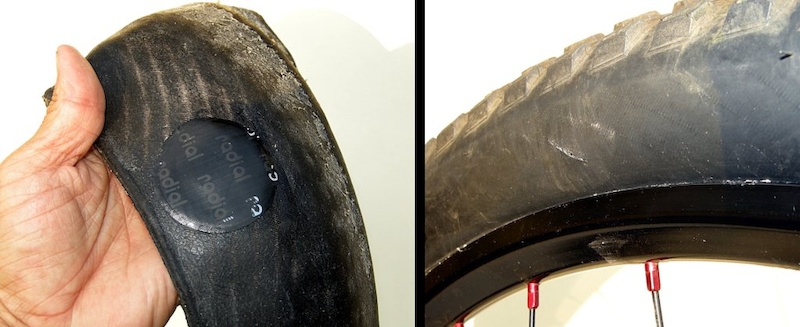 If it doesn't work out, help with an awl.
After the penultimate stitch of the third layer of threads is tightened, we bend the sole at a right angle and carefully examine the section of the crack that is located at the very end. If the edges of the crack move apart by no more than 0.5 mm, you can safely bring out the inner thread, tie a knot and hide it in the last hole. nine0003
Sooner or later the shoes start to leak, as the sole bursts or cracks. If you want the pair to last for a long time, it is better to take the products to the workshop.
Do-it-yourself methods will help repair shoes, but not for a long time. But if you want to fix the products yourself, we offer methods on how to glue the soles of shoes at home.
Before starting work, the soleplate must be cleaned, dried and degreased. For degreasing, use a special solution, gasoline or acetone. After processing, the product is dried again. nine0003
Pick up the load so that the shoes do not deform.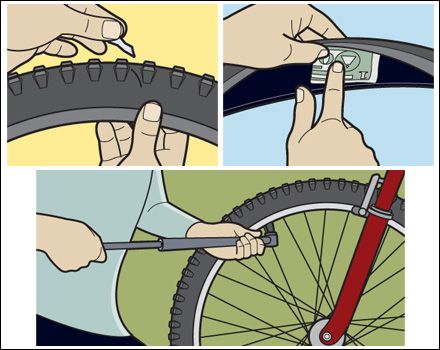 A block in the form of the letter G with an additional load is optimal. Keep the product under pressure for at least ten hours.
The adhesive composition is applied up to three mm thick, then kept for ten minutes and only then the parts are glued. Choose only high-quality and proven glue. A suitable option would be the classic Moment glue, a polyurethane agent or an epoxy sealant. In addition, you can use special rubber glue for shoes or shoe glue. nine0003
According to experts, polyurethane adhesive will be the best product due to its strength and elasticity. It provides a secure fit and can restore any kind of footwear. In any case, these are toxic compounds, so ensure safety when working. If the product gets into the nose or eyes, immediately rinse the mucous membranes with running water.
Be careful when working, as the adhesive may damage the material of the product, especially if it is suede boots, leather or patent leather shoes. The glue is quite difficult to wash off. Now let's figure out what to do if the soles of the shoes are cracking. nine0003
If the shoes are slightly sticky at the edges, you can repair them with a suitable adhesive. Clean and dry the products, degrease the surface so that the glue grabs better and ensures a reliable connection. Then you need to apply the composition to the parts and leave for ten minutes, then glue the shoes and press down with a load.
To repair a crack in the sole, step back five centimeters from the crack in the direction of the heel and draw a parallel line. The area from the line to the nose is cleaned with sandpaper along with a crack. Then you need to glue the gap with Moment glue and make markings for the holes for the threads. nine0003
Remove the insoles from the shoes, take a shoe knife and cut out small holes according to the markings. Then, through the resulting grooves, sew the material with strong threads. From above, each seam is covered with glue and left to dry. Clean the sole again and degrease it, then cover it with micropores and press it with a press.
Clean the inside of the crack and degrease it. Cut the edges of the sole at the edges with a depth of one mm and indents of five mm in each direction. Then make a patch of rubber in size with a margin. nine0003
A bicycle inner tube is suitable for making a patch. Clean the material with sandpaper and degrease, completely cover with glue on one side, on the other - leave dry edges of five mm.
Bend the cracked sole so that the hole opens up and apply glue. After it dries slightly, glue the rubber patch into the affected area and straighten it out. Leave it under load. The listed methods will help if the sole on the boots, boots or shoes is cracked.
A hole in the sole can be sealed with silicone adhesive-sealant. You need to glue the products on the inside of the shoe under the insole. Carefully insert open glue into the hole and completely fill the hole with the composition.
Leave the products to dry under the press for the time indicated in the instructions for the sealant. Close a large hole with a special horseshoe made of polyurethane and seal it with thick glue. Such a horseshoe can be bought in the shoe department or store. nine0003
Spring and autumn, demi-season and winter shoes are often characterized by a honeycomb or lattice construction of the sole. If the sole bursts on such products, as well as with prolonged wear, it gradually wears out. Voids form inside, the heel can fail.
To restore such products, you must first remove the rubber that covers these honeycombs. To do this, tear off the insole, carefully clean each hole from dirt, debris, cardboard and glue residues. Then empty honeycombs are filled with small scraps of micropores and filled with silicone sealant. nine0003
Repair is continued when the sealant has dried and hardened. Prepare new insoles, impregnate with sealant or glue, glue to the sole of the shoe and press with a load for the time indicated in the instructions for the adhesive.
For summer shoes, sneakers, sneakers and other light shoes, you can buy a separate thin rubber sole and glue the products with rubber glue. This method is suitable if the products have flat soles. When gluing rubber onto leather shoes, make a 45 degree hem first. nine0003
In order for the rubber to stick firmly and permanently to the polyurethane or nylon base of the shoe, first cut out a cotton fabric template to size and weld it to the base with a hot iron. Then glue on the new sole.
After repair, it is important to look after the shoes and take care of the pair. Wash and dry items regularly. Which shoe cream is better to choose, see.
If your trainers or sneakers are worn where the socks are, sand the damaged area and degrease. Take rubber or polyurethane of different thicknesses and cut out the patch. A greater thickness of the material is applied to the site of damage, and a smaller one - to a normal sole. nine0003
Sand the patch where it meets the damaged area. Then cover the material with glue and press it to the sole of the sneakers or sneakers. Keep under pressure for a day.
If a hole has formed in the sole of a sneaker or sneaker, the edges of the hole must first be cleaned and degreased, then the adhesive must be applied. A fiberglass mesh (sickle) is inserted into a large hole.
Very often one has to deal with this problem, and alas, no one is immune from this. What causes a crack in the sole? How to prevent this and whether it is possible to restore the sole to its primary form, you will learn in this article from Dom Byta.com. nine0003
Let's first understand the causes of such cracks. The most common cause of cracks is poor quality material , from which the sole was made. For example, if your shoes have a PVC sole, then it is more likely to burst, crack, than shoes made from another material of higher quality. The PVC sole is not elastic, so it does not respond well to strong bends.
The next reason is - sole thickness nine0006 . The thicker the sole, the more likely it is to crack. Thick soles are most often made of polyurethane foam or microporous rubber. So, if the rubber is not of high quality, then most likely you will soon walk with a cracked sole.
And if the sole of your shoes is made of polyurethane, then it withstands strong bends quite well, but it has other disadvantages. Let's say in five years, the foamed polyurethane begins to literally crumble. The most annoying thing is that even if you don’t walk in it at all, the sole will still begin to collapse. With the initial destruction, the first cracks will appear. Another reason why your sole has burst may be a banal case, for example, stepped on something sharp , and subsequently noticed a much larger crack. Most often, such a hole can be determined when we step on a puddle. We want to note right away that if you notice a small cut on the sole, then be prepared for the fact that after a while it will become many times larger. There are also cases that if the rubber is of good quality and elastic, then the sole may not crack in half, but it will bring inconvenience and discomfort. Therefore, it is not worth postponing the repair of shoes. nine0003
The fourth reason can be called - season . Based on statistics, it is noted that it is in winter that the sole bursts most often . First of all, this is due to the cold and the 2 previously listed reasons.
The fifth reason is that the sole cracks right at the junction of the heel. Most often this happens in summer and demi-season shoes, due to a burst arch support .
We would like to immediately give advice, if you find that the heel has begun to stagger, then do not wait for the sole to burst, it is better to immediately eliminate the defect and replace the arch support. Contact our shoemakers, and they will fit your shoes with professionalism. nine0003
In most cases it is possible to prevent the problem. To do this, you need to remember two things: learn how to choose shoes and monitor their wear. The sole will not burst if it is elastic and made of quality material. Leather and polyurethane sole bursts extremely rarely.
Do-it-yourself sole repair
Joomla 2.5 templates here: http://joomla25.ru/shablony/
What to do if the sole is worn out, cracked, burst, the sole is broken, shoe repair. sole repair, how to repair the sole? repair the sole, installation of prevention on shoes, change prevention on shoes, replace prevention on shoes, how to put prevention on shoes, the sole has worn out - read and see here! Repairing a broken or cracked (burst) sole is no fantasy!
I did it without takes, I just cut it a little. A very reliable option. By the way, if the outsole is intact, but worn out, worn out - this is the "installation of prevention." The fact is that the relief (tread, pattern) of the sole is different. nine0003
B is shown, one might say, smooth. It wasn't hard to straighten it out. What to do when the sole is "bumpy"?
In this case, we do not grind the entire sole, but only the place where it is necessary to sew with threads and glue the prophylaxis. You can not grind it, but carefully cut it off with a sharp knife and clean it with a large "skin", there will be less dirt around. Need to stitch! If you just glue the "kink", and on top of the prevention, then this will not last long, the prevention will also crack. It is advisable to tighten the threads more tightly, but if they cut the sole, then catch the "golden mean", i.e. do not overdo it. If the sole is all cracked, then sew only the largest ones, leave the small ones. five nine0003
One common problem with shoes is cracked soles. When cracks appear in it, the use of a lining is not always effective, so the solution must be sought elsewhere.
In order to repair shoes with your own hands, you will need the following tools: First, the sole must be cleaned of dirt and treated with sandpaper. To degrease the surface, wipe it with acetone or gasoline. The next step is to cut the edge of the sole around the crack to 5-7 mm in width. nine0003
Depth of cut - 1mm. Measure the depth of the crack itself again in mm, and add another 15mm to the result. Cut a strip from the bicycle tube that will fit your result. Also, clean the strip with sandpaper and degrease it.
Spread the strip with glue on both sides so that on one side the glue covers the entire surface, and on the other side the edges remain 5-7 mm dry. opened up to the maximum. Holding the boot in this position, apply glue to the damaged area of the sole and leave it to dry for 10-15 minutes. nine0003
Please note that you do not need to close the crack, otherwise it will simply stick together. The final step is to apply a strip of rubber. Bend it in half and gently place it in the crack. And only after that you can straighten the shoes.
Press the edges of the strip firmly against the sole and place the shoes under any load for a day. After such a repair and with further proper use, your shoes or boots will serve you for a long time. Another option for restoring the sole is to fill the crack with melted nylon. To do this, the shoes are cleaned of dirt and dust, the defective area is also cleaned with sandpaper and degreased with acetone. nine0003
Use a heated soldering iron to run along the inside of the crack. Such heat exposure to the leather or rubber surface will cause it to bubble and become sticky.
Use a small piece of nylon, put it on the crack and press it with a soldering iron. Now you can rub the melted nylon into the damaged sole. This simple procedure must be performed until the damage has completely disappeared. Please note - you need to straighten the melted nylon only with the handle of the soldering iron. Based on the materials of the site http://www.butik-obuvi.ru/
Moreover, hands growing from a normal place, and not from where they grow from Lada car manufacturers. You also need a head, preferably a sober one, in which there is at least a little imagination.
And if the last problem is for you, a detailed photo instruction for repairing shoes with your own hands is presented. If the sole of your shoe has become unusable, in no case should you think of throwing these shoes away.
It can still be used to make such walking boots that they will serve not only you, but also your children. To repair shoes with your own hands, you need a car tire. To make the repair quite economical, the tire can either be found in a landfill or smuggled from a neighbor. nine0003
Just so that he doesn't notice you, because in this case you are threatened with proceedings not only with your neighbor, but also with the cops, which is very painful and unpleasant, you can trust me. After you get the tire, with a deft movement of your hand, cut off the layer of the desired width and length.
Then, using super glue, glue part of the tire in place of the sole and cut off the excess. Everything, walking boots are ready.
How does shoe sole repair relate to construction? The most immediate thing is that you can’t build much barefoot. Therefore, work shoes can be safely called a tool that, like a hammer drill, sometimes needs to be repaired.
It is not uncommon for used shoes to end up in the trash can, although they can still serve as work shoes. After all, appearance is not so important for her, the main thing is that she be comfortable and warm. After a couple of seasons of intensive use, the soles of winter fur boots were slightly wrinkled, and it became slightly uncomfortable to walk in them for a long time. nine0003
For some reason, my hand did not rise to throw away a fairly sturdy pair of leather shoes. Having discarded the last doubts, he boldly tore out the cardboard insoles from the shoes, especially since they were glued only around their perimeter. In most modern shoes, the soles in the inside look like vertical cells formed by thin cast partitions that serve to cushion when walking. From the load over time, the walls of the cells are crushed, and the heel with the toe falls, which causes inconvenience during movement. nine0003
This is not the first time I choose the third option. An hour of work and in the hands of almost new boots, tailored to individual characteristics and needs. To restore the soles, you will need a simple tool (knife and scissors) and old slippers.
I don’t know what they are called correctly, but I think everyone has them - summer ones made of porous material, either rubber, or foamed polyurethane. I tried to use different materials, but slates give the best effect - after all, they are just and are designed for the load from the heels during long walking. Microporous rubber is harsh, tourist rugs, on the contrary, are too soft, they quickly wrinkle. Using a knife, I cut out cubes (sometimes straight parallelepipeds) from old slippers a little larger than the size of the cells and simply insert them into the cells by friction. nine0003
Their upper edges form the inner surface of the sole, which can be shaped according to individual preferences (like an orthopedic insole). In the front of the sole, the manufacturer of these boots depicted the sea in the form of wavy lines - well, it’s beautiful, but you can’t insert cubes. Therefore, I simply cut off a flat leaf from an old slipper and cut out a part from it, designed to eliminate the deflection of the insole under the knuckles.
I glued this plate to the insole with an ordinary double-sided adhesive tape - it holds perfectly on shift, and hardly anyone will tear it off. like new! In this simple way, fishing winter boots, a couple of sneakers and something else were repaired - unfortunately I don’t keep records. All repaired shoes feel great and continue to serve me faithfully. nine0003
The slipper-reinforced sole easily supports my carcass with a fifty-kilogram bag of cement on my shoulders. Contents of the section The best shoes that you don't feel or notice.
A post about how to repair your own shoes at home or on the go. How to fix the sole at home or on the go? There are several ways to fix this issue.
I will describe the repair at home, but if you collect and take a small repair kit with you, then a simple repair of shoes can be done on a hike. To do this, you need to take a regular thread treated with wax. This is to ensure that the shoes are waterproof. nine0003
Then draw a line on the sole with a pencil, stepping back from the edge of 5 millimeters. Then pierce the sole along this line with an awl. Holes need to be made at a distance of 10 millimeters.
Tie the thread tightly when sewing to prevent loops. Glue can also help repair the sole. From thin rubber, cut a piece according to the shape of the defect. Then take sandpaper, coarse-grained is better, and clean the sole.
Apply a thin layer of adhesive to the sole and the piece of rubber. Wait 5 minutes. After that, apply glue again to the sole and attach a rubber outsole to it. Press firmly with a load and leave for 12 hours. nine0003
After the glue has dried, cut off the edges of the outsole with a knife. You can also repair a cracked sole yourself. First you need to clean it from dirt and dust, process it with sandpaper. Then wipe with gasoline or acetone so that the surface is degreased.
Cut off the edges of the crack 1 mm deep with a knife. Measure its depth and add about 15 millimeters more. Cut a strip of such a width, which turned out. For this, a bicycle camera is suitable.
Sand the rubber strip with sandpaper, wipe with petrol or acetone. Apply rubber adhesive. After that, you need to bend the cracked sole so that the crack opens.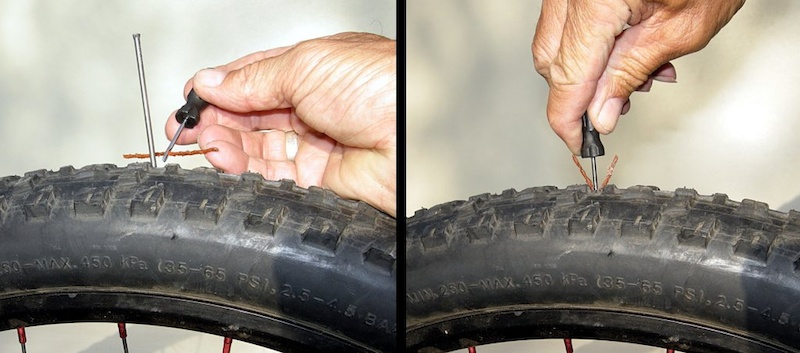 Apply glue. nine0003
After 15 minutes, insert the rubber strip into the crack and straighten it out. For a day, leave the shoes pressed under pressure. Repair of the honeycomb structure of the sole can also be done at home. It is necessary to separate the insole above the sole, fill the honeycombs with silicone sealant.
Then glue the insole back on. I hope that these tips will help you keep your hiking and walking shoes in good working order and they will serve you for a long time to come.
Often not only shoes need repair, but also underground telephone lines, water or sewer lines, and difficulties arise when horizontal drilling is required. In this case, specialized drilling equipment of Western or Russian production is needed. Of the Russian manufacturers, the drilling equipment of LLC NPK "Gidrofob Remsvyazmontazh" has proven itself well. nine0003
More info
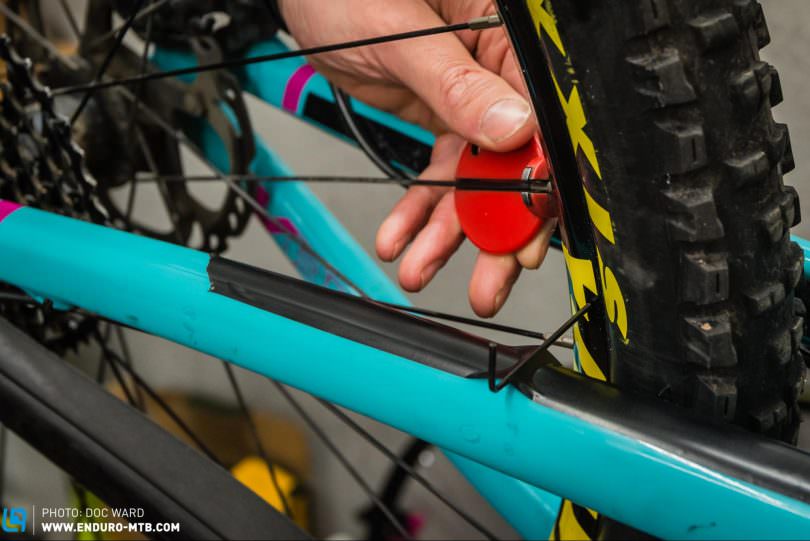
Cyclists these days are all crazy about carbon fiber, a material that has arguably revolutionized the bike industry with its incredible strength and aerodynamics. Carbon fiber is relatively new in the industry when compared to traditional steel, aluminum and even iron frames. Bikes made from this exotic material are definitely repairable, but here are some things you need to keep in mind when repairing a carbon fiber bike frame. nine0003
Is a carbon bike strong enough?
Although the material is literally made from hair-like fiber, the myth about carbon frames is that they are not as strong as steel and other traditional frames. Moreover, many people wonder if they can be repaired at all if a crack appears on them. One of the biggest advantages of carbon frames is that they can be molded and designed for specific destinations and occasions. You cannot do this with steel or aluminum. nine0003
In addition, light weight and incredible fatigue resistance make carbon fiber extremely profitable for avid bikers. And what about durability? Well, the engineers have also worked on this as carbon fiber is also known for its strong durable nature with better aerodynamic freedom sourced straight from the aerospace industry. However, such durable materials can also be damaged, and the nature of the injury can be completely different than with steel, aluminum, and even titanium. nine0003
Can a carbon bike be repaired?
Yes, carbon frames or bike components are largely repairable. But it may not be for everyone as it requires a lot of complex supplies and professional skills. As mentioned earlier, carbon fiber is actually a bundle of thin fibers made from carbon. One of the most common reasons why carbon bike frames are so expensive is that they are almost entirely hand assembled and almost the same amount of labor is required during their repair. It is almost impossible to automate the assembly and repair process. nine0003
Proper examination and professional discipline is required to evaluate and correct any bruising on it. If the excavation is neat and delicate, professionals can perform an ultrasound examination before starting the repair operation. Thus, finding an experienced carbon fiber bike repair technician is very important. First, disassemble all components and take the damaged frame in for repair.
How can I tell if my carbon bike is damaged? nine0006
Carbon injuries are sometimes difficult to track down and even people often ride a damaged bike with very little damage. Sometimes they don't bother checking, and when they finally start to feel uncomfortable, expert opinion becomes inevitable. But with a few simple steps, you can also test the bike yourself to locate the injury. Start pressing on the damaged area immediately after the crash to feel if any part feels soft. nine0003
Although the carbon fiber surface is not as hard as steel or aluminum, ideally it may not feel soft either. Usually a soft area is a sign that something has happened. You can also take the hex wrench to click on the suspect to hear if it sounds different than the other parts. The difference in sounds can also give you a clue. If the damage is yet to be understood, specialist intervention is inevitable.
DIY repair process
There is no definitive answer to the question of how to repair a carbon fiber bicycle frame? We always recommend taking a cracked carbon frame to a specialist for professional refinishing. But if you want to try it yourself in case of minor damage, let's see how to do it. The basic idea is to wrap the cracked part with a few extra layers of carbon, epoxy and hardener and let it heal. Now take your sandpaper and start sanding it well. After that, rinse the frame with alcohol and wrap the rest of the frame with suitable electrical tape, leaving the damaged area exposed. nine0003
Then you need to mix epoxy and hardener in a ratio of 2:1, apply half to the damaged surface and let it dry. In the meantime, keep your carbon fiber sheet at the ready, and once the layer is dry, lay it down perfectly. Again, you need to apply the mixture of epoxy and hardener directly to the surface of the carbon sheets. Repeat the same steps over and over to apply a very strong layer of carbon sheets to the damaged area, usually as many times as you have layers of carbon. When you're done, wrap the area with heat shrink tape to let it dry for 24 hours. Remove the covering from the tapes and check if it has healed properly. Sand the frame again to paint it for a neat look. nine0003
Can all damage be repaired and what is the cost?
While carbon bikes can be repaired and are quite effective, not all abuses can be corrected. The cost of repairing a carbon fiber bike frame is also quite high. If your carbon road bike has been in a horrendous accident and sustained major damage, it might be time to replace it rather than throw money away. There are high chances that broken carbon wheels and rims cannot be repaired at all. But with the help of cutting-edge technology, remodeling professionals are now successfully tackling many waves of abuse, though the significant expense may come as a surprise. nine0003
Even if you have a mountain bike, the cost of repairing a carbon fiber mountain bike may be higher than the cost of repairing a carbon fiber road bike.