Written By: David Munoz (and 3 other contributors)
Difficulty
Difficult
Steps
5
Time Required
25 minutes - 1 hour
Sections
1
Flags
0
In this guide, we will explain how to replace a valve stem, such that people of all mechanical backgrounds can attempt this repair.
This guide assumes you have removed your wheel from the vehicle. For instructions on removing the wheel, refer to this guide.
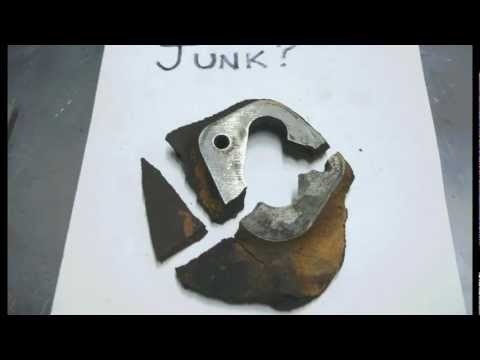
Valve Stem
Available for sale on Amazon
Buy
Locate the stem valve and remove the cap.
Using the Schrader valve core bit in your 1/4" driver, unscrew the valve core from the stem.
Allow the tire to fully deflate before proceeding.
Edit
To reach the valve stem, you will need to break the bead on the tire. The bead on a tire is where the rubber meets the rim.
Insert the pry bar in between the rim and the tire. Push the pry bar as far down as possible. This will require a large amount of force.
The bead is broken when the tire is visibly separated from the rim. Use the pry bar to hold the tire down by leveraging it against the small lip inside the rim.
Edit
Locate the stem valve on the inside of the rim. It will be a large piece of rubber underneath the lip.
Use the diagonal cutters to cut off an appropriate amount of rubber from the under-side, as shown.
Remove the stem by pulling it through the face of the rim.
Edit
Insert the new stem up through the rim. Use the diagonal cutters to help pull the stem into its seated position. There will be an audible pop when it is in correctly.
When using the diagonal cutters, take care not to pinch the stem too tight.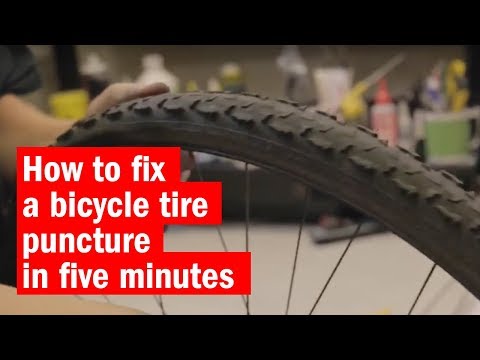
If you are having trouble seating the stem, use the rim as leverage.
Edit
The tire must be re-inflated. Simply use your air compressor to inflate the tire. We recommend re-inflating to 32 p.s.i. to check for leaks.
When inflating, the tire will produce a loud pop as the bead returns to its place. If the tire is having trouble inflating, squeeze the tire against the rim to create a seal.
Edit
Almost done!
If all goes well, your tire should be fully resealed and good as new.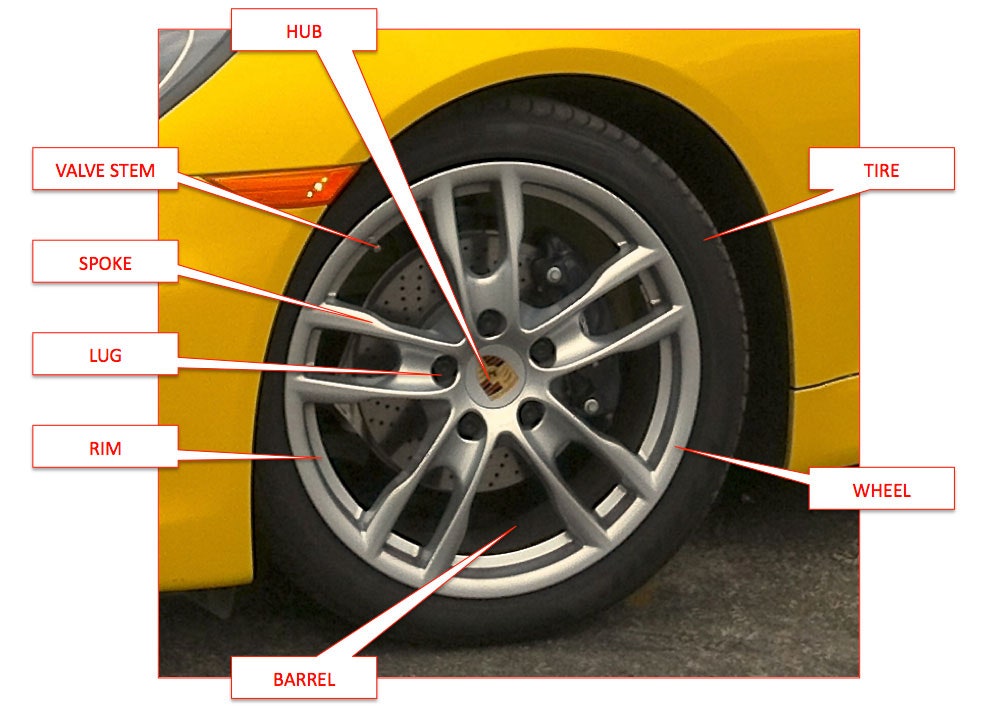
Conclusion
If all goes well, your tire should be fully resealed and good as new.
Cancel: I did not complete this guide.
One other person completed this guide.
with 3 other contributors
Badges: 4
+1 more badge
Ask a question, get an answer ASAP!
☰
×
GET A QUOTE
| Save Big on Auto Repairs | Get a Quote |
Tire valve stems are the valves located in a vehicle’s wheel where the tires are inflated from.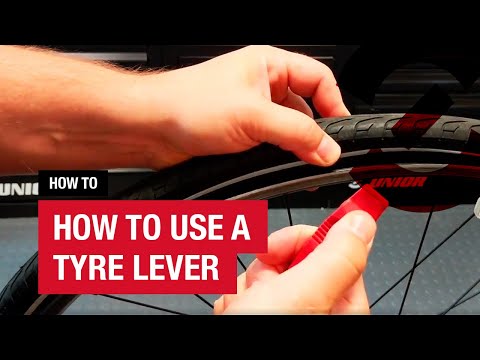 They contain a spring loaded valve core that seals itself using the air pressure inside of the tire. Over time valve stems may get old, crack, become brittle, or begin to leak, causing larger problems with your tire and your driving experience.
When valve stems begin to leak, the tire will no longer hold air. Depending on the severity of the leak, the tire may leak air slowly, or in more sever cases not hold air at all, warranting replacement of the valve stem.
In most cases the the fastest way to replace a valve stem is to take it to a tire shop and have them remove the tire and replace the valve stem using aid of a tire machine. However, for instances where this is not an option, a tire can be removed and the valve stem changed manually. In this step by step guide we will cover how to remove a tire from a wheel manually, using a tire iron, to replace the valve stem.
Materials Needed
Step 1: Loosen the lug nuts.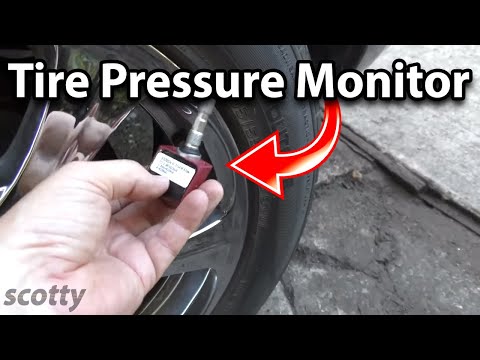 Loosen the lug nuts of the wheel from which the valve stem is going to be replaced.
Step 2: Raise the car on jack stands. Set the parking brake, and then raise the vehicle and secure it on jack stands.
Step 3: Remove the wheel. Once the vehicle is raised, remove the wheel and set it flat on the ground with the outside of the wheel facing up.
Step 4: Deflate the tire. Remove the cap from the valve stem, and then remove the valve stem core using the valve stem removal tool to release the air from the wheel.
Once the valve stem core is removed the tire should deflate on its own.
Step 5: Separate the tire’s bead from the wheel. Next, use the sledgehammer to break the tire’s bead free from the wheel.
Hit the sidewall of the tire using the sledgehammer in the same place until the bead breaks loose.
When the bead breaks loose you may hear a crack or popping sound, and you will see the inside lip of tire visibly separate from the lip of the wheel.
Once the bead has been broken, continue around the tire with the sledgehammer until the bead is completely broken all the way round the tire.
Step 6: Lift the lip of the tire up from the wheel. Once the tire’s bead has been broken, insert your tire iron between the edge of the rim and the inside lip of the tire, and then pry upward to pull the lip of the tire over the edge of the wheel.
Once you have pulled the lip of the tire over the edge of the wheel, work the tire iron around the rim until the entire lip of the tire is off the rim.
Step 7: Remove the tire. Grab the tire by its removed lip and pull it upward so that the opposite lip that was at the bottom of the wheel is now touching the top edge of the rim.
Insert the tire iron in between the the tire’s lip and the edge of the wheel and pry upwards to pull the lip over the edge of the rim.
Once the lip is over the edge of the rim, work the tire iron around the edge of the wheel until the tire is removed from the wheel.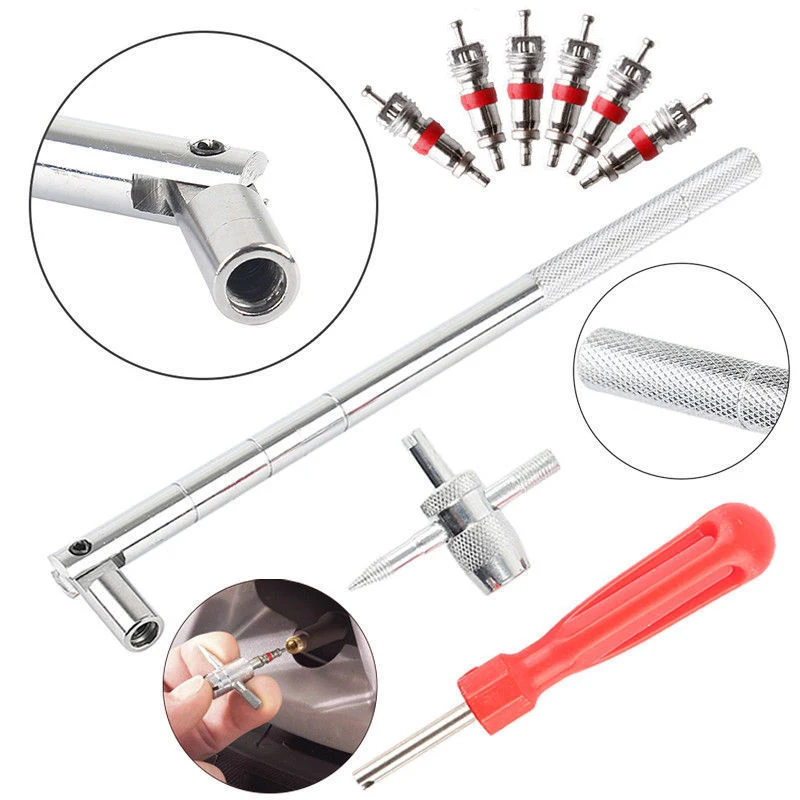
Step 8: Remove the valve stem. Once the tire is removed from the wheel remove the valve stem. Use the needle nose pliers to pull the valve stem free from the wheel.
Step 9: Install the new valve stem. Take your replacement valve stem and install it from the inside of the wheel. Once it is in position use the needle nose pliers to pull it through into place.
Step 10: Reinstall the tire. Reinstall the tire onto the wheel by pressing it down over the the rim until the bottom bead clears the edge of the rim.
Then press the side of the tire down underneath the edge of the wheel, tuck your tire iron in between the lip of wheel and the bead, and then pry the bead over the lip the of the wheel.
Once the bead clears the lip of the wheel, work your way round the entire wheel until the the tire is completely installed on the wheel.
Step 11: Inflate the tire. Once the tire has been re-installed onto the wheel, turn on the air compressor and inflate the tire to the correct specification.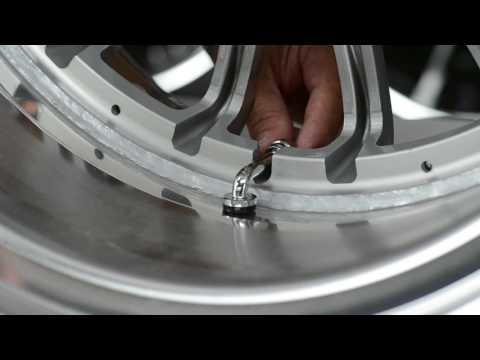
For most tires, the recommended pressure is between 32-35 pounds per square inch (psi).
Step 12: Check for leaks. Once the tire is properly inflated, double check to make sure that there are no leaks of any kind, and then reinstall the tire onto the vehicle and lower it off of the jack stands.
For most cases, the easiest course of action to replace a valve stem would be to simply take it to a tire shop, have the tire removed with a machine, and then have the valve replaced.
However, in the instances where that is not an option, a valve stem, and even a tire, can be removed and replaced manually with the correct tools and the correct procedure. If you find that there is a leak or damage in the tire and not just the valve stem, you may want to replace the tire entirely.
Tires
wheels
The statements expressed above are only for informational purposes and should be independently verified. Please see our terms of service for more details
4.2 Average Rating
Service Hours
7 AM - 9 PM
7 days a week
Phone Number
1 (855) 347-2779
Phone Hours
Mon - Fri / 6 AM - 5 PM PST
Sat - Sun / 7 AM - 4 PM PST
Address
We come to you at no extra charge
Guarantee
12-month/12,000-mile warranty
Our certified mobile mechanics perform over 600 services, including diagnostics, brakes, oil changes, scheduled mileage maintenances, and will come to you with all necessary parts and tools.
Get a fair & transparent quote instantly before booking.
Earn up to
$70/hr
Apply Now
Our certified mobile mechanics make house calls in over 2,000 U.S. cities. Fast, free online quotes for your car repair.
GET A QUOTE
GET A QUOTE
How to Do a Tire Safety Inspection
Car tires are a big part of staying safe on the road. Check tire inflation, tread depth, and sidewalls to make sure they're in good shape.
How to Replace the Rear Hub Bearing on a Ford Explorer
Wheel bearings allow the car's wheels to give you a smooth ride. A howling or grinding noise is a sign that your hub bearing should be replaced.
What are the Best Car Tire Brands to Buy?
Car tires come as all season passenger tires, summer passenger tires, on-road light duty truck and SUV tires, and off-road truck and SUV tires.
Steering wheel vibration over 60 mph
Hello. This vehicle should not shake like this when driving at high speeds. If it only occurs at higher rates of speed then it either has a warped front hub assembly or it may have a problem with the alignment....
Car stalls when stopped, steering wheel locks up
Yes, this is a common problem with CX-9. Carbon deposits can build in the throttle body (https://www.yourmechanic.com/article/symptoms-of-a-bad-or-failing-throttle-body) causing a restriction in airflow and reaction time of the throttle plate causing stalling with no Check Engine Light or no diagnostic trouble...
How can you tell if my tires need to be rotated?
Hi, thanks for writing in. If it has been more than 5000 miles, then it is time. Also, you can take a look at the front and rear tires and move your hand over top of the tires in one...
Estimates
Cities
Maintenance
Our service team is available 7 days a week, Monday - Friday from 6 AM to 5 PM PST, Saturday - Sunday 7 AM - 4 PM PST.
1 (855) 347-2779 · [email protected]
Read FAQ
GET A QUOTE
Related materials
Tire inflation with nitrogen and 7 more wirings at the tire fitting
In the middle-end of autumn, car owners storm tire shops. However, you can disassemble the wheels yourself. We'll show you how to do it. We will need a special tool, as well as a screwdriver to unscrew the wheel valve, and a couple of pliers to help remove the tire from the rim.
To rid the rim of the tire, we bought a simple but very useful device - a mechanical wheel beader. There are several options on the market, but we chose the one produced by the Sorokin company. It is inexpensive. Thanks to the ability to adjust the retractable linkage, tires can be removed from discs of different diameters. You only need to select the desired position of the rod and tighten the two bolts holding it, after which you can start working. nine0003
Related materials
Is it possible to pump up a wheel without a compressor - the experiment "Behind the wheel"
We took a 16-inch wheel. It is more convenient to remove the tire if you put it on the floor.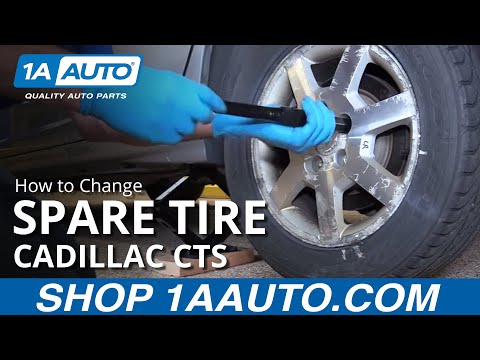 In order not to scratch the aluminum disc during work, we will place a sheet of foamed polyurethane under it, which is used in construction for sound and heat insulation. We unscrew the cap on the valve, holding it with a finger, unscrew the spool so that it does not pop out under air pressure. The tire starts to deflate. nine0003
Before carrying out work with the help of a special tool, it is necessary to moisten the working edge of the disc with a penetrating liquid. Otherwise, we risk damaging the disk. Also, the liquid, having seeped under the edge, will facilitate the removal of the wheel from the humps.
We apply our device to the disk. Its hook in this case should protrude from the mandrel by 7–8 cm. For reference, this is one hole on the retractable rod. With a hand, we press on the device from one side so that it goes under the protrusion of the disk, and we wind the hook under the disk from the opposite side. We spread the levers of the device in different directions. The main thing is not to try to throw off the tire immediately, but to move it off the hump gradually. Otherwise, the tire may be damaged. Please note that the device should not be inserted near the wheel valve. nine0003
Related materials
Changing shoes correctly: everything you need to know about discs
Pulling out and moving the tool, slowly move the tire off the hump around the entire circumference. You can hold the side of the flight attendant, where there is no hook, with your foot. Having removed the tire on one side, turn the wheel over and do the same work on the other. Don't forget about lubrication. By the way, it is not necessary to use a liquid, a silicone composition is also suitable.
We removed the tire from each side of the humps. It remains to take mounting blades and completely remove the tire from the disk. We process the belt with penetrating lubricant. It is advisable to get on the inside of the rim, this will make things easier.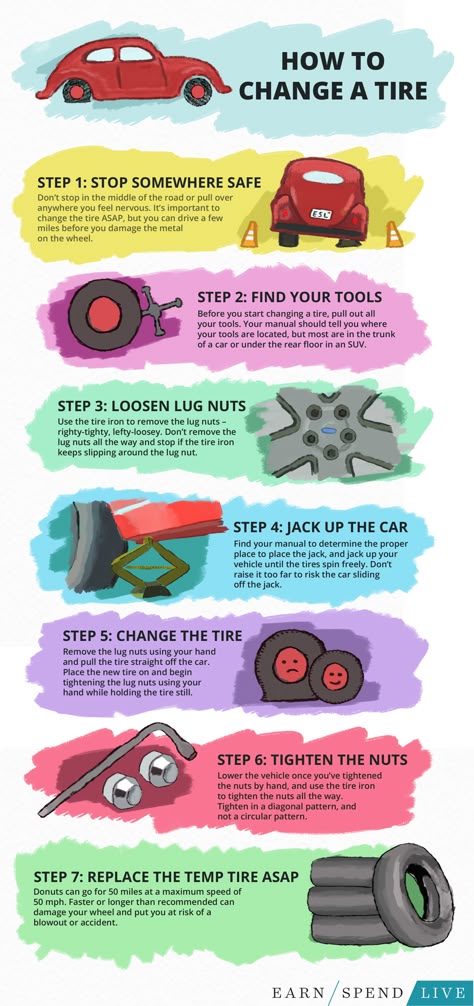 We start the first blade under the tire. It is convenient to do this in the area of the wheel valve. We take the assembly aside in advance so as not to damage it during work. Hold the mount with your foot. We insert a second spatula next to it and lift the edge of the tire with it. We do this along the entire inner circle, also gradually. We removed the tire from one side of the disc, it remains to do the same on the other. We turn the wheel. We wind the blade behind the disk and begin to remove it from the tire. As soon as we succeeded, we can consider that the work is over. nine0003
Taking apart the wheels yourself is easier than you think. The main thing is to stock up on the right tool and free time, as well as take into account the characteristics of rubber.
Please send all questions and suggestions regarding the Technical Environment series to: [email protected].
Our new video
Haval Dargo and Mitsubishi Outlander test (video)
The story stopped there: the test of the last Volga
5 meters, 9 seats, boosted motor.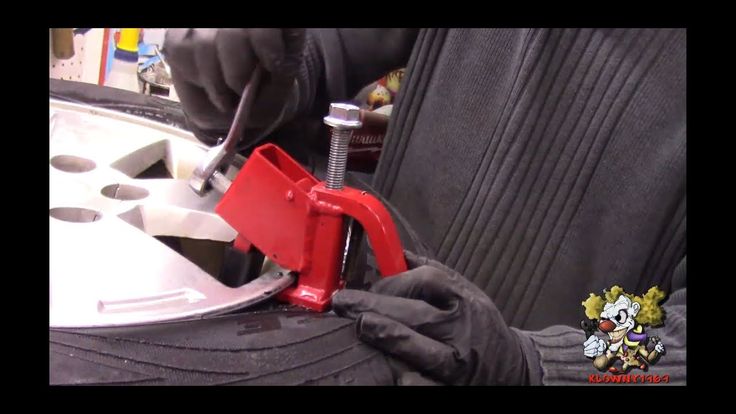 .. Is that Lada? Yes!
Did you like the note? Subscribe and you will always be in the know!
Driving in Zen
News smi2.ru
, is interesting to every motorist. Many car owners prefer to overboard a car only themselves, not trusting the service masters, as there are times when a car tire “sticks”, and an incompetent car mechanic can simply ruin the tires of the car. Therefore, it is worth remembering how to bead the wheels on your own, then you can be 100% sure of the success of the disassembly. nine0003
Wheel beading is a complex process. Experts give a number of recommendations on how to disassemble the car's wheels yourself:
Self-disassembly of the wheel
 Often it is expensive: but you should not change a winter tire for an all-season one. And there is no summer for winter either.
 Note!
If the wheel was damaged on the way and began to lose pressure, experts recommend not to get the unfortunate nail or screw. The item will hold back part of the pressure in the tire of the car, and this will make it possible to get to the garage or car service, where the craftsmen know exactly how to disassemble the wheel of the car.
Mounting spatula
Wheel beading requires some "handy tools", time and effort. Many, most likely, have observed how newcomers to driving a car try to remove a “sticky” tire from the rim of the wheel by beating a hammer on a screwdriver. This is a mistake and it is forbidden to do so. Even if initially “injuries” on the tire will not be visible, after a certain period they will “remind” of themselves.
Get the right solvent or turpentine,
White spirit can also be used. It is necessary to process the product in the “welding” area and after 120 seconds have passed, the tire will easily move away from the car rim. After that, it is important to walk around the treatment area with a dry cloth.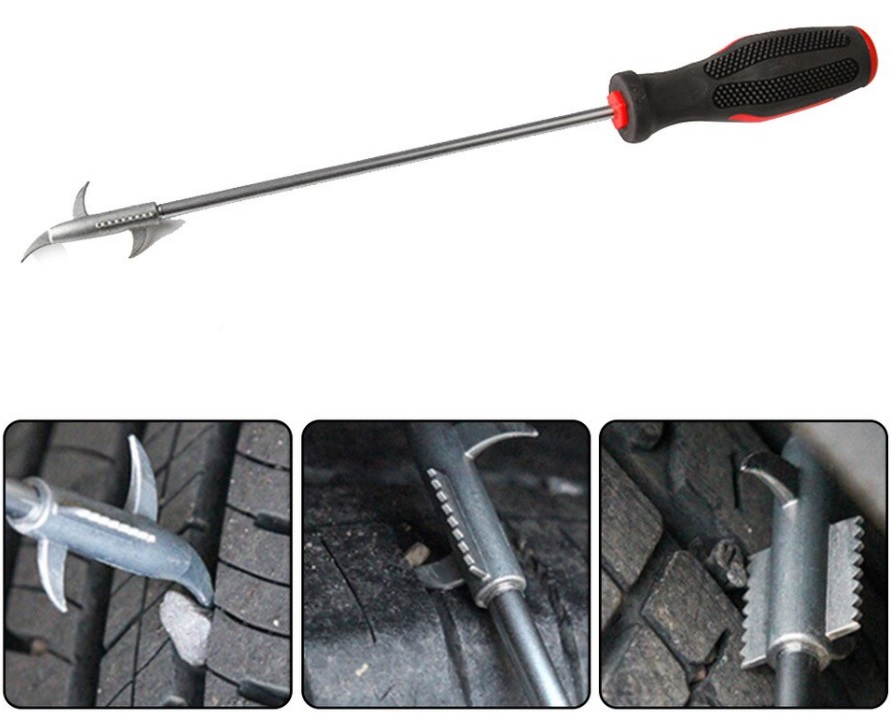 nine0003
Do-it-yourself wheel dismantling is carried out using the following tools:
In order for the wheel to be disassembled without problems, it is necessary to remove it from the car. Next, using a steel corner, you need to remove the tire from the rim: for this, the corner is driven between the rim and the rubber and efforts are made.
Wheel beading starts from the side opposite the spool. The tire is going down. The end of the device should be properly rounded for comfortable removal of the rubber and so as not to damage the tire. nine0003
Tip!
It is important to take care not to damage the rubber part, it is necessary to carefully remove it from the rim, slightly pressing on the carcass.
Only after turning the entire surface of the side of the tire onto the outside of the rim can the inner tube be carefully removed. Here's how to rim the wheels. The assembly is performed in the same way, but reversely to the disassembly.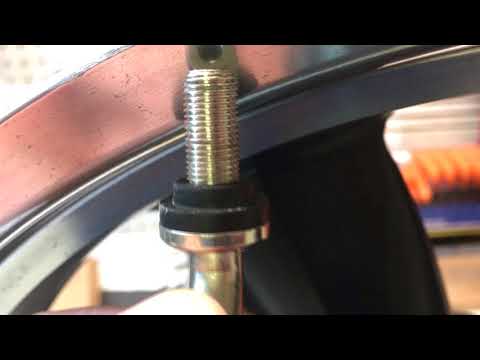
Tire edge lubrication
Once you learn how to strip a wheel, you won't have any problems later. As with any renovation, you need to prepare first. The “duty” tool the driver must always carry with him. There are no special devices, but this does not mean that only a hammer with a mount is enough - car owners use these tools to disassemble wheel tires. It will not bring anything other than damage to the wheel, and it threatens with problems on the road. Therefore, answering the question of whether the rubber deteriorates from overboarding, one can answer that the result depends on the correctness of the repair. nine0003
Attention!
After carrying out all operations, dry the place on the rubber, eliminating all wet areas. Disassembly of wheels homemade devices usually does not imply. From the toolkit, a jack is used, you will also need wrenches, special blades for installation, a steel corner.
Finding the spool
The initial and significant step towards the successful removal of tires from the wheel yourself is knowing the instructions.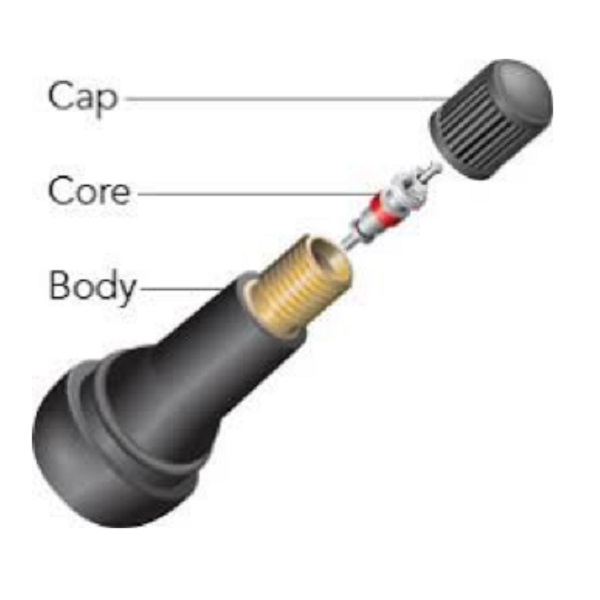 It is necessary to raise the car on a jack, unscrew the fasteners (it is better to twist a little in advance before lifting to a height) and remove the wheel. Next, the tire is lowered and the places where the tire touches the rim are pressed. As a result, the rubber will fall behind faster. nine0003
Important!
Wheel beading is carried out from the side opposite the spool, carefully moving forward along the rim. If there is no experience and professional tools, as at a tire fitting, then it will take about 40 minutes to remove one tire.
A prefabricated steel corner will help in separating the rim and rubber. It is carefully driven between the rim and the rubber. You should not press hard on the tool, as the material is still soft and can easily bend. nine0003
You must work very carefully and carefully. Mounting blades are often used by many drivers, as they help to carry out disassembly more accurately without affecting the integrity of the tire. The tire must be carefully removed from the metal.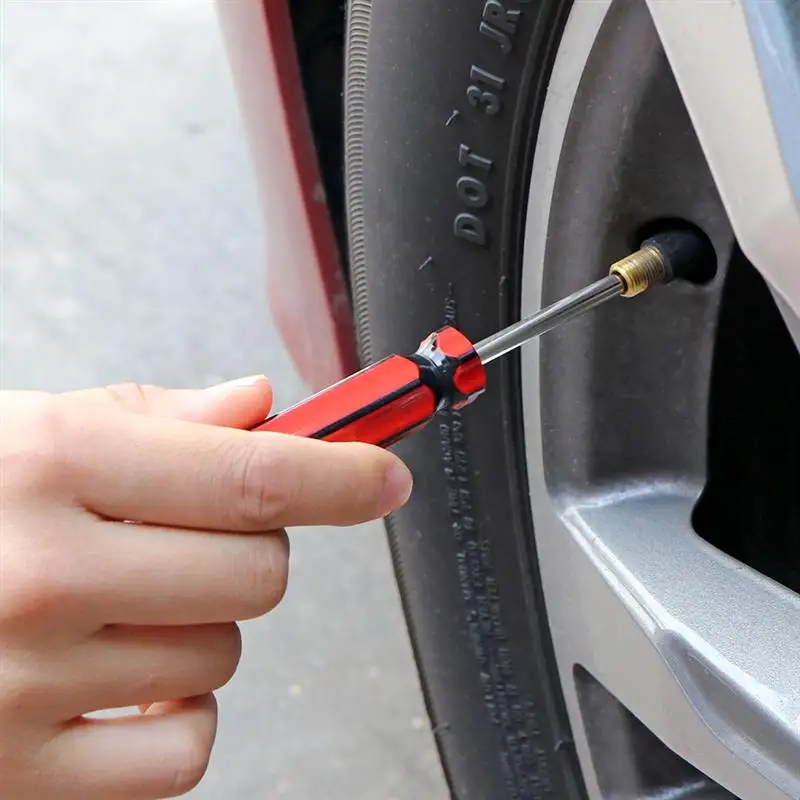 As soon as the side of the rubber is released, you can slowly take out the camera.
This completes the activities. Everyone now understands how to remove the tires from the disk with their own hands. It remains only to learn how to board the wheels. Very simple: a new tire is taken and placed on a car disk, the assembly is elementary - in the reverse order. nine0003
Impact breaking technology is used by drivers frequently. Do-it-yourself devices for disassembling a tire with this method are the same - a corner made of steel or 2 special blades. You will also need a jack and a sledgehammer.
The technique involves applying light blows with something heavy around the entire circumference of the wheel. This is a simple job that does not require skills, but it must be done carefully. If you have doubts about your own abilities, then you need to turn to professionals or experienced motorists, neighbors in the garage. nine0003
Semi-automatic wheel breaker
You can make your own machine tools. To create the frame part, which will be the basis, experts advise taking metal-profile pipes. Between them must be kept at least 700 mm.
This interval is required for the equipment to be reliable.
Two tubes are arranged in parallel, welded with a steel angle. The profile of the smallest standard size is also suitable. As an additional component, adjustable legs can be built. nine0003
When the base is done, a tube must be attached to the frame part. Its radius is sufficient within 10-15 mm. Before welding, the flange part must be welded in advance at 400-600 mm from the floor. Vertically, you need to make fasteners, which are created in the form of a steel plate. It will be required to mount the device as a lever. The main purpose of the lever is to remove the rubber from the disc rim. The lever part is a pair of elements of the shoulder and paw, which acts on the rubber itself. nine0003
You can also disassemble the wheel in a garage with your own hands. The main thing is to do everything right and not to rush.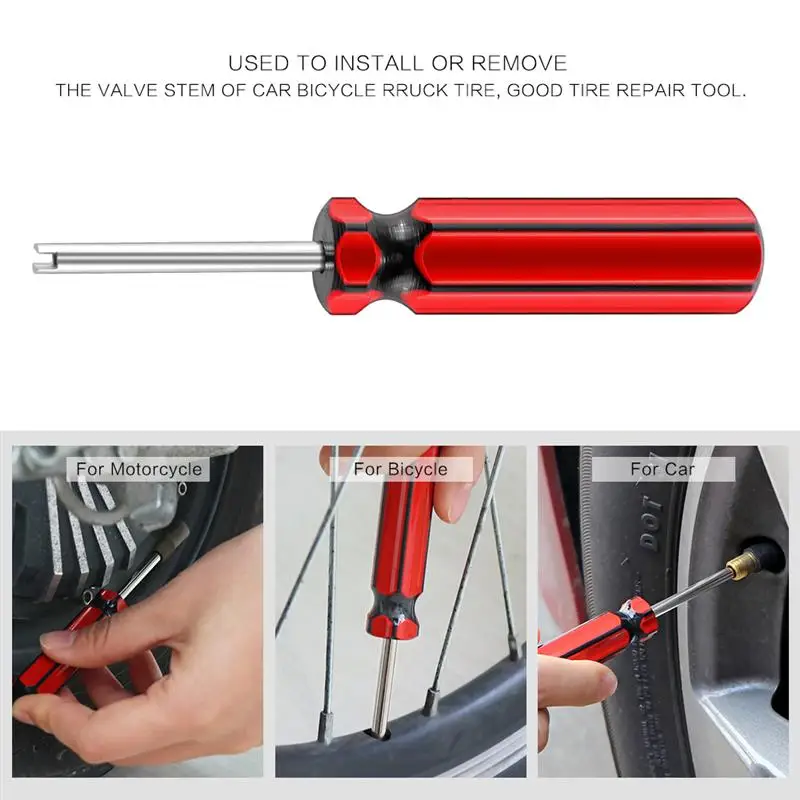 Only by listening to the advice of experts, you can guarantee the success of the event to remove the tire from the wheel.
Do you need to remove a car wheel to make other repairs? You've come to the right place, we are a team of ASE certified master mechanics who will show you the right way to remove a wheel (rim and tire) without hurting your back or stripping or breaking wheel studs and nuts. After Repair To finish you will put the tire back on the wheel hub or axle flange, that's where our guide 9 comes in0003
Many repairs on cars involve removing tires to access replacement parts, so it will need to be taken off and put on many times, it's a good idea to know how to do it right. The safety of yourself, family and friends depends on proper wheel fitting not to mention the damage that can happen to your car if a wheel falls off.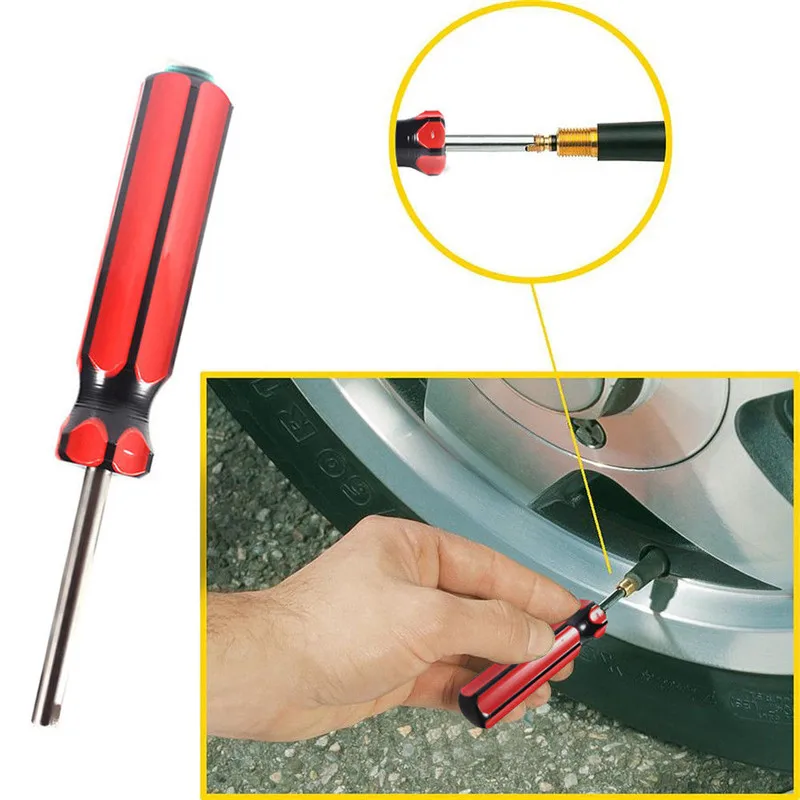
You will need the tools and supplies that can be found at your dad's or grandpa's garage. If not, it's a good idea to start your own toolbox so you can learn to be self-sufficient when repairing your car with 2CarPros and our guide to repair. We're here to help and answer any questions your car repair can be free of charge. nine0003
SPONSORED LINKS
Amazon is an excellent resource for many high quality parts and tools that you will need to save money over a lifetime of driving.
Let's get started
Before you start, you need to know how to lift and lift your car properly without damaging the chassis. This is important because if you don't set up your car correctly, you will do more harm than good, costing you more time and of money.
Before lifting the car up and off the ground you will need two blocks of wood to install on either side of the tire at the opposite end of the car while it is raised. This is because if you lift the car off the wheels that hold it in place (lead or emergency brake), the car can roll away if it's on a slight incline. nine0003
In other words, if you have a rear wheel drive car and you move both rear wheels off the ground, the front wheel will allow the car to move because nothing is in the way, they roll freely. The rear wheels hold the car in place with the transmission in park or the emergency brake on.
SPONSORED LINKS
Start with the car on a level surface and then lift it up. This will stabilize the car while preparing the wheel for removal. There are usually two types of wheel caps that prevent lug nuts from being removed. The first is the full cap, which must be removed to gain access to the handpiece nuts. nine0003
Using a wrench on the back of the car or a large flat blade (standard) screwdriver wedges the tip between the cap and the tire rim. This will begin to release the grip on the cap's spring loaded clips that hold it to the inside of the rim.
Turn the wrench or screwdriver back and forth to aid in the removal process as you watch the cover around. Bypass the cap until it is completely removed to expose the lug nuts holding the bezel to the bearing hub or axle. The cap is made of plastic and can break if you are not gentle with it so take your time and pull it out easily. nine0003
SPONSORED LINKS
Here is an example of a lug nut cap on an aluminum wheel that has plastic covering them that must be removed to access. These plastic caps are made to resemble eye nuts and actually screw onto the metal ones that hold the rim on. Each of these must be removed before the center cover can be removed.
This is what it looks like after removing the center cover with the nuts behind it. This cover can also be held in place with a signal screw or a small bolt. nine0003
This type of wheel already has protruding nuts and is ready to be removed without any further preparation.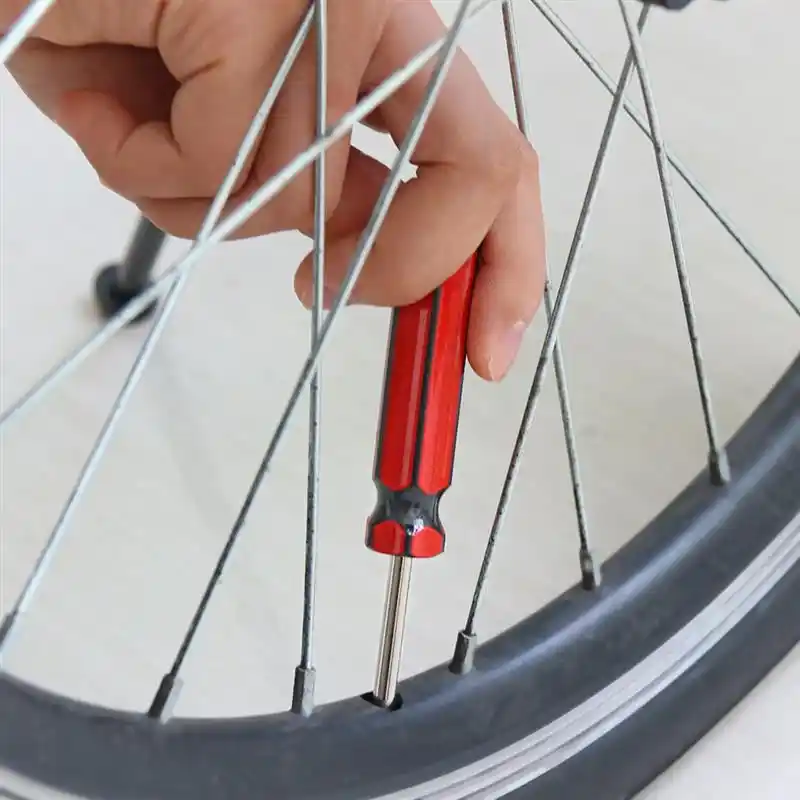 You can find this style on alloy or aluminum wheels which are more drastic. Some manufacturers have a wheel lock, which is usually inside the car, located in the glove box or in one of the side door compartments.
SPONSORED LINKS
This lock is a specialized socket that only fits the specific car it is designed for. If this lock is lost, you will need to contact the dealer and provide the VIN number to get a replacement. nine0003
The first step in removing the lug nuts is to get a tool capable of doing so. This could be the wrench that comes with the spare tire in most cars. If you can't find a spare, check your owner's manual, it should be in the trunk or glove box.
Most mechanics prefer to use a breaker, which is a large wrench socket that will give you extra leverage over a traditional wrench or socket and ratchet. This panel is usually not included in a typical toolbox and will need to be purchased separately with Kit 1 /2 holes Rosettes. nine0003
Wheel lug sizes in most cases can be 17 mm, 18 mm, 19 mm, 21 mm or 3/4 or 13/16. cases.
To remove the lug nuts, turn them counterclockwise. These nuts are going to be tight so be prepared one thing you never want to do is pull up on a wrench this will put pressure on your lower back and cause pain as the muscles stretch in a direction they are not used to. It delivers the pleasure of repair work. nine0003
SPONSORED LINKS
As long as the tire is still touching the ground, you are ready to smash the lugs to lose. The reason for this is that the tire will want to spin when you apply downward pressure to break the nuts and if they are on the ground it will be hard to keep it in place. You can "put" the jack in place and raise the car a little, this will allow the suspension to move down, but not enough to lift the tire off the ground.
While the tire touches the ground, apply downward pressure on the lug arm, keeping the pivot point steady.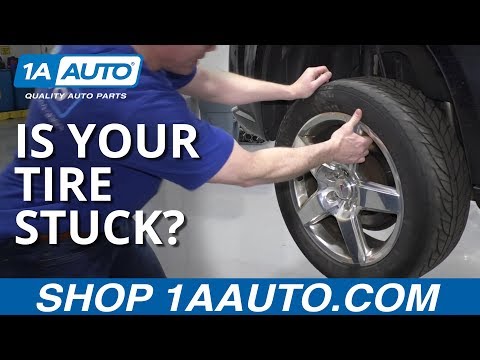 If the ears are very tight, try using your body weight and bouncing on this key. increase pressure exponentially. nine0003
Some lugs can get rusty or the mechanic who last tightened them Time lifted the impact wrench and they tightened up a lot. In this case, you may need to use full body weight and step on the jerk. Do make sure the toggle wrench or jumper is fully on the nuts to avoid rounding.
Be careful doing this because there's a lot more pressure and things like that can get out of control as the wrench flies off and hits you or someone else. nine0003
SPONSORED LINKS
Continue disassembling the lugs until they are all done and it has been rotated about one full turn in the air you will have no problem removing the nuts completely, do not completely remove the nuts at this time.
Now you can finish lifting the car until the tire is no longer in contact with the ground, in which case we use a hydraulic jack which is more stable than the scissor jack that comes with most cars. The car is then stabilized with a jack, never get hit by a car without these safety stands. nine0003
Now you can continue to remove all the mounting nuts by hand or using a wrench or a jumper. At this point you can even use a normal socket and a ratchet set up.
Note some European models such as Mercedes Benz, BMW and Porsche will use eye bolts which will allow the tire to fall off when removed because there is no wheel stud to hold the rim in place so be prepared to grab the tire. nine0003
SPONSORED LINKS
Once all the lugs are removed, the tire is loose, grab it and pull it out of the wheel studs. , do not hit the jack stands with the tire.
Now is a good time to inspect tire wear, also check tires for nails and cuts that could hinder its performance. If the tire needs to be replaced, the shop is the best place to go because removing the tire from the rim is difficult and requires a machine to do so in most cases. nine0003
Once the above repair has been completed, it is time to reinstall the tire and back on the car. rotor.
You should also check the clamp nuts themselves and replace any that are damaged. Also wipe off any dirt or grease from the mounting surface before reinstalling the wheel.
SPONSORED LINKS
After successfully inspecting or repairing the vehicle, take the tire and install it carefully on the wheel studs so as not to damage the threads.
On some European vehicles you will need to hold the tire to the wheel hub and then try to align the rim with the threaded bolt holes before installing. You may need to move the rim to line up these holes. the bolts are already installed in the image below). nine0003
With the rim seated on the wheel studs, push the wheel until it rests against the rotor or drum flange. Install the lock nuts onto the studs by turning them clockwise.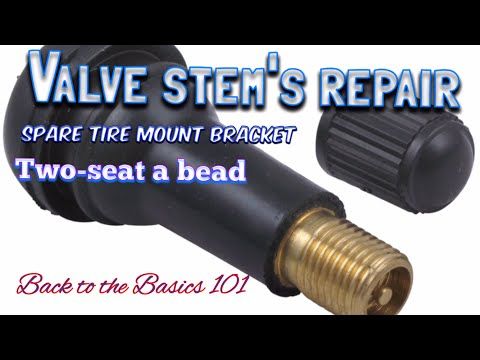 Do not start the lugs with a socket and ratchet, pneumatic tool, or electric impact gun, as this may twist the nut and ruin the stud and nut.
SPONSORED LINKS
Continue installing lug nuts until all are started, at least two turns. (Never use grease on the nuts, if there is rust on the wheels, use a wire brush to remove it before installation.)
Start initial tightening following the sprocket pattern. This will ensure the wheel is evenly tightened to avoid deformation of the rim, brake rotor, drum, hub or brake drum. You can use a regular ratchet and socket for this while holding the bar with your hand. In the next step, the wheel will be fully tightened.
Now lower the car until the tire touches the ground and hold it. from rotating while it is being tightened. Use a torque wrench and set it according to the manufacturer's specifications, which are usually 70 to 90 pounds for passenger cars, and 100 to 120 pounds for pickup trucks and large SUVs.
Done by tightening the star shaped eyelets, listening for the feel of the wrench to give and click the alarm the correct torque has been reached. If a torque wrench is not available, tighten the star lugs evenly, go around the lugs twice to make sure they are all tight.
SPONSORED LINKS
After the wheel is tight, reinstall the cap cap or nut. Some of these lids will have a notch or indentation timer that will sit in a suitable place in the frame. Full hub cap with relief for the valve stem, so pay attention and install it correctly. Be careful not to hit the cover too hard as it is plastic and it will break. nine0003
Once the job is done, listen for any strange sounds while driving. The free wheel will make clicking or ticking sounds when driving at low speeds. It's a good idea to recheck the nuts a day or two after driving to make sure they're secure. After installation is complete, check the air pressure in the tire, this will help the tire last long and perform best for years to come.
If you have a question about wheels and their installation or removal please visit our forum where our online community of mechanics and car enthusiasts will help you for free. nine0003
Article published on 2018-04-11
,
Your tires are an integral part of your car. They are there for safety, comfort and productivity. The tires are attached to the wheels, which in turn are attached to the car. Some vehicles have directional or position tires. Directional means that the tires are designed to rotate in one direction only, while positional means that the tires are only designed to fit on a certain side or a certain corner of the vehicle. nine0003
You may have received a flat tire and needed a replacement. You can remove your wheels to rotate your tires for maintenance. You may need to do other work, such as brake work or wheel bearing replacement.
Whatever the cause, knowing the correct way to remove and install wheels and tires will help prevent damage and put you out of action. When removing and installing wheels, there are a few key points to remember. nine0003
Regardless of the reason you are removing wheels and tires, it is important to have the right tools and safety equipment to prevent vehicle damage or injury.
Materials needed
Step 1: Park your vehicle . Park your vehicle on a level, firm and level surface. Apply the parking brake.
Step 2: Put the wheel chocks in place .Place the wheel chocks and tires, which must remain on the ground.
Step 3: Loosen the clamp nuts . Using a ratchet and socket or iron, loosen the lug nuts on the wheels, which need to be removed about ¼ turn.
Step 4. Raise the vehicle . Using a house jack, raise the vehicle to the manufacturer's recommended jacking point until the tire being removed is clear of the ground.
Step 5: Install jack stand . Place a stand under the jack and lower the vehicle onto the stand.
Tip . If you are removing more than one wheel and tire at the same time, you will need to lift one corner of the vehicle at a time. A jack stand must be installed on each corner of the vehicle being worked on. nine0003
Warning : Do not attempt to lift one side of the vehicle or the entire vehicle at the same time as damage or injury may result.
Step 6: Remove clamp nuts . Remove the lug nuts with a tire removal tool.
Step 7: Remove wheel and tire . Remove the wheel carefully and secure it in a safe place.
Some wheels may become corroded to the wheel hub and be difficult to remove. If this happens, use a rubber mallet and hit the back of the wheel until it loosens.
Step 1: Install the wheel back onto the studs. Install the wheel onto the lug studs.
Step 2: Install the lock nuts by hand. First install the flare nuts back on the wheel by hand.
Step 3: Tighten the star clamp nuts . Using a ratchet or iron, tighten the star lug nuts until they are snug.
This will help position the wheel correctly over the hub.
Step 4: Lower the vehicle to the ground . Once the wheel is secured, carefully return the vehicle to ground level.
Step 5. Make sure the clamp nuts have the correct torque . Tighten the clamp nuts to manufacturer's specifications using the starting pattern. nine0003
When removing and installing wheels and tires, it is very important to tighten the lug nuts using an alternating star pattern and torque them to specification. Failure to do so may result in the wheel coming off the vehicle while driving. If you are having trouble removing the wheels from the vehicle, or you think the problem is with the lug nuts, you should seek the assistance of a qualified mechanic who will assist you to tighten the nuts and make sure the wheel is installed correctly. nine0003
,
When you have beautiful new rims on your car, you won't be the only one to admire them. Beautiful wheels attract the attention of car lovers and thieves alike.
Wheels are an easy sign for thieves. When you leave your car parked anywhere, a thief can remove your wheels with a simple set of tools like a wrench and a floor jack. In just a few minutes, they can get rid of your wheels and tires, leaving you with thousands of dollars out of their pocket. nine0003
Wheel lock or lock nuts can be fitted to prevent wheel theft. A lock nut or wheel stud is installed in place of one of your original wheel nuts or studs on each wheel. The new lock nut is an irregular shape that only fits the wheel lock key. The wheel lock must only be tightened and released with the special wheel lock wrench, so a standard socket wrench or countersunk wrench will not be able to release the wheel locks. nine0003
How do you remove the wheel locks from your car? What happens if your wheel lock key breaks or is lost? Follow these instructions to remove wheel locks from your vehicle.
Materials Needed
Wrench for your vehicle
30404 : Never use power tools to unlock a wheel from a vehicle.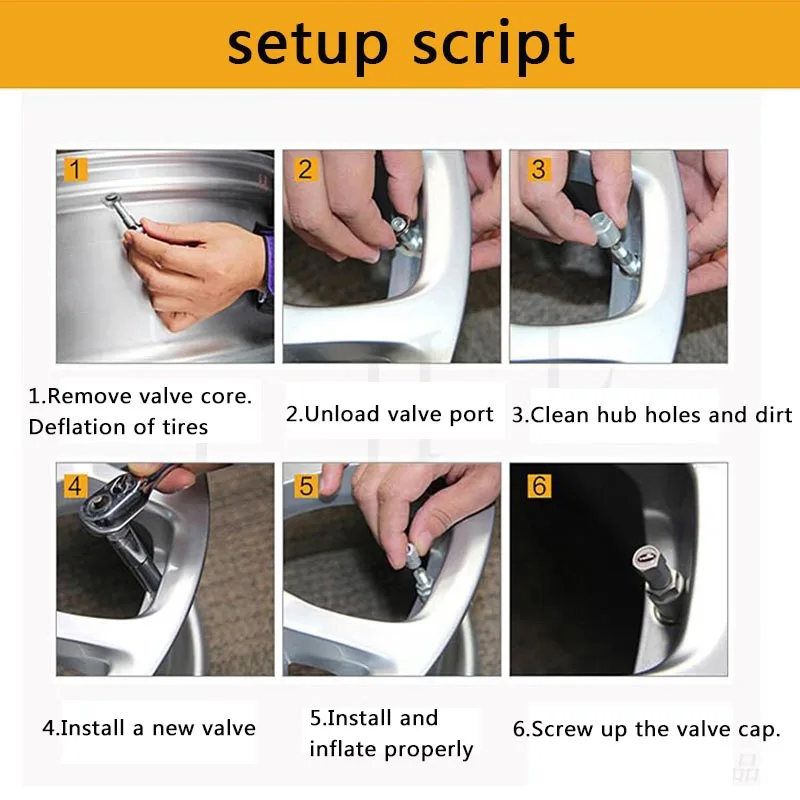 Power tools apply too much force and can damage or remove the wheel lock of the wheel lock key, rendering them useless.
Step 1. Make sure your vehicle is in park . Engage the parking brake for added safety.
Step 2: Align wrench with nut . Align the splines on the wheel lock key and the wheel lock on the wheel. nine0003
This is achieved by placing the wheel lock key on the wheel lock and turning it slowly until the lugs or structure align. The wheel lock key will snap into place on the wheel lock.
Step 3: Place wrench with clamp nut on wheel lock wrench . This is a six point hex head and should match the size of your vehicle's wheel nuts.
Step 4: Turn the clamping nut wrench counterclockwise . This will loosen the wheel lock and may require significant force to loosen the wheel lock from the wheel.
Step 5: Disengage the wheel lock manually . After loosening the wheel lock, you can easily release the wheel lock manually.
If you are reinstalling the wheel lock, reverse this procedure.
Required materials
In this procedure, you will use a universal wheel lock release tool to remove a wheel lock. This will most likely damage the wheel lock that you cannot reuse. Make sure you don't have the wheel lock key before using the universal kit.
Step 1: Park the car . Turn the car on in park and apply the parking brake.
This prevents rotational movement when you try to loosen the wheel lock. nine0003
Step 2: Find the right wheel lock release tool . Perform a trial installation of the tool on top of the wheel lock to be removed.
It should fit snugly and the teeth on the inside of the removal socket should cut into the wheel lock.
Step 3: Hit the tool with hammer . Hit the end of the wheel lock release tool hard with a rubber mallet.
You need the wheel lock release tool to be securely attached to the wheel lock. The teeth inside the wheel lock release tool now cut into the wheel lock itself. nine0003
Step 4: Loosen the wheel lock . Loosen the wheel lock by turning the removal tool counterclockwise with a wrench.
Expect considerable effort to loosen wheel locks.
Step 5: Manual turn completion . After loosening the wheel lock, you can completely disengage it manually.
The wheel lock is stuck in the removal tool.
Step 6: Unlock tool . Insert a punch or screwdriver through the hole in the wheel lock release tool opposite the wheel lock and hit the hammer with a hammer.
After a few blows with a hammer, a damaged wheel lock will pop out.