Garage
Cart
Account
By Eric McMillan
7/21/2021
Add Article To List
Tags: Tech, Tech, Race, Racing, Speedy Tip, Racing
Supply chain disruptions and raw material shortages seem to have become the norm these days. In the wake of recent events within the rubber industry IMCA has issued a news release stating that due to nation-wide tire shortages, and to extend the life of current G-60 tires, IMCA now permits grooving of the G-60 tire effective June 23, 2021. Here we have compiled some tips for grooving and siping to assist you in getting the most out of your tires.
Hoosier Recommendations for IMCA G-60 Tires
Courtesy of Hoosier Racing Tire:
We would NOT recommend grooving brand new tires. New tires are already as aggressive as a tire will ever be, so grooving them will only reduce the block stiffness and INCREASE tire wear on a new tire without dramatically assisting performance.
We would recommend that after the 2nd night of racing on an IMCA G60, customers should recut the factory groove lines with a #3 width grooving blade. Cut each block individually for best results as the tread pattern lines do not match, and try to avoid creating small, unsupported areas in the tread blocks. We would also suggest placing a #1 groove across each of the blocks on the rear tires, and around on the front tires. This basically creates 2 smaller blocks and should increase movement for better traction or steering force.
As normal, we would still recommend 1 direction siping for the IMCA G60 tire. Siping around front tires creates steering force, across on rear tires creates traction force. You should be able to do less siping with a grooved tire, as the block structure is already reduced with the additional groove cuts.
Tire Grooving Iron Tool Prep
Tire Grooving Iron With Tips
Prepare Your Tires Prior to Grooving
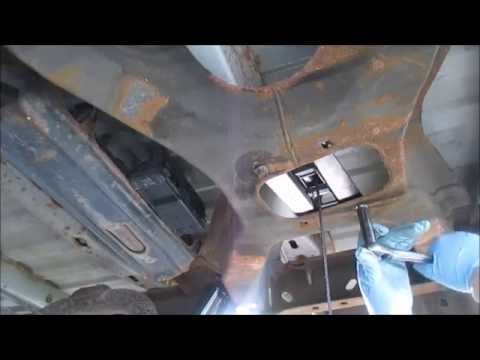
Grooving A Tire with A Heated Grooving Iron
Tire Grooving Tips
Straight Vs Angled Tire Grooving
Photos courtesy of Hoosier Racing Tire
Tire Siping Tips
home / NEWS / Siping and Grooving Hoosier Sprint Tires
|
||||||||||||||||||||||||||||||||||
At the height of summer, it's time to get into the car and go on a trip: to see the world, so to speak, and show yourself at the same time. But truly interesting and breathtaking places are rarely found near busy roads, and in order to gain impressions and take good photos, sometimes you have to go to the ground and shake off-road.
Maxim Stroker
Therefore, in order to save your car, we recommend using simple tips from experienced jeepers.
The amount of atmosphere in the tires that we drive on asphalt is not always suitable for driving a car on the ground. For example, if you drive down a rocky broken road, from which sharp rocks stick out, then the pressure in the tires is less than 2.5-3 bar, which is fraught with a cut. Therefore, experienced "off-road fighters" recommend pumping up tires from the standard 2-2.2 bar to 2.5-3. In addition, a slightly pumped wheel rolls better on large obstacles, which means you will also increase the cross-country ability of your vehicle.
But if you drive off onto a road soaked after rain, or sand dunes, then here you need, on the contrary, to bleed the air from the “cylinders”. This method is universal and suitable for all types of wheeled vehicles. The physics is simple: when we lower the wheels, the area of contact between the tire and the surface increases, which means that the grip becomes better, the ride is more comfortable and the suspension does not work for wear.
More specifically, when driving in mud, it is best to bleed the tires to the 1 bar mark. For driving on sand, it is not a sin to blow off the wheels to 0.5 bar. True, you need to remember that at such a low pressure you can “take off your shoes” right on the go. To prevent this from happening, you need not to turn the steering wheel to extreme positions and prevent slipping.
Remember: low tire pressure means driving at low speeds - no more than 30 km/h. With more active driving, the likelihood of loss of control is high. In addition, it is not recommended to lower the tires too much when descending from a steep, because when braking, the tires themselves will continue to rotate, and the rims will be blocked.![]()
Bleeding pressure "by eye" is a dangerous event, because the uneven amount of air in the tires adversely affects the car's handling and off-road capability. The fact is that any car has a differential that redistributes torque between the wheels. The drive wheel, pumped up more, rotates easier, which means that the "diff" will give the lion's share of the motor's energy to it, and the car will pull to the side. In a muddy mess, this will immediately end with a landing on the bottom.
It is therefore best to use a pressure gauge to deflate the tires correctly. It is desirable that it be equipped with a special bleed valve (deflator), such as, for example, in the BERKUT ADG-031 high-precision pressure gauge, because then you can easily and quickly not only check, but also reset the tire pressure to the required values. By the way, this pressure gauge is in demand by professional jeepers who, in order to improve the car's patency on marshy or loose soil, overcome obstacles on half-flat wheels. To regulate the pressure, you can also use the hose from the compressor, which also has a pressure gauge with a "deflator". After reducing the pressure, the difference in patency and comfort when driving on dirt roads and off-road is very noticeable.
After you have overcome the off-road section and you have to return to the asphalt, you need to return the tire pressure to its original state. And here the BERKUT off-road compressor comes to the rescue, which is equipped with an extension hose with a pressure gauge and a “deflator” for more precise adjustment of tire pressure. Thanks to its high performance, Berkut only needs a few minutes to pump up all the wheels of a car (even if it is an SUV) to the required atmospheres. A long twisted hose allows you to approach the wheels without dragging the compressor from place to place.
on advertising rights
In August, the next innovation in the procedure for obtaining WU
In August, the next innovation in the procedure for obtaining WI
675033
0009
 The unequivocal answer - to poison, was found by the Soviet builders of BAM and communism, but even in the age of tubeless tires, many doubts remain about the need for this simple procedure, which significantly increases patency any car. This means that once again it's time to dispel them.
 Let's start from the basics. Why release pressure in tires before leaving off-road do you still need it? Because our native off-road is thick or liquid mud, swamps, deep snow, sands in some places, that is, soils with a weak bearing ability. Simply put, it came - and fell almost to the very tomatoes. The best way to avoid such a fiasco is to reduce the pressure on the ground, for which it should be distributed over the maximum area. How to do it? Bleed your tires early!
The inflated wheel is in contact with a smaller surface area, which means it falls deeper. Downgrading pressure, the tire starts to work like a caterpillar. where you had to fight for every meter, you will easily go, surprised by the increased almost half patency. After all at low pressure, tires not only sink and slide less, but are also lighter crawl over obstacles, whether it be a rut or a fallen tree. Think about this, when some log crosses your path. With inflated wheels you are most likely you will simply push it in front of you, and the lowered tires will easily crawl over through the barrier.
But, they say not all tires can be poisoned? No, everyone. Winter and summer, off-road and not Very. On our planet, the laws of physics are unchanged and always work - the more area the tire touches the ground, the puts less pressure on him. However, the effect of pressure reduction is different.
For example, fairly low profile universal tires Toyo Open Country A/T Plus 275/50R21 , with All/Terrain type tread, for status Lexus LX can be lowered to 1.5, up to 1 atmosphere, and confidently overcome the slippery slope. But poisoning even more is useless and dangerous: patency will not improve, but the wheels, most likely disassembled. So that having coped with the ambush, it is better to re-inflate the tires to the recommended pressure manufacturer.
Another high profile off-road tires. They provide excellent patency even at normal pressure, but if they play off - reveal for real. Let's say tires Toyo Open Country M/T can be lowered to 1.5 atm, in order to gently lay on bumpy primers, and their "full width" tread works at 0.5 - 0.3 atm.
At low pressure, the tires not only sink and slide less, but also more easily crawl over obstacles, whether it be a rut or a fallen tree Suppose we convinced you that to lower the wheels off-road useful, but how to do it? The question seems idle only at first glance. Imagine how much air is in big tires like Toyo Open Country M/T 35X12.50 R17? Don't even think about just pressing the nipple valve with the key apartments - your comrades will come back and you'll still be lower your "thirty" fifth." The cheapest and fastest way is just unscrew the spool. But so that he does not fly into the grass or snow, skill is required. and well-developed fine motor skills. A Also a pressure gauge. One from old jeep legends says that you can poison "on sound", they say, on one tire atmosphere start whistling. There is some truth in this but not everyone whistles, not always and not exactly, and if the pressure in the wheels turns out to be different, then the behavior of the SUV will not will be stable.
So it's better to use a deflator, but also not any. Better choose deflator with a pressure gauge and a device for unscrewing the spool. Everything will be fine with him. fast and under your full control. The thing is simple - and dear glamorous ARB, and a cheap Chinese craft work equally. But taking a deflator that simply presses the spool is not worth it. It's like poisoning yourself with a key - it's long, tedious and you can lose the key. The same goes for deflators tuned to a specific pressure. They just press on valve, are expensive, yes also require calibration.
Congratulations! If you've read this far places you've already learned drop wheels. Now it's up to the small, learn to understand how much you need bleed and how to ride. For driving on bumpy primers on high profile tires one and a half atmospheres is enough. Will be much more comfortable. But it must be remembered that when such a sufficiently high pressure, the car will begin to behave differently: it will become more rolled, sluggish in control, and the load on the power steering will increase. But the weaker the soil, the stronger it is necessary get poisoned.
To make it easier to drive on not too heavy mud or sand, 1 atmosphere may be enough, but if there is liquid porridge under the wheels, you will have to lower them to 0.5 atm. Or maybe even stronger. Here is important visual control, because those the same off-road toyo Open Country M / T at a pressure of 0.5 atmospheres don't even look deflated, but This means they can be hit harder. And the softer winter Toyo Observe GSi-5, or their latest generation GSi-6, with the same pressure, literally spreads over ground.
By the way, a thin layer of freshly fallen snow, at a temperature of about zero, so slippery that the car could slide on the slightest deviation. In this case, winter the tread will work much better than sparse and wide off-road checkers. The same goes for deep snow, so always choose tires for the season! Anyway, the lower the pressure, the more carefully you need to drive. After all, the sidewall of the wheel becomes softer, it is easier to break it on branches or stones, sticking out in a rut. From hitting the walls of the track, stump, or during sharp maneuvers, the wheel can be disassembled. By the way, it is precisely because of the fear of "sorting out" that Jeepers often do not want to be poisoned.
Although it seems what afraid here? There is a spare! But what if two wheels disassembled at once? There are many options, and a special call to the forest tow truck - the latest of them. Usually Enough own forces and compressor. Most often, the tire moves away from the disk with only one outside. In that case, you need to hang the wheel with a jack, rinse (if there is nothing, then wipe the rim and tire well), be sure to unscrew the spool, screw the pump hose onto the nipple, turn it on and firmly press the tire to the rim with your hands. The tire itself, within a few seconds, will stand up with a pop in place. If it didn't work the first time times, clean the rim more thoroughly and press the tire more firmly, changing the application of force. Everything will work out!
Worse if the tire has moved away from the rim on both sides. Here, apparently, you have to remove the wheel. Clean it up put the disc on the stump and jump on the tire to put it on the disc on one side, and then inflate, pushing the other side of the tire against the rim like we already said.
B field tire fitting, the main thing is to thoroughly clean the tire bead and the rim of the disk from mud or snow. Take a more powerful compressor with you and do not forget to unscrew spool before pumping . R tire to rim be careful not to get your fingers between the tire and disc
It is even worse when the tire partially or completely off the disk. This is already quite serious, but also fixable. True, it will take much more effort and several mounts. If succeeded putting a tire on a rim is the hardest part. What do next you know. What you should not do is to bead the wheel with an "explosion" - no less trouble than with a compressor, and the result is unpredictable. Not only can damage tire, but also himself. Remember that fenced in fields and forests wheel, it will be much easier to disassemble the second time, so choose trajectories and maneuvering must be doubly careful. Well, having left for civilization, be sure to visit tire fitting and overboard the affected wheels with flushing and balancing.

 First, this will help the tire build heat quicker which will help the tire "fire" better. Siping will also dissipate heat when the tire gets to operating temperature and the sipes open up. If you are using a fairly hard tire, siping will help create a "graining" effect which will help keep the tire from "sealing" over. The only sprint compound we do not normally recommend siping is a D10 tire because it is already very soft and may result in "tearing" of the tread blocks and will result in loss of traction. As such, you rarely see Hoosier sprint tires siped for qualifying since the D10 compound is normally the qualifying compound. Also,
never sipe a tire more than half the depth of the tread block. Any deeper than half the depth of the tread block may cause the sipes to rip or chunk out. How much you sipe a tire will come from your own experience through trial and error. Also, like all good racers, pay attention to what techniques your competitors are using. They may have learned something you have yet to experience.
First, this will help the tire build heat quicker which will help the tire "fire" better. Siping will also dissipate heat when the tire gets to operating temperature and the sipes open up. If you are using a fairly hard tire, siping will help create a "graining" effect which will help keep the tire from "sealing" over. The only sprint compound we do not normally recommend siping is a D10 tire because it is already very soft and may result in "tearing" of the tread blocks and will result in loss of traction. As such, you rarely see Hoosier sprint tires siped for qualifying since the D10 compound is normally the qualifying compound. Also,
never sipe a tire more than half the depth of the tread block. Any deeper than half the depth of the tread block may cause the sipes to rip or chunk out. How much you sipe a tire will come from your own experience through trial and error. Also, like all good racers, pay attention to what techniques your competitors are using. They may have learned something you have yet to experience.
 The depth should be set no deeper than 1/2 the depth of the tread blocks. Deeper than 1/2 the depth may cause individual tread blocks to rip or chunk out. When setting the depth of the blades for siping, place the siping head on the tread block and visually adjust the depth to 1/2 the thickness of the block.
 Angled grooves will result in a combination of increased side bite as well as increased forward bite.