If you travel to the mountains or snowy areas regularly, sooner or later you’re going to have to use tire chains. Start by getting the right set for your vehicle at your local Les Schwab.
Quick-fit chains are not your grandpa’s tire chains. They are MUCH simpler to put on and take off. Here are a video, step-by-step instructions, and driving safety tips for installing quick-fit tire chains on your vehicle.
When you need chains, driving conditions are nasty. Snow is coming down, passing traffic is spraying slush, dirty water is dripping off your wheel wells, the road is slick, and it may be dark. Don’t make this the first time you put on your chains.
Practice installing your new chains once BEFORE you travel. Take advantage of a dry garage or driveway to make sure your winter tire chains are the right size and you’re comfortable putting them on. If needed, the professionals at Les Schwab Tire Centers can help.
Put together a simple winter road trip safety kit with warm gloves, waterproof layers, and other items to make your winter driving more safe and comfortable. In the winter, always carry this emergency kit and tire chains in your vehicle.
Once you’re comfortable installing your chains, you’re ready to hit the snow.
Be Safe. If you’re on the road, pull off as far as possible onto a safe shoulder. Flip on your hazard lights. Put on your waterproof layers, hat, headlamp, and gloves from your winter road trip kit.
Identify the Correct Tires. If your vehicle is front-wheel drive, the chains go on the front. If it’s rear-wheel drive, chains go on the back. If it’s all-wheel drive, please check your owner’s manual. If you’re not sure, you can ask the experts at Les Schwab for help.
Pull Out Chains & Instructions. With your vehicle parked, open the bag and pull out your instructions and your first chain. Each bag comes with two chains. The plastic instruction mat that comes with your chains can be used as a barrier between you and the snow to keep you dry.
Untangle Your Chains. Holding them from the plastic-covered cable, make sure everything is straight and the chains are not looped over one another. Hold up your chains so the yellow end is in your left hand and the blue end is in your right.
The chains should hang loosely and the metal hooks seen along the yellow and blue sections should be facing away from you so they don’t damage your tires.
Place Chains onto Your Tire and Connect the Cable.
Lay your chains on the ground and push them behind the tire, yellow cable end first, from the right side to the left.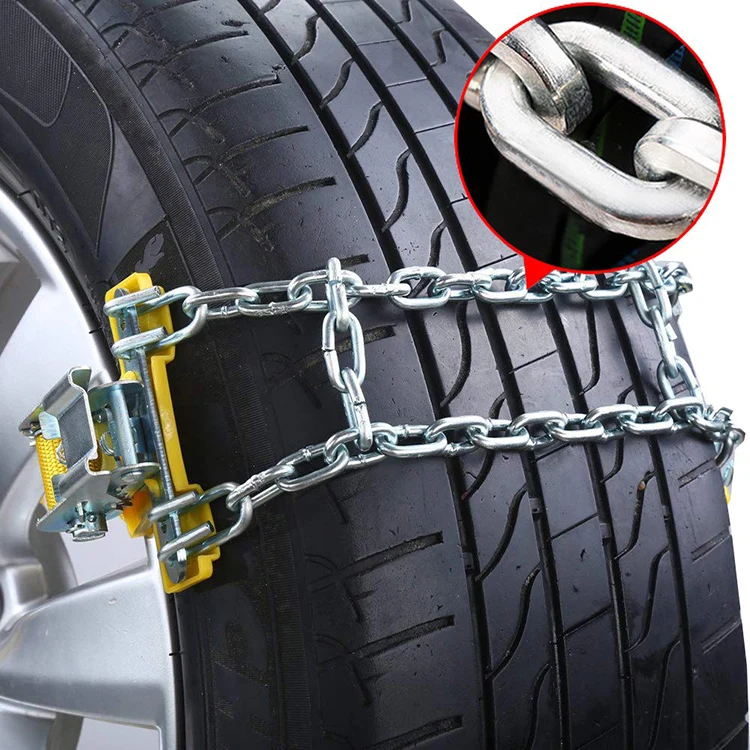
Once the chains are centered behind the wheel, grab both ends and pull them up over the top of the tire. You should feel the chains against your axle.
This will allow you to easily connect the yellow and blue ends of the cable by slipping one end into the other and pulling them into place.
Connect the Red Hook. Now that the cable is connected on top, look for the red hook directly opposite the cable connection. Connect the red hook on the right to the first available gold link on the left.
Check the Diamond Shape. Push the connected chain over the top of the tire. You should see the diamond shape in the chains against your tire. Between each of those diamonds is the center rail, which should be placed down the middle of the tire tread.
Connect the Red Chain Along the Bottom. Now that the cable is connected on top, look for the red hook directly opposite the cable connection. Connect the red hook on the right to the first available gold link on the left. Push the connected chain over the top of the tire.
The bottom of the chains includes a red draw chain with bungee on your right, and a chain guide on the left. Pull these out towards yourself.
Take the long red chain and run it through the chain guide and pull as tight as you can with both hands. Don’t pull using the bungee. As you pull, one of the chain links will find its way into the notch on the red chain guide, locking it into place.
Using the bungee end of the red chain, pull it through one or both of the red loops and secure it to a gold-side chain opposite the red loops. If you can’t get it through both loops, that’s ok, pull tight through one and attach it to a side chain to the left of the loop.
Repeat on Second Tire.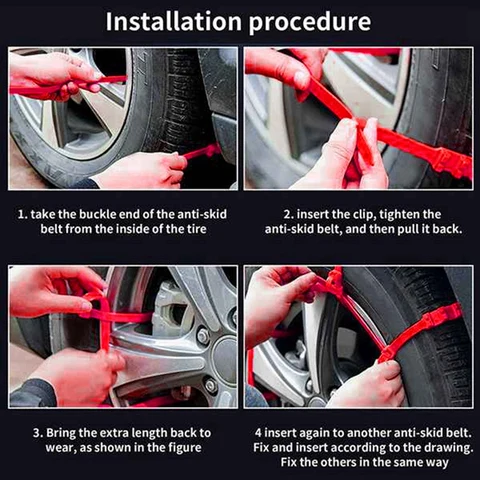 Repeat these steps to install chains on the other side of your vehicle.
Drive Forward Slightly. The next step is to drive forward about 15 feet, or a full car length. This gives the chains a chance to relax and settle on your tires.
Re-tighten Chains. To take up any slack, unhook the rubber end of the red draw chain and pull it tight again. Once it’s tight, guide the red chain through the loops and, again, securely latch the bungee end to the gold-side chain.
The chains should be tight on the tire. And, be sure to stop if you hear them making any contact with your vehicle. If your chains are still loose, unhook the bungee and adjust the red hook straight across from the chain guide. Unhook and reattach to the tightest position on one of the three gold chain links. It’s okay if the extra links are hanging loosely. Now, you’re ready to reattach your bungee.
While driving with tire chains, listen for a loud sound of slapping, or metal on metal. If you hear any indication that a chain may be broken or hitting your car, STOP as soon as safely possible. Loose or broken chains that flap can wrap around a strut or shock component, causing big damage to your vehicle. To help prevent damage, here are a few tips for driving when you have winter chains installed on your vehicle.
Pull over in a safe location and remove the chains. Start by unhooking the bungee and chain from the guide, removing them from the tensioner. Unlatch the red hook, and then undo the blue and yellow cable connection. Once all of your chains are off and lying flat on the ground, pull backward or forward slowly a few feet so you can safely pick them up.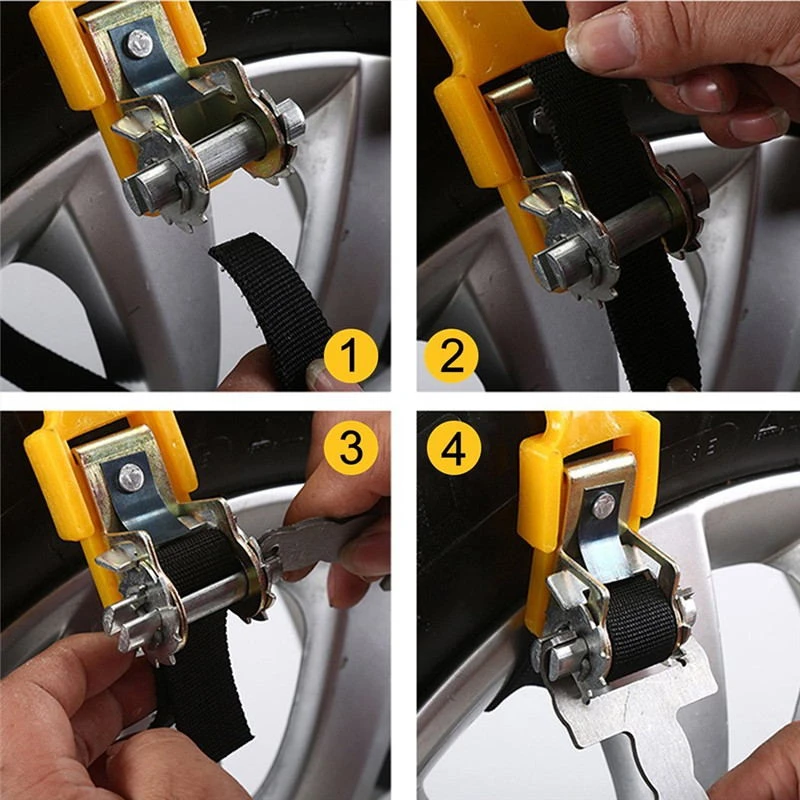
At the end of your trip, lay your chains out in the garage and let them dry. If you pack them wet, they can rust.
Also check them for wear, especially if you’ve driven them on asphalt for any distance. Look for flat spots, and replace the chains if you find some.
Link at left shows flattening from wear. Link in center shows sharp edge from wear that can damage a tire.
Remember, if you don’t use your chains all winter long, you can return them with proof of purchase to any Les Schwab for a full refund in the spring.
Get your next set of Quick-Fit chains, along with a few tips on how to install them, at your local Les Schwab, where doing the right thing matters.
Want more tips on winter road safety? See 19 Winter Driving Resources You Can’t Do Without.
Get More Winter Tips
We may earn commission from links on this page, but we only recommend products we back. Why Trust Us?
We tested tire chains on Mt. Hood after a week of deep snow. The parking lots and roads we chose had been plowed and featured a variety of conditions: everything from several inches of snow to almost bare pavement to ice-covered asphalt.
By doing laps around the Mt. Hood Meadows parking lot, on some of the resorts’ private roads, on nearby public roads, and Oregon Highway 35 is how we evaluated these traction devices. Our test routes provided a variety of flat surfaces, snow-covered grades, and tight turns. We tested the traction devices for overall road feel and comfort, stopping distance under hard braking, and ease of putting them on and off the CR-V’s front 235/60R18 snow tires.
Best All-Around
Best All-Around
$250 at Amazon
The König XG-12 Pro 255 snow chains are the best we tested—and the second most expensive. They have a special chain-pattern design with welded double-traction plates for maximum grip. They were easy to install, too, thanks to König’s Micro-Adjust system that makes mounting and tensioning the chains a breeze while providing a precise fit on the tire. The chains’ Active Tensioning and Balancing device keeps the chain tight and centered while driving, eliminating the need to stop and tighten the chains.
| Weight | 14.96 pounds |
|---|---|
| Size | 5.91 x 3.94 x 3.94 inches |
| Material | Steel alloy, nylon |
Runner-Up
Runner-Up
Now 41% Off
$94 at Amazon
A very close second to the Königs, these Peerless chains are a deal at $120 less.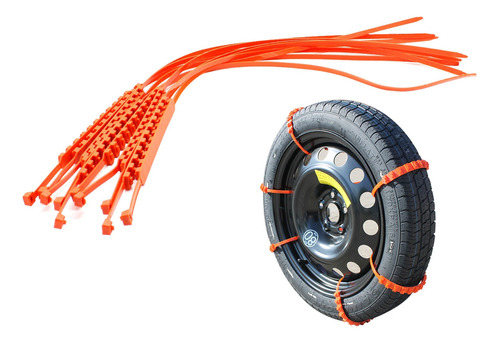 Installation was fast and easy. The patented ratcheting system automatically tightens the chain while driving. The Auto-Trac cross member links are made of manganese alloy steel, making them shorter, narrower, and lighter than conventional cross members, which provides more grip points. These chains had a bit rougher driving feel than the Königs and longer stopping distance, though not by much— and they’re more than a pound lighter. If you want to save money and aren’t as concerned about maximum performance, these Peerless chains are a smart buy.
| Weight | 13.9 pounds |
|---|---|
| Size | 11.8 x 11.7 x 3.3 inches |
| Material | Steel alloy |
Advertisement - Continue Reading Below
Best Quick Fix
Best Quick Fix
$139 at Amazon
ISSE calls these “Textile Snow Chains,” but they’re more like snow socks—and a great alternative to heavier, bulkier chains.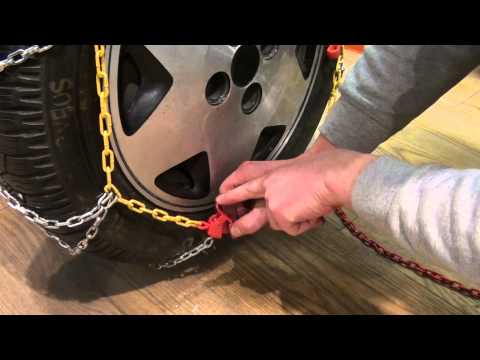 Since they’re made from 100 percent polyester, they’re easier to install and remove than other chains. They come as a pair, are reusable and even washable, but are also for very limited use. While you can drive on bare pavement with chains if you must, ISSE insists you shouldn’t do so with these since they can become damage easily. Ride feel was the best out of all the products tested and stopping distance was decent—not as good as chains but good enough if you drive carefully and prepare to stop in time.
| Weight | 3.39 pounds |
|---|---|
| Size | 14.75 x 8.5 x 3 inches |
| Material | Polyester |
Most Expensive
Most Expensive
$497 at Amazon
If cost isn’t an issue and you drive a large SUV, the König K-Summit XXL K66 snow chains are a decent option. The K-Summit are compact and flexible and because they’re installed and removed only on the outside of the wheel, they’re easier to put on. The K-Summit uses proprietary-designed adapters, while fastening is performed via a supplied wrench that tells the user when the ideal torque is reached. Tensioning is handled through an integrated ratchet that causes the chain to automatically reach its ideal position while driving. Special injection-molded plastic plates with hard metal studs and special steel chain make the K-Summit tire chains relatively lightweight.
| Weight | 24.2 pounds |
|---|---|
| Size | 17.52 x 13.66 x 8.66 inches |
| Material | Metal and plastic |
Best for Smaller Vehicles
Best for Smaller Vehicles
$111 at Amazon
Security Chain is one of several brands owned by Peerless, and the Super Z6 cable-style chains offer self-tensioning like their Peerless 0232105 Auto-Trac cousins.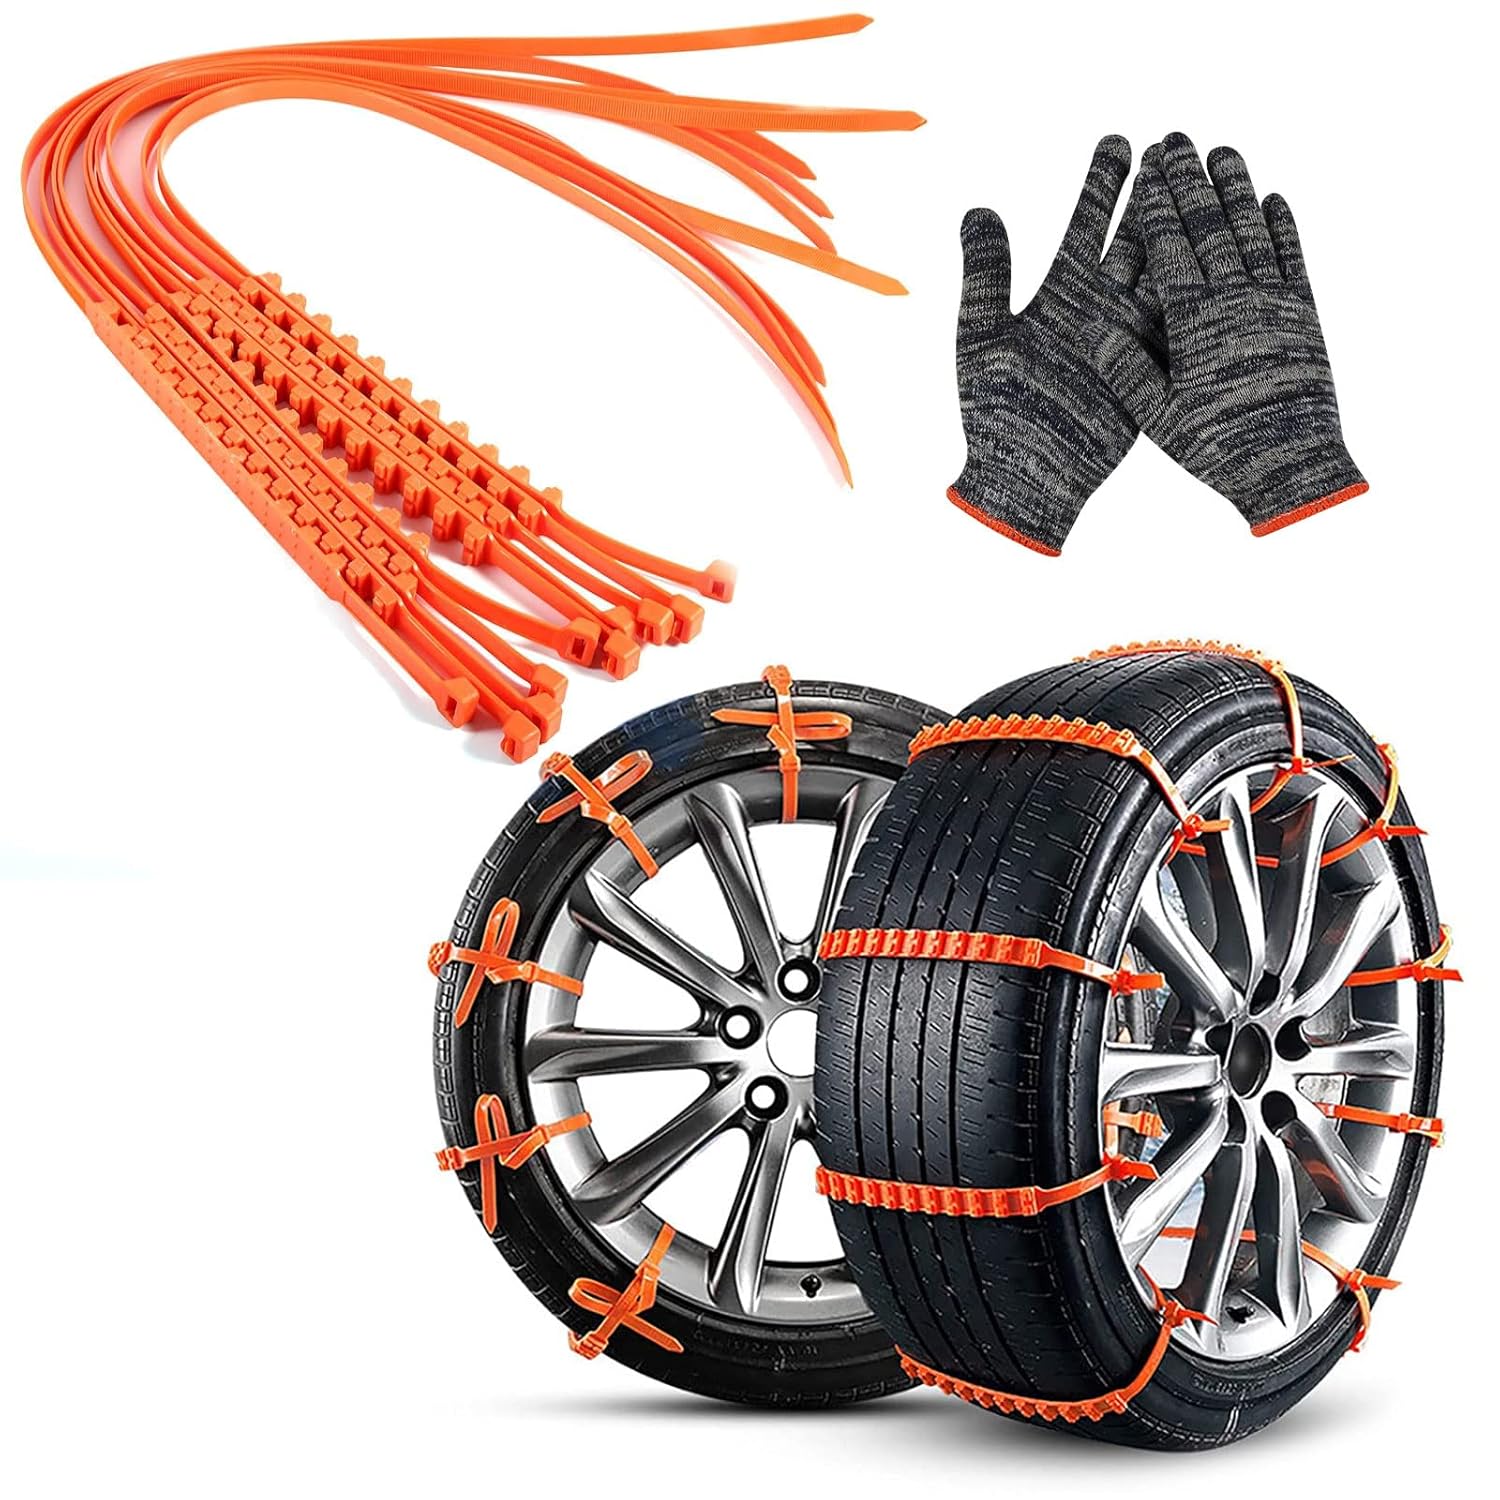 But they use cables wrapped in steel coils instead of chain links, making them lighter. This means they also take up less space than traditional chains and better for compact vehicles with small wheel wells. The coils don’t dig into snow as deeply as chains, but they get the job done and they’re easy to install. A rubber tensioner that connects to a cable running around the circumference of the tire and six clips tighten the cable and keep the Z6s snug on the tire.
| Weight | 1 pound |
|---|---|
| Size | 7 x 4 x 18 inches |
| Material | Rubber and steel |
Advertisement - Continue Reading Below
Best for Pickups
Best for Pickups
Now 22% Off
$137 at Amazon
If you’re one of the millions of drivers who prefer the utility and perch of a pickup, Security Chain’s QG2228CAM Quik Grip chains are specifically designed for trucks and can handle the extra weight of a 4X4. Built from manganese alloy steel, they feature long-wearing square crosslinks for maximum grip and durability and come in a variety of sizes to fit a wide range of truck tires. A built-in tightening system means they don’t need additional tensioners, but some online reviewers report that these chains can be difficult to install.
| Weight | 6.5 pounds |
|---|---|
| Size | 12.5 x 9.4 x 6.5 inches |
| Material | Steel |
Doug Newcomb
Doug Newcomb splits his time between Hood River, Ore., and Todos Santos, Mexico. He's been writing about technology and cars for more than 30 years for Wired, Rolling Stone, Road & Track, Automobile, PCMag.com, Playboy and numerous other publications. He cofounded the C3 Group in 2013 to produce automotive industry events in New York, San Francisco, Washington, D.C. and at SXSW in Austin. C3 Group was acquired by Informa in 2018. When he's not writing, he's riding a surfboard
 info
info In our country, in winter conditions, many people use studded tires, and almost all use winter tires. Therefore, unlike European countries, where the majority travels on the "all-season", many of us ignore the chains on the wheels - why do we need chains if there are spikes? However, not everything is so simple with snow chains, so we will consider the issues of their choice and application in more detail.
So - what are the chains on the wheels for? To drive on a road that is completely covered with snow. After all, spikes in such conditions do not give a special result - soft snow is not ice into which they could "bite". In addition, if you are going to Europe by car in the winter, then in the mountainous regions you can see a sign obliging you to wear chains (regardless of what tires the car has). Therefore, instead of asking why you need chains on the wheels, it is better to ask which snow chains to choose and how to use them correctly.
Of course, as with any question, there are pros and cons as to whether or not to install chains on wheels.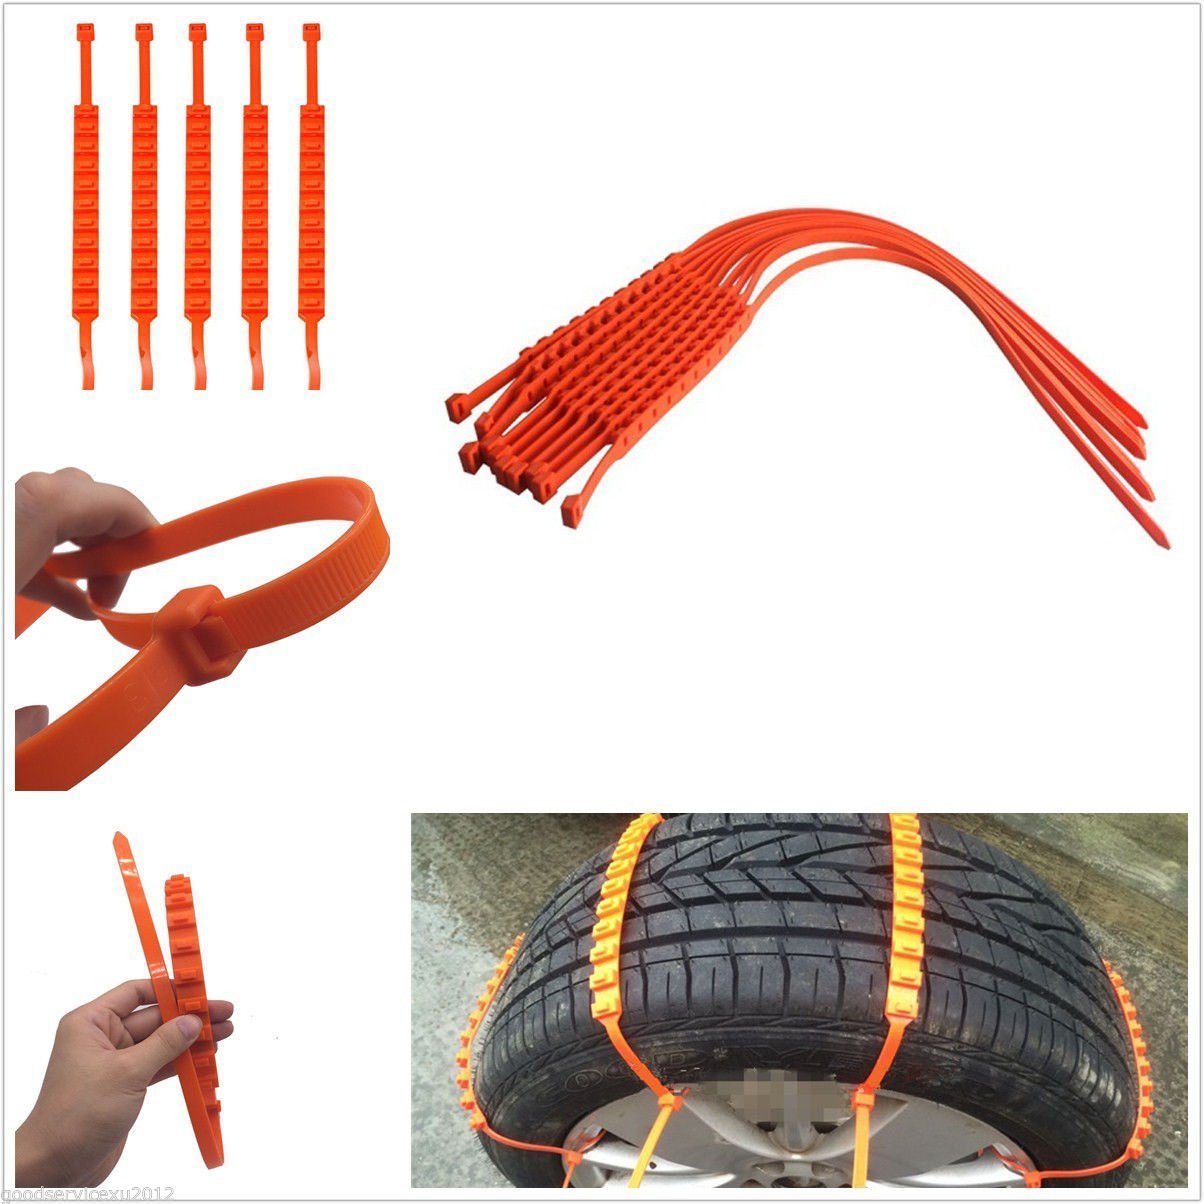 For example, snow chains may not be used with all wheel sizes recommended for a particular vehicle. In some cases, the margin of distance between the maximum permitted wheel size and the arches is not enough to install chains - they can damage the body. Therefore, you need to look at the instructions for the car, which should indicate with what size tires winter chains on wheels are allowed to be used.
There are also cases where the presence of snow chains affects the operation of the electronic sensors in the steering system. This usually happens on cars with electric power steering, but at low speeds it does not noticeably manifest itself, and it is still not recommended to accelerate with snow chains on the wheels. Therefore, this argument against wheel chains is also not an obstacle to their use. Although it may have an impact on the choice of snow chains, as will be discussed below.
When considering snow chain options, think safety first. There is no better criterion for choosing a chain for wheels, how to choose the more expensive and less convenient to install, but the most effective option.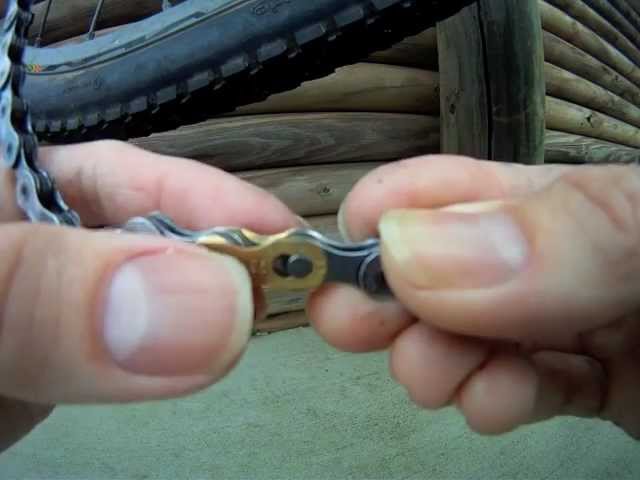
When deciding which snow chains are best, you need to consider a number of factors: how often they will be used and in what conditions. And also - what kind of drive the car has - front or rear. For cars with electric power steering, you should choose chains that are evenly distributed on the outer and inner side of the wheel - so as not to mislead the sensors that respond to resistance with steering effort.
On front wheel drive vehicles, chains can only be used on the front axle, but be aware that the vehicle will tend to oversteer due to the inertial movement of the rear of the vehicle. On rear-wheel drive cars, it is highly desirable to use chains on both axles, since using them only on the rear is risky for loss of control.
Many people ask themselves the question - what chains to prefer for wheels: ladder or herringbone? Ladder-type chains consist of chain segments located on the tire tread parallel to each other and perpendicular to the direction of travel.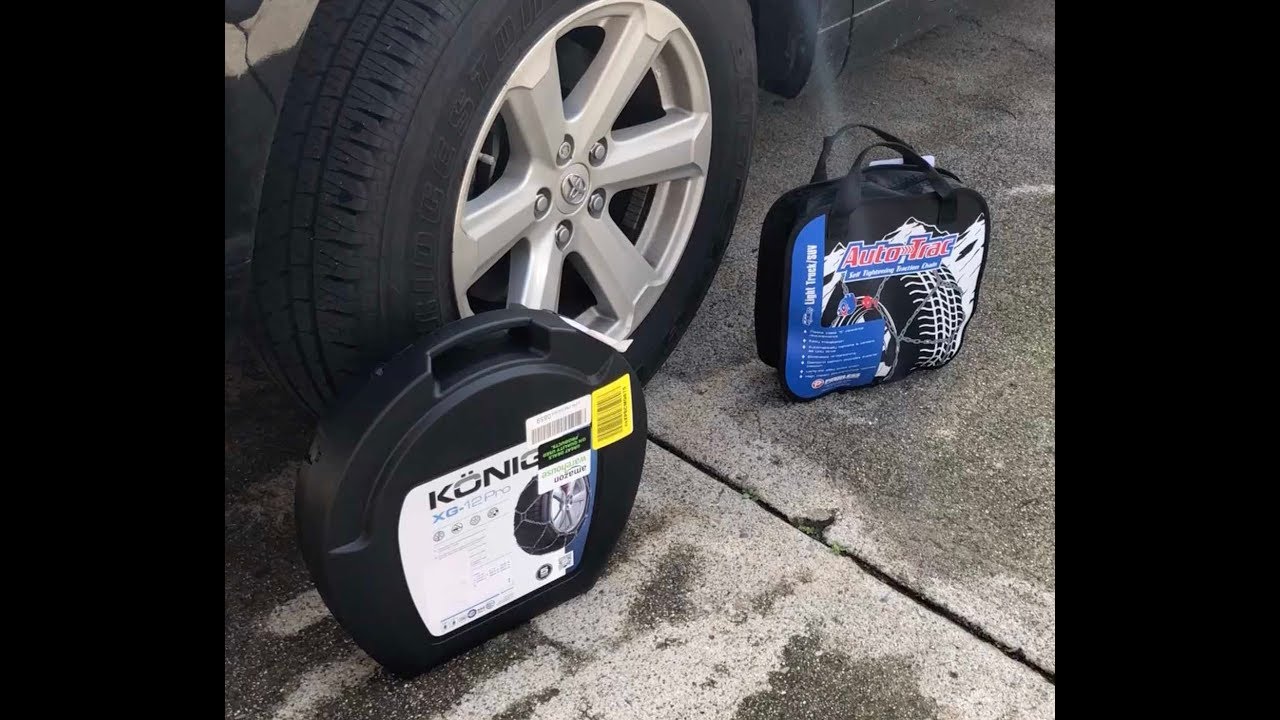 Herringbone chains, also called diamond-shaped chains, form a complex pattern of segments intersecting at different angles. There is no fundamental difference between them, however, it can be noted that the "ladder" usually has better traction properties, while the "herringbone" has better control properties. Therefore, diamond-shaped chains can be recommended for front-wheel drive vehicles, and “ladder” chains for rear drive wheels.
Ladder chains generate less vibration when driving and are more effective when braking due to the fact that at any time a segment of the chain is in contact with the road. For effective braking on ladder chains, repeated, stepped braking may be required. Another point - diamond-shaped chains usually wear out rubber less, so they are preferable when long distances are expected to be covered using chains.
Many are confused by the fact that the metal of the chains is in contact with the rubber of the tires. And people think, not wanting to ruin expensive tires by installing chains on wheels, than to replace traditional metal chains.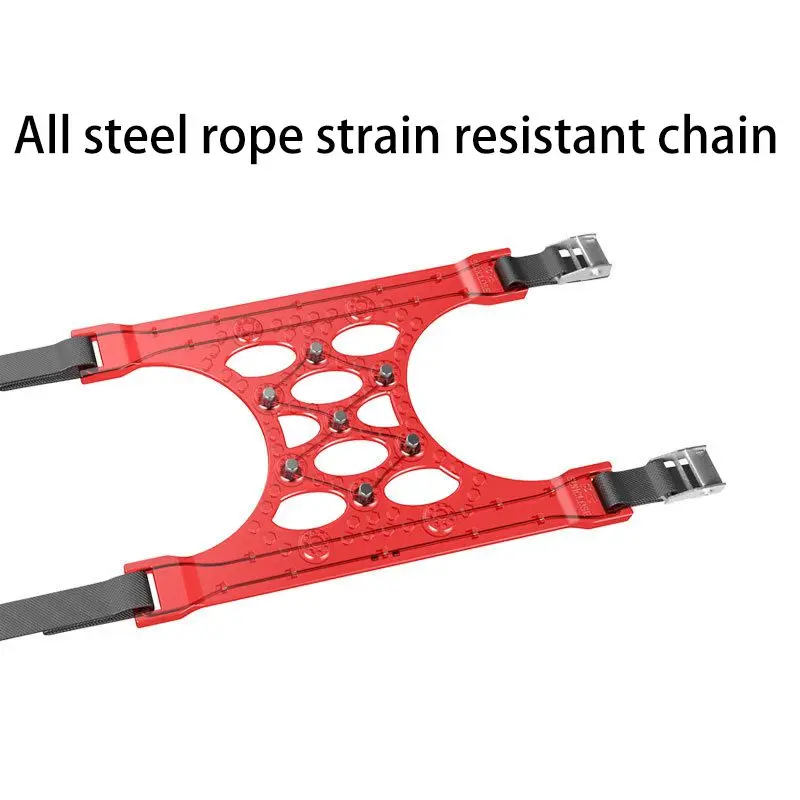 In this case, there really is a solution - soft snow chains on the wheels. They consist of a combination of chains and rubber elements with large "snow" spikes. The chain is used only on the sidewalls, and only the soft rubber part of this design contacts the tread. On such chains, it is possible to overcome not only snow-covered, but also icy sections of the road.
Others are not satisfied with the process of installing chains - rather long, laborious and often dirty. For such consumers, there are quick-release snow chains. The quick installation of these chains is made easier by the adapter attached to the rim and the tabs that hook onto the tire tread, so there is no need to throw part of the chain over the wheel. As soon as the car starts, the adapter correctly positions the chain. The disadvantages of quick-release chains are their high price, bulkiness and not as high efficiency as traditional snow chains.
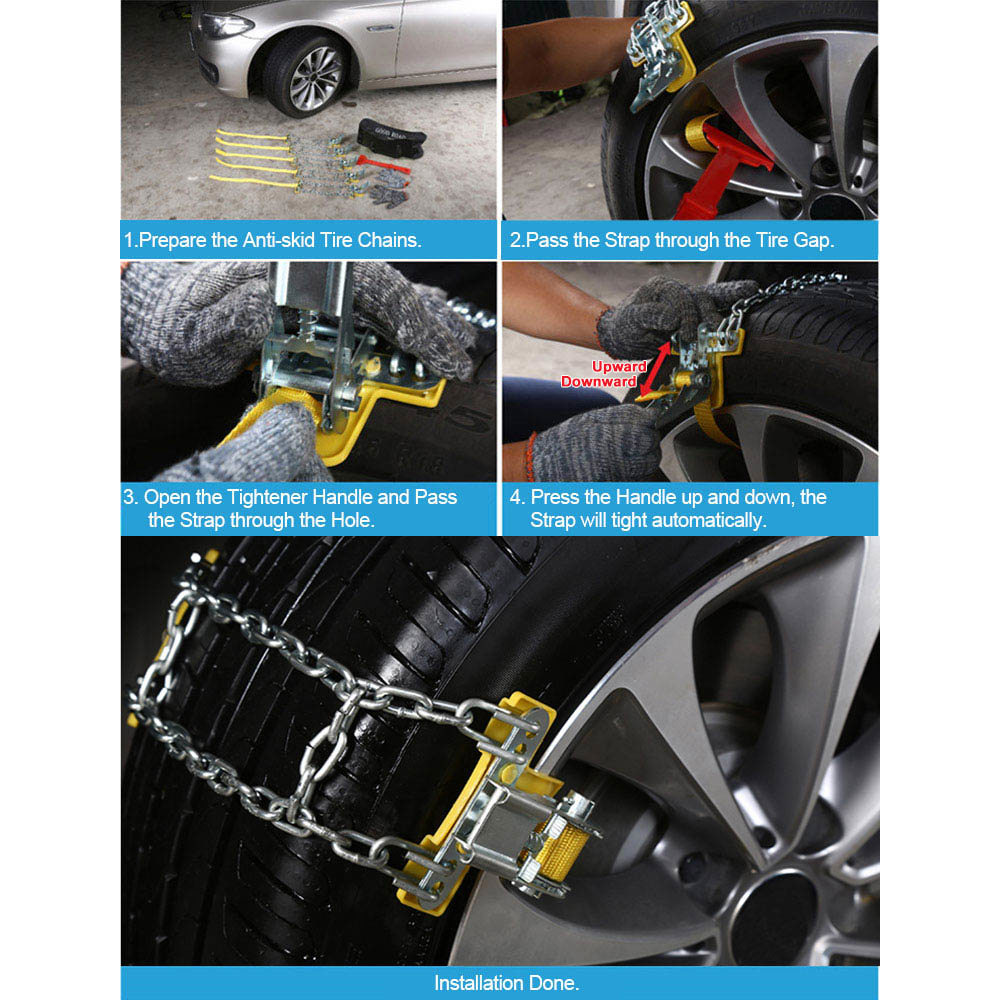
A separate question is how to properly put snow chains on wheels. In any case, this requires some skill, so it is recommended to practice in the garage, or in good weather. It is necessary to wear chains when the car is on level ground, and of course - on the hand brake. When you need to install specific chains on the wheels, how to put them on depends on the design of the mount.
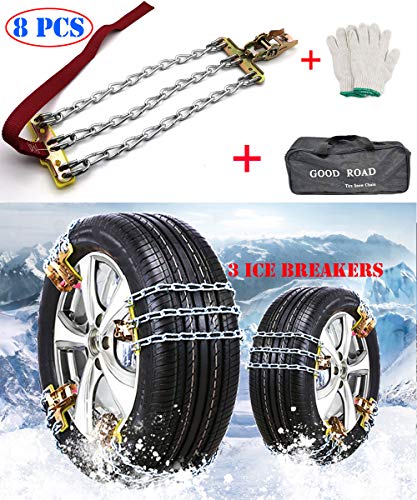
There are two main fastening systems - cable and hoop. The cable attachment system leaves more mounting space. These chains are usually less expensive, and are easy to install, provided that the instructions that come with the chains describe how to put the chains on the wheels. The hoop system consists of a steel hoop that sits behind the wheel, from which the chain links extend over the tread and are held in tension by a chain placed on the outside of the wheel. Installing such a chain is more difficult, but it keeps a little better on the tire and is better distributed over the wheel thanks to the hoop - it shifts less during movement.
Many chains are shaped in such a way that they form two sides of the chain - flat and embossed.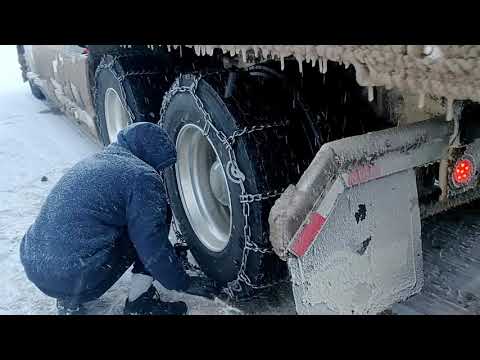 When installing, the flat side of the chain should face the tire, and the embossed side, the gripping side, should face the road.
To install the chains, have with them a set of two pairs of gloves - cloth (knitted) and rubber, selected so that the second can be put on over the first. Then when installing the chains, your hands will not be wet or cold.
Naturally, you need to drive with chains on the wheels slowly, avoiding sudden maneuvers and accelerations. Otherwise, the chains may come off and cause damage to the suspension and steering parts. Reduce your speed when cornering to the minimum. If the car has an anti-lock braking system, it must be disabled. After installing the chain, after driving a couple of kilometers, you should go out and check the tension of the chain, tightening it if necessary.
And one more important tip when choosing chains for wheels in winter - you can read reviews of other motorists about different chains. But it is better to rely on the advice of professionals, since each car has its own specifics, operating conditions, etc. may vary. Therefore, reviews are good when the source of the reviews has the same car and needs as you. We hope that after reading this article about snow chains, how to choose, install and use them, you will find your bearings easier and faster.
Tuning and auto gadgets, Tires and wheels, Operation / From Autoclub
Contents wheels
How to install the chains on the wheels with your own hands
Installation method without jacking up the machine
Alternative solutions
Things to remember
Any experienced car enthusiast has experienced unpleasant moments when the drive wheels of the car began to slip in mud, ice or deep snow. It is often almost impossible to get out of such situations on your own - only with the help of another vehicle. How are our colleagues doing? Some people buy studded tires after such incidents, others simply put the car on a "fun" during natural disasters. But there is another category of motorists that uses homemade chains for wheels and, I must say, quite successfully.
These devices are based on simple design, consisting of steel links or armored wire . A successful application lies in the uniform distribution of the elements along the entire radius of the tire. Failure to comply with this condition threatens to break the product and loss of anti-skid properties. The classic scheme, proven by more than one generation of motorists, consists of internal and external components that run around the entire circumference of the tire. They are interconnected by transverse parts, the so-called " grouser ". The manufacturing technology of do-it-yourself wheel chains is available even to beginners. Depending on the layout of the structural elements, there are three types of devices :
Each type has its own advantages and disadvantages. In terms of labor costs, the first option is the most accessible - "ladder" .
It is not always possible to purchase an anti-skid device - the high price and lack of availability of the right size makes car owners decide such issues on their own. I must say that this is a pretty good choice - all the necessary components are always available in hardware stores. In a critical situation, you can try to simply wrap the tire with a cable or a piece of metal rigging , but not everyone carries a similar set with them. Moreover, for a disc type brake system, this option is absolutely contraindicated - such a design will disrupt the operation of the mechanisms. Therefore, it is worth preparing in advance homemade chains for wheels , for which will need :
The dimensions of the workpieces depend on the dimensions of the tire used, so it is important to measure the desired values in advance. The number of transverse parts is also individual - craftsmen recommend making sure that there are two "crossbars" at once in the plane of contact between the tire and the ground. Thanks to this scheme, traction characteristics and reliability of the entire product will increase. Preparatory action process and do-it-yourself assembly of chains on wheels consist of the following items:
As can be seen from the description, with a certain skill and tool, the operation will take no more than 40 minutes. Those who have welding experience can put it into practice and refuse threaded connections, which will certainly affect the quality of the equipment.
Having checked the reliability of the finished product, it remains only to install it on the car.
The anti-skid device is mounted first of all on the drive pair and this is done using two methods :
The choice of method is up to the driver, but it is worth focusing on one recommendation - you need to think about installation in advance, even before entering a difficult area . Only in this way will it be possible to avoid annoying mistakes and save a lot of time.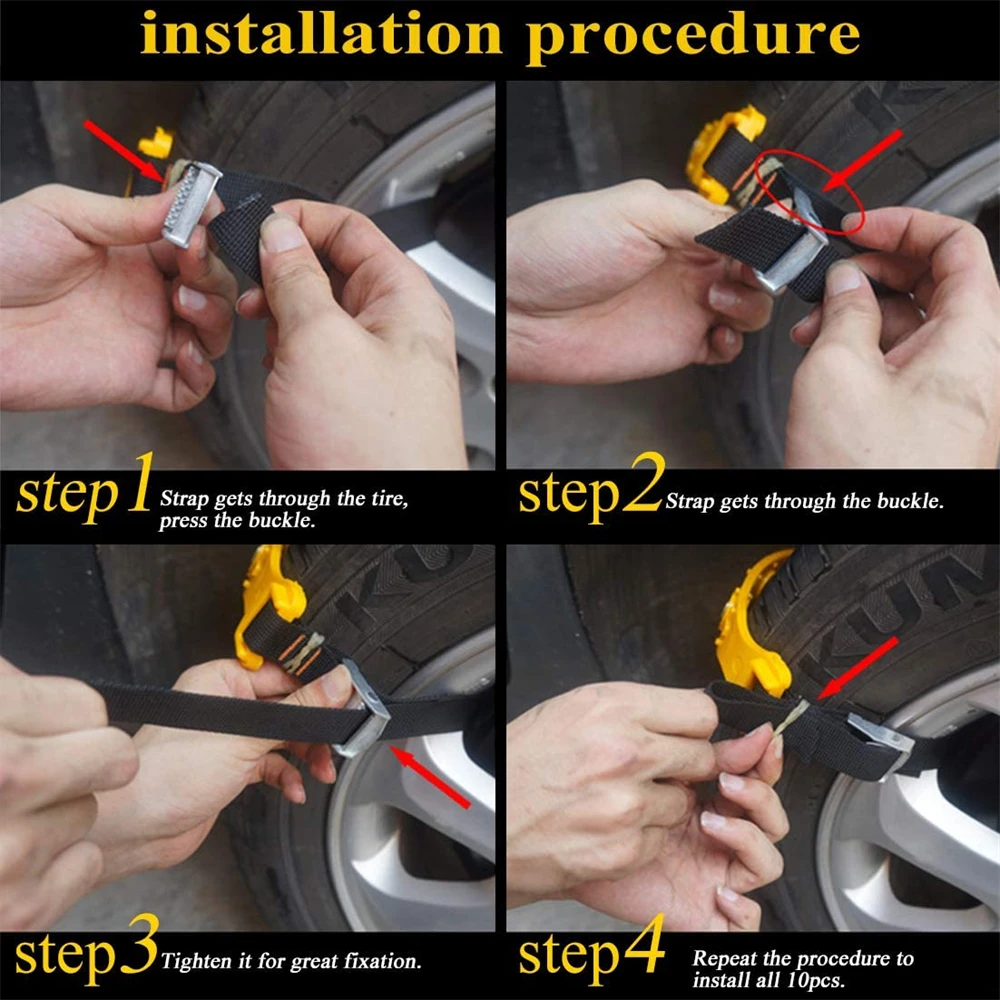
Before proceeding with the operation of installing homemade chain on car wheels , carefully lay it, not allowing the links to twist. Further, we act according to the points:
Do-it-yourself installation of the chain on the car wheels using a jack is similar to the technology described above, its only advantage is to facilitate the task. For a better installation, you must first reduce the pressure in the tires, but after the operation, do not forget to restore normal parameters. This procedure will allow the product to fit as tightly as possible to the tire.
The idea of folk craftsmen does not stand still - and now they offer an alternative solution: anti-skid bracelets . In principle, these are the same home-made metal chains for wheels , only with a difference in the absence of longitudinal elements . The advantages of bracelets are as follows:
So, what is needed for the manufacture of :
For 195 and 205 mm tires, about 4 meters of chain will be required. As you can see, the costs are minimal, and you only need to cut the material to the required length. Another alternative is kits for DIY wheel bracelets using chains , they are quite affordable and of good quality (except for Chinese ones).
Set consisting of:
The kit is very easy to use and does not take up much space. An important plus is the possibility of using machines with disc brakes . Judging by the reviews, owners of expensive SUVs do not disdain to use them, which once again speaks of the practicality of the device.
For more information on how to make your own anti-skid bracelets, watch the video:
The use of anti-skid chains is not allowed when driving on paved roads (concrete, asphalt). In conditions of loose snow or soil, it is recommended to adhere to a speed of 10-20 km / h. Wheel slippage must not be allowed.
After installing the anti-slip device, after driving the first 100 meters, you should stop and check the reliability of its fixation, as well as the tension around the entire perimeter.