FREE 2 or 3-Day Delivery on 10,000+ Items. Details
Close
ExtremeTerrain is proud to offer FREE SHIPPING on any order over $75!
Free 2-3 Day Delivery on most items, see Product Page for details.
Free Shipping Offers are for Standard Ground Delivery Service and are only valid for shipping addresses within the 48 contiguous United States. Truck freight and oversize charges still apply unless otherwise noted, and can only be shipped to the lower 48 States. Rough Country items are not included in Free Shipping offers. Tires and Wheel and Tire Kits do not qualify for free shipping.
Shipping to Alaska and Hawaii will require an additional charge.
For full shipping details please view our Shipping Policy
ExtremeTerrain.comTalk to Wrangler Enthusiasts
1-877-870-8556
M-F 8:30A-11P, Sat-Sun 8:30A-9P
$5,000 Giveaway! 5 Chances to Win Enter Daily >
Close
Update
Not sure if you have a JL or JK? Check out this guide
If you have a 2018, confirm that you have a JL or JK.
more
more
For more details, check out this guide
BackDon't see Delete Question 1 of 3
I don't own a 1976+ Wrangler Ownership does not affect chances of winning
Select a different vehicle
Please complete your Wrangler info
Delete
Tacoma
Update
If you have a 2018, confirm that you have a JL or JK.
more
more
For more details, check out this guide
How To
Find your bed length; Measure from bulkhead to tailgate
BackDon't see Delete Question 1 of 3
I don't own a 2005+ Tacoma Ownership does not affect chances of winning
Select a different vehicle
Please complete your Tacoma info
Delete
Tundra
Update
If you have a 2018, confirm that you have a JL or JK.
more
more
For more details, check out this guide
How To
Find your bed length; Measure from bulkhead to tailgate
BackDon't see Delete Question 1 of 3
I don't own a 2007+ Tundra Ownership does not affect chances of winning
Select a different vehicle
Please complete your Tundra info
Delete
Gladiator
Update
If you have a 2018, confirm that you have a JL or JK.
more
more
For more details, check out this guide
BackDon't see Delete Question 1 of 3
I don't own a 2020+ Gladiator Ownership does not affect chances of winning
Select a different vehicle
Please complete your Gladiator info
Delete
Bronco
Update
If you have a 2018, confirm that you have a JL or JK.
more
more
For more details, check out this guide
BackDon't see Delete Question 1 of 3
I don't own a 2021+ Bronco Ownership does not affect chances of winning
Select a different vehicle
Please complete your Bronco info
Delete
4Runner
Update
If you have a 2018, confirm that you have a JL or JK.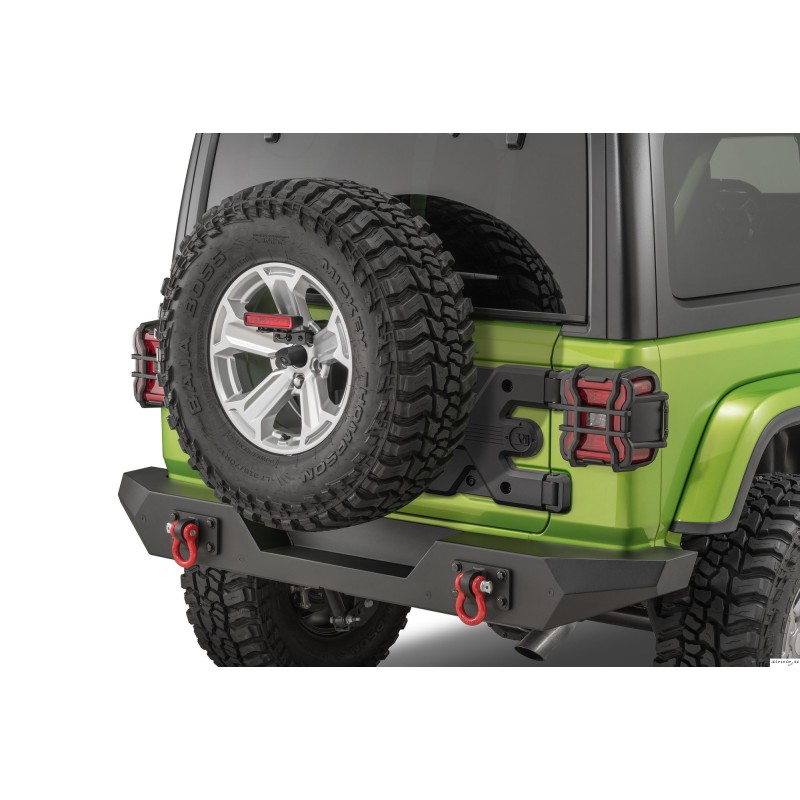
more
more
For more details, check out this guide
BackDon't see Delete Question 1 of 3
I don't own a 2003+ 4Runner Ownership does not affect chances of winning
Select a different vehicle
Please complete your 4Runner info
Delete
Yes, ContinueNo, Select a Different Vehicle
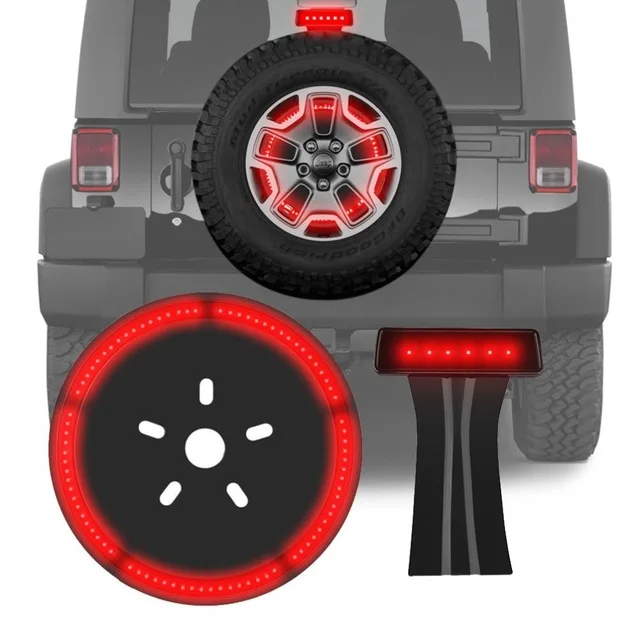
1. Remove spare tire.
CAUTION: Have another person help lift tire off tire mount.
2. Attach Accessory Brake Light to spare tire mount by sliding over wheel studs.
NOTICE: Proceed to Step 3 if installing on 2007 to 2017 Wrangler.
Skip to Step 9 if installing on earlier model.
3. Open tailgate. Using T-20 Torx bit, remove four screws attaching third brake light to factory tire mount.
4. Pull third brake light away from tire mount. Remove electrical connector by depressing tab. Set third brake light aside to be used again.
5. Cut Accessory Brake Light plug three inches from end and strip all four wires.
6. Using supplied butt connectors, splice JK Jumper Harness and Accessory Brake Light plug in one end and Accessory Brake Light in other end.
7. Connect Accessory Brake Light plug to factory third brake light harness and connect JK Jumper Harness to factory third brake light.
8. Reattach factory third brake light to tire mount.
NOTICE: Skip to Step 12 if installing on 2007 to NOTICE 2017 Wrangler.
9. Disconnect battery by removing negative terminal first, then positive. Unsheathe factory third brake light wires. Cut and strip both ends.
WARNING: When removing battery cables do not touch positive and negative terminals together.
10. Cut Accessory Brake Light plug three inches from end and strip wires on Accessory Brake Light.
11. Using supplied butt connectors, splice factory third brake light and Accessory Brake Light in one end and factory wiring in other end. Reconnect battery.
12. Install spare tire and torque lug nuts to factory specification. Depress brake pedal and check for brake light functionality.
CAUTION: Have another person help lift tire on tire mount.
WARNING: Failure to tighten lug nuts to proper torque specification could result in serious injury or property damage.
Close
Update
Not sure if you have a JL or JK? Check out this guide
If you have a 2018, confirm that you have a JL or JK.
more
more
For more details, check out this guide
BackDon't see Delete Question 1 of 3
I don't own a 1976+ Wrangler Ownership does not affect chances of winning
Select a different vehicle
Please complete your Wrangler info
Not your vehicle?
Select a different vehicle
Address
Apt / Suite / PO Box
Zip / Postal Code
City
State Please SelectAlabamaAlaskaAmerican SamoaArizonaArkansasArmed Forces AfricaArmed Forces Americas (except Canada)Armed Forces CanadaArmed Forces EuropeArmed Forces Middle EastArmed Forces PacificCaliforniaColoradoConnecticutDelawareDistrict of ColumbiaFederated States of MicronesiaFloridaGeorgiaGuamHawaiiIdahoIllinoisIndianaIowaKansasKentuckyLouisianaMaineMarshall IslandsMarylandMassachusettsMichiganMinnesotaMississippiMissouriMontanaNebraskaNevadaNew HampshireNew JerseyNew MexicoNew YorkNorth CarolinaNorth DakotaNorthern Mariana IslandsOhioOklahomaOregonPalauPennsylvaniaPuerto RicoRhode IslandSouth CarolinaSouth DakotaTennesseeTexasUtahVermontVirgin IslandsVirginiaWashingtonWest VirginiaWisconsinWyomingAlberta ABBritish Columbia BCManitoba MBNew Brunswick NBNewfoundland and Labrador NLNorthwest Territories NTNova Scotia NSNunavut NUOntario ONPrince Edward Island PEQuebec QCSaskatchewan SKYukon YT
Country Select a CountryUnited StatesCanada
How did you most recently hear about us? Select an OptionTelevision AdSearch Engine (Google, Bing, etc)Social Media (Instagram, Facebook, Forum, etc)Word of MouthI don't remember / otherYouTube
*Required field
Receive text messages for special offers and discounts.
Mobile Number
By entering my number, I AGREE and expressly consent to receive recurring marketing or promotional text messages from Extreme Terrain and our related brands and affiliates using an automatic telephone dialing system at the telephone number voluntarily provided above. Message frequency may vary. Consent to receive text messages for these purposes is not a condition of any purchase, service, or sweepstakes entry. Msg and data rates may apply. Reply HELP to 94985 for help. Reply STOP to 94985 to cancel. View Terms & Privacy Policy.
No thanks
Terms & ConditionsFREE 2 or 3-Day Delivery on 10,000+ Items. Details
Close
ExtremeTerrain is proud to offer FREE SHIPPING on any order over $75!
Free 2-3 Day Delivery on most items, see Product Page for details.
Free Shipping Offers are for Standard Ground Delivery Service and are only valid for shipping addresses within the 48 contiguous United States. Truck freight and oversize charges still apply unless otherwise noted, and can only be shipped to the lower 48 States. Rough Country items are not included in Free Shipping offers. Tires and Wheel and Tire Kits do not qualify for free shipping.
Shipping to Alaska and Hawaii will require an additional charge.
For full shipping details please view our Shipping Policy
ExtremeTerrain.comTalk to Wrangler Enthusiasts
1-877-870-8556
M-F 8:30A-11P, Sat-Sun 8:30A-9P
$5,000 Giveaway! 5 Chances to Win Enter Daily >
Close
Update
Not sure if you have a JL or JK? Check out this guide
If you have a 2018, confirm that you have a JL or JK.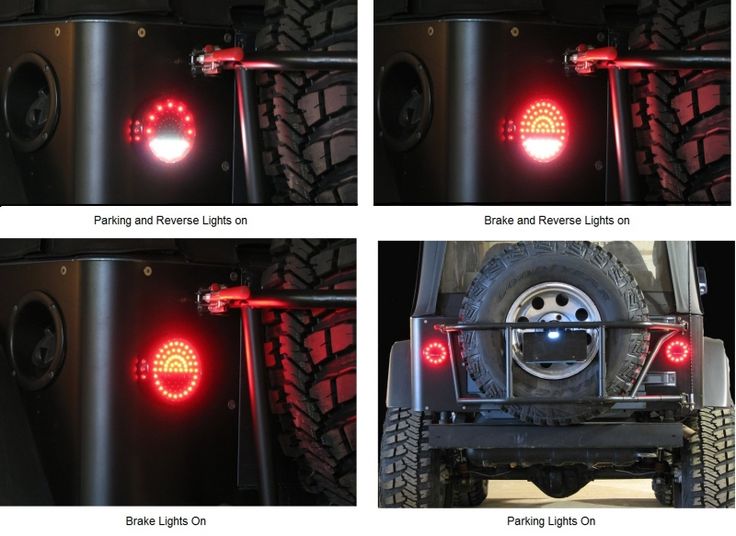
more
more
For more details, check out this guide
BackDon't see Delete Question 1 of 3
I don't own a 1976+ Wrangler Ownership does not affect chances of winning
Select a different vehicle
Please complete your Wrangler info
Update
Not sure if you have a JL or JK? Check out this guide
If you have a 2018, confirm that you have a JL or JK.
more
more
For more details, check out this guide
BackDon't see Delete Question 1 of 3
I don't own a 1976+ Wrangler Ownership does not affect chances of winning
Select a different vehicle
Please complete your Wrangler info
Delete
Tacoma
Update
If you have a 2018, confirm that you have a JL or JK.
more
more
For more details, check out this guide
How To
Find your bed length; Measure from bulkhead to tailgate
BackDon't see Delete Question 1 of 3
I don't own a 2005+ Tacoma Ownership does not affect chances of winning
Select a different vehicle
Please complete your Tacoma info
Delete
Tundra
Update
If you have a 2018, confirm that you have a JL or JK.
more
more
For more details, check out this guide
How To
Find your bed length; Measure from bulkhead to tailgate
BackDon't see Delete Question 1 of 3
I don't own a 2007+ Tundra Ownership does not affect chances of winning
Select a different vehicle
Please complete your Tundra info
Delete
Gladiator
Update
If you have a 2018, confirm that you have a JL or JK.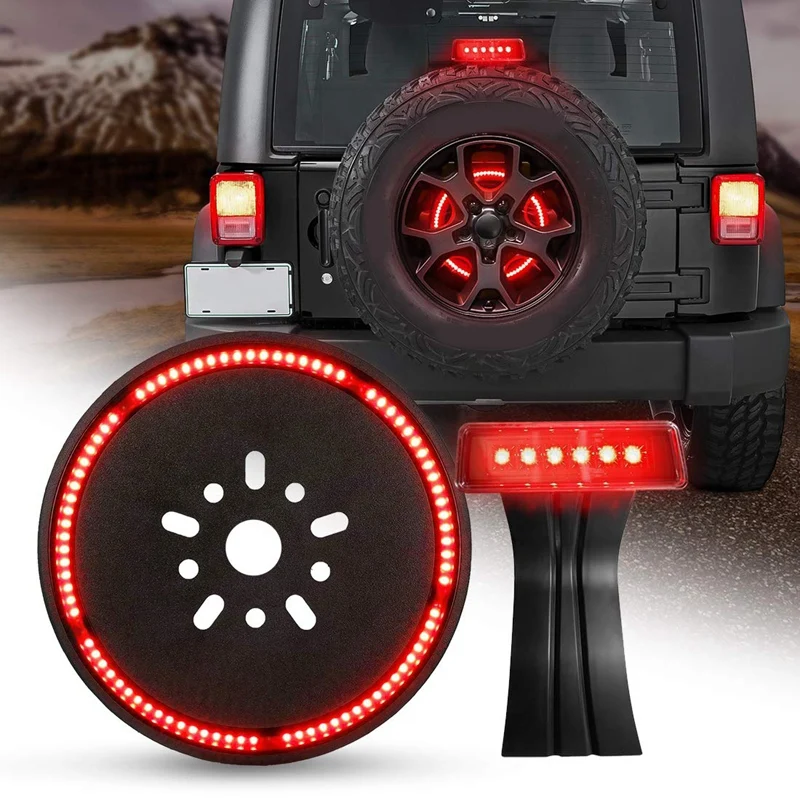
more
more
For more details, check out this guide
BackDon't see Delete Question 1 of 3
I don't own a 2020+ Gladiator Ownership does not affect chances of winning
Select a different vehicle
Please complete your Gladiator info
Delete
Bronco
Update
If you have a 2018, confirm that you have a JL or JK.
more
more
For more details, check out this guide
BackDon't see Delete Question 1 of 3
I don't own a 2021+ Bronco Ownership does not affect chances of winning
Select a different vehicle
Please complete your Bronco info
Delete
4Runner
Update
If you have a 2018, confirm that you have a JL or JK.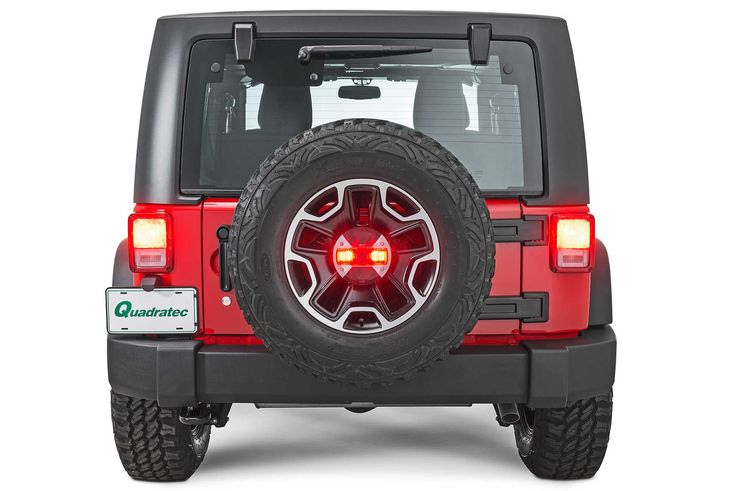
more
more
For more details, check out this guide
BackDon't see Delete Question 1 of 3
I don't own a 2003+ 4Runner Ownership does not affect chances of winning
Select a different vehicle
Please complete your 4Runner info
Delete
Yes, ContinueNo, Select a Different Vehicle
Item J139667
Close X
Enter Your Email to Save Products.
By entering your email, you agree to receive recurring automated marketing emails from ExtremeTerrain at the email provided.
View Terms and Privacy Policy
Saved to My List
Review & Install - Oracle LED Illuminated Spare Tire Wheel Ring Third Brake Light Video
Call a Wrangler Enthusiast at 1-877-870-8556
M-F 8:30A-11P, Sat-Sun 8:30A-9P
25 Reviews
Market Price $82.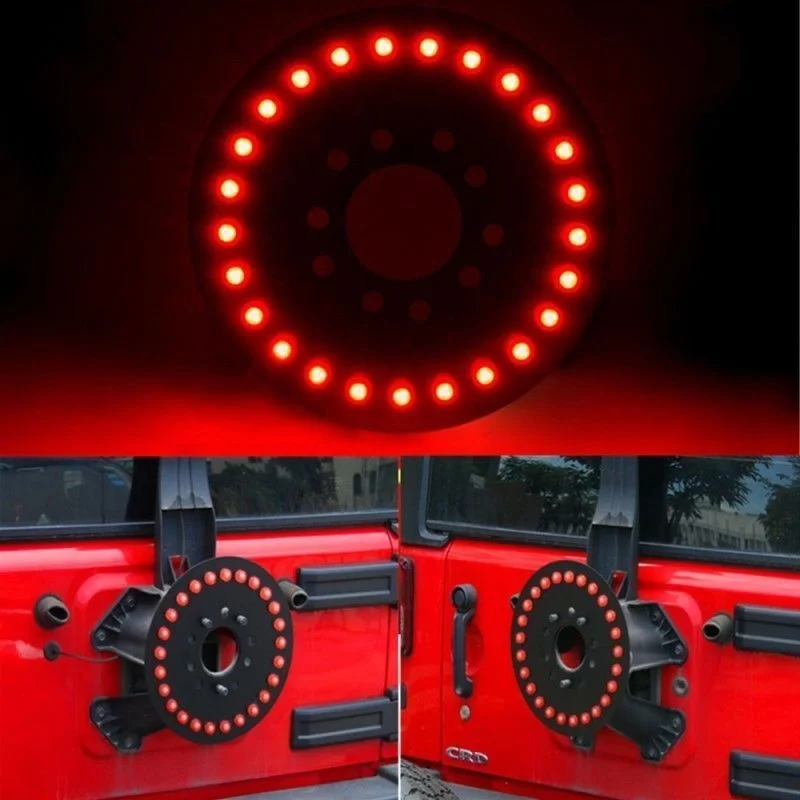 75 You Save 13% ($10.79)
Our Price
$71.96 (each)
FREE Shipping on orders over $75
Open Box from $50.37
Close
Update
Not sure if you have a JL or JK? Check out this guide
If you have a 2018, confirm that you have a JL or JK.
more
more
For more details, check out this guide
BackDon't see Delete Question 1 of 3
I don't own a 1976+ Wrangler Ownership does not affect chances of winning
Select a different vehicle
Please complete your Wrangler info
Close X
Enter Your Email to Save Products.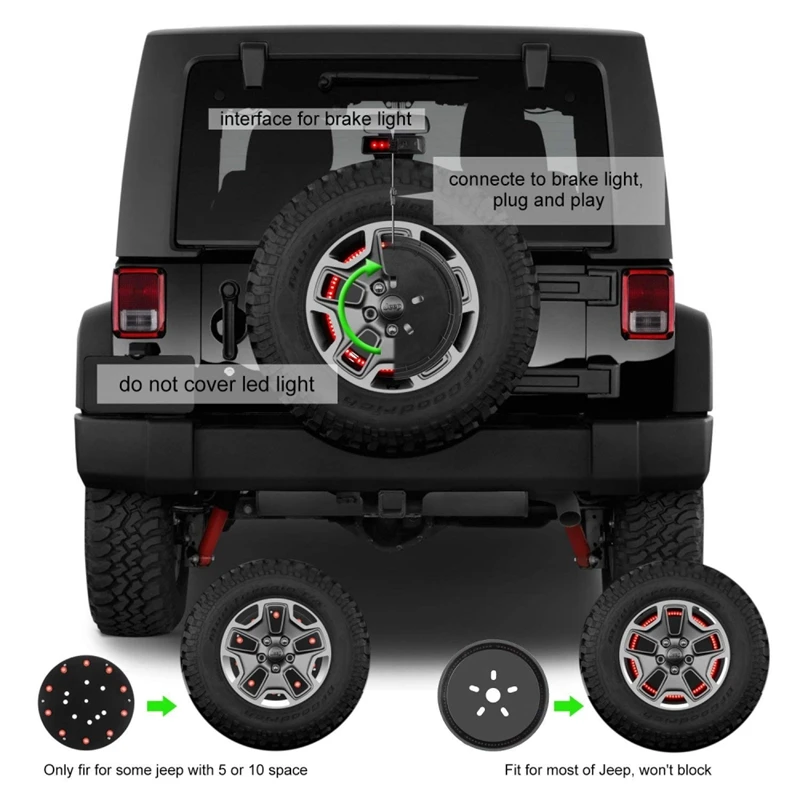
By entering your email, you agree to receive recurring automated marketing emails from ExtremeTerrain at the email provided.
View Terms and Privacy Policy
View Open Box Items Save for laterCreate a list
Name your new list Add to New List
Saved - View your saved items
We're sorry. We couldn't save this product at this time.
or use
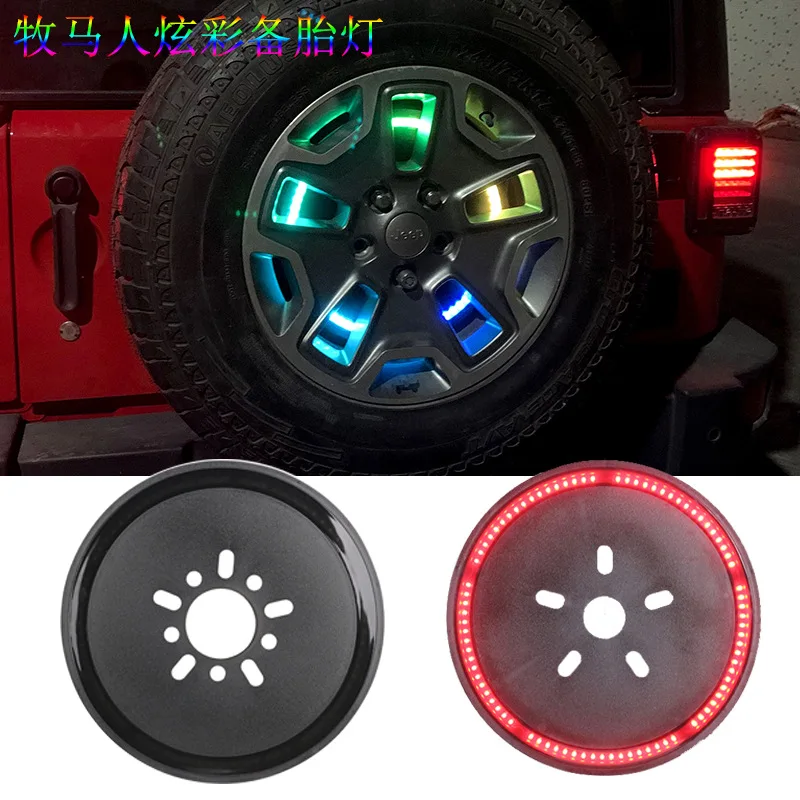
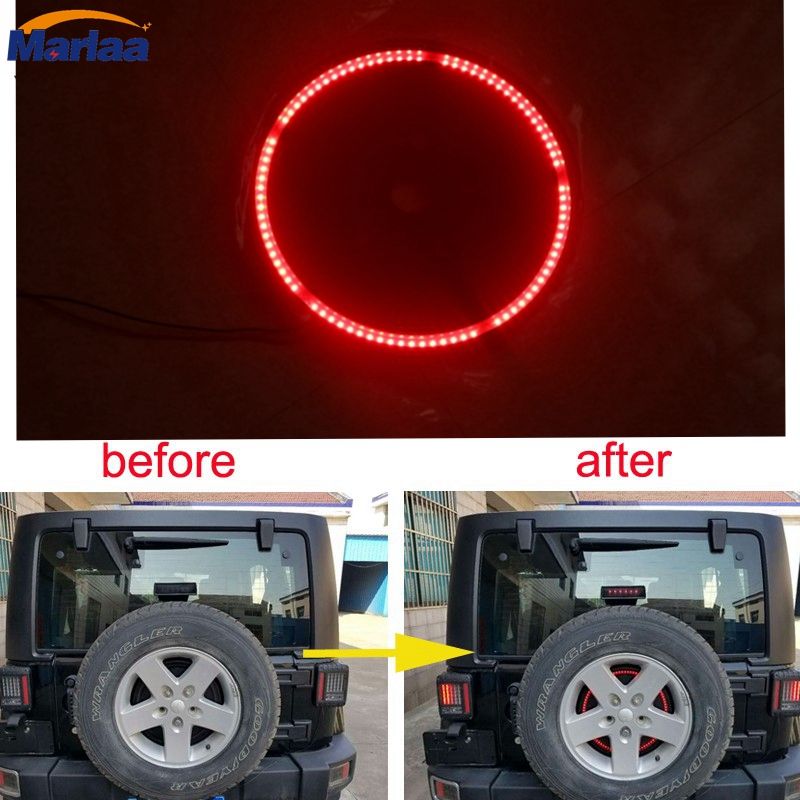
Hey guys, Adam here with extremeterrain.com. And today, we're taking a closer look at and installing the Oracle LED Illuminated Spare Tire Wheel Well Ring Third Brake Light, available for the 1966 and newer CJ and Wrangler models. You should be checking this out, very simply put, if you're looking for one of the most common rear-end LED accessories for the Jeep. Now, this guy here is almost a universal fitment for most Jeep models from the CJ era to the TJ, JK, and JL. This basically puts an LED red ring light in conjunction with your third brake light inside of your spare tire. This is an extremely popular mod for Wrangler owners and Jeep owners alike, just because it is just gonna stand out and really grab the attention of people behind you. Now, this uses extremely bright LED technology inside of that ring to illuminate with that third brake light. And as you can see, it far outshines that factory third brake light. It's super bright, super attractive, and very noticeable.Now, keep in mind, guys, depending on the style of wheel that you're running for your spare tire, it's gonna make a difference on how much of this ring you can actually see once your spare tire is mounted. As you can see, we have a set of Mammoth wheels here, and those spokes are super far apart. So we get a lot of that ring coming through. If you have a wheel that has tighter spokes with smaller space in between, you might get a little bit less of that ring, but regardless, because that LED is so bright, you'll definitely be able to see it.
 And what I like about it is that it kind of reflects off the inner barrel of that spare wheel, so it gives it a little bit more character. Now, again, being more universal, depending on the style of the spare tire carrier that you're running on your Jeep, may change up the install just a bit, but nonetheless, the actual ring itself has three spokes that allow you to attach it to the carrier regardless of style.Each one of those spokes has two different mounting points or mounting holes rather, that you'll use the included self-tapping screws to get installed. So, if you have something that's a little bit different than our factory spare tire carrier on our '14 JK, you'll be able to get it mounted up regardless, and you'll be able to tap it into your factory wire loom. Now, what we're gonna be doing is using the outermost hole at the top spoke and the innermost holes on the other two spokes, and then tapping it into our third brake light wire, which is right behind that spare tire. Again, maybe a little bit different.
 Obviously, this goes all the way back to 1966, which is gonna be vastly different than what you have here today. But nonetheless, you can get it done in the driveway at home. Price-wise, you're looking at about 100 bucks, which I think is a very worthwhile price because this stands out so clearly at the rear end and grabs everyone's attention. I think it's a pretty worthwhile price to pay with a relatively simple install.Speaking of which, I'm giving it two out of three wrenches on our difficulty meter because there is a little bit of splicing involved, but it does use very easy, quick splice connectors to get the job done. All you have to do is open up that wire loom or that wire harness coming off of the factory brake light. That, in addition to drilling three very small pilot holes, so the self-tapping screws go in a little bit easier, but that may be changing depending on the spare tire carrier you have on your Jeep. I'm gonna walk you guys through that entire process. What do you say we get started?Tools used in the install include a drill and a small drill bit for your pilot hole, an impact gun, 21-millimeter deep socket, Phillips head socket bit, or you can use a Phillips head screwdriver, pair of wire cutters, and pliers.
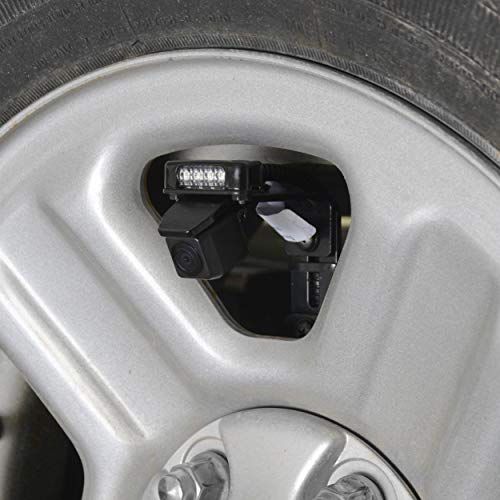 First step, of course, we have to get our factory spare tire out of the way. Now, if yours is factory, it's gonna look a little different than this. Ours are aftermarket Mammoth wheels. It doesn't really make a difference to the install. Just make sure you're getting it out of the way. I'm going to grab my 21-millimeter deep socket and get the three factory lug nuts off. All right. From there, take the tire off.Now, if you're working with a factory spare tire carrier, this install is gonna be the same for you. If you've got an aftermarket one, you may need to make some modifications or it may look a little bit different for the install, but for ours, we're going to install it right here in the middle. Now, as you can see, the lug studs are a little bit in the way, so you can't center the connector up here. It has to be a little off-center. Now, whether you want to put this to the right or to the left is completely up to you. You can even put it somewhere toward the bottom if you'd like.
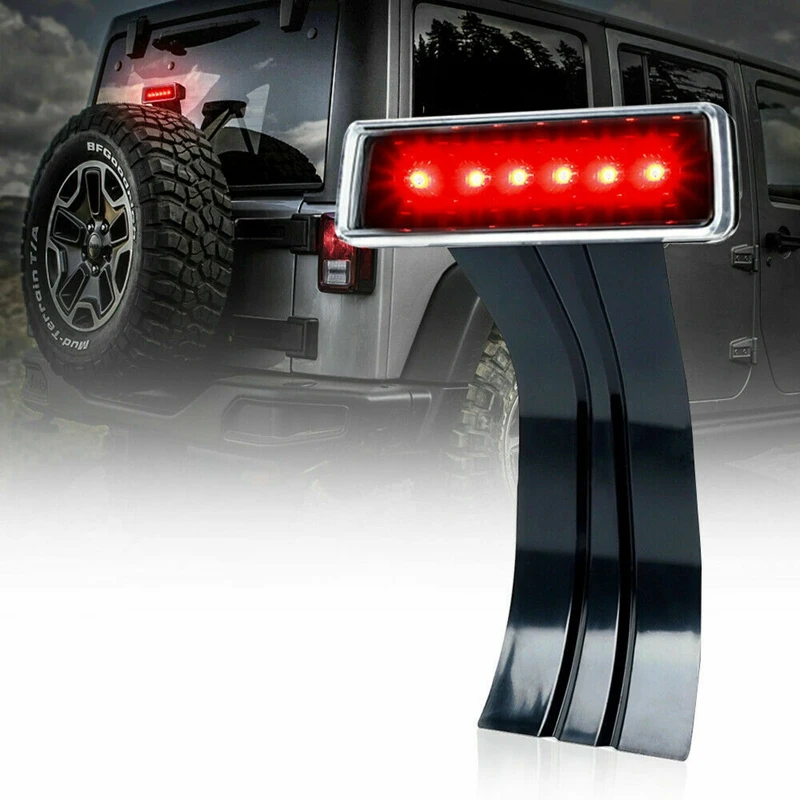 I'm gonna keep it a little bit more toward the top just so our wiring is a little bit easier to reach the factory wiring for the third brake light. I'm gonna install this just like that. So I'm gonna use this top hole here that's inner, and I'm gonna use the outer holes for those two because these ones are in the center here. So obviously, it's not gonna work. So I'm gonna screw in this middle one first, and then hit the two ends.All right. So what I'm gonna do is set my bit...what I'm gonna do is take a Phillips head bit on my impact gun. I'm gonna center that, just making sure it's completely centered, I'm gonna go right in here at the top. Do the same thing for the other two, just making sure it's completely straight. All right. Repeating that for the other two. All right. It looks like the holes on the outer ones are a little bit more difficult than the top one. This is going into straight plastic, this one's got a little bit more of a metal ring around the edge. So I'm gonna drill a pilot hole.
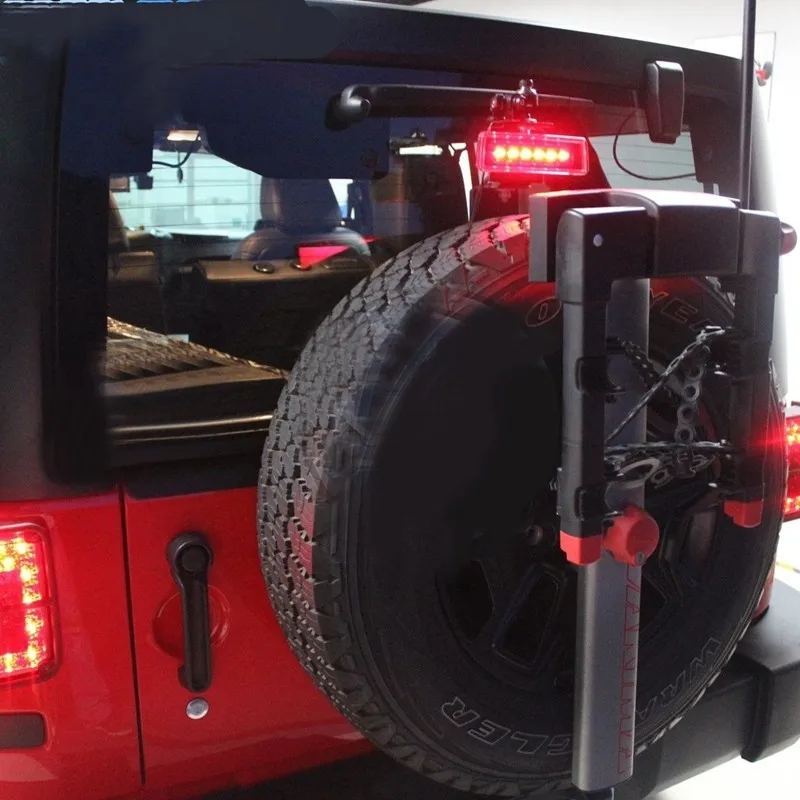 That's gonna be making it super easy to use the self-tapping screws included in the kit. So I'm gonna grab a bit smaller than the screws itself just to get it started, making sure that I'm not going in too deep because we don't have to go in too deep. Obviously, it's about a half an inch to a little bit more than a half an inch. So drill your pilot holes for the other two, and then we can tap them in. Perfect.All right. Same thing on the other side. All right. With those pilot holes in place, let's screw this guy in. Perfect. Repeat that on the other side. Now, how you want to wire these or where I should say will be up to you. If you wanna tuck it down a little bit farther, you can. If you wanna pull this plastic cover off and go a little bit higher, you can. I'm gonna go straight back right into this wire loom here. Either way, you're gonna need to grab a knife to cut this netting aside so we can access the two wires, the ground, and the positive underneath that. So, I'm just gonna use my knife here, make a small incision right in that net without damaging the wire.
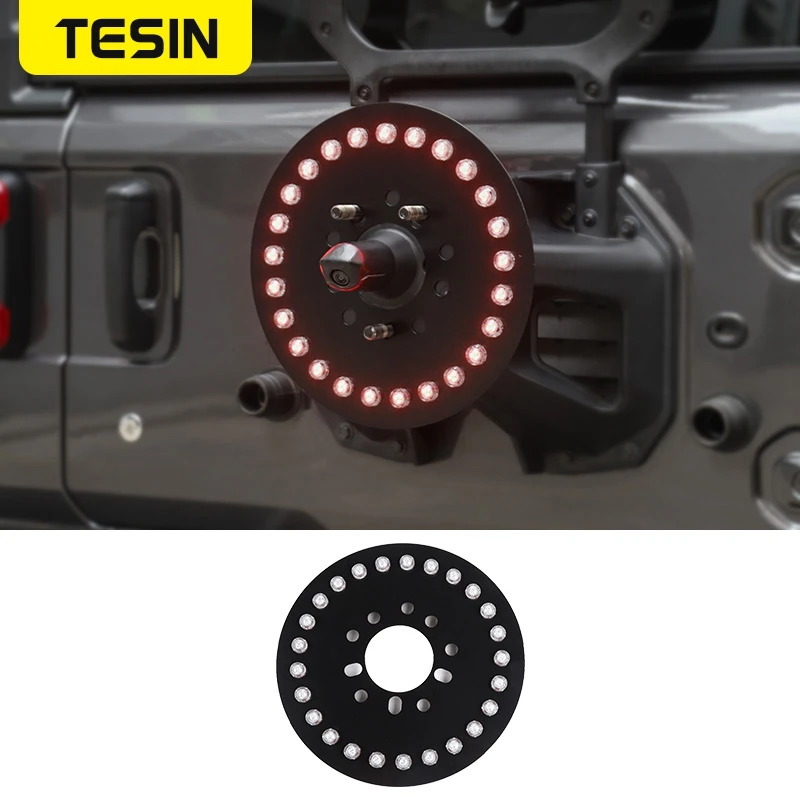 I'm gonna switch over to these wire cutters just to snip away some of this netting here, get a little bit better access to the wires underneath. Obviously, whatever tool you'd like to use to get that done is up to you. I just find this to be a little bit easier. Just wanna make sure you're not damaging any of those wires. That wire net is super stubborn. All right. Back over to my knife and just get that last bit off.So now we have easy access to the ground and the power to tap into. All right. At this point, we can pull this back a little bit and expose both wires. Take those quick splice connectors, and you're gonna clamp it onto the black and clamp another one onto the white. The black is your ground, the white with the orange stripe is your power. Now, if your colors are different than what we have here, you might wanna grab a light tester, hit the brakes, and see which one of these is actually your power and ground. But if it's the same color as ours, you know which one's which. So we're gonna take this clamp, insert that on there, grab pliers, clamp it down.
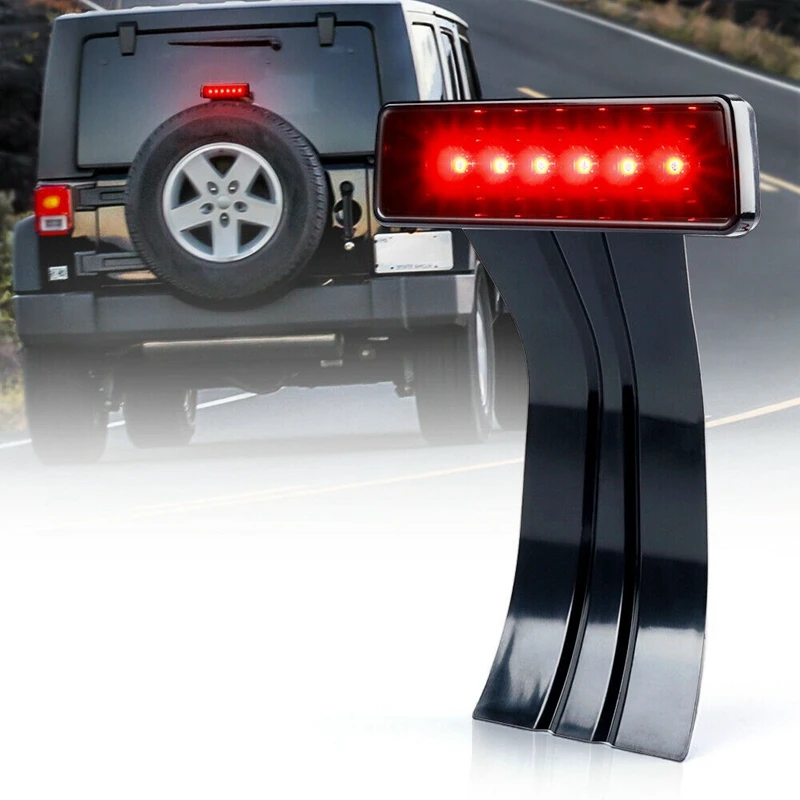 All right. Once you clamp that down, it's gonna close up and snap shut. And that's how you know it's got a good bond with the wire underneath that black cover. And do the same thing with the white.Now, what we can do is bring up the LED harness on the back and it already has the male version, so these are the females. What we're gonna basically do is take the black wire from this harness and plug it in to the black connector that we just installed. All right. Plug that guy in and make sure it seats all the way. Plug in the red wire from this harness to the connector we installed on the white wire with the orange stripe. All right. Before you throw your spare tire back on, hit your brakes, or have a friend hit your brakes and verify that they work. And then we can put everything back together. Now, obviously, this next step is optional, but if you wanna clean this up a little bit and make sure this wire isn't just dangling here, I'm gonna run it right up against the back here and use the zip ties included in the kit to zip tie it back.
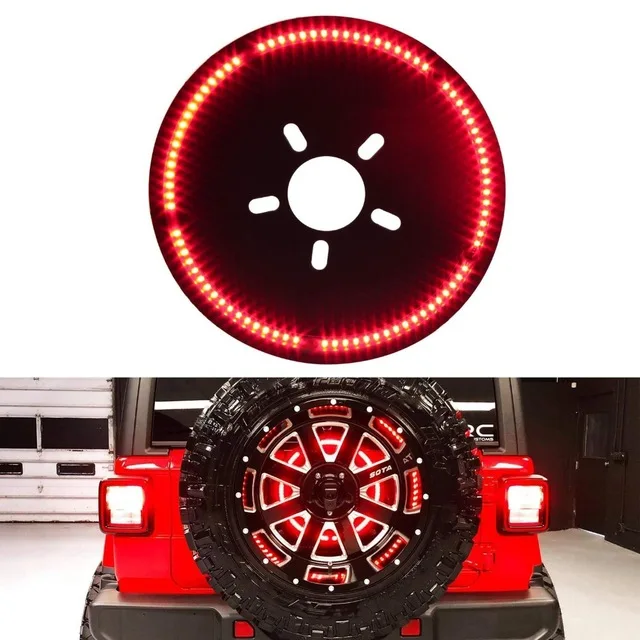 Next, this is optional, but if you wanna clean this up a little bit so this wire isn't dangling there, I'm gonna run it right behind the LED bar there, and use a zip tie included in the kit to zip tie it up and back, and then we can snip off the excess of the zip tie. All right. At this point, you can just mount your spare tire once you know the ring light works. All right. If you have factory lugs, grab your 21 deep socket and tighten them down.That's gonna wrap up my review and install for the Oracle LED Illuminated Spare Tire Wheel Ring Third Brake Light, available for the 1966 and newer Jeep CJ and Wrangler models. You can get yours right here at extremeterrain.com.
Subscribe: New Wrangler videos daily!
Subscribe to our YouTube Channel
Features, Description, Reviews, Q&A, Specs & Installation
 50 Inches
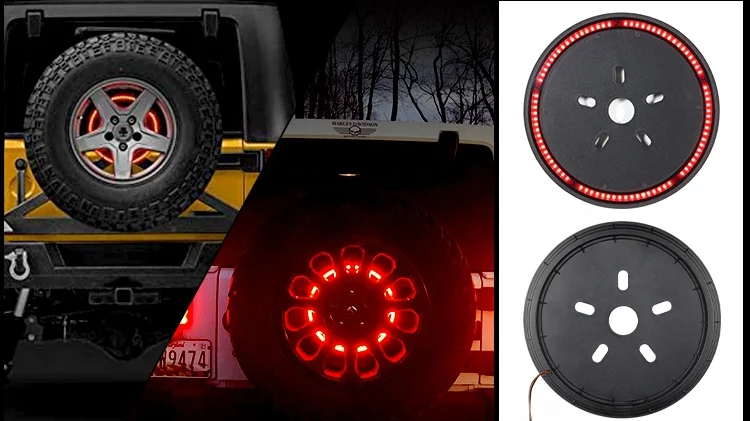
 High Visibility. Installing an Oracle LED Illuminated Spare Tire Wheel Ring Third Brake Light on your Jeep Wrangler will help to increase your visibility to those around you. Being much brighter than the factory third brake light, this Spare Tire Wheel Ring Third Brake Light features Oracle's high-output 2835 LEDs that will be sure to catch the attention of distracted drivers.
Simple Installation. Oracle designed its Spare Tire Wheel Ring Third Brake Light to be a simple upgrade for your Jeep's original factory third brake light. Using the supplied mounting brackets and T-Tap electrical connectors, installation can be completed in under 1 hour with just basic hand tools.
Application. This Oracle LED Illuminated Spare Tire Wheel Ring Third Brake Light is designed to fit 1966-2022 Jeep CJ and Wrangler models.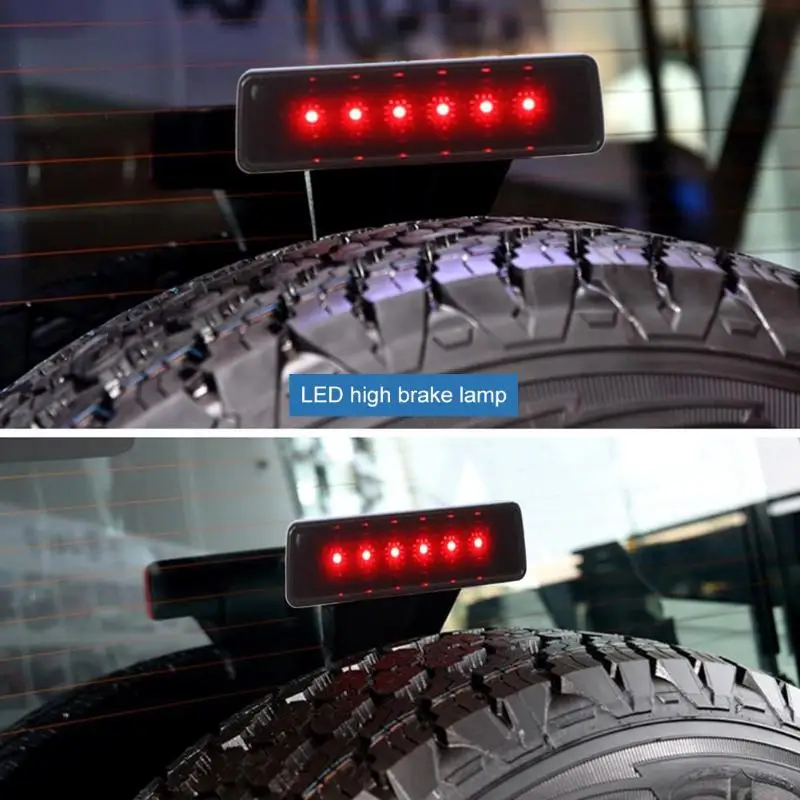
Oracle 4211-003
CA Residents: WARNING: Cancer and Reproductive Harm - www.P65Warnings.ca.gov
Installation Info
Installation Time
(approx) 1 Hour
Difficulty Level:
Light to Moderate mechanical skill required.
Installation Guides
What's in the Box
4.7
No questions about this product yet.
Ask the First Question
10 More Questions
Not finding an answer? Ask your question! Post Your Question
Skip & Go to CartChoose your warranty term
Oracle LED Illuminated Spare Tire Wheel Ring Third Brake Light (Universal; Some Adaptation May Be Required)
New $71. 96
96
Please select
Sorry, there are no open box items available for the selection options
Please note: returns within 30 days of purchase for Store Credit only.
Close
Update
Not sure if you have a JL or JK? Check out this guide
If you have a 2018, confirm that you have a JL or JK.
more
more
For more details, check out this guide
BackDon't see Delete Question 1 of 3
I don't own a 1976+ Wrangler Ownership does not affect chances of winning
Select a different vehicle
Please complete your Wrangler info
Not your vehicle?
Select a different vehicle
Address
Apt / Suite / PO Box
Zip / Postal Code
City
State Please SelectAlabamaAlaskaAmerican SamoaArizonaArkansasArmed Forces AfricaArmed Forces Americas (except Canada)Armed Forces CanadaArmed Forces EuropeArmed Forces Middle EastArmed Forces PacificCaliforniaColoradoConnecticutDelawareDistrict of ColumbiaFederated States of MicronesiaFloridaGeorgiaGuamHawaiiIdahoIllinoisIndianaIowaKansasKentuckyLouisianaMaineMarshall IslandsMarylandMassachusettsMichiganMinnesotaMississippiMissouriMontanaNebraskaNevadaNew HampshireNew JerseyNew MexicoNew YorkNorth CarolinaNorth DakotaNorthern Mariana IslandsOhioOklahomaOregonPalauPennsylvaniaPuerto RicoRhode IslandSouth CarolinaSouth DakotaTennesseeTexasUtahVermontVirgin IslandsVirginiaWashingtonWest VirginiaWisconsinWyomingAlberta ABBritish Columbia BCManitoba MBNew Brunswick NBNewfoundland and Labrador NLNorthwest Territories NTNova Scotia NSNunavut NUOntario ONPrince Edward Island PEQuebec QCSaskatchewan SKYukon YT
Country Select a CountryUnited StatesCanada
How did you most recently hear about us? Select an OptionTelevision AdSearch Engine (Google, Bing, etc)Social Media (Instagram, Facebook, Forum, etc)Word of MouthI don't remember / otherYouTube
*Required field
Receive text messages for special offers and discounts.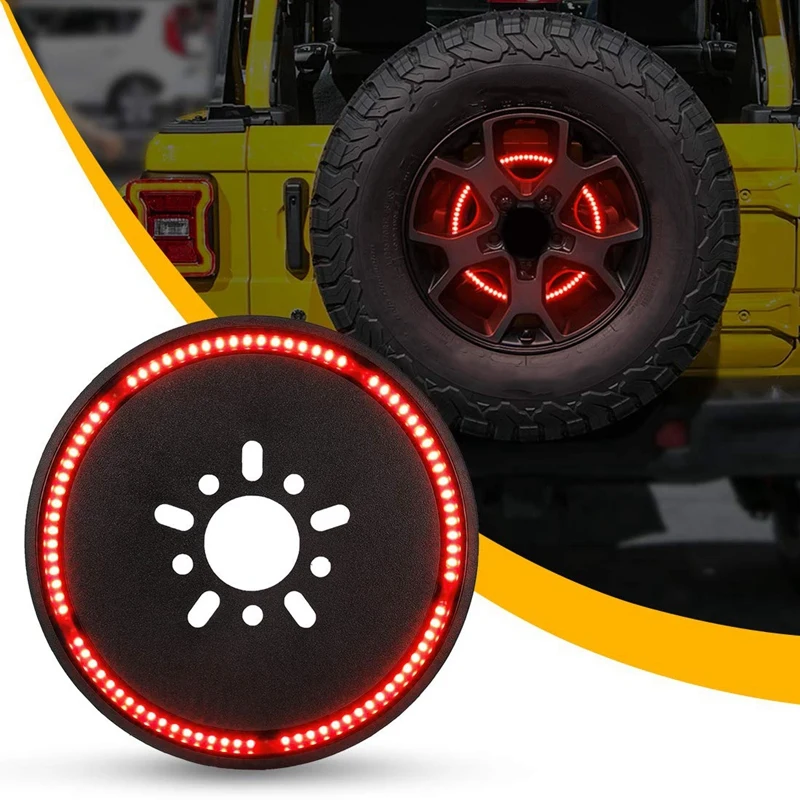
Mobile Number
By entering my number, I AGREE and expressly consent to receive recurring marketing or promotional text messages from Extreme Terrain and our related brands and affiliates using an automatic telephone dialing system at the telephone number voluntarily provided above. Message frequency may vary. Consent to receive text messages for these purposes is not a condition of any purchase, service, or sweepstakes entry. Msg and data rates may apply. Reply HELP to 94985 for help. Reply STOP to 94985 to cancel. View Terms & Privacy Policy.
No thanks
Terms & ConditionsFREE WRANGLER CATALOG! TRANSFORM YOUR RIDE TODAYRequest Now
Main page
Magazine
Jeep Wrangler JL certified options list for off-road tuning
OffJeep.
 Ru store team welcomes you, dear reader, on the pages of our blog-magazine "Rusty Willys" :-). Someday we will definitely tell how this name was born, but for now we will talk on our Internet pages about off-road tuning, about some interesting projects, competitions, but most importantly about Jeep is a four-wheel drive brand that we truly love.
The document "Vehicle Type Approval (OTTS)" for the new Jeep Wrangler JL 2019 + has been published. At present, it applies only to gasoline cars, in the fall it is expected to expand the document, including diesel versions. Unlike previous versions of Jeep, the list of approved accessories for the Wrangler JL included many off-road options:
Download OTTS for Jeep Wrangler JL
Dear clients. We all heard about the persecution on the roads by traffic police officers of motorists under article 12.5.1 of the administrative code, for the so-called "changes in the design.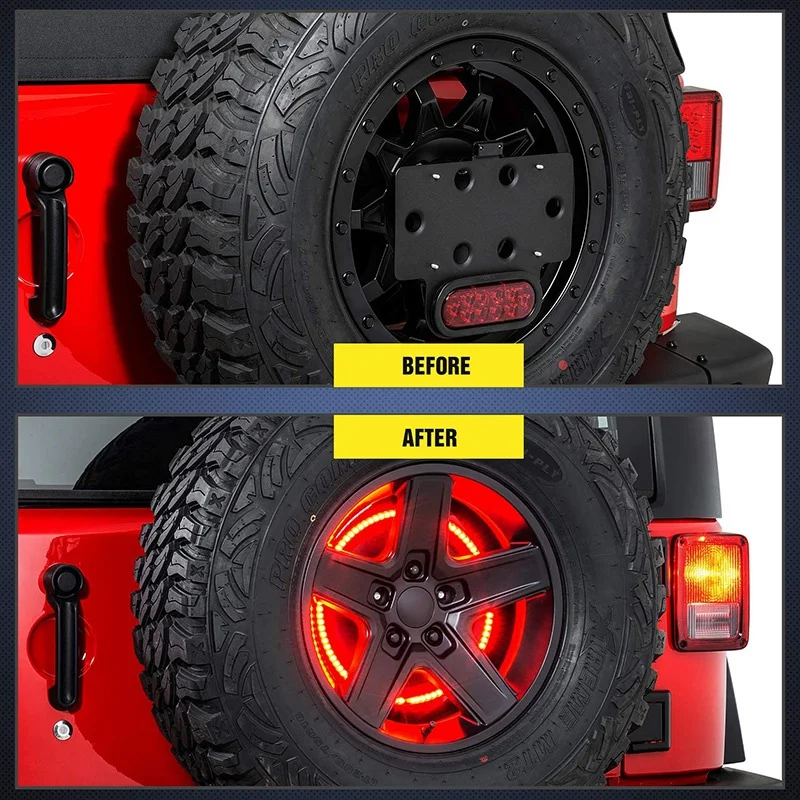 " However, not everyone was affected. Firstly, the main regulatory document for employees is the OTTS document or Vehicle Type Approval certificate. However, such a document itself appeared in 1998, and became mandatory for the official import of cars only in 2000. Which means that officially and legally, employees cannot find fault with cars "from the dashing nineties." The same applies to privately imported cars from the USA, as their VIN range is not included in the OTTS for European officially sold cars. That is, such a hole in the law really exists, but since the old cars are almost all rotten, and every day there are fewer of them, and the "American used" is now far from the most common type of car, and they can’t find fault with you. In addition, the technical regulation clearly states: "This regulation does not apply to cars over 30 years old with the original engine." Theoretically, if you have a Jeep Cherokee XJ 1990 years of release, they can’t show you anything on the road either.
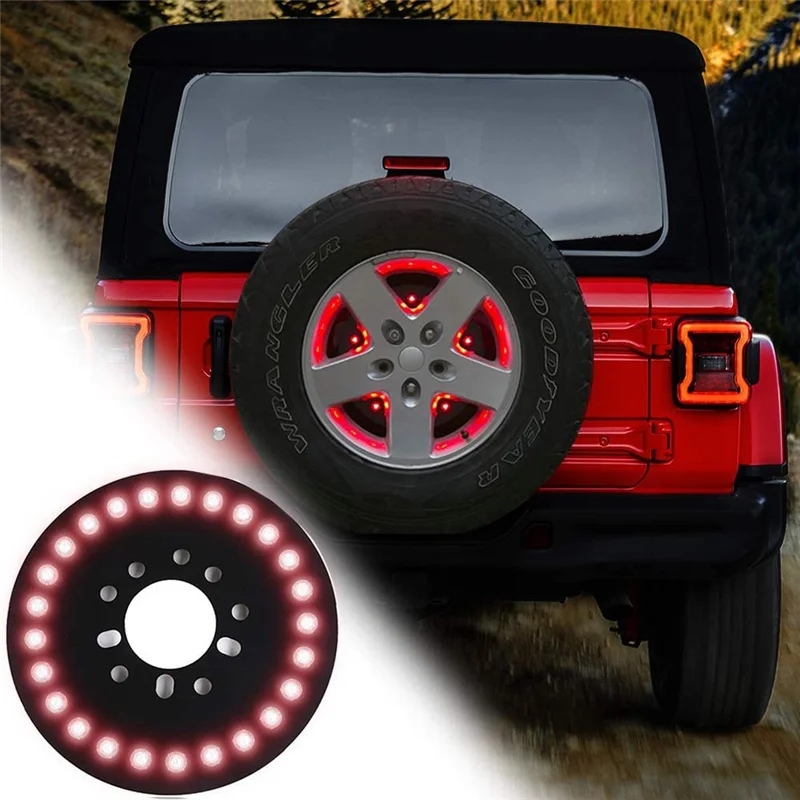 Another thing is that one must be able to defend one's rights, because unfortunately not all traffic police officers themselves are strong in such nuances.
As for the Jeep Wrangler JL , which appeared several years later than the current technical regulations, the representative office took care of the owners.
We have specifically identified the options prescribed in OTTS that are of the greatest interest specifically for off-road tuning:
Vehicle equipment: in-vehicle emergency call system, combined ventilation, heating and air conditioning system (climate control system) with manual or automatic control, immobilizer, electronic stability control system, multimedia information center, rear and front view cameras, liquid crystal display, tire pressure monitoring system, rear upper brake light for spare wheel holder
on request: side steps including in the form of pipes , exhaust tips, decorative door sills, side window deflectors, decorative radiator grille, mirror covers, gas tank flap, bam lane built-in winch with winch mounting elements , parking sensors, roof rails with mounts for roof rack, hood cover, hood deflectors, protective bar for windshield frame , fog lamps , front and rear towing eyelet, non-flexible splash guards mounted behind the wheels, spare wheel cover, soft top kit, lower engine protection , cargo net, kit for ride height increase , hood latch, wading air filter kit (off-road use) , wheel extensions k, removable front and/or rear doors, headphones for multimedia information center, parking aid (parktronic),
So, let's figure out what this means in simple "jeep language".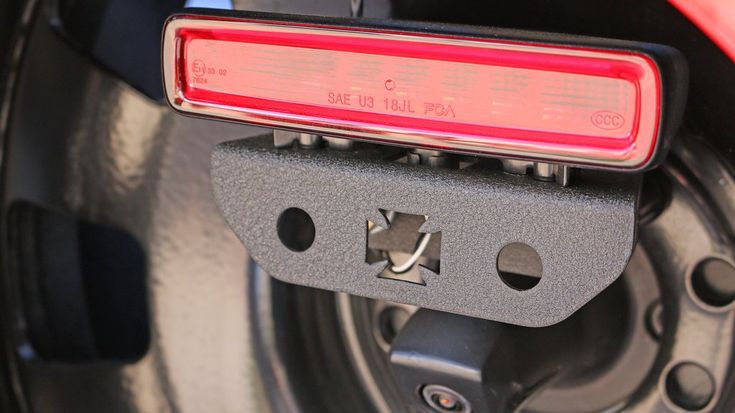 You can absolutely legally install additional lights, a bumper with a winch, a snorkel, expanders and mudguards, power thresholds and not register such changes. All you need is to print the OTTS from the link, and it is best to come to your official dealer and ask for a printout of this document (additions and extensions to this document are possible) with the dealer's seal. Well, it is advisable to put the details of the original Mopar, so as not to carry a stack of certificates with you.
Of the most requested, the document did not include a towbar, and oversized wheels, but the wordings bumper with a built-in winch and a set of equipment for an air filter when overcoming a ford (used outside public roads) , alas, but leave some scope for the actions of employees traffic police and judges. However, for those who are not going to turn their Jeep into a super-rogue, such a legalization of the minimum tuning kit is a chic gift from the FSA.
Jeep Happens!
Go to the list of magazine articles
Car selection
-- vehicle type -- SUV ATV or snowmobile Tow truck -- vehicle brand ---- vehicle model --Pick up
Reset selection
Now the products in the catalog sections will be filtered according to your choice!
News and announcements
03/16/2020
Dear clients! Due to the instability of the ruble exchange rate against foreign currencies, customs and border restrictions and hourly changes in quotations, we warn you that the prices on the site are for guidance only and may change without warning due to rate fluctuations. In addition, delivery times for goods from the United States may be extended due to reasons beyond our control.
Thanks for understanding,
administration of OffJeepRu.
Read more
07/09/2019
Friends, if you are looking for spare parts for Jeep, we will be happy to help you find them, based not only on our availability, but also on their personal experience of use. In addition to our own availability, we work with the largest wholesale warehouses of Chrysler in Russia, we deliver spare parts for Dodge*Chrysler*Jeep from the USA on order in the shortest possible time and at an affordable price. We have cheap and favorable prices for spare parts, accessories and consumables for all generations of Jeep Cherokee, Jeep Grand Cherokee / Commander, Jeep Wrangler, Jeep Wagoneer, Jeep Compass, Patriot and Renegade, as well as Dodge*Chrysler*Ram and vehicles of GM groups and American made Ford.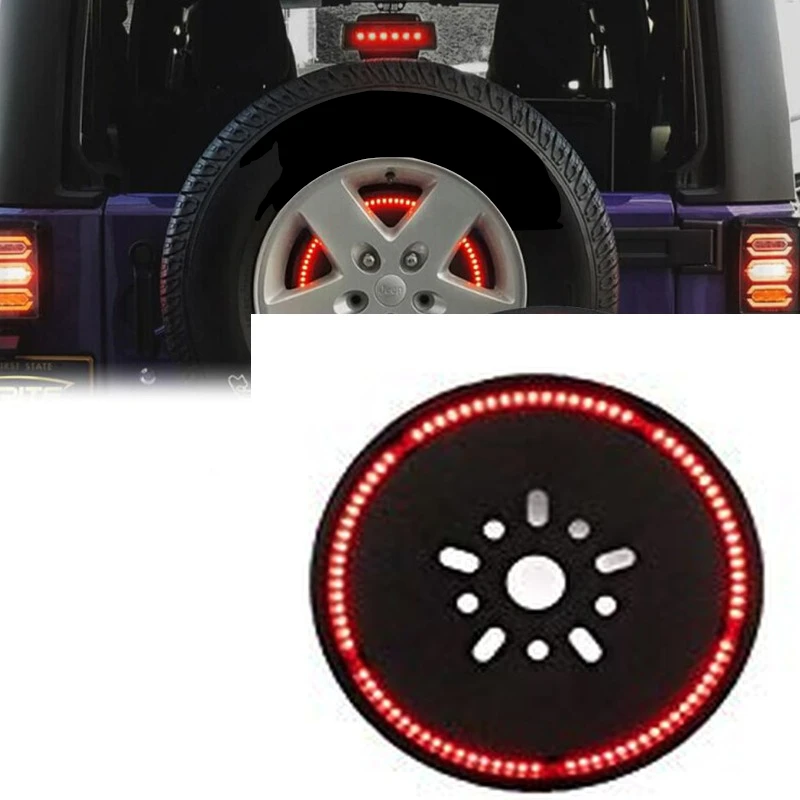
More
All News and Announcements
Document

Part 2
Part 3
 If this bolt is not removed, the panel will break.
Part 1

Part 2