It’s not uncommon that valve stems start leaking only after a few years in use due to dirt, corrosion, road salt, or degraded rubber. Luckily, they are relatively cheap and easy to replace at home.
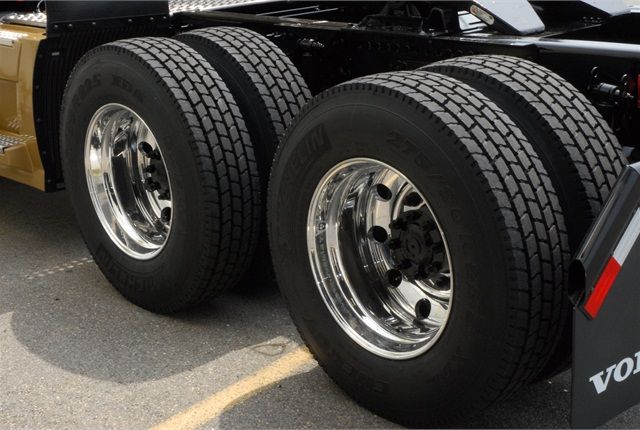
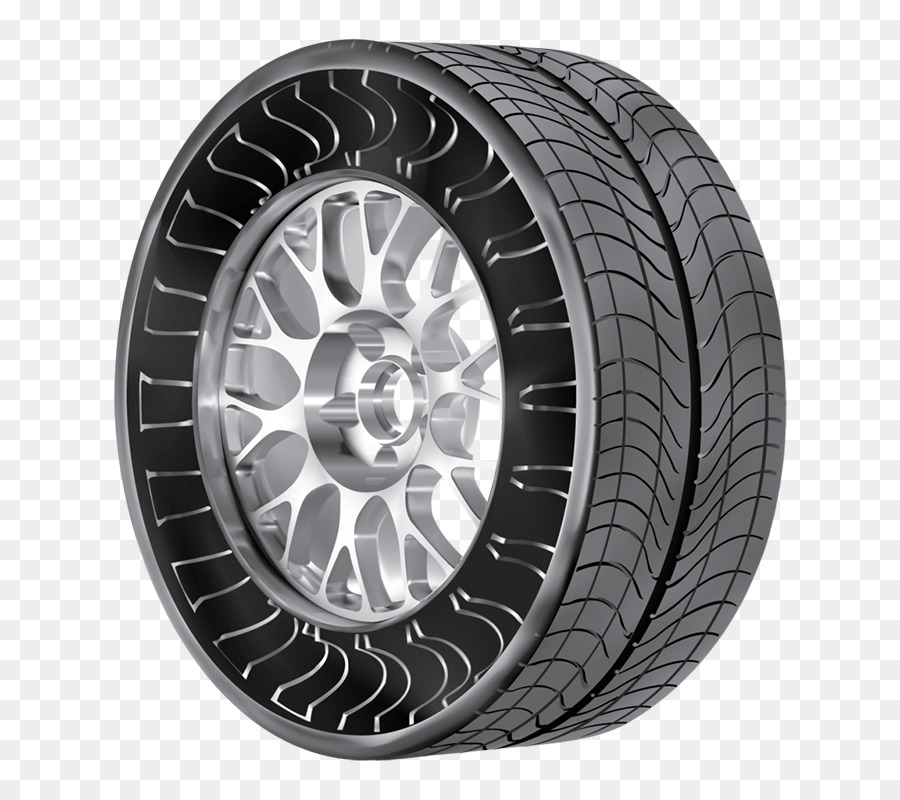
The same basic principles displayed in this guide apply to most tubeless tires, whether on an ATV, car, lawnmower, or snowblower.
A tire shop may charge around $20 to $30 to change a valve stem. If you do the job yourself, it will cost about 5$, depending on what tools you choose and have at your disposal.
I’ve made this guide for those that wish to do the job at home to save a few bucks or don’t have a tire shop nearby. We’ll be looking at two different methods; one where the wheel needs to come of the room, and a second, where the valve can be replaced with the tire still on the rim, using a specialist tool.
You can replace a valve stem with the tools most people already have in their garage. However, to make the job easier, faster, and safer, we recommend that you get a couple of cheap tire tools as well, available at most auto supply stores
Valve stems come in a range of sizes. They vary in diameter and length, depending on the size and style of wheel you have.
A design-number is used to categorize the various types and sizes of valves available.
Let’s use the most common valve for ATVs as an example: TR-412.
| Industry Valve Number | Maximum Inflation Pressure (PSI) | Effective Length (in) | Rim Hole Diameter (in) |
| 412 | 65 | 0.88 | 0.453 |
| 413 | 65 | 1.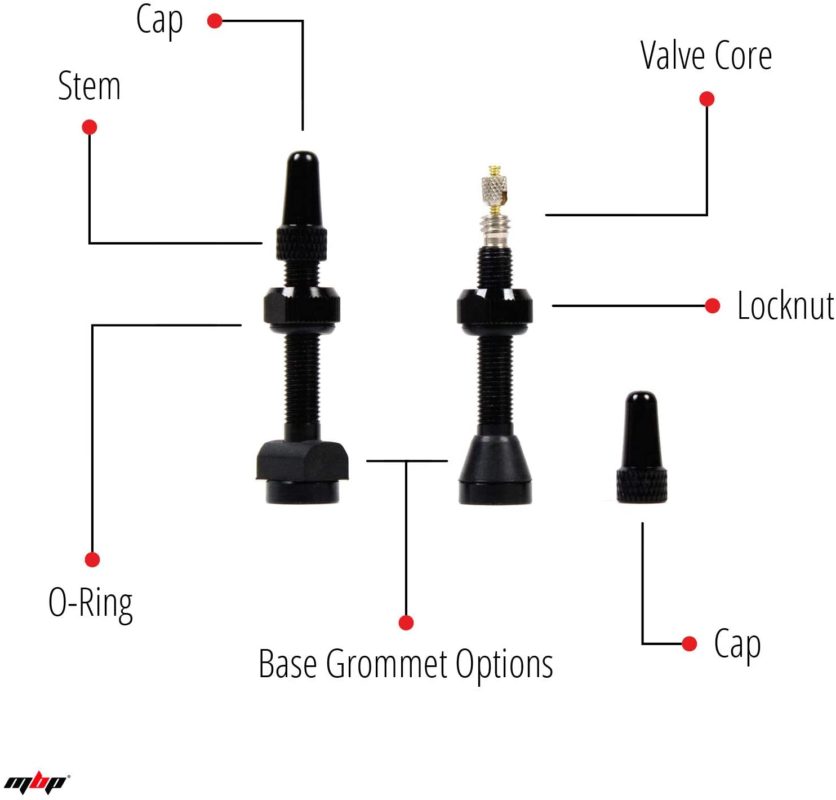 25
25 | 0.453 |
| 414 | 65 | 1.50 | 0.453 |
| 415 | 65 | 1.75 | 0.453 |
| 418 | 65 | 2.00 | 0.453 |
| 423 | 65 | 2.50 | 0.453 |
| 415 | 65 | 1.25 | 0.625 |
| 425 | 65 | 2.00 | 0.625 |
You will find the design number of your old valve stem stamped on the bottom of the stem. This does, however, require removing the valve stem or removing the tire from the rim.
Alternatively, you can measure the old stem and compare your findings with the table above.
You can move straight to step 2 if you already know how to remove the wheel from the vehicle safely.
Remove the valve cap, then use a valve stem core removal tool to unscrew the valve stem core from the valve stem. This will release the air from the wheel.
Remove the valve stem core, using a valve stem core tool.If you don’t have a valve stem removal tool at hand, you should be able to unscrew the core with a pair of small needle-nose pliers. Just place the pliers on the flat portion of the core, and turn anti-clockwise. In a pinch, you could even use a pair of tweezers, as long as they fit.
Next, you need to break the tire bead from the rim.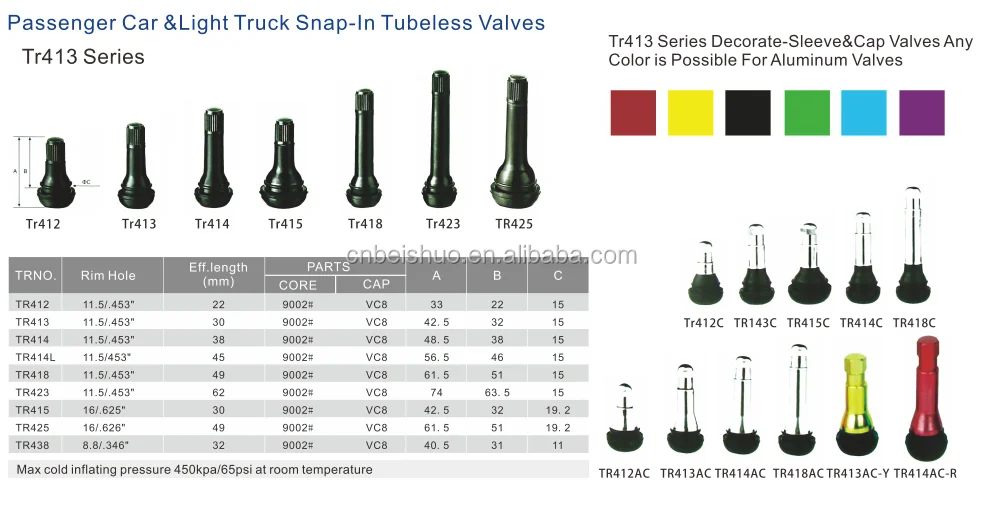
I tend to use my portable tire changer, but there are several ways you can de-bead a tire. Click here to find a list of alternatives for home mechanics to choose from.
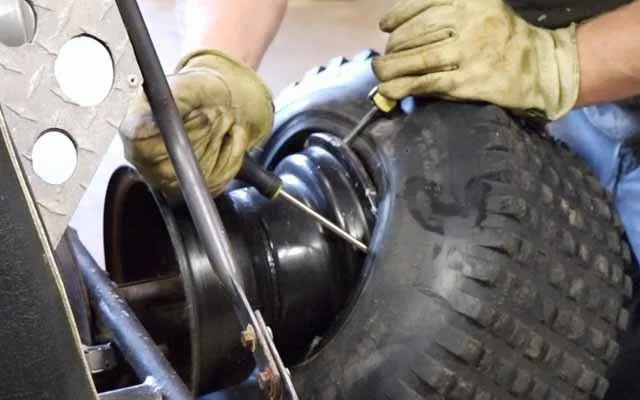
After successfully de-beading the tire, place your knee or a wood block between the rim and the tire for easy access to the bottom portion of the valve stem.
You only have to de-bead the side of the wheel that has the valve stem in it. I removed the tire from the wheel completely to take better photos for this post, but this is unnecessary.
To remove the old stem, you have two options.
You can use a sharp knife to cut it, either on the outside or inside the rim. Cut as close to the rim as possible without scratching the rim itself.
Use a razor blade to cut the old valve stem flush with the inside of the rim.After cutting, you should be able to pop out the remaining piece of the stem easily.
Alternatively, you could use a pair of vice grips to pull the plug out from the inside of the tire. Use this method if you plan on reusing the valve stem.
Spray some soapy water on both the outside and inside of the rim as lubrication. Place the grips over the stem’s thick portion and use leverage to pull the plug out. You may need to reposition the tool several times for better grip until you get the core out.
Before installing the new valve stem, you need to lube the rubber portion to slip into place much more effortless.
Use dish soap, some vegetable oil, or spray the new valve with a generous amount of soapy water.
Notice: Do not use any petroleum-based products such as oil or grease as it will degrade the rubber over time.
Lube the valve stem with dish soap.Insert the valve stem through the hole from the inside of the rim. Make sure the hole is clean and free of debris. The threaded part should protrude on the outside of the rim.
To pull the plug in place, you will need a valve stem pull tool. You can find them at most auto supply stores at an affordable price.
These tools come in a variety of shapes, but all work with the same basic principle.
The threaded portion of the tool mounts to the valve stem core’s threads to get a good grip.
Attach the valve stem tool to the threaded portion of the valve stem.Do not use pliers to pull the valve stem, as this will likely damage the soft copper threads.
Use the tool to pull the valve stem straight out from the wheel until the small rubber groove on the valve stem pops in place.
This tool uses leverage to pull the valve stem out through the rim.As an alternative, you can use a simple 4-way valve tool to pull the valve stem in place. Make sure the valve is properly seated.
The tire is seated back on the rim by using compressed air. This will press the tire outwards until it pops over the tire bead and rests against the rim’s lip.
Lube the tire and tire bead with soapy water. This allows you to seat the tire without using excess pressure, which could blow out the tire’s side.
The trick to succeeding is by adequately closing the gap between the rubber and the rim as you start adding air.
On softer and smaller tires, you should be able to close the gap manually. However, on tires with stiffer sidewalls, you may not be able to create a tight enough seal to build up pressure.
I prefer using the ratchet strap trick as this works great most of the time.
Using a ratchet strap when seating the tire will helpforcing the tire sidewalls outward.Use a ratchet strap to press the tire walls out against the rim. Attach the strap as shown in the picture and tighten it until the tire touches the rim.
With the valve stem core removed, add air until the bead pops in place. Never exceed 7-8 PSI with the strap attached.
As soon as the tire has seated, deflate the tire, remove the strap and install the valve stem core before inflating the tire according to spec.
You are now done and can install the tire back on the vehicle.
The hardest part of replacing a valve stem from the inside is getting the tire off the rim.
If you don’t have the tools or don’t feel comfortable with the idea of de-beading a tire, consider getting a valve changing tool kit designed to replace a valve stem from the outside, like this one from Amazon.
It can be a bit fiddly to get the hook past the old valve stem. Use plenty of soapy water as a lube, and be careful not to damage or scratch the rim as this could cause a leak.
How to Mount ATV Tires
Mounting ATV Tires at Home
If you’ve been thinking about changing ATV tires or UTV tires at home, know that while it can be tricky the first few times because these tires tend to have stronger beads than on-road tires, it’s a pretty straight-forward process as long as you have the proper tools, and follow this step-by-step tutorial from the tire experts at Treadworld.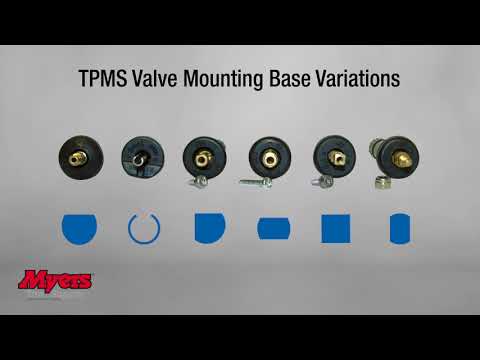 Also keep in mind that air under pressure is potentially dangerous so take any necessary precautions. Balancing your ATV tires can be difficult and is likely not necessary unless you’re racing or engaging in high-speed ATV and UTV activities.
The Tools You Will Need to Change ATV Tires
Remove the wheel from the ATV
When mounting ATV tires at home, it’s best to start with your ATV on a hard floor like a garage. Loosen the lug nuts a little to make them easier to get off, then jack up your four-wheeler so you can remove the wheel. Consider getting the bolts off using a hand tool rather than an impact wrench, which can on occasion be powerful enough to snap a bolt.
Deflate the ATV tire
Remove the cap from the valve stem and release all the air in the tire using either a valve stem core removal tool which will remove the stem and is the quickest method, or a tire pressure gauge that has a notch on the side used to push in on the valve stem or a screwdriver, which will take longer.
Break the bead on both sides of the ATV tire
This is likely the toughest part of changing an ATV or UTV tire because the bead is set to the rim a lot more firmly with off-road tires, than with on-road tires. That’s because off-road tires are asked to do things on-road tires don’t, like ride steep slopes, travel rocky terrain and land jumps. First, here are a few details. The bead retainer is a small ridge that goes all the way around on both edges of the wheel rim. It is intended to keep the tire in place so that aggressive riding won’t result in it sliding and losing the air seal. The tire bead is on the edge of each tire. Essentially, it’s a strong steel reinforced loop around both edges of the tire. Many times, a bead sealer is used on the bead to further keep it from popping off. In a nutshell, with this step, you’re getting the bead off the rim so you can remove the tire.
3 options for breaking the bead on ATV tires at home
There are essentially three ways to break the bead on an ATV tire.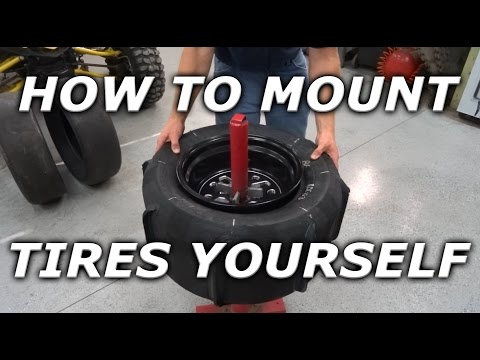 Likely the easiest method is with a BeadBuster, a tool designed for the job that clamps onto the rim and forces a wedge between the rim and the tire. BeadBusters are quick, simple and offer less chance for damaging the tire than other methods. A quick look shows they currently sell for around $100 at online shops. A cheaper alternative is using another of the several available portable tire-changing tools, generally available at any hardware store or auto supply shop. Most models need to be bolted to the floor, or some other heavy object. If you go with this alternative, you’ll want to leave 3-5 PSI air in the tire to facilitate success. Finally, there is the DIY method, which involves your inventiveness. Start by putting soapy water on the bead to help it slide. Devise the best way to get the tire in position so you’ll be able to force the tire to break free of the bead. You may want to use a 2×4 set as close to the rim as possible to push the tire edge away from the bead. Then flip the tire and do the other side.
 Again, it may help to have 3-5 PSI of air left in the tire with this method.
Peeling the ATV tire off the rim
You’ll want to use tire spoons or large screwdrivers for this step. Place one of the irons between the tire and the rim, and lift a section of the tire over the rim. Using one tool, hold that section away from the rim, and use the other tool to edge the rest of the tire over the side of the rim. Continue with this process until the full tire is from the rim, then remove the tire from the wheel rim completely.
Clean the lip rim on both sides and consider a sealer
The better you clean the lip rim on both sides, the better your new tire will fit. Wash off any dirt and debris. Use a stiff brush if necessary. Remove any rust. To get a good airtight seal, you need the surface to be smooth. If your rim shows any signs of pitting, nicks or other damage, you’ll likely want to apply a bead sealer, which is a rubber product designed to aid in bead seating.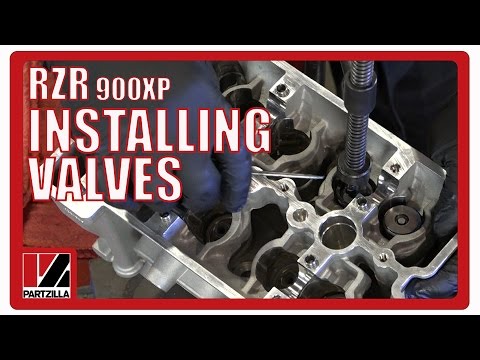 You may want to skip the bead sealer if you don’t need it in order to make changing the tire in the future easier.
Clean and lube the tire bead on the new ATV or UTV tire
So that the rubber will slide easier, put commercial tire lube or some soapy water on the bead retainer on both sides of the wheel rim. You can also use a light coating of baby powder, but stay away from WD40 as it can deteriorate rubber.
Check to see if your ATV tire is directional
Tires can be directional or multi-directional. Directional ATV tires should be mounted in a certain way for best traction and optimal performance and safety, while multi-directional tires work in either direction. Some types of four wheeler tires are directional depending on usage, like ATV mud tires for example. Look on the tire sidewall for an arrow, which indicates the tire is directional and should be mounted with the arrow facing the direction of the forward rotation. Another way to tell is by looking at the tread. A tire with an aggressive V-tread is likely a directional tire and should be mounted so the tip of the V hits the ground first. Directional tires can be mounted on either side.
Pop the new tire on the rim and get it seated correctly
The next step is to get the tire seated and the bead lined up correctly. Start by putting soapy water or lube onto the wheel rim. With stiffer walled tires, place the tire on the garage floor then push the wheel into position. With tires that have a less-stiff wall, placing the wheel on the floor and positioning the tire may be easier. Push straight down with both hands to slip the bead of the tire over the lip of the wheel. To get the second bead pried over the lip of the wheel, you’ll need to use your tire spoons, working your way around the tire until you have the entire bead pried over the wheel. To hold air, the tire needs to be firmly seated on the bead. At this point, be sure the tire is lubed up and begin using your higher-powered air compressor to put air in the tire. Don’t over inflate. The maximum inflation pressure should be stamped on the sidewall of the tire. The expectation is that as the tire inflates, both beads will seat themselves, as indicated by a loud “pop”, which should happen at a fairly low air pressure, 7-8 PSI. Once that occurs, let the air out of the tire. The beads will remain seated.
You may have difficulty getting the air into the tire fast enough to get the beads seated. That’s due to the gap that still exists between tire and rim. A good way to solve that issue is to tighten a ratchet strap around the middle of the tire, pushing the tire walls out towards the lip of the wheel on each side. Stop tightening as soon as the tire touches the tip of the rim. Then the tire should hold air because the gap has been closed.
Reinstall the valve stem and inflate the tire
Use your valve stem tool to reinstall the valve stem, then inflate the tire before capping the valve stem to keep it free of debris. Now you’re ready to reinstall the tire on your ATV, having solved the problem of how to mount ATV tires at home.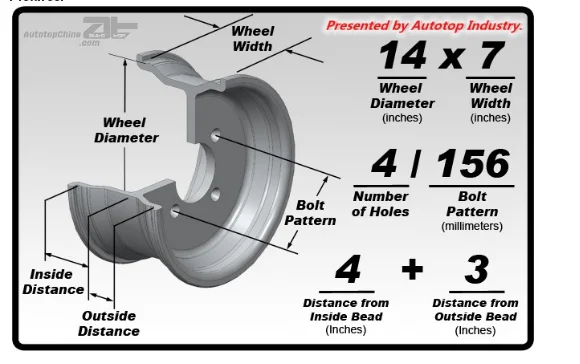
Find Master ATV Tires here. Big selection, fast shipping and guaranteed quality.
Here at Treadworld, we have the ATV tires you need for wherever your adventures take you. Our wide selection of Master ATV Tires and Master UTV Tires are the high performance tires you want, made from top quality rubber compounds, triple-tested for quality before being X-rayed to be sure they’re perfect, and covered by our Ultimate Advantage Warranty. Don’t hesitate to contact our tire experts via live chat or email with any questions you may have, and to get the ideal Master ATV tires for you.
• Manometer;
• Technical specifications for the motorcycle and its tires;
• Motorcycle hand tire pump or air compressor (compressed air units can be found at some gas stations).
The pressure gauge should measure pressure within the appropriate range and in the appropriate units that you can work with (in Europe it's bar, in North America it's pounds per square inch (PSI)). Many professional pressure gauges are capable of measuring in both units. Slider type gauges with a sliding plastic stem are relatively inexpensive, but they are capable of making fairly accurate measurements. nine0003
The correct tire pressure for a particular motorcycle will be indicated in its Owner's Manual. If it is not at hand, then this question can be checked with a mechanic, read the specification on the side of the tire of the selected brand, or call the dealership where you bought the motorcycle.
A manual motorcycle tire pump does a great job when it comes to pumping air and is much cheaper than an air compressor. In addition, it is easy to carry and does not require electricity. A tire pump is an essential part of a motorcycle tool kit. Of course, if necessary, you can use the pumps at gas stations, but always double-check the pressure with your own pressure gauge. nine0003
Advice:
Be sure to use your own pressure gauge to check the pressure level after filling the tires with air.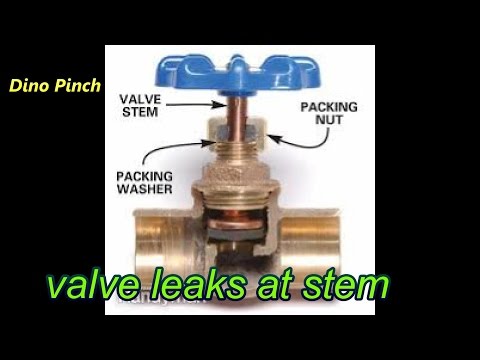 Service station pump gauges are considered relatively inaccurate measuring devices. Also, your pressure gauge should be the only one that will be used to ensure correct readings. Each measuring device is unique in its own way.
Over-inflated tires will cause premature tire wear, both the tread itself and the tire rim may be damaged. Excessively high pressure can also reduce traction. nine0006
• Locate the valve stem on the inner surface of the wheel rim. For convenience, it may be necessary to roll the motorcycle back and forth until the valve stem is easily accessible. Sometimes the valve stem has a cap (which protects the valve from dirt, debris, and damage). In order to remove it, you need to unscrew it by turning it counterclockwise.
• After removing the cap, the end of the valve will be visible. Make sure it is clean and then install a pressure gauge on the end of the valve, carefully aligning it before pressing on the valve stem. nine0006 • First check that the pressure gauge has been reset to zero or that the dipstick has been returned to its original position. If a hissing noise is heard or air is felt to come out, this means that the pressure gauge is not set correctly and the measurement results will be incorrect.
• Remove the pressure gauge and try again. If no air leakage sounds are heard, the pressure gauge is correctly attached. Most pressure gauges retain their readings after they are removed from the valve. If a slider gauge is used, be careful not to move the end of the gauge before reading the measured pressure. nine0006 • By knowing the tire pressure level, it can be adjusted accordingly to achieve the desired value. When pumping air, it's always easy to pump too much in and then bleed to get the pressure you need. However, it is worth adding air little by little, and then you need to check again until the correct pressure is ensured in the tires.
• If excess air is to be bled out, the pin in the center of the valve stem can be pressed down with a fingernail, or often at the opposite end, gauges have a small angled tip for this purpose. Once the pressure is at the desired level, replace the valve stem cap. nine0003
Checking the tire pressure on the rear wheel is a bit tricky due to the presence of the chain and rear brake discs. If the motorcycle is equipped with a center rack, then it will be very useful for this task.
Repeat the above process for the rear tire. When finished, screw the cap back onto the cleaned valve stem.
Look for the following: tread depth, signs of uneven wear or undulations, signs of aging such as small cracks in ruts, and any signs of puncture damage. If you find something like a nail or screw in your tire, but the tire is still holding pressure, don't remove it until you've taken the motorcycle to the nearest service station. If you remove a foreign object from the tire, it can immediately release all the air. In this case, you may need recommendations for self-repair of motorcycle tires, which we have already talked about earlier. If any unusual wear or discoloration of the tire is noticed, it is recommended to consult a service center or a mechanic. nine0003
This procedure may seem tedious at first, but it is essential that checking tire pressure becomes as common as checking that a helmet is fastened before a ride. The procedure will be faster after the driver becomes familiar with this process.
Carefully monitor the technical condition of the tires so that they effectively serve their full life, and problems can be noticed at an early stage before they become serious.
Adjusting the valves on an ATV is one of the most important maintenance steps. Ignoring this operation will adversely affect the operation of the engine, make it difficult to start the ATV, and even lead to a number of serious breakdowns. Therefore, it is important for the rider to figure out when it is necessary to carry out the adjustment and whether it is worth performing the procedure on their own or it is better to seek help from an ATV store in Kyiv.
Experienced motorists advise adjusting the valves on the ATV immediately after purchasing the equipment. The fact is that when assembling devices (especially Chinese ones), manufacturers do not pay due attention to this procedure. And the operation of ATVs with incorrectly adjusted clearances leads to:
The second clearance setting should preferably be done when the vehicle is broken in. That is, after 300-350 km of the way, the rider should check the cylinder head.
Please note: An operation such as adjusting the valves on an ATV is considered a mandatory maintenance item and should be carried out every 1000-1500 km.
Before adjusting the valves, you need to prepare the quadric for the procedure. To do this, it is recommended to raise the front of the ATV. This will clean the cylinder head oil bath and remove excess fluid.
Then dismantle the body parts that make it difficult to get to the valves. However, it all depends on the model of the quadric, in some devices you can get to the cylinder head without removing the plastic parts and assemblies.
The rider also needs to prepare tools: an 8 wrench (better with a head so as not to damage the nuts), measuring probes (you can find them in any auto shop) and a hammer. nine0003
Let the machine cool down before adjusting the ATV's valves. The procedure is performed "cold", so it is better not to start the ATV before adjusting.
In fact, adjustment is a basic operation, so even a novice ATV rider can perform it. The driver only needs: