In January I'd found another dog on Craigslist: Elle. A dog is essential to me on site. She’s a tiny Golden Retriver/Great Pyranees. She’s good to have on site, but she wants to take off and hunt. Sweetie stayed and stood guard. But otherwise she’s great.
The whole site is different now because of the roof. Instead of starting from scratch there was already shade & shelter. Still, as always after winter, I found need to set up a workbench plus additional shade. The simplicity of the worksite is like an artform to me. Water catchment and a place for everything…including rest. Repurposed banners from the Library summer reading program make car and cobbing shade this year. (they have a giant student logo from my spring design class!).
It was easy to start cobbing because I’d made sure at the end of last season there was clay and sand.
The first cob went up on the west wall embedding electric boxes for an eventual solar setup, then cobbing over my first lintel.
End of June and I moved to the North wall, lifting the tarp that wrapped the building to make shade and keep unplastered walls protected.
| Right: On the ground is window frame made with 4x4 cedar fenceposts. It is for a stained glass window with dragonflies! Far right: |
Jen came up and stomped cob for me and I was able to go over my first lintel. First, sturdy cedar branches were cut to length and screws put into the parts facing the cob. At first I was going to put the heaviest limb on the outer side facing to the inside of the building, but then I realized to serve function, it should be the middle lintel to support the central heaviest portion of the wall. We only got one photo this day as I forgot camera and phone and Jen's phone died. But at least there's one of the branches before the cob.
|
Left: standing on scaffolding, view from above wall with niche and open window after lintel branches have been cut and ends with screws pushed into wet cob. Above: view from below after cob has been sculpted on top of the lintel branches. So excited! First cob over lintel! Below: inside and outside. |
Though I really wanted to keep working over the lintel, walls should rise at an equal rate so it was time to move to the north wall. The left photo below is south wall but shows how the walls were still covered with 20 yard length of the outdoor fabric I discovered last summer.
I decided to just raise that long length up tarp up to make shade and it worked beautifully. Photo right below shows raised sandy colored tarp that is now protection from sun and rain. I'd recommend this to cobbers from the start. Buy a long length and raise it up, then down. This fabric also works great for stomping cob.
A similar thing has held true for a very large tarp I'd bought to cover the whole site after just making the foundation. Though it has been trimmed on the edges, it has covered the floor since I laid it down the first time.
Above: June 26 before and after picture for the day. You can see the rise.
June 29: Though I added a few more inches, I came home feeling like it's going slowly, thought I can see the top of the walls getting closer. Then I thought:
9 a.m., arrive and wheelbarrow 850# of sand off the truck
...then jump in the clay pit which is deeper than I am tall and dig four buckets of clay which I've decided to blend with the pottery studio clay for cob
...then stomp two batches of cob and have lunch.
It's no wonder I can only build a few inches on a day like this! But Jen says she's going to come stomp cob which will be wonderful...then I can BUILD!
The next sequence will be around the east wall with the single door.
Below left: inside photo of the southeast corner where there is just enough room for a little double sleeping loft above the door, figured out after measuring everything. The board going from the floor to the rafter indicates where the corner of the loft will be. Because supports ideally are embedded in the wall, it's best to figure out dimensions, placement, etc, so...
There are several drawings figuring out the plan.
I realized I want the rest of the cob on top of the building walls by the porch to be a solid cohesive mass, ie. to not dry between passages. Which means the porch rafters must be readied and the porch built. I resigned myself to a few weeks of no cobbing.
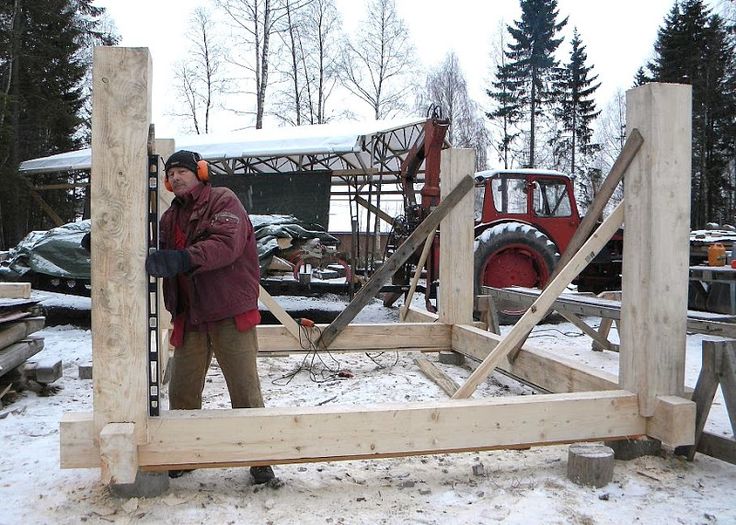
First I spent a day uncovering and sorting logs from what was left after roofing. They were covered all winter with tin from Linda and John's re-roofing in Minturn. I picked a girder and used the dolly and a skateboard to move it down hill :-) I also hauled a few logs (cut to 9' long on site last year) from fire mitigation in the forest here from storage in the shed. Two sturdy Junipers were peeled, drilled at the base to accept rebar and were placed for Northeast and East porch piers. They'll need saddles cut in the top for the girder.
So several days were spent peeling rafters (chips put on roadpath)....and thinking about the fact the logs aren't a tight fit on their stone base. I decided I could tuck mortar under them, also making a very flat pad for the "L" brackets. First I used a crowbar to lift the post an inch, tucking one or two stones under to hold it up.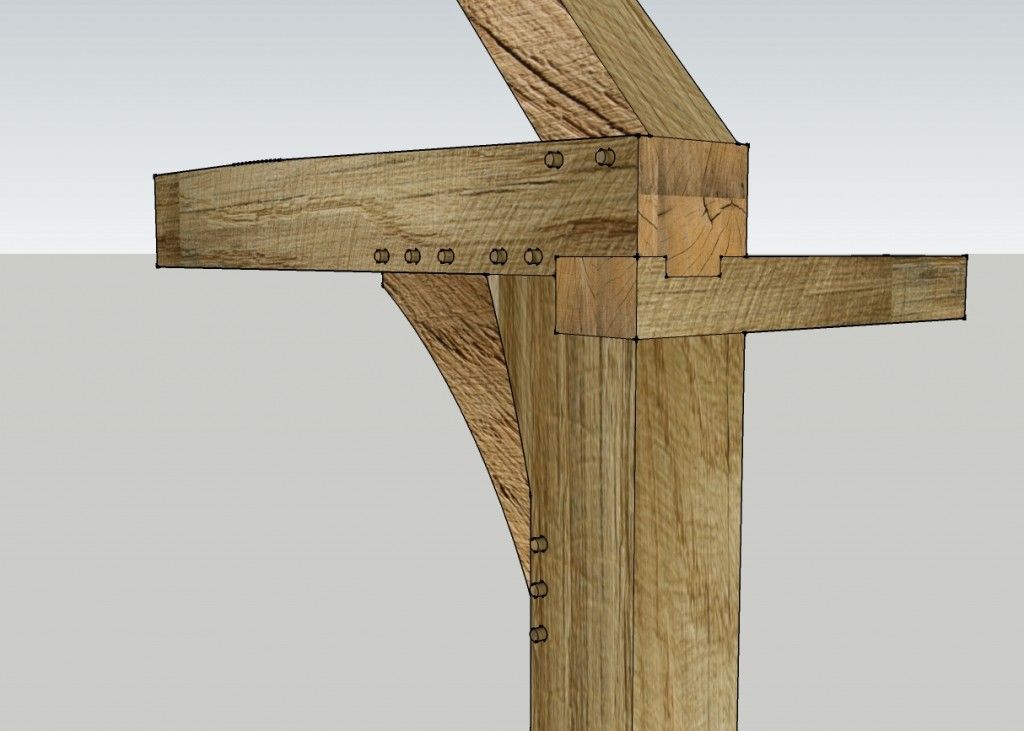 Moisture barrier was then tucked under and a sheet of plastic wrapped up the sides to hold the moisture barrier in place. Then mortar was mixed and tucked under the posts with a wood point tuck tool I made from wood since I forgot masonry tools at home (extra trowels on site–whew!).
End of day I decided to mark the first saddle notch on the post coming out of the lizard bench and when I climbed the ladder, I saw the three east porch posts weren't in a perfect line, and the girder is pretty straight. So I adjusted the middle pier putting a stone and some fresh mortar under one side to push it a little into line.
This day isn't very "cobby" or very glamorous, but solving these problems is excellent.
Below: ignore all the stripey ropes...they're holding shade et al in place.
|
July 13: Making what I call "saddle" notch in top of porch post. This Juniper wood is very hard. |
East porch posts in place. |
|
,The north side will be two girders with butt ends connected above a middle post. Two straight Japanese Junipers are perfect. They were stored/used over winter under temporary rain gutter and ladder. After peeling and scrubbing with a steel brush: July 16th: |
| This image is the culmination of years of work. So the Juniper was peeled, cut to the right height, the top was notched with saddle to hold girder, and finally the bolts are set with a wee bit of anchoring concrete. There will be cob over all of this up a couple of feet to add weight because the winds on the hill can be intense. When I had to stop cobbing a week or two ago I was kind of bummed. (As mentioned, the porch rafters must be embedded in the cob, so the porch must be done and rafters ready to embed in cob). But I'm stoked now to see it coming together and all the plans I made for this working out. |
It has been close to 100˚ in town out on the prairie, but the interior of the building has stayed around 75˚, even with the walls several feet short of the roof, allowing exterior air in. This is due to the radiant mass of the cob which holds the cool night temperatures. |
Now that I know what timbers will be used for girders, I went up to the Black Forest salvaged log pile left after roofing and cut three more porch rafters, then recovered remaining timbers with tin from Linda & John's re-roofing.
Below left: bottom of rafter...the nearest light spot on the log is a notch for the rafter to sit on the porch girder (other light spots are where I recently removed branch stubs). Stubs on end were added to anchor rafter in cob wall of building.
Below right: top of the rafter, flattened slightly with drawknife to accept roofing.
| Right: I continue to drill holes for "L" braces on porch posts ("L" brace in top left of photo). This one required some removal of stone with stone chisel & mallet and removal of some wood from post with wood chisel and wood mallet (homemade). Cardboard was tucked under post so wood chisel wouldn't hit concrete & be dulled. |
Porch rafters almost ready, stacked on east and north sides waiting for girders to be put up.
The long girder for the east side was brought down next to where it be put on the porch. Porch posts and rafters prepped (seen in above photos).
I planned a method for raising the girder. It had to be done solo mostly because friends are coming to work next weekend and I think it best use of time to make cob...but rafters must be embeeded in cob, therefore the porch much be done.
The method I used solo is seen in the photo below. Lag bolts used for attaching all elements.
1) Attach pulley to the top of a long board
2) which is then bolted to the uphill post of the porch (which is also embedded in the lizard bench).
3) Use that climbing rope I was compelled to purchase to raise girder.
4) Ladder or step stool were put on other side of girder from me. Mostly I made a triagle with my arm and put one end of the 2x4 in it...then used thighs to raise 2x4 which then raised girder. At the same time, with my other arm I'd reach a scoot a board under the girder to hold it at the new height. The slack in the pulley ropes was re-cleated.
It was inches at a time...but finally, the girder swung on to it's seat at the top of the post with a satisfying little thunk.
A storm was coming, so up on the ladder I quickly covered the girder.
The old body did it, but I need much rest the day after.
| Below left: |
Above right: The uphill end of the girder has been raised to sit on the first post. The pulley and board were thent moved to the far post to raise the other end of the girder. In the photo below you can see the board and pulley in place in the other corner. I didn't have time before the storm to add temporary securing boards like the two on the foreground post in the photo below; or to dismantle the pulley setup. Perhaps it should stay to life the north girder, though it is in two pieces and won't be as heavy. Below: girder up!!! Again, you may notice middle post not quite under girder. There's enough give in the long log and the post that a little pry with the crowbar and it slipped right into place. |
At the end of every page, my postings from 2014 attached themselves. So, below you see the raising of the first girder, which was smaller. It took me and two men. We did it in much less time than it took me alone, though!
As work shifted to the north porch, I had to spend a day re-doing shade which was in the way of aligning north porch posts. But as of August 7th, I got all north porch posts in place with "L" brackets ready to bolt down. I strung a cable from the corner to a far tree to align posts. I forgot a camera or even my phone, so I drew a picture. The dotted line indicates cable.
Aug. 7
Left below: I lifted the remaining three porch rafters into place. Right below: They are suspended above awaiting cob.
Notice short stumps added to end to anchor in cob.
Also note the board they rest on will be removed as there is also
rope tied/suspending rafters from board above.
While the east girder is one long Ponderosa log, the north is two Japanese Junipers. It is a very hard wood.
|
Raising the first of two logs. Thick ends meet on top of a middle post. Spent a while hand trimming so fit was better. To the right: |
Both logs in place. North girder for porch! | East girder on top of corner post "saddle". It is notched with another "saddle" to accept Japanese Juniper north girder. |
ALMOST TIME TO COB AGAIN!!! ....when all porch rafters are in place they will be cobbed into the wall.
Above left: lag bolt attaching girder to post. Above right: for door lintel Japanese saw makes clean cut.
After two months work, I completed the timber porch and with the advisement of electrician Ellioutt, I placed and secured all elements for electrical wiring through conduit to three interior outlets, one exterior outlet, three interior lights and two exterior lights.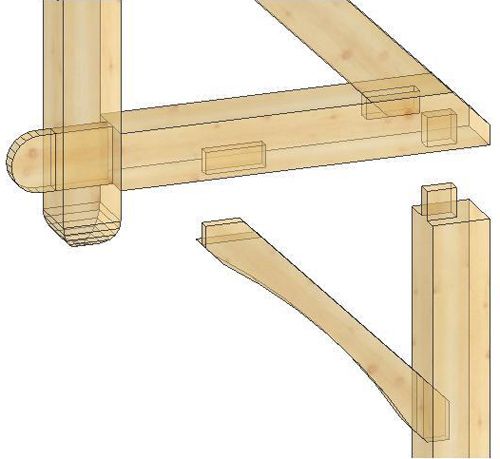 This is not very poetic, but had to be done before cobbing could proceed if there was ever to be electric in the building. The plan is to eventually get solar cells, but for now, the setup is there. Received Ellioutt's stamp of approval.
|
Above is east wall. One too many curves in the conduit on the west wall, but it won't be cobbed in as this is the half bale part of a bale-cob wall, so we can fix it before bales go in. |
North wall. Hexagonal boxes for light fixtures are attached to a 2x4 that will be embedded in cob. Below, after it's all cobbed in. |
Above the door I put a lot of pottery rejects from local studios to displace weight of the cob. Because there is a roof girder, a header and a lintel, I wasn't too worried about the cob being a super continuous mass. I learned this from an article on Roman concrete which said they embedded "amphorae" high up in their domes.
|
Friends camp, help and learn, Labor Day Weekend. |
It took sixteen days to cob the remainder of the north wall. I had two days help this past weekend. Kate has visited since I bought the land. She is a former student and is like family now to me and my grown kids. From a South Dakota ranching family, she is an amazing "do it" gal. She figures out what needs to be done and does it, from covering things with tarps, putting away tools, hauling water...you name it! ...including making me a sandwich before leaving Sunday.
Thank you, Kate!
Her beau Tim is a large scale construction project manager and wants to develop a community of tiny homes with a shared cob building, so he's super curious, very helpful and totally appreciates the concept and design. They're the best!!!!
|
Kate cobbing and having too much fun. |
Tim learning cobbing, |
Hello and Happy Monday!!!
For those of you new here or haven't been following along, from mid May to mid June of this year, we built a cabin in remote Alaska for DIY Network. Now that we have completed the cabin, and aren't working such extreme hours, we have been sharing the build process here on the blog. You can read all the posts here.
We wanted our cabin to be special and unique, so we decided to integate a timberframe roof system into a conventionally framed wall system. We've got the main walls framed, and we precut the timberframe ourselves earlier in the spring at home.
So finally, after months of prepping, it's time to start adding the timbers to the cabin!
The first portion of timbers will be the floor framing for the upstairs loft. If you look closely, you can see little brown dots on tops of the beams - this is how the timbers are attached with screws, and will be hidden by the upstairs floor.
We already hauled all the timbers in on sleds, pulled by snow machines. This is much more ideal than using an ATV for a couple of reasons - snow is much smoother and cleaner than a dirt trail. For those of you with eagle eyes, the beams on this sled are the valley rafters, to be installed when we do the roof system.
This here is the floor package, all ready to be installed. We've got everything numbered and organized, so hopefully things go like Lincoln logs.
Except these Lincoln logs weigh hundreds of pounds.
We had everything staged on the frozen lake. To get the timbers to the cabin, we pulled them up with the snow machine sled as close as we could get, and then manually carried them inside the cabin.
When we framed up the cabin walls, we placed pockets in the framing for the timbers to sit in the walls.
A crane or boom truck would have been nice here, but since we are remote, this is how we put the timbers up.
Once side at a time,
One beam at a time. This is the very first beam for the cabin in! This beam will support the upstairs loft floor.
To tie all the beams in, we have a center "pole" that goes all the way up to the main ridge. It's close to 16 feet tall.
This one wasn't so much as heavy as it was awkward and top heavy.
Thanks goodness for a calm day. Since this beam is a finished product, we did not want to nail bracing to it - as that nail hole would be there forever. There was a certain amount of stress as we hurried to get the other loft floor timbers in to tie in the main pole. If that main pole went, the walls are just tied in with bracing at this point, so it could do major damage to the cabin. Or set us back weeks if we damage the beam itself and have to re-cut a replacement. And we won't even discuss someone getting injured while working remote.
Back home when we precut the timbers, we had debated whether or not to predrill the fastening holes (hidden on the unexposed sides of the beams). We should have, because we stood there and held up the main support pole, while the beams were predrilled first with a larger bit (sized for the timber screw heads),
And then a smaller sized bit, but much longer for passing through the timber.
The floor beam rafter sits in pockets on the side beam and the pole,
And then gets screwed in with a timber screw, sized anywhere from 8" to 16" long, depending on the size of the beams.
Once we got two of the beams up, we can breath a little sign of relief, but the pole is only held in place with the two screws, on the two beams. It could definitely fall to either unsupported side without too much convincing. So despite it getting late, we are forced to get the two other beams in tonight before leaving the job site.
While Jacob tied in the second beam, Matt and Ross are already working on the third beam.
The third beam was heavy, but manageable, but just wouldn't go in. We tried the sledge hammer, but since the walls aren't fully tied in yet, that didn't work - the entire cabin structure would just move every time you hit it. Then we tried ratchet straps - which did help - but in the end, we had to trim a little off the tenon to get it to fit in.
This is our first time working with a timber frame, so we learned alot, and the old saying is true - education is not cheap.
Now we just have the fourth beam to tie in.
I was adamant in the design to not have a post support under the main beam, wanting the cabin to be open from the living area to the dining area. But this meant we had to integrate a large glulam beam into the timbers for structural support.
This beam is a beast.
I tried to pick up my end just to manuever it back at the garage. I couldn't even budge just one end to scoot it over.
These guys are quite a bit stronger than me though. But you knew that.
This one is a little tricky because not only do you have to lift it, but you have to pull it into the main pole, and line up the tenon with the mortise cut into the main pole.
Whew!
Big sign of relief.
Until we realized we'd need to take a little off the tenon to get the beam to fit in it's pocket.
I think this beam we only did twice. Next time, when it's a big heavy beam, we'll definitly be cutting the tenon a little smaller to make fitting just a little easier.
It was a very exciting moment to have the entire first floor loft framing done! The view from up in the loft is incredible, and the beams were stunning from underneath. Although putting this floor system in was anyting but easy, it was definitely worth it. You do get what you pay for, don't you?
Thanks for reading and being part of our cabin build! Will be sharing next how we put lights in the beams and then we are on to getting that roof system done!
XO Ana + Crew
Do you want to buy several chairs for your kitchen or summer veranda? Or maybe you need a few inexpensive stools for a garden house? In any case, you are exactly where you will find the best solution. Bar and kitchen stools, individually or as a set, can be purchased from us. A large selection of materials and styles will allow you to choose the most suitable solution for the place where you plan to put dining or bar stools. Wooden ones will create a more rigorous and classic look, while tapestry or velor models will appeal to lovers of sitting softer. We wish you to find those chairs that you have been looking for for a long time.
Show more Show less
Filter byView product list Cheapest at the top
The offer is valid in the application on 12/15/2022 until 23:59 for specially marked products of the Kaup24. ee seller. '> -10% DISCOUNT IN APP
8 10 € / month 129 00 €
Add to cart
5/5
Set of 2 chairs Halmar K332, green / black
Type: Living room chairs
Quantity included: 2
Seat height: 48 cm
The offer is valid in the application on 12/15/2022 until 23:59 for specially marked products of the Kaup24.ee seller. '> -10% DISCOUNT IN APP
7 60 € / month 157 00 €
Add to cart
PICK UP TOMORROW
Set of 2 chairs Halmar K357, gray
Type: Living room chairs
Quantity included: 2
Seat height: 48 cm
The offer is valid in the application on 12/15/2022 until 23:59 for specially marked products of the Kaup24. ee seller. '> -10% DISCOUNT IN APP
8 00 € / month 164 00 €
Add to cart
Set of 2 chairs Halmar K430, green
Type: Living room chairs
Quantity included: 2
Seat height: 48 cm
The offer is valid in the application on 12/15/2022 until 23:59 for specially marked products of the Kaup24.ee seller. '> -10% DISCOUNT IN APP
8 90 € / month 238 00 €
Add to cart
5/5
FAST DELIVERY
Set of 4 Signal Meble Chic Chairs, Gray
Type: Living room chairs
Quantity included: 4
Seat height: 49 cm
The offer is valid in the application on 12/15/2022 until 23:59 for specially marked products of the Kaup24. ee seller. '> -10% DISCOUNT IN APP
6 90 € / month 185 00 €
Add to cart
Set of 2 chairs Halmar K366, red
Type: Living room chairs
Quantity included: 2
Seat height: 46 cm
The offer is valid in the application on 12/15/2022 until 23:59 for specially marked products of the Kaup24.ee seller. '> -10% DISCOUNT IN APP
8 60 € / month 64 99 €
Add to cart
FAST DELIVERY
Dining chair BRW Ortiz, grey/white
Type: Living room chairs
Quantity included: 1
Seat height: Not specified cm
The offer is valid in the application on 12/15/2022 until 23:59 for specially marked products of the Kaup24. ee seller. '> -10% DISCOUNT IN APP
9 60 € / month 255 00 €
Add to cart
4.5/5
Set of 2 chairs Halmar Verdi, white/grey
Type: Living room chairs
Quantity included: 2
Seat height: 51 cm
The offer is valid in the application on 12/15/2022 until 23:59 for specially marked products of the Kaup24.ee seller. '> -10% DISCOUNT IN APP
8 20 € / month 219 00 €
Add to cart
5/5
FAST DELIVERY
Set of 4 Signal Meble Mila chairs, gray
Type: Living room chairs
Quantity included: 4
Seat height: 49 cm
The offer is valid in the application on 12/15/2022 until 23:59 for specially marked products of the Kaup24. ee seller. '> -10% DISCOUNT IN APP
7 30 € / month 174 00 €
Add to cart
1/5
Set of 2 bar stools Signal Meble Chic H-2, grey...
Type: Bar stools
Quantity included: 2
Saddle height: 60 cm
The offer is valid in the application on 12/15/2022 until 23:59 for specially marked products of the Kaup24.ee seller. '> -10% DISCOUNT IN APP
10 50 € / month 280 00 €
RRS
559 00 €
Add to cart
Chair Kooko Home Arco, gray
Type: Living room chairs
Quantity included: 1
Seat height: 52 cm
The offer is valid in the application on 12/15/2022 until 23:59 for specially marked products of the Kaup24. ee seller. '> -10% DISCOUNT IN APP
8 10 € / month 217 00 €
Add to cart
FAST DELIVERY
Set of 2 chairs Signal Meble Lilia, black
Type: Living room chairs
Quantity included: 2
Seat height: 51 cm
The offer is valid in the application on 12/15/2022 until 23:59 for specially marked products of the Kaup24.ee seller. '> -10% DISCOUNT IN APP
7 70 € / month 204 00 €
Add to cart
FAST DELIVERY
Set of 2 bar stools Signal Meble Cherry H-2, se...
Type: Bar stools
Quantity included: 2
Saddle height: 60 cm
The offer is valid in the application on 12/15/2022 until 23:59 for specially marked products of the Kaup24. ee seller. '> -10% DISCOUNT IN APP
7 30 € / month 175 00 €
Add to cart
FAST DELIVERY
Set of 2 bar-rolubar stools Signal Mebl...
Type: Bar stools
Quantity included: 2
Saddle height: 62-82 cm
The offer is valid in the application on 12/15/2022 until 23:59 for specially marked products of the Kaup24.ee seller. '> -10% DISCOUNT IN APP
12 90 € / month 345 00 €
Add to cart
Set of 4 chairs Halmar K 214, cream/oak...
Type: Living room chairs
Quantity included: 4
Seat height: 47 cm
The offer is valid in the application on 12/15/2022 until 23:59 for specially marked products of the Kaup24. ee seller. '> -10% DISCOUNT IN APP
6 90 € / month 142 00 €
Add to cart
Set of 2 chairs Halmar Citrone, oak / beige...
Type: Living room chairs
Quantity included: 2
Seat height: 47 cm
The offer is valid in the application on 12/15/2022 until 23:59 for specially marked products of the Kaup24.ee seller. '> -10% DISCOUNT IN APP
7 70 € / month 123 00 €
Add to cart
2 tools set Modena
Type: Living room chairs
Quantity included: 2
Seat height: 46 cm
The offer is valid in the application on 12/15/2022 until 23:59 for specially marked products of the Kaup24. ee seller. '> -10% DISCOUNT IN APP
6 80 € / month 140 00 €
Add to cart
Set of 2 chairs Halmar Gerard 3, white/grey
Type: Living room chairs
Quantity included: 2
Seat height: 47 cm
The offer is valid in the application on 12/15/2022 until 23:59 for specially marked products of the Kaup24.ee seller. '> -10% DISCOUNT IN APP
8 20 € / month 107 00 €
Add to cart
5/5
Chair Halmar Toledo, sand color
Type: Living room chairs
Quantity included: 1
Seat height: 47 cm
The offer is valid in the application on 12/15/2022 until 23:59 for specially marked products of the Kaup24. ee seller. '> -10% DISCOUNT IN APP
8 70 € / month 232 00 €
Add to cart
Set of 4 chairs Signal Meble Look, brown
Type: Living room chairs
Quantity included: 4
Seat height: 50 cm
The offer is valid in the application on 12/15/2022 until 23:59 for specially marked products of the Kaup24.ee seller. '> -10% DISCOUNT IN APP
7 90 € / month 104 00 €
Add to cart
5/5
Set of 2 chairs Halmar K281, white/brown
Type: Living room chairs
Quantity included: 2
Seat height: 46 cm
The offer is valid in the application on 12/15/2022 until 23:59 for specially marked products of the Kaup24. ee seller. '> -10% DISCOUNT IN APP
7 10 € / month 146 00 €
Add to cart
5/5
Chair Emilia, dark blue
Type: Living room chairs
Quantity included: 1
Seat height: 49 cm
The offer is valid in the application on 12/15/2022 until 23:59 for specially marked products of the Kaup24.ee seller. '> -10% DISCOUNT IN APP
8 20 € / month 107 00 €
Add to cart
Chair Halmar Toledo, gray
Type: Living room chairs
Quantity included: 1
Seat height: 47 cm
The offer is valid in the application on 12/15/2022 until 23:59 for specially marked products of the Kaup24. ee seller. '> -10% DISCOUNT IN APP
6 90 € / month 141 19 €
Add to cart
PICK UP TOMORROW
Set of 2 Louise chairs, dark gray
Type: Living room chairs
Quantity included: 2
Seat height: 45-47.5 cm
The offer is valid in the application on 12/15/2022 until 23:59 for specially marked products of the Kaup24.ee seller. '> -10% DISCOUNT IN APP
7 70 € / month 123 00 €
Add to cart
5/5
PICK UP TOMORROW
Bar stool Avanja, gray
Type: Bar stools
Quantity included: 1
Saddle height: 52-78. 5 cm
5 cm
21 40 € / month 571 99 €
Add to cart
Dining chairs, set of 6, gray
Type: Living room chairs
Quantity included: 6
Seat height: 43 cm
The offer is valid in the application on 12/15/2022 until 23:59 for specially marked products of the Kaup24.ee seller. '> -10% DISCOUNT IN APP
8 00 € / month 164 00 €
Add to cart
Set of 4 chairs Halmar K187, cream
Type: Living room chairs
Quantity included: 4
Seat height: 45 cm
The offer is valid in the application on 12/15/2022 until 23:59 for specially marked products of the Kaup24. ee seller. '> -10% DISCOUNT IN APP
7 90 € / month 60 00 €
Add to cart
4.8/5
PICK UP TOMORROW
Bar stool Halmar H 15, light gray
Type: Bar stools
Quantity included: 1
Saddle height: 61-82 cm
The offer is valid in the application on 12/15/2022 until 23:59 for specially marked products of the Kaup24.ee seller. '> -10% DISCOUNT IN APP
7 30 € / month 117 00 €
RRS
119 00 €
Add to cart
Brita chair, gray
Type: Living room chairs
Quantity included: 1
Seat height: 47. 5 cm
5 cm
The offer is valid in the application on 12/15/2022 until 23:59 for specially marked products of the Kaup24.ee seller. '> -10% DISCOUNT IN APP
6 90 € / month 141 00 €
Add to cart
5/5
FAST DELIVERY
Set of 2 Signal Meble Piano chairs, gray
Type: Living room chairs
Quantity included: 2
Seat height: 49 cm
The offer is valid in the application on 12/15/2022 until 23:59 for specially marked products of the Kaup24.ee seller. '> -10% DISCOUNT IN APP
7 90 € / month 103 00 €
Add to cart
4. 4/5
4/5
Set of 2 Parma chairs
Type: Living room chairs
Quantity included: 2
Seat height: 42 cm
The offer is valid in the application on 12/15/2022 until 23:59 for specially marked products of the Kaup24.ee seller. '> -10% DISCOUNT IN APP
8 30 € / month 109 00 €
Add to cart
5/5
Chair set (2 pcs.) Modena, brown
Type: Living room chairs
Quantity included: 2
Seat height: 46 cm
The offer is valid in the application on 12/15/2022 until 23:59 for specially marked products of the Kaup24.ee seller. '> -10% DISCOUNT IN APP
7 70 € / month 101 00 €
Add to cart
Set of 4 dining chairs Saska Garden Matera, white. ..
..
Type: Living room chairs
Quantity included: 4
Seat height: 41 cm
The offer is valid in the application on 12/15/2022 until 23:59 for specially marked products of the Kaup24.ee seller. '> -10% DISCOUNT IN APP
7 60 € / month 122 00 €
Add to cart
4.7/5
Set of 2 MNSC chairs, walnut
Type: Living room chairs
Quantity included: 2
Seat height: 47 cm
8 10 € / month 167 58 €
Add to cart
Bar stools, 2 pcs., yellow
Type: Bar stools
Quantity included: 2
Saddle height: - cm
The offer is valid in the application on 12/15/2022 until 23:59 for specially marked products of the Kaup24. ee seller. '> -10% DISCOUNT IN APP
7 40 € / month 119 00 €
Add to cart
Set of 4 chairs h361 Bis Alu, black
Type: Living room chairs
Quantity included: 4
Seat height: 45 cm
7 30 € / month 175 61 €
Add to cart
Set of 4 chairs Dumo, green
Type: Living room chairs
Quantity included: 4
Seat height: 45 cm
7 60 € / month 203 61 €
Add to cart
Bar stools, 2 pcs.
Type: Bar stools
Quantity included: 2
Saddle height: - cm
The offer is valid in the application on 12/15/2022 until 23:59 for specially marked products of the Kaup24. ee seller. '> -10% DISCOUNT IN APP
8 80 € / month 67 00 €
Add to cart
5/5
Set of 2 bar stools Halmar H64, brown
Type: Bar stools
Quantity included: 2
Saddle height: 63-80 cm
The offer is valid in the application on 12/15/2022 until 23:59 for specially marked products of the Kaup24.ee seller. '> -10% DISCOUNT IN APP
8 70 € / month 138 60 €
Add to cart
PICK UP TOMORROW
Set of 2 chairs Signal Meble Piano B, light...
Type: Living room chairs
Quantity included: 2
Seat height: 50 cm
The offer is valid in the application on 12/15/2022 until 23:59 for specially marked products of the Kaup24. ee seller. '> -10% DISCOUNT IN APP
7 80 € / month 161 00 €
Add to cart
Chair Homede Argento, beige
Type: Living room chairs
Quantity included: 1
Seat height: 41 cm
The offer is valid in the application on 12/15/2022 until 23:59 for specially marked products of the Kaup24.ee seller. '> -10% DISCOUNT IN APP
8 90 € / month 84 99 €
Add to cart
Set of 2 bar stools LBC65X, black/brown
Type: Bar stools
Quantity included: 2
Saddle height: 65 cm
8 20 € / month 107 71 €
Add to cart
5/5
Dining chairs, set of 2, black
Type: Living room chairs
Quantity included: 2
Seat height: - cm
9 10 € / month 69 00 €
Add to cart
Chair MarkAdler Prince 4. 0 Green
Type: Living room chairs
Quantity included: 1
Seat height: 46 cm
The offer is valid in the application on 12/15/2022 until 23:59on specially marked goods of the Kaup24.ee seller. '> -10% DISCOUNT IN APP
26 99 €
Add to cart
4.8/5
Stool Thomas, 34 x 34 x 45 cm, light brown
Type: Stools
Quantity included: 1
Saddle height: - cm
9 10 € / month 69 00 €
Add to cart
Chair MarkAdler Prince 4.0 Gray
Type: Living room chairs
Quantity included: 1
Seat height: 46 cm
8 60 € / month 82 34 €
Add to cart
Bar stool, brown
Type: Living room chairs
Number included: 2
Saddle height: 77 cm
The offer is valid in the application on 12/15/2022 until 23:59 for specially marked products of the Kaup24. ee seller. '> -10% DISCOUNT IN APP
8 50 € / month 135 90 €
Add to cart
5/5
Bar stool Emu, brown
Type: Bar stools
Number included: 1
Saddle height: 61-82 cm
The offer is valid in the application on 12/15/2022 until 23:59 for specially marked products of the Kaup24.ee seller. '> -10% DISCOUNT IN APP
13 49 €
Add to cart
5/5
Folding chair Patio, gray
Type: Living room chairs
Quantity included: 1
Seat height: 44 cm
The offer is valid in the application on 12/15/2022 until 23:59on specially marked goods of the Kaup24. ee seller. '> -10% DISCOUNT IN APP
10 49 €
Add to cart
4.9/5
Folding stool Patio, black
Type: Stools
Quantity included: 1
Saddle height: 44 cm
24 78 € 26 64 €
Add to cart
4.3/5
Stool Sixty, oak color
Type: Stools
Quantity included: 1
Saddle height: 45 cm
Have you found the perfect dining table but wonder if you can match the perfect chairs? Firstly, the chairs do not have to be perfectly combined with the table - the main thing is that they complement each other. How to choose the right kitchen chairs? Be sure to measure everything. Chairs not sm
What you need to know when choosing a dining table and chairs for it? The dining room often becomes a meeting place for family or friends, where you want to relax and have fun, so the table and chairs for this room should be chosen with care - a lot depends on this furniture. In order to facilitate the decision making, it is necessary to first consider some important aspects that Read more
Semi-bar stool height - how to choose? A large bar counter in the kitchen or the so-called island is not only fashionable, but also very convenient. Only by creating such a comfort zone, you may have to overcome more than one obstacle. For example, buy quality semi-bar stools that will fit your lifestyle. Here are 5 tips Read more
White kitchen: advantages and disadvantages Quite often, when we are about to make an expensive purchase, we wonder if this choice is really the best one for us. Especially often such thoughts arise when arranging a house. After all, after painting the walls, laying parquet, installing plumbing and kitchen, you may not want to plan how Read more
How to equip the kitchen as if from "Pinterest"? Interior designer tips The kitchen space is one place in the house that requires significant investment. However, it is definitely worth investing in various modern solutions, because the kitchen is often the main space in the house where we spend the most time - evenings with family or guests who Read more
Needless to prove the need in every home of such interior items as kitchen chairs . It is important that they are not only comfortable and practical, but also consistent with the overall style of the environment. When it is possible to purchase chairs separately, and not as a set with a table, there are many more options to choose from that meet individual requirements and preferences. And if the functional purpose of different models is the same, then the appearance is distinguished by an enviable variety.
Chairs for a small kitchen are usually chosen based on their practicality and convenience. The most practical are hard chairs, they are easy to clean and durable. More comfortable - with soft upholstery that is easy to clean. Alternatively, look at transparent chairs. They are distinguished by a durable and stable construction made of polycarbonate, and the original look will add lightness and weightlessness to the interior of the kitchen.
In a dining room with a separate dining area, chairs are not only an everyday item, but also a stylish decoration. Lots of options. Wooden chairs in a classic style or upholstered chairs with a backrest of different heights. Unusual design chairs in a modern style, for example, with metal legs, a plastic seat or a flexible frame. The seats are hard, made of wood or rattan, semi-soft with upholstery, and as comfortable as possible with thicker upholstery and even with springs.
They are indispensable when the kitchen is equipped with a breakfast bar. With a backrest or in the form of a stool, with a footrest for comfortable positioning of the legs. The most stable - on four legs, and adjustable in height, on one leg, easily adapt to any height.
Also take into account the height of the bar - the seat of the chair should be at a distance of 25-35 cm from the bottom edge of the tabletop.
Looking for where to buy kitchen chairs on the most favorable terms? For those who value their time, we offer a modern solution - online shopping in the Kaup24.ee e-shop. Here the range is distinguished by an enviable variety of models with excellent value for money. You will definitely find what you are looking for. To speed up your search, use filters by marking all the indicators you are interested in. Photos and detailed descriptions of the chairs will help you make the right choice, perfectly matching your wishes
Initially, the word “buggy” meant lightweight vehicles with a frame and a powerful engine, and now it is called all-terrain vehicles with a car seat. They have a lot in common with classic ATVs - for example, four-wheel drive, off-road tires and high ground clearance. But, despite the constructive similarities, there are still more differences. What technique and for what purposes is best suited - we will tell in the article.
Buggy and ATV have different controls and seating
Buggy. Landing and controls are automobile, due to this, the equipment is more comfortable on a long trip. The roof, doors and windshield protect against dirt and rain flying from under the wheels, so you can ride in any weather and still keep your clothes clean.
ATV. Motorcycle seating and controls. Sitting is less comfortable, but you can shift your body weight and help the technique overcome obstacles - for example, swing it in the mud. In general, riding an ATV means more physical activity.
Buggy is more spacious than ATV
Buggy. Most buggies are designed for a driver and two passengers, but there are more spacious models.
ATV. Models for active skiing are single-seated, while universal and tourist models are usually double-seated.
Buggy carrying capacity is 3-4 times more
Buggy . Truck models have a rear body that holds about 400 kg and has a dump mechanism for easy unloading. Tourist and sports buggies also have a rear luggage compartment, but more modest - it can accommodate about 100 kg.
ATV . Has luggage platforms in front and behind. Their carrying capacity is on average 60-80 kg. To haul something heavier, you can attach a trailer, but note that ATVs have less towing capacity than buggies.
Only the driver's sanity protects against injury on an ATV
Buggy. The wheelbase and track width of the buggy is greater than that of the ATVs, which means that they are more stable and less prone to tipping over. This will be noticeable when cornering at high speed or climbing a steep hill. In addition, in a dangerous situation, the driver and passenger are protected by multi-point belts and a strong frame.
ATVs. The only place where an ATV is better than a buggy in terms of safety is in frozen waters. Light vehicles put less pressure on the surface, and in an emergency, the driver can quickly jump off.
It's easier to start riding confidently on a buggy
Buggy. Full cockpit gives a sense of security, so the beginner will get used to the buggy faster than the ATV.
ATV. Driving on a flat road is easy and safe. But overcoming obstacles on horseback with powerful equipment is scary at first.
You can learn how to operate any technique. But to know for sure what you like better, try to ride an ATV and a buggy before buying. You can do this at the off-road driving school CFMOTO EXPERIENCE under the guidance of experienced instructors. On the track with off-road obstacles, you can test any CFMOTO model in "combat" conditions.
Which technique is passable depends on the terrain
Buggy. The buggy has more suspension travel and ground clearance than an ATV. This increases the cross-country ability on difficult terrain - there is less risk of hanging the wheels or getting stuck.
ATV. ATVs have a small weight - from 300 kg. Due to their lightness, they can pass through the swamp and other unsteady surfaces and not get stuck. And pulling such equipment out of the mud is often done manually without using a winch.
Another plus of the ATV is its small dimensions: as a rule, the length is less than 250 cm, and the width is up to 130 cm. This allows you to bypass problem areas, easily maneuvering among trees and shrubs. On a large buggy, maneuvering in the forest is much more difficult.
Buggy. Category AII required. You can open it from the age of 19. At the same time, you must already have a driver's license with an open automobile category "B" and an experience of 12 months.
ATV. Need category AI. You can open it from the age of 16. There are no other requirements.
Please note: ATV licenses are obtained from Gostekhnadzor.
Hunting and fishing. What to choose depends on the area and the purpose of the hunt. It will be easier to get through the dense forest and thickets on an ATV. But if you need to carry a lot of equipment and big game, and you hunt in the company of comrades, you should take a closer look at a cargo buggy with a spacious interior and a roomy body.
Walks. For family holidays, buggies are preferable due to their capacity, comfort and safety. You can also ride a quad bike alone or alone.
Tourism. Driving a buggy will make you feel less tired than riding an ATV. In addition, in the cab of the buggy, the driver and passenger are protected from precipitation.
Work. If you need to work in a limited space or have little space for storing equipment, it is better to choose an ATV. It will be more comfortable to ride a buggy in bad weather and over long distances, and such equipment also has a greater carrying capacity and towing capacity.
Off road. For off-road routes with fords, swamps, deep puddles and other heavy obstacles, a single-seat ATV is best suited. This is a light and maneuverable technique that is less likely to get stuck, and can go around many obstacles.
Extreme. If you want to drive across the crossroads, a sports buggy is best. This technique is stable on straight lines and in turns, has energy-intensive suspension. In addition, if after the next maneuver it ends up on its side or roof, the driver and passengers will not suffer.
For most purposes, a buggy is more suitable. Especially such equipment will be appreciated by tourists, hunters and fishermen. The spacious cabin with doors and a roof allows you to ride comfortably in any weather. Due to the car landing, you will be less tired on a long trip. The long wheelbase and wide track add stability, while the multi-point harness and cage protect you in a crash or rollover. The body of cargo models is tipper and usually holds up to 400 kg of cargo.
An ATV is indispensable for overcoming difficult off-road routes - due to its lightness it is less likely to get stuck, its compact dimensions allow you to bypass many problem areas, and it is often possible to rescue such equipment from mud manually without using a winch. Off-road, fishing and hunting in hard-to-reach areas, work in confined spaces - for all this, an ATV is best.
Important: the choice of technique largely depends on personal preferences.

 The nearest is Ponderosa, placed in cob bench five years ago! I wish it were Juniper like the others, both for strength and similarity. My plan is to cob all the way up it.
 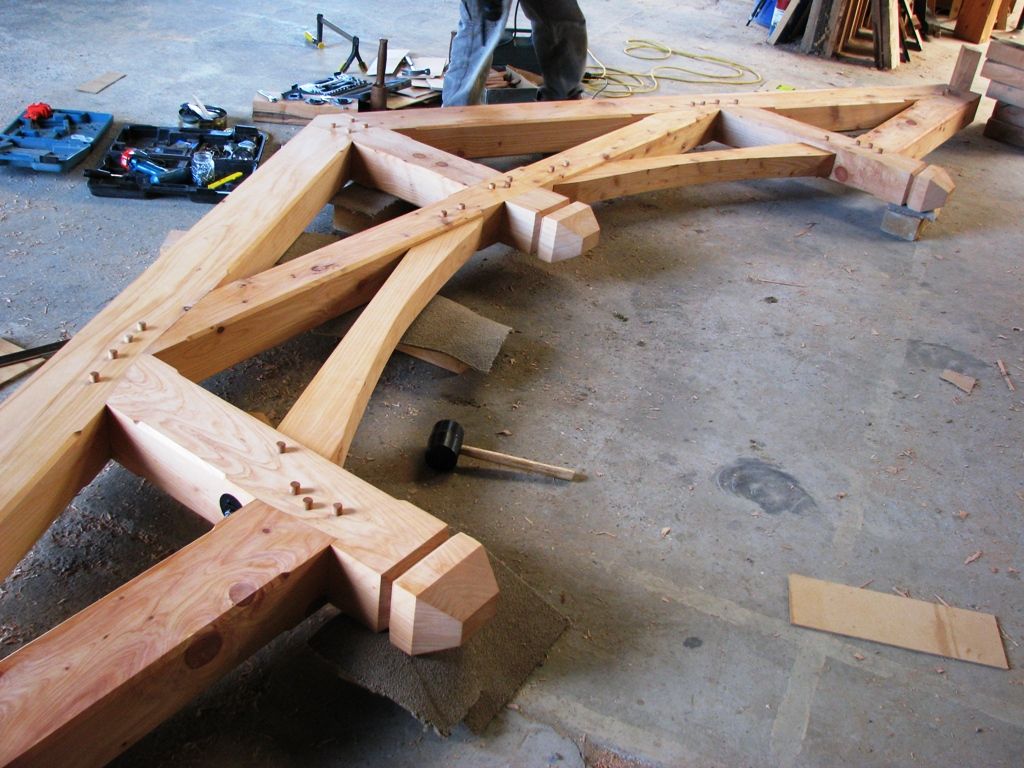 • The stone piers (with vertical rebar in the middle) were completed in 2011.