Tire swings are ideal ways to spend a lazy afternoon at your garden, with your favorite book on one hand, and feet off the ground. While a gentle swing has a tranquil effect, fast and rapid swings are for an adrenaline rush, like you have never felt before. You can either place the tire vertically or horizontally, but the fun is ensured in both cases.
Tire Swing Ideas
1. How to Make a Tire Swing
If your place has a garden, utilize a wide branch of a large tree to hang a tire from. Nylon ropes are sturdy enough to use for this.
Tire Swing
Now, once you are done with one tire swing, suspend a few more to have fun together with your family.
Image of Tire Swing
2. Tire Swing with Chains
When you use chains, secured with eye bolts, it ensures the much-needed protection from suddenly breaking off the swing. Still, keep it lower if it is your first attempt to make this.
How to Make a Tire Swing
How about adding some colors for a vibrant appearance? Spray paint or use some waterproof shades, so that the colors won’t flake during rainy days.
Tractor Tire Swing
However, instead of changing the entire get-up of the tire, you can just add a single white border with acrylic paint and finish off with a paint sealer.
How to Make a Tire Swing with Chains
3. Polka-Dotted Tire Swing
Since recycled tires are affordable solutions, you may use your saved money for painting polka dots on them for a peppy look. Place two or more side by side so that your kids and their friends can swing together.
Tire Swings
4. How to Make a Horse Tire Swing: DIY
Build a pony out of a tire and see your little one’s happiness. All edges must be smoothened, minimizing the chances of minor cuts.
Horse Tire Swing
5. Yarn Draped Tire Swing
Wrapping a tire with colorful yarns changes its ruggedness instantly.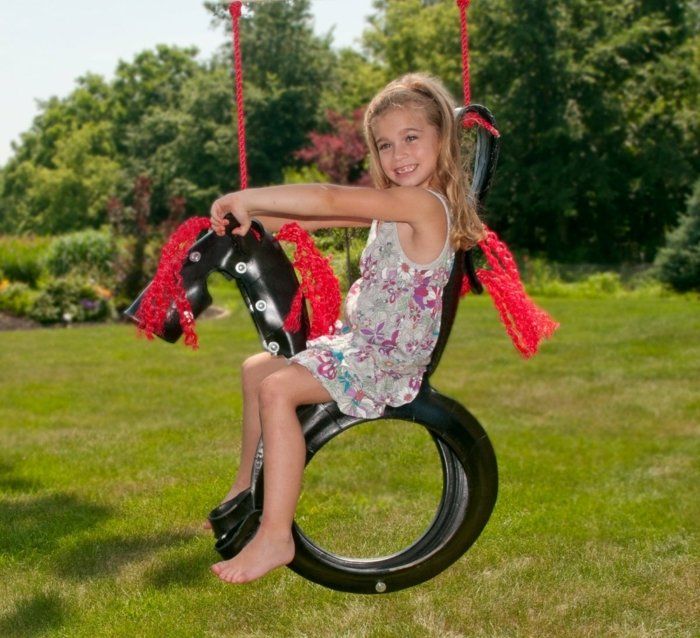 Light shades like peach, pink, white, and beige are likely to fade away soon, but they have an eye-catching look, more than black, brown and other dark shades.
DIY Tire Swing
6. How to Build a Tire Swing
When you want both the softness of the rope and the sturdiness of a chain, drill a wide tire and insert rope just as shown in the tutorial. Instead of tying the rope, this is a better way to dangle your tire. Moreover, your kid might hurt himself by the chains if they become rusty. So rope is safe.
How to Build a Tire Swing
The same tutorial is applicable even if you have a smaller tire. The two strands of rope give you a proper grip and you may rest your back on them. If possible, add a wooden surface by drilling the bottom and place a cushion so the horizontal swing becomes a more relaxing affair.
Horizontal Tire Swing for Playgrounds
7. Plastic Tire Swing
Plastic tires are light, so the process of building one swing with this would be easier for you. Check out the instructions and grab your kits.
Plastic Tire Swing
8. Chair Tire Swing
A single tire can be transformed into a chair swing with handles and a surface to sit on. It might sound unbelievable but it is super easy and a fun task too.
Tire Swing for Trees
9. Monochromatic Tire Swing for Kids
Following a basic tutorial, you can get such a vertical swing, where you can slip on easily and enjoy the night sky illuminated with starts.
Painted Tire Swing for Kids
10. Homemade Tire Swing
Woss gears make it easier for you to install a tire from a tree. The inexpensive tools are user-friendly as well.
Homemade Cool Tire Swing
11. Blue Tire Swing
Place a vertical swing beside your porch so that you can always watch your kids while you engross into knitting.
Making a Large Tire Swing out of a Tire
12. Tire Swing with a Thick Knot
Tie a thick knot like this and hang the tire from a heavy wood tree branch.
How to Make Your Own Vertical Tire Swing with Rope
13. How to Build a Tire Swing without a Tree
This tire is like an extension to your readymade swing set. Change your sit once in a while with your partner and enjoy the ride.
How to Build a Tire Swing Without a Tree
Recycling old objects is a sensible approach towards nature. Moreover, making such swings doesn’t affect your budget. Paint it, hang it, and enjoy your homemade swing.
CommonCentsMom.com is advertiser-supported: we may earn compensation from the products and offers mentioned in this article. However, any expressed opinions are our own and aren't influenced by compensation. The contents of the CommonCentsMom.com website, such as text, graphics, images, and other material contained on this site (“Content”) are for informational purposes only. The Content is not intended to be a substitute for professional financial or legal advice. Always seek the advice of your Financial Advisor, CPA and Lawyer with any questions you may have regarding your situation. Never disregard professional advice or delay in seeking it because of something you have read on this website!
There is something so idyllic about incorporating a tire swing in your back or front yard for your children. Even if you never had one yourself as a kid, you can't help but want one to provide your child with endless hours of easy fun most days out of the year. Tire swings are more affordable than an actual swing set and they are typically fairly easy to make, no matter the style you plan to go with. These tire swing ideas and instructions on how to make one yourself will help you get started, but really, your kid will be the best test to know if you did it right.
While it might seem like there is only one way to make a tire swing, there are actually a few different ways to go about it and several different designs. At the end of the day, whether you make the swing vertical or horizontal, or paint it to look like your kid’s favorite animal, they will have hours of fun.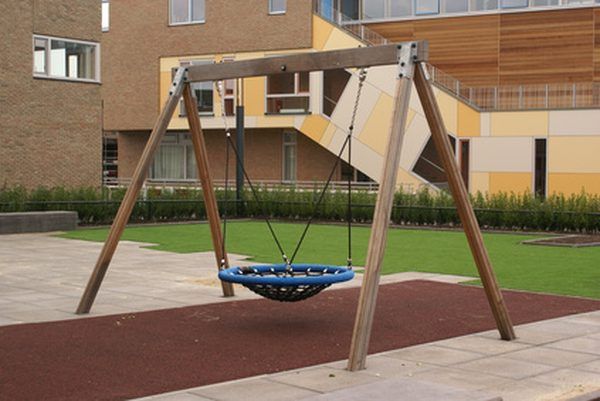 You can also opt for either a chain or rope to attach the tire to your tree and either way, it will remain secure to hold your child as they swing back and forth.
But before you look at all of the possible tire swings to adorn your front or back yard, you should get familiar with the “how” of it all.
A tire string swing is a simple, but fun, swing that uses a tire as the main component. The tire is attached to a long piece of string and is swung back and forth by the child. This type of swing is great for smaller children as it is easy to move and doesn't require much strength to operate. The bottom of the tire is usually weighted so that it will stay in the air longer, providing your child with a longer ride.
The Average Household Income in the...
Please enable JavaScript
The Average Household Income in the United States
You can use an old tire, or you can purchase a new tire specifically for this type of swing.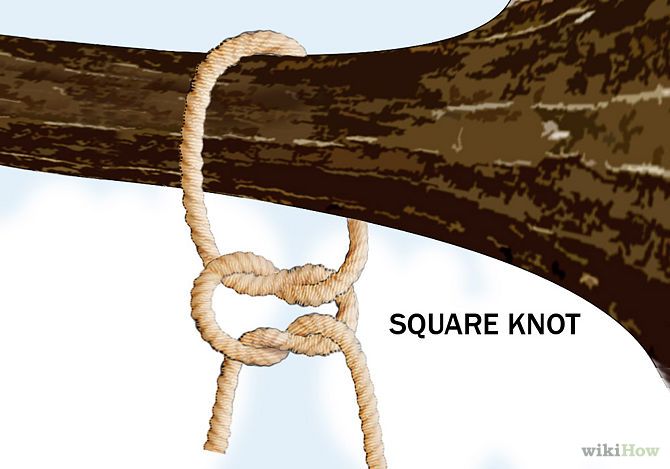 If you choose to use an old tire, be sure to remove the rubber from the inside of the tire so that the string doesn't get caught on it. The tree branch should also be long enough to accommodate the length of the tire.
If you want something a little more elaborate, consider building a playset-style tire swing. This type of swing is typically built from two pieces of wood that are attached at the top and bottom of the tire. The front and back of the playset are then attached to the tire using screws or nails. This type of swing is great for larger children as it offers more stability and is easier to move around.
In the tutorial below, you will learn how to make a simple tire swing using a couple of pieces of wood. You can do the heavy duty work yourself or you can buy a pre-made playset.
Before you start to make your own tire swing, you will need the following supplies:
-A large tire
-An anchor bolt or a sturdy tree
-Tape measure
-Circular saw
-Spray paint and a sealant
-Ruler or a straight edge
-Jigsaw or a belt sander
-Pipe clamps
-Carabiner hook
-Drill bit
-1/2 inch hole saw
-Stiles (or boards) to attach the tire to the tree (optional)
-Wood screws and nails
-Swivel
-Nylon rope or polypropylene rope
-Washer bolt
Surprisingly, to make a simple tire swing, you only need a few tools.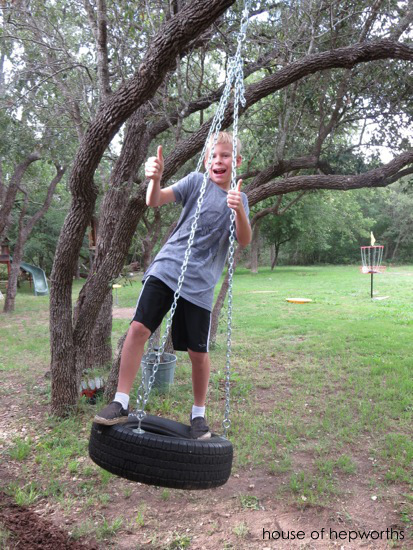 First, find a large used tire and clean it as thoroughly a you can. Even though it is for an outdoor swing, this is something your kids will sit in and sometimes hold onto. You will want to use soap and water on the inside as well as outside of the tire before continuing to the next steps. You might even want to use WD40 to cut through any residual grease.
Next, find the branch you want to hang the swing from. Ideally, it should be one that is thick and sturdy and stands at least nine feet above the ground. But even if it’s the highest branch you can find, make sure it is strong enough to withstand the pressure of a tire swing moving back and forth.
Get 50 feet of rope and drill drain holes in the tire. Then, use a ladder to secure the rope over your chosen branch and make sure it is as sturdy and secure as possible. Next, tie the rope around the tire in a same kind of secure loop that won't come undone. Preferably, a square knot or a bowline knot. And after you give it a quick test run, bring out your kids for the real test of how fun it is. The end of the rope should be hanging down below the branch, so they can grab onto it as they swing.
Once you have the tire swing set up, it is time to start painting it. Use a sealant to protect the wood from the elements and to keep the paint from chipping. You can use any color you like, but we recommend using a bright primary color and a darker secondary color.
Now is also a good time to cut out your swing design. We recommend using a circular saw and a straight edge to make your cuts. Make sure your measurements are precise, as this will be the only way to ensure that your swing is perfectly fitted to your tire.
After you have your design cut out, it is time to start assembling it. Start by attaching the side panels using screws and nails. Then, attach the front panel using screws and nails as well. Finally, attach the back panel using screws and nails. Make sure that all of your screws are hidden by the trim pieces you just installed.
Now it’s time to add the rope handle and swivel.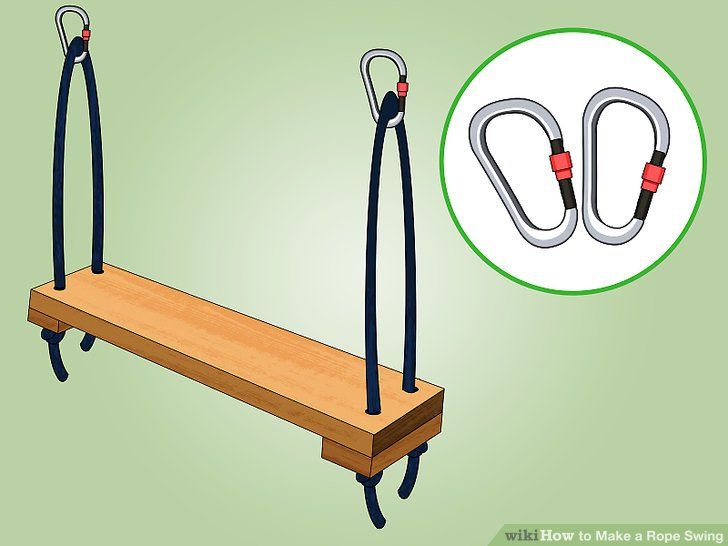 Cut two pieces of nylon rope that are about 18 inches long each and screw them into place on either side of the swing’s back panel. Then, tie one end of each rope around an appropriate post on either side of the swing (or use a swivel). The drainage holes in the tire should now be usable. Insert a pipe clamp into one of the holes and use a drill bit to drill a 1/2 inch hole. Then, use a swivel to attach the other end of the pipe clamp to the swing. Now, you can hang your tire swing using the rope and pipe clamps.
And finally, tie each end of the ropes together in a knot or bowline knot. Fraying rope is one of the most common problems with tire swings, so it is important to keep them as safe as possible. To do this, we recommend using pipe clamps to attach the rope to the swing. Make sure that the clamps are tight, but not too tight, as this will damage the rope. The rope swing should now be ready for use! That’s it!
What to do with the excess rope?
It is advisable not to tie the rope too tightly to the tire.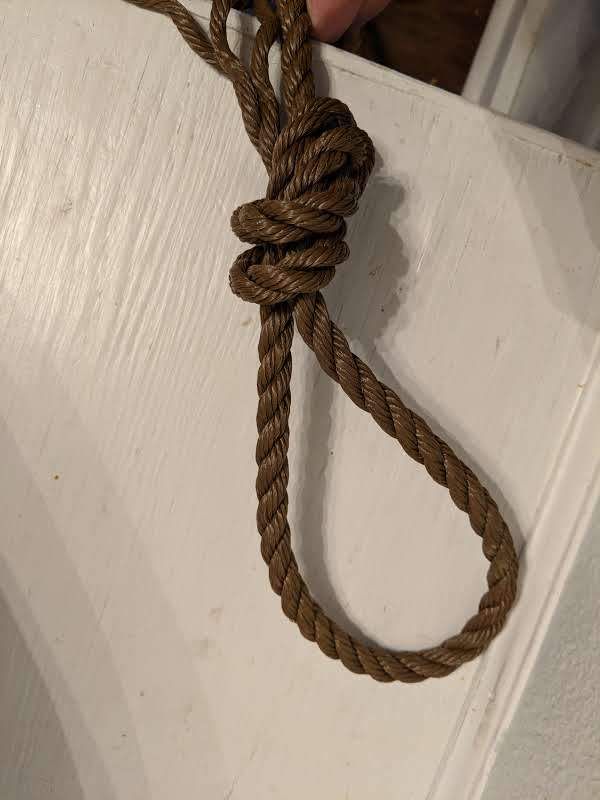 If it becomes too tight, it could cause the tire to puncture or break. Instead, use a simple knot or a bowline knot to keep it secure. And the more excess rope you have, the more swing you can create!
You can also use the excess rope to create a swing frame. This will help to keep the tire in place while in use and will also make it easier to move around. A swing frame is also a great way to add extra stability to the swing. This is a great project for kids to help with.
660lb Weight Capacity 2 Added Hanging Straps Adjustable Multi-Strand Ropes Colorful Safe and Durable Swing Seat for Children Adults
Now that you know how to make a tire swing yourself, take a look at all of these other options, some of which take tire swing up to a whole other level.
This one changes things up by painting the actual tire to look like your kid’s favorite animal. And instead of keeping it vertical, you can turn it to a horizontal angle and attach chains to make it easier for more than one kid to ride on at once.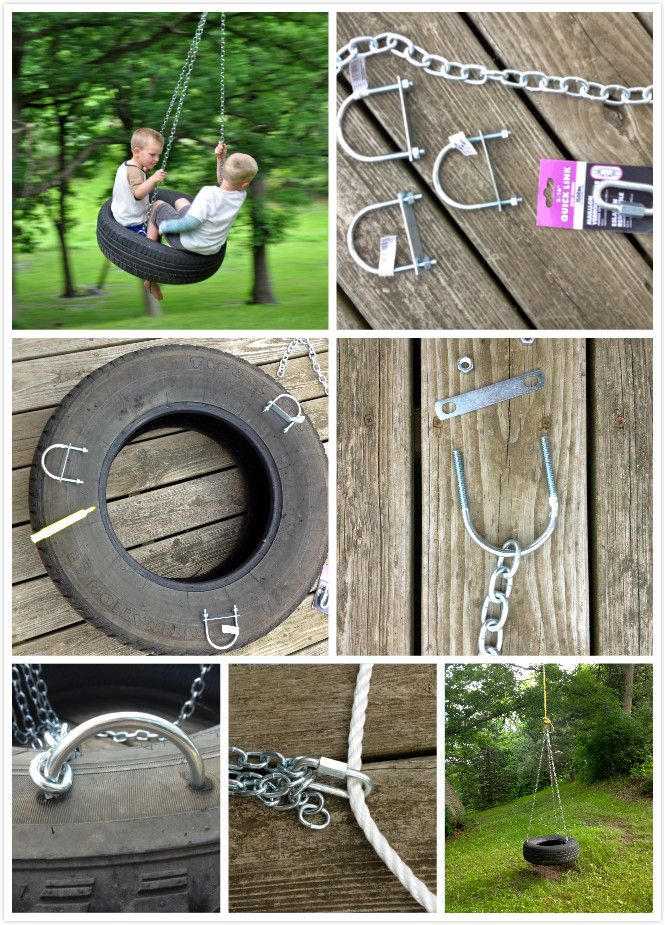
43″ Large Round Swing, 500 Lbs Weight Capacity, Great for Tree, Swing Set, Backyard, Playground, Easy to Install, Blue
To make this variation, you go by the standard instructions, but wrap a soft rope around the entire tire. This keeps it from getting too hot out in the summer sun and adds a little cushion too.
Unless you are already experienced with complicated DIY projects, this horse tire swing might be a little ambitious. Still, it’s a unique take on the classic tire swing and still requires the same tools to get it done.
(Includes 3 Eye Bolts, three 6′ Long Plastic Coated Chains & a 3″ Quick Link) Child and Adult Tire Swing Set Accessories For The Porch, Trees
Although the blog where this tire swing idea originated from is in German, it’s easy to see how this was accomplished. You can thread soft rope or bungee cord in a pattern on the tire to provide a comfortable seat in the middle of the tire rather than an open hole.
If you have more than one kid, you can go with this horizontal tire swing which places a smaller tire above the larger tire to provide two places for kids to sit as they swing back and forth together.
It’s a little more complicated to make this chain tire swing than a more standard rope tire swing, but it can also be more long lasting. Plus, with three anchored spots where the chain attached to the tire, it’s easy to balance on it.
You don't need much more than rope, a few small pieces of wood, a drill, and a sturdy tire to make this swing for your little ones to enjoy outside. But instead of knotting the rope around the tire for a vertical swing, turn it horizontal and drill holes to attach the rope in three different points on top.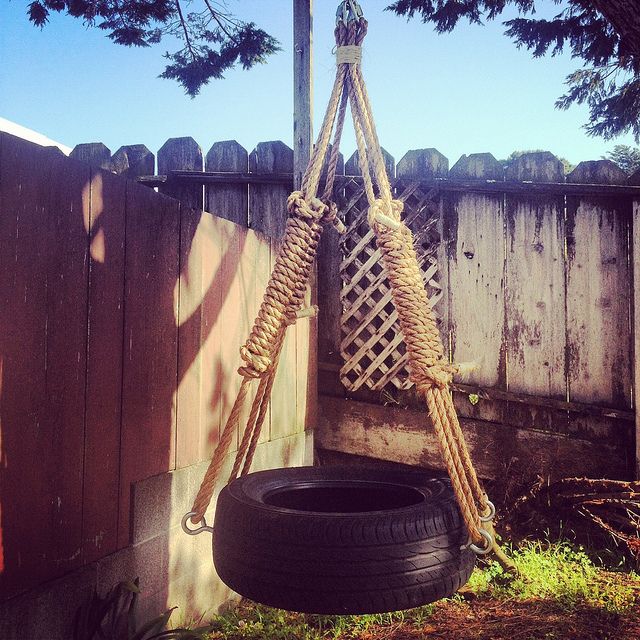
Making your own tire swing can be a hard and strenuous project, depending on which type you go with. But if you remind yourself that it is all in the name of giving your kid a memorable outdoor toy to last their childhood, it makes it all worth it in the end.
660lb Weight Capacity 2 Added Hanging Straps Adjustable Multi-Strand Ropes Colorful Safe and Durable Swing Seat for Children Adults
A tire swing is a great way to have some fun outside and get some exercise at the same time. It is also a great way to get your children moving and enjoying themselves. You can make your own tire swing using simple materials that you likely already have in your home. These materials include a tire, some rope, and a few simple tools.
To put it simply, to make your tire swing, first take the tire and place it on a flat surface. Make sure that the tire is large enough so that it can support your weight. Then, tie the rope around the tire in a loop.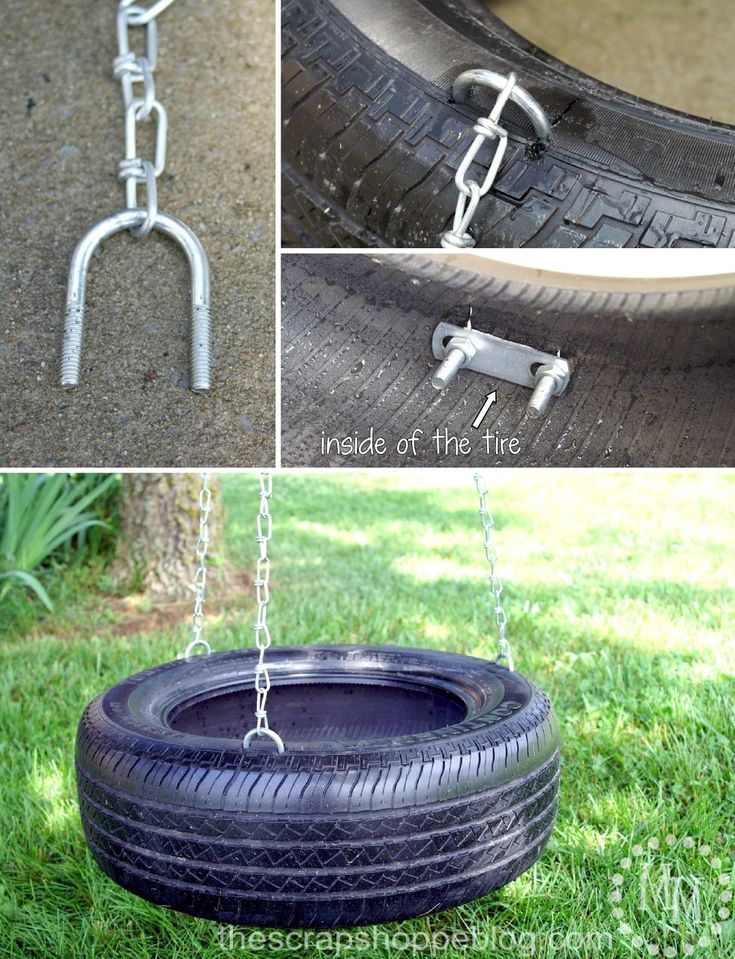 Make sure that the loop is large enough so that you can swing the tire easily. Finally, use the tools that you have to make a simple frame out of wood or other sturdy material. Place the frame on top of the tire and make sure that it is securely attached.
It is important to note that your tire swing should be properly maintained in order to ensure that it lasts for a long time. Make sure to keep the rope clean and free of knots. Additionally, make sure to check the frame periodically for signs of wear and tear. If the frame is damaged, you will need to replace it before you can use your tire swing. Safety is always a top priority when it comes to swings, so make sure to keep your children safe while they are enjoying this fun activity.
(Visited 1,296 times, 1 visits today)
I remembered my entertainment in childhood and decided to make a swing from a tire with my own hands, otherwise a real DIYer is somehow even ashamed to buy such toys for children 😉 .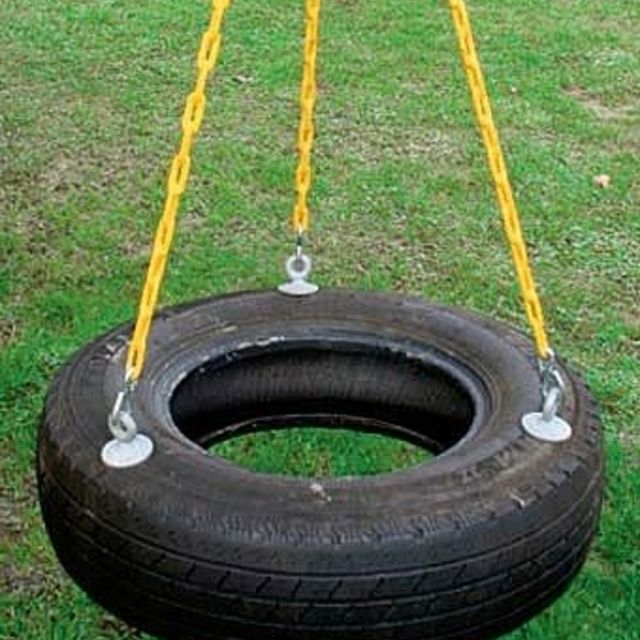
Do you remember your childhood, what a carefree time it was, and really, one of the best entertainments was to swing in the yard on a swing ... homemade tire swings that we wrote about (in the form of simply suspended tires) are not so interesting and aesthetic, and the kids demanded a “pony” when choosing options. nine0010
Why tires are good - affordable, easy to cut, and most importantly strong and elastic enough to give them interesting shapes (horses in our case) pleasant childhood memories. Look at the photos and comments, spend a day and I'm sure you can build the same handmade swing.
1 First of all, the pattern of the horse's swing.
It can be enlarged and printed out to be translated into a tire or just draw similar shapes on both sides of the tire.
The template is round from above, below you can see how it should unfold into a horse.
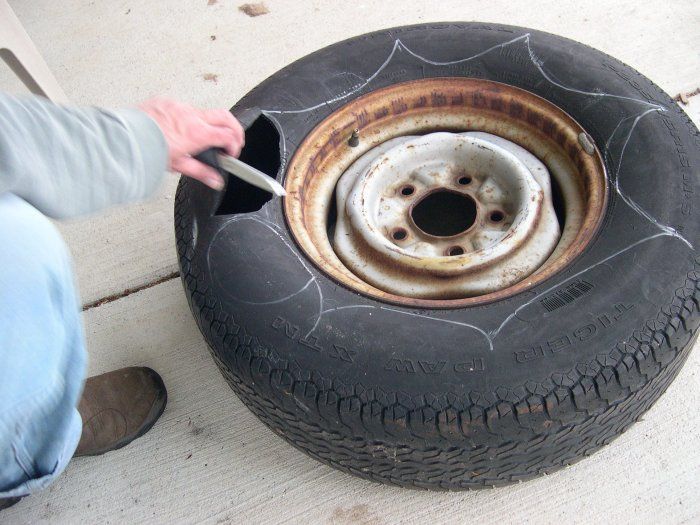
2 You can cut tires with what you have at hand: from a knife and metal shears, to a hacksaw or a jigsaw.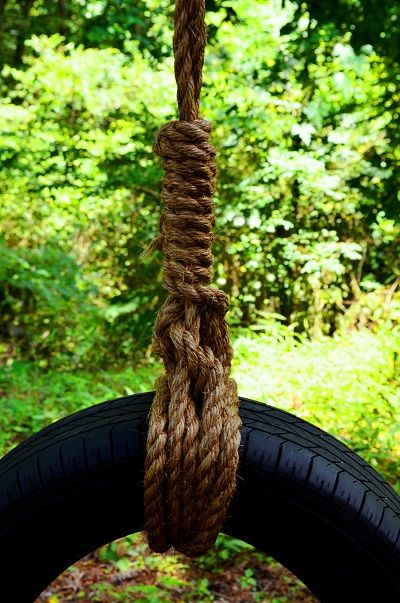
3 After cutting out, proceed to the second stage of the swing construction - the installation of screw spacers and ties of forms. nine0008
- On the horse, you need to make two spacers on long bolts in size equal to or slightly less than the width of the tire tread.
The bolts must be fully threaded to grip each side of the tire. If it is not there, you need to drive it to the head with a lerka. We clamp each side of the tire between the nut and the head, the nut and the nut under the seat and at the withers of the horse. So the swing will not fold and it will be more convenient to sit there. If you do not find such bolts, in principle, you can get by with inserts from rails and screws. One thing - on bolts, nuts, screws, the edges should be rounded - all the same, children should not scratch anything. nine0010
- You will also need three to four smaller bolts 3-5 cm long to tighten the horse's head, back - saddle in the rope attachment area and perhaps one will be needed to attach the mane from loose twisted rope if you decide not to thread it through the hole , and attract for strength.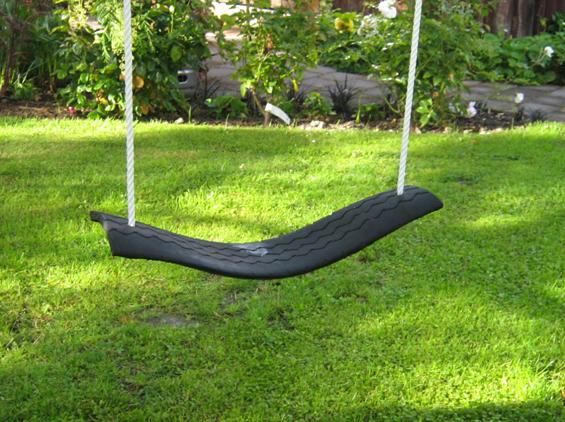
5 The swing is suspended, of course, on a strong cord with good knots at the end. Having previously threaded it into the scruff and back of the horse's saddle.
And one more piece of advice try to make the swing as stable and durable as possible because children will use it and nothing can stand against their energy. To do this, do not narrow the bends of the tire in the seat area, tighten the nuts tightly (you can even clog the thread) and use wide washers, take the cord not too thin.
And I'm sure you can handle the rest. And when your children understand what a cool do-it-yourself tire swing you have prepared for them, I think they will become their favorite place of entertainment. nine0011
(Viewed 279, including 1 today)
May 29, 2022 Likbez Do it yourself
Everything can be used, from an old tire to a construction pallet.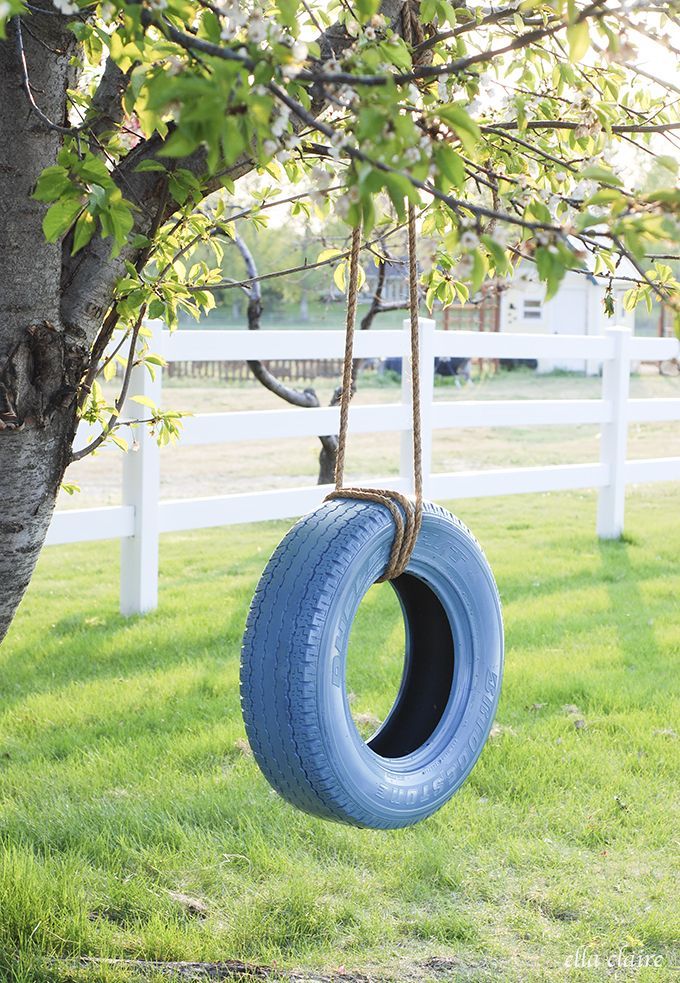
1. Cut a piece of board about 50 cm long with a hacksaw or other saw that is at hand.
Jeremy Rabe YouTube channel2. Paint the finished seat to protect it from rain and make it look more aesthetic.
Jeremy Rabe YouTube channel3. With a drill a couple of millimeters larger than the thickness of the rope used, make two holes - at both ends of the board. Set back 2-3 cm from the edge so that the seat does not break, and drill exactly in the center of the vertical for even suspension. nine0011 YouTube channel Jeremy Rabe
4. Divide the rope into two equal parts, make loops at the ends and fasten to a suitable branch.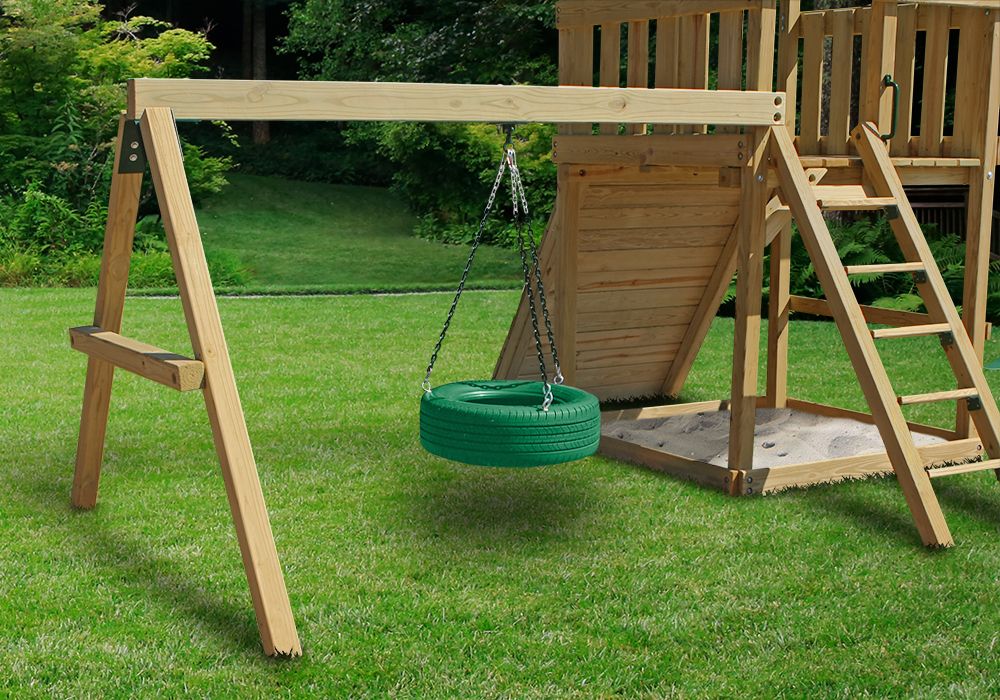 Place the ropes at a distance approximately equal to the width of the seat.
5. Thread the ends of the ropes through the holes in the board and tie a couple of knots at the desired height.
YouTube channel Jeremy Rabe6. Try rocking.
Jeremy Rabe YouTube Channel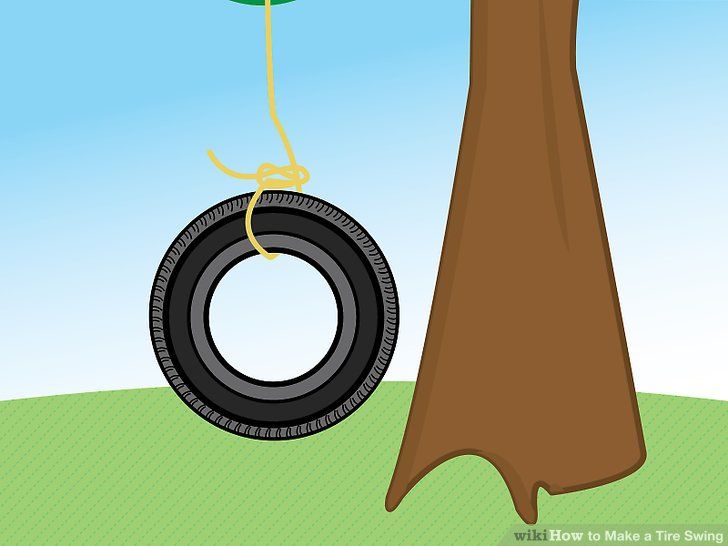
1. Build a platform out of boards. To do this, spread the side ends with glue, connect them together and tighten with clamps. An easier option: nail two blocks across the boards, stepping back from the edge by 10 cm.
Mitch Deitrich YouTube channel2. Sand the top of the platform manually with sandpaper or using a machine.
Mitch Deitrich YouTube Channel3. Using a tape measure, locate and mark the center of the area with a pencil. Also put a line at a distance of 10 mm from the edge of one of the sides. nine0011 YouTube channel Mitch Deitrich
4. Drive a nail into the center, tie a pencil to it with a thread and draw a circle with a radius along the mark at the edge of the site. Pull out the nail; you won't need it anymore.
Mitch Deitrich YouTube channel5. Saw out the circle with a jigsaw and trim the sharp edges with a file or sandpaper.
YouTube channel Mitch Deitrich 6. Using a drill, make a hole in the center with a diameter of 2-3 mm larger than the thickness of the rope of the future swing.
7. Use a file to grind off the resulting sharp edges in the center so that the rope does not fray when swinging.
Mitch Deitrich YouTube channel8. Paint or varnish the resulting seat and wait until it dries.
Mitch Deitrich YouTube channel9. Thread the rope through the hole and tie a couple of knots so it doesn't fall through.
Mitch Deitrich YouTube Channel10. Attach the free end of the rope to the tree.
Mitch Deitrich YouTube channel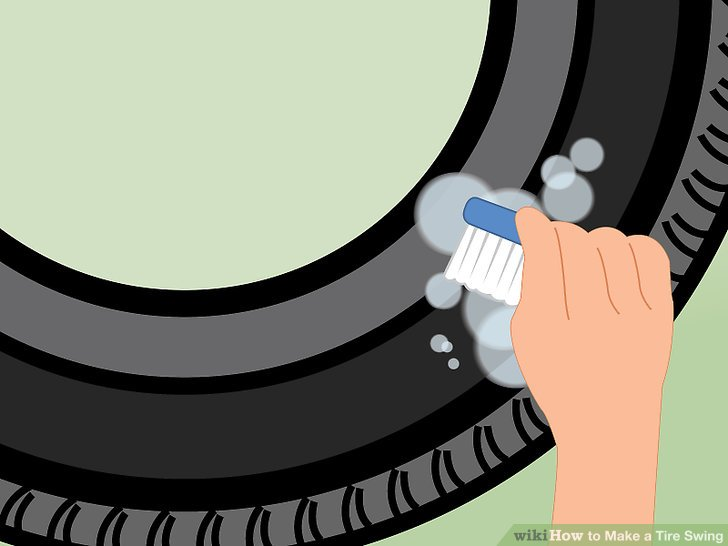
1. Estimate the approximate length of the rope from the branch to the ground, and add 1 m in reserve.
Rewind in place with duct tape to keep the edges from fraying, and cut off the piece with a sharp knife.
Chris Notap YouTube Channel2. Cut the bike tube and put it on one end of the rope.
Chris Notap YouTube Channel3. Tie off this piece to form a loop wrapped around the camera. This will protect the rope from chafing and prevent it from cutting into the branch. nine0011 Chris Notap YouTube Channel
4. Throw the rope over the branch and tighten the loop. For convenience, you can use a thin cord with a weight attached to it.
Chris Notap YouTube Channel5. Form a knot about 1.5 to 1.7 m from the ground.
Chris Notap YouTube channel6. Cut two more pieces of rope about 2 m long each. Thread them into a knot on the hanger, and then tie one knot at each end to secure.
Chris Notap YouTube Channel 7. Tie a knot on the main rope from the branch. You should have three ends to hold the tire on. nine0011 YouTube channel Chris Notap
8. Divide the tire into three approximately equal parts and drill holes d along the thickness of the rope, stepping back from the edge of the tire. On its back, make a few more holes for rainwater to drain.
Chris Notap YouTube channel9. Insert the ropes into the holes, put on the washers, and fix the ends with clamps.
Chris Notap YouTube channel10. Release the tire and try to rock.
Chris Notap YouTube channel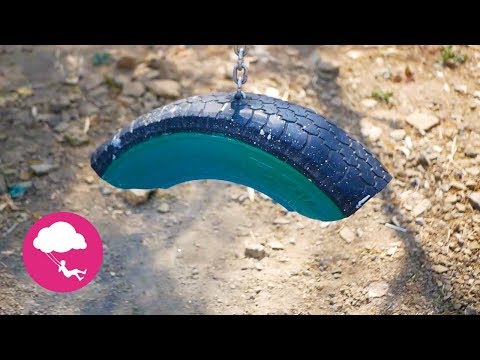
1. Step back from the edge of the furniture board by 250–300 mm, attach a square and draw a line with a pencil.
YouTube channel "Mikhail Le Dantu"2. Saw off the future swing seat along the line with a hacksaw.
YouTube channel “Mikhail Le Dantu”3. Mark with a pencil the places for attaching the rope in each corner, departing from the edges by 20 mm.
Michael Le Dantu YouTube channel4. Make holes with a drill. Choose a diameter so that the rope passes with difficulty and does not dangle.
YouTube channel “Mikhail Le Dantu”5. Saw off the sharp corners of the plank with a hacksaw, and then grind it down with a file. If you want it to be neat, first outline the shape with a template, coin, or other round object.
YouTube channel “Mikhail Le Dantu”6. Round the top edge of the board with sandpaper or a planer so that the child does not get hurt.
Michael Le Dantu YouTube channel 7. Cut two identical pieces of rope and cauterize their ends.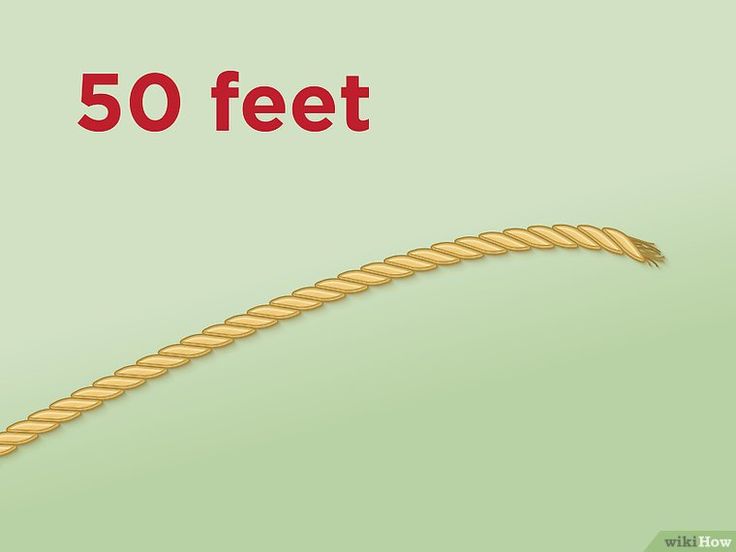
8. Thread the ropes through the holes in the board on each side, with the loose ends on top.
YouTube channel “Mikhail Le Dantu”9. Attach the ends of the ropes to any strong support, such as a wall bar.
YouTube channel "Mikhail Le Dantu" 1.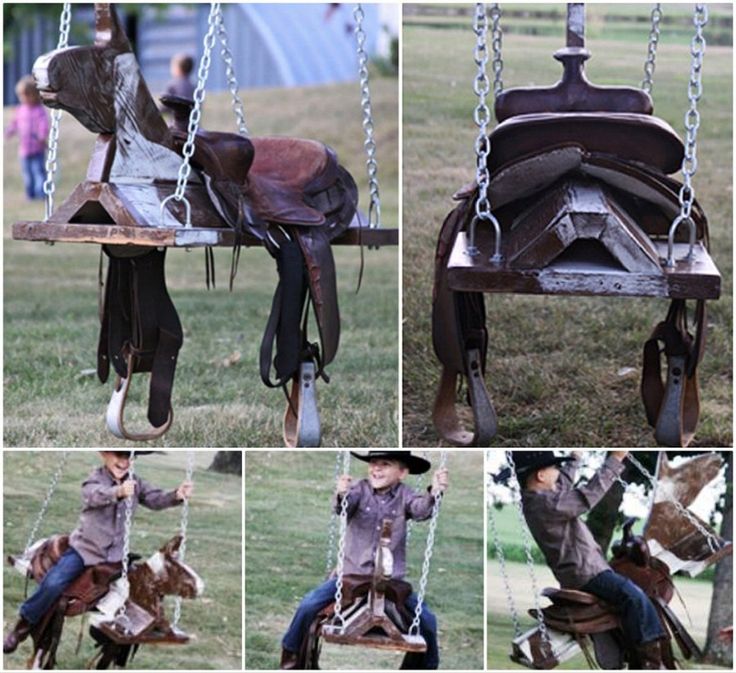 Cut a 30 x 30 cm or 30 x 40 cm seat out of plywood. Drill holes in the corners to attach a rope. Paint the plywood if desired. nine0011
Cut the polypropylene pipe into pieces: 15 cm - four pieces, 25 cm - two pieces, 35 cm - two pieces. Drill through holes in each piece along both edges.
Divide the rope into two equal pieces. Then fold each in half, thread and secure in carabiners. These will be the left and right suspensions.
YouTube channel “Marcel Yarmakov”2. Take the longest piece of pipe and thread one rope of the right and left hangers through the holes on each side.
YouTube channel “Marcel Yarmakov”3. Next, string the middle piece of pipe one at a time, also inserting the rope through the holes at the ends of the parts.
YouTube channel "Marcel Yarmakov"4. Next - one short piece at a time. Here, the rope is already inserted into the pipe itself, along the entire length.
Marcel Yarmakov YouTube channel 5. Now thread the free ends of the left and right hangers through the holes of the second long piece.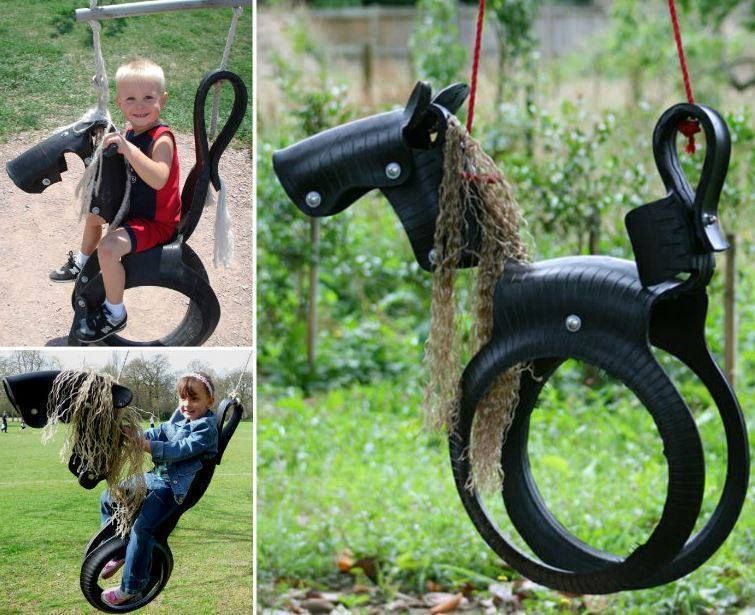
6. Insert the rope into the remaining free holes in the tubes of medium length. And then add one short piece at a time, again passing the rope through the pipe along its entire length. nine0011
Pass the free ends of the hangers through the holes in the seat and tie a knot in each.
Marcel Yarmakov YouTube channel7. Attach the carabiners to any solid support. The swing is ready!
YouTube channel "Marcel Yarmakov"
1. Remove the wheels and everything else from the board.
DIY Network YouTube channel2. Step back 5 cm from the edges and mark four holes for the ropes: two on each side. nine0011 DIY Network YouTube Channel
3. Drill through these areas. Choose the diameter so that the rope holds as tightly as possible.
DIY Network YouTube Channel4. Cut two 30-40 cm long pieces from the handle and drill one hole in each side. Step back from the edge by 3-5 cm so that the wood does not crack. These will be the hand rests.
DIY Network YouTube Channel5. Paint the bars the same color as the skateboard.
DIY Network YouTube channel6. Divide the rope into two equal pieces and fold in half. Tie a knot at each end, but don't tie it tight just yet. nine0011 DIY Network YouTube channel
7. Pass the rope through the bars, make another knot, and then pass the rope through the holes in the skateboard. Tie knots at the free ends from the bottom of the board.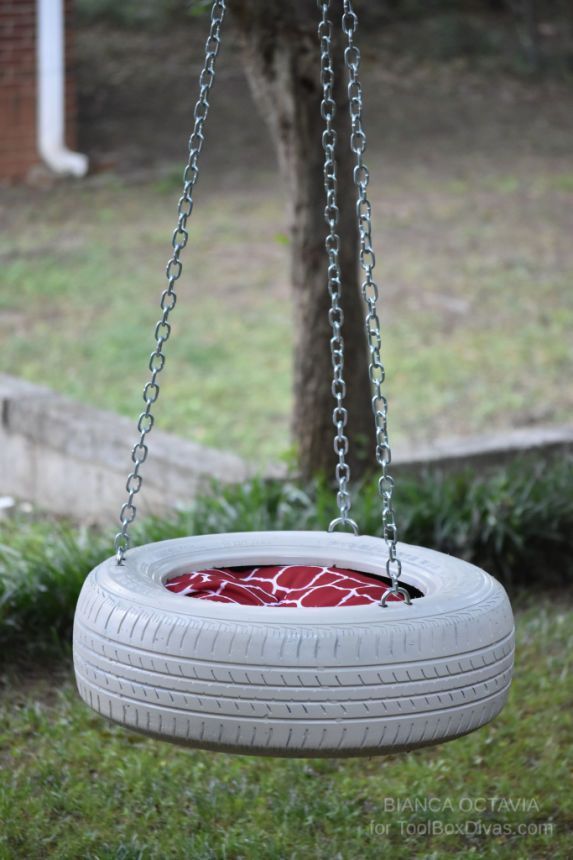
8. Hang the structure from a suitable tree branch and use knots to adjust the handles to a comfortable position.
DIY Network YouTube Channel 1. Cut the parts needed to assemble the two supports: four pieces of 2.5 m from a board 50 × 200 mm, four pieces of 1. 35 m from a board of 25 × 100 mm and four pieces of 35 cm from a bar 50 × 100 mm. nine0011
Assemble the "A" structure. Fold long boards at an angle and nail lintels from the middle segments to them. Reinforce the top of the support with short pieces of timber.
Build the second swing leg in the same way.
YouTube channel “Dacha TV”2. Cut off the protruding edges with a hacksaw or jigsaw so as not to get hurt.
YouTube channel “Dacha TV”3. Place a piece of board 50 × 200, 2 m long, on the crossbars at the top of the letter “A” and nail it. Raise the entire structure. nine0011 Dacha TV YouTube channel
4. Drill holes for fasteners in the middle of the beam at a distance of 50–70 cm from each other. Wrap anchor bolts with rings in them.
Dacha TV YouTube channel5. Hang the seat on the ropes and fasten it to the rings with carabiners.
Dacha TV YouTube channel6. Check the strength of the structure.
YouTube channel “Dacha TV”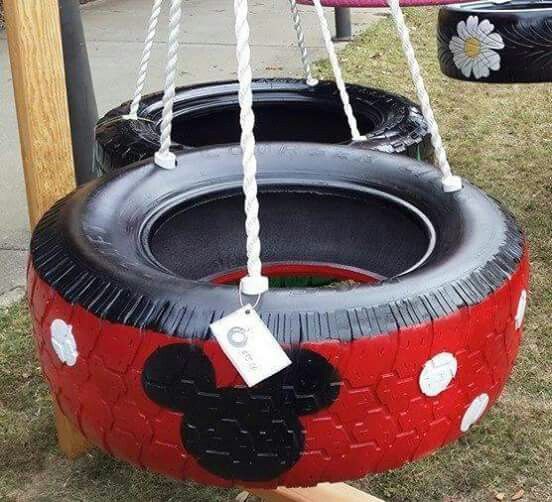
1. Saw off the chair legs with a hacksaw near the seat.
YouTube channel deco dino2. Drill one hole in each corner of the seat. nine0011 YouTube channel deco dino
3. Sand the surface of the chair with sandpaper.
deco dino YouTube channel4. Paint the resulting swing seat with fresh paint and let it dry.
YouTube channel deco dino5. Divide the rope into four equal parts. Pass each piece through the hole and tie a couple of knots.
deco dino YouTube channel 6. Use the loose ends to hang the structure from a thick tree branch.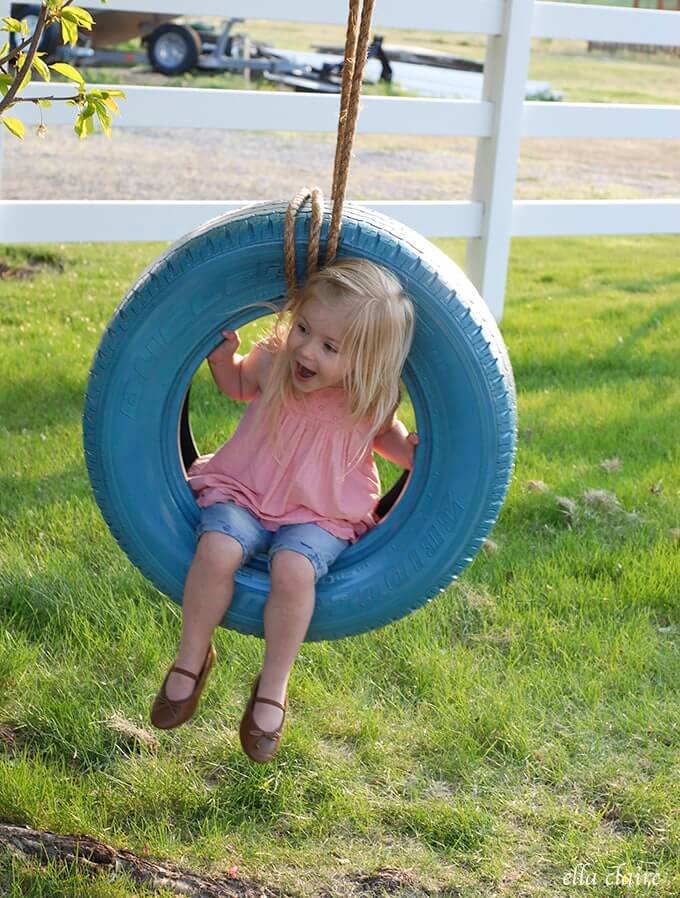
1. Sand the surface of the pallet with a sandpaper or machine to remove all burrs.
SuzelleDIY YouTube channel2. Drill six holes in the outer boards of the pallet with a diameter equal to the thickness of the rope.
SuzelleDIY YouTube channel 3. Flip the palette over and do the same on the other side. Try to keep the holes in the top and bottom boards on top of each other.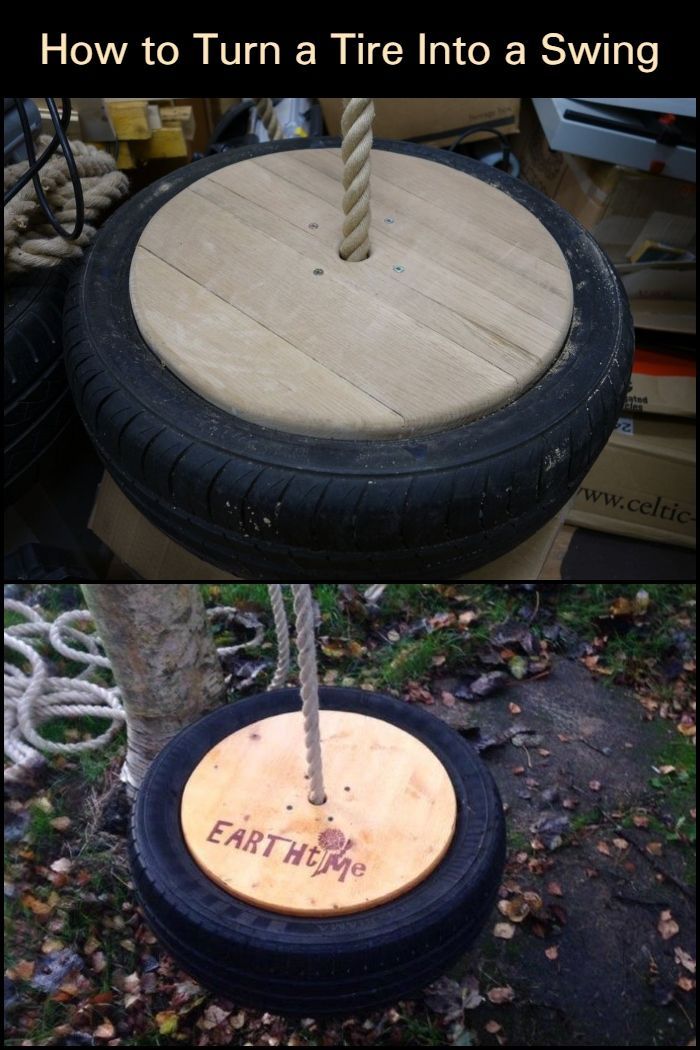
4. Go over all the holes with sandpaper or a machine to remove burrs and not damage the rope. nine0011 YouTube channel SuzelleDIY
5. Prepare two pieces of rope. Wrap the rope with tape and cut in this place. Then cauterize so that the edges do not fray.
SuzelleDIY YouTube channel6. Snake the rope through the holes on one end of the pallet and tie knots at the ends.
SuzelleDIY YouTube Channel7. Do the same on the other side of the palette.
Straighten the ropes to look like suspension bridge cables and connect with carabiners, one on each side. nine0011 YouTube channel SuzelleDIY
8. Take two more pieces of rope and tie them in a loop at both ends.
YouTube channel SuzelleDIY9. Throw these ropes over a thick tree branch.
SuzelleDIY YouTube Channel10. Hook the pallet to the hangers with the carabiners.
YouTube channel SuzelleDIY11. Lay down a blanket and bring pillows.
SuzelleDIY YouTube channel Support cables can also be replaced with chains, but it will look too brutal. nine0080
 5 see
YouTube channel “Mikhail .MD. Dervedmid"2. Assemble two supports in the form of the letter "A" with the upper and lower braces from a bar 50 × 50 mm. Drill through the parts and connect with bolts.
YouTube channel “Mikhail .MD. Treevedmid” 3. Cut off a 1.8 m long crossbar from a 100 × 100 mm beam and fasten it to the upper stops of the uprights by tightening it with bolts.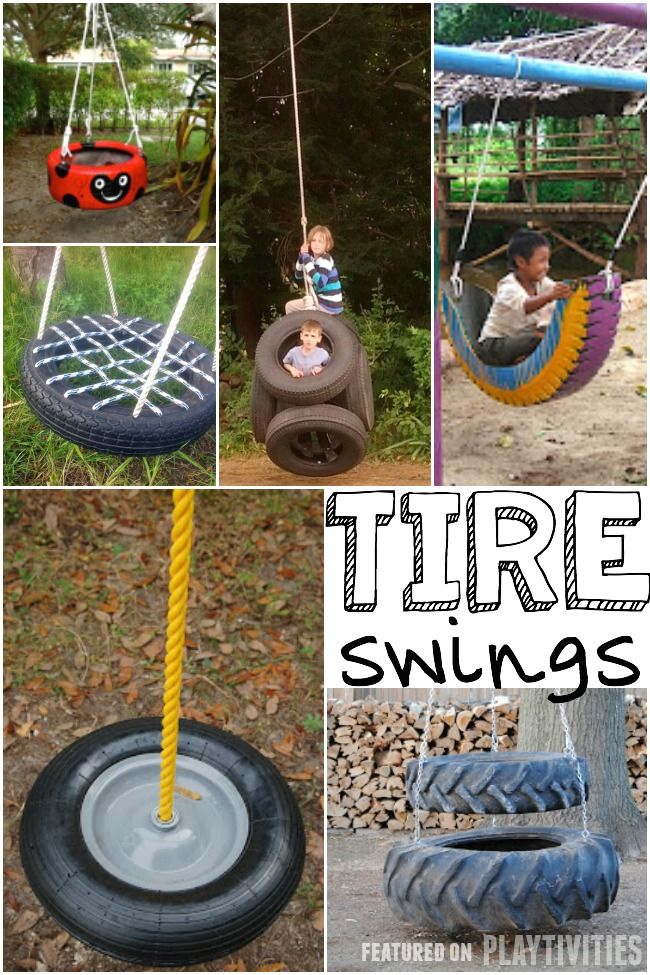
4. Saw six boards 120 cm long: three for the back and three more for the seat.
YouTube channel “Mikhail .MD. Derivedmid"5. On the top board of the backrest, if desired, cut out a pattern with a jigsaw. Sand well with sandpaper.
YouTube channel “Mikhail .MD. Derivedmid”6. Attach three boards with screws to the pieces of timber 50 × 50 mm - this will be the seat.
Do the same for the back and join the two pieces together at the desired angle.
YouTube channel “Mikhail .MD. Derivedmid»7. Saw out the armrests from two boards and attach them with screws through the beam to the seat and back.
YouTube channel “Mikhail .MD. Derivedmid"8. Drill holes for the bolts in the beam and install them through the chain link. Fix it on top with a nut, and so that it does not fall into a tree, place a metal plate or a large-diameter washer.
YouTube channel “Mikhail .MD. Derivedmid» 9. Make holes in the beams of the seat, insert bolts into them and fix the ends of the chains.