Knowing how to adjust an ATV chain helps you maintain and operate your ATV at its best. It also saves you a trip to a shop to deal with something easily managed at home. All it takes is some knowledge, focus, and enough time to get the job done.
First, to know how to adjust an ATV chain, you must understand what the chain is and why it’s there. An ATV drive chain looks similar to what you would find on a bicycle. Some modern ATVs don’t have a drive chain, so consult your manual if you can’t find one.
When an ATV engine turns over, the transmission causes a front sprocket to rotate. That turning sprocket pulls the drive chain, which in turn pulls the rear sprocket. That makes the rear axle turn, which spins the wheels and propels the ATV forward.
If you hear a strange, almost crunching noise while rolling an ATV forward in neutral or feel resistance outside of the norm, you might have chain problems. A jerky feeling, or power loss and clicking noises while driving, is a sign that your chain is loose. Of course, if the chain falls off, it’s clearly too loose.
It’s wise to check your chain routinely. This part can stretch and become loose through regular wear and tear. Trying to drive with a chain that is too loose can pull off sprockets, break cases, rip gears out of the motor, and otherwise cause problems.
How to Adjust an ATV ChainYou will need some wrenches or sockets, a measuring tape, and a screwdriver. Check your ATV’s user manual to learn the recommended slack. It is usually one to one and a half inches.
Start by putting your ATV on level ground and shutting off the engine. Have someone sit on the ATV to see what tension the chain is usually under with a rider aboard. Measure from the skid plate or chain guard near the center of your swingarm. Take note of the measurement where the chain rests on its own, then pull up the chain and note the measure at the highest point. The difference between those two points tells you what your slack is.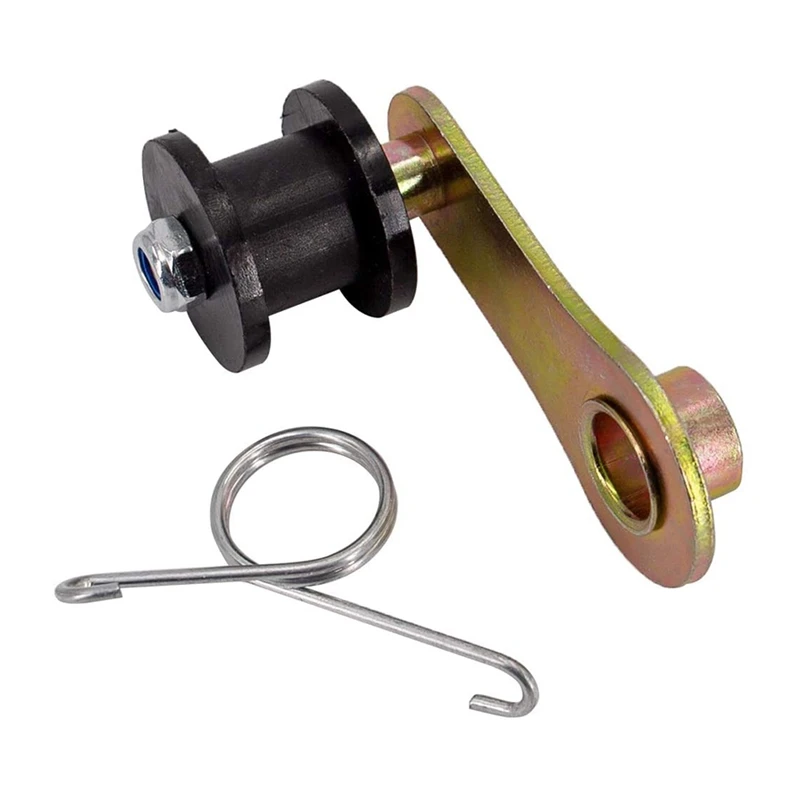 If it’s outside of what the manual says, you will know if it’s too loose or too tight.
To tighten the ATV chain, loosen the bolts on the bearing carrier. Then loosen jam nuts on the adjuster bolt(s). Tighten the adjuster bolt to tighten the chain. Go through the measurement process again, with weight on the ATV. Keep measuring and tightening until you are within the range of the user manual. Once the slack measurement is correct, tighten all of the hardware and jam nuts again.
What if you don’t have adjuster bolts on your ATV? The process is similar, with a few differences. You will still loosen the bolts on the bearing carrier. Then, you will find a hole that allows access between the carrier and sprocket. This is where you will insert a screwdriver or Allen key. Put the Allen key or screwdriver in place, then rotate the rear wheels forward to tighten. The screwdriver or Allen key ensures that the chain adjusts while the bearing carrier is rotated.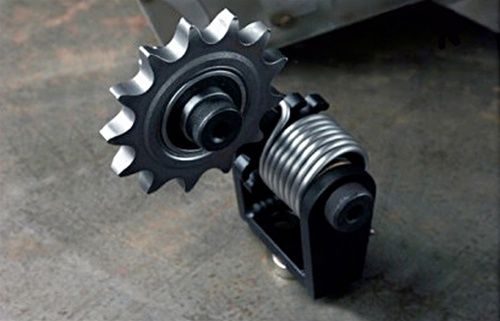 Again, put weight on the ATV and take measurements. Adjust until it is within the right range. Tighten all of the hardware once that process is complete.
An ATV chain that is too tight can wear out sprockets prematurely. While a loose chain is reasonably obvious, it can be trickier to determine that your chain is too tight. One method is to use your hands. If the chain doesn’t give much when you press down on it, it needs more slack.
You can also use your hands as a preemptive measurement tool before every ride. Stack three fingers on top of one another and place them behind the chain slider. With the chain draped across the top of your index finger, it should be taut overall. Anything looser or tighter calls for adjustment.
Luckily, the process to fix it is the same as tightening, in reverse. Instead of tightening adjuster bolts or rotating the bearing carrier forward, loosen. Measure for slack as you would when tightening the chain.
If the chain is still too tight and you cannot loosen it further by adjuster bolts, you may need to lengthen the chain. That requires taking the chain apart and adding a master link to it. You can also shorten a chain if need be by removing portions and using a master link to put it back together.
Disclaimer: While we endeavor to keep the information on our blog up to date and correct, Maxtrade (Coolster) makes no representations or warranties of any kind, express or implied about the completeness, accuracy, reliability, suitability, or availability with respect to the website or the information, products, services, or related graphics contained on the website for any purpose. Any reliance you place on such material is therefore strictly at your own risk.
Lenovo Smartbulb Gen 2
C $7.99
C $25.99 | up to 69% off - Previous price: C $25.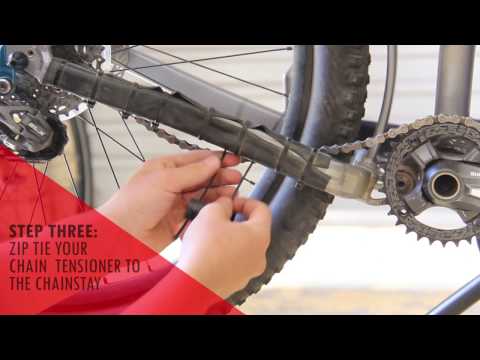 99 up to 69% off
Lenovo IdeaCentre 5i Desktop, i3-10100, UHD Graphics 630, 8GB, 1256GB
C $613.99
C $844.99 | up to 27% off - Previous price: C $844.99 up to 27% off
Apple iPhone 11 Pro Max - Unlocked - 64GB / 256GB / 512GB - CA - Grade A
C $599.00
Apple iPhone 11 Pro - Unlocked - 64GB, 256GB, 512GB - All Colours - CA - Grade A
C $499.00
C $669.00 | up to 25% off - Previous price: C $669.00 up to 25% off
Bose Solo Soundbar II Home Theater, Certified Refurbished
C $109.00
C $169.00 | up to 36% off - Previous price: C $169.00 up to 36% off
Pokemon Sword & Shield Ultra Premium Collection Charizard UPC (Sealed)
C $149.44
HP Elitebook 725 G3 12.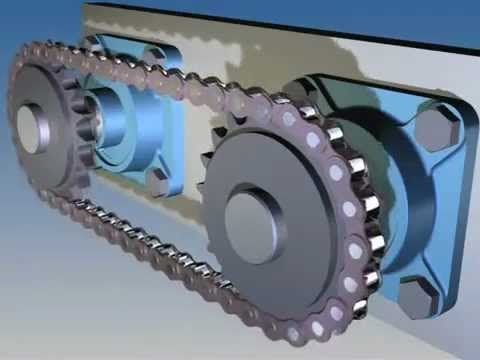 5" AMD-A10 8GB 256GB SSD
C $199.99
C $589.99 | up to 66% off - Previous price: C $589.99 up to 66% off
Dell Alienware m15 R7 Gaming Laptop i7 /16GB / 1TB SSD - NEW SEALED
C $1,999.00
C $2,899.00 | up to 31% off - Previous price: C $2,899.00 up to 31% off
Lenovo ThinkCentre M73 Tiny Desktop (Intel G3250T 2.8GHz,128GB SSD, 8GB, WIFI)
C $94.99
C $490.00 | up to 81% off - Previous price: C $490.00 up to 81% off
Apple iPhone 11 - Unlocked - 64GB, 128GB, 256GB - All Colours - CA - Grade A
C $419.00
Lenovo ThinkCentre M73 Tiny Desktop (Intel G3250T 2.8GHz,128GB SSD, 8GB, WIFI)
C $90.99
C $490.00 | up to 81% off - Previous price: C $490.00 up to 81% off
Samsung S10 G973W /G973U 128GB 6. 1" Display Unlocked Smartphone - Very Good
C $235.99
C $435.99 | up to 46% off - Previous price: C $435.99 up to 46% off
HP ProBook 14-inch (Intel Core i5-6300U, 512GB SSD, 16GB PC4, Webcam, DVD/RW)
C $482.00
C $1,175.00 | up to 59% off - Previous price: C $1,175.00 up to 59% off
Ventray Masticating Juicer BPA-Free Juice Extractor with Reverse Function -White
C $119.99
C $229.99 | up to 48% off - Previous price: C $229.99 up to 48% off
Dyson Official Outlet - HP09 Purifier Hot+Cool Formaldehyde purifying fan
C $749.99
Sony WH-1000XM5 Wireless Industry Leading Noise Cancelling Headphones
C $359.99
C $499.99 | up to 28% off - Previous price: C $499. 99 up to 28% off
Pokemon TCG Sword & Shield Brilliant Stars Booster Box 36 Packs Wave 3 | 1 box
C $230.66
Lenovo ThinkBook 15 Gen 4 Intel Laptop, 15.6" FHD IPS Touch Narrow Bezel
C $997.45
C $1,919.00 | up to 48% off - Previous price: C $1,919.00 up to 48% off
Microsoft Surface Laptop 3 15" Touch AMD Ryzen 5 8GB 256GB Certified Refurbished
C $548.00
C $999.00 | up to 45% off - Previous price: C $999.00 up to 45% off
Dell Precision 7760, 1TB NVMe, Intel 11th Gen 8 Core i7-11800H, 32GB DDR4, Win11
C $1,314.00
C $5,350.00 | up to 75% off - Previous price: C $5,350.00 up to 75% off
Microsoft Surface Pro 8 Intel® Evo™ Core i7 / 16GB RAM / 512GB SSD
C $1,199. 00
00
C $2,050.00 | up to 42% off - Previous price: C $2,050.00 up to 42% off
Samsung Galaxy Note 20 Ultra 128GB SM-N986W Unlocked- Fully Functional !!
C $549.00
Dell Precision 7760, RTX A3000, 1TB NVMe, 8 Core i9-11950H, 32GB DDR4, AR & VR
C $2,552.00
C $7,050.00 | up to 64% off - Previous price: C $7,050.00 up to 64% off
Dell 7610 16 Plus, 16" 3K 100% sRGB, i7-11800H, 1TB SSD, 32GB DDR4, RTX 3060/6GB
C $1,503.00
C $1,940.00 | up to 23% off - Previous price: C $1,940.00 up to 23% off
Samsung Galaxy S20 5G SM-G981W - 128GB - Cosmic Gray (Unlocked) Best Deal !!
C $349.99
C $599.00 | up to 42% off - Previous price: C $599.00 up to 42% off
Apple iPhone XR - 64GB / 128GB Unlocked - 1 Year warranty
C $319. 99
99
C $489.99 | up to 35% off - Previous price: C $489.99 up to 35% off
Apple iPhone 11 Pro Max - Unlocked - 64GB / 256GB / 512GB - CA - Grade B
C $579.00
C $719.00 | up to 19% off - Previous price: C $719.00 up to 19% off
Apple iPhone 11 Pro - Unlocked - 64GB, 256GB, 512GB - All Colours - CA - Grade B
C $479.00
C $549.00 | up to 13% off - Previous price: C $549.00 up to 13% off
Apple AirPods Pro with MagSafe Wireless Charging Case - White
C $159.99
Samsung Galaxy S22 5G SM-S901U(GALAXY S22 5G) Unlocked Fully Functional!!
C $599.00
C $958.00 | up to 37% off - Previous price: C $958.00 up to 37% off
So, what to do if the chain on the ATV has come off? We tell you:
1. Be sure to clean the chain itself of dirt and lubricate with oil, and remove excess material with a soft rag.
2. Next, place the ATV on a level surface and put it in neutral.
3. Then loosen the bolts that are located near the rear sprocket.
4. Insert a metal rod of suitable diameter into the holes and thus fix the tensioner and sprocket;
5. If you roll the ATV forward a little, the chain will be taut, after which you can remove the rod and tighten the nuts and bolts.
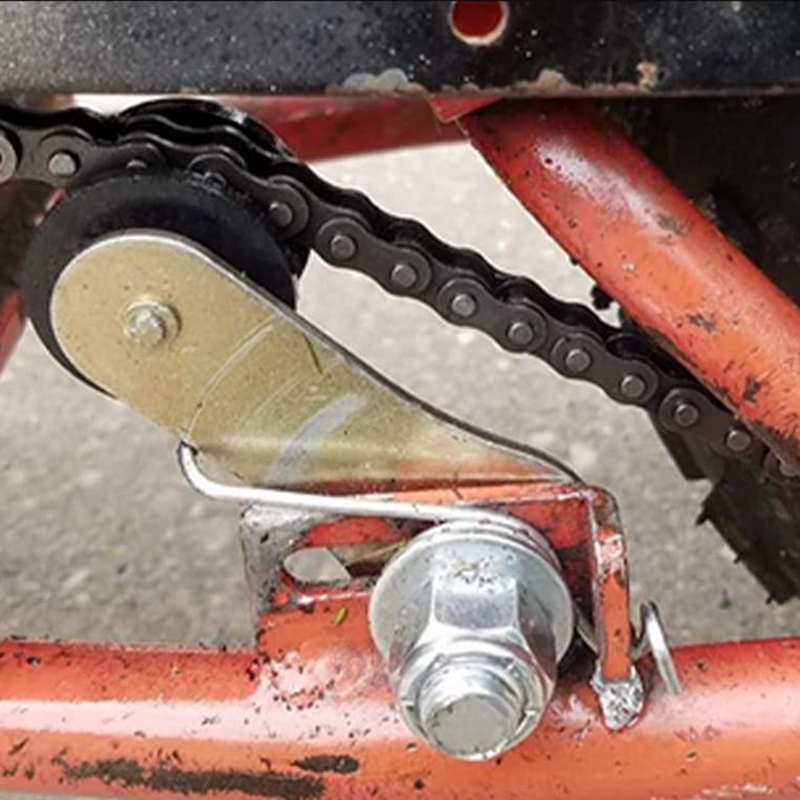
If these steps do not help, and the chain on the ATV flies, you will have to tinker and tighten the roller, if any. If the design of your ATV model does not provide for this element, you can make and install it yourself. To do this, study models of ATVs with rollers installed “from the factory” and select a similar part of suitable sizes. You can use donor quads or any other motorcycle equipment.
If the chain on your ATV flies and the model does not have the usual tension roller, but an eccentric bushing is installed in the swingarm housing, the chain tension is adjusted in a slightly different way. We tell you how. For tension, you will need to turn the rear swingarm carriage either clockwise or counterclockwise. To turn, use a special hook-shaped wrench, or a wrench with an extension and a hammer. Do not forget to first loosen the coupling bolts, otherwise you will not be able to act on the carriage.
Please note! Salon masters https://dvako.com.ua advise periodically changing the chain to a new one, rather than cleaning and installing a used item on the vehicle transition between gears. As already said, excessive tension complicates the switching process, while in a loose state, the links jump over the stars, due to which some speeds may not turn on or the accuracy of the transition to other sprockets will sharply decrease.
The tensioner device only temporarily compensates for elongations during operation, but does not eliminate wear itself. On bicycles with a multi-sprocket drivetrain, the chain stretches many times faster than in a standard front-rear chainring system due to constant slight misalignment. Exceeding the fixing force of the switch rollers when stretched leads to the fact that the device can no longer cope with the chain, and you will have to shorten it yourself.
Tensioner installed additionally
Nevertheless, the use on a mountain bike is justified: the chains are long enough, and there is no slack at any ratio of front and rear chainrings. As for self-installation on a bicycle, where this is not provided, there is no particular reason for this: it will be much easier to remove and shorten a stretched chain by removing extra links. In addition, the price of such devices also does not indulge.
A situation may arise when the roller retainer has become unusable: the rollers themselves have become loose or the tab is bent. The problem will be especially relevant for a mountain bike, which is often run in tough conditions, and it is simply impossible not to hit something! In such cases, you can put a new tensioner. The first thing to do is buy it. In principle, there should be no difficulties: bicycle parts manufacturers, for example, shimano, actively produce such parts for specific bicycle models.
Mountain bike wheel and roller lock
The roller tensioner can be installed using the mounting bolts. The chain must first be thrown off the rear sprockets. After the tensioner is installed, it is removed from the front as well. You need to dress in the following sequence:
Adjustable angle α
The tensioner can be adjusted by changing the angle relative to the frame. The optimal position will be near the "critical angle" where the tension is maximum. Since increased chain stiffness is not good, it should have a little free play. However, it is not worth it to move too far, otherwise the chain will start to ride.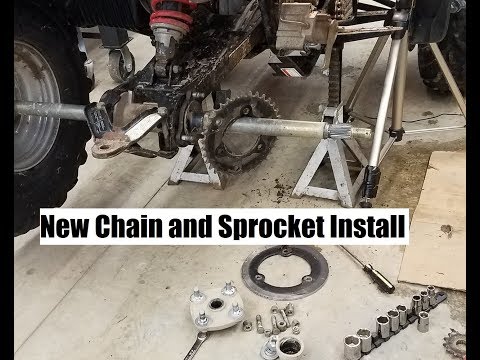 What should be the angle? There is no exact answer, this parameter is individual for each bike, and self-adjustment will require care. An alternative option is to contact a specialized workshop.
To save some money, you can make your own bicycle chain tensioner. But first of all, you need to understand why you need a damper (aka tensioner) of a chain on a bicycle. This accessory is a protective element of bicycle transport. Thanks to the damper, the level of tension of the chain mechanism is regulated in order to eliminate the decrease in vibration when overcoming obstacles (jumping over stones, rails, and so on). In addition, the tensioner provides protection against mechanical damage and the chain jumping off the sprockets. A damper is used on bicycles that have one speed or an internal shift mechanism.
There are only 3 types of standard tensioner settings:
"ISCG" is installed directly on the frame by reinforcing the bolts in a circle. For this, 3 fasteners are enough. In this case, the distance between the bolts should be 47.77 mm.
"ISCG 05" is considered the most popular option, since mounting it is quite simple. Iscg05 chain damper and other models are used. The mounting circumference is 73 mm in diameter, but the distance between fasteners is 55.92 mm.
"BB" is attached to the bottom bracket that presses the tensioner to the bike frame.
The dampers differ not only in the type of installation, but also in other parameters:
The material can be used in both high quality metal and plastic. The cost of the product depends on these indicators.
Spoke tensioner.
bicycle spokes
Aluminum plate tensioner.
Using a marker, draw an old part on a metal blank, called a rooster, after which the central part of the hole is drilled. Further, the workpiece is sawn off as much as possible with a hacksaw and the external shape is brought to an ideal state with a file. Instead of a dropout, you can make a groove along the diameter of the shaft, which is subsequently inserted into the groove of the rooster. At the place where the rooster is installed in the frame, a difference is made across the width. Its width on a thin section should be 4 mm, and on a thick one - 8 mm.
The hole can now be drilled out completely. Please note that the diameter of the drill should be slightly smaller than the diameter of the hole. Especially if the metal is soft. It is best to use an electric drill, as a manual one does not give perfect accuracy. Then the thread is cut with translational-return movements.
IMPORTANT! The thread must be cut strictly perpendicular to the axes. To improve the appearance of the product, sanding and polishing
Do not forget to use oil for lubrication.
Installation and adjustment methods depend on the design and purpose of the bicycle. But you should start the same way:
Turn the bike upside down.
Install the tensioner on the cock, axle or frame dropout.
Put the chain on the front and rear sprockets and on the idler pulley.
With a chain pressure of 100 g, its deviation from a straight line must not exceed 25 mm, but not less than 15 mm. If the indicators are not normal, you can adjust the tension by changing the angle of the lever. If, at the minimum angle, the tension is so great that the straight line of the chain is tensioned by less than 15 mm, 2 links should be added.
Adjust the chain line: roller, chain and star must be in the same plane.
Rotate the connecting rod. A running transmission should sound smooth and the wheel should spin smoothly.
These bikes do not have a permanent tension lock. It is adjusted by a spring. The degree of elasticity is adjusted by a bolt.
For diagnosis, set speed to maximum chainring and widest sprocket.
Pull the chain away from the chainring in the direction the bike is moving (normal 5 cm (2 links)).
If abnormal, adjust the spring. The rollers of the derailleur and star in all combinations must be in the same plane (they are adjusted by the tension of the cable and the bolts with "H" and "L"). In motion, the sound should be homogeneous, when switching, the chain should be thrown clearly.
This tensioner is made in many ways, but the easiest way to do this is with pliers. The option is old, outwardly it does not look very attractive, but many cyclists use it. The spoke should be bent into a spiral and placed on the transmission so that it pulls the chain.
Another simple method for which a duralumin or aluminum plate is used. For everything to be done correctly, you will need:
A worn part is taken, applied to an aluminum blank, outlined with a marker, a hole is drilled in the center. The workpiece is cut as much as possible, trimmed with a file and sandpaper.
The chain is the component of the bicycle transmission with the least resource. It stretches quickly, especially on road and mountain bikes. A stretched chain can damage other transmission components such as the system and cassette. The bicycle chain tensioner extends its life and, as a result, protects other transmission components and even frames.
Bicycle chain tensioners.
A toothed roller pulls the sprocket chain from below, as it when pedaling, the chain is pulled rigidly above the feather. It is attached to a foot that is fixed on the rear triangle of the bicycle frame, on the cock or on the axle (depending on the type). The farther the chain is from the star, the stronger the tension.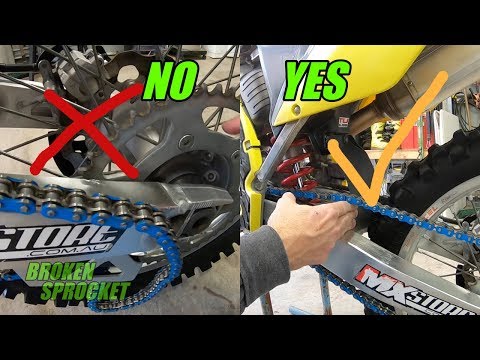 The closer, the weaker. The tension is adjusted by the position of the presser foot.
Tensioner performance is best seen on bikes with multiple speeds where sprockets of different diameters are mounted on the rear wheel. When switching speeds, the chain is rearranged from one star to another, and due to the different diameters of the stars, its tension changes. This is compensated by changing the distance between the star and the roller.
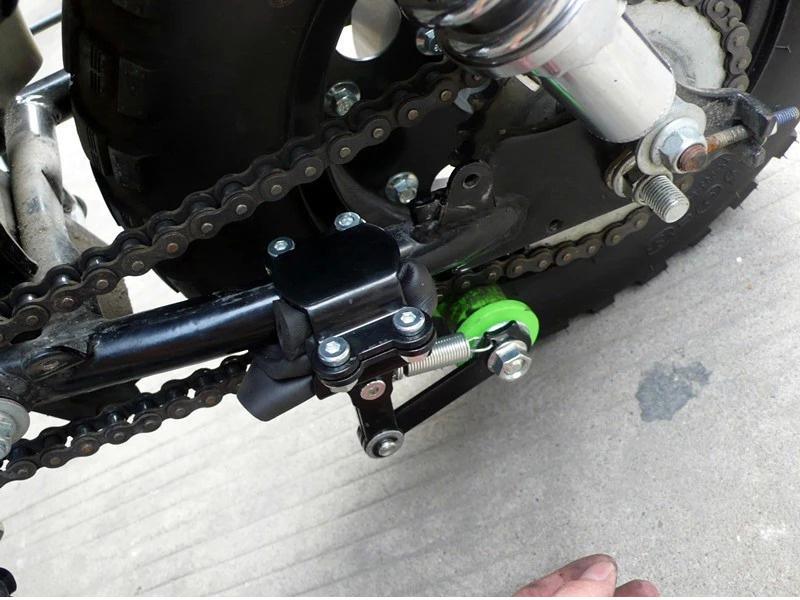
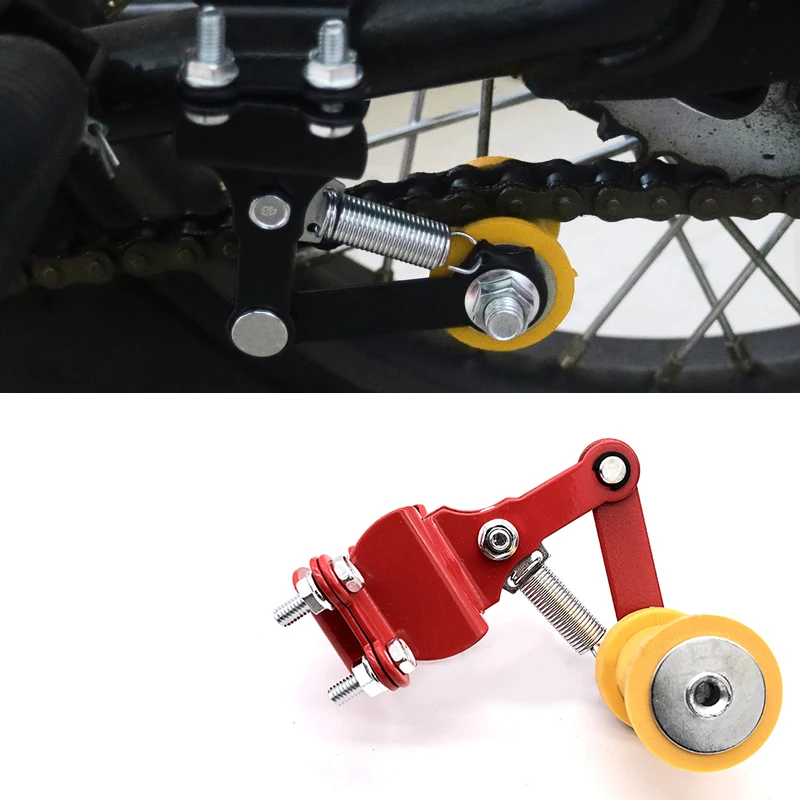
Home → Repair → 150 cc → Chain and drive → Do-it-yourself chain tensioner roller
This is most often due to chain stretching and the absence of a chain tensioner roller (there is no roller on some models of ATVs). It is also not uncommon to complain that the factory tensioner roller quickly wore out and ceased to perform its function properly.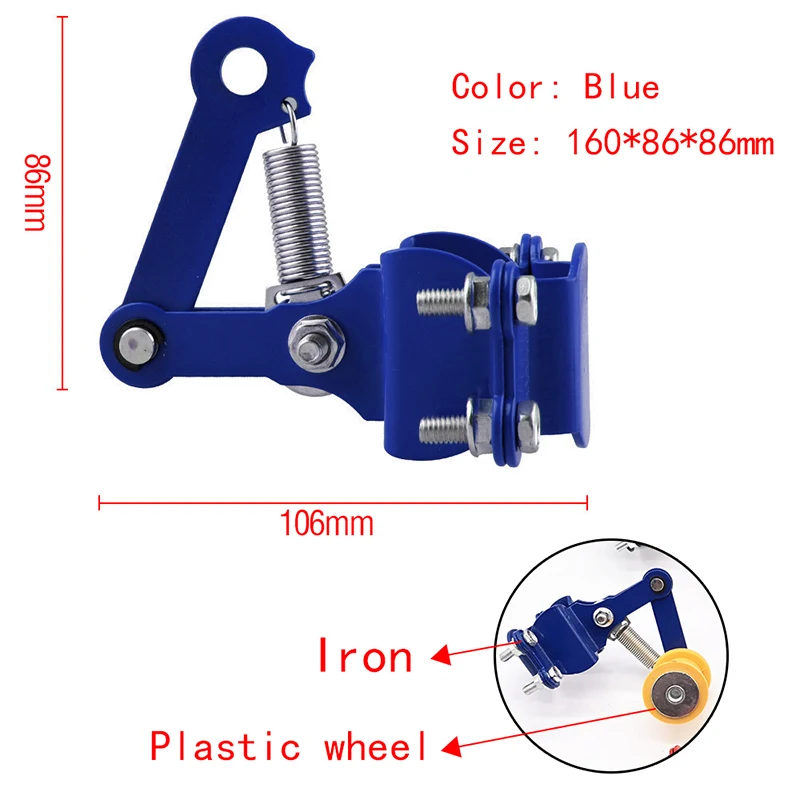 Most recently, we wrote about how to tension the chain on an ATV, but we will try to solve the problem with the roller in this article.
Let's start with the case where the roller is installed on the ATV by the manufacturer, but for some reason you want to replace or upgrade it.
Most often the roller is quickly eaten by the chain when the plate on which it is mounted is crooked from the factory and the chain rubs hard against the sides, or when the quality of the plastic from which the roller is made is very poor.
In both the first and second cases, it is better to get rid of the factory roller (which, by the way, is not cheap) and switch to using the timing belt tensioner roller, for example, from the VAZ 2108, which, if properly installed, will go with you more than one thousand kilometers.
Let's go. We go to the store and buy a VAZ 2108 timing tensioner pulley.
Let's remove the standard tensioner pulley together with the plate from the ATV and change the design a little, namely, remove the standard pulley mount.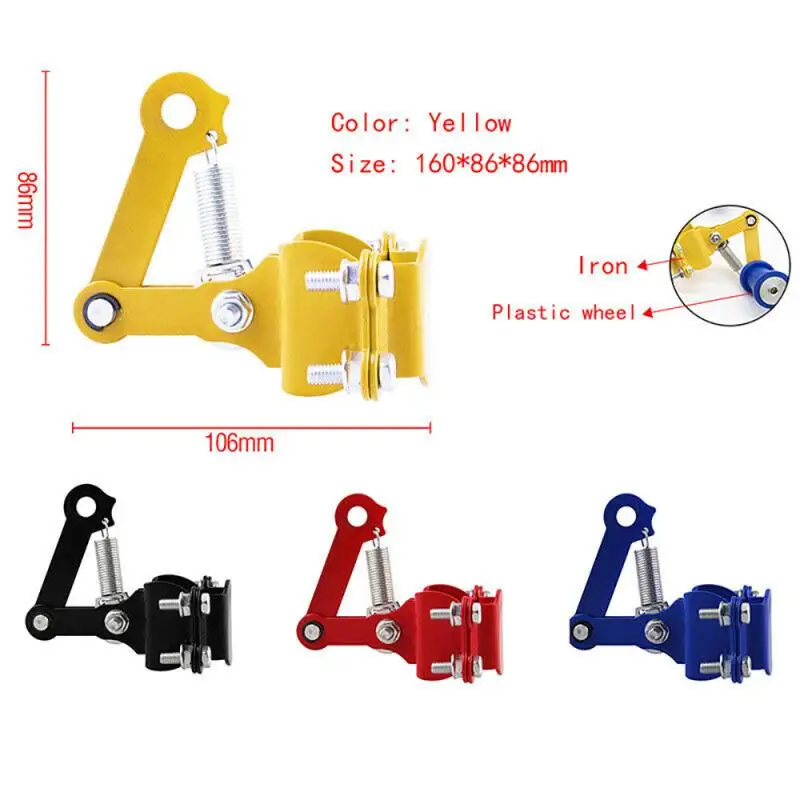
Instead, we weld the bolt (we select the diameter so that the new roller fits as tightly as possible on the bolt).
We put the roller on the welded bolt and counter it with a nut using a washer or a groover.
Optionally, an additional spring can be added to press the roller against the chain more strongly.
Well, that's all, let's go for a ride and forget about the problem for a long time.
Now let's consider the option when the tensioner pulley is not provided by the factory at all.
In this case, there is no limit to fantasy at all, and, perhaps, after looking at the proposed options, you will come up with your own.
So, the first option.
Same timing pulley, 15X15 square tube bolted to swingarm rear ski bolt and spring. Works on "cheers".
Option two.
The ATV swingarm has a hole for a bolt, on which a plate (lever), a favorite timing roller and two springs for stretching are fixed.
type).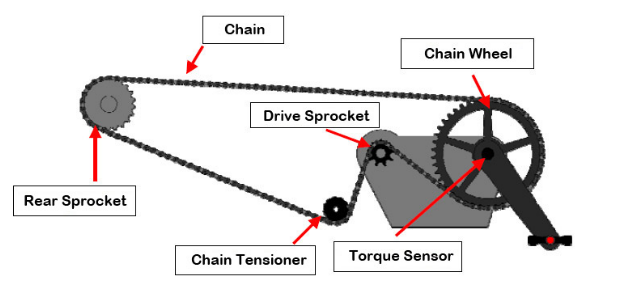
All chains in "Toyota" are divided into two types: gear and roller, and the latter are practically not used. On most machines with a gas distribution mechanism, gear systems are installed if a chain drive is used.
Gear units provide smooth running, have increased reliability, and practically do not make noise during operation. In operation, gear systems are similar to belt drives. It is impossible to answer the question exactly which is better. If you start talking about this topic, you get a full-fledged article.
Hydraulic tensioners, the working medium of which is engine oil, tension the chain in a Toyota. Oil enters through the engine lubrication system. The number of tensioners depends on the number of camshafts. There may be one, two or three.
The timing chain system includes the chain itself, the tensioner, and the lubrication system. Over time, due to wear of parts, the mechanism starts to work worse: a replacement of the tensioner or the chain itself in Toyota is required.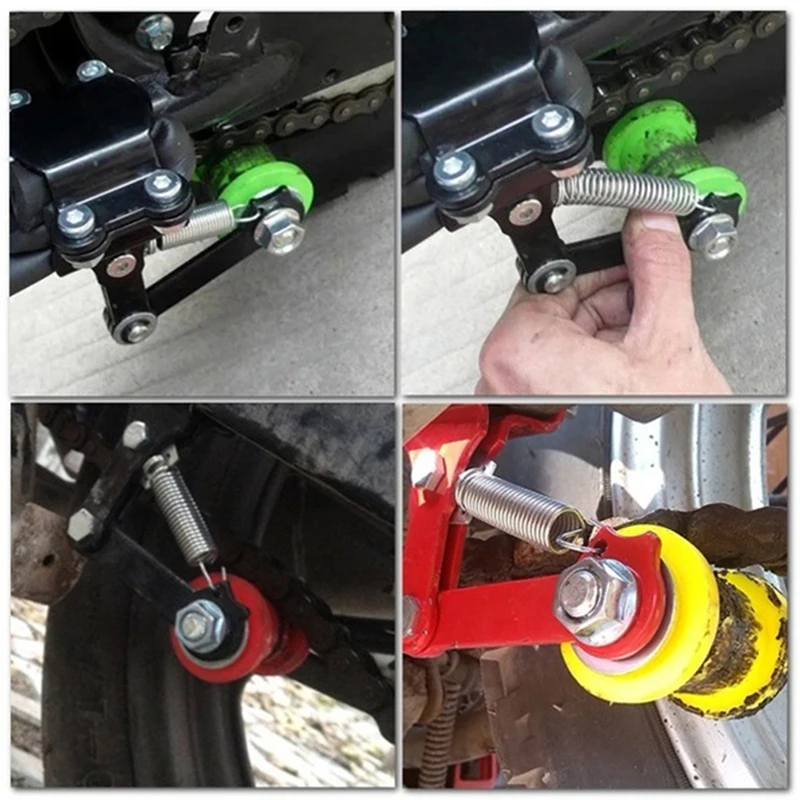
How to understand that the timing has become unusable? To do this, listen to how the motor works. We heard metallic sounds, and crackling at high speeds, which means that the gas distribution mechanism system is out of order.
Press the accelerator pedal hard, you will immediately know that the circuit is faulty. In this case, the ignition will not work normally, and as the speed increases, black exhaust gases can be seen coming out of the exhaust pipe. This indicates that the fuel mixture is too rich.
Inspect the motor to check for wear on the chain drive. We remove the valve cover, even a beginner can handle it, the main thing is to take a suitable key. After 10 bolts are unscrewed, remove the cover. Now you can easily reach the chain. Do a visual inspection of it. If it is in working order, it will not sag at the top.
The Toyota tensioner should also be inspected. It should be in such a position that the chain is well tensioned. Did you notice that she is sagging? So it needs to be replaced.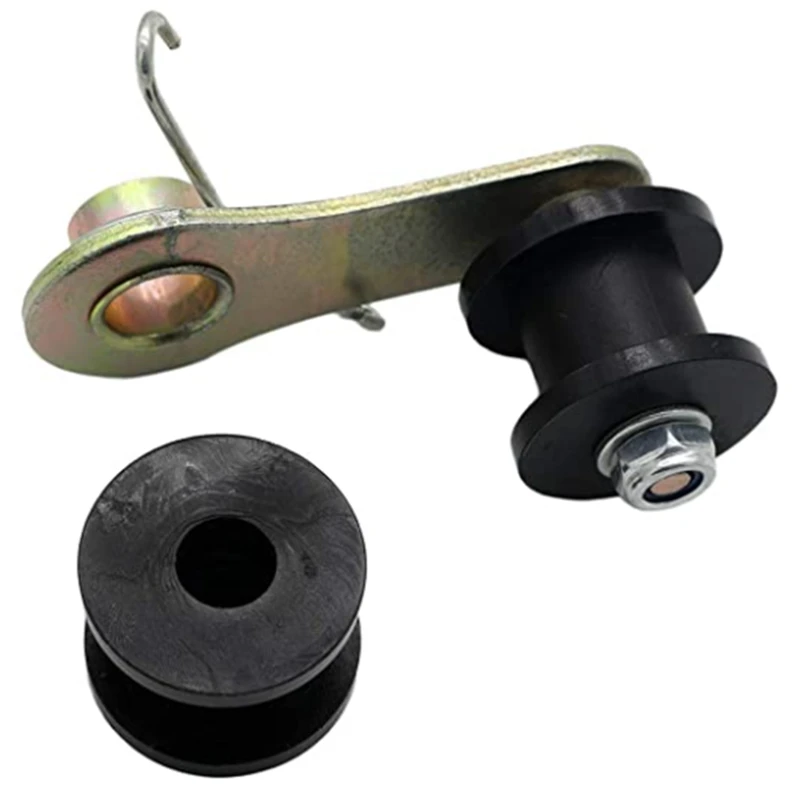 Many motorists who do not have the opportunity to replace the chain do the following. They install bolts on the tensioner or even mount a second tensioner. This manipulation is considered a last resort, and it can be performed only in emergency cases. After all, the effect will be temporary, and then it will be more difficult to repair the mechanism.
How long a chain lasts depends on the material it is made from. It must be of high quality
You should also pay attention to the degree of efficiency of the heat treatment of the material
Timing sprockets must also meet the above requirements, because they participate in the operation of the mechanism. The lubrication system must not be allowed to be faulty, as it affects the functioning of the unit. Only high-quality lubricant should be poured into the engine, change it in time.
"Oil change in a 6-speed automatic transmission: basic steps" More If the chain drive is made of durable material and the required tension is set during maintenance, while the oil is changed regularly, the mechanism will properly last as long as the engine.
Conversely, a stretched chain will quickly fail. So that its replacement is not required, you should buy a high-quality part, set the tension correctly, use the right lubricant.
If the chain tension is correct, you can avoid a lot of trouble.
Chain tension on a multi-gear bike depends on the rear derailleur spring. But this does not mean at all that there is no need to check the tension: the process of shifting gears can take place with complications, the chain and sprocket teeth can fail, and in case of sagging, it beats against the frame pen, dirtying it and wearing out the transmission.
The tension is checked in two ways:
Adjustment on full suspension is done as follows: the bike is pressed until the front sprocket is lowered from the cassette as much as possible. According to this indicator, the length is determined.
Most often this element fails due to mechanical wear from traveling over difficult terrain. For example, roller-type retainers on mountain models break quite often: they become loose, or the foot is deformed. If the wear is severe, a new chain tensioner is installed. The procedure is as follows:
If you do not know how to install the chain tensioner, ask a specialist for help.
, knob, screwdriver with a flat blade. 1. Disconnect a wire from the minus plug of the storage battery.
3. Remove the timing chain cover.
5. and remove the timing chain guide.
6. Remove the timing chain tensioner shoe.
8. and remove the upper chain guide.
9. Disengage the timing chain from the timing chain drive sprocket.
10. Remove the timing chain.
Follow the steps below to install the timing chain.
1. Place the chain on the timing chain drive sprocket, aligning the marked link B with the alignment mark on the crankshaft A. Rotate the shafts.
2. Fit the chain onto the camshaft sprockets, matching the marked chain links with the marks on the variable valve timing clutches.
NOTE. To align the marked chain links with the marks on the sprockets, use a wrench to turn the shafts clockwise over the hex areas.
3. Install the parts in the reverse order of removal, taking into account the following:
before installing the hydraulic chain tensioner, raise the tensioner ratchet
and attach the hook to the pin.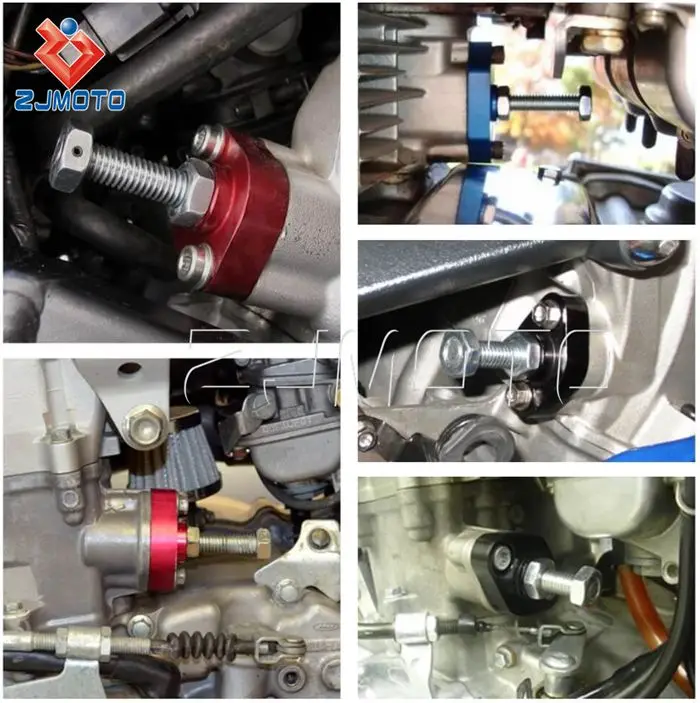 4. Turn the crankshaft two turns clockwise and check that the alignment marks of the crankshaft and camshafts match. If the marks do not match, reinstall the chain.
source
The most common victims of chain failures and malfunctions are budget Chinese ATVs. Their chain may begin to subside after the first 200-300 km. At least, this is evidenced by some posts on specialized forums for ATV owners. However, on better and more durable equipment, the problem of sagging and dropping of the chain is also not a rare phenomenon
After about 500 km, we still recommend that you pay attention to this part of your vehicle
At first, the chain starts to sag more than it should. Immediately make a reservation that if the chain sag exceeds 1.5-2 cm, you need to "sound the alarm" and fix the problem. If you do not respond in time, the chain may break and damage the drive axles or ATV driveshaft. And this is an extra cost for repairs.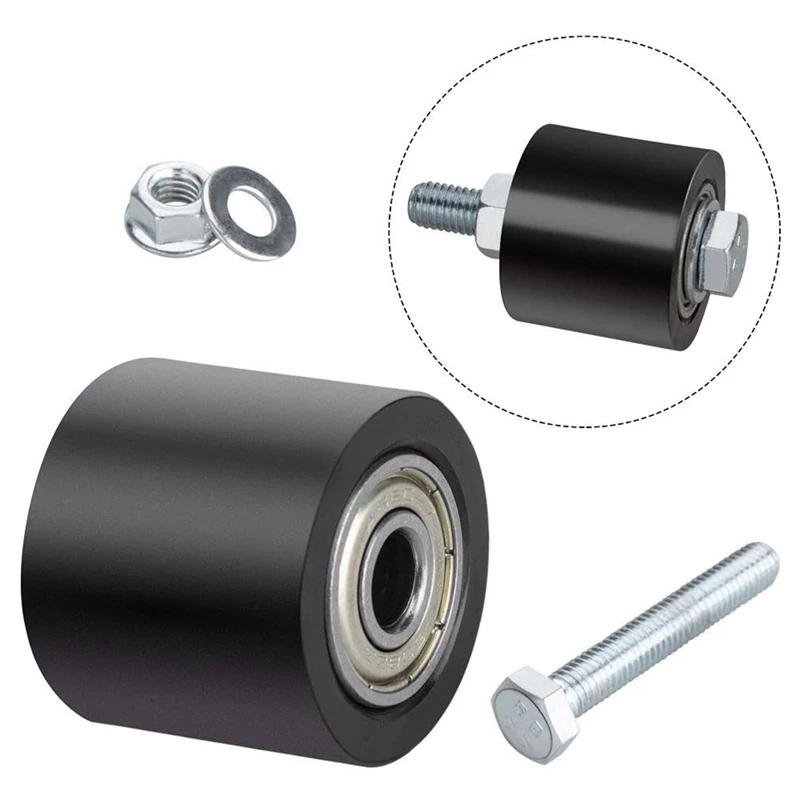 Much easier and cheaper to deal with chain slack.
If you are having a chain slip on your ATV, normal wear on the part itself or on the drive sprocket may be the cause. This is normal, especially during intense four-wheel rides.
How to solve the problem:
● The first step is to clean and lubricate the chain itself;
● check that there are no deformations or cracks on the chain links;
● the sprocket may have been worn - check that all teeth are in place, otherwise the part will have to be replaced;
● Be sure to tighten the tension screws.
You can independently make a bicycle chain tensioner of varying complexity and degree of reliability.
For this you need a small sprocket as a tensioner pulley. As a mount, you can use part of the reflector, an aluminum plate in which holes are drilled for mounting the sprocket and bolts holding it to the frame.
But there are also unusual solutions, such as a bicycle spoke tensioner.
An old, unreliable, but working way.
The bicycle spoke is bent into a spiral and attached to the rear axle. Its end should pull the chain and point upwards from the pen and in the direction of the bike.
Aluminum plate is used as the base. It is folded in half or cut into 2 parts. A roller is attached at the end between them. On the other, holes are made for fixing to the frame with bolts.
If the plate is bent, a rubber gasket is installed in the place of the bend. The curved plate clings to the nib and clamps around it. The rubber gasket prevents the plate from damaging the paint layer and helps to firmly fix the homemade lever.
The reflector mounts, like the aluminum plates, serve as the base for the tensioner pulley.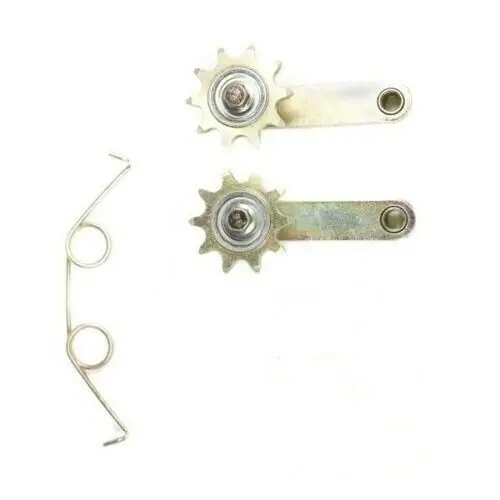 This design is installed on the pen next to the rear or front star.
The soft material used in the manufacture of reflector mounts has good resilience and strength characteristics. This gives an advantage to those who love hard driving.
A used rear derailleur will still be useful if you cut off the lower part from the old derailleur: roller and foot. The latter must be fixed on a rooster or dropout and the tension adjusted correctly. This is the easiest but most reliable way to make a homemade tensioner, because. the original parts were produced in profile industries.
How to install snow chains on ATV
The first thing we have to do is to lay them out in front of the wheels along the movement, so that the locks remain outside. Run into the chain, stop for 20 - 30 cm to the end. Put the chain behind the wheel and hook it on the hook from the inside. Next, we straighten the chain so that the links are located at the same distance, and put on the hook from the outside. We drive 15 - 20 meters and tighten all the locks. The process of installing the chain for the ATV is finished. Remember that during operation, the chain tends to stretch, so they need to be tightened from time to time, and not wait for it to break or fly off, breaking individual parts of the ATV. On quads, of course, I have not seen this yet, such a bad experience took place in a car.
If there is no tensioner, this is very bad, because you will often have to change the chain, so the manufacturer of chains with such a pitch - as a rule, uses the Izhevsk chain from the IZH motorcycle. This is a domestic or Chinese production of chains. There are also some imported brands. Latvia manufactures chains, there is Ditten company.
What is the advantage of these chains? They, of course, are of better quality than the Izhevsk chains of our or Chinese production. They do not stretch out as quickly and they do not mow the roller as, for example, in the Izhevsk chain.
There were cases when the Izhevsk chain was stretched in one trip, but for example, the Latvian one runs much longer
, if it is an imported chain, you will not have to suffer with it - change or remove links
7563
69
12
00:10:09
02/24/2020
Hello, my dear viewer, my name is Ilya Kozulin, I am glad to welcome you to my channel.
-On the channel you will find a video on the repair, tuning and collective farm (how could it be without it) of various kinds of Chinese, and maybe not Chinese, motor vehicles.
-I also make rides and reviews, videos on various garage topics and much more.
-I am engaged in the repair of motorcycles in Perm,
all links to contact me below.
-If you like my videos, then I do them for a reason.
-Subscribe to the channel, there will be many more interesting things)
-In this video I will show you how to replace consumables on a children's Chinese ATV, namely the drive chain and the drive, driven sprockets. Well, after the work done, we will ride this infernal chariot. Fortunately, nothing fell off, I'm very surprised, and you?
Enjoy watching.
-Parts taken here: ????
Links to my social networks:
My VK: ????
My Instagram: ????
Also in VK there is a channel group: ????
When there are oil leaks and the chain starts to ring, then the replacement of the Toyota chain tensioner is mandatory.
What tools and consumables will be required for replacement:

The procedure for replacing the chain tensioner in Toyota is as follows: retract the stem on a new part. It must be fixed in a compressed position, to do this, use the hook. On the Toyota 1ZZ-FE engine with a volume of 1.8 liters, the mechanism is located on the passenger side at the rear of the cylinder block.
When unscrewing the second mounting bolt, you must be careful - the Toyota tensioner is spring-loaded and can pop out. Use a flathead screwdriver to pry the mechanism lightly so it can be removed more easily.
The O-ring in Toyota should be oiled or silicone-based sealant
It is important that the lubricating compound does not get directly on the tensioner itself. Apply a small amount of sealant
Otherwise, the compound will squeeze out when you start tightening the bolts.
When replacing the chain tensioner in a Toyota, make sure it is installed correctly. How to do it? The hook should be located at the top, then tighten the mounting bolts with the required force, approximately 20 Nm
"Toyota Gear Oil for Responsible Car Owners of All Brands" More Next, take a key or a head for 22, scroll the generator pulley. This will allow you to turn the motor counterclockwise. This is necessary to release the locking hook and bring the stem into working condition. If you do everything right, you will hear a click.
Let's start with the case where the roller is installed on the ATV by the manufacturer, but for some reason you want to replace or upgrade it.
Most often the roller is quickly eaten by the chain when the plate on which it is mounted is crooked from the factory and the chain rubs hard against the sides, or when the quality of the plastic from which the roller is made is very poor.
In both the first and second cases, it is better to get rid of the factory roller (which, by the way, is not cheap) and switch to using the timing belt tensioner roller, for example, from the VAZ 2108, which, if installed correctly, will take you more than one thousand kilometers.
Let's go. We go to the store and buy a VAZ 2108 timing tensioner pulley.
Let's remove the regular tensioner pulley together with the plate from the ATV and change the design a little, namely, remove the regular roller mount.
We weld the bolt instead (we select the diameter so that the new roller fits on the bolt as tightly as possible).
We put the roller on the welded bolt and counter it with a nut using a washer or Grover.
If desired, an additional spring can be added to press the roller against the chain more strongly.
Well, that's all, let's go for a ride and forget about the problem for a long time.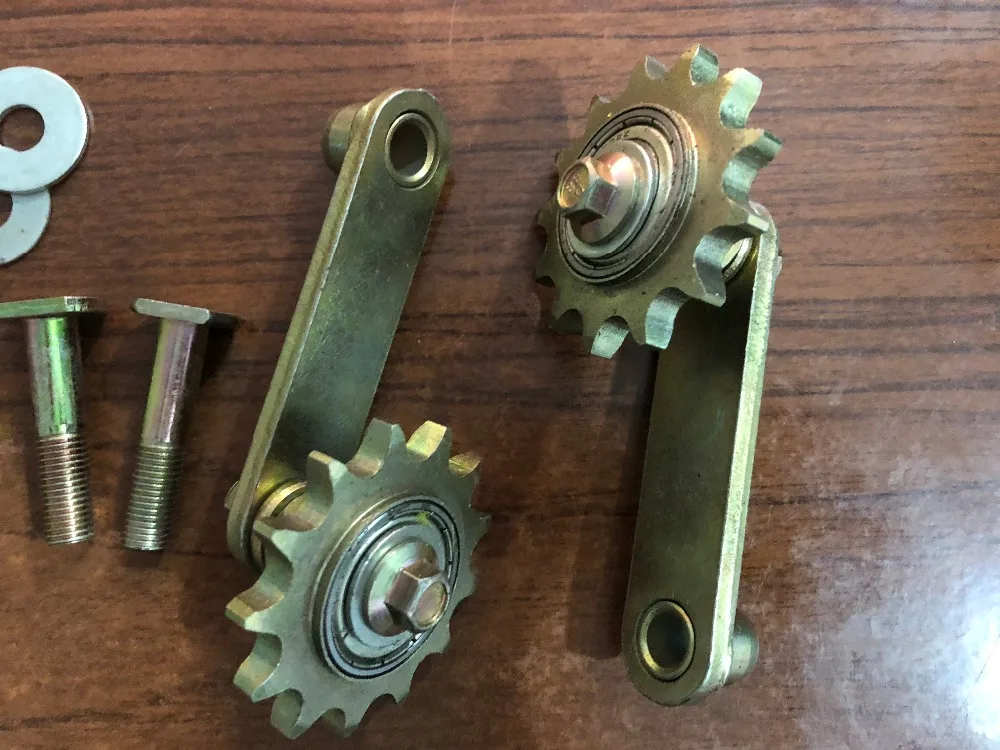
Now let's consider the option when the tensioner pulley is not provided by the factory at all.
In this case, there is no limit to fantasy at all, and, perhaps, after looking at the proposed options, you will come up with your own.
So, the first option.
Same timing pulley, 15X15 square tube bolted to swingarm rear ski bolt and spring. Works on "cheers".
Option two.
ATV swingarm has a hole drilled for a bolt, on which a plate (lever), a favorite timing roller and two springs for stretching are fixed.
As you can see, all presented designs are simple and accessible to absolutely everyone. Well, we are waiting for your questions and suggestions on the topic in the comments.
"Ignition coil...
ATV tow bar..."