If you race go karts, you will undoubtedly know the pain and heartache of changing go kart tires. It not only hurts, but it takes forever to get them on! No matter how many times you claim to have done it. The only thing we can do here at Go-Kart-Source.Com is offer you some advice on how to make this task a little bit easier for everyone.
You first of all should know the ins and outs of your tires, and your rims. This will make the whole process go a little smoother.
A slick racing tire is made of rubber obviously. The rubber is generally stiff and hard to handle when it’s at room temperature or less. The tire has three parts that are important to you when changing tires. The tire wall, the tire tread and the tire bead. These are all illustrated to the right.
The rim is what the rubber tire sits on, and it might just be your enemy when going to mount tires. You might be thinking… Why is this stupid rim too small for the tire! This is impossible!
Sensibly though, the tire must be a little smaller than the rim to ensure a snug fit, other wise your tire would fall right off, and you can’t win a race without tires. All you need to know about a rim is that there is a wide end and a less wide end. The less wide the end is where you will plan your attack against when mounting your tires. The rim is illustrated to the right.
If you are mounting your tire at home or in the garage, you can do it on a table low enough so that you will be able to get some leverage. If you can find a non-slip surface to do it on such as an old piece of carpet or some taped down cardboard that’s even better.
Half the battle of mounting tires is trying to keep the tire in one place. It’s also a good idea to have a friend help you by holding the tire if you don’t have a non-slip surface to do it on. If you are at the track, a table is a good idea again, but you can always use the grass as a non-slip surface. Just make sure you don’t get any grass in between the tire bead and the rim or you could run the risk of a leak.
Pro Tip: Try heating up the tires if possible. If you are at home this is easier because you have access to an oven, a hair dryer maybe. If you are at the track, this is a little harder, but on a nice sunny day we all know that those black rubber tires can heat up pretty quick! Just leave them lying in the sun to try and soften up that rubber.
You are going to need some lube. Generally, dish soap is an inexpensive solution. If you’ve ever wondered why some people have dish soap sitting out at their pit area, that’s probably why. Lube up the edges of the tire with lots of dish soap and get ready to push!
Getting the rim into the tire is all about getting the correct angle. You want to keep pressure moving downward as you push the tire rim into the tire. Some people make it look easier than it is I admit, but mounting a tire is no easy feat for a beginner. Its much easier to mount an uninflated tire as tire full of air requires much more force to get it on the rim.
Below is a step by step guide on how to mount a tire.
I’m not gonna lie. I always find the second bead a little harder to get on than the first. But trust me that second bead will slide on eventually when you have applied enough force.
With practice you will find the perfect angle and learn little tricks with weight positioning, etc. Now just complete the whole process again for your other 3 tires! And then make an appointment for your chiropractor. I’m sure you’ll feel like you need it.
If you are mounting inflated tires its better to put the rim on the ground and then push the tire onto it. It requires alot of strength and often help to have someone hold the rim. The key to doing an inflated tire is getting the correct angle of the tire to the rim. You will still need to lube up the rim and the bead before you start pushing.
**Disclaimer** Mounting a go kart tire, as mentioned above, is really quite hard to do for most people. The above is just a few suggestions on how to make it a little easier for those who have never done it before. We here at Go-Kart-Source.Com take no responsibility for those of you who unfortunately get injured while mounting tires. Keep in mind it might just happen. So be careful!
[cs_content][cs_section parallax=”false” separator_top_type=”none” separator_top_height=”50px” separator_top_inset=”0px” separator_top_angle_point=”50″ separator_bottom_type=”none” separator_bottom_height=”50px” separator_bottom_inset=”0px” separator_bottom_angle_point=”50″ style=”margin: 0px;padding: 0px;”][cs_row inner_container=”true” marginless_columns=”false” style=”margin: 0px auto;padding: 0px;”][cs_column fade=”false” fade_animation=”in” fade_animation_offset=”45px” fade_duration=”750″ type=”1/1″ style=”padding: 0px;”][x_custom_headline level=”h3″ looks_like=”h4″ accent=”false”]How to Mount Tires[/x_custom_headline][cs_text]Bernie Adamson
Woodbridge Kart Club
Anyone who ever tried to mount a tire on a one-piece wheel rim will be able to confirm that this can be a daunting task. Getting the stiff rubber of the tire bead over the edges of the wheel rim is often exceedingly difficult. Ask anyone who ever tried it, and almost all will tell you (usually garnished with a few expletives) what a difficult endeavor this is.
My experience with mounting tires on one-piece wheels came very early on in my karting career. Racing in a novice class I was required to use Bridgestone YBN tires, pretty much the hardest tires out there. I managed to mount them, though, so I would think that whatever worked for me and my YBNs should work for anyone else as well, especially if softer tires need to be mounted. I do have to caution you, though: There is no magic trick which will allow you to mount the tire without effort. It will still be a struggle, but by following the advice of this document, you may ease your struggle just enough to make the whole thing possible, and not throw tire and rim out of the window in disgust.
Oh, and one more thing. Strange things happen these days, so please allow me to put a disclaimer in here:
Mounting a tire bears the risk of serious property damage and/or injury, including but not limited to: Burned down houses, stains or holes in the carpet, damaged tires or rims, upset neighbors or family members, strained backs, burned hands, poisoned pets, broken hands, hernias, headaches, death and all sorts of other forms of aggravation and grief.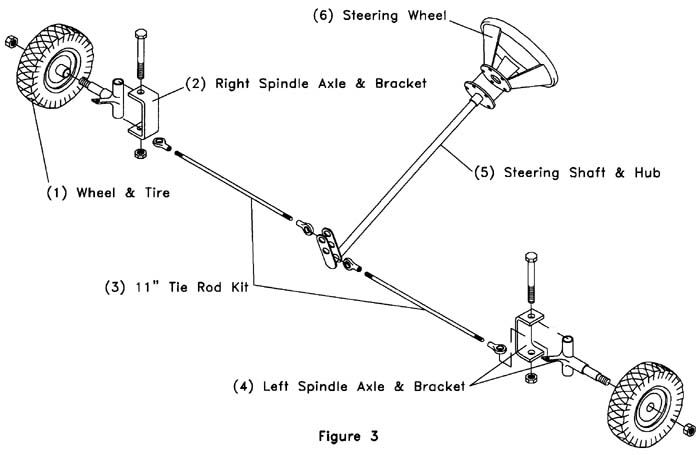 Just because I am describing a way to mount tires does by no means imply that the procedures outlined below guarantee that any of the before mentioned disasters can be avoided and I certainly will not be responsible for any damage, injury (physiological and psychological) or other negative side effect that may occur when you try to mount a tire. Don’t follow my advice if you can’t live with that! Thank you.
Now back to the regularly scheduled program.
What’s the problem?
Quite simply, the openings in the side of the tire are too small to fit over the edges of the wheel rim. This is understandable, since the bead of the tire, i.e. the ‘edge’ of the openings, needs to sit firmly on the wheel rim in order to provide a good seal. Furthermore, the ‘lib’ of the wheel rim extends outward even further, to provide a seat for the tire bead and to prevent the bead to slip off the outside edge. The tire therefore needs to be stretched considerably in order to fit on. Stretching a tire however is the hard part, unless you happen to be the Hulk.
So, what’s the solution?
By following the considerations and steps outlined below, mounting the tire will still not become a breeze, but it will certainly help to make it somewhat easier.
Location
First, choose your location. Don’t try to do the tire mounting on hard concrete, since you might damage tire or rim. If you have a very secure stand of some sort into which you can mount the rim, by all means, use it. But if you are like me, i.e. you don’t have such a tool, you might try it in your living room. Why there? Because you probably have some carpet there, and that seems to work best for this purpose. Carpet is good, because it is soft enough so that neither tire nor rim will be scratched or damaged. On the other hand, it will allow the tire-rim combination to get some grip during the upcoming struggles of squeezing the tire on. I tried to protect the carpet with some old newspapers or card-board, but it simply didn’t work.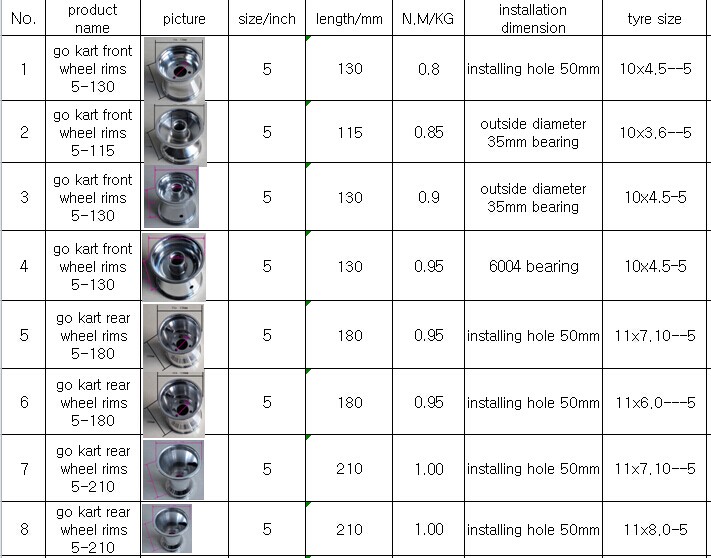 The rim would slip around too much on such a surface. I eventually just tried it directly on the carpet, and it worked much better. Also, since tire and rim are rounded, the carpet will actually not get damaged. It might get a little dirty, though, but by washing the tire and rim before the operation starts, you can limit that as well. Some people have suggested using an old mud-flap from a truck. They are made from rubber, and thus are soft and will also prevent tire and rim from slipping around. I have not tried this, but it sure sounds like a great idea.
The smaller edge
Now identify the smaller edge of the wheel rim. Very often, the inside, i.e. the side of the wheel rim which does not contain the valve, is smaller than the outside of the wheel rim. So when choosing your side over which you will attempt to slip the tire, make sure you choose the smaller one. Some types of wheel rims (e.g. Douglas wheels), seem to have equally sized ‘lips’ on both sides. However, when you look closely at the edge of the inside lip, you can probably see that the lip is made somewhat thinner, and that its edge is more rounded than the edge of the outside lip. So even in the case of equally sized lips, the inside lip is still a little easier to slip the tire over.
Lube. Lot’s of it…
Now place the rim on the floor, standing on the outside edge. Proceed to lube the upper, i.e. inside, edge of the rim. People have suggested various substances to use as a lube. I personally use ordinary dish washing liquid, while someone else even suggested KY Jelly. Whatever you do, choose something slippery that can be washed off and does not damage the rubber of the tire. BTW, you are free to do this over some old newspaper, since some of the lube might drip on the floor. For the actual act of mounting the tire, you should go back on the carpet, though. Be sure to apply plenty of lube all around, and keep the lube close by, since you might need it again later.
In the oven
Place a paper towel on a cooking sheet, and put the tire on that paper towel. Now place this ‘tire cake’ in the oven, and heat it to some 200 F. [/cs_text][/cs_column][/cs_row][/cs_section][/cs_content]
 Slip Angle
 The slip angle depends not only on the design of the kart, but also on the coefficient of friction of the kart tires. That is, on the type of tread, pressure and width of the tire for karting. Using wide special tires in karting, you can achieve the greatest grip, but with a small slip angle.
As noted earlier, slip precedes side skid. And just because of the use of hard low-profile kart tires, slipping (loss of grip) begins unexpectedly, as they say, without symptoms. A kart driver needs a lot of experience and the ability to feel the behavior of a kart on bends. Whenever you visit a karting club, you can observe how the kart "holds" in turns, depending on the condition or type of tires.
Centrifugal force will act on karts moving in an arc, and the tire reaction force will balance it. Consider one wheel, which will naturally be affected not by the entire centrifugal force, but by part of it. The reaction force of a kart tire is perpendicular to the plane of the wheel and can be represented as two components.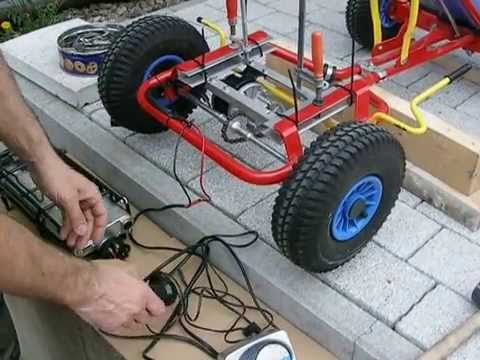 This is the rolling resistance force directed back along the axis and the force F, which will balance the centrifugal force. If the force F is less than the centrifugal force, then the slip angle will exceed the limit value and skidding will begin. If the centrifugal force becomes less than the force F (Part of the reaction force of the wheel), then this will cause a decrease in the slip angle and return the wheels to a normal trajectory.
And it turns out that if the kart moves in a turn at a speed at which the slip angle will be compensated by the angle of rotation of the front wheels, then its center of gravity will move along the trajectory we need, and despite the asymmetric position, the turn will be correct. If we increase the speed in the curve of the go-kart track, we will cause a slip, a skid. And the action to recover from a skid in this case is to reduce the speed to such a value at which the centrifugal force becomes less than the force F.
Many people think that it is possible to turn correctly in kart only with a side skid.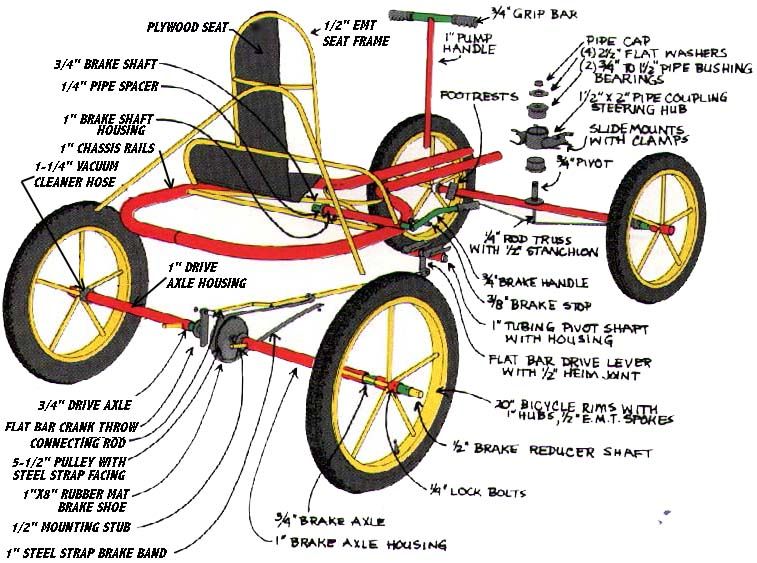 Especially often beginners-amateurs in a karting club are subjected to this delusion, where without proper preparation many people go according to the principle "as I can". But everything is exactly the opposite, side skidding is dangerous and highly undesirable in karting .
It starts when the kart kart track's grip force is less than the centrifugal force generated when cornering. Slight slip at karting we are always able to terminate. And the right thing to do to overcome rear axle slip is to set the front wheels in a position where they continue to roll along the path they should have rolled in the absence of slip. If such counteraction fails, then the kart may begin to rotate around the vertical axis and it will be impossible to control it. There is a great danger of skidding the back of the kart in the opposite direction. And then the front wheels will have to turn in the same direction. Negative or positive hard acceleration of the kart can also lead to increased slip and skidding becomes uncontrollable. So at Karting should not be braked or accelerated when skidding.
An experienced kart driver always knows when to start slipping, on a given road and in given conditions. For evaluation it uses the speed map. And the immediate cessation of sliding depends on his skills. Slip must be eliminated at the very beginning, by precisely counteracting the steering wheel. And especially pay attention to the compliance of the speed of the kart with the conditions of the karting track. Having mastered the techniques of overcoming the slip, the kart driver will be able to accurately control the kart, and this is the first condition for winning the karting .
It is necessary to work out ways to overcome slip in karting training by deliberately driving the kart into a skid.
During training on the kart track , the rider gains experience in cornering at the highest speed. But for greater efficiency, it is worth understanding the physics of motion, i. e. consider the systems of forces that act on the car when moving in a turn.
The kart is moving in a turn, the speed is low and the centrifugal force is also low, almost zero. The front wheels are turned at a certain equal angle. The center of mass of the sports car moves in an arc with a larger radius than the turning arc. The front wheels also describe an arc with a larger radius than the radii from the rear wheels. We increase the speed of cornering on the map, the centrifugal force appears and the map begins to move already asymmetrically with respect to the trajectory that we considered above, but so far without side skid. This is the withdrawal. I think he is familiar to many after the first visit to the karting club. And geometrically, this is the angle between the direction of movement and the plane of the rear wheel.
When the kart moves without pull, it turns around the theoretical center.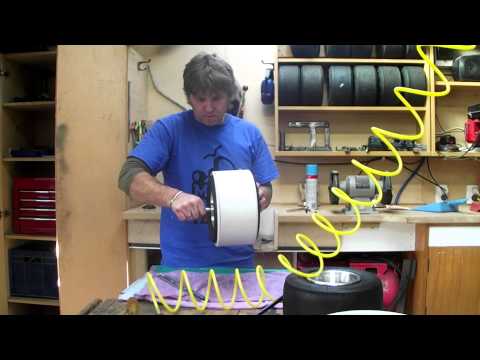 As soon as a slip appears, this center of rotation shifts and ceases to have a physical meaning, while its position relative to the map is preserved. The center of mass of the map rotates around the already new center of rotation, which has taken the place of the theoretical center. At high speed in the turn, the planes of the rear wheels will be shifted from the direction by a certain angle, and the planes of the front wheels by this angle and plus the angle of rotation of the wheels is added. When moving with the withdrawal of the card, it rotates about the vertical axis passing through the center of mass. And as a result, the front wheels are located closer to the inside edge of the go-kart track than at kart speed, when there is no pull.
Centrifugal force deforms the tire laterally and causes the kart to slip. The amount of slip depends on the characteristics of tires for Karting . Many car enthusiasts who are passionate about tuning cars know that the use of low profile hard tires helps to reduce vehicle slip compared to high profile tires. Therefore, low-profile tires are also used in karting .
Centrifugal force, as we discussed earlier, causes the kart to slip, but since low profile tires have more rigidity and elasticity, a tire reaction force arises. It acts towards the center of the arc that the kart describes and is perpendicular to the plane of its wheel. Its value depends on the angle of withdrawal. The larger the slip angle, the greater the reaction force of the tire. But the value of the reaction force does not grow indefinitely, but until the maximum slip angle is reached, beyond which the sliding begins. It is generally accepted that the maximum slip angle of karting is equal to 15-18 degrees.
As you know, braking of the car is made possible by the force of friction between the tire and the road surface. The friction force is expressed as the product of the weight of the kart on the braking wheels times the coefficient of friction of the rubber on the track surface for the kart .
If the surface under all wheels has the same appearance, the condition and tread of the tires are the same, then the coefficient of friction is equal for all wheels of the kart. But if we change the load on the wheels (wheel), then we will change the friction force.
It is known that the length of the braking distance increases in proportion to the square of the speed.
And addiction is very important to remember! By doubling the braking start speed, the braking distance of will quadruple! With a threefold increase, we get nine times the stopping distance!
Common misconception: the minimum braking distance is achieved when the wheels are completely stationary. But when sliding on locked wheels, the coefficient decreases by 15%. That is, effective braking is possible only on the verge of wheel slip. Moreover, such a technique will allow us to avoid lateral skidding, as a result of different braking of the wheels.
The implementation of this method in practice requires more experience in karting . It is very difficult to define the boundary between rolling and sliding, especially on wet, slippery or uneven kart track surfaces. Some riders use intermittent brake application with high frequency, the wheels of the kart are braked only for a short period and the kart does not lose control.
Avoid braking when cornering. The grip of the tires on the kart track counteracts the centrifugal force that pushes the kart out of the turn. When braking, part of the grip of the tires with the track is used, and this part may not be enough, which will immediately lead to side skid . It will be difficult to fix it. And as a result, cornering speed without braking is always higher.
Also remember that if the front wheels are locked, then turning them will not lead to a change in direction of movement, the kart will stop responding to the steering wheel. It is necessary to reduce the force on the brake pedal and control will return.
When braking hard, the front wheels may tend to steer by themselves, caused by differences in wheel braking forces due to different tire grip on the go-kart track surface or uneven brake action.
Before entering turn , the braking start point must be accurately determined.
It is important to slow down to the required speed for this turn just before entering the turn and not a meter earlier.
Errors that occur during a stage stage are either too early braking at low speeds, or braking too late at high speeds. All this arises from the inability to correctly estimate the distance to the turn. It is important to remember that the stopping distance of the map has a quadratic dependence on speed.
A kart driver must practice extensively in various track conditions before learning to determine where to start braking.
There are no exact ways to determine, only practice. If we start braking too early, we will reduce the average speed. If we are late with the start of braking, then we may not be able to hold on to the turn and lose our chances of winning. The correct assessment of the start of braking is especially important for karts with brakes only on the rear wheels. Significantly increases the likelihood of side skid increases braking distance. Do not brake hard on uneven track surfaces for karting . An unloaded wheel is instantly braked, and a new contact with the track of an already blocked wheel can lead to a change in the trajectory of movement.
Karts are sports cars of a special kind. They are light, have a large engine power, but there is no differential mechanism. Thanks to special high-traction tires, the kart can fully utilize the engine's capabilities and move with great acceleration without slipping. When operating the carburetor throttle (throttle), the rider must take this into account. Kart has an excellent weight-to-power ratio. And the higher the class of the card, the greater this advantage. Sometimes even surpassing the weight-to-power ratio of sports cars of other racing formulas (categories).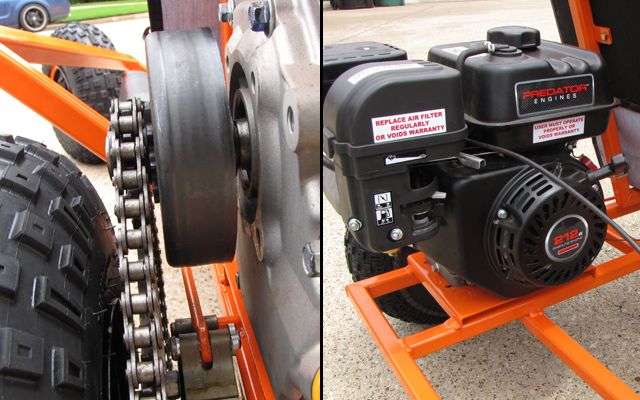 Add to this less frontal resistance, less rolling friction resistance and we can already imagine the running capabilities of this machine.
With a sharp start and acceleration in low gears, the wheel torque is much greater than the friction force of the wheels and the track surface for karting , which leads to slipping of the drive wheels. This is sometimes helpful, but inexperienced is inconvenient and can be dangerous
When driving straight on a muddy or wet kart track hard depressing the accelerator pedal (in low gear) will cause the back of the kart to skid. To compensate for this, and maintain the direction of movement, it is necessary to steer the front wheels at the same time.
In karting, under heavy acceleration, any sudden maneuver can increase the side skid, which will eventually lead to an uncontrolled rotation of the car around the vertical axis. And special attention is required to accelerate on bends. Do not allow excessive engine power .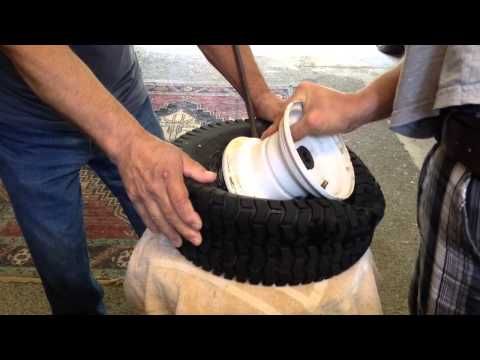 Evaluate the conditions of track karting . It is also necessary to take into account that the card does not have a differential. And in a turn, one of the drive wheels always slips, i.e. the likelihood of drift increases. But the same sliding, as a result of acceleration on a turn, simplifies the movement along the trajectory of the turn.
Sometimes it may be necessary to make a 180° turn on a tight section of a go-kart track and excess rear wheel torque with a sudden increase in engine speed will artificially cause rear wheel spin and rear axle skid. Also, such actions will help if there is not enough angle of rotation of the front wheels
On the slippery track skidding can occur with a sharp release of "gas". To maintain control, you can give a little "gas" or squeeze the clutch.
You can practice all these driving techniques in karting clubs, and if you wish, you can also do karting with your own hands, the drawings have already appeared on the site.
Not everyone knows how important it is to get your chassis right. And this is not an easy task even for an experienced kart driver. In this article I will try to explain how the kart chassis works and what needs to be adjusted to make the kart handle better. Many of the settings described here are not applicable to domestic karts, but, of course, it will be useful for every kart driver to know.
Map front settings:
Toe.
One of the most important settings that will change the characteristics of your kart is the front. All the main problems that arise when entering a turn are problems of an incorrectly tuned front end. How your kart responds to steering and holds the track can be changed with very simple adjustments and toe-in. Different toe settings will affect the weight distribution, top speed and cornering handling of the kart. With an increase in the angle of convergence (forward or backward), the maximum speed will decrease due to the fact that the wheels will “slip” sideways. But despite this disadvantage, by increasing the toe angle, we will improve the response of the kart to the steering angle when entering the turn, thereby helping the rider to enter the turn better. But, if the kart starts to “twist”, then the convergence may be too large. For dry weather racing, major chassis manufacturers recommend 0 to 2mm toe-in. For racing in the rain, you can try increasing the toe. It is important to note that the toe should only be changed last. Try other settings before changing the toe. Also, when changing toe, make sure the settings are the same on both sides.
Ackerman.
Ackermann steering allows the front wheels to turn at different speeds. For example, when turning left, the left wheel will turn faster than the right (outer) wheel. This helps the map react faster to steering and cause the chassis to buckle. The Ackerman increase helps the map turn much easier. At the same time, the rider will notice that the kart is more responsive to steering inputs.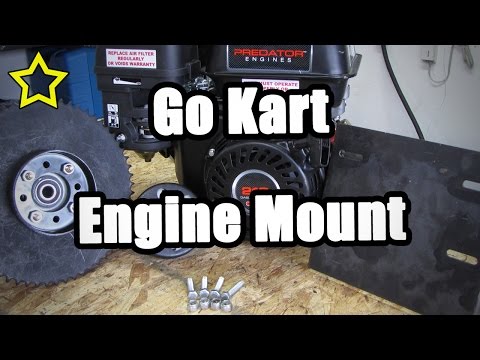 This setting usually works for all traces. For very high-speed tracks, Ackerman can be removed. Spindles usually have 2 holes for steering rods - installing in the inner holes will increase the Ackerman, in the outer holes it will reduce. The length of the steering rods must also be changed.
Caster (Caster).
The Caster change affects how the kart "holds" the track. This applies to both the front and back of the kart. This is due to the transfer of weight to the opposite rear wheel during a turn. Although it looks difficult to understand, there are a few simple rules to follow when talking about Caster. If you reduce the Caster, it will be easier to turn the steering wheel. Some riders say it helps them feel better in the kart and the front end grips better. You can also reduce the Caster if the track is very hackneyed (a lot of rubber on the pavement) and the kart already holds the track very well. The kart will be easier to handle if the caster is set to 0. The rider may wish to increase the caster if it is cold or if hard compound tires are used. This will allow the map to better hold the track and remove the skid. Many manufacturers offer 3 different "tablets" for adjusting the caster on their chassis. The standard or "neutral" tablet is the most popular. It is also recommended and comes with the new card. Additional "pills" allow you to increase or decrease the caster. Some manufacturers recommend lowering the caster for small riders and increasing it for larger riders.
Collapse.
Camber is like the front wheels are tilted when viewed from the front of the kart. If the wheels are tilted towards the center of the kart, then the kart has a negative camber, if the wheels are tilted away from the center, it is positive. Many chassis are designed with 0.5 degrees of negative camber. Typically camber is only adjusted when the race is on a wet track. In this case, the camber angle must be made even smaller. Sometimes manufacturers offer a special axle with eccentrics that allow you to change the camber.
Front track width.
The most popular change to change the characteristics of the chassis is to change the width of the front track. Increasing the track will create a greater "bending" effect on the frame when the wheels are turned. This will result in better front end traction and better turning. Reducing the front track width will have the opposite effect.
Back of the kart:
The back of the kart starts from the seat. Some settings include the length of the calipers (hubs) under the wheels, the track width, the height of the rear of the frame above the track level, the rigidity of the axle and additional seat mounts. Changes to these settings are usually made when handling problems occur during corner exit.
Length of calipers (hubs).
Manufacturers make calipers in 3 different sizes. It is recommended to have all sizes, because. this is one of the most popular settings. Long calipers give the back of the kart better grip on the track.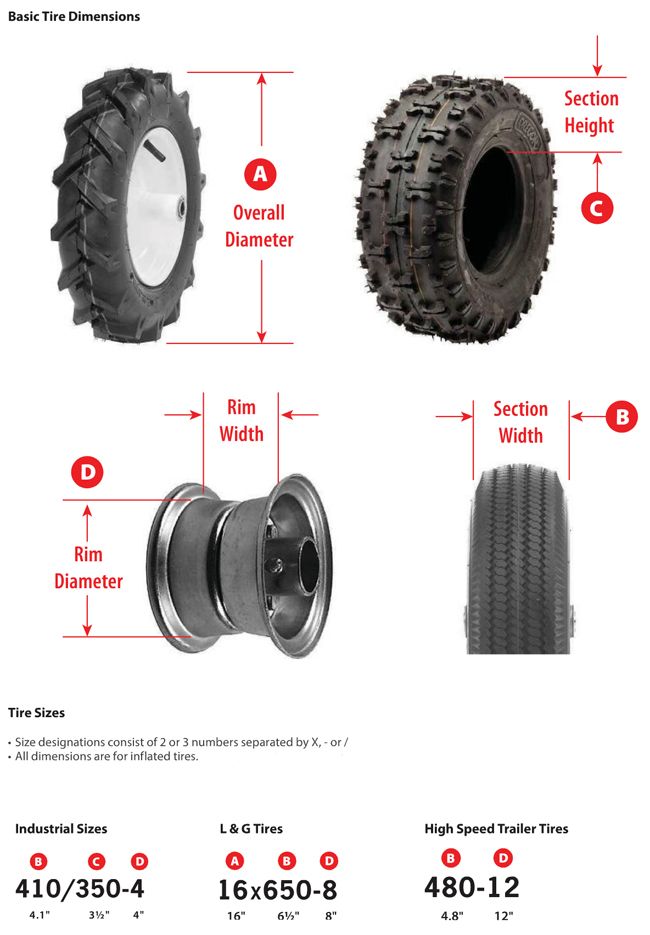 If the kart starts skidding while exiting a turn, the calipers may need to be changed. Short calipers are used when the kart "carries" out of a turn. If the driver “does not have enough space” at the exit of the turn, then the kart “carries”. In such a situation, you can try short calipers.
Rear track width.
For most competitions the maximum rear track width is set to 1400mm. It is important to set the rear track width to the maximum. It may be necessary to reduce the width of the rear track if the kart "carries". However, this setting is done last. First you need to try short calipers. It is necessary to reduce the width of the rear track by 3 mm, because. many chassis are very sensitive to minimal changes.
Rear kart span.
Basically all chassis have 2 positions. The settings must be made so that the span is maximum. This will help create more torque, which will put more weight on the outside wheels. The result is better wheel traction and better handling for the driver. Only in the case of very run down roads (sticky) can the span be reduced.
Axle stiffness.
Many different axles are available according to the type of stiffness. from "soft" to "hard" (each manufacturer has its own markings). In most cases, you should use the "middle" axis. A rigid axle can be installed if the weather conditions are "cold" or the track is "slippery" or if solid compound tires are used. A soft axle is used in hot weather or when there is a lot of rubber on the track.
Seat anchors.
In general, conditions dictate the use of two additional mounts on each side of the seat. These supports should extend from the topmost edge of the seat to the outer axle bearing mounts. From the side of the motor, this may not be possible, then you need to put at least one support. Additional supports help transfer momentum from the rider's body to the rear axle to put more stress on the rear wheels. This creates a better grip on the back of the kart. It is necessary to remove additional supports in the event that the rear holds the track too much.
Rear reinforcement insert.
Also increases rear stiffness. Often supplied as a flattened tube. To reduce rigidity - install in parallel, increase - vertically.
Front bumper.
Should always be clamped, except when there is a lot of rubber on the track and you need to lighten the front.
Rear bump stop.
Similar effect as reinforcing insert. Should be clamped in most cases.
Tire pressure.
Pressure can be in the range of 6 to 30 psi depending on the rubber compound, temperature, track surface and other chassis settings. In most cases, 10-14 psi is a good start. For slick tires like the Biridgestone YGC, up to 16psi can be used. Dunlop SL4 can be used up to 18psi. For very hard tires like Biridgestone YHB or YXC up to 30 psi can be used. All tires have certain data and pressure standards with which the best result is achieved.