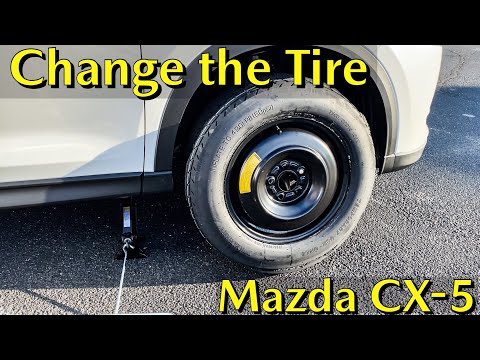
Getting a flat tire on an ATV is a fairly common occurrence, and if you’re not prepared for it, it can be a huge hassle too. The best case scenario is you get a flat tire near home, or near your vehicle. But most of the time it happens miles away on the trails. If you didn’t bring the right tools it becomes a major pain, and could be dangerous too.
The last thing you want is to be miles from home with a flat tire you can’t fix. You’ll have to ride on a flat tire, which could cause even more damage to your machine, or worse, you could have to push your few hundred pound machine with a flat tire all the way back. Trust me, you definitely want to prevent a scenario like this.
It happened to me before, I got a flat tire a couple miles from home, and had no flat tire repair kit with me. I still drove the quad back home with a flat tire, but that ended up banging my rim up pretty badly and shredding my tire up. What started out as a simple flat tire fix turned into me needing a whole new tire and rim, it was a bad day.
I highly recommend at least keeping a small Tire Repair And Inflation Kit (link to Amazon) on your machine for emergencies.
The easiest and fastest way to fix a flat tire out on the trail, is to plug it. This is where having the tire plug and inflation kit comes into play. You don’t need to remove the tire to plug it with the kit, which is definitely a good thing on the trail. And the kit comes with CO2 cartridges to fill the tire back up and keep you riding.
Here is a step by step of how to fix a flat on an ATV:
Having a Tire Pressure Gauge (link to Amazon)
comes in really handy.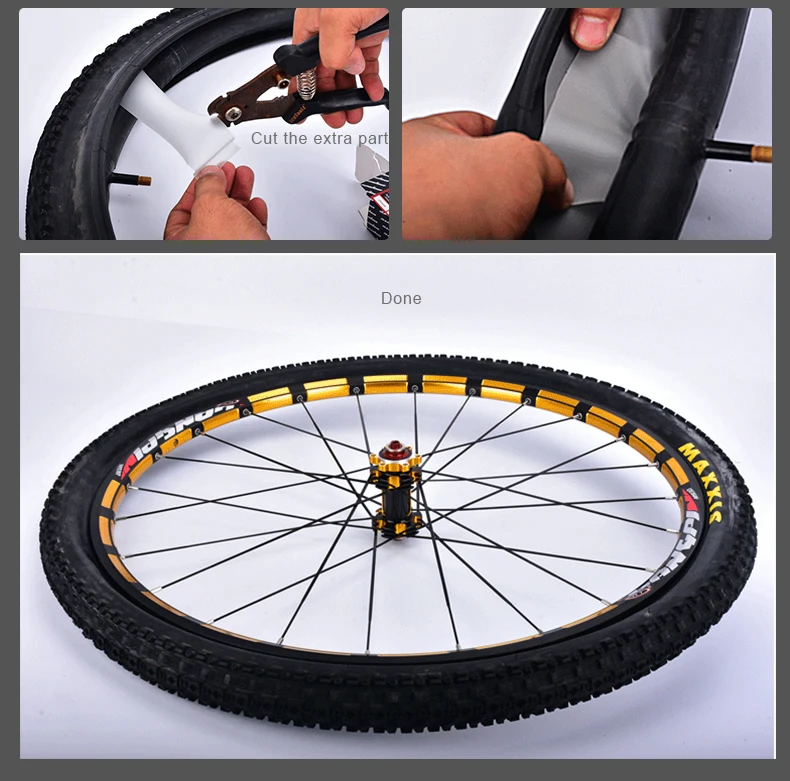 If you don’t keep one on your ATV, take a slow easy ride back to camp to get your tire properly inflated. You can bring a pump with you on your ride, but they tend to be too big. I don’t carry one with me on the quad, but the CO2 cartridge is usually enough to at least get me back home or to the truck.
Once back to my truck, I am golden. I keep this Slime Power Spair (link to Amazon) in my truck at all times. This kit comes with enough plugs for years of punctures, and has all the tools you need to fix a flat tire. If we go on long group rides, we usually just bring this with us on one of the ATV’s. It connects to a 12v ATV battery using alligator clips, and really is the easiest way to go.
When you plug a tire, the integrity of the tire is compromised a little. It is recommended to replace a tire that has been plugged, but I usually have good luck just riding on it until I replace the tires from normal wear and tear. You are more likely to get a flat again, but for me, it doesn’t happen all that often, so I figure why waste the money buying new tires.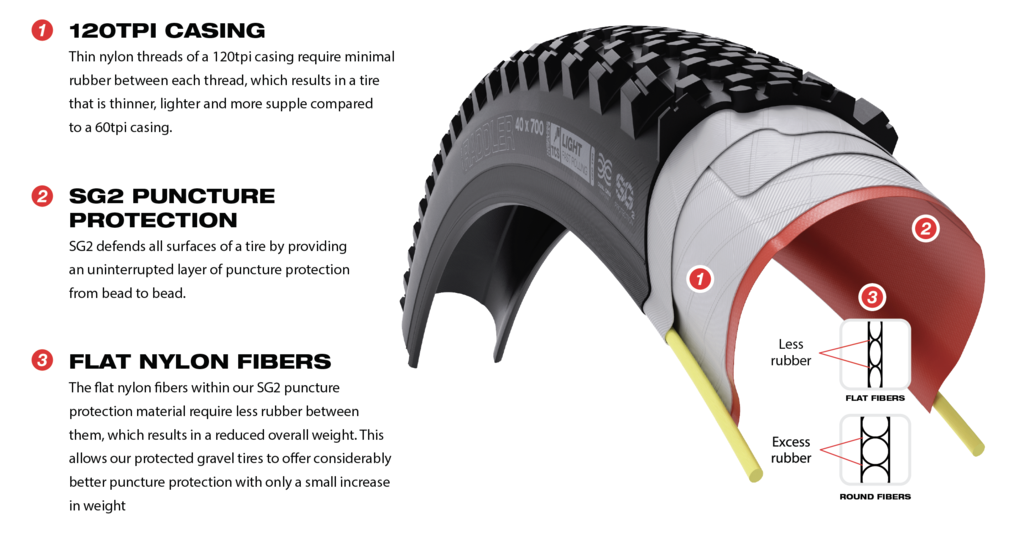
Plugging a tire this way won’t work if you get a sidewall tear or a large puncture in the tire. If you get a major blowout, the only way to fix it is to replace the tire or get an inner tube. I don’t use inner tubes because of how much extra work they are. If you ever need to fix an inner tube, you have to remove the wheel and tire, no thanks.
The first, and easiest, step is knowing what kind of terrain you will be riding on and adjusting your air pressure accordingly. To learn more about ATV Tire Pressure, check this article. But the short of it is to aim for around 5-6 psi, a little less for sand or loose terrain. If your tires are over-inflated and you plan on riding through rocky terrain, you’re greatly increasing the chances of a flat tire. Do not over-inflate your tires, you are a lot more likely to get a flat.
Avoid sharp obstacles that could puncture or tear the sidewall of your tire. Fallen logs and sharp rocks are the most common things to look out for. Some rocks and stones have razor sharp edges. When you ride over rocks, give extra attention to where you’re putting your tires. Maybe skip on the aggressive driving when you’re in rugged terrain. The faster and harder you ride, the more likely you’ll get a flat because of something you didn’t see.
Finally, you could put some Slime Tire Sealant (link to Amazon) in your tires. This won’t work well for bigger punctures (1/4 inch) or for sidewall tears, but it will prevent small holes from giving you a flat tire. You simply put the Slime in your tire and it will help prevent you from getting a flat, or repair small leaks your tire may already have. When you do get a small leak, you can actually see the green goo seeping out of the tire, sealing it.
Next, I will go over some other tire flat prevention techniques. Before I begin though, I want to point out that I don’t use any of these methods. I simply make sure my tires are at 5 psi, maybe have some Slime in them, and have a Tire Repair And Inflation Kit stored on my ATV. I can’t recommend any of these methods because I have not used them myself.
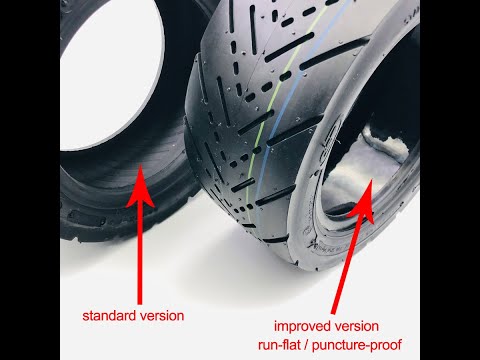
If you are really worried about getting a flat tire, you could always get thicker walled tires for you quad. Most stock ATV tires are 4 or 6 ply, but you can get up to 12 ply tires. They will cost you a pretty penny and they weigh a lot more than standard tires, but are very resistant to punctures. You may have heard of run flat tires, well that’s what this is, it’s a thick enough tire to still be usable even if it does get a puncture.
There are many types of inserts out there. You basically put some kind of rubber or foam in between your tire and wheel to keep the tire from going flat. The problem with these is the hassle of dealing with them. You have to take the tire off the rim every time you want to replace one. If you’re racing for competition, this is an excellent way to avoid losing a race because of a flat tire. But for the average trail rider, this is too much work for what it’s worth.
Tire balls are just these little oval shaped urethane balls that fill the gap between your tire and the wheel. Similar to inserts, I wouldn’t use these because of the hassle. For racing though, they work great. In fact, many racers use products like these and win races doing it. The idea here is that even if you get a major puncture and a ball fails, you have many other balls in the tire so you can still finish the race.
Yet another form of tire insert, the tire blocks. Tire blocks are basically high density foam blocks that you put in your tire. They are light weight and made specifically for your tire size. The cool thing about these is that the fit is so snug that you don’t even need air in your tires at all. The foam is flexible and provides cushioning over bumpy terrain. They don’t feel quite like a standard air filled tire, but you could get a puncture with these and not even know it.
Sharing is caring!
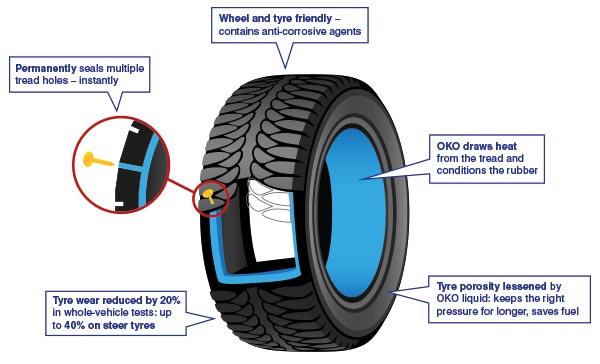
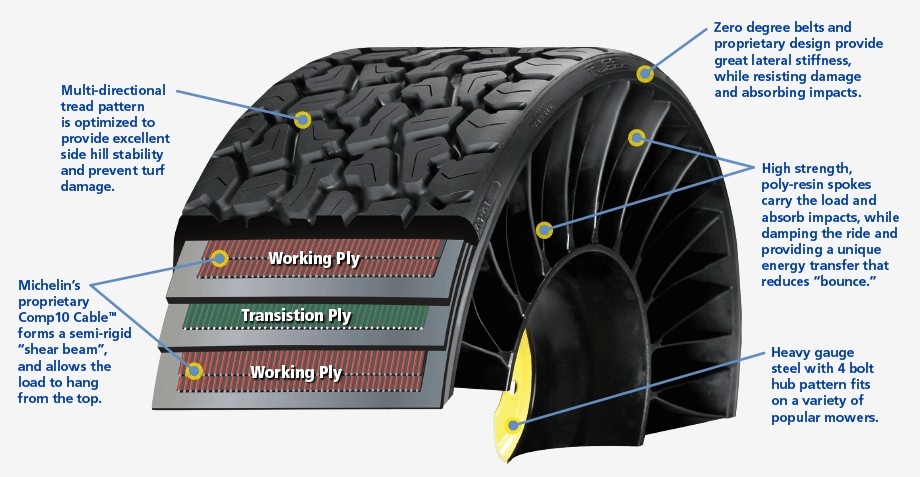
ATVs, UTVs, and other off-road military vehicles all benefit from TireBall's superior flat prevention. When there's no time to lose, TireBalls keep you riding.Each individual Tire Ball cell is made from state of the art materials that are 10 times more puncture resistant than conventional heavy-duty neoprene tubes. And even if one, two, or even three TireBalls suffer punctures, the rest of the Balls pick up the slack and keep you running strong. Questions about military uses?Call or email us to speak with a TireBalls expert, who can answer any questions. › Contact Us |
| |||
An MCIS inflated tire is a conventional tire that is filled with cells designed to fill the cross-sectional space between the tire tread and rim, and sidewall to sidewall. Each cell is individual and independent of the others. Each cell is pressurized to an internal pressure nearly identical with typical tire inflation pressure for the tire and vehicle on which it is installed. The number of cells that fill a tire is a design parameter. For runflat applications more cells are typically used, thereby minimizing the effect of the loss of a single cell on the total tire performance. The cells do not fill 100% of the tire/rim void space, but typically 80-95%. There is a small amount of additional (interstitial) space between the tire/rim and the confined volume occupied by the MCIS cells. This interstitial space and inflation thereof is accessible through the traditional rim mounted inflation valve, and filled with air, up to standard operating pressure.
The patented Tire Ball® Air Inflation System is comprised of multiple individually inflated, cells that fill the vast majority of the space within a tire. The Tire Ball® system is used in off road tires of ATVs, UTVs, light trucks, Dune Buggies, special purpose sedans, motorcycles and now HMMWV’s. The individual cells are made of a urethane material that is 10 times more puncture resistant than a typical heavy duty inner tube for motorcycles (up to 30x more in HMMWV cells). Each Tire Ball has a valve similar to a sports ball and is inflated with a standard needle. The system offers virtual flat proofing, along with improved “ride” qualities such as: enhanced suspension, greater traction, better cornering, and quicker braking. A puncture of a single Tire Ball® cell allows the rider to continue riding/driving on 90-95% of air volume originally present in the tire. This small amount (5-10%) of air loss is truly unnoticeable to the rider/driver.
A major advantage for applications such as ATV/UTVs and Light Tactical Vehicles is you will eliminate rim to ground contact through the unique progressive increase in air pressure at the tire’s contact patch, enabled by the compartmentalization of air within the Tire Balls. These vehicles, which typically can run with lower tire pressures, can now possess great traction characteristics without the downside of bent rims and cut sidewalls which could flatten a tire.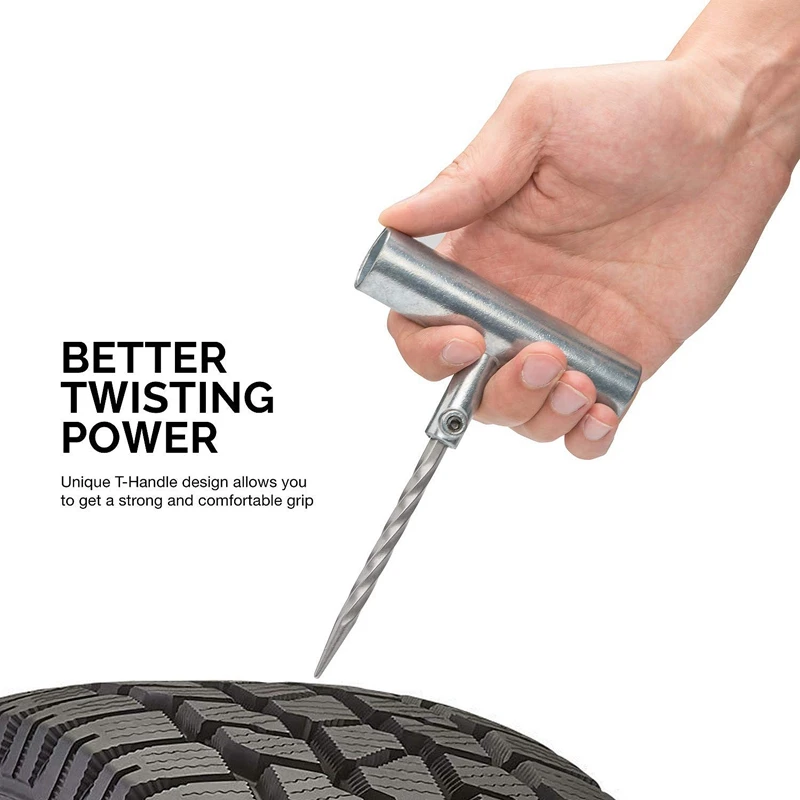
August 31, 2017
The ATV is a great technique, but every ATV rider must know the simplest steps to repair his "beast". These activities include tire puncture repair .
ATV tires are different from car tires. Low pressure quad tires , which increases the chance to puncture or cut the tire. Every ATV rider should have a puncture repair kit. ATV punctures are the norm rather than an emergency. And without tire repair experience, riding an ATV is very difficult.

When you notice leaks, you need to stop and start looking for a puncture. It is most convenient to look for a puncture by first removing the wheel, but the first stage can be carried out by dismantling the wheel.
If you are unable to locate the puncture, then remove the wheel and lower it into water, such as a puddle, lake, river. If the wheel is already heavily deflated, and the air is no longer coming out, then you need to pump it up and perform the described actions.
In the water you will immediately understand where exactly the air comes from
We take the wheel out of the water. Now you need a reamer, the tool helps to make the puncture surface rough on the rubber. This helps ensure a better bond between the adhesive and the rubber. We act like a file, only the effect is the opposite.
We take a tool to install the patch. This stage is the most responsible.
We thread the tourniquet into the tool, it is desirable to thread it so that the patch has the same tips. We cover the patch with special glue. After that, we insert all this into the puncture site. insert into the tire halfway.
Now you need to quickly pull the tool out of the hole, but do not pull the patch with you. We install so many patches until the air stops coming out.
But before pumping, you need to let the glue dry a little.
After that, inflate the wheel, and when you are sure that the air is no longer escaping, but it is necessary to cut off the patch, leaving 3 millimeters of flagella so that the patch does not pop out while driving.
In the next article, we will analyze what to do with a tire side cut.
Tire punctures are a common occurrence for cyclists and at the same time a nightmare on a race and spoiled mood on a bike trip.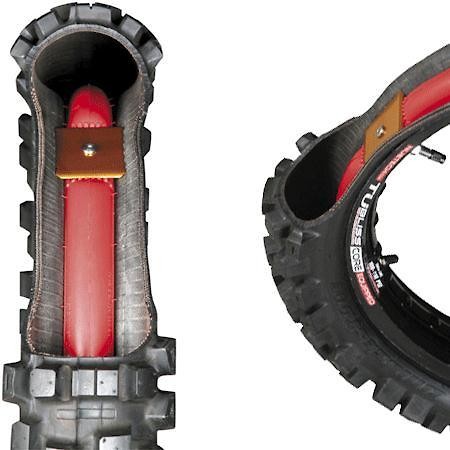
Fortunately, there are steps you can take to reduce the risk of a puncture. Our tips will help you avoid an unpleasant situation.
Bicycle tires are what protect your camera. The lightest and fastest tires are also the most prone to punctures.
Tough and durable marathon tires have a tough, puncture-resistant layer that helps prevent sharp objects from penetrating the belt and tube. Yes, they are heavier, but the repair of the wheel has a stronger effect on the results of the race in a negative direction.
Often the cause of a puncture, puncture or snakebite is under-inflated tires. "Snake bite" occurs when a sudden collision with something protruding (curb, stone). In this case, the camera breaks in two adjacent places. Due to the weak pressure in the chamber, the tire bulges, pressing against the rim, and the chamber is sandwiched between the rim and a solid object on the road.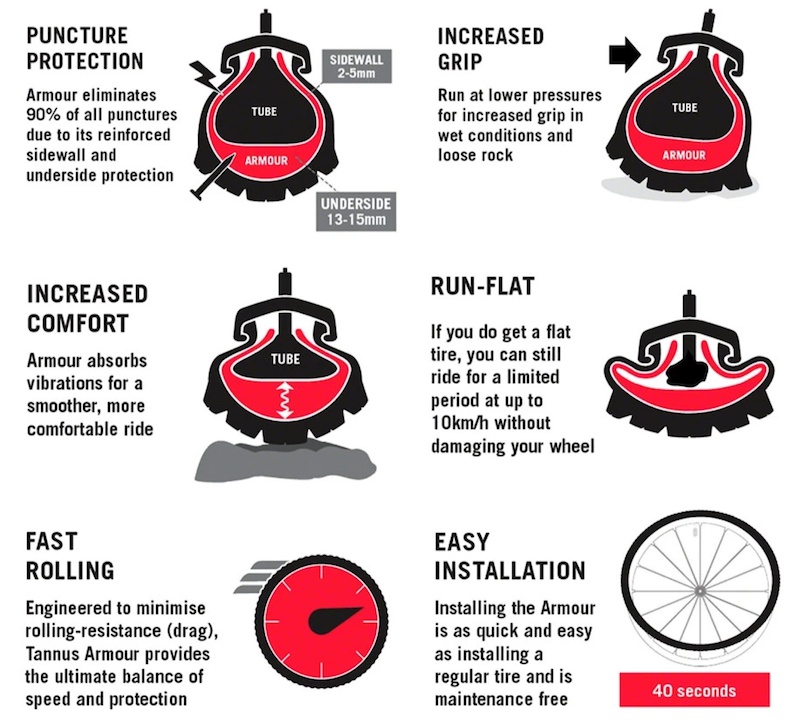
To avoid this kind of trouble, make sure your tires are properly inflated before riding, especially if you're on a less than perfect track. Properly selected pressure gives less chance of deformation of the tire and its contact with the rim.
The tire must be marked with the values to which it should be inflated. Try not to go beyond both the minimum and maximum values. If you are going to ride on asphalt, bring the tire pressure to the maximum value, and if on an uneven surface, reduce it to the average allowable.
This simple tip is ignored by many, unaware that before and after every ride you need to spin the wheels and check for any sharp objects stuck in the tyre. If they are not removed, they will over time, under the influence of your weight, push into the inner chamber - and provide a puncture.
Most glass and debris collects on the edge of the road, so another way to protect yourself from camera repairs is to choose a place on the road away from littered areas.
Don't just look under your wheel, otherwise you risk not noticing a pit, stone, broken glass and other dangers in time. Look a few steps ahead.
If you are traveling in a group, warn your comrades of the danger. There are special signs for this. If someone has a puncture, the whole group will have to wait on the side of the road until the injured cyclist is done with the repair.
If you cannot avoid a potential hazard, loosen your grip on the handlebars as much as possible and try to “slide” over the obstacle. When you tense up by squeezing the steering wheel and leaning on it, the force acting on the front wheel in the event of an impact increases.
In addition, you can use your cycling skills to literally jump over obstacles. This works well with potholes, rails, and narrow artificial bumps like speed bumps. Just don't show off your amazing skills when riding in a group.
If you do need to replace tubes, always check the inside of the rim and tire to make sure there is no debris. To do this, carefully run your finger along the inner surface and inspect.
Then inflate the inner tube a little, place it in the rim support and make sure that the inner tube does not get stuck between the rim and the edge of the tire.
Tubeless tires don't have the usual tube underneath, hence the name. Tubeless technology has been around for many years, especially in the mountain bike market. Gradually, it is being introduced into the road cycling environment. "Tubeless" have increased resistance to punctures and here's why:
Tires don't last forever and wear out over time. Many of them have an indicator showing when it's time to replace.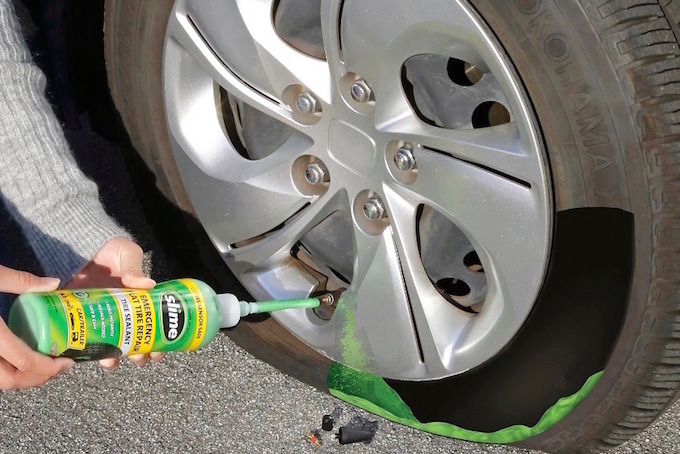 As soon as it shows up, get a new tire.
Indicators are usually two small holes a few mm wide in the tire tread. If they are no longer visible, then the tire has worn out, and it is time to change it.
There are no such indicators on the MTB, but you can watch the tread spikes. When they get rough and close to being level with the ground, it's time to install a new tire.
Sometimes the problem is not on the outside, but on the inside. For example, in the rim. So, the rim is surrounded by a rim tape, which can be damaged or move. This is the most innocuous of problems, and if you find worse faults, visit a bike shop where they will fix your wheel.
Of course, it is not expected that a puncture will be the fault of the old chamber, but it does happen. The inner chamber also wears out, and the rubber becomes more crumbly. If you haven't changed your camera for several years, check it before an important start.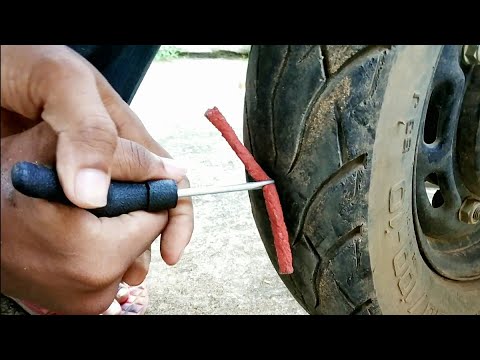
Although there is a belief among riders that with a new tube a puncture will happen literally on the same day.
Taping a punctured chamber is a cheap but temporary solution. With a camera that has a patch, and even more so more than one, the risk of a puncture increases. If it is not possible to install a new camera on the way and you have to patch a punctured one, we recommend that you replace it immediately after the trip.
This advice is suitable for cyclists who ride without punctures for a long time. The chamber valve itself and the place around it wear out faster than rubber. During the year, you have to pump up the wheel countless times, so sometimes the culprit of a flat tire on a trip is a valve damaged from use.
The area on the tube around it can also tear and crack, because it is most subject to friction against the hole in the rim.
 cc
cc It's more likely to get a puncture in the rain because the water acts as a lubricant and helps sharp stones and glass cut through the tire. And when it rains, there is more garbage on the road: it is washed from sidewalks, lawns and from the edge of the road to the part where you usually ride a bike.
Sealant can be used for more than just tubeless tyres. This tool is added to conventional cameras. It, of course, will make the wheel a little heavier, but it will create additional protection.
Adding sealant is easier if the chamber has a removable valve core, so you can fill it without risking clogging the valve. But before you follow this advice, make sure the sealant is compatible with your bike's inner tubes, especially if you're using latex ones.
Inner tube sealant works the same as tubeless sealant. It covers the inside of the chamber as the wheel spins, and if you puncture, the air escaping from the chamber sucks the sealant towards the hole.