A kill switch, although small in size, can make the difference in saving your ATV or UTV, and potentially some lives. Kill Switches are especially useful when you have children riding, but it can be a useful tool for anyone with an ATV or UTV.
An ATV kill switch causes the engine to shut off whenever it is triggered. It usually attaches to the rider and can be pulled in an emergency or triggers automatically if the rider falls.
In this article, we will look at the kill switch, its importance, and, more importantly, how to use it.
Generally, the kill switch is used to kill the engine of a vehicle. The Kill Switch can have many uses. One is to reduce your risk of vehicle theft. In fact, one of its most crucial and important components is that you, as the owner of the ATV, UTV, or car, will be the only person who knows where the switch is and how to operate it.
It won’t stop someone from hauling your ATV away on a trailer, but it will stop them from riding it out.
The kill switch deters crime since without finding it, a thief cannot start the vehicle. Many thieves will leave a vehicle alone and move on when there is a kill switch. With an ATV, this is very important. Although you may not have a lot of belongings within the vehicle itself, its open model is very enticing. Without a kill switch, someone can easily hijack the vehicle and take it for themselves. Although it sounds a bit far-fetched, a lot of ATVs are stolen; in fact, there has been a huge rise in stolen ATVs over the past few years.
The more common purpose of a kill switch on an ATV or UTV is to shut off the vehicle in an emergency situation. It is extremely beneficial for you when you want to shut it off immediately. Depending on the kill switch, you can arrange for it it shut the engine off immediately if you fall from the ATV or UTV.
Another perk is that some insurance companies offer a discount for those owners whose vehicle does have a kill switch.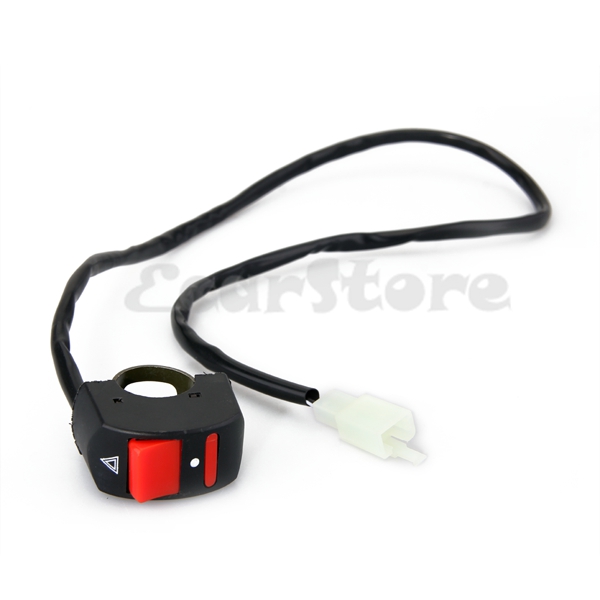 This is often an overlooked aspect of having one. Insurance companies are well aware that these features prevent theft and also provide a safety measure that protects the driver and vehicle.
Other than understanding its benefits, you must learn how a kill switch works on an ATV or UTV. It is in the vehicle for a reason and understanding that can help you a lot as an owner.
The kill switch is usually wired to the ignition coil. The ignition coil is part of the ATV or UTV that sends a spark that ignites the engine.
The kill switch breaks the ground circuit so that the coil no longer has a positive and ground. Because of that, the ignition coil is no longer firing. Without that, the ATV or UTV cannot run.
A kill switch can come in different forms, such as the push or pull style, which have different ways of functioning, but their key differences are essential.
In an ATV/UTV, there are two ways or systems that a kill switch is used, either an NC or NO, or “Normally Closed” or “Normally Open.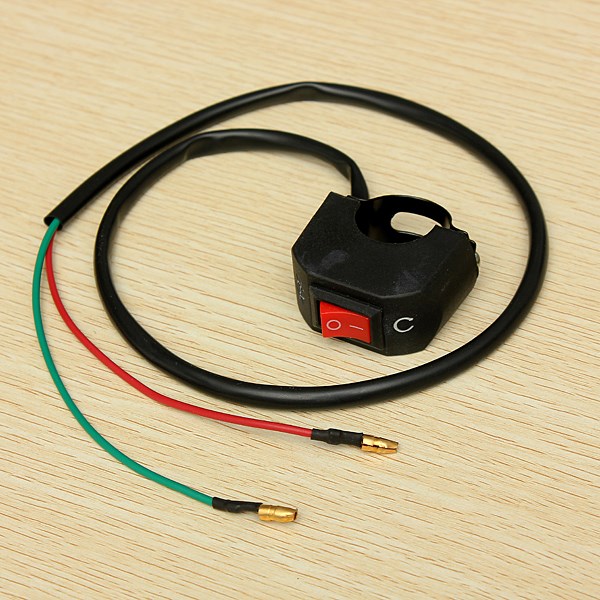 ” An NO switch is the open type, hence the name Normally Open, and functions by grounding the primary ignition lead when the tether is pulled away from the bars.
When the tether is removed from the NO, it will end up closing itself. This, in turn, creates a short to the circuit to which it is wired. It is important to note that this function should not be used to ground the high voltage. An NO system is not used as often as the NC system, but you still see them frequently enough.
An NC switch, on the other hand, works in the opposite way. It is Normally closed and is connected to the 12V input to the ignition. When the tether is removed, it will disconnect or open the circuit from the negative to a positive voltage, turning on the ignition.
Usually, NC kill switches are used in battery type ignition systems that have a clear Run/Stop switch with a key identifier. While it is typically known that newer models are NC, but you will want to double-check the manual at all times to confirm.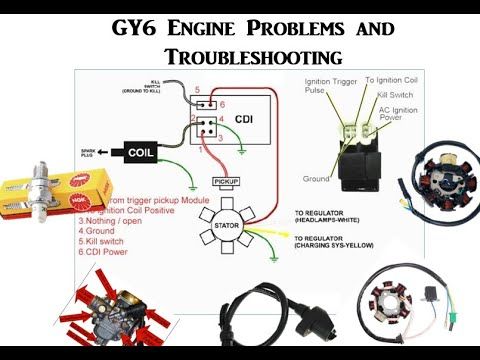
In general, the ATV kill switch is usually easy to install and uses wire plugins that ease into the OEM stock designs. Most of the kill switches for ATVs are designed to mount on the handlebars, but there are other option.
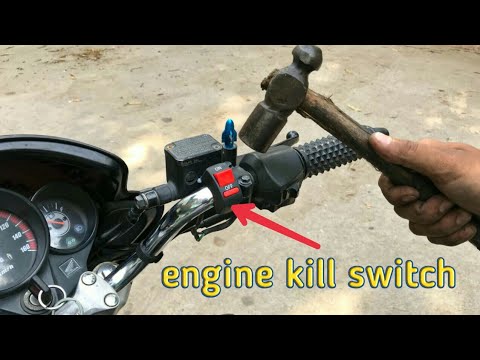
Most of the time, the kill switch will activate the same as a kill switch in any other vehicle. Essentially, you either push or pull the switch and the engine should shut off. You will want to remember to shut the ignition off if you are not going to start the ATV back up.
Typically, you only want to use the kill switch when needed, but some riders like to use the kill switch whenever they shut down their ATV.
This isn’t the end of the world, but it isn’t a best practice. You can cause serious damage to your alternator if you regularly try to start your ATV without reengaging the kill switch. Your manual should have clear instruction about whether you can use the kill switch routinely, but most recommend only in emergency situations.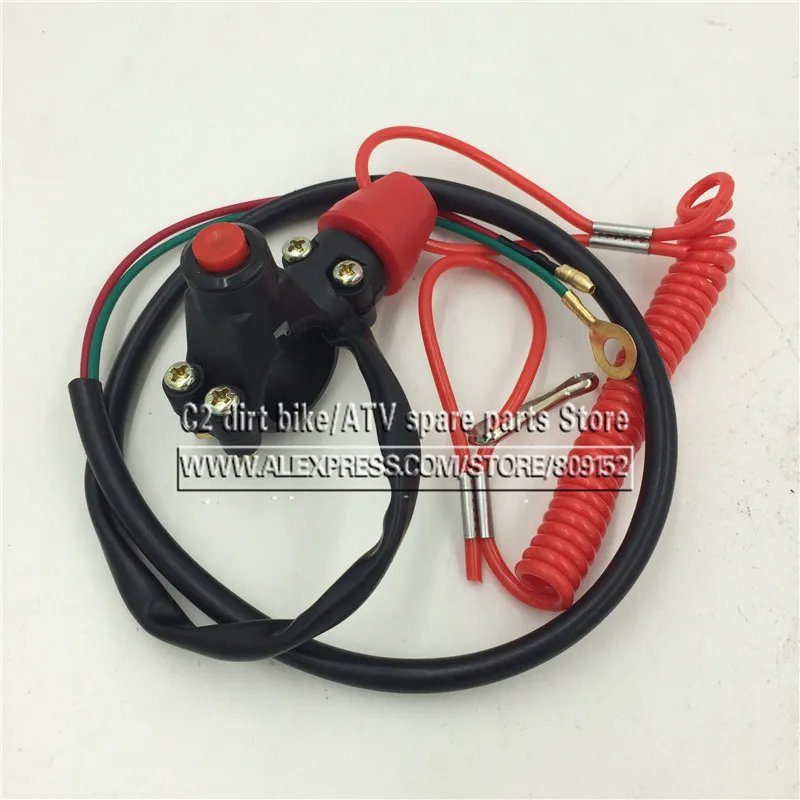
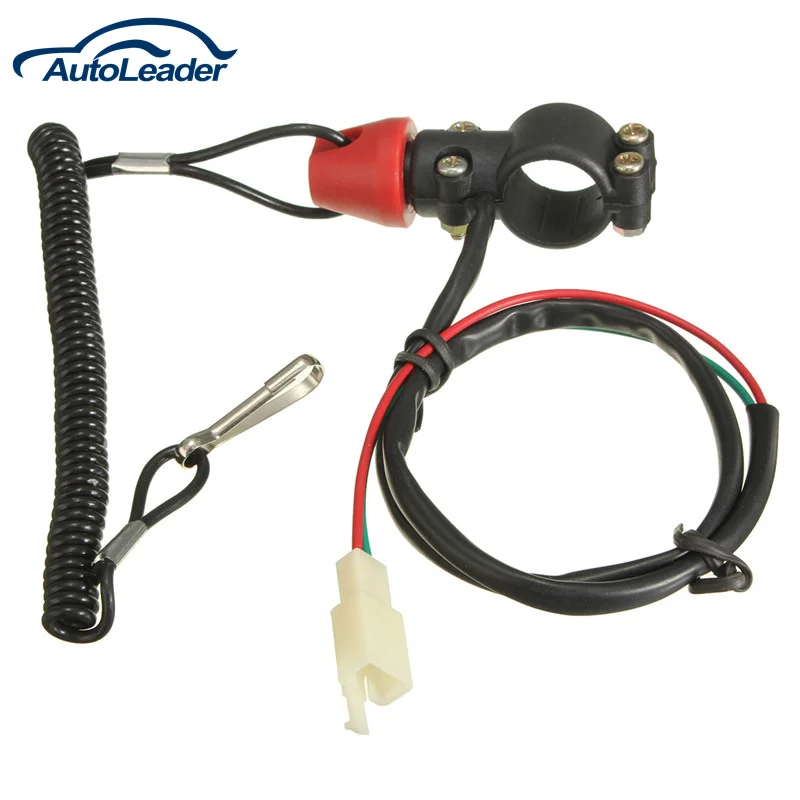
Most of the time, an ATV kill switch is mounted to your handlebars, or to a handlebar clamp designed for the switch. You also want to install the kill switch where it can be easily reached, but won’t get in the way during normal operation.
Once you have determined where to mount the kill switch, simply tighten the screws using a 3mm Allen wrench in most cases. You will want to be careful not to overtighten the screws, while still ensuring the switch is mounted securely and wont slide or come loose during aggressive riding.
In terms of wiring, most kill switches are universal and will work with almost any ATV. However, the wiring inside ATVs is not universal.
Regardless of the type of ATV you have, the kill switch can never be directly on the on/off panel if the ATV already has one. In most ATVs, one lead from the switch will be wired to the ground, and the second wire will splice between the stator and ignition coil.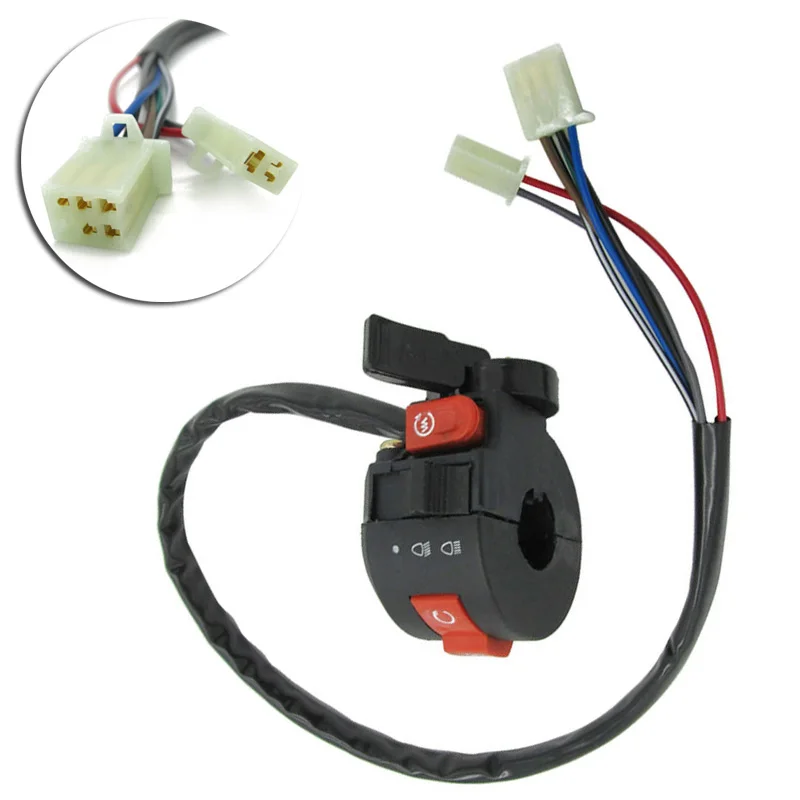
When the stator wire is grounded, it will cause the engine to shut off. Make sure to consult the instructions of your particular model to ensure you wire it correctly.
Once you have installed the kill switch on your ATV, test the switch by pulling the clip while the ATV is running.
The kill switch, regardless of where or which vehicle it is used in, is one of the most imperative and essential assets you can have for safety purposes. From its anti-theft design to its last-second emergency usefulness, a kill switch can do you wonders.
Regardless if you have an ATV or UTV, this kill switch can save your life. Whether that be on the off-road when you are going too fast or when the engine seems to malfunction, the kill switch is known to be the last resort and for good reason. It is both efficient and easy to use, either through a push or pull motion, and can be easily found by the owner of the vehicle.
Furthermore, it can protect your vehicle from being stolen.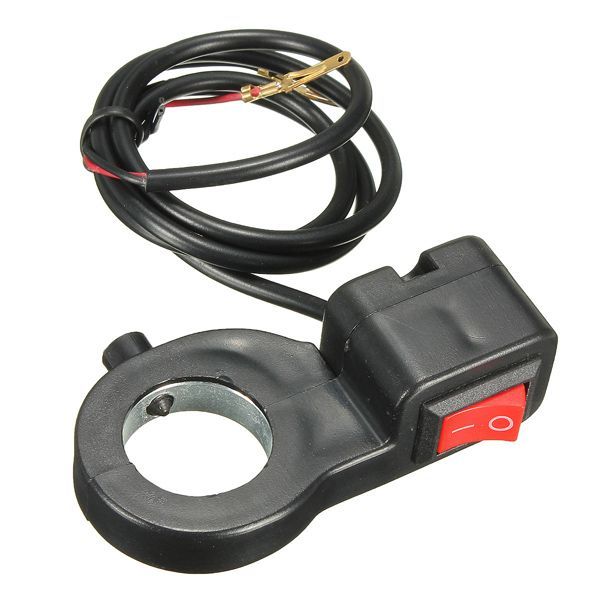 A ton of ATVs and UTVS have been stolen through the years and having a kill switch has been one of the most effective protection against thieves. This is important in cars, but even more so in an open-model vehicle like an ATV. With a kill switch, you can turn off the engine from being used unless you yourself are utilizing the vehicle.
In terms of its installation, know where and how to activate the kill switch. It will be useless unless you know exactly where it is at all times and how to use it. Usually, this place would be accessible and easy to activate. In an emergency situation, you do not want to be looking for a kill switch. Instead, you want it to be an instant instinct that comes from experience. So, when installing, try to even practice or simulate what it would be like to use the switch. Furthermore, when attaching to the handlebar, make sure that the lead from the switch will be wired to the ground, and the second wire will splice between the stator and ignition coil.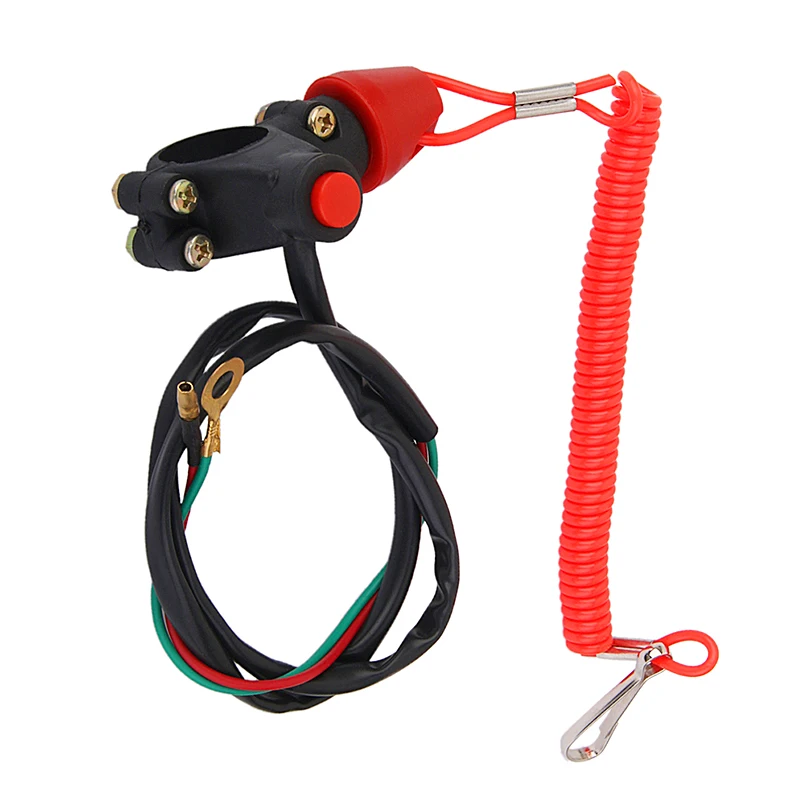 If not, you can cause serious damage to yourself and the ATV or UTV that you are operating on.
Finally, there are a lot of automotive insurance policy benefits for having a kill switch. Make sure you check to see if you insurance carrier offers a discount when you are considering whether to install a kill switch.
Did you know that an average of 20,339 ATVs is reported stolen each year in the U.S.? That’s not a fun statistic to find out especially if you paid more than $5,000 for your new ATV.
A kill switch can be the answer to help you keep your ATV from getting stolen. More than that, a kill switch can protect you and your family when you use an ATV. In an emergency or when you lose control, you want to have some type of protection.
It’s especially useful when you have young kids that want to play with everything. You can protect them even when you’re not around.
A kill switch can save lives, but how does a kill switch work?
Before you sign yourself up for a kill switch, you probably want to learn everything you can about them.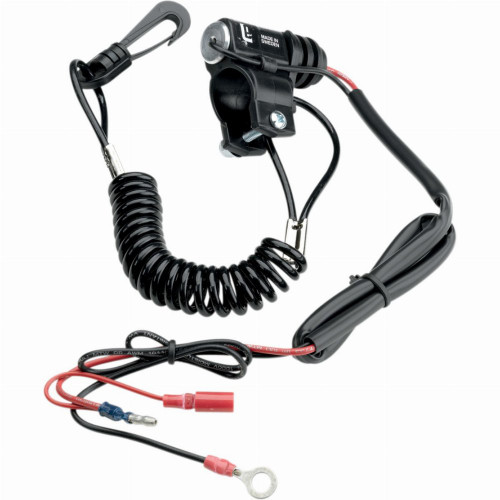 We’ve made that easy for you with our guide on everything you need to know about how a kill switch works.
Table of Contents
What Is a Kill Switch?A kill switch is also known as an emergency stop or emergency power off. It’s a safety mechanism that can shut down your ATV, UTV, snowmobile, or bike in an emergency.
In most cases, you can use your key to properly turn off your bike. But if there’s an emergency where you need to immediately shut down your bike to protect yourself or someone else, then a kill switch comes in handy. It’s designed to be easy and noticeable, so when you’re panicked and worried, you can use the kill switch easily.
A kill switch is a common mechanism used in many different machines. They’re used in industrial machinery including nuclear power plants. You probably don’t know it but a kill switch is also used in gas station pumps to ensure that the pump doesn’t overflow and pump out large amounts of flammable gas.
The emergency button on your elevator is also a kill switch.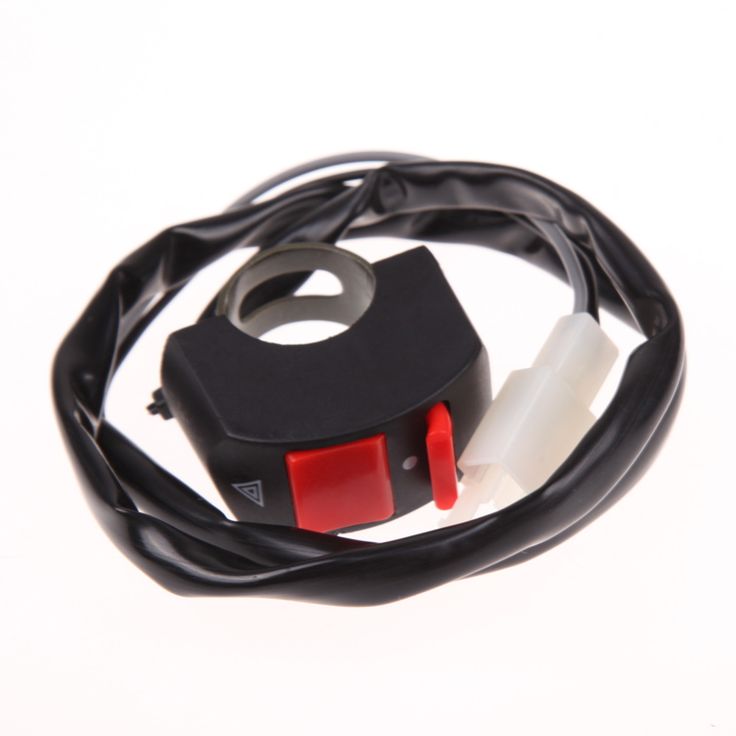 Your treadmill also has a kill switch so if you stumble or fall, you can pull the red kill switch to immediately turn off the machine without causing you further injury.
You can rest assured that your amusement park rides have kill switches, so you’re always protected. The fact that you can go online and turn your phone off when it’s lost or stolen is another form of a kill switch.
Why Use a Kill Switch On an ATV, UTV, Snowmobile, or Bike?A kill switch can be incredibly useful on an ATV, UTV, snowmobile, or bike. These vehicles are designed to be easy and convenient, but they can also be dangerous. You want to make sure that you and your family are protected when using these vehicles. You also want to protect your investment from theft.
Emergency ProtectionThe main reason that people get kill switches is to shut off the vehicle in an emergency. If you fall off or your ATV flips over, you want to shut down the vehicle before it gets away from you and hurts people.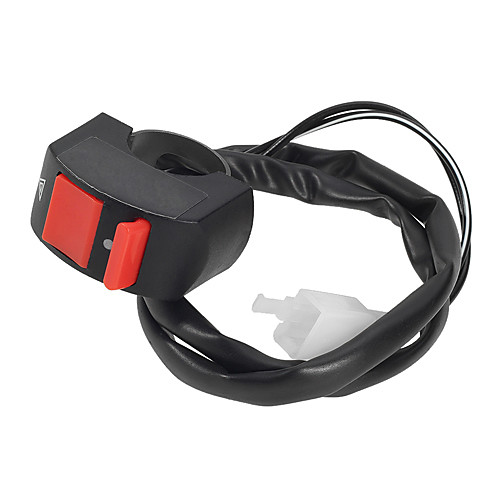 If your vehicle malfunctions, then the kill switch can be a lifesaver.
Remember there are other safety features you should also keep in mind. Protective equipment like gloves, pants, and boots can also help you. Also, some states have ATV helmet laws that require that you wear a helmet when driving.
Safety of Young ChildrenYour kids might run around playing with everything in sight, but you want to make sure that they can’t hurt themselves on your ATV, UTV, snowmobile, or bike. A kill switch allows you to protect them.
If they’re old enough, you might want to teach them how to ride on a little ATV or minibike. To protect them from hitting things and hurting themselves, you can use a remote kill switch. When you think they’re going to crash, just hit that kill switch and the vehicle will die and come to a stop.
Protection From TheftOne important reason to install a kill switch is to reduce your risk of vehicle theft.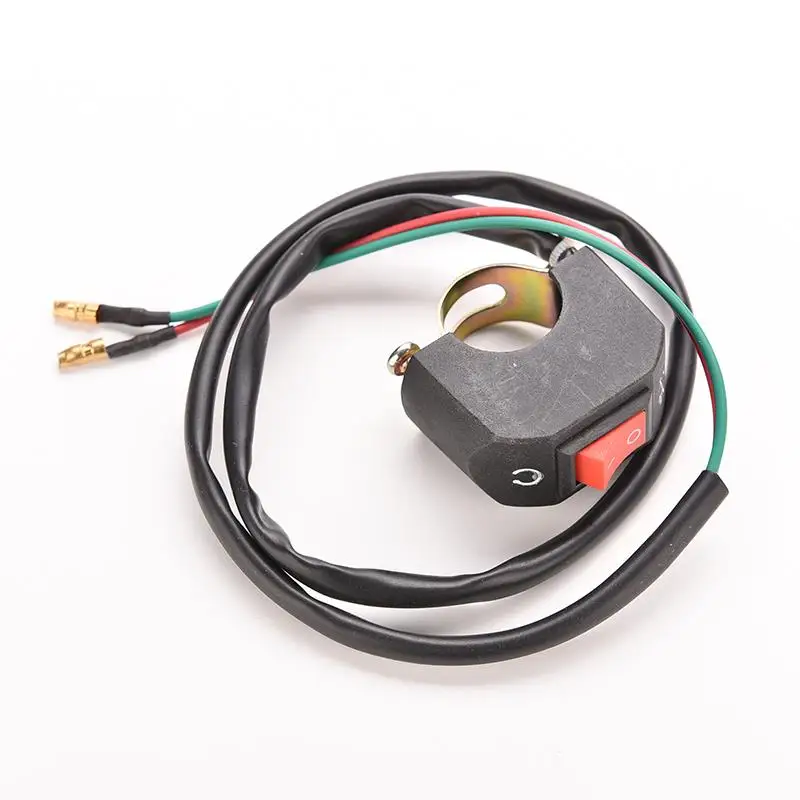 If you do, you can rest assured that you are the only person who knows where the switch is and how to operate it.
You spend a lot of money on your ATV, UTV, snowmobile, and bike and you want to make sure you protect your investment. The price of an ATV can range from $3,000 to $15,000+ with an average price of $7,000.
Remember that they can still haul that ATV on a truck, but at least they won’t be able to simply ride it out. Without a kill switch, they can simply get on the ATV, UTV, snowmobile, or bike and drive it away.
In most cases, your ATV thief is not going to be a specialized professional with all the tools of the trade. It’s just a matter of convenience for them. So, making it even a little bit difficult can reduce your risk of getting your ATV stolen. Check out other ways to protect your ATV from theft.
Insurance DiscountThere’s another perk that you probably aren’t aware of is a discount on your insurance. Some insurance companies offer you a discount if your vehicle has a kill switch.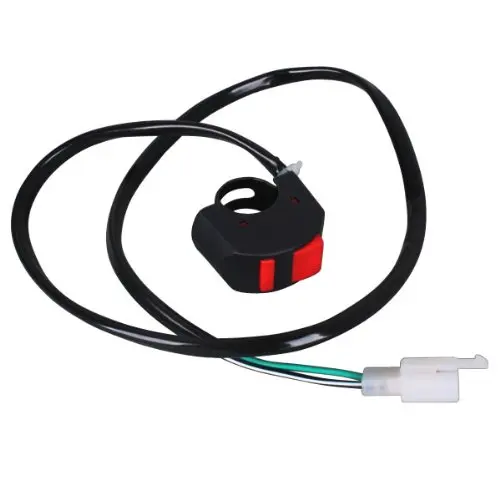 Ask your insurance company if they have this offer and how much of a discount they can give.
A kill switch is wired into the ignition coil. An ignition coil sends a spark that ignites the engine. The kill switch breaks the ground circuit, which means that the ignition coil will not work. It won’t send a spark to the engine and the vehicle won’t work.
A kill switch can be either Normally Open (NO) or Normally Closed (NC). The NO kill switch grounds the primary ignition when it’s pulled. This leads to a short circuit that stops the engine.
In an NC switch, the circuit is always connected. When you push the kill switch, the circuit breaks and the engine stops working. This is usually used in battery-powered ATVs.
What Are the Different Types of Kill Switches?A kill switch can be a push-button, a pull switch, or a remote kill switch. You can either push a button to kill your vehicle or pull the cord to make sure the kill switch is on.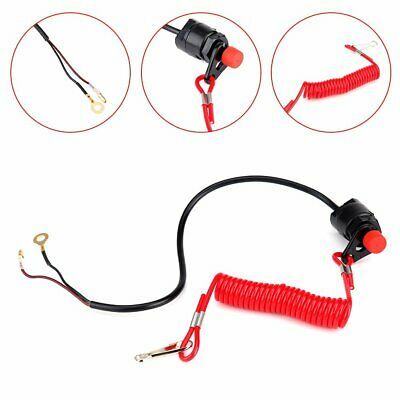
A push kill switch is usually located on the handlebar in a bright red color so you can always tell where it is. This means you or any passerby will always know what it is and where it is.
A pull kill switch is useful for competitive racers because they can simply pull the switch to stop the engine. If the driver falls out of the vehicle, a wire is connected to their chest plate or wrist. That wire pulls the kill switch turning the engine off.
A remote kill switch is best if you’re a parent teaching your kids to drive a small ATV or minibike. These small ATVs usually come with a kill switch and a remote kill switch.
Kill Switch vs KeySome riders use the kill switch instead of a key to turn their vehicles off. It becomes second nature for them to press the kill switch to turn off their bike or ATV.
At the end of the day, the kill switch and key ignition switch are part of the same circuit. You still want to make sure your ignition is off, otherwise, your battery will die.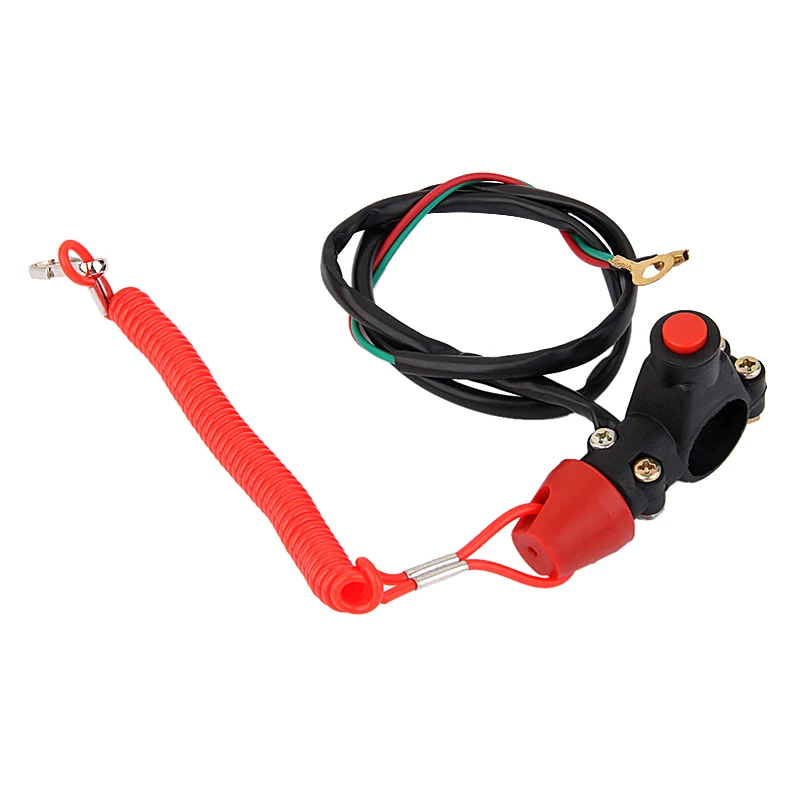 You can decide what works best for you in different situations.
Usually, you want to install your kill switch on your handlebars so you can get to it easily in times of emergency. Also, thieves will see the kill switch immediately and it may make them change their mind about stealing your vehicle. You want to remember to make sure it’s out of the way, but you can still reach it easily.
Kill switches tend to be universal so they should work with almost any ATV. The wiring in the ATV may be different, so if you’re not sure consult an expert.
You should have three wires. The short wire is connected to the ground. The long wire is connected to the signal wire on the ATV engine. The third wire is the tether wire which activated the kill switch when pulled.
Remember to test your kill switch while the ATV is running.
Check Out More Tips and Tricks on ATV RidingHow does a kill switch work? You asked the question, and we gave you the answer.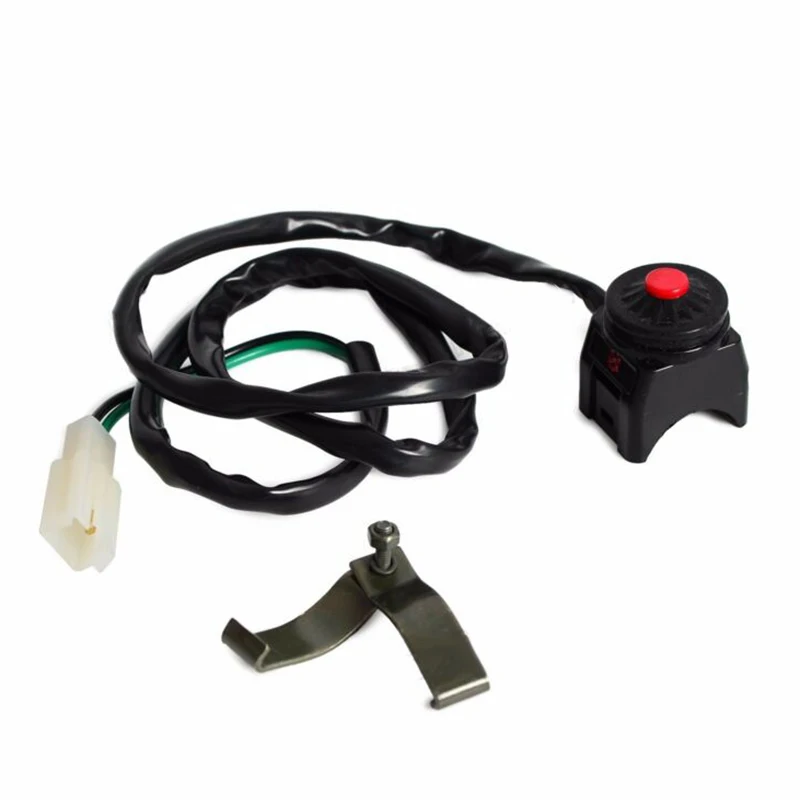 Now you know everything you need to about kill switches. You know all the reasons to get a kill switch and the different types of kill switches.
If you’re just starting or an avid rider, you probably still have a lot of questions on your mind. Maybe you want to learn about ATV tire pressure or ATV fuel economy. Check out our blog for more articles that answer all your questions about ATV riding like learning how to negotiate with ATV dealers.
Moscow:
1st Varshavsky proezd, 2s8
+7 499 500-97-34 Call me back
Page not found at given address.
Please go to the main page or use the site map.
 03.2020
To turn the ATV or fall from it, it is quite incredibly pressed on a steep slope - for example, on a steep slope - on a steep slop . Due to the high center of gravity, small width and short wheelbase, the equipment easily stands on 2 wheels. At the same time, a fall, even at low speed, threatens with fractures. Therefore, after buying an ATV, you need to familiarize yourself with the basics of control.
To start an electric start engine, turn the ignition key to the ON position, press the brake and press the green electric start button for no longer than 5 seconds.
ATVs usually shift automatically - the shift lever is used to select high, low, neutral or reverse gears, as well as select the parking mode.
To move off or increase speed, you need to press the thumb of your right hand on the throttle. The gearbox must be in the “H” or “L” position. The middle finger of the right hand rests on the front brake lever while driving, and the middle and index fingers of the left hand rest on the rear brake lever.
Also on the steering wheel there are buttons for turning on the four-wheel drive and locking the differential. Four-wheel drive will be needed when driving off-road, slippery roads, transporting goods and towing. A differential lock is needed so that the wheels of the ATV spin synchronously - for example, it will help to drive out if one of the wheels is stuck in the mud, and the second remains on a stable surface. When the lock is off, in such a situation, only the wheel that is stuck will spin.
Whether it is possible to turn on the four-wheel drive and blocking on the go and at what speed - should be indicated in the instruction manual. At the same time, regardless of the model of the ATV, the lock cannot be turned on after a jam, since the differential gears must engage without load.
1 - ignition key. 2 - starter button. 3 - light switch. 4 - signal.
1 - throttle lever. 2 - switch 2WD / 4WD. 4 - fuse.
1 - throttle lever. 3 - 4WD / LOCK differential lock switch. 4 - fuse.
Standing up makes it easier to avoid tipping the ATV by shifting your body weight. There are 3 main racks:
The worst stance is when the back is tense, the person leans on his hands, and his legs are straight. In this case, the body does not absorb shocks and shocks, and the bones, intervertebral discs and joints experience a strong load.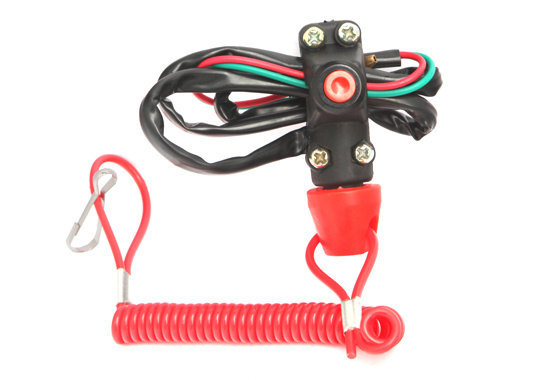 In addition, control over technique worsens and fatigue increases.
middle rack
A-pillar
rear pillar
To climb, you need to shift into a low gear, take the front stand and drive at medium engine speeds. It is impossible to sharply press the gas when driving up a slope or mountain - there is a risk of rolling over.
When stopping in the middle of a hill, start carefully, as a sudden start will be followed by tipping over. If the ATV rolls backwards, you need to press the front brake lever, and after stopping, turn off the engine, put the equipment on the handbrake, turn around manually, slide down and try again.
To descend, you need to take the rear rack and shift into a lower gear. In order not to roll over, brake should be simultaneously front and rear brakes.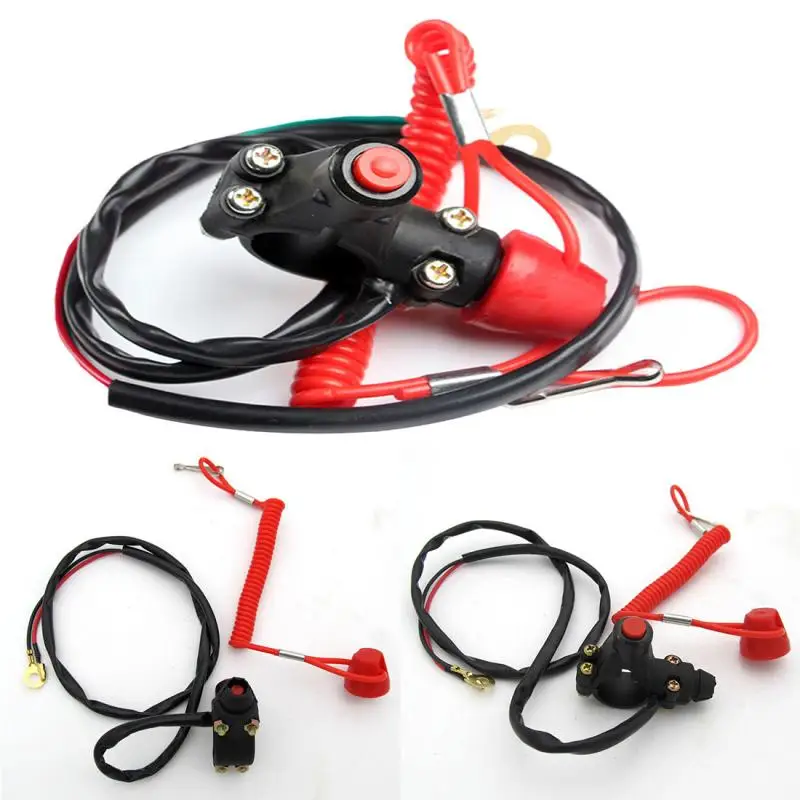 To avoid skidding, you can not change the trajectory of movement and speed abruptly, as well as brake too hard. It is better not to touch the gas lever when descending.
To drive downhill, shift into low gear and shift your body weight towards the top. Don't hit the gas hard and don't brake hard. You can also fall when making a sharp turn. If the slope is steep and the ground on it is slippery, it is better not to risk it.
To enter a tight turn, lean on the outside footrest and tilt your upper body inward. On slippery surfaces, shifting forward will improve handling, and shifting back will improve the grip of the drive wheels with the road.
Before driving into deep mud, you need to make sure that there are no logs, large stones and other obstacles in it, and the soil is not marshy. You should drive smoothly, without sharp pressure on the gas lever.