|
JavaScript seems to be disabled in your browser.
You must have JavaScript enabled in your browser to utilize the functionality of this website.
Description Specification Product Video Gallery Size Guide Q&A Reviews
SKU: AES-500W
Shop Parts
Regular Price: $999. 99
99
Special Price $499.95
+ $239.95 shipping
Availability: In stock
Buy 3 $110off / Buy 4 $165off Limited Time Discount2022 CYBER MONDAY Deal - Limited Time Coupon!
How to redeem:
1. Add this item to cart.
2. Enter coupon code CYBERDEAL1-3 for 3 units
3. Enter coupon code CYBERDEAL1-4 for 4 units
4. Mix and Match with 50cc ATV Mini X-Sports
This offer ends: Dec 24th, 2022, while supply last.
Holiday Delivery: Order on or before the dates below to get them delivered by 2022 Christmas. Dates provide are base on estimation, actual delivery time frame may vary.
West Coast 12/18/2022
Central West & Central 12/15/2022
East Coast 12/13/2022
See detail holiday delivery info by state here >>
 5inch tire, big size tire
Free Assembly Manual ($25 Value)
Free Residential Delivery Fee ($15 Value)
Free User Manual Handbook ($30 Value)
Free Standard Tool Kit Set ($15 Value)
Free Life Time Technical Support
Free Delivery Notification($15 Value)
Free Standard 3 Months Limited Warranty ($89 Value)
Read More +
-- Please Select --80% Assembled (FREE) Ready to Ride Package +$249.95
80% Assembled (FREE)
Ready to Ride Package
+249.95
-- Please Select --3 Months Limited Warranty (FREE) 6 Months Parts Warranty +$99. 9512 Months Parts Warranty +$199.95
3 Months Limited Warranty (FREE)
6 Months Parts Warranty
+99.95
12 Months Parts Warranty
+199.95
-- Please Select --Standard Process (FREE) RUSH Processing +$49.00
Standard Process (FREE)
RUSH Processing
+49.00
* Required Fields
| Shipping Rate | 239. 9500 9500 |
|---|---|
| Assembly | 80% Assembled (Installation require on varies bolt-on items) |
| Moto Power | 500 Watt |
| Valtage | 60V |
| Charger time | 4-6 hours |
| Drive Distance | Est 20-25 |
| Starter | Electric Start/ Remote Start |
| Gear | AUTO |
| Transmission | Chain Drive |
| Driving wheel | Rear Wheel Drive |
| Max Power | 6.7hp@5500 |
| How Fast | Est 20 |
| Cooling System | Air Cooled |
| Controls | Kill Switch with Strap |
| Kill switch | Yes |
| Speed limiter | Yes |
| Fuel Type | Electric |
| Frame | High Strength Steel |
| Ground Clearance (inch) | 3. 15 15 |
| Wheelbase (inch) | 27.55 |
| Brakes Front | Disc |
| Brakes Rear | Disc |
| Tires Front | 14.5 |
| Tires Rear | 14.5 |
| Front Suspension | Single A-arm with Coil Over Shock |
| Rear Suspension | Coil Over Shock |
| Wheel Size | 6inch |
| Weight Capacity (lbs) | 185 |
| N.W. (lbs) | 105.00 |
| G.W. (lbs) | 125.00 |
| Overall Length (inch) | 42.52 |
| Overall Width (inch) | 25.59 |
| Overall Height (inch) | 26.38 |
| Seat Height: (inch) | 19. 29 29 |
| Tools Kit | Yes |
| CARB Approved | Yes |
| MCO(Title) | No |
| Menu and Diagram | Assembly menu |
| Low Price Guarantee | Yes |
A: We have been in the Power Sports industry since 2004 , We do have our own exclusive factory working with us. This will allow us to present exclusive NEW products every year.
A: We are located in Southern California with full service capability. Address can be found on the website under office hour and location at the bottom of the page.
A: Yes, Red Fox Powersports has the most updated technology on website design, 100% secure shopping cart, self-checkout, user friendly search engine, Detail and accurate specification, exclusive photos and videos of the product. Our goal is to make sure our customer’s money is well spend.
A: Yes, contact us at and our well trained staff is ready to help you to pick the best one that is suitable for you. Although some time the phone calls could be busy and you may have to wait on the line, you can always reach us by using the live chat or send us a email (usually live chat is the faster route). To place phone order, please call 877-266-2148
A: You can contact us either by phone, live chat or email to confirm the availability before you place the order.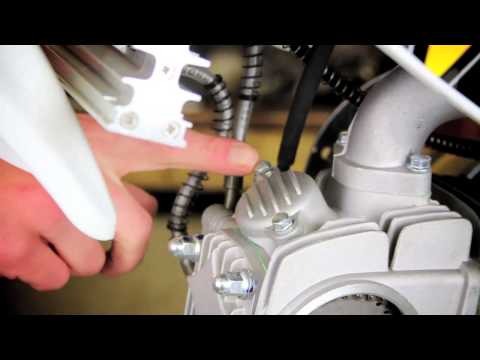
A: Due to large demand and limited quantity, a 2nd choice color will help your order to get process smooth incase the 1st choice color is just happen to be out at that moment. But if you absolute need your 1st choice color, just put the 2nd choice color as the same as your 1st choice color.
A: This means the package is a factory package which require assembly and fine tune (vary by models). If you are not a mechanic yourself, we strongly suggest you to take our PRO Fully Assembled with Ride Test Package.
A: If you select rush process we will ship your order out within 24-36 hours.
A: This will depending on many factor such as the product, package that is choose, weather , destination and freight carrier schedule and your location, but under normal circumstance it should take anywhere around 5-10 business days.
A: After you order has been placed, our customer service team will start process your order, they will first make sure your order complies with all security standard and then submit order to the shipping department for freight schedule. At the same time, warehouse will prepare your order for shipping too. The above procedure should be complete within 24-72hrs after you have placed the order. Once the freight carrier picked up your order then you can start track the package by using the tracking number provided by us to you via email.
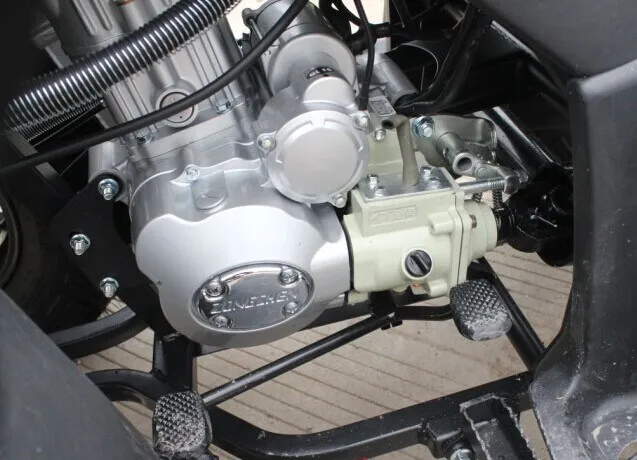
In this article, we'll cover the maintenance features of 125cc 4-stroke gasoline engine ATVs for kids and teens. see the MOTAX family, using the MOTAX T-REX SUPER LUX ATV as an example.
 Air filter service
 To change the engine oil you will need:
1. A container for draining used oil (can be made from an old plastic canister by cutting off the side).
2. Four-stroke ATV engine oil (we recommend using oil of the MOTUL line).
Please note that it is not permissible to use oil intended for automobile engines, since the gearshift mechanism and clutch are in the same oil bath with the engine and for their proper operation a certain set of additives is required, which are not found in automobile oil.
3. 17mm socket wrench or wrench.
The 125cc MOTAX T-REX SUPER LUX power pack has a 0.7L oil fill tank.
The ATV engine must be warmed up to operating temperature before changing the oil. Since the oil sump of the gearbox and engine is combined, it is recommended to ride the ATV forward and in reverse gear. This must be done so that the oil becomes more liquid and fluid, and the wear products that may have been deposited on the inner walls of the crankcase and the mechanism become suspended and mixed with the oil.
Don't be alarmed if the oil you drained from the ATV's power unit is dark in color. During operation, the oil darkens, which indicates that it works and protects the engine from wear.
In order to drain the oil, it is necessary to unscrew the drain plug located at the very bottom of the engine crankcase. Do not confuse this plug with the chain tensioner bolt, which is installed next to it, in the left side cover of the motor.
It must not be unscrewed during this operation.
Unscrew the drain plug (in our case, the drain plug is green, see the photo above), having previously moved a container under the ATV to drain the used oil.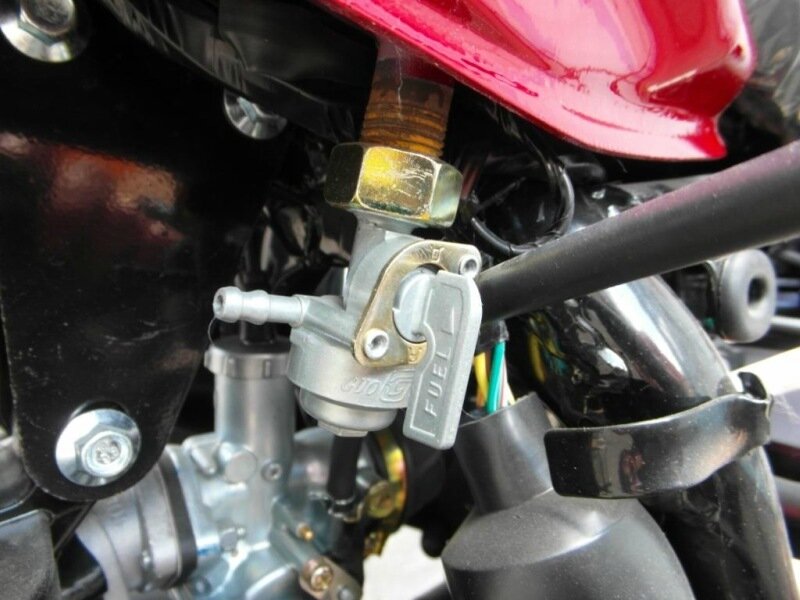 Let the oil drain completely.
While the oil is draining, unscrew the oil dipstick, which simultaneously functions as an oil filler plug and leave it in place without removing it
below
In this case, the used oil will drain off without residue.
After the old oil is completely drained, screw back the oil drain plug
Be careful not to use too much force when tightening the plug, as this could damage the threads in the aluminum crankcase of the ATV engine.
New oil can now be added. The ATV's engine is equipped with both a dipstick and a viewing window on the bottom of the engine.
It is better to focus on the viewing window. The oil level should be approximately at the top of the oil.
The engine is splash lubricated, too much oil is better than too little. The ATV engine is equipped with a breather at the top, the excess will come out through it without damaging the gaskets and seals. Of course, you should not get involved in overflowing oil into the engine either.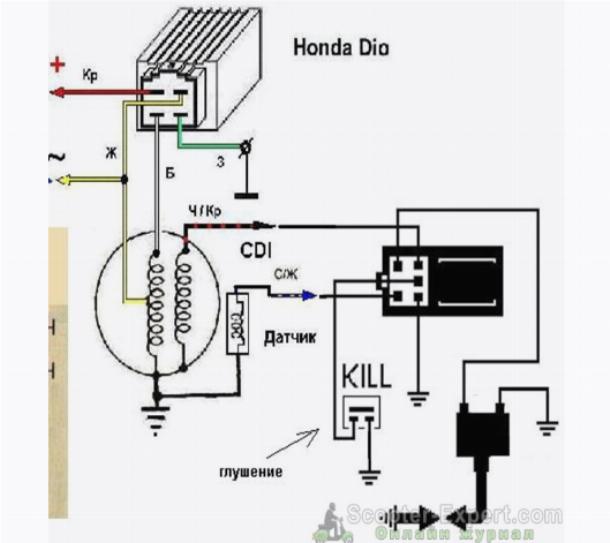 Oil should be poured through the hole in which the oil dipstick is installed
After the oil has been filled, screw the dipstick back into place. Start the engine and let it idle for about 30 seconds. Stop the engine, let the ATV stand still on level ground for about 30 seconds. If the oil level has dropped, the oil must be topped up.
If the level is correct, you can proceed to the next stage of maintenance work.
Almost all 2017-2019 ATVs a serviceable foam rubber filter is installed for cleaning the air entering the carburetor. If the filter element is intact, not torn, then it is allowed to simply rinse it without changing it to a new one.
The first thing to do is disconnect the filter from the ATV carburetor.
Filter, worm-drive clamp, Phillips screwdriver required for removal
Loosen the clamp and tighten the air filter
The MOTAX uses two types of filters. Foam rubber, as in the photo above and a filter with a metal mesh. The principle of their maintenance is similar, the used ATV filter must be washed and then impregnated with a special oil, such as MOTUL.
To wash the filter element, you can use both special liquids (for cleaning carburetors) and ordinary liquids - gasoline, kerosene, diesel fuel, water from Fairy for washing dishes.
The filter must be washed carefully to avoid damaging the filter element.
After the filter has been washed, it must be dried and soaked in oil. Oil penetrates through the pores of the filter element, lingering in them, thereby helping to trap the smallest particles of dust and dirt. It is necessary to impregnate the filter evenly, without gaps. Any, even the smallest gap, is a weak point through which dirt and dust will surely get into the engine, subjecting it to premature wear
After oil is applied to the filter, you need to take a regular plastic bag, put it on the filter and rub the applied oil on the surface of the filter element.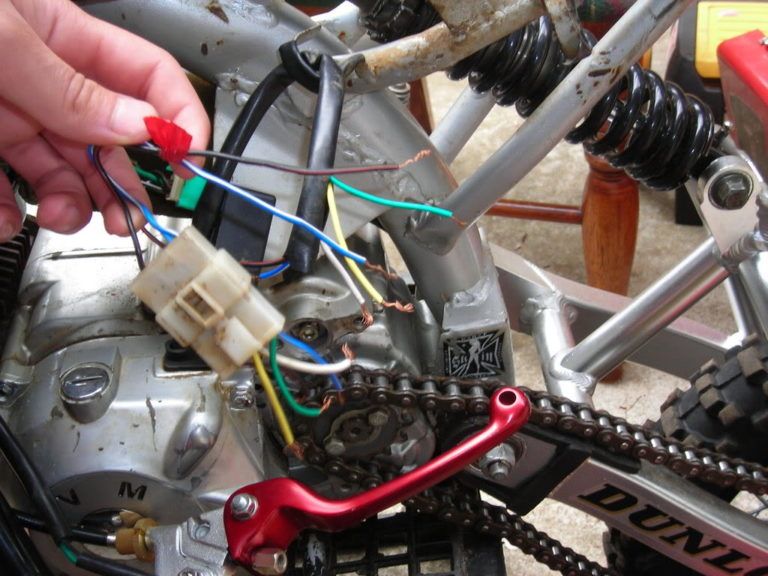
The oil is now evenly distributed over the surface of the filter element. No gaps or voids.
Reinstall the filter, leaving the filter bag in place for now to avoid getting your hands dirty. Before installation, it is recommended to lubricate the rubber seat with engine oil
Tighten the clamp with a screwdriver
Remove the bag from the filter. Done - the air filter has been serviced, you can proceed to the next stage of the ATV maintenance work.
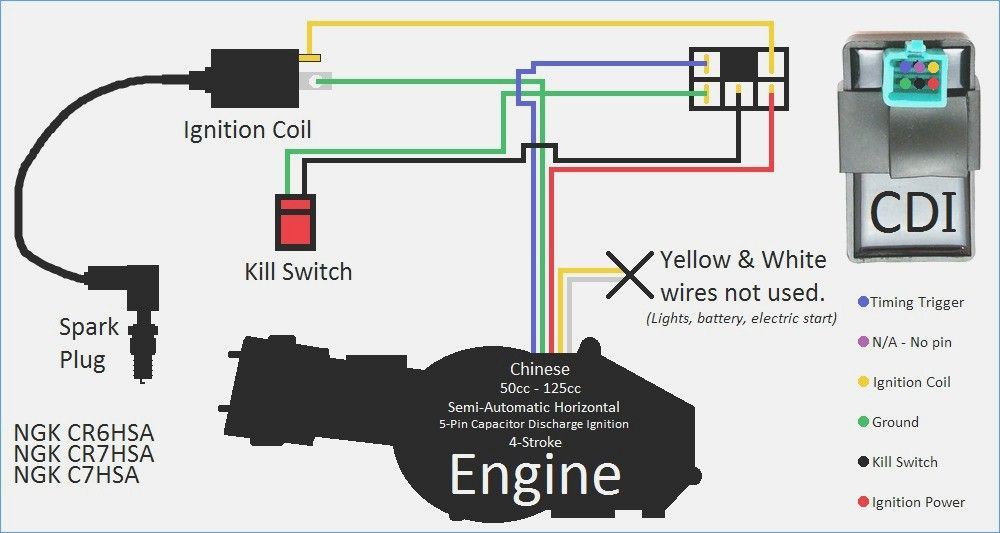
NGK C7HSA Spark Plug
Requires 16 Spark Plug to ignite mixture on MOTAX ATVs with 125cc engine
MOTAX T - REX SUPER LUX0003 Remove the spark plug cap from the spark plug, put the cap on the spark plug and turn it counterclockwise. Install the new spark plug in reverse order. We tighten the candle with sufficient force, but at the same time carefully so as not to break the threads in the head of the engine block. After the spark plug has been replaced, it's time to service the ATV's suspension. The MOTAX ATV's suspension joints are equipped with grease fittings that are designed to force grease into the ball joint using a special grease gun. The same grease fittings are provided to lubricate the steering shaft and rear swingarm ATV's suspension requires a special grease gun and grease for the pivot joints. Any type of grease gun can be used, but we find the most convenient gun with a flexible nose, designed to work with hard-to-reach suspension grease points MOTUL Tech Grease 300 is an excellent lubricant.0003 Once the syringe is ready for use, put its head on the grease fitting of the suspension assembly to be lubricated injected with a syringe can damage them. In order to control the supply of oil to the lubricated unit, we recommend that you keep your fingers free from the syringe on the rubber boot. Wipe off excess grease with a rag or rag and put a protective cap on the grease fitting All suspension units equipped with grease fittings are sprayed in this way. To lubricate the steering shaft, put the syringe head on the grease fitting it is equipped with. passed through the entire node and is no longer required. To service the ATV's drive chain, jack up the rear axle of the ATV so that the wheels turn freely in the air, but the ATV maintains a stable position. mud. For this work, you can use the special tool MOTUL or regular gasoline and a brush. It is better to install a pan under the ATV so that the remnants of the old grease and cleaning agent flow into it. To do this, you can use the same canister that was used to drain the used oil from the engine. The chain should be thoroughly rinsed from the inside and the outside by turning the ATV wheel and thereby shifting it Apply new lubricant only on a dry, clean surface, so after washing the chain should be wiped with a rag or rag Please note that the ATV during the performance of these works, for safety reasons, it must be de-energized. Be careful not to get your hands between the drive chain and the star. ATV chain can be lubricated with any lubricant specifically designed for this purpose. Chain lubricant is sold in aerosol cans. We recommend using MOTUL C3 off Road Lubrication should be applied on the inside and outside of the chain, on both rows of links. A chain tensioner is installed on MOTAX ATVs. This assembly is flushed and lubricated during maintenance along with the chain Pull the roller down and loosen the chain with one hand, check for slack with the other by pressing the chain from the bottom up If the chain slack is more than 1. To adjust the tension of the chain, loosen the rear bottom bracket at the top and bottom using the 17 and 14 wrenches. Next, tighten the chain with tensioners. Chain tensioners are installed on both sides of the carriage and it is necessary to adjust the chain tension both simultaneously and evenly. Otherwise, the axle of the ATV will be skewed That is, if the nut was tightened three turns on one tensioner, then the same must be done on the second tensioner. Retract the roller and check the chain tension. After the chain tension is adjusted, tighten the nuts securing the rear carriage of the ATV. Pay special attention to the position of the speed sensor, which is mounted on one of the bottom bracket bolts. Please note that the sensor must be installed flush with the holes in the driven star into which the magnets are inserted. These magnets during movement transmit signals to the sensor, which converts them and transmits them to the dashboard of the ATV The ATV battery is one of the most important elements in its electrical system. Given the amount of additional equipment installed on the ATV (winches, additional lights, alarms, heating, etc.), the battery often does not charge to the end. And the owners do not pay due attention to this, which is why they change the battery every season. Believe me, with proper care, the battery can last 3 or more seasons. Let's pay attention to the rules for charging your ATV battery, consider errors and answer questions that arise when servicing the battery. Warning. The conversation for the most part will be about serviced batteries. Maintenance free ones have no plugs (at the top of the battery) and only need a timely and full charge, and their owners may skip some of the points described below. Can I use a car charger to charge my ATV battery? It is possible, in the case when the charger has an adjustable charge current and it is possible to set the minimum current from 0. Is noise and bubbling normal when charging? Moderate boiling is normal. This is explained by the reaction in which the electrolyte enters with lead plates, in which the acid releases a certain amount of gas. It is worth worrying if the boiling is excessively strong - this indicates that the charge current has been exceeded. Why does a new battery drain quickly? What is sulfation? Sulfation is the formation of lead sulfate (white matter) on the battery plates. What affects the sulfation process? How to avoid sulfation? Monitor the condition of the ATV's electrical system at all times. Amp /hours - what is the characteristic? This is the unit in which the battery capacity is measured. For example, a fully charged battery with a capacity of 1 Ah should theoretically provide a current of 1 ampere for an hour. How and why to monitor the electrolyte level? The electrolyte is sulfuric acid diluted with water in the right proportion. During operation, water evaporates, and the proportion of sulfuric acid increases, which, in turn, adversely affects the health of the battery. If the electrolyte level drops (each battery has a normal level mark), add distilled water (available from auto parts stores) to the mark. How can I tell if the battery is charged? A charged battery produces 12.8 V. If your multimeter measures 12.5 V or less, the battery needs to be charged. Which terminal should be connected first when installing the battery on the ATV? Always connect the positive terminal first. When connecting the wire to the terminal, a spark may occur, so all flammable liquids must be removed in advance. Always tighten the bolts on the terminals firmly to avoid short circuits. The terminals can be treated with a lubricant to prevent oxidation. What happens if the polarity is reversed? How to store the battery in winter? If you do not use the ATV in winter, the battery must be removed and stored in a cool place, and charged several times during the winter with a small current. The applied force on the key should be smooth and moderate.
  Thus, it will be possible to feel when the lubricant passes through the swivel and its excess begins to come out. At this point, the injection of lubricant into the joint must be stopped
 5 cm, the chain tension must be adjusted.
 Charging the battery on an ATV.
 -
-  5 to 0.7.A. There is a simple rule: one tenth of the battery capacity will be considered the normal current for charging (calculation should be made in Amperes). Of course, it is much easier and more correct to use special devices designed for low charging current. Complete with the charger always comes instructions for use, which contains the basic requirements and rules, do not neglect to read it.
 6 volts;
All old and failed batteries are subject to this phenomenon.
 The battery loses its charge significantly during engine start, and the charge must be replenished when driving, so monitor the health of the regulator and generator relays. When the ATV is not used for a long time, remove the battery and charge it with the charger at least once every 2 months. When the first signs of sulfation appear, charge the battery with low current for a long time (up to 2 or more days).
Always respect the polarity - wrong polarity can lead to a blown fuse at best and an exploding battery at worst. 


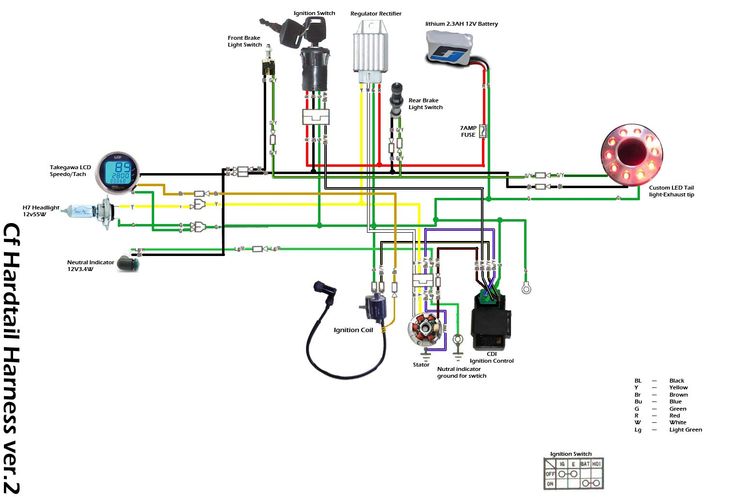
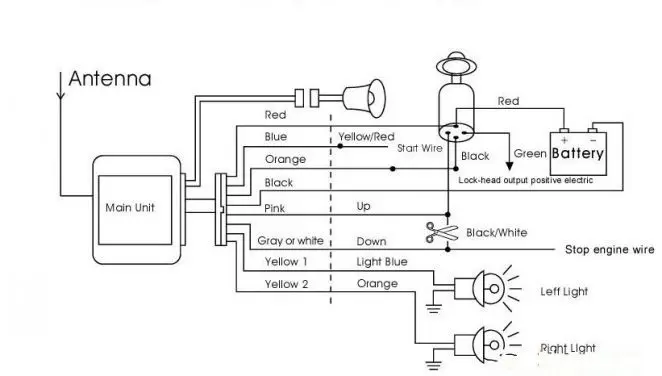
 You will have to fill the battery with electrolytes (battery acid) and seal it. Everything is included with your purchase. Red wires go to the positive and green/black go to the negative terminal.
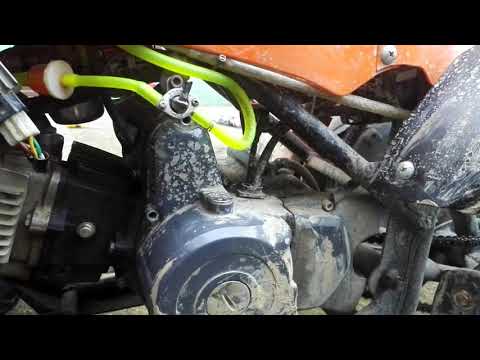
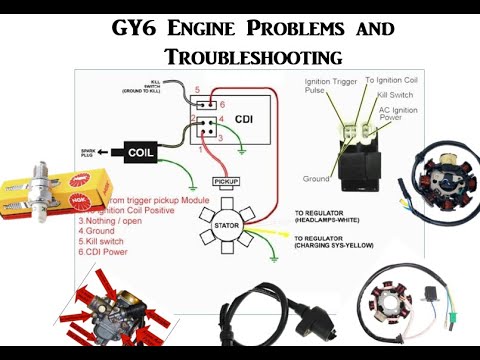
 1st thing to try would be the CDI box, 2nd the coil, 3rd the spark plug, 4th the stator
 It might be bad or maybe the carburetor came loose due to engine vibration.
 Certain oils can’t cling on when the engine gets too hot. As a result, the needle bearing may fall apart inside and cause the engine to lock. You’ll have to buy a new a engine or try to rebuild it. Be sure to always maintain proper engine oil levels to help prevent this from happening.
 Most of the batteries charging cycle are around 250-300 times.
 This is accomplished with the primer pump bowl located at the bottom of the carburetor. Simply press and release this pump several times until gas can be seen flowing through the clear gas return line to the fuel tank. This will help start the ATV under the aforementioned conditions. However, if this is done once the ATV has warmed up it may induce flooding.
 This screw controls the idle speed. The tip should extend about an 1/8 of an inch (4 mm). Adjust it so the engine will idle at a fast enough speed to stay running.

 The spark plug must be cleaned, and must be replaced promptly when signs of wear begin to show. The condition of the spark plug can tell you a lot about the performance of your engine. If the electrode is white, that can be a sign that your ATV is running too hot. This can be a result of either running too lean, or that the fuel and air mixture is too lean. If you are running your ATV to rich then your spark plug may be black, covered with gas, oil, or carbon. Another common problem is that the spark plug gets clogged up with carbon and/or oil and "fouls". This should be checked by assuring the electrode has a clean gap of .023 in.
 When the protective cover is removed the air filter is revealed. You can also see the small workings of the choke and butterfly valve. The filter should be free from dirt and grease and appear clean like the one shown on the right. If there are contaminants on the filter it can be cleaned in a container of gasoline. Allow the filter to dry before re-installing it into your ATV.
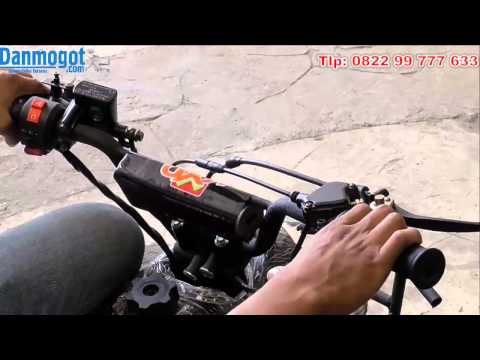
 Although the throttles are different in operation, they are essentially mechanically the same. When the rider applies the throttle, a cable carries this motion down to the engine. For continued smooth operation it is important to keep this cable clean and free of obstructions. Should the throttle begin to feel loose and sloppy, the slack can be adjusted on the cable at the handlebars. Simply loosen the lock nut and adjust the cable tension. Once the desired tension is achieved re-tighten the lock nut.