When you purchase through links on our site, we may earn a commission at no additional cost to you. Learn More
It’s not uncommon that valve stems start leaking only after a few years in use due to dirt, corrosion, road salt, or degraded rubber. Luckily, they are relatively cheap and easy to replace at home.
The same basic principles displayed in this guide apply to most tubeless tires, whether on an ATV, car, lawnmower, or snowblower.
A tire shop may charge around $20 to $30 to change a valve stem. If you do the job yourself, it will cost about 5$, depending on what tools you choose and have at your disposal.
I’ve made this guide for those that wish to do the job at home to save a few bucks or don’t have a tire shop nearby. We’ll be looking at two different methods; one where the wheel needs to come of the room, and a second, where the valve can be replaced with the tire still on the rim, using a specialist tool.
You can replace a valve stem with the tools most people already have in their garage. However, to make the job easier, faster, and safer, we recommend that you get a couple of cheap tire tools as well, available at most auto supply stores
Valve stems come in a range of sizes. They vary in diameter and length, depending on the size and style of wheel you have.
A design-number is used to categorize the various types and sizes of valves available.
Let’s use the most common valve for ATVs as an example: TR-412.
| Industry Valve Number | Maximum Inflation Pressure (PSI) | Effective Length (in) | Rim Hole Diameter (in) |
| 412 | 65 | 0.88 | 0. 453 453 |
| 413 | 65 | 1.25 | 0.453 |
| 414 | 65 | 1.50 | 0.453 |
| 415 | 65 | 1.75 | 0.453 |
| 418 | 65 | 2.00 | 0.453 |
| 423 | 65 | 2.50 | 0.453 |
| 415 | 65 | 1.25 | 0.625 |
| 425 | 65 | 2.00 | 0.625 |

You will find the design number of your old valve stem stamped on the bottom of the stem. This does, however, require removing the valve stem or removing the tire from the rim.
TR412 valve stem.Alternatively, you can measure the old stem and compare your findings with the table above.
You can move straight to step 2 if you already know how to remove the wheel from the vehicle safely.

Remove the valve cap, then use a valve stem core removal tool to unscrew the valve stem core from the valve stem. This will release the air from the wheel.
Remove the valve stem core, using a valve stem core tool.If you don’t have a valve stem removal tool at hand, you should be able to unscrew the core with a pair of small needle-nose pliers. Just place the pliers on the flat portion of the core, and turn anti-clockwise. In a pinch, you could even use a pair of tweezers, as long as they fit.
Next, you need to break the tire bead from the rim.
I tend to use my portable tire changer, but there are several ways you can de-bead a tire. Click here to find a list of alternatives for home mechanics to choose from.
After successfully de-beading the tire, place your knee or a wood block between the rim and the tire for easy access to the bottom portion of the valve stem.
You only have to de-bead the side of the wheel that has the valve stem in it. I removed the tire from the wheel completely to take better photos for this post, but this is unnecessary.
To remove the old stem, you have two options.
You can use a sharp knife to cut it, either on the outside or inside the rim. Cut as close to the rim as possible without scratching the rim itself.
Use a razor blade to cut the old valve stem flush with the inside of the rim.After cutting, you should be able to pop out the remaining piece of the stem easily.
Alternatively, you could use a pair of vice grips to pull the plug out from the inside of the tire. Use this method if you plan on reusing the valve stem.
Spray some soapy water on both the outside and inside of the rim as lubrication. Place the grips over the stem’s thick portion and use leverage to pull the plug out. You may need to reposition the tool several times for better grip until you get the core out.
Before installing the new valve stem, you need to lube the rubber portion to slip into place much more effortless.
Use dish soap, some vegetable oil, or spray the new valve with a generous amount of soapy water.
Notice: Do not use any petroleum-based products such as oil or grease as it will degrade the rubber over time.
Lube the valve stem with dish soap.Insert the valve stem through the hole from the inside of the rim. Make sure the hole is clean and free of debris. The threaded part should protrude on the outside of the rim.
To pull the plug in place, you will need a valve stem pull tool. You can find them at most auto supply stores at an affordable price.
These tools come in a variety of shapes, but all work with the same basic principle.
The threaded portion of the tool mounts to the valve stem core’s threads to get a good grip.
Attach the valve stem tool to the threaded portion of the valve stem.Do not use pliers to pull the valve stem, as this will likely damage the soft copper threads.
Use the tool to pull the valve stem straight out from the wheel until the small rubber groove on the valve stem pops in place.
This tool uses leverage to pull the valve stem out through the rim.As an alternative, you can use a simple 4-way valve tool to pull the valve stem in place. Make sure the valve is properly seated.
The tire is seated back on the rim by using compressed air. This will press the tire outwards until it pops over the tire bead and rests against the rim’s lip.
Lube the tire and tire bead with soapy water. This allows you to seat the tire without using excess pressure, which could blow out the tire’s side.
The trick to succeeding is by adequately closing the gap between the rubber and the rim as you start adding air.
On softer and smaller tires, you should be able to close the gap manually. However, on tires with stiffer sidewalls, you may not be able to create a tight enough seal to build up pressure.
I prefer using the ratchet strap trick as this works great most of the time.
Using a ratchet strap when seating the tire will helpforcing the tire sidewalls outward.Use a ratchet strap to press the tire walls out against the rim. Attach the strap as shown in the picture and tighten it until the tire touches the rim.
With the valve stem core removed, add air until the bead pops in place. Never exceed 7-8 PSI with the strap attached.
As soon as the tire has seated, deflate the tire, remove the strap and install the valve stem core before inflating the tire according to spec.
You are now done and can install the tire back on the vehicle.
The hardest part of replacing a valve stem from the inside is getting the tire off the rim.
If you don’t have the tools or don’t feel comfortable with the idea of de-beading a tire, consider getting a valve changing tool kit designed to replace a valve stem from the outside, like this one from Amazon.
It can be a bit fiddly to get the hook past the old valve stem. Use plenty of soapy water as a lube, and be careful not to damage or scratch the rim as this could cause a leak.
Pulling a valve out of a head is easy-peasy. Putting it back in is only slightly harder.
Here's what you need to know.
Fearless Editor Lance has this crazy editor thing he does where he keeps asking me why someone might want to do something every time I suggest a how-to article, and then he makes me write that into the article. So if you’re not standing in your garage with a cylinder head (or a jug, if you’re working on a sidevalve) sitting next to you, you might want to know a few of the reasons you might be compelled to remove yer valves:
On the left is a Triumph 650 cylinder head. On the right is Joe Zito's enormous head. He agreed to be the model and face of this job we're gonna illustrate. Photo by Lemmy.
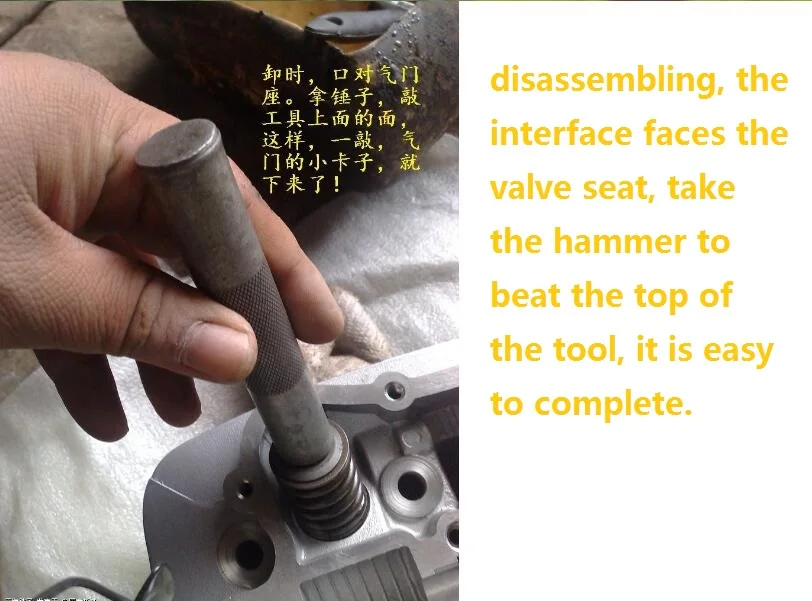
As a young man, I was shown a way to get valves out of a head quickly. This way involves zero specialty tools. First, put your head’s gasket surface onto a non-marring surface. (Scrap lumber works great for this.) Locate your head somewhere where the valve can’t drop very far so it doesn’t get damaged.
Place a deep-well socket that’s similarly sized to the valve spring collar on the collar, centered carefully. Smack your socket with a mallet, and the valve locks (keepers) will slip out of their grooves, freeing the valve. The collets will be contained by the socket; when you lift it up to peek at the valve and spring, the keepers will usually fall right out.
You can remove valves with minimal tooling — but if you need to reinstall them (you do, right?), you'll probably want a specialty valve spring compressor. Photo by Lemmy.
Cons of this method: Smacking things can get ugly and things can be broken. There is also some concern with a spring under tension suddenly releasing all its energy. And if you are also responsible for reinstalling the valves, there’s like no way possible to reinstall using the same toolset.
Pros of this method: You won’t break things if you’re not a complete gorilla, and even if you do, if the head is getting renewed anyway, so it is of little consequence. Also, it’s fast. If you’re doing one little two-valve head, the proper way does not take very long. However, on a 16-valve, inline-four head? You can do this in under five minutes. The “right” way will take considerably more time.
Would you do it, Lem? I have. I use the right tools when I can, but I wouldn’t look down my nose at someone who did this. That said, if you cherish your cylinder heads, here is the less risky method for valve removal.
Before we get cooking: Understanding how the keepers keep is critical to understanding how this process goes. (You need to know how to unlock the locks!) The keepers fit into the area of the valve stem with the reduced diameter. The spring forces the collar up up up, and eventually the taper of the keepers locks the whole shootin' match in place. Photo by Lemmy.
As mentioned previously, this part sucks a little bit. Take apart half your bike. Probably the tanks. Exhaust. Intake. Get the cam(s) or rocker shafts out once you extract the head. This is the easiest step to write but it’s probably the most time-consuming part of this process.
Here are a few compressors that Zito and I own. Some things work great on some heads. Some are unusable or difficult. Photo by Lemmy.
There are lots of spring compressors. You can make or buy or some combination of the two. If you’re making, C-clamps come in handy here. If there is any advice I can give you, it is this: the larger the access window is in the tool, the easier your life will be.
Here's a pusher tool Joe machined himself to be used in combination with a basic C-clamp. Note the large windows he milled into the side of this. These make dealing with the valve keepers a snap. Photo by Lemmy.
Different valves, and heads/jugs require different tools. There are a few styles. Not every tool is compatible with every head/jug. The automotive ones that screw into a rocker stud are particularly useless for motorcycle work.
I also like to have a right-angle transmission pick and small magnetic flathead screwdriver handy.
All set to squinch down those valve springs. See how well centered the pusher tool is on the valve collar? That's important. If you scroll up to the very top of this page for this article's image, you'll also see how well centered Joe has the other end of the tool located in the valve. Photo by Lemmy.
Center the two points of attachment at the top and bottom of the valve. Don’t score up the valve face if you can help it, and line up the collar fork/pusher concentrically with the collar.
As you tighten things, the pressure will make it easier to maintain the position, then as you really screw on the pressure, it will become quite difficult.
Load your pieces back into the head in the correct order. (Clean them up first! These are filthy and are not in shape to be in a running engine.) Photo by Lemmy.
Compress the spring, making sure things are compressing and the tool is not moving or slipping. Once you’ve got the spring compressed far enough, remove the valve locks and seals if you desire. Then start decreasing the spring pressure, and your valve should either fall out, or a gentle tap from a finger should free it. Make sure you label which valve went where if not fully reconditioning the head.
Treat it like Brylcreem: just a dab will do you. If you're paranoid, you can use engine assembly lube, but you're gonna use so little it's not necessary in my estimation. Photo by Lemmy.
This step will likely be performed after your additional work has occurred. You’re basically just repeating the process, but inserting the valve keepers at the end, rather than removing them. Protip: A dab of grease on each keeper will help them adhere to the valve’s stem, then you can use your picks to rotate them where you need them. A screwdriver with a weak magnetic tip can also make this part go a bit more smoothly. This is the fiddliest part of the job.
A little grease will hold the keepers to the valve stem while you finagle them back in. If you are able to roll the head around to work with gravity, life is a bit easier. If not, well... have patience. And maybe a beer if you're working on a 16-valve head. Photo by Lemmy.
The smaller your window in the collar pusher you have, the worse the task. I find a little light can make this part easier, too. Once they’re in place, back the pressure off, double check they’re in place correctly, and repeat, returning each valve to its proper spot.
Adjusting the valves on an ATV is one of the most important maintenance steps. Ignoring this operation will adversely affect the operation of the engine, make it difficult to start the ATV, and even lead to a number of serious breakdowns. Therefore, it is important for the rider to figure out when it is necessary to carry out the adjustment and whether it is worth performing the procedure on their own or it is better to seek help from an ATV store in Kyiv.
Experienced motorists advise adjusting the valves on the ATV immediately after purchasing the equipment. The fact is that when assembling devices (especially Chinese ones), manufacturers do not pay due attention to this procedure. And the operation of ATVs with incorrectly adjusted clearances leads to:
The second clearance setting should preferably be done when the vehicle is running in. That is, after 300-350 km of the way, the rider should check the cylinder head.
Please note: An operation such as adjusting the valves on an ATV is considered a mandatory maintenance item and should be carried out every 1000-1500 km.
Before adjusting the valves, you need to prepare the quadric for the procedure. To do this, it is recommended to raise the front of the ATV. This will clean the cylinder head oil bath and remove excess fluid.
Then dismantle the body parts that make it difficult to get to the valves. However, it all depends on the model of the quadric, in some devices you can get to the cylinder head without removing the plastic parts and assemblies.
The rider also needs to prepare tools: an 8 wrench (better with a head so as not to damage the nuts), measuring probes (you can find them in any auto shop) and a hammer.
Let the machine cool down before adjusting the ATV's valves. The procedure is performed "cold", so it is better not to start the ATV before adjusting.
In fact, adjustment is a basic operation, so even a novice ATV rider can perform it. The driver only needs:

 01 mm). If the readings are very different, then adjust the gap with a lock nut and screw.
 After making adjustments, start the ATV and observe engine operation. It is possible that at first the device will make a slight tapping sound. However, if the knock is strong, then the valves were not set correctly.
Important: Do not load the ATV heavily after adjustment. Carry out a mini run-in (5-10 km). Also, during the trip, listen to the sounds that the ATV engine makes.
02/19/2021 4567
Replacement of the scooter petal valve.
For example, in 4-stroke scooters, the intake and exhaust valves are responsible for supplying the fuel mixture to the cylinder and removing exhaust gases from the combustion chamber. And for 2-stroke engines, the same functions are performed by a reed valve, which also serves as additional protection against fuel getting back into the carburetor. In addition, it performs the following functions:
The scooter reed valve is closely connected to the carburetor, exhaust pipe (pipe) and cylinder-piston group, has the form of a single or gable element and consists of:
In the gas distribution system, the air-gasoline-oil mixture enters the combustion chamber through intake ports in the cylinder. When compression occurs as the piston moves, the mixture tends to flow back into the carburetor and air filter. This penetration is prevented by valve petals, which securely close the inlet from fuel ejection back.
Reed valve care
Different types of reed valves are installed on different models of two-stroke scooters, which can significantly affect engine performance, fuel consumption and parts wear. In addition, the same factors are influenced by the materials that make up the body and petals: in some models it is carbon fiber and rubber, in others it is plastic and metal.
If the body of the reed valve is made of high-strength and resistant to aggressive environment rubber, and the petals themselves are made of high-quality carbon, such a mechanism can last quite a long time, provided it is properly used and cared for.
With a plastic body and metal petals, the life of the valve will not be as durable due to the wear of the seats, which will eventually lead to difficult starting of the engine and interruptions in its operation.
By following some rules when operating the reed valve and oil, gasoline and air supply systems, you can significantly extend its service life. To do this, it is necessary:
The reed valve is one of the few scooter parts that needs constant cleanliness and careful maintenance. The thing is that even the smallest mote, a lump of dirt or a grain of sand can lead to a violation in its work.
Symptoms, diagnosis and replacement
The main symptoms of a reed valve malfunction are:
The symptoms are very similar to a bad carburetor setting, however, the valve must also be inspected before turning and adjusting it. To do this, disassemble and dismantle the carburetor, then unscrew the exhaust pipe and remove the reed valve itself. For convenience, it can be dismantled along with the oil pump so as not to disconnect the hoses once again.
When visually inspecting the valve, special attention should be paid to its cleanliness, because the presence of the smallest particles of dirt will indicate a possible malfunction in its operation.
It is also necessary to inspect the entire surface of the petals and body very carefully (possible with a magnifying glass). To do this, unscrew the bolts securing the petals and the limiter and remove these parts., After which they should be carefully inspected. The presence of microcracks, chips, scratches and other damage on the surface of the petals or body also signal their breakage.
Loose petals are another of the valve failures, so it's also worth checking to see if they are skewed and measuring the amount of bend in the restrictor. If it matches the one specified in the instructions for the scooter, the valve is OK, if not, it needs to be replaced.