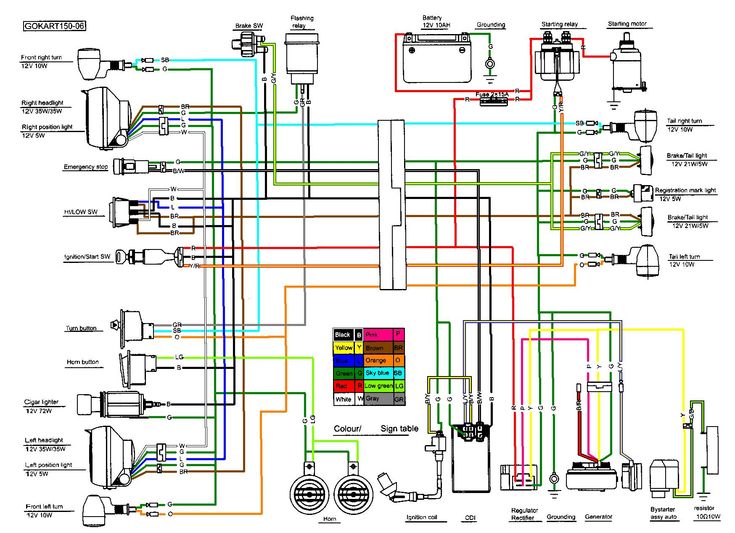
If your ATV isn’t getting spark from the spark plugs at the engine, you’re basically dead in the water. This can be an extremely frustrating spot to be in because the engine won’t turn over and won’t give any hints as to why. I’ll tell you exactly how to check for spark on an ATV, and if you’re not getting any, how to diagnose the electrical components to find out exactly where your problem is.
To quickly tell if your ATV is getting spark, remove the spark plug from the engine. Reinsert the plug back into the coil wire. Hold the electrodes of the spark plug close to the engine to ground it, and try starting the engine. If you see spark coming from the end of the spark plug, your ATV engine is getting spark.
Keep in mind, on some models you will need to have the handle bar switch in the run position and the rear brake applied. Look for any other red buttons or kill switches that might have been pressed. A lot of quads have fail safes you need to think about when trying to start the engine.
If you have a hard time being able to tell if you can see a spark or not, you could always have a buddy hold the electrodes of the spark plug. If he yells when you try to start the engine, you have spark.
There are a few reasons an ATV won’t be getting spark from the spark plugs. The electrical systems on these quads can get a little tricky sometimes. Your best bet is to just check one thing at a time making your way down the list until you’ve found your problem.
The most common reason an ATV is getting no spark is a bad spark plug, either the wrong plug all together or just not gapped correctly. Or the spark plug just went bad, that happens quite often and it’s normal.
If you find out you need to replace the spark plug, you can usually find them easily on Amazon here: ATV Spark Plug.
If you know your spark plug is good and gapped correctly, then you’ll want to check for a loose wire, a bad switch, a bad connection, the ignition coil, or a problem with the stator. Lets go over how to check these one by one.
First, you’re gonna want to check the condition of the spark plug wire or ignition coil wire. This is the wire that hooks up to the spark plug when it is bolted into the engine. Sometimes these wear out because the wire itself is usually exposed to dirt, rocks, and debris while riding.
If the spark plug wire looks good, the next step is to check for bad connections or bad switches. To do this, disconnect the main electrical connector coming out of the engine. Doing this will unhook the kill switch, ignition switch, and all the wiring associated with those switches. Check to see if you get spark now.
If you got spark after unhooking the main electrical connector, then your problem is one of those switches or the wiring for one of those switches. Now your task is to go through and disconnect each switch one at a time to find the problem part. It will help to have an ohm meter to check each switch and each wire separately.
First off, you’re going to need a digital multi-meter to test the electrical components of your ATV. If you don’t know what that is, check out this Fluke 115 Compact True-RMS Digital Multimeter on Amazon. That’s the one I have and use, and I recommend it if you’re in the market for one.
You will also need basic tools to get the ignition coil on and off the machine. If you want to be extra safe, you could unplug the battery before starting. But I find it’s ok to just unplug the wiring to the ignition coil before removing it.
To locate the ignition coil, simply follow the wire connecting to your spark plug. Once you have the ignition coil out, you can hook your multi-meter up to it to begin testing. Start by testing the primary side of the ignition coil, where the ignition coil was wired, not the side that goes to the spark plug.
You should see between 0.2 and 5 ohms of resistance. That is a wide range because it varies from machine to machine.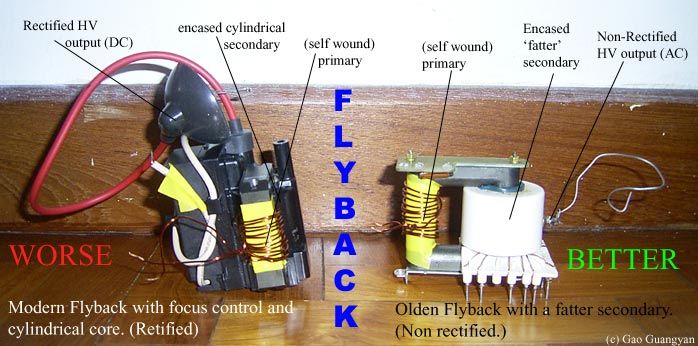 It’s best to look through your service manual to see what your ignition coil should read on its primary.
Next lets test the secondary side of the ignition coil. This is the side with the spark plug caps. If your ignition coil has two spark plug caps, simply put the red test lead in one and the black in the other. Look for around 16k ohms resistance, but again you should check your service manual for your specific measurements.
If you only have one spark plug cap, you will take one multi-meter lead and connect to the spark plug cap and the other to the primary side power connector.
Use the spark plug cap as if it’s the negative side of the primary for this test with that type of ignition coil.
Again you will need a multi-meter and basic hand tools to remove the stator. You either have a single phase or a three phase stator. Three phase is the most common, and probably the type you have.
To make sure, check the wiring harness coming from your stator, If you see group of three wires of the same color (usually white, yellow, or black) you have a three phase stator. A single phase stator will not have that set of three wires.
To start with the three phase stator, set your multi-meter up for ohms. Now get the connector with those three same colored wires we talked about before. You are going to be testing each of those wires against each other. So leg one vs leg two, leg two vs leg three, and leg three vs leg one.
You can do this by simply inserting the multi-meter leads into the connector. You should typically see between 0.1 – 1 ohms for each measurement. But check your service manual for your specs on your machine.
If your meter reads OL, that stands for open line, and you will need a new stator. To check if your stator is shorting to ground, simply hook one lead to a stator leg (through the connector) and the other to the stator body or chassis ground on your machine. You should not get any reading on your meter. If you do get a reading on any of the legs, you will need to replace your stator.
You can do this testing while the stator is still on the machine if you’re able to access it. I find it easier to remove the stator to do the actual testing, but that can be a pain all on its own.
That’s it for the most common electrical problems you’ll see with your ATV. It’s usually something like a bad kill switch or loose wire or connection. Hopefully you find your issue with out too much trouble.
Electrical problems can be some of the most time consuming. If you have the money to spare, it may be worth it to just bring your machine to a shop if you don’t feel like messing around with all the potential causes.
Even then, it doesn’t hurt to quickly look over some connections before calling in a professional.
Sharing is caring!
{% if result.isEmpty and result.term %}
{% if translation.search.not_found %}{{translation.search.not_found}}{% else %}Sorry, nothing found for{% endif %} {{result. term | escape}}
{% endif %}
{% if false and result.loading %}
{% else %}
{% if result.suggestions or result.collections or result.pages %}
{% if result.suggestions %}
{{keywords_suggestions_title | escape}}
{% endif %} {% if result.collections %}
{{translation.search.collections | default: "Collections"}}
{% endif %}
{% endif %}
{% if result. products %}
{{products_suggestions_title}}
{% if result.term and result.isEmpty == false %} {% if translation.search.view_all_products %}{{translation.search.view_all_products}}{% else %}View all products{% endif %} {% endif %}
{% if product_list_layout == 'carousel' %}
{% for product in result.products %}
{% if product.image %} {% else %} {% endif %}
{{product.title | escape}}
{{product.first_available_variant.sku}}
{{ product.price | money}}
{% endfor %}
{% else %}
{% for product in result. products %}
{% if product.image %} {% else %} {% endif %}
{{product.title | escape}}
{{product.first_available_variant.sku}}
{{ product.price | money}}
{% endfor %}
{% endif %}
{% endif %}
{% endif %}
{% if translation.search.not_found %}{{translation.search.not_found }}{% else %}Sorry, nothing found for{% endif %} {{result.term | escape}}
I don't know why this is, but most owners of scooters and motorcycles equipped with a CDI ignition system, if there is a problem with a spark on a candle, they immediately sin on the ignition coil. To all my reasoned arguments in favor of the fact that, in addition to the coil in the electrics of the scooter, there are still a bunch of devices that provide sparking between the electrodes of the spark plug: a generator, an induction generator sensor, a switch, wires in the end - they make glass eyes and repeat their signature phrase as one : "Can't you call her?" You can't, my dears, you can't!
No, of course I can make a smart person and, for solidity, poke a coil in front of you with a tester, as collective farm gurus do. But I won't do that today. For one simple reason: you can “ring out”, measure the resistance of the coil windings, but what will it give us? .. Well, the tester will show us the treasured numbers on the display, so what? And if there is an internal turn-to-turn short circuit in the coil windings, a factory defect, or the winding of one of the coils burned out. Do you think with the help of a tester you can determine all these malfunctions? I assure you not.
Therefore, since it comes to that and you are inclined to believe that the absence of a spark can still somehow be connected with the ignition coil - we will go from the opposite. Namely: today we will not learn how to check the coil itself, since it is useless and does not give anything, but we will check the electrical parameters of the devices that ensure the operation of the ignition coil. This approach to diagnosing such devices is more effective than the usual “ringing” of the windings for a break or resistance measurement.
The CDI ignition coil is a classic two winding high voltage transformer. The work of which is based on the effect of magnetic inductance.
Inside the ignition coil there is a cylindrical or rectangular core over which a large amount of the thinnest copper wire is wound in a strictly defined order, which is the secondary winding. On top of the secondary winding, a thicker copper wire is wound through the insulation layer, which is the primary winding.
Both windings are connected at their ends to each other and have one common terminal on the body in the form of a ground terminal (green). The second ends of each of the windings have separate outlets on the body in the form of a power terminal and a central contact of a high-voltage wire.
For more clarity, let's break the case and see what's inside.
During engine operation, the alternating current generated by the high-voltage winding of the generator is supplied to the switch in which it accumulates in a special capacitive storage (capacitor) - this principle of current accumulation applies only to AC CDI switches. There are even less common DC CDI switches that use direct current from the battery for storage.
Hence the name of the CDI system, from Capacitor Discharge Ignition - loosely translated, it sounds something like this: “ignition from a capacitor discharge”
the moment of sparking, a special element in the switch (thyristor), which acts as an electronic key. Further, the following happens: the thyristor, under the action of an alternating pulse from the induction sensor of the generator, opens and the current accumulated in the capacitor in the form of a pulse shoots through it to the primary winding of the ignition coil.
When a pulse passes through the primary winding, magnetic induction occurs, under the influence of which an electric current is induced in the secondary winding, many times higher than the current supplied to the primary winding in voltage. In fact, in the ignition coil, there is the most transformation of current from a lower (incoming) to a higher (outgoing) current.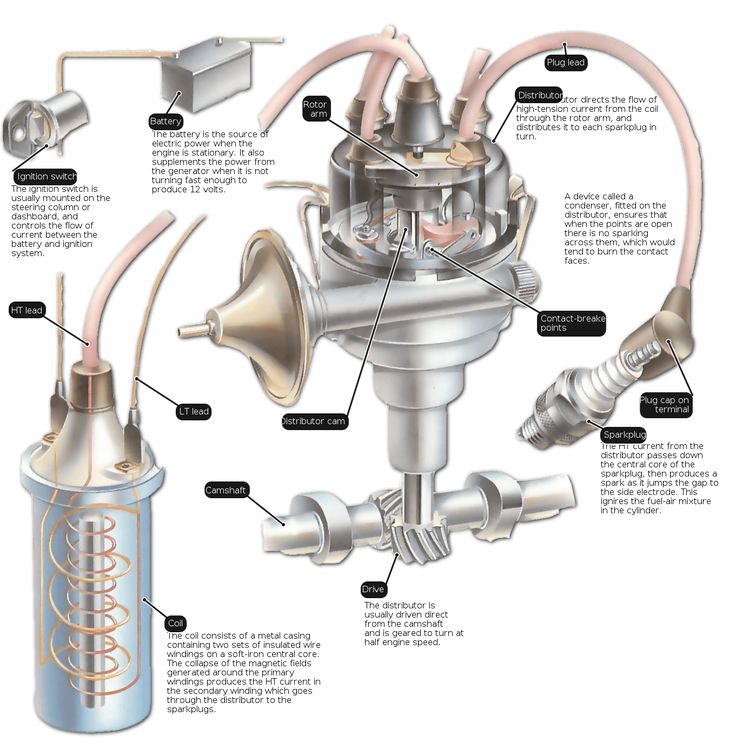
The current formed in the secondary winding, through a high-voltage circuit, enters the spark plug and, due to its high voltage, about 18,000 - 20,000V, easily overcomes the air resistance between the electrodes and forms a spark.
Malfunctions as such in the CDI ignition coil are very, very rare, contrary to popular belief. And all of them are mainly associated with damage to the case, burning of the windings, or an internal break, short circuit of the wires.
In all my hard practice, I have only once come across a really faulty coil. And this despite the fact that the owner of the scooter himself ruined it: he forgot to connect the ground to the engine and turned on the starter button ... A very high starting current went straight through the coil to the starter ... And where was he supposed to go? .. There was no mass on the engine. Naturally, the coil could not stand such mockery: it heated up and burst.
For work, we need a regular tester with a sound “ringing” function, a 3W control light, a piece of thin wire or a carnation, a piece of insulated wire, a screwdriver and, of course, a desire .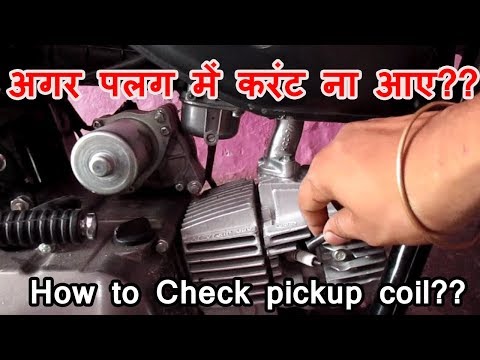 ..
..
Herself verification is not particularly difficult even for beginners. And it will be connected with measuring the supply voltage supplied to the coil, checking the mass, which must necessarily fit the engine, switch and coil, and checking the integrity of the wires supplying current to the consumers of the ignition system.
Another point: the technique that will be described here can be safely applied not only to a scooter, but also to any other type of vehicle equipped with a CDI ignition system, be it a motorcycle, an ATV, a scooter or even a walk-behind tractor - it doesn’t matter.
Whether the power supply (impulse) goes from the switch to the coil or not depends on whether the coil will produce a spark to the candle or not. Power is power, without it, no electrical consumer can work. Therefore, any check should begin with a power check - is it there or not? And only then, depending on the result, finish the check or move on.
We release access to the coil and without removing the terminals from it - we connect the control light to the power wires: green and black and yellow and turn the engine with a starter. In the mode of cranking the engine with a starter, the control light should burn to the floor of the glow.
The light on the coil is on - the switch is 100% working.
If your light is off, check the switch and if it is working and there is no voltage at the coil terminals, look for the cause in the wires supplying power to the coil.
The voltage on the switch is checked in the same way as on the coil: touch the green and black-and-yellow wires, turn the engine with a starter and look at the light bulb.
The light on the switch is on, it means it is 100% working.
Another common cause of coil failure when there is power at the coil terminals is poor or no ground. The mass on the coil is checked simply: we put the tester into the sound “ringing” mode, touch any metal part of the engine with one probe, and the green ground terminal with the second.
This spool has good ground.
Malfunctions in the high voltage circuit often leading to a complete or partial (interruption) failure of the ignition system are mainly associated with damage, contamination or breakdown of the spark plug cap housing or breakdown of the insulation of the high voltage wire.
As I said: the current generated by the secondary winding of the ignition coil is very high and it is not uncommon for the current supplied to the spark plug to break its way through cracks in the cap body or a layer of dirt, dust, cracks in the insulation of the high-voltage wire. Which leads to a complete failure of the ignition system. These malfunctions occur very, very often and in most cases lead to a complete or partial (interruption) failure of the ignition system.
In order to check the high-voltage circuit, do the following: We twist the cap from the high-voltage wire; insert a thin nail or piece of wire into it; we bring the nail to the metal case of the engine at a distance of 2-3mm ( This is important! The distance between the end of the wire and the motor housing should be 2-3mm, otherwise screw the switch ) and turn the motor.
We check the high-voltage wire in a similar way: We unscrew it from the coil and screw in any other piece of insulated instead of it (The wire must be insulated! Otherwise, it will blow so that it won’t seem small!) wires, bring it to the engine housing at a distance of 2-3mm and turn the engine.
That's actually the whole technique. I've been testing coils this way for a few years now. And for a complete check with almost one hundred percent accuracy, it takes me only a few minutes. Of course, this technique may seem complicated to many of you, but in fact it is not quite so. The main thing is to understand the principle, the rest will follow by itself.
Author : Andrey Gagarin
The ignition coil is an element that is necessary to obtain high voltage. It is required to get a spark. In order for the ignition system to perform its tasks correctly, the coil must be in good working order. It is a small transformer. Its primary winding will receive 12 V from the battery, and the output voltage indicator is several kV. This element is used on different ignition systems: electronic, contact and non-contact.
Contents:
There are many reasons that can lead to coil failure. Most often, they are insulation damage, wire breakage, and deformation. You should separately consider the signs that indicate a malfunction, and figure out how to check the ignition coil yourself.
The ignition coil performs the tasks of a voltage transformer capable of transforming 12 V into a voltage of several kV. The design of this part is simple. It includes two windings - primary and secondary. They differ in voltage. The ignition coil can be of different types, so the windings, as well as their location, will differ.
To begin with, we should consider the simplest common coil. There will be about 100-150 turns on the primary winding. There is an insulated wire made of copper. The ends of the winding go to the coil body. The number of turns may vary, it varies from 30 to 50,000. The exact number depends on the specific model. The minus winding of the secondary type is connected to the minus of the primary type. In this case, the plus will be connected to the terminal, which is located on the cover. This allows you to fully discharge the resulting high voltage.
To increase the magnetic field, the windings are wound on a core made of metal. There are situations when the core is filled with transformer oil. This is necessary in order to prevent overheating. Oil in such a situation performs the tasks of an insulator, and not only helps to cool the system.
Separately, you should consider the diagnosis of an individual ignition coil. It is equipped with two windings, and the difference between them is significant. It's about the fact that they are wound in reverse order. There is a primary winding, its core is of the internal type. The secondary winding has an external core.
Individual coils are mounted in systems related to electronic type ignition. This leads to the complexity of their design. To cut off the significant current that appears in the secondary winding, a diode is used. Another feature of this coil is that the high voltage will not be supplied to the distributor. It goes straight to the spark plugs. This result was achieved due to the design features. It includes a spring, an insulated housing, and a rod.
Separately, it is worth considering another type of coil - two-pin. With its help, it is possible to apply voltage to 2 cylinders simultaneously. Usually the coils are in one block, which looks like a four lead ignition coil.
It does not matter what type the coil will have, in the case of diagnosing the state of the element, it is imperative to focus on the resistance of the windings. It is important to carefully understand how to check the performance of the ignition coil. The primary winding resistance is most often in the range from 0.5 to 3.5 ohms. In this case, the value of the secondary winding is from 6 to 15 kOhm. These values can differ, because they directly depend on the type of coil. That is why it will be useful to find data on exactly the model that is installed in the vehicle. Measurements must be performed using conventional instruments - ohmmeters and multimeters. If the value obtained is significantly different from the specified value, then there is a high chance that the coil is broken.
Keep in mind that each coil will have different characteristics:
spark current;
winding resistance value;
energy emanating from a spark;
winding inductance, which is of the primary type;
spark duration.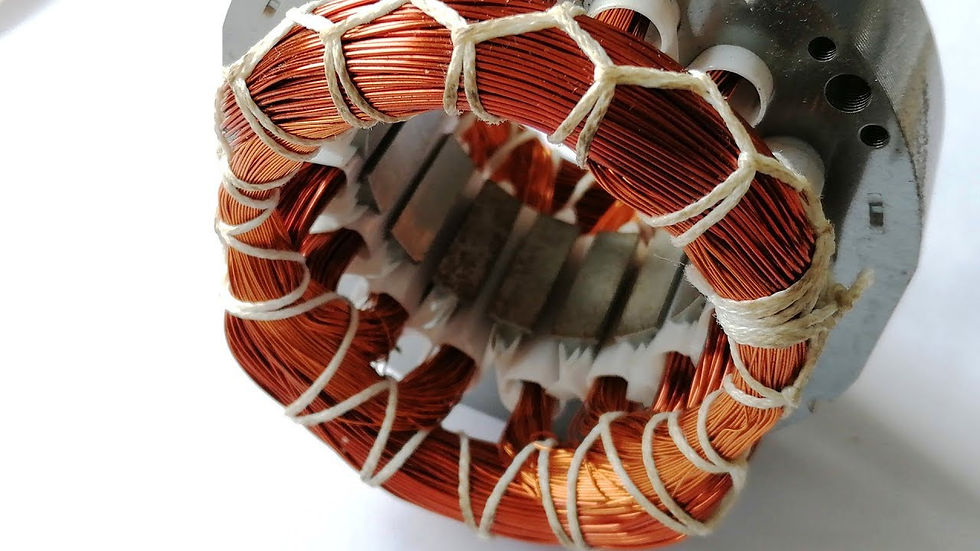
It is important to understand what values are normal. For this purpose, you will have to refer to the parameters of a particular coil, otherwise it will not be possible to understand whether the element is in a normal state. This is especially important in a situation where the spark disappears. It is the ignition coil that must be checked when this situation occurs.
When solving the problem of how to check the ignition coil, you need to be well aware of the typical signs of a breakdown. When they appear, be sure to check this element.
The main symptoms of a malfunction:
at low temperatures outside, the motor “troit” until it is fully heated;
the motor began to “troit”, and over time the situation is getting worse;
there are problems with the engine on rainy days;
if you quickly depress the accelerator pedal, then a failure will be noted in the functioning of the engine.
If there are problems with the coil on vehicles with EBO, then in this situation the “Check Engine” icon will appear on the console. The above symptoms may also indicate the presence of other failures, such as faulty spark plugs. In this case, the occurrence of at least one of the symptoms indicates the need to check the coil and spark plugs. If the driver connects a scanner (diagnostic tool), a P0363 error may be displayed.
There are various reasons that lead to the failure of the ignition coil. You can consider the main ones in order to roughly understand what you have to deal with.
Contact connections are damaged. If the weather is warm, then moisture can penetrate into the area under the hood, if it was raining heavily or the driver drove through deep puddles. It also happens when washing a vehicle. In winter, damage can be caused by the ingress of reagents that are sprinkled on the road to remove ice.
Mechanical damage. This is a common cause of breakdowns. Malfunctions can occur if the insulation has collapsed over time. It also happens that oil gets through the seals. It ends up on the coil, which leads to its subsequent destruction. Most often, repairs are not carried out, since it does not make sense. The correct solution is to completely replace the node.
Overheat. It most often affects coils of an individual type. When overheating is observed, this significantly reduces the life of the ignition coils. The process of overheating is not easy to track. To prevent this situation, it is necessary to use only reliable coolant, as well as carefully monitor that the cooling system is fully functioning.
Vibrations. They pose a particular danger to individual type ignition coils. Most often, vibrations come from the cylinder head. To reduce their number and amplitude, you will need to monitor that the motor is functioning normally. That is, the pillows must be serviceable, detonation is excluded.
Ignition coils are reliable components that are distinguished by a long service life. If they fail, it is most often attributed to insulation failure or aging. Now let's figure out how to check the health of the ignition coil.
There are two methods that allow you to check the performance of the ignition coil on your own. Let's consider each of them in more detail.
The first of the methods is called "on a spark." Its main advantage is that this option can be used even on the road. There are also disadvantages. They lie in the fact that this method is not accurate enough and at the same time laborious. Among the causes of malfunctions may not be a coil.
To diagnose, a person will need some items: pliers, a candle wrench and a working candle.
First you need to make sure that the insulation is intact. To do this, it is enough to conduct a visual inspection. It is important to turn off the ignition - that is, the key must be in the zero position. If there are no problems with insulation, you will need to perform a number of other actions:
Remove the tip from the spark plug of the first cylinder, and then combine it with the working spark plug.
Put the ignition key in the second position, that is, you need to start the engine. You can do it yourself or ask someone to do it.
When the coil is working normally, a spark forms between the electrodes of the candle. It is necessary to evaluate its shade. Normally it will be deep purple. When the spark is weak or yellow, it indicates a broken coil or a wiring problem. It also happens that there is no spark. This indicates a breakdown of the ignition coil.
It is necessary to repeat the above steps for each of the coils, if they are of an individual type.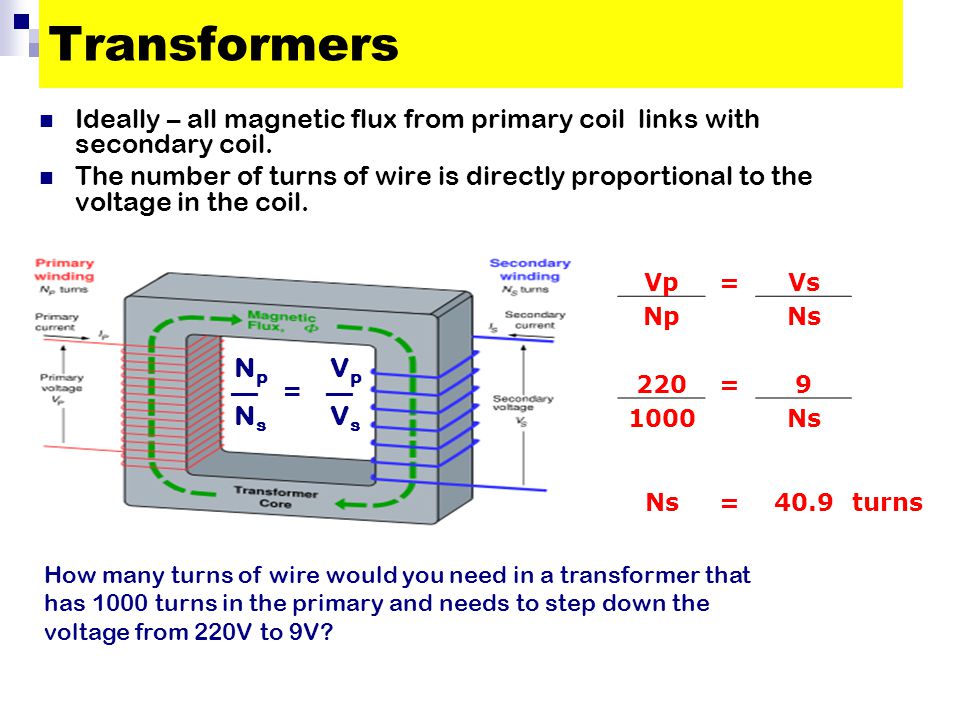
When you have to work with the ignition system, you need to be careful. Do not touch parts that conduct current, as they are energized.
If there is no working candle, then you can unscrew one of the installed ones. You need to disconnect it, and then use the candle key. This will allow you to check the coil on each of the candles that are, and understand what condition they are in.
Checking the ignition coil using a homemade device does not require much effort. You will need to connect the coils in turn to the candle of this “device”. Alligator fasteners must be connected to the "mass" of the vehicle body. At the moment when the coils are changed, the motor must be turned off. After that, it needs to be restarted.
Using a piston, you will need to set the smallest gap between the electrode and the wire located on the piston. Further, by adjusting the distance, it will be necessary to observe the process of the occurrence of a spark. The greatest distance in this situation depends on the vehicle, on the condition and quality of the spark plug, as well as on the health of the electrical system and many other factors. The spark should appear at a distance of 1 to 7 mm.
To prevent fuel from flooding the cylinder, each time you check, you need to disconnect the connector from each nozzle.
It will be possible to assess the condition of various coils, focusing on the cylinders. If there are breakdowns, they can be seen along the length of the spark. It will differ from serviceable coils.
To complete this task, you will need a multimeter that can measure resistance. It is recommended to remove the element to make it easier to ring the ignition coil with a multimeter. Two probes of the multimeter must be connected in pairs to the terminals of the primary winding. The resistance indicator is usually in the range of 0.5–3.5 ohms.
The same procedure for checking the ignition coil with a multimeter should be carried out with the secondary coil.