SUBJECT VEHICLES: 2007-2013 GMC Sierra and Yukon.
RELEARN PROCEDURE? Yes.
SPECIAL TOOLS NEEDED? A TPMS Sensor Activation Tool (EL-46079 or EL-50448) may be used.
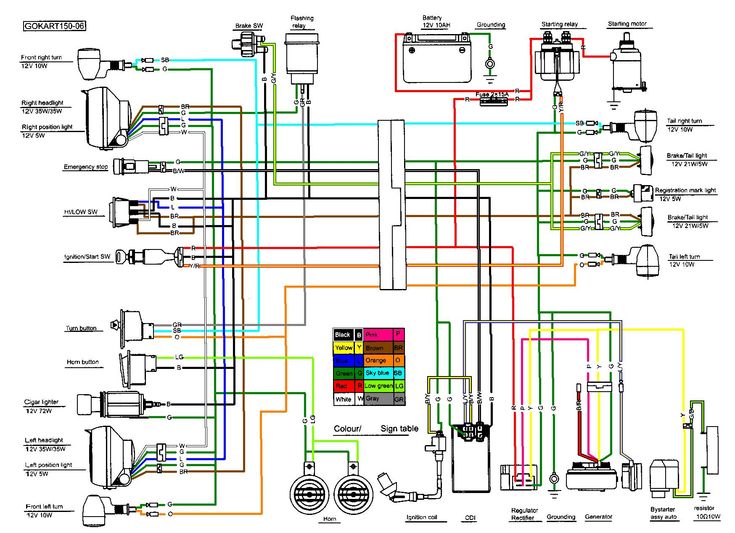
The tire pressure monitoring system (TPMS) on the 2007-2013 GMC Sierra and Yukon alerts the driver when any one or all four of the vehicle’s tire pressures have become significantly under-inflated.
The system also will display individual tire pressures and their locations on the driver information center (DIC). The TPMS uses the powertrain control module (PCM) or body control module (BCM), instrument panel cluster (IPC), DIC, remote control door lock receiver (RCDLR), a radio frequency (RF) transmitting pressure sensor in each wheel/tire assembly, and the serial data circuit to perform the system functions. When the vehicle is stationary, the sensors go into stationary mode.
In this mode, the sensors transmit once every 60 minutes to minimize sensor battery consumption. As vehicle speed increases to 20 mph (32 km/h), the sensors go into drive mode, in which they transmit once every 60 seconds.
NOTE: The sensor’s pressure accuracy is about 2 psi (14 kPa) at temperatures from 14 to 158 degrees Fahrenheit (-10 to 70 degrees Celsius). The RCDLR receives and translates the data contained in each sensor transmission, then sends the tire pressure and tire location data to DIC for display. When the TPMS detects a significantly under-inflated tire pressure, a “CHECK TIRE PRESSURE” message is displayed on the DIC and the low tire pressure indicator is displayed on the IPC. This DIC message will also set if a spare tire is in use. The RCDLR has the ability to detect malfunctions within the TPMS. Any malfunctions detected will cause the DIC to display a “SERVICE TIRE MONITOR” warning message.
Tire pressure monitor warning indicators
When the TPMS detects a significant loss of tire pressure, the “CHECK TIRE PRESSURE” message is displayed on the DIC and the low tire pressure indicator is displayed on the instrument panel. Both the message and indicator can be cleared by adjusting the tires to their recommended pressures. The DIC will display the “SERVICE TIRE MONITOR” message if one or more of the tire pressure sensors has malfunctioned or if all of the sensors have not been programmed successfully. If warning indicators are still on after a completed relearn procedure, there is a problem in the TPMS.
Reset procedures
NOTE: When the wheels have been rotated, or a tire pressure sensor or RCDLR has been replaced, retrain the tire pressure sensor. When the TPMS detects a significant loss of tire pressure, the “CHECK TIRE PRESSURE” message is displayed on the DIC and the low tire pressure indicator is displayed on the instrument panel. Both the message and indicator can be cleared by adjusting the tires to their recommended pressures.
Tire pressure sensor relearn
NOTE: Once the learn mode has been enabled, each of the sensor’s unique Identification (ID) codes can be learned into the RCDLR’s memory. When a sensor’s ID has been learned, the RCDLR sends a serial data message to the BCM to sound a horn chirp. This verifies the sensor has transmitted its ID, and the RCDLR has received and learned it.
NOTE: Each sensor takes a pressure measurement sample once every 30 seconds while in stationary mode. If the tire pressure increases or decreases by more than 1.6 psi (11 kPa) from the last pressure measurement, another measurement will occur immediately to verify the change in pressure. If a pressure change has indeed occurred, the sensor transmits in learn mode. When the RCDLR receives a learn mode transmission while in learn mode, it will assign that sensor ID to the location on the vehicle relative to the order in which it was learned. The RCDLR must learn the sensor ID codes in the proper sequence in order to determine sensor location. The first learned ID is assigned to left front, the second to right front, the third to right rear and fourth to left rear.
NOTE: The TPMS will cancel the learn mode if more than two minutes have passed and no sensors have been learned, or if the system has been in learn mode for more than five minutes. If the learn mode is canceled before any sensor has been learned, the RCDLR will remember all current sensor IDs and their locations. As soon as the first sensor ID code is learned, all other IDs are erased from the RCDLR’s memory. The updated tire pressures will not be displayed on the DIC until RCDLR receives two more valid transmissions from each sensor.
After performing the procedure below, always test drive the vehicle above 25 mph for at least two minutes before viewing tire pressures on the DIC.
NOTE: In the following procedure, a TPMS Sensor Activation Tool (EL-46079 or EL-50448) may be used in place of increasing/decreasing pressures to enable the sensor. To use, place the activator antenna against the tire sidewall close to the wheel rim at the valve stem location, then press and release the ACTIVATE button.
NOTE: If a TPMS Sensor Activation Tool (EL-46079 or EL-50448) is used, and the vehicle is having trouble entering the relearn mode, check the batteries in the activation tool. Low batteries may allow some functions to work, but not allow the vehicle to perform the learn function. When the internal battery is fresh (fully charged), the indicator is “full” or is all dark. When the battery is depleted, the indicator shows “empty” or is all light.
There are three ways to enable the learn mode; using a scan tool, using the keyless entry transmitters (if equipped) or using the DIC. After the learn mode has been enabled there are two different methods of activating the transmitters in the tires; utilizing the J-46079 tire pressure monitor diagnostic tool at each tire or increase/decrease tire pressure for eight to 10 seconds in each tire. If a scan tool has been used to enable the learn mode, the J-46079 must be used to activate the transmitters.
NOTE: Before proceeding with the following steps, ensure that no other sensor learn procedure is being performed simultaneously, or that tire pressures are not being adjusted on a TPMS-equipped vehicle within close proximity.
Preferred scan tool method
IMPORTANT: In the event a particular sensor’s information is displayed on the special tool upon activation but the horn does not chirp, it may be necessary to rotate the wheel valve stem to a different position because the sensor signal is being blocked by another component.
1) Using a scan tool, initiate the TPMS learn mode. A double horn chirp will sound indicating the learn mode has been enabled. The left front turn signal also will be illuminated.
2) Starting with the left front tire, active the sensor by holding the antenna of the Sensor Activation Tool aimed upward against the tire sidewall close to the wheel rim at the valve stem location. Press and release the Activate button and wait for a horn chirp. Once the horn chirp has sounded, the sensor information is learned and the turn signal in the next location to be learned will illuminate.
3) After the horn chirp has sounded and the right front turn signal is illuminated, repeat the procedure for the remaining three sensors in this order: right front, right rear, left rear.
4) When the left rear sensor has been learned and a double horn chirp has sounded, the learn process is complete and the RCDLR exits the learn mode.
5) Turn ignition OFF, adjust all tires to the recommended pressures.
Alternate keyless entry transmitter or DIC method
NOTE: If the learn mode cannot be enabled, the TPMS is not enabled in RCDLR. See appropriate service information.
1) With the ignition ON, initiate the TPMS learGMCn mode using one of the following procedures:
 The left front turn signal also will be illuminated.
NOTE: If a horn chirp does not sound after 35 seconds for any of the four sensors, turn the ignition switch to the OFF position to exit the learn mode. Repeat the procedure from the first step.
2) If using the Sensor Activation Tool, go to Step 2 of the Preferred procedure above. If using the increase/decrease tire pressure method, go to the next step.
3) Starting with the left front tire, increase or decrease the pressure for eight to 10 seconds, or until a horn chirp sounds. The horn chirp may occur before the eight to 10 second pressure increase/decrease time period has been reached, or up to 30 seconds after the eight to 10 second pressure increase/decrease time period has been reached. Once the horn chirp has sounded, the sensor information is learned and the turn signal in the next location to be learned will illuminate.
4) After the horn chirp has sounded, repeat the procedure for the next three sensors in the following order: right front, right rear, left rear.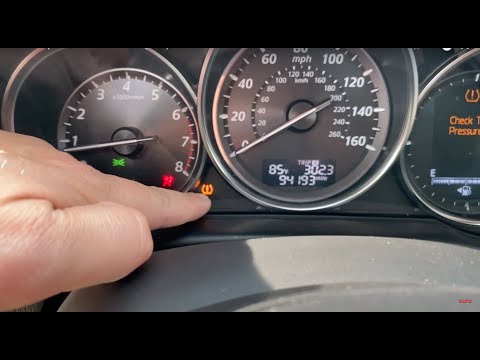
5) After the left rear sensor has been learned, a double horn chirp will sound. Turn the ignition switch to the OFF position to exit the relearn procedure. Adjust all tire pressures to specification. If the double horn chirp did not occur, repeat the procedure from the first step.
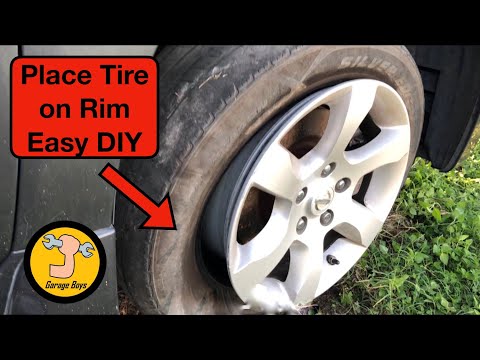
Demounting/mounting procedures
CAUTION: The tire should be demounted from the wheel using the tire changer manufacturer’s instructions. Use the following information to avoid damage during the demounting/mounting procedures.
NOTE: If the vehicle’s tires are replaced with those not having a TPC Spec number, the TPMS may give an inaccurate low pressure warning. Non-TPC Spec tires may give a low pressure warning that is higher or lower than the proper warning level achieved by TPC Spec numbered tires.
NOTE: When the wheels have been rotated, or a tire pressure sensor or RCDLR has been replaced, retrain tire pressure sensor. See Reset procedures.
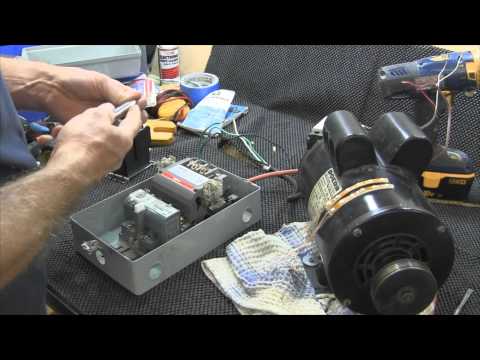
Tire pressure sensor
CAUTION: Do not inject any tire liquid or aerosol tire sealant into the tires, as this may cause a malfunction of the tire pressure sensors. If any tire sealant is noted upon tire demounting, replace the sensor. Also remove all residual liquid sealant from the inside the tire and wheel surfaces.
There are currently two different kinds of TPMS sensors in use on the vehicles covered in this article. Identification of which sensor is in use can easily be made after the tire has been removed from the wheel by referring to Figures 1 and 2.
Removal and installation
1) Raise the vehicle on a suitable support. Remove the tire/wheel assembly from the vehicle.
2) Demount the tire from the wheel following the tire changer manufacturer’s instructions while paying special attention to the following to avoid damaging the tire pressure sensor:
3) If the TPMS sensor is the clamp-in style (see Figure 1), follow clamp-in style removal as follows. If it is a snap-in style (see Figure 2), follow the snap-in style removal below.
Clamp-in style sensor removal
1) Remove the tire pressure sensor nut (see Figure 1).
2) Remove the sensor from the wheel hole.
3) Remove the sensor grommet from the valve stem.
4) Follow the clamp-in sensor installation below, to replace the sensor.
Snap-in style sensor removal
1) Remove the TORX screw (3) from the tire pressure sensor (2) and pull it straight off the tire pressure valve stem (1) (see Figure 2).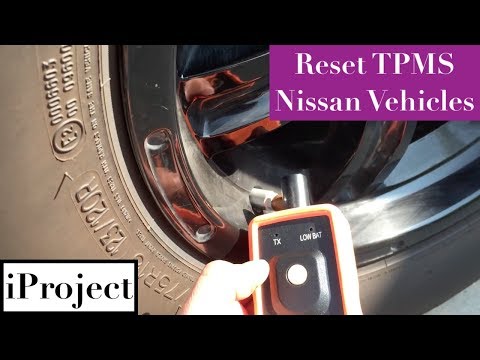
2) Remove the tire pressure valve stem by pulling it through the rim.
3) Follow snap-in style sensor installation below, to replace the sensor.
Clamp-in sensor installation
1) Clean any dirt or debris from the grommet sealing areas. Install the grommet on the sensor valve stem.
2) Insert the sensor in the wheel hole with the air passage facing away from the wheel.
3) Install the sensor nut, and position the sensor body parallel to the inside wheel surface while tightening the nut to 62 in.-lbs. (7 N.m).
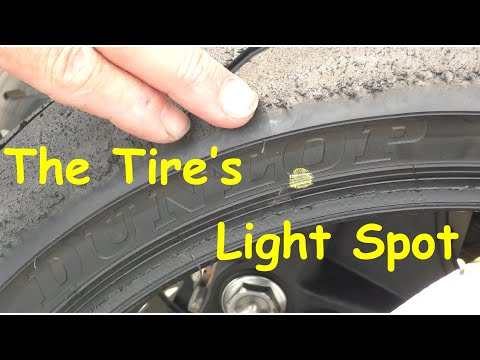
4) Before installing the tire on the wheel, note the following items to avoid tire pressure sensor damage upon tire mounting:

5) Install the tire on the wheel. Install the tire/wheel assembly on the vehicle. Retrain the tire pressure sensor. See Reset procedures.
NOTE: A service replacement tire pressure sensor is shipped in the OFF mode. In this mode, the sensor’s unique identification code cannot be learned into the RCDLR’s memory.
The sensor must be taken out of the OFF mode by spinning the tire/wheel assembly above 20 mph (32 km/h) for at least 10 seconds in order to close the sensor’s internal roll switch.
Snap-in style sensor installation
1) Assemble the tire pressure sensor (2) to the valve stem and install the new TORX screw (3) — see Figure 2.
2) Apply tire soap to the rubber portion of the valve stem.
3) Using a tire valve stem mounting tool, pull the valve stem through in a direction parallel to the valve hole on the rim (see Figure 3).
4) Before installing the tire on the wheel, note the following items to avoid tire pressure sensor damage upon tire mounting:

5) Install the tire on the wheel. Install the tire/wheel assembly on the vehicle. Retrain the tire pressure sensor. See Reset procedures. NOTE: Snap Fit TPMS sensors are still shipped in the OFF mode. However, the TPMS sensor no longer needs to be spun to remove it from the OFF mode. The sensor will exit its OFF state when the tire is inflated. The technician can then program the vehicle as normal. ■
TORQUE SPECIFICATIONS
Component
Ft.-lbs. (N.m)
Spare tire hoist retaining bolt 30 (40)
Wheel nut 140 (190)
In. -lbs. (N.m)
Clamp-in sensor nut 62 (7)
Snap-in sensor TORX screw 11.5 (1.3)
Information for this column comes from Mitchell 1’s “Tire Pressure Monitoring Systems Guide” for domestic and import vehicles.
Headquartered in Poway, Calif., Mitchell 1 has provided quality repair information solutions to the automotive industry for more than 80 years.
For more information, visit www.mitchell1.com.
To read more TPMS articles, see:
Hyundai Sonata 2008-2010
Subaru Legacy and Outback 2005-2013
Nissan Sentra 2007-2012
Like many cars in the United States, the GMC Sierra comes with plenty of safety features to make driving safer. One of these is the Tire Pressure Monitoring System, or TPMS. It sends a signal from each tire to the central computer and indicates if one of the tires has lost pressure. But, sometimes, it can have issues. So, let’s find out how to reset the Sierra’s TPMS.
To reset the tire pressure sensor on a GMC Sierra, you must start with the vehicle turned off. Turn your key to the “ON” position, but don’t start the car. Find the “Reset TPMS” button (your manual indicates where it’s located), then hold it until the “TIRE PRESSURE” light blinks three times. Then, start the car and wait for 20 minutes for the light to reset. There are other reasons why the light might turn on, and we’ll go through them in this article.
Tire pressure sensors work by measuring the pressuring inside the tire. They are small devices that attach to the wheel and constantly feed the vehicle’s computer. When one tire loses pressure, the sensor sends a signal to the driver, causing the TPMS light to illuminate. Most of the time, the TPMS light goes away by inflating the tires. If it turns on again, then there’s a leak somewhere.
But, if you’ve inflated your tires and the light doesn’t turn off, the sensor might need resetting. Because TPMS work under constant pressure, literally, then might not react fast to changes. In these cases, you might have to go through this procedure.
You might not know this, but the US implemented mandatory pressure sensors on all vehicles in 2007. Tires are a vital component of safe driving. If they’re not in optimum conditions, serious or deadly accidents can occur.
But, it’s hard for drivers to know if they’re deflated. After a series of accidents and lawsuits throughout the ’80s and ’90s, the Government implemented the TREAD Act. So, from then on, GMC Sierras have TPMS and all other vehicles sold in the US.
We’ve explained how to reset the TPMS, but let’s look at the procedure in detail and discuss other essential aspects.
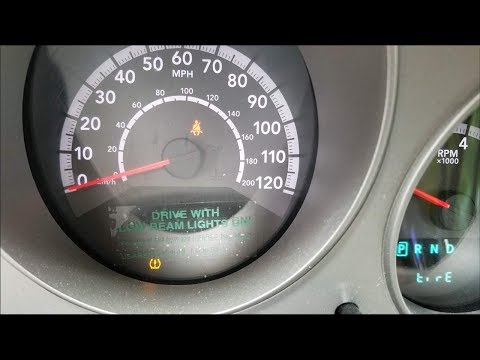
When there are issues with your tire pressure or TPMS, your dash indicates “TIRE PRESSURE” or “CHECK TIRE PRESSURE.” If this happens, you can do the following.
To reset a tire pressure sensor monitor, you must first inflate the tires to the recommended pressure. Yes, this sounds logical, but it’s the first and easiest step to solving any warning lights that might appear on your dash.
Once you’ve inflated the tires, take your Sierra for a drive. Ideally, you should last about 10 minutes, at or above 50 mph. Why this speed and for this long? The TPMS needs time to adjust to the pressure.
The air inside a tire in motion has a different density (as it gets warmer) than a tire at rest. As the vehicle moves, the air molecules will begin to stabilize and equalize pressure all over the tire wall, giving you a more precise reading.
If you’ve done this correctly, the TPMS light should turn off the next time your start your car. But, when this doesn’t happen, then you might have to go through the following procedure.
With your truck turned off, turn your key or starter button to the “ON” position without starting your car. Find the TPMS button and press it until the “TIRE PRESSURE” light blinks three times. Start the Sierra and wait for 20 minutes, which should reset the TPMS and light.
When these steps don’t work, a possible solution is to inflate your tire to 3 PSI above the recommended pressure. Then, deflate your tires entirely. This drastic difference in pressure helps the TPMS reset. Inflate your tires to the recommended pressure and check whether the “TIRE PRESSURE” light turns off. Do this with your car turned off.
The final step is to disconnect the battery, then honk the horn for three seconds. Yes, that’s right. Honk the horn.
We’ll explain why this step works further in the article. For the moment, remember that the honk consumes a lot of battery, so honking it discharges any excess charge in the system. Reconnect the battery, start the car, and then check if the “TIRE PRESSURE” light has turned off.
If none of these steps work, or you don’t feel up to the task of resetting the TPMS, contact a certified professional. They will go through a “relearning” process.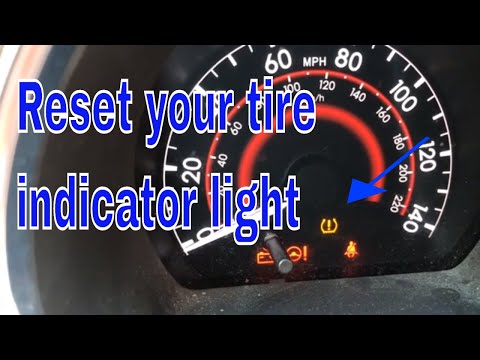
These technicians do an entire step-by-step process, checking for possible faults and error codes. It should be a fast procedure and not too expensive.
Imagine a large, thin strip of metal that contours perfectly with the rim. It reacts to how much pressure the air generates over it, and it’s calibrated to a determined ideal pressure.
The strip feels less pressure when there’s a leak. So, it sends a signal to the computer.
But, also, it’s connected to the filler valve. So, it also measures whether there’s a leak in this area. A faulty valve could trigger the “TIRE PRESSURE” light.
GMC Sierras have TPMS and all other vehicles sold in the US. We’ve explained how to reset the TPMS, but let’s look at the procedure in detail and discuss other essential aspects. Step by step process to reset a tire pressure sensor on the GMC Sierra When there are issues with your tire pressure or TPMS, your dash indicates "TIRE PRESSURE" or "CHECK TIRE PRESSURE.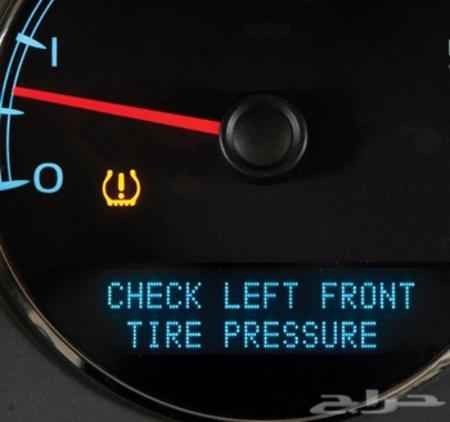 " If this happens, you can do the following. To reset a tire pressure sensor monitor, you must first inflate the tires to the recommended pressure. Yes, this sounds logical, but it’s the first and easiest step to solving any warning lights that might appear on your dash. Once you’ve inflated the tires, take your Sierra for a drive. Ideally, you should last about 10 minutes, at or above 50 mph. Why this speed and for this long? The TPMS needs time to adjust to the pressure. The air inside a tire in motion has a different density (as it gets warmer) than a tire at rest. As the vehicle moves, the air molecules will begin to stabilize and equalize pressure all over the tire wall, giving you a more precise reading. If you’ve done this correctly, the TPMS light should turn off the next time your start your car. But, when this doesn’t happen, then you might have to go through the following procedure. With your truck turned off, turn your key or starter button to the "ON" position without starting your car.
 Find the TPMS button and press it until the "TIRE PRESSURE" light blinks three times. Start the Sierra and wait for 20 minutes, which should reset the TPMS and light. When these steps don’t work, a possible solution is to inflate your tire to 3 PSI above the recommended pressure. Then, deflate your tires entirely. This drastic difference in pressure helps the TPMS reset. Inflate your tires to the recommended pressure and check whether the "TIRE PRESSURE" light turns off. Do this with your car turned off. The final step is to disconnect the battery, then honk the horn for three seconds. Yes, that’s right. Honk the horn. We’ll explain why this step works further in the article. For the moment, remember that the honk consumes a lot of battery, so honking it discharges any excess charge in the system. Reconnect the battery, start the car, and then check if the "TIRE PRESSURE" light has turned off. If none of these steps work, or you don’t feel up to the task of resetting the TPMS, contact a certified professional.
 They will go through a "relearning" process. These technicians do an entire step-by-step process, checking for possible faults and error codes. It should be a fast procedure and not too expensive. How the GMC Sierra tire pressure sensor works Imagine a large, thin strip of metal that contours perfectly with the rim. It reacts to how much pressure the air generates over it, and it’s calibrated to a determined ideal pressure. The strip feels less pressure when there’s a leak. So, it sends a signal to the computer. But, also, it’s connected to the filler valve. So, it also measures whether there’s a leak in this area. A faulty valve could trigger the "TIRE PRESSURE" light. Because the TPMS requires energy, it uses the vehicle’s battery as a power source. But, it doesn’t use it permanently. In fact, most TPMS use power every ten or twenty minutes to avoid battery consumption. Due to this intermittency, you see that most of the resetting procedures require time intervals. They allow the TPMS not only to regulate but also have the power to generate a signal.
 The TPMS is reliable; it has to be, but it only operates at a determined temperature range, and extreme conditions might cause it to fail. So let’s discuss some of the reasons why the TPMS has issues. Why does a tire sensor fail? The GMC Sierra’s TPMS operates in temperatures between -10 and 70 Celsius. Sure, these seem extreme, but for those living in northern regions, you might face these temperatures for months at a time. The low (or high) temperatures cause the metal in the sensor to be more rigid, making it less sensitive to changes in pressure. So, if you live up north, don’t be surprised if you find that the TPMS presents issues in the most challenging winters. Another possible reason for failure is a decaying battery since the TPMS directly uses it for power. An irregular source of energy could damage components inside the TPMS. Aerosol tire fillers might save you on the fly. But, the chemicals inside them can cause a world of hurt to TPMS. Since the device is so sensitive, any excess chemical and glue can interfere with the signal.
 The average lifespan of a TPMS is about five years, which is also the average time a tire can last. So, it’s not unusual to have TPMS issues in these intervals. Also, use a certified tire shop when replacing them. Improper handling can damage the TPMS permanently. A TPMS is not expensive, costing from $25 to $60. You can buy them online and ship them anywhere, but replacing them does require technical knowledge. So, these are some of the reasons why TPMS can fail. But, what can you do to keep them functioning as long as possible? Let’s find out in the next section. Some cautions to take with the TPMS As we’ve said in the previous section, do not use aerosol tire fillers. They have adhesives and chemicals that will damage the TPMS. Also, once you’ve filled a tire, changing it is close to a nightmare. Just ask any tire technician. Though they are less frequent, try to avoid brass valve inserts. Always use nickel-plated valve inserts, as they do not chemically react with aluminum inside the sensors.
 In time, the brass inserts will deteriorate and might even fuse with the TPMS. Once you’ve removed any rubber seal, replace it with a new one. The old one most likely has lost its elasticity. Finally, do not use excessive torque on either the valve and the sensor. These are sensitive devices that will break easily. Closing thoughts The GMC Sierra comes with a TPMS since 2007. It’s a valuable device that helps you be aware of the pressure in your tires. It sends out a warning if the pressure has dropped, allowing to fix any issues that might make driving unsafe. It can last an average of five years and is generally reliable. But, like all devices, it can have issues. The most common is the "TIRE PRESSURE" light on your dashboard. This means that one or more tires have lost pressure. The first step to remove this warning light is to fill up your tires. If this doesn’t work, there are many easy procedures to follow to reset the TPMS and turn the warning light off. If you happen to see this light turn on, go through these steps.
Because the TPMS requires energy, it uses the vehicle’s battery as a power source. But, it doesn’t use it permanently. In fact, most TPMS use power every ten or twenty minutes to avoid battery consumption.
Due to this intermittency, you see that most of the resetting procedures require time intervals. They allow the TPMS not only to regulate but also have the power to generate a signal.
The TPMS is reliable; it has to be, but it only operates at a determined temperature range, and extreme conditions might cause it to fail. So let’s discuss some of the reasons why the TPMS has issues.
The GMC Sierra’s TPMS operates in temperatures between -10 and 70 Celsius. Sure, these seem extreme, but for those living in northern regions, you might face these temperatures for months at a time.
The low (or high) temperatures cause the metal in the sensor to be more rigid, making it less sensitive to changes in pressure. So, if you live up north, don’t be surprised if you find that the TPMS presents issues in the most challenging winters.
Another possible reason for failure is a decaying battery since the TPMS directly uses it for power. An irregular source of energy could damage components inside the TPMS.
Aerosol tire fillers might save you on the fly. But, the chemicals inside them can cause a world of hurt to TPMS. Since the device is so sensitive, any excess chemical and glue can interfere with the signal.
The average lifespan of a TPMS is about five years, which is also the average time a tire can last. So, it’s not unusual to have TPMS issues in these intervals. Also, use a certified tire shop when replacing them. Improper handling can damage the TPMS permanently.
A TPMS is not expensive, costing from $25 to $60. You can buy them online and ship them anywhere, but replacing them does require technical knowledge.
So, these are some of the reasons why TPMS can fail. But, what can you do to keep them functioning as long as possible? Let’s find out in the next section.
As we’ve said in the previous section, do not use aerosol tire fillers. They have adhesives and chemicals that will damage the TPMS. Also, once you’ve filled a tire, changing it is close to a nightmare. Just ask any tire technician.
Though they are less frequent, try to avoid brass valve inserts. Always use nickel-plated valve inserts, as they do not chemically react with aluminum inside the sensors. In time, the brass inserts will deteriorate and might even fuse with the TPMS.
Once you’ve removed any rubber seal, replace it with a new one. The old one most likely has lost its elasticity.
Finally, do not use excessive torque on either the valve and the sensor. These are sensitive devices that will break easily.
The GMC Sierra comes with a TPMS since 2007. It’s a valuable device that helps you be aware of the pressure in your tires. It sends out a warning if the pressure has dropped, allowing to fix any issues that might make driving unsafe.
It can last an average of five years and is generally reliable. But, like all devices, it can have issues. The most common is the “TIRE PRESSURE” light on your dashboard. This means that one or more tires have lost pressure.
The first step to remove this warning light is to fill up your tires. If this doesn’t work, there are many easy procedures to follow to reset the TPMS and turn the warning light off.
If you happen to see this light turn on, go through these steps. But, as always, if you don’t feel qualified, be sure to take your car to a certified technician for a checkup.
You are the proud owner of a recent car, the pleasure of tactile gadgets, the integrated technologies, however, should bring you the convenience of using your GMC Sierra, which is to say that the technology is talking about electronic, and as we all, unfortunately, We know that in some cases there are problems that need to be solved. Today we will focus on the tire pressure sensor and specifically on the tire pressure sensor. how to reset the tire pressure sensor on a GMC Sierra so you no longer have this indicator on the dashboard. To do this, we will divide our content into two parts: first we will discuss the classic case of the tire pressure indicator light and the procedure to follow, and then the case where the tire pressure indicator remains on even if the tires are inflated. So, how to reset this tire sensor on GMC Sierra.
First, we will look at the general methodology for resetting a tire sensor on a GMC Sierra which, if it lights up, here are the basic steps: GMC Sierra tire pressure indicators come on, get out of the way quickly if you are driving on the highway, keep a firm grip on the steering wheel just in case.

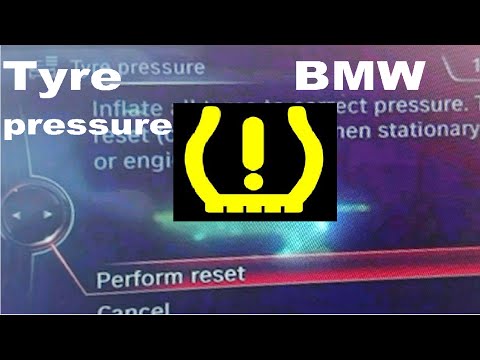
Now that you have used the basic technique of removing the tire pressure sensor on the GMC Sierra and this didn't work, we'll move on to the second solution, which is to have the tires on my GMC Sierra well inflated and I still want that light to go away. Most likely it shows that you have Faulty tire pressure sensor. This requires to reset the value on your car's dashboard. However, be careful not to do this while driving as pressure fluctuations can damage your pressure sensors. Typically, you need to look at the parameters of the vehicle, then you should look for an option to diagnose inflation or "detect deflation". While on this tab, you must hold the select button or reset button depending on the year of your GMC Sierra. until a message appears from the car console confirming that the reset is taken into account (usually takes a few seconds). You can now turn off the ignition and restart the GMC Sierra to see if the tire pressure indicator has gone out.
If despite your reset the tire pressure indicator on your GMC Sierra does not go away, then the smartest course of action is to go to a workshop, rather In total, it's the tire pressure sensor on the valve that is faulty or defective on your GMC Sierra .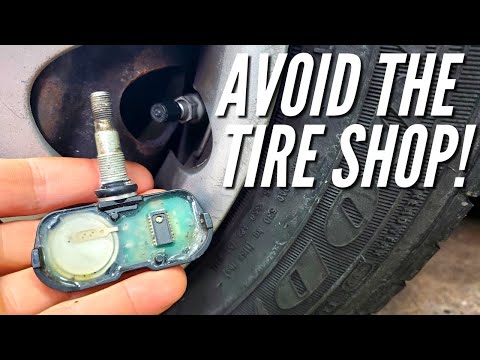 Keep in mind that in general the unit price is around 120 euros. Another option that some choose to use as the problem may recur in some series is to disable the sensors with your carrier and diagnose your vehicle. However, this approach is not recommended as it may result in mishandling and disruption of your GMC Sierra. Now you have all the keys to know how to reset the tire pressure sensor on the GMC Sierra.
For more GMC Sierra tips, take a look at the GMC Sierra category.
Russian cars:
ECU Bosch 7. 9.7 - 100% diagnose ELM327.
ECU January 7.4 (also some other versions of January) - diagnoses ELM327.
Chevrolet Niva 2007 ISO 14230-4(KWP FAST) Gasoline Russia
Vaz 2105 2009 ISO 14230-4 KWP (fast init, 10.4 kbaud) Gasoline Russia ) Gasoline Russia
VAZ 2110 2005 ISO 14230-4 KWP (fast init, 10.4 kbaud) Gasoline Russia
VAZ 2114 ISO Gasoline Russia
Lada GRANTA 2012 Gasoline Russia
Lada Priora 217130 2011 ISO 14230-4 KWP (5 baud init, 10.4 kbaud) Gasoline Russia
Lada Largus 2013 Gasoline Russia
, 10.4 kbaud) Gasoline Russia
If you have a different ECU, the K-line adapter (VAG COM) is most likely to suit you.
List of foreign vehicles tested with ELM327 adapter. If you did not find your car, check the availability of the OBD connector in the documentation for the vehicle.
Gasoline engines:
Acura 2.3Cl 1998 ISO9141-2/ISO14230-4 Gasoline United States
Acura Integra GS-R 1998 ISO9141-2/ISO14230-4 Gasoline United States
Acura Integra Type R 2000 ISO9141-2/ISO14230-4 Gasoline United States
Acura RSX 2002 ISO9141-2/ISO14230-4 Gasoline Hong Kong
italy petrol 20 3.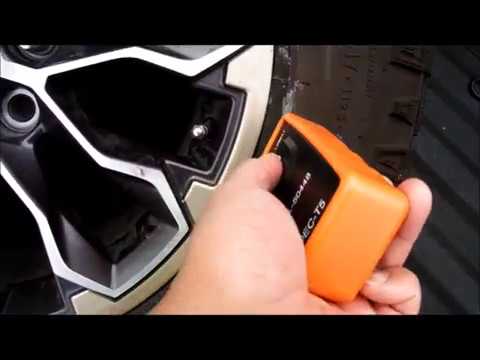 0, restyling, connected via VT auto mode
Alfa Romeo Spider 2.0 2001 ISO9141-2/ISO14230-4 Gasoline Germany
Alfa Romeo Spider 2.0 TS 2001 ISO9141-2/ISO14230-4 ISO9141-2/ISO14230-4 ISO9102 Astra 1
BMW E46 318 N42 2003 ISO 14230-4 KWP (FAST Init, 10.4 KBAUD) gasoline ECE
BMW 325i 2001 ISO9141-2/ISO14230-4 Gasoline SPIN
BMW 325XI 2002 ISO9141-2/ISO141-2/ISO141-2/ISOA
BMW 328I (E46) 1999 ISO9141-2/ISO14230-4 Gasoline Israel
BMW e-90 330i N52 2005 ISO 15765-4 CAN (11 bit ID, 500 kbaud) Petrol Germany
BMW 520I 1997 ISO432 ISO91-4132 -4 Gasoline Germany
BMW 540I6 1997 ISO9141-2/ISO14230-4 Gasoline United States
BMW 740I 1997 ISO9141-2/ISO14230-4 Gasoline United Kingdom (11 bit ID, 500 kbaud) Gasoline ECE
BMW X5 2002 ISO9141-2/ISO14230-4 Gasoline United States
BMW Z3 2000 ISO9141-2/ISO14230-4 Gasoline United States
BMW Z3 2001 ISO9142 -4 Gasoline United Kingdom
Buick LeSabre 3. 8l SFI L36 1997 Petrol USA 998 J1850 VPW Gasoline United States
Chevrolet S10 1995 J1850 VPW Gasoline United States
Chevrolet S10 2001 J1850 VPW Gasoline United States
Chevrolet Silverado 8.1 2001 J1850 VPW Gasoline United States
Chevrolet Tahoe 1997 ISO9141-2/ISO14230-4 Gasoline United States
Chevrolet Tahoe 1998 ISO9141-2/ISO14230-4 Gasoline United States
Chevrolet TAHOE 1997 SAE J1850 VPW (10.4 kbaud) Petrol United States
Chevrolet Trailblazer 2008 Petrol USA
Chrysler Intrepid 1998 J1850 VPW Gasoline Canada
Chrysler Intrepid 2.7 1998 J1850 VPW Gasoline Canada
Chrysler Sebring 2000 ISO9141-2/ISO14230-4 Gasoline United States
Chrysler Voyager 1998 ISO9141-2/ISO14230-4 Gasoline Finland
Citroen C2 2004 ISO9141-2/ISO14230-4 Gasoline Spain
Citroen C3 2002 ISO9141-2/ISO14230-4 Gasoline Portugal
Citroen C 5 2002 Petrol France
Citroen Saxo 2000 ISO914 ISO9140005
Citroen Saxo 2002 ISO9141-2/ISO14230-4 Gasoline Portugal
Citroen Saxo VTR 8V 1. 6I 2001 ISO9141-2/ISO14230-4 Gasoline United Kingdom
Citroen Xsara 2000 ISO9141-2/ISO14230-4 Gasoline Poland
Citroen Xsara 2000 ISO9141-2/ISO14230-4 Gasoline Poland
Citroen Xsara 2000 ISO9141-2/ISO14230-4 Gasoline Poland
Citroen Xsara 2000 ISO9141-2/ISO14230-4 Gasoline Poland
Citroen Xsara VTR 2000 ISO9141-2/ISO14230 -4 Gasoline Poland
Citroen Xsara VTR 2000 ISO9141-2/ISO14230-4 Gasoline Poland
Citroen Xsara VTR 2000 ISO9141-2/ISO14230-4 Gasoline Poland
Citroen Xsara VTR 2000 ISO9141-2/ISO14230-4 Gasoline Poland
Citroen Xara Picasso 1.8i 2003 gasoline France
Crown Victoria A4 2000 J1850 PWM GASLINE United States
Dacia Logan 2006 ISO 14230-4 KWP (Fast Init, 10.4 KBAUD) Daihatsu 2008 gasoline 9000 9000 9000 9000 9000 DAIHANIA 9141-2/ISO14230-4 Gasoline United Kingdom
Dodge Caravan 2004 ISO9141-2/ISO14230-4 Gasoline United States
Dodge Caravan SE 2000 J1850 VPW Gasoline Canada
Dodge Caravan SE 2001 J1850 VPW Gasoline Canada
Dodge Caravan SE 2002 J1850 VPW Gasoline Canada
Dodge Caravan SE 2003 J1850 VPW Gasoline Canada
Dodge Caravan SE0002 Dodge Dakota 1999 ISO9141-2/ISO14230-4 Gasoline Canada
Dodge Intrepid 1996 ISO9141-2/ISO14230-4 Gasoline United States
Dodge Intrepid 1997 ISO9141-2/ISO14230-4 Gasoline United States
Dodge Neon SE 2001 J1850 VPW Gasoline United States
Dodge Ram 1998 ISO9141-2/ISO14230-4 Gasoline United States
Dodge Ram 1500 1996 ISO9141-2/ISO14230-4 Gasoline United States
Fiat Albea 2000 Coup? 1998 ISO9141-2/ISO14230-4 Gasoline Italy
Ford Galaxy WGR 2. 3 1998 SAE J1850 PWM (41.6 kbaud) Gasoline Germany
Fiat Grande Punto 2007 ISO 15765-4 CAN (29 bit ID, 250 kbaud) Gasoline Italy
Fiat Marea 1997 ISO9141-2/ISO14230-4 Gasoline Germany
Fiat Punto 2000 ISO9141-2/ISO14230-4 Gasoline
Fiat Seicento 2001 ISO9141-2/ISO14230-4 Gasoline Greece
Fiat Stilo 2002 ISO9141-2/ISO14230-4 Gasoline Greece
Fiat Ulysse JTD 2001 ISO
Ford Fiesta 2002 J1850 PWM Gasoline United Kingdom
Ford Fiesta 2007 ICE 1.6L
Ford Fiesta 2009 ISO 15765-4 CAN (11 bit ID, 500 kbaud) Gasoline Russia
Gasoline Ford Focus 20 Focus 20 ZX3 2002 SAE J1850 PWM (41.6 kbaud) Petrol Spain
Ford Focus 2 2005 Petrol Russia
Ford Focus Trend 1 6 1998 J1850 PWM Gasoline Poland
Ford Focus ST225 ISO 15765-4 CAN (29 bit ID, 500 kbaud) Petrol Germany
Ford Focus ZTS 2001 J1850 PWM gasoline Canada
Ford focus 2008 ISO 14230-4 KWP (5 baud init, 10.4 kbaud) Gasoline
Ford Fusion 1.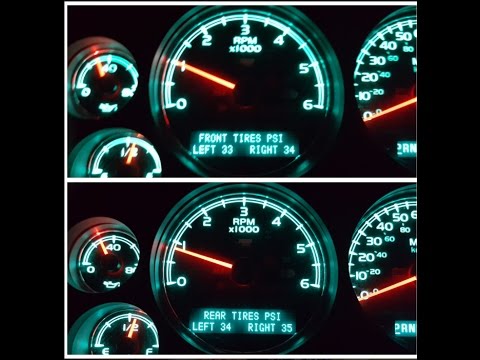 4 2008 ISO 15765-4 CAN Germany (29 bit ID, 250 kbaud)
Ford Fusion 1.6i 2005 PCM module via CAN-H, Airbags and ABS according to ISO 9141 Petrol Germany
Ford Ka 1999 J1850 PWM Gasoline Argentina
Ford Ka 1999 J1850 PWM Gasoline Argentina
Ford 9005 Petrol Spain 2 Ka 2001 J1850 PWM Gasoline United Kingdom 9141-2/ISO14230-4 Gasoline
GMC Jimmy 1997 J1850 VPW Gasoline United States
GMC Jimmy 2002 J1850 VPW Gasoline Canada
GMC Savana 1998 J1850 VPW Gasoline Canada
GMC Serria 2500 HD 2002 J1850 VPW Gasoline United States
GMC Sierra 1999 J1850 VPW Gasoline United States
GMC Sierra 1500 2003 J1850 VPW Gasoline United States
Great Wall Hover
Honda Accord SE 1997 ISO9141-2/ISO14230-4 Gasoline United States
Honda Accord wagon 2001 ISO 9141-2 (5 baud init, 10.4 kbaud) Gasoline Japan
Honda Civic 2001 ISO9141-2/ISO14230-4 Gasoline United States
Honda Civic 4d 2008
Honda Civic 5D 2001 Gasoline Germany 1.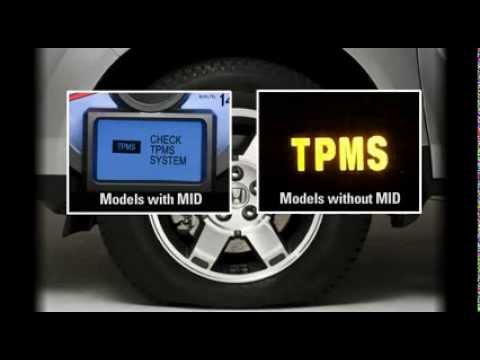 4, 90HP , SIN, ENG
Honda CR-V 1998 Petrol Canada (left hand drive)
Honda R-V 2005 Petrol Europe
Honda CR-V 2007 ISO 14230-4 KWP (fast init, 10.4 kbaud) Petrol Europe
Honda fit 2002 ISO 9141-2 (5 baud init, 10.4 kbaud) Petrol japan
fit 2009 ISO 15765-4 CAN (29 bit ID, 500 kbaud) Gasoline japan
Honda Element 2004 Gasoline USA left hand drive
Honda Element 2007 Gasoline USA
Honda HR-V 1999 ISO 9141-2 (5 baud init, 10.4 kbaud) Gasoline Japan
Honda Odyssey 2000 ISO9141-2/ISO14230-4 Gasoline Canada 996 ISO9141-2/ISO14230-4 Gasoline United States
Hyundai Accent (Sohc) 1996 ISO9141-2/ISO14230-4 Gasoline United States
Hyundai Elantra 1998 ISO9141-2/ISO14230-4 Gasoline Canada
Hyundai014 Elantra 20 -2 (5 baud init, 10.4 kbaud) Petrol Korea
Hyundai Getz 2006 ISO 9141-2 (5 baud init, 10.4 kbaud) Petrol Korea
Huyndai i-20 2010 Petrol India
Hyundai Lantra 1996 ISO9141-23/ISO9141-23 -4 Gasoline Germany
Hyundai Matrix 1. 6 2006 ISO 9141-2 (5 baud init, 10.4 kbaud) Petrol Korea Petrol, manual
Hyundai Santa Fe 2007 ISO 15765-4 CAN (29 bit ID, 500 kbaud) Petrol California USA
Hyundai Solaris 2011 ISO 15765-4 CAN (11 bit ID, 250 kbaud) Gasoline Russia
Hyundai Tiburon GS-R/GT (V6) 2003 ISO9141-2/ISO14230-4 Gasoline Canada
Hyundai Trajet 2006 Gasoline Korea
Infiniti G35 2003 ISO9141-2/ISO1424 Gasoline United States
Infiniti G35 2003 ISO9141-2/ISO14230-4 Gasoline United States 998 ISO9141-2/ISO14230-4 Gasoline United States
Jeep XJ 1994 J1850 VPW Gasoline United States
KIA Cerato 2005 ISO 9141-2 (5 baud init, 10.4 kbaud) Petrol Korea
90REAKO 002 Petrol KIA 2005 Spec05KIA Rio 2001 ISO9141-2/ISO14230-4 Gasoline
KIA Rio 2006 Gasoline Korea init, 10.4 kbaud) Gasoline USA
KIA SorentoXM 2010 Gasoline Korea
KIA Soul 2011 Gasoline Korea
KIA SHUMA 2002
Lancia Y 2000 ISO9141-2/ISO14230-4 Gasoline Germany
Lexus RX320 2L.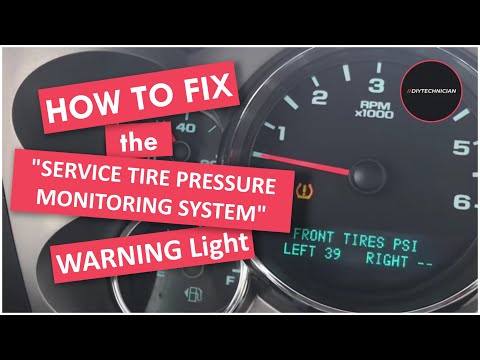 s. Gasoline United States
Lexus GS 300 T3 2002 ISO 9141-2 (5 baud init, 10.4 kbaud) Gasoline Japan (Reads all engine sensors)
Lifan smile 1.3i 2001 ISO 9141-2 (5 baud init, 10.4 kbaud) Gasoline China/Cherkessk
Mazda Demio 2001 ISO 9141-2 (5 baud init, 10.4 kbaud) Gasoline Japan (right hand drive!)
Lincoln Navigator 2005 USA gasoline
Mazda 3 2004 gasoline Japan
Mazda 3 MPS 2007 gasoline Japan
Mazda 3 2008 gasoline
Mazda Germany
Mazda 6 2.0 Mazda 6 2.0 MAZDA 6 2.0 MAZDA 6 2.0 MAZDA 6 2.0 MAZDA 6 2.0 MAZDA 6 2.0 MAZDA 6 2.0 MAZDA 6 2.0 MAZDA 6 2.0 MAZDA 6 2.0 MAZDA japan
Mazda 6 2009 Gasoline japan
Mazda CX7 2008 Gasoline EU
Mazda MPV 1996 ISO9141-2/ISO14230-4 Gasoline Canada
Mazda MPV 2002 ISO9141-2/ISO14230-4 Gasoline Canada0005
Mazda MX-5 1999 ISO9141-2/ISO14230-4 Gasoline
Mazda Protege 2000 ISO9141-2/ISO14230-4 Gasoline United States
Mazda Protege 1997 J1850 PWM Gasoline 1 4 CAN (11 bit ID, 500 kbaud) Gasoline Japan
Mazda Tribue V-6 2002 J1850 PWM Gasoline United States
Mazda Xedos 6 1996 ISO 9141-2 (5 baud init, 10. 4 kbaud) Gasoline Japan
Mercedes C32 AMG 2001 ISO9141-2/ISO14230-4 Gasoline Italy
Mercedes Benz A-140 1.4 2000 Gasoline Germany (PO codes 4itaet i stiraet.Programa VitalScan)
Mercedes Benz E-320 1998 ISO9141-2/ISO14230-4 Gasoline Cambodia
Mercedes-Benz C230 1914-97 ISO914-2 /ISO14230-4 Gasoline Japan
Mercedes-Benz E 430 2000 ISO9141-2/ISO14230-4 Gasoline United States
Mercedes-Benz ML 270 Cdi 2000 ISO9141-2/ISO14230-4 Gasoline Denmark
Gasoline Denmark
Mercury19 Cougar19 United States
Mercury Villager 1996 ISO9141-2/ISO14230-4 Gasoline United States
Mitsibushi Montero Sport 2000 ISO9141-2/ISO14230-4 Gasoline United States
Mitsibushi Carisma 2003 ISO 9141-2 (5 baud init, 10.4 kbaud) Gasoline Netherlands 900t z34a 1.3 2006 Petrol eur edcar
Mitsubishi Colt 2005 ISO 9141-2 (5 baud init, 10.4 kbaud) Petrol Japan engine 4G15 Mivec Turbo
Mitsubishi Diamante 2001 ISO9141-2/ISO14230-4 Mitsubishi Galant 1 ISO900 Galant 1 ISO 902 United States 902 9141-2 (5 baud init, 10. 4 kbaud) Gasoline Japan
Mitsubishi Eclipse 1998 ISO9141-2/ISO14230-4 Gasoline United States
Mitsubishi Eclipse 2000 ISO9141-2/ISO14230-4 Gasoline United States
ISO14230-4 Mitsubishi Lancer 1919 2/ISO14230-4 Gasoline JamaicaMitsubishi Lancer Evolution 2003 ISO9141-2/ISO14230-4 Gasoline
Mitsubishi Lanser 1997 ISO9141-2/ISO14230-4 Gasoline Sweden
Mitsubishi Lancer Cedia (4G15, MPI) 201-92 (5 baud init, 10.4 kbaud) Petrol Japan
Mitsubishi Lancer X 2008 Gasoline Japan
Mitsubishi Lancer X 2009 Gasoline Japan
Mitsubishi Mirage 2001 ISO9141-2/ISO14230-4 Gasoline United States 2003 ISO9141-2/ISO14230-4 Gasoline Netherlands
Mitsubishi Outlander XL 2008 Gasoline Japan
Mitsubishi Spase Star 1.3 2001 Gasoline Japan
Mitsubishi Spcer 2002 ISO9141-2/ISO14230-4 Gasoline Japan
Mitsubishi Pagero 3 2001 Petrol Japan
mitsubishi Pajero IO UK 2002 Petrol Japan
Nissan Altima 2001 ISO9141-2/ISO14230-4 Gasoline Canada
Nissan Almera tino 2001-ISO 9141 petrol Spain
Nissan Frontier 2000 ISO9141-2/ISO14230-4 Gasoline United States
Nissan Juke 1. 6 2WD CVT SE F9-8B 2011 Petrol
Nissan March K12 P12 2003 Japan ISO 9141-2 (5 baud 4 k) Petrol
Opel Agila 2002 J1850 PWM Gasoline Poland
Opel Astra 1997 ISO9141-2/ISO14230-4 GASOLINE HUNGARY
OPEL ASTRA-F 1997 ISO14230-4 GASLINE LITHUANIA
OPELINE LITHUANIA
(11 bit ID, 500 kbaud) Petrol Russia
Opel Astra Convertible 2002 ISO9141-2/ISO14230-4 Gasoline Australia
Opel Astra-h 2.0T 2007
Opel Astra J Petrol Poland
ISO911 2002 Opel Corsa2 ISO14230-4 Gasoline Belgium
Renault Megane II 2004 ISO9141-2/ISO14230-4 Gasoline Czech Republic
Renault Safrane 2.5 1997 ISO9141-2/ISO14230-4 Gasoline
Renault Twingo 1999 ISO9141-2/ISO14230-4 Gasoline France 9002
Rover 45 2001 ISO 9141-2 (5 baud init, 10.4 kbaud) Gasoline UK
Saab 9-5 2000 ISO9141-2/ISO14230-4 Gasoline United States
Saab 9-5 2002 ISO9141-2/ISO9141-2 Gasoline Sweden
Saab 900 19141-2 (5 Baud Init, 10.4 KBAUD) gasoline Switzerland Motor 2. 3 VR5 170PS
Skoda Fabia 1994 ISO9141-2/ISO14230-4 GASOLINE GERMANY
SKODA FELICIA FELICIA
GASLINESkoline 9000. 2001 ISO9141-2/ISO14230-4 Gasoline Czech Republic
Skoda Octavia 1.8T 2001 ISO9141-2/ISO14230-4 Gasoline Czech Republic
Skoda Octavia RS 2/ISO14230-4 Gasoline Europe
Suzuki X-90 1996 ISO9141-2/ISO14230-4 Gasoline United States
Toyota 4Runner 1996 J1850 VPW Gasoline United States
Toyota 4Runner 1996 J1850 VPW Gasoline United States
Toyota Avalon 1998 ISO9141-2/ISO14230-4 Gasoline United States
Toyota Avensis 2003 ISO9141-2/ISO14230-4 Gasoline Italy
Toyota Auris 2007 ISO 9141-2 (5 baud init, 10.4 kbaud) Gasoline Japan
Toyota Camry 1997 ISO9141-2/ISO14230-4 Gasoline0 United States
Toyota Camry 2004 Gasoline Japan Manual
Toyota Camry XLE 2004 ISO9141-2/ISO14230-4 Gasoline United States
Toyota Camry XLE 2004 ISO9141-2/ISO14230-4 Gasoline United States
ISO 5 Baud Init, 10. 4 KBAUD) gasoline Japan
Toyota Camry 3.5 2008
Toyota Carina AT-212 1999 gasoline Japan
Toyota Corona AT-21* 1998 Toyota Corola 1996 J1850 VPW GASELARA CANOLAS AT Corolla 1994 ISO9141-2/ISO14230-4 Gasoline Greece
Toyota Corolla 2005 ISO 9141-2 (5 baud init, 10.4 kbaud) Petrol Japan
Toyota Corolla Verso 2006 ISO 9141-2 (5 baud init, 10.4 kbaud) Petrol Turkey
Toyota Corolla 2007 Gasoline Japan, left hand drive
Toyota Echo 2000 ISO9141-2/ISO14230-4 Gasoline United States
Toyota Funcargo 2001 Gasoline japan right hand drive, engine 2NZ-FE. Software - TECU v.2
Toyota Ipsum 2002 Gasoline Japan tecu 2 9 software0005
Volvo S40 T4 1999 ISO9141-2/ISO14230-4 Gasoline United Kingdom
Volvo S60 B5244S2 2002 ISO 9141-2 (5 baud init, 10.4 kbaud) Gasoline Sweden
Volvo S70 1998 ISO9142 United Kingdom Gaso40-12-3 States
Volvo S70 1998 ISO9141-2/ISO14230-4 GASOLINE CANADA
VOLVO S70 1998 J1850 PWM GASLINE SWEDEN
ISO 9141-2 (5 Baud Init, 10.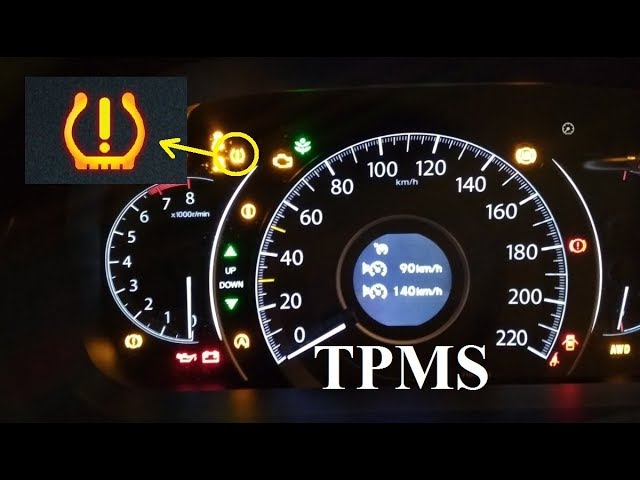 4 KBAUD) EUST 9000. 9141-2 (5 baud init, 10.4 kbaud) Gasoline Sweden
Volvo T5R 1995 ISO9141-2/ISO14230-4 Gasoline United States
Volvo V40 1996 ISO9141-2/ISO14230-4 Gasoline Belgium
Volvo V40 2.0 T 1999 ISO9141-2/ISO14230-4 Gasoline Sweden
Volvo V70 2001 ISO9141-2/ISO14230-4 Gasoline Italy
Volvo V70 XC 1999 ISO9141-2/ISO14230-4 Gasoline Poland
Volvo V70 T5 2000 ISO9141-2/ISO14230-4 Gasoline United Kingdom
ISO14230-4 -4 Gasoline AustraliaVolvo XC70 190) N47uL 2009 ISO 15765-4 CAN (11 bit ID, 500 kbaud) Diesel ECE
BMW 320D 2001 ISO9141-2/ISO14230-4 Diesel Germany
BMW 320D 2002 ISO9141-2/ISO14230-402 Diesel 2000 ISO9141-2/ISO14230-4 Diesel Finland
BMW 320Td 2003 ISO9141-2/ISO14230-4 Diesel France
BMW 530D 15765-4 CAN (11 bit ID, 500 kbaud) Diesel ECE
BMW X6 3.0sd M57/TU2TOPsc (E71 3.5 X-Drive) 2008 ISO 15765-4 CAN (11 bit ID, 500 kbaud) Diesel ECE
Chevrolet Starcraft 1998 J1850 VPW Diesel Finland
Citroen C3 2003 ISO9141-2/ISO14230-4 Diesel Spain
Citroen Evasion 1999 ISO9141-2/ISO14230-4 Diesel France
Citroen Picasso HDI 2001 J1850 PWM Diesel France
Citroen SAXO 2001 ISO9141-2/ISO14230-4 Diesel France
Citroen XSARA 1.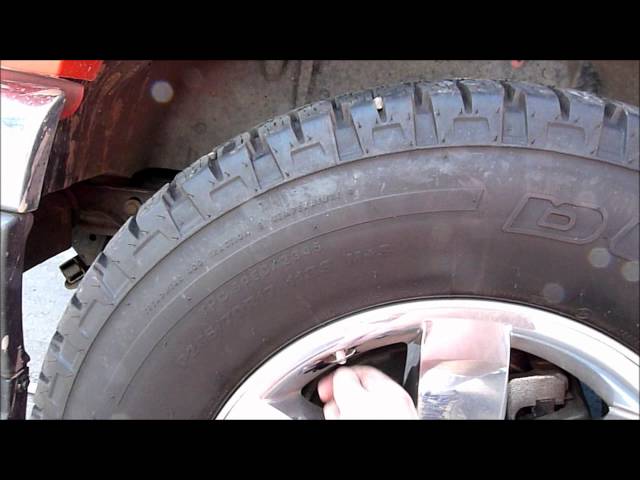 4 HDI 2004 ISO9141-2/ISO14230-4 Diesel SPAIN
FIAT DOBLO CARGO 1.3MJET Turkey
FITA MARET MARET MARET MARETU Italy 998 J1850 PWM Diesel
Ford Mondeo 2001 J1850 PWM Diesel Austria
Ford Mondeo 2004 J1850 PWM Diesel
Ford Mondeo 2001 J1850 VPW Diesel Austria
Ford Mondeo 18TD 1997 J1850 VPW Diesel Italy
Ford Mondeo 4 2008 ISO 15765-4 CAN (11 bit ID, 500 kbaud) Gasoline Germany
Ford T280 2008 ISO 15765-4 CAN (29 bit ID, 250 kbaud) Diesel Germany
Ford Transit 1995 J1850 PWM Diesel Germany
Ford Transit 2008 ISO 15765-4 CAN (11 bit ID, 500 kbaud) Diesel Belgium
Huyndai Grand Starex 2011 Diesel Korea
Hyunday Santa Fe CM 10+ 2012 ISO 15765-4 CAN (11 bit ID, 500 kbaud) Diesel Korea
Kia Carnival 2006 ISO 15765-4 CAN (11 bit ID, 500 kbaud) Diesel Russia
Kia Sorento 2.5 CRDi 2003 ISO9141-2/ISO14230-4 Diesel Italy
Kia Sorento 2.5 tdi 2007 Diesel Korea-Ukraine Diesel Korea
Kia Bongo III 2011 Diesel Korea
Land Rover Defender TD5 2004 ISO9141-2/ISO14230-4 Diesel France
Mazda 3 2005 Diesel Japan French engine 1600 cc 109 HP
Mercedes-Benz Vito 2001 ISO 9141-2 (5 baud init, 10. 4 kbaud) Diesel Spain
Mcc Smart Fortwo 2002 ISO9141-2/ISO14230-4 Diesel Portugal init, 10.4 kbaud) Diesel Spain
Nissan Navara 2.5Dci Le Prem. Aut. 2006 ISO9141-2/ISO14230-4 Diesel Norway
Nissan Note 2007 Diesel England
Nissan Primera 1999 ISO9141-2/ISO14230-4 Diesel
Opel Antara 2007 Diesel
Opel Astra 2000 ISO9141-2/ISO14230 4 Diesel
Opel Astra H 2004 ISO9141-2/ISO14230-4 Diesel Germany
Opel Astra h 2006 Diesel Germany
Opel Combo 2004 ISO9141-2/ISO14230-4 Diesel Singapore
Opel Corsa 2 ISO14230-4 Diesel Turkey
Opel Frontera 1994 ISO9141-2/ISO14230-4 Diesel Portugal
Opel Omega 1998 ISO9141-2/ISO14230-4 Diesel Israel
Opel Vectra B 2.0 1998 ISO9141-2/ISO14230-4 Diesel Opel C ISO 15765-4 CAN (11 bit ID, 500 kbaud) Diesel Germany
Opel Vivaro 2008 ISO 14230-4 KWP (fast init, 10.4 kbaud) Diesel Germany
Opel Zafira 2001 ISO9141-2/ISO14230-4 Diesel Paris
Opel Zafira 2001 ISO9141-2/ISO14230-4 Diesel France
Opel Zafira 2002 ISO9141-2/ISO14230-4 Diesel
Peugeot 206 2004 ISO9141-2/ISO14230-4 Diesel France
Peugeot 307 2004 ISO9141-2/ISO14230-4 Diesel France
Peugeot 307 2. 0 HDI 90 Hp 2004 ISO9141-2/ISO14230-4 Diesel Netherland
s Peugeot Partner 2005 ISO9141-2/ISO14230-4 Diesel Belgium
Renault Clio 2003 ISO9141-2/ISO14230-4 Diesel Romania
Renault Clio II 50 P002 90 J18 Renault Duster 2012 Diesel Russia
Renault Espace 2000 ISO9141-2/ISO14230-4 Diesel Germany
Renault Espace 2001 ISO9141-2/ISO14230-4 Diesel Portugal
Renault Espace 2.2 Dt 1998 ISO9141-2/ISO14230-40 Diesel France
4 -2/ISO14230-4 Diesel Sweden
Renault Kangoo 1.5 dci 2003 Diesel France
Renault Laguna 1998 ISO9141-2/ISO14230-4 Diesel Spain
Renault Laguna2 2002 ISO9141-2/ISO14 230-45 Diesel
Renault Megane 1998 ISO9141-2/ISO14230-4 Diesel Ireland
Renault Megane 1998 ISO9141-2/ISO14230-4 Diesel Ireland
Renault Megane 1.9 DTI 2001-ISO91412 4 Diesel Spain
Renault Megane Gran Tour 2004 ISO9141-2/ISO14230-4 Diesel Spain
Renault Megane Grandtour 2008 1.