A flat wheelbarrow tire, or a tire with a slow leak can be frustrating. Rather than taking the time to assess the damage and root cause of the problem, we sometimes just opt for the costly solution of replacing the tire, replacing the entire tire and wheel assembly, or even tossing out the wheelbarrow. It is not uncommon to see discarded wheelbarrows at dumps and waste yards that could have been easily returned to service with a minor wheelbarrow tire repair or tube replacement. Flat wheelbarrow tire repair or buying and installing a new tire, is an easy, money saving DIY project that anyone can do at home.
All that is needed to remove and replace the tire from the wheel is a large flathead screw-driver and a hand tire pump. You will also need a wrench to remove the wheel and tire assemble from the wheelbarrow. This is easily done by loosening one or both of the brackets holding the axle to the wheel.
If you have a tubeless tire which a puncture in the tread area of the tire, you will need a plug repair tool instead of the flathead screwdriver.
1. Once the flat wheelbarrow tire is off the wheelbarrow, you can conduct a thorough visual inspection. First, inspect the wheel for damage and the tire for obvious sources of the leak. You also want to check the amount of wear on the tread rubber and the amount of cracks in the tire due to dry rot. If the tire is badly rotted with deep cracks in the side of the tire, or the tread is worn and not providing sufficient traction, you should consider buying a replacement tire. A wheelbarrow tire could cost between 15 and 40 dollars delivered right to your door, compared to the $150 or more for a new wheelbarrow. If the wheelbarrow itself is in good condition, a new tire can make it work like new.
2. If the source of the leak is not easily identifiable on a tubeless tire (like a hole or object stuck in the tread), you need to inflate the tire to find the source of the leak. If the tire is entirely flat and won’t easily seat against the wheel flange, you can tighten a rope around the outside of the tire to push the tubeless tire against the wheel and get a good seal. If the wheel itself is severely bent, then you may need a new wheel, however small dents in the wheel flange usually don’t cause any problem, particularly for tube type tires. Adding
a tube to a tubeless tire and wheel assemble is a cheaper alternative to buying a new wheel even if it is damaged and leaking air between the wheel and tire itself.
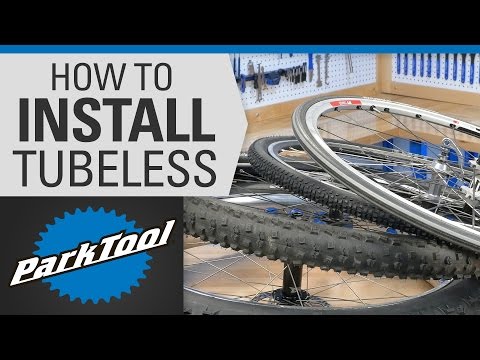
3. For a tube type tire, the tire must be removed from the rim. Use the flathead screwdriver to pry the tire off the rim as shown in this video. Once one part of the tire is over the wheel frange, one side of the tire will easily twist off the wheel. Turn the wheel over, and repeat for the other side of the tire. Be careful not to pinch the tube between the screwdriver and the wheel flange. A tubeless tire can often be repaired by leaving the tire on the wheel and using a plug.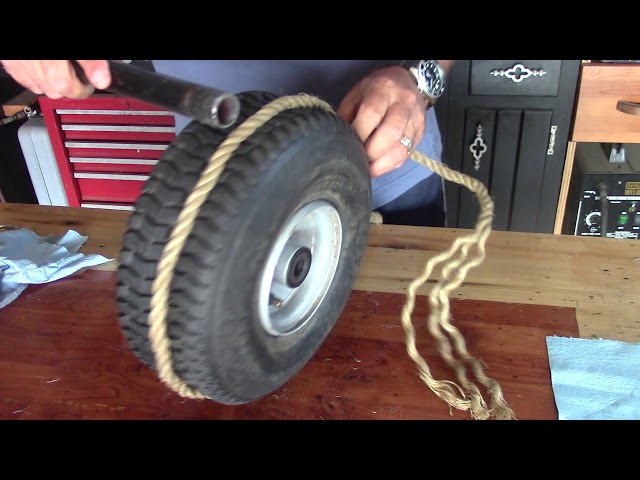 It is much easier to repair a hole in a tubeless tire but it does take some specialized equipment. Here is a video on how to plug a tubeless tire. Once the tire is plugged and the plug is trimmed, the tire and wheel is ready to be installed back onto the wheelbarrow.
4. Once the tube is removed, it can be inflated and submerged in a bucket of water to find the source of the leak. The bubbles will identify even pin pricks from thorns or otherwise hard to see damage. The area around the hole should be roughened up using fine grit sandpaper or a wood file. Coat the area to be repaired with rubber cement and apply the patch. If the tube cannot be repaired, and the tire is still in good condition, consider buying a replacement tube. A wheelbarrow tube will cost under $10, so a fraction of the cost of a new wheelbarrow or even a new tire and wheel.
5. Once the tube repair has fully cured, it is time to install the tire and tube back on the wheel. First, insert the deflated tube in the tire, and reposition one side of the tire back in the wheel. At this point, for a tube type tire, you will need to position the tube valve in the wheel hole. Once aligned, the other half of the tire can be pried on to the tire.
6. The tire or tube is now ready to be inflated to the psi suggested on the side of the tire. Replace the axle and fasten the entire wheel and tire assemble to the wheelbarrow.
If your flat wheelbarrow tire or tube is too damaged or worn to be repaired, then tires-easy.com is your best option for inexpensive wheelbarrow tires. They have a large variety of wheelbarrow tires at low prices. Armed with the tire size you need, you can easily find your replacement tire, with fast and convenient ordering and shipping direct to your home.
Released: July 13, 2018, 2:54 PM
A flat wheelbarrow or a slow leak tire can be highly frustrating. Instead of inspecting the damage and root cause of the error, sometimes we just opt for the costly solution of tire replacement, wheel assembly or even tossing out the wheelbarrow. It is not unusual to see the discarded wheelbarrows at dumps and waste yards that could have been easily reused with the help of a minor wheelbarrow tire repair or tube replacement. Buying and installing a new tire or flat wheelbarrow tire repair is an easy money-saving DIY project that can be easily be attempted by anyone at home.
In order to remove and replace the tire from the wheel, all you require is a large flat head screwdriver and a hand tire pump moreover you would also need a wrench to remove the wheel and reassemble tire from the wheelbarrow. It can easily be done by loosening one or both of the brackets that is holding the axle to the wheel. If you have a tubeless tire with a puncture in the tread area then instead of a flathead screwdriver you would need a plug repair tool.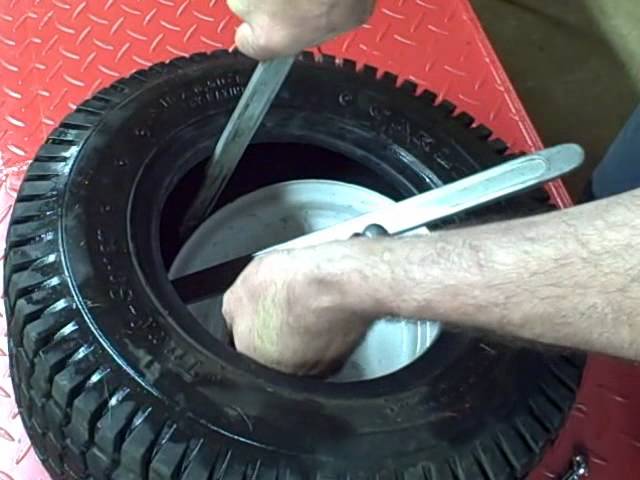
1. You can conduct a thorough visual inspection once the flat wheelbarrow tire is off. Firstly, assess the wheel for damage and the tire being the obvious resource of the leak. You must check the amount of wear on the tread rubber and cracks in the tire due to the dry rot. If the tire is badly rotten with deep cracks in the side or that tread is worn and is unable to provide sufficient traction then you must consider buying a tire replacement. A wheelbarrow tire must cost between $15 and $40 which will be delivered right to your doorstep as compared to the $150 or more for a new wheelbarrow. If the wheelbarrow is in good condition then a tire replacement can make it work more efficiently like a new one.
2. If the source of the leak is not easily detectable on a tubeless tire (like a whole or object stuck in the tread) you need to inflate the tire to identify the source of leakage. If the tire is completely flat and would not easily seat against the wheel flange then you must tighten a rope on the outside of the tire to push the tubeless tire against the wheel and get a good seal. You may need a new wheel if the wheel is severely bent however small dents in the wheel flange usually do not cause any big problems, particularly for the tube type tires. Inserting a tube into a tubeless tire and assembling a wheel is a cheaper alternative to buying a new wheel even if it has leakage and damaged the wheel and tire itself.
3. In case of a tube type tire, the tire must be removed from the rim. As shown in the video, use the flat head screwdriver to pry the tire off the rim. Once one part of the tire is over the wheel flange, the other will easily twist off the wheel. Turn the wheel over and repeat for the other side. Be careful; don't pinch the tube between the screwdriver and the wheel flange. A tubeless tire can often be repaired by leaving the tire On the Wheel and using a plug. It is a much easy method to repair a hole in a tubeless tire but it takes some specialized equipment. Here's video on how to plug a tubeless tire. The tire and wheel are ready to be reinstalled onto the wheelbarrow once the tire is plugged and the plug is trimmed.
4. Once the tube is removed, it can be inflated and submerged into a bucket of water to identify the source of leakage. The bubbles would identify even pinpricks from the thorns which would otherwise be very difficult to see. With the help of fine grit sandpaper or a wood file, the area around the hole should be properly roughened up. The area of repairing must be coated with rubber cement and then the patch should be applied. If the tube cannot be repaired but the car is still in a good condition then you must consider buying a new replacement tube. Wheelbarrow would cost under $10 which is the fraction of the cost of a new wheelbarrow, tire, and wheel.
5. Once the tube repair has fully been done, it is time to reinstall the tire and tube on the wheel. Firstly, insert the deflated tube in the tire and reposition one side of the tire that into the wheel. At this point, in case of a tube type tire, you would position the tube valve into the wheel hole and as it gets aligned the other half can be pried on the tire.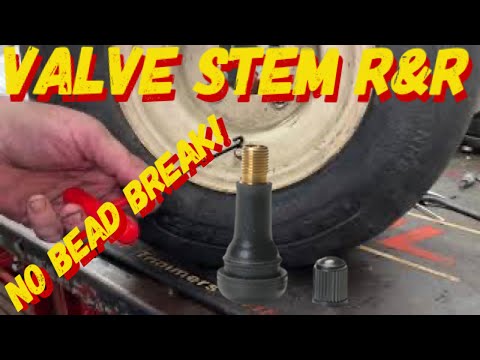
6. The tire tube is now ready to be in related to the PSI as suggested on the side of the tire. Fasten the entire wheel, assemble the tire to the wheelbarrow and replace the axle.
If your flat wheelbarrow tire or tube is highly damaged and worn out to be repaired then Tires-online.net is the best option to buy inexpensive wheelbarrow tires. They have a large variety of wheelbarrow tires at the best and lowest prices. They are armed with various tire sizes. You can easily find your replacement tire with the conveniently fast ordering and shipping services directly to your doorstep.
Tires
Often, spending very little time, you can avoid additional costs, which are already enough for those who spend the summer in the country and in country houses, taking care of buildings, gardens and gardens. In this particular case, the conversation, or rather, the video sequence, will be about how to bring the wheel of a garden cart back to life in a few minutes. A garden wheelbarrow in the country is never idle: take out the garbage, then bring building materials, then transport the crop. And, of course, with such intensive use, the wheel periodically fails: the tire is punctured, the chamber bursts, etc. But, before you go to the market and buy a new wheel, see how quickly you can disassemble the wheel, patch it, or, in case of significant damage, replace the tube and tire, and return everything to its original form. nine0003
We want you to see how easy it is to replace a punctured, cracked, or simply worn tube wheelbarrow wheel . Of course, we do this job every day, and we boarded several hundred thousand of these wheels before we decided to post this video. The video lasts only a couple of minutes, but after watching it and following the simple sequence of actions we perform, you will be spared unnecessary time costs.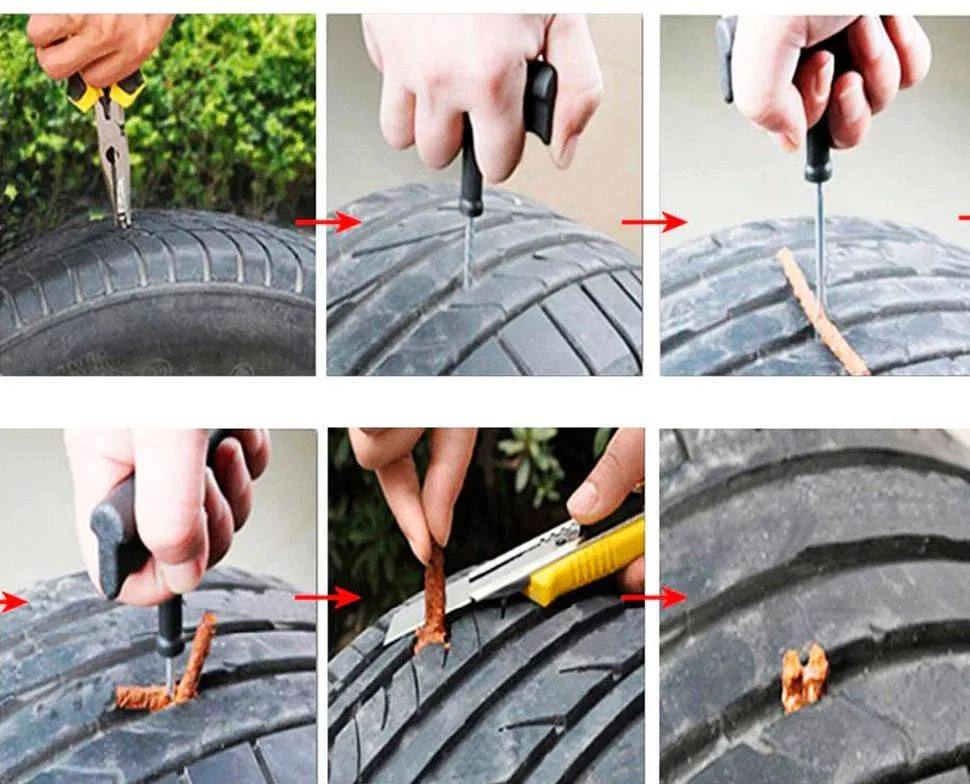
Wheel mounted on garden wheelbarrow is typically 3.25-8, slightly smaller in diameter than wheelbarrow for construction wheelbarrow .
First you need to unscrew the spool and completely deflate the wheel to make it easier to remove the tube tire from the rim.
Then we insert the new tube into the tire, be sure to carefully straighten it around the entire circumference inside the tire.
Once, on a video about the repair of a construction wheelbarrow wheel, we received a comment from a man in which he assured us that our inner tube with a tire was made of soft rubber, while his was made of oak and it was impossible to do what was shown in the video. So, if you carefully distribute the tube inside the tire before you put all this on the rim, any tire set, of course, if it is matched to the size of the rim, regardless of the softness of the rubber, will definitely fit on the rim. nine0003
If we don't do it with due diligence, then we won't put the kit on the disk. There is no need to watch how quickly the person in the video does this work, he does it all the time, just pay attention to how carefully the tire set is prepared before putting on the disk.
The next step is to insert the nipple into the hole on the disk and insert the pre-assembled tire kit with the inner chamber with force in a circle.
Inflate the wheel and close the nipple with a cap. That's it! nine0003
In the video, we use a compressor to inflate a tire, but it can be inflated almost as quickly with a conventional car pump. Everything else is done exclusively by hand and does not require any improvised means.
And in conclusion, once again I would like to draw your attention to the fact that if something does not work out for you, then this happens not because the rubber is “oak”, but because the sequence of actions is violated.
We often have to bead the wheels in winter, at minus 15. Knowing the properties of rubber, you can easily guess that any rubber will be “oak” at such a temperature, but we spend exactly the same amount of time as in this video. nine0003
Wheel bearing replacement
We select a wheel for a garden wheelbarrow
Mounting and dismantling of tires is now cleverly done in the tire shop. And, some 30 years ago, the drivers themselves were engaged in repairing the wheels. For the “experienced”, disassembling a tubeless wheel is not difficult. But what about those who have no repair experience, and in a traffic situation there is no other way out? Such drivers should study the theory of self-breakdown. The acquired knowledge can be put into practice. nine0003
Wheel stripping is the process of removing a tire from a rim. To disassemble the wheel, it may be necessary to replace the rubber with a new one, or in the case of an off-season “change of shoes”.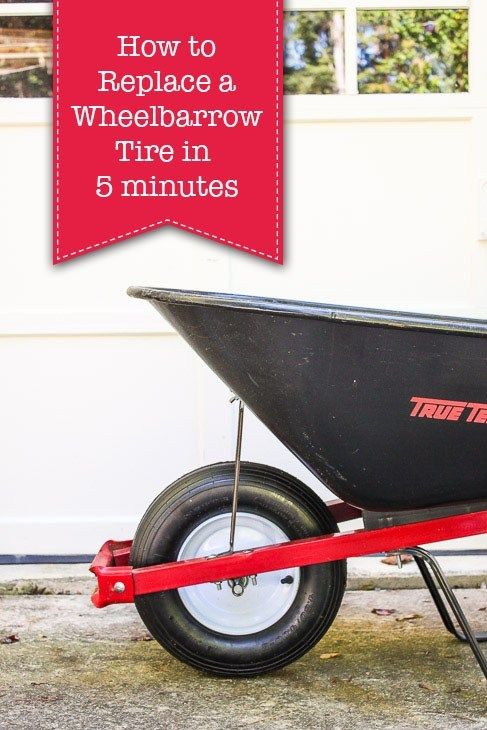 And sometimes, you need to disassemble the wheel to repair a tire or disc. The most common are two methods of dismantling.
One of the oldest methods still used by truck drivers. During the operation of the wheels, the tire bead is "welded" to the seat on the disk. This phenomenon is especially common with tubeless tires. In this case, it is possible to separate two elements that have become attached to each other by hitting a wedge with a sledgehammer. A wedge is a piece of steel thick corner with machined ends so as not to tear the rubber. After a series of blows, the tire and disc are separated. nine0003
In this case, weights must be used. The method is more humane, since it harms the rubber and the disk less (it is not always possible to accurately hit the corner with a sledgehammer). For weight, it is possible to use the mass of the car or your own body. In the second case, in order to increase the pressure, you will have to use a lever structure (pipe or board).-Step-1-Version-2.jpg/670px-Fix-a-Wheelbarrow-Tire-(tubeless)-Step-1-Version-2.jpg)
Tires with tubes stick less often (except for truck wheels). Therefore, it is enough to bleed the remaining air, clean the wheel of dirt and start dismantling. Tubeless tires stick a lot. Therefore, a few hours before disassembly, it is recommended to apply a decoking spray, for example, WD-40, to the stuck place. It is also possible to pour a little vinegar on the connection, as professional drivers used to do in the old days. nine0003
To disassemble the wheels at home, it is necessary to prepare the tools. First of all, these are mounting blades 2-3 pieces. For the shock method, you will need a sledgehammer and 1-2 corners. In the case of shockless technology using the weight of the car, you will need: a jack and pieces of boards. Consider the case on the road. The steps are as follows:
 We fix the position with the foot. With the second spatula we pry the tire bead and take out the edge of the rubber from the disk, and so on;
 Before disassembly, it is recommended to inspect the mounts for chips and burrs. Sharp edges can damage the disc and tire. Never use crowbars or nail pullers. Their sharp edges are guaranteed to tear the tire bead. nine0003
Another option is how to disassemble a tubeless wheel yourself using a rack and pinion jack. We tie the edge of the lifting platform to the disk with a wire or cable, and rest its heel against the tire. We raise the disk. In the process of work, we gradually move the jack along the perimeter of the tire. However, this option is dangerous. If the connection breaks, the structure will shatter.
Assembling a tubeless wheel is easy. A few movements with the shoulder blades, and the tire is in place. But, how to pump up such a cylinder, because the tire bead does not have an airtight connection? This will require high air pressure, which will quickly expand the rubber. The compressor will supply the necessary pressure. But in the field there is no compressor. There is an exit. nine0003
It is possible to apply two types of pumping. The first is the use of flammable liquids. Pour some gasoline inside the wheel, step back and set it on fire. Hot air will instantly expand the rubber. The second option is a radial tire tie. Wind the towing cable around the protector and twist it with a mount. The tire will expand. Its edges will press against the disk. After that, you can inflate the tire with a foot / hand pump and remove the bandage.
Before you try to disassemble the wheel with your own hands, you should take care of the tool. Keep a couple of mounting spatulas in stock, they can come in handy on the road.