SAFETY FIRST: Protective gloves and eyewear are recommended at this point.
Note: These instructions are very general, and you should have a service manual for your particular vehicle to get a better understanding of your particular setup and have factory recommended torque levels and specifications on hand.
Check out the Additional Service Information Resources for more information on finding service information for your specific vehicle.
If you are replacing axle carrier bearings see the ATV Axle Carrier Bearings guide.
Thoroughly clean the vehicle to make the job easier and prevent contamination of the new components during installation.
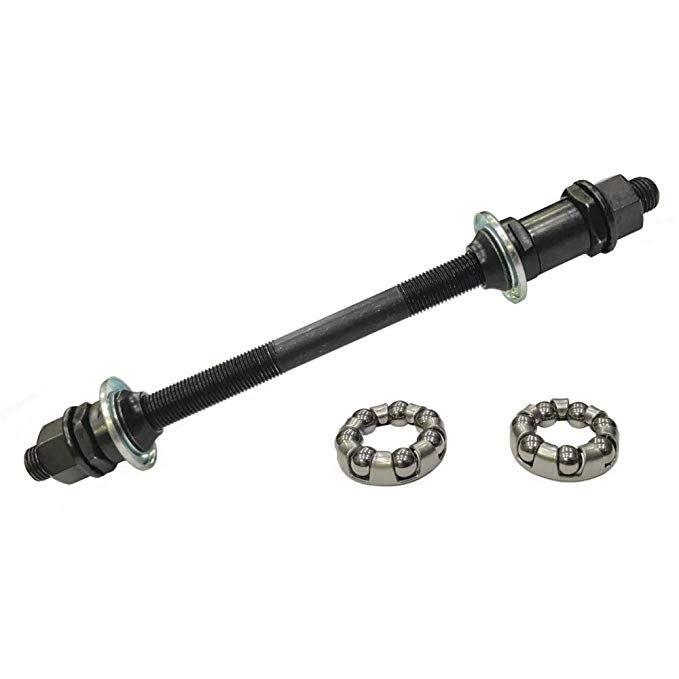
Get your steering bearing kit from ALL BALLS RACING.
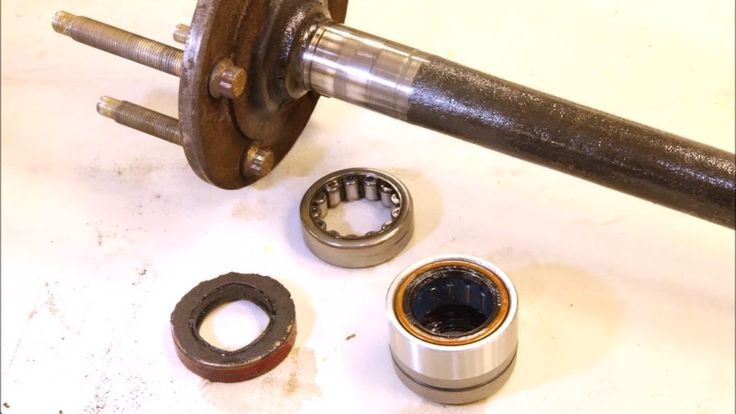
Remove the contents of your ALL BALLS RACING rear axle bearing rebuild kit. Layout the components in an organized manner for easy installation.
Place the new bearings in the freezer for about an hour before installing them.
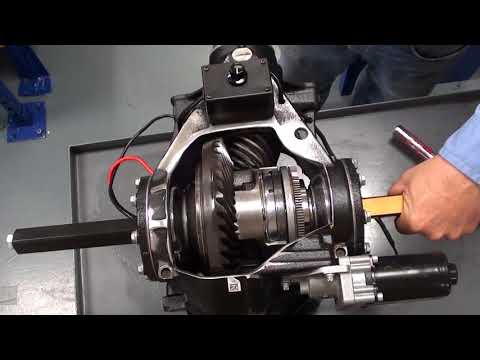
Remove the axle housings and axle from the final drive unit.
Remove the dust seals with a seal pick or flat blade screwdriver.
Remove the bearing from the axle housing with a suitable bearing puller or drive it out from the opposite side.
Clean away all of the old grease, grime, and rust from the bearing bore.
Inspect the bearing bore for wear and damage. Make sure the bore is free of damage or burrs that may cause the new bearings to hang during installation.
Install the new bearing into the axle housing.
Drive the bearing in until it is fully seated or to the OEM specified depth. Use a suitable driver or socket that only applies force to the outer race of the bearing.
Apply grease to the lips of the dust seal.
Install the dust seal into the axle housing.
Push the dust seal in so that it fits flush or as otherwise specified by the OEM.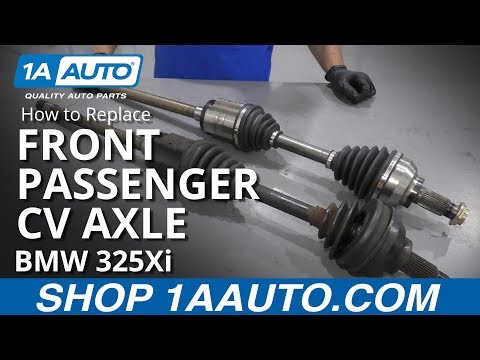
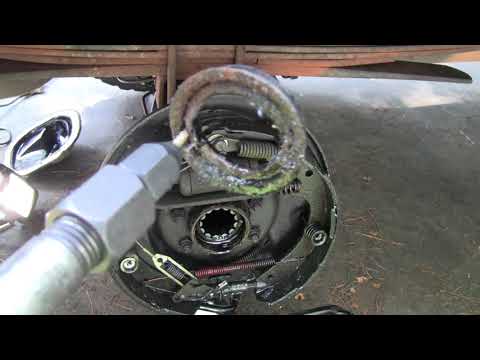
Remove the hub nut, brake drum cover, brake drum, and shoes. Remove the brake drum panel from the axle housing.
Remove the dust seal with a seal pick or flat blade screwdriver.
Remove the snap ring with snap ring pliers.
Heat the brake panel around the area of the bearings with a heat gun.
Drive the bearings out.
Clean away all of the old grease, grime, and rust from the bearing bore.
Inspect the bearing bore for wear and damage. Make sure the bore is free of damage or burrs that may cause the new bearings to hang during installation.
Take the bearing out of the freezer and install it into the brake panel.
Drive the bearing in so that it is fully seated. Use a suitable driver or socket that only applies force to the outer race of the bearing.
Install the second bearing in the same manner as the first.
Use snap ring pliers to install the snap ring into its groove to secure the bearings.
Apply grease to the lips of the dust seal.
Install the dust seal over the bearings so that it fits flush or to the OEM specified depth.
Remove the old dust seal from the brake drum cover.
Clean up the seal area.
Inspect the seal area for damage.
Apply grease to the lips of the new dust seal.
Install the new dust seal into the brake drum cover.
Drive the seal into place with an appropriate driver that matches the outside diameter of the seal.
Assemble the vehicle. Replace any other seals with new items as necessary or as indicated by the OEM.
Tighten the fasteners to specification and Install new cotter pints with the hub nuts.
INSTALL ALL BALLS RACING STICKER!
Most ATV riders will at some point need to replace their machine’s axles. This how-to guide is intended to show you that this repair can be done as a DIY project, saving you professional labor costs and even enhancing your overall ATV experience.
The steps we provide below are general in nature and are not meant to replace the instructions found in your OEM owner’s manual. Different brands may have different torque specifications and axle mounting configurations. When in doubt, follow the OEM instructions.
Please read these instructions thoroughly prior to working on your vehicle to prevent damage and/or injury from occurring. These axles come with a sure-lock mechanism designed into the inner joint which requires special handling in order to be properly removed and installed into the casing.
If all goes well, this procedure should take an hour start to finish, even if it’s your first experience.
Do not use any form of mechanical force when removing the inner joint from the gearbox or damage may occur. We recommend that sure-grip work gloves be worn while working on your vehicle.
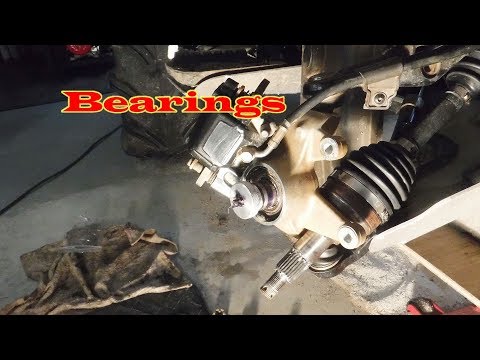
Front Axle Removal & InstallationRear Axle Removal & Installation
 Raise your machine so that the wheels are off the ground with a jack. Make sure you have a reliable jack that can take the sideways pull required to remove the axle. Use wheel blocks to secure the ATV.
 Also, ensure your ATV is secure and will not fall off the jack. Holding onto the axle shaft, give it a few swift tugs, and it should come free. You may need to push in first. There’s a snap ring holding the axle into place, so it could take a little force to remove the axle.
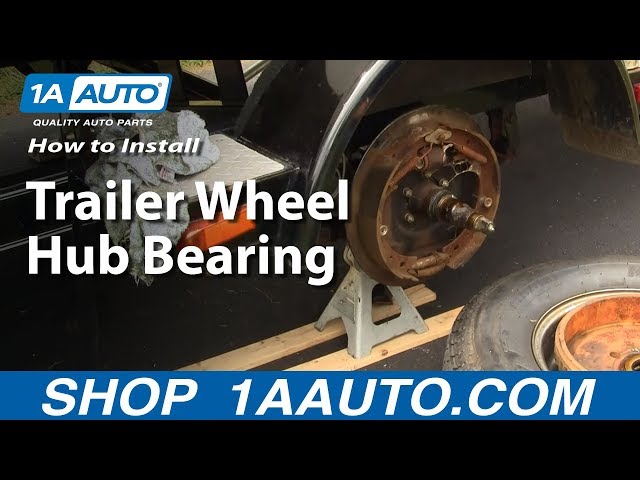 You’ll know it’s in position when you hear and feel it click. Give the axle a slight tug to make sure the clip is locked into place.
We encourage you to use caution on your first ride to ensure your axle has been properly installed. Happy riding!
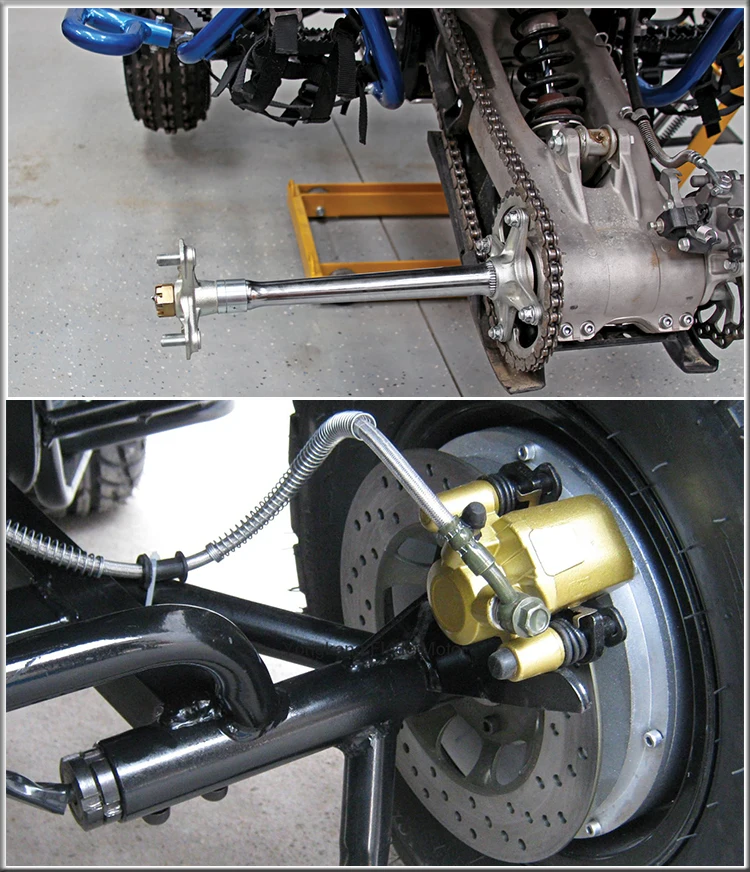
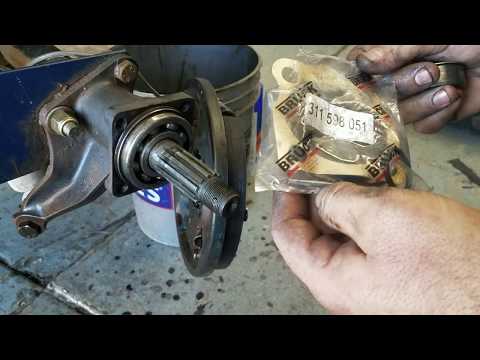
 Remove the cap. Then use needle nose pliers to remove the cotter pin on the axle nut securing the hub. To remove the axle nut, you may need to have someone press and hold the brake to provide the resistance you need. Use a socket wrench (typically 27 mm) to loosen the nut. Remove any washers as well.
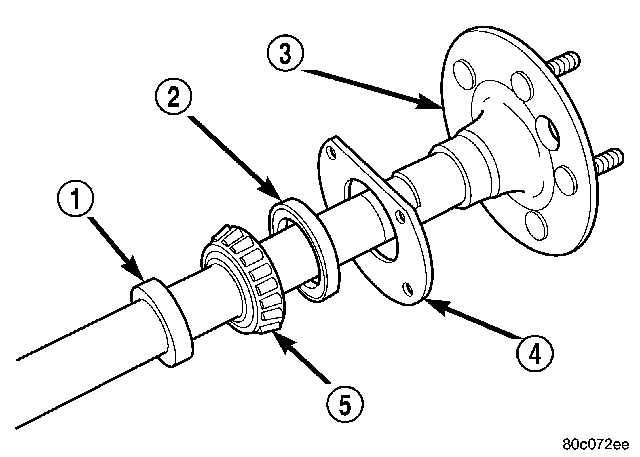 You may need to remove the lower shock bolt to allow the trailing arm to move out far enough.
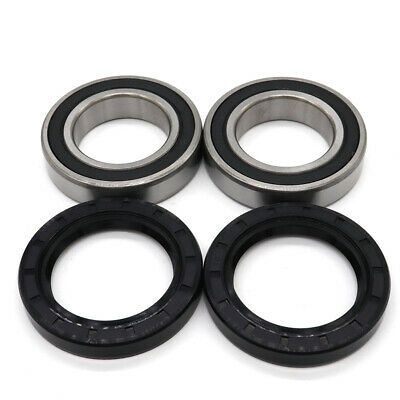 Put some grease or anti-seize on the inner splines. Then, insert the axle into the casing, lining up the splines.
 Reinstall the brake caliper onto the rotor and thread in the new fasteners.
We encourage you to use caution on your first ride to ensure your axle has been properly installed. Happy riding!
Our axles are designed and intended for use as OE-replacement axles only. These axles are not warranted if installed improperly, a modification has been made to include a lift kit, the installation of over-sized tires, or if racing or performance enhancements are made to the engine other than the OE design.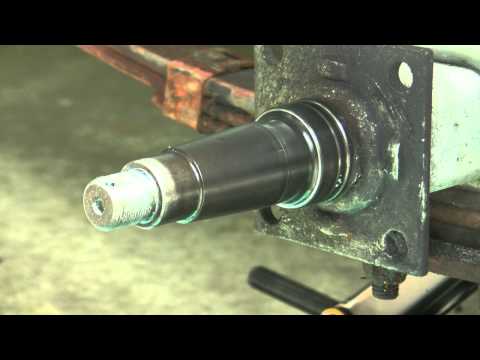 Read our full warranty policy here.
- End of Procedure -
Return to all Repair & Install Guides
Most ATV riders will at some point need to replace their machine’s axles. This how-to guide is intended to show you that this repair can be done as a DIY project, saving you professional labor costs and even enhancing your overall ATV experience.
The steps we provide below are general in nature and are not meant to replace the instructions found in your OEM owner’s manual. Different brands may have different torque specifications and axle mounting configurations. When in doubt, follow the OEM instructions.
Please read these instructions thoroughly prior to working on your vehicle to prevent damage and/or injury from occurring. These axles come with a sure-lock mechanism designed into the inner joint which requires special handling in order to be properly removed and installed into the casing.
If all goes well, this procedure should take an hour start to finish, even if it’s your first experience.
Do not use any form of mechanical force when removing the inner joint from the gearbox or damage may occur. We recommend that sure-grip work gloves be worn while working on your vehicle.
Front Axle Removal & InstallationRear Axle Removal & Installation
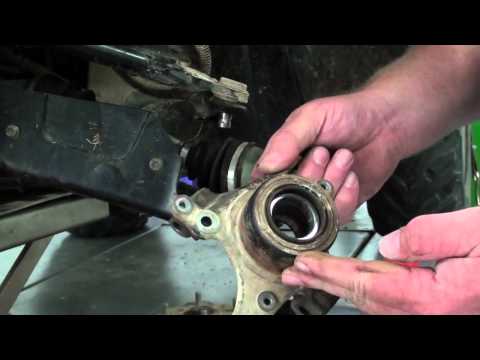
 Remove the upper steering knuckle joint from the bearing carrier to free the lower carrier assembly. Swing the carrier assembly down and back, carefully working the axle from the spindle. Since models vary, consult your service manual for their recommendations.
Note: Depending on the make and model of your ATV (and the extreme angle of the axle), you may prefer instead to remove the upper sway link connection and lower shock mounting bolt to move the shock up out of the way and swing the carrier assembly up rather than down to gain enough clearance to free the axle. Or you may choose to remove both the upper and lower ball joints, along with the tie rod end to remove the knuckle completely.
Remove the upper steering knuckle joint from the bearing carrier to free the lower carrier assembly. Swing the carrier assembly down and back, carefully working the axle from the spindle. Since models vary, consult your service manual for their recommendations.
Note: Depending on the make and model of your ATV (and the extreme angle of the axle), you may prefer instead to remove the upper sway link connection and lower shock mounting bolt to move the shock up out of the way and swing the carrier assembly up rather than down to gain enough clearance to free the axle. Or you may choose to remove both the upper and lower ball joints, along with the tie rod end to remove the knuckle completely. You may need to push in first. There’s a snap ring holding the axle into place, so it could take a little force to remove the axle.
 Give the axle a slight tug to make sure the clip is locked into place.
We encourage you to use caution on your first ride to ensure your axle has been properly installed. Happy riding!
 Remove the cap. Then use needle nose pliers to remove the cotter pin on the axle nut securing the hub. To remove the axle nut, you may need to have someone press and hold the brake to provide the resistance you need. Use a socket wrench (typically 27 mm) to loosen the nut. Remove any washers as well.
 You may need to remove the lower shock bolt to allow the trailing arm to move out far enough.
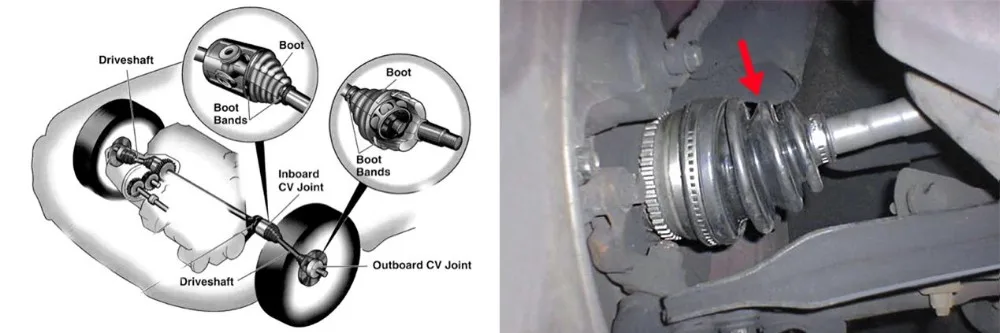 Put some grease or anti-seize on the inner splines. Then, insert the axle into the casing, lining up the splines.
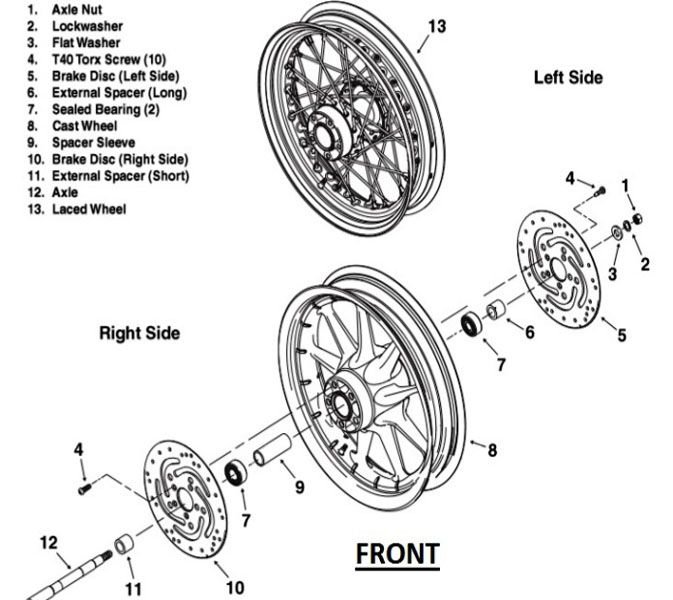 Reinstall the brake caliper onto the rotor and thread in the new fasteners.
We encourage you to use caution on your first ride to ensure your axle has been properly installed. Happy riding!
Our axles are designed and intended for use as OE-replacement axles only. These axles are not warranted if installed improperly, a modification has been made to include a lift kit, the installation of over-sized tires, or if racing or performance enhancements are made to the engine other than the OE design. Read our full warranty policy here.
- End of Procedure -
Return to all Repair & Install Guides
Published Updated While riding, a young rider can put a lot of stress on their ATV. As a result, various breakdowns are not ruled out, some parts fail. Each of them is part of a well-functioning mechanism, without which the entire system cannot work correctly. If desired, many breakdowns can be eliminated on their own, without contacting a car service. Your child's ATV may need to be repaired if one of the following parts fails: These are the most common breakdowns, in the event of which it is necessary to repair a children's gasoline ATV. The rear axle is subjected to significant loads during driving, especially if there is a second passenger in the seat above it. On children's models, axle failures occur much less frequently than on ATVs for adults. But if a child likes to carry passengers, jump, the likelihood of a rear axle failure increases significantly. Before the element completely fails, when driving, you can hear a rattle, tapping or hum, sometimes the rear wheels begin to jam, and play appears on the wheelset. The reasons for such a breakdown can be: The ATV must be jacked up to carry out repairs. You will need to perform several sequential steps to repair the rear axle: The rear axle can be fixed with different bolts and nuts. They will need to be unscrewed to free the sprockets. The axis is carefully knocked out, and the seals and bearings remain inside the pendulum housing. After that, it will be possible to replace any part of the rear axle assembly. First you need to inspect the seals, hubs, brake calipers. All moving parts are generously lubricated with oil recommended by the manufacturer of the ATV model. It is worth considering that when the axle is knocked out of the pendulum, the possibility of its breakage is not ruled out. Also a common mistake during repairs is an overtightened bearing or an incorrectly assembled brake caliper. To carry out repairs, you do not have to use special equipment, you can get by with improvised tools. You only need to purchase the appropriate parts that require replacement. Do-it-yourself repair of a children's ATV will not be difficult if a breakdown occurs in the area of \u200b\u200bthe rear axle. Sooner or later the plastic parts of the ATV will have to be changed. If a crack appears in the material, you need to heat it with a 100 W soldering iron. To do this, the part must be carefully removed in order to warm up the deformed place on both sides. Dents and chips can be repaired with suitable material. To do this, you need to purchase a fine-mesh stainless steel mesh. It is reliably soldered into the structure of the material when heated. The use of a mesh will avoid cracking of the plastic and will help to securely fix the junction on the fault. Next, you will need to use "liquid plastic" or resin, which is poured into the cavity. The ATV owner may encounter a situation where, after a long period of inactivity, the engine will not start. Sometimes this happens after a cross-country race. You might think that an expensive engine repair will be required, but this is not so. You need to pay attention to other systems, for example, the presence of gasoline in the fuel tank. It is also worth checking the battery, it may be discharged. If there is no petrol in the fuel tank, this is not always the fault of the driver, for example, there may be a leak in the fuel line. The battery may be discharged if the user forgets to turn off the appliance. If there is fuel in the tank, but it does not enter the engine, then the problem is in the pump. If the speed decreases, there is a smell of burnt rubber, and the variator belt is slipping, it's time to replace the element. The service life of this part is different for models, so it is almost impossible to predict a problem. The life of the component depends on the driving style and the load on the equipment. To get to this part, you will need to remove the cover from the transmission. You should definitely check if all the screws have been removed, if there are any hidden latches on the variator. When the cover can be removed, the tensioned belt will become visible. You need to find the fixing bolt and loosen it. Once the pulleys are apart, the belt can be removed. It is also recommended to inspect the surface of the transfer device. If it has scuffs in only one area, you need to find a bias in the variator system. A new belt is installed in its place. It must be well tightened by fully tightening the screw. It is necessary to create the same tension as the belt drive made by the ATV manufacturer. Further assembly is carried out in the reverse order. By starting the engine, it will be possible to evaluate the quality of the work performed. During maintenance, check the condition of the oil seals, add oil to the system if necessary, and perform other technical tasks. Regular maintenance will improve the performance of the equipment and extend its life. And only in case of "dead" sticking of the cage, resort to emergency measures. The principle of pressing and pressing the rear wheel bearing is no different from the work done with the front axle. The clip should be hit with even force. You need to beat on opposite sides or evenly moving in one direction. The main thing is that there are no distortions. Since the hole has expanded, there should be no problem with this task. When all the parts have cooled down, you can try to pull out the bearing - it is unlikely that you will succeed. Naturally, the second option will cost more. suitable liquid). In essence, the operation of a factory machine is based on a decree that cannot be canceled is the most important law of hydrostatics. The liquid, here, is used like a lever, and the voltage depends on the size of the ratio of the areas of the working surfaces. The workpiece is clamped by one beam of the press, and the other beam under pressure compresses it into the desired shape, which is determined by the operator. The outer ring is seated in the housing due to heating, which means the thermal expansion of the latter. When landing on the shaft, the inner ring of the bearing is heated, which allows you to easily and quickly install the bearing. choose a suitable heating method. When hot pressing, it is recommended to use a real, non-corrosive mineral oil as a heat transfer medium. It is worthwhile to rotate with the device delicately, since its plunger, even richly lubricated with grease, simply falls out of the body even under its own weight. going into this groove and protecting the plunger from falling out. But I didn’t do such a refinement - there was just an additional reason to handle the device more carefully during operation and, in order to avoid accidental “dismantling”, keep it in a separate plastic bag. When assembling the lever with the brace, install the removed shims in place so that the chamfers on them face the thrust end of the brace. Before tightening the brace nut, install the lever and the brace on a special device that provides distance A (fig. the axis of the lever and the center of the brace, the same 10 mm, and fix the brace. In this position, tighten the brace fastening nut to a torque of 160–176.4 N m (16.3–18 kgf m). Then, remove the lever assembly from the device and determine adjusting washers on the other end of the extension, adhering to the rules for their installation. Before further disassembly of the rack, check its condition. With the rack in a vertical position (stem up), perform several full stretching and compression strokes, after which the stem should move without crashes and jams and there should be no knocks or other people's noises. Fluid leakage is also not allowed, Deformation and destruction of the strut body, support cup, strut brackets, and swing arm. Your version of Opera Mini 4.71 contains the following bugs: 472 Error. later.659 Error.Your browser is vulnerable, on your browser can load unknown PO without your permission. ). In 2012, Grantek XXI turned 13 years old. The main value of the company is the rare knowledge and experience gained during continuous work with customers. spravconstr.ru

Repair of a children's ATV: rear axle
 One of the most unpleasant breakdowns, as it requires a certain professionalism when repairing.
Repair and replacement of plastic
 The same principle applies when replacing large areas of damaged plastic. But in case of serious damage, the material will have to be taken from the donor ATV. After such work, the surface is treated with sandpaper, and painted in the color of an ATV.
 Motor maintenance
 The hardest thing to fix the problem is if the piston system is worn out. There will be no compression in the engine, knocking may appear, and the whole system will not work as it should.
 CVT belt
 To eliminate the imbalance, it is necessary to compare the places where the defect appears with the teeth.
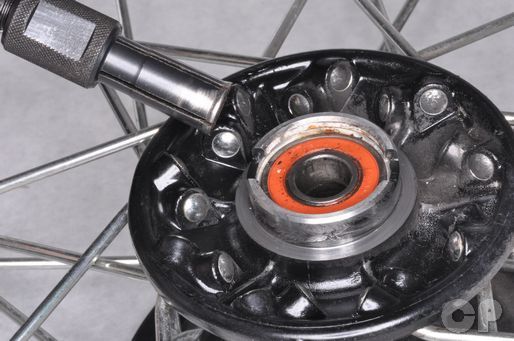
 How to press in a bearing. Self-replacement of the wheel bearing
How to press in the wheel bearing with your own hands
If you are replacing a front wheel bearing using a homemade method, pay attention to the following tips:
Pressing bearings | Manual of the mechanical designer
 A good option is insulating oil for transformers.
 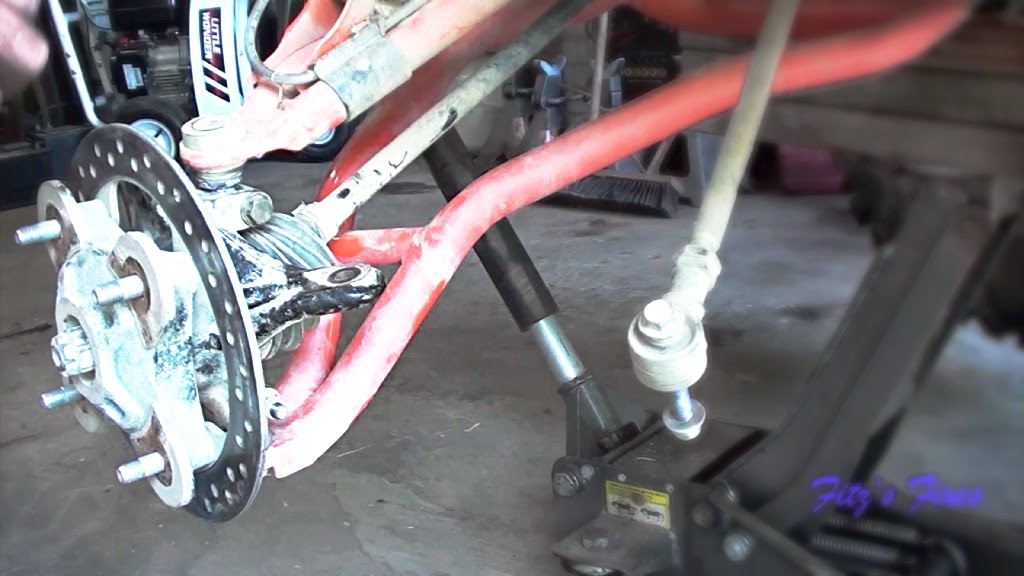 After that, fix the bracket with a nut, involving it only until the gap in the joint is selected. Perform the final tightening of the nut on the car, as shown in the chapter "Installation of components and parts of the front suspension".
 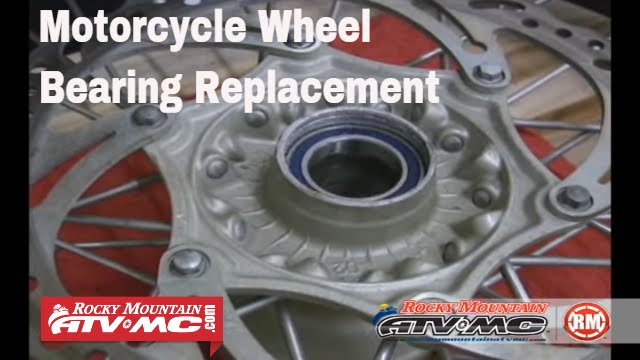 equipment. This advantage is the basis of our services. We are always one step ahead of the competition and provide our customers with the best products.
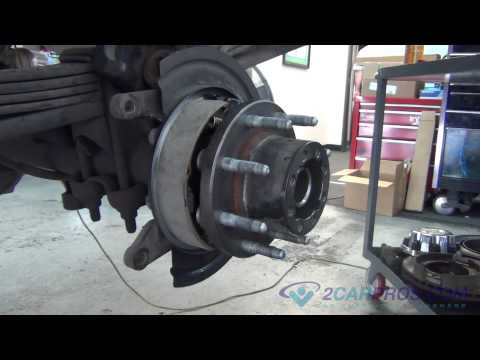
All about wheel bearing repair - be sure to substitute under the wheels that we will not repair the shoes; - wrenches off the nuts on the wheel and after jacking up, finally unscrew the wheel with the disk of God in a secluded place until better times; - dismantle the fixing pin and unscrew the axle shaft nut; - using wrenches, disconnect the tie rod ends (if we are talking about the front suspension), the lower arm and the stabilizer link - see the photo: - clasping the hub with both hands, and turning it to the left, then to the right, dismantle the hub with gentle movements.
It is very important not to pull the axle shaft out of the gearbox!
- by removing the sealing and retaining rings, in accordance with your car model, and using a puller, we easily and simply press out the faulty bearing.
Bearing replacement
The main purpose of a bearing is to reduce friction and protect mechanisms from rapid wear.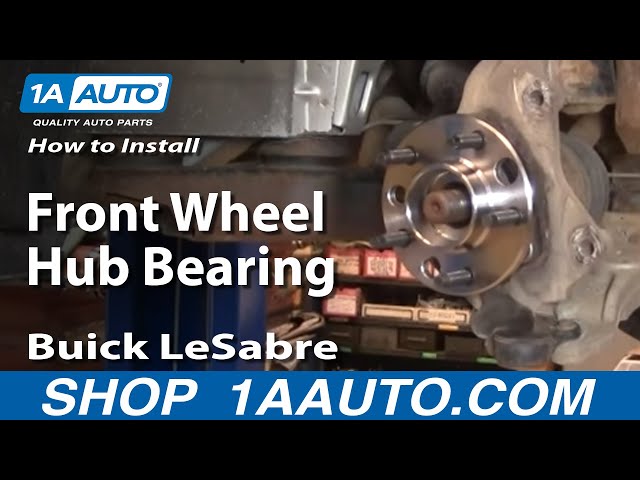 There is a wide variety of bearings. They differ in purpose, size and location. The part is subject to wear and therefore requires timely replacement. But in solving the problem of how to remove the wheel bearing, a lot of difficulties arise, so experienced craftsmen and amateurs have come up with reliable ways to remove the bearing. Let's consider some of them.
Since the hole has widened, this task should not cause any problems.
When all the parts have cooled down, you can try to pull the bearing out - it is unlikely that you will succeed.
This simple press-in method avoids hub scuffing and ensures bearing integrity, which is not the case with the "cold" version of a similar action, in which the new bearing often bursts.
Naturally, the second option will cost more.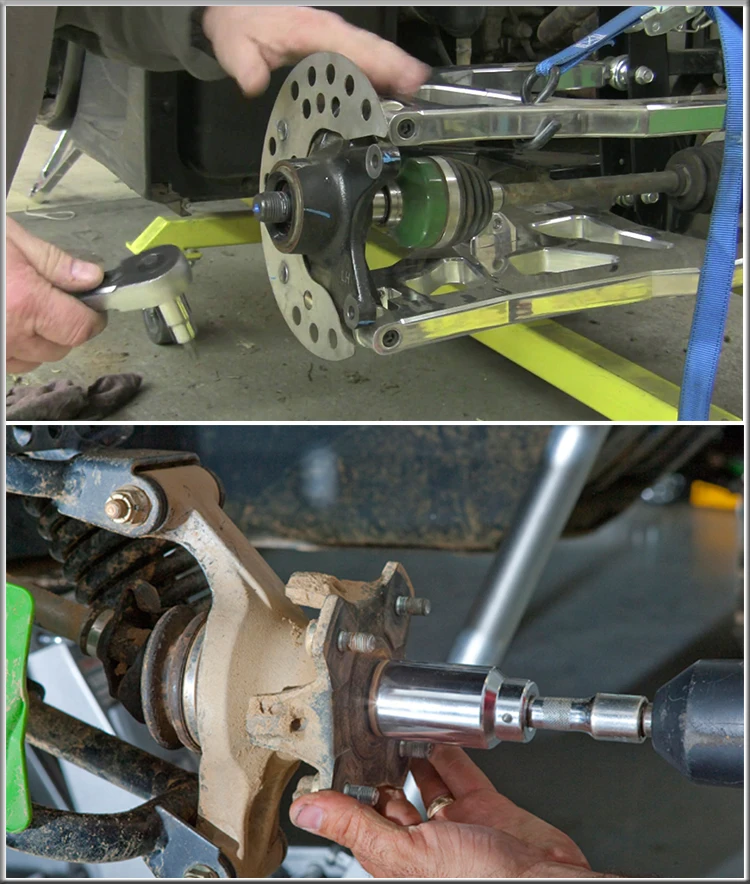
In a word, before making a final choice, you should study in detail all the possible options presented on the modern market and, if possible, consult knowledgeable people. Subscribe to our feeds on Facebook, Vkontakte and Instagram: all the most interesting automotive events in one place.
Useful tips. Axle for a car trailer: types of how to do it yourself. Hubs for light trailers and trailers with a gross weight of 3.5 tons. How to make an axle for a light trailer from a Zhiguli hub RELATED VIDEO: Why does the trailer AXLE BEND // Chernak
Dear readers! Our articles talk about typical ways to resolve legal issues, but each case is unique.
If you want to know how to solve your particular problem, please use the online consultant form on the right or call the numbers listed on the site. It's fast and free!
Useful tips.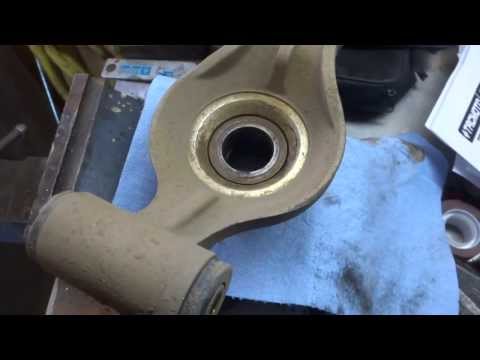 Axle for a car trailer: types of how to do it yourself. Hubs for light trailers and trailers with a gross weight of 3.5 tons. How to make an axle for a light trailer from a Zhiguli hub do-it-yourself without a lathe -.
Before replacing the front hub, you need to carefully study its design.
This will allow you to do all the work faster.
The design of the hub itself includes the following elements:
Attaches the steering knuckle with the front hub at the top and bottom. Moreover, on front-wheel drive vehicles from above, they are rigidly attached to the lower part of the suspension strut.
In order to carry out repairs yourself, you need to have the following set of tools: You also need a replacement kit - bearing, hub, new nut (mandatory).
Before making repairs, you need to look at the reviews of various manufacturers. Bearings are produced by such companies (foreign): Before replacing the hub or bearing, you will need to perform several steps: After all these manipulations, you can raise the car, completely remove the wheel. According to this algorithm, the front hub of the VAZ of new modifications is replaced - Samara, Samara-2.
Encyclopedia of Mechanical Engineering XXLCylinder liner dryPOISK
The question in the realities of a complete lack of technical literacy is not an idle one. In this difficult field, a lot of things were ruined: the fingers of the bearings were beaten off, the nests in which they are placed, a sledgehammer, and how many nerves were spent? It's scary to imagine...
To install a bearing and forget about it forever, you need to meet several conditions:
difficult to predict:
 It is strongly not recommended to apply force to the bearing through its working elements! If you need to press the bearing into the seat, then the pressing force must be applied strictly to the cage with which you press or press it. And in no case should you do the opposite: stuff the bearing onto the shaft by hitting the outer race or hammer it into the seat by hitting the inner one, that is, apply force through the working elements
  If possible, the bearing must be pressed in using an industrial press. This method gives a lot of advantages: only a linear load will be applied to the bearing, and not an impulse one, if hammered
 It is not necessary to buy the mandrel; If you are too lazy to mess around, you can buy a mandrel or even buy a whole set and use it to your health. Whichever is more acceptable to you, then choose.
We take an old unnecessary bearing that is still able to rotate. We bring the bearing to the circle of the grinding machine and grind the clip a little: if the bearing is turned across the stone, then the work will go much faster
It is not necessary to grind the clip strongly, there will be enough tenth of the tenth of the millimeter
by welding the internal clip
for ease of work - we weld the puck
We heat the nest, we hide the bell, we are hung with the bell. bearing mandrel and using a hammer we hammer it to the desired depth.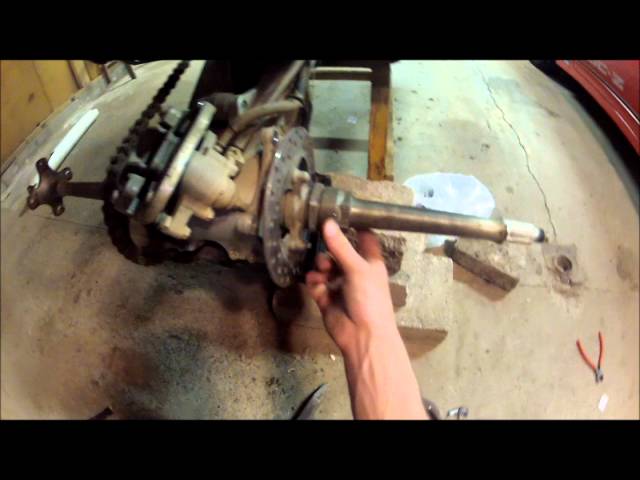 It is necessary to hammer in several light blows, constantly monitoring so that the bearing does not go skewed
Mounting the bearing on the shaft is even easier: cut off a piece of a suitable pipe size, heat the bearing, put it on the shaft, put the pipe on the inner race and hammer it in
thread length 75mm.
Place washers under the nuts and moisten with a bucket.
It is necessary to turn the nuts so that the thread does not roll. Well, then everything is clear from the photos.
This is how we pull out the bearing. Very thick washer from the inside.
Start by tapping the bearing lightly with a hammer.
There are a large number of special devices that, even at the factory assembly, received the only purpose - to quickly dismantle the bearing, without requiring power investments and financial costs from the auto mechanic or car owner.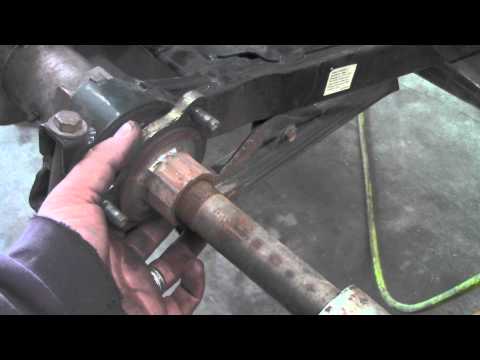 The use of special tools to remove the bearing from the shaft is the best and easiest solution to repair. You can save yourself from unforeseen situations. And for this you just need to follow the instructions. Typically, a standard puller is a threaded shaft that is screwed onto special auxiliary holders. They act as anchors. With the help of such a simple puller, the bearing is fixed and dismantled. Everything ingenious is simple!
Replacing the wheel bearing is a routine work, the implementation of which is within the power of all motorists.
The essence of the work is to transfer rotation through the rolling elements.
In this case, the outer and inner cages are not interconnected.
In our case, the inner race is articulated with the hub, and the outer with the steering knuckle. Inside the hub there are teeth that serve to engage the hub with the drive shaft. It is these splines that allow you to transfer torque from the gearbox to the wheels of the car.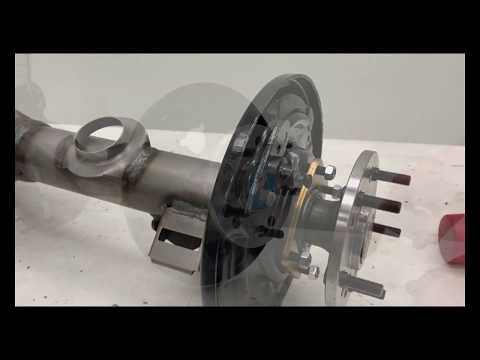
It is immediately worth noting that the wheel bearing can be replaced in two ways:
Another type of design uses the threaded joint between the bolt and nut as the force to push the bearing out.
The principle of selection of attachments is the same as for the previous puller. The second replacement method involves the use of various tips and a hammer. They knock out, and then clog back, the hub and wheel bearing.
Using Daewoo LANOS as an example, let's look at how to replace a front wheel bearing. When you feel that the bearing has rested, you can stop.
Install the second circlip. Press the hub into the steering knuckle.
Folk craftsmen recognize two ways to get out of this situation:
Both of these methods are dangerous in that there is a risk of damaging the front bearing seat on the hub.
Greetings to all lovers of self-repair. I think it's time for you to replace the noisy worn bearing. I already wrote about how to choose a bearing and not make a mistake with the choice and marking, and I advise you to read about it in this useful article. But how to properly replace the wheel bearing of a car was not said in that article. We will talk about how to properly and with what help to replace the rear wheel bearings in this article.
For proper disassembly, you need to have a press (how to make the simplest threaded press, read here, and the simplest hydraulic press from a jack here) or an ordinary large vice. We begin the repair by bending the jammed locking belt of the hub nut (usually with M22x1. 5 thread), and now you can unscrew the nut without damaging the thread. Next, we press the trunnion using the fixture shown in Figure 1. For pressing out, you will need a mandrel 1 and a support 4, with three pins 5.
But this is the press version shown. If you do not have a press, but have a vise, then mandrel 1 needs to be modified by shortening the length of the mandrel to the size of the maximum expansion of the jaws of your vise. And the thread on the mandrel is not needed at all for the vise, so we remove it (or don't do it at all). When using a vice, and not a press, we do the same with other mandrels shown in figures 2, 3 and 4.
When you press bearing 4 out of the hub (shown in figure 2), be sure to clean the inside of the hub from dirt . Here you will need a mandrel made with other dimensions (by the way, the dimensions in the drawings are for domestic cars, therefore, specifically for your car, these dimensions should be changed in accordance with the dimensions of the cages of your bearings and hubs).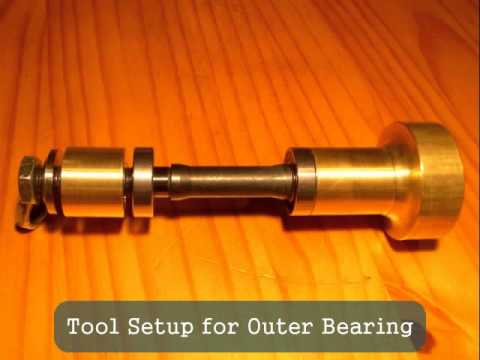
Figure 3 shows a new bearing being pressed into the hub. Pay attention to how the mandrel lies on the bearing races, and this is important, because if you move the inner race relative to the outer race with improper pressing, the bearing cage will certainly be damaged and the new bearing will turn into a sinker for the bottom. That is, when pressing in, large pressing forces should not be transmitted from holder to holder through the balls. This greatly affects the further mileage of a pressed new bearing. And the devices proposed in these figures provide this.
For example, look at pressing the trunnion in Figure 4. When pressing the trunnion, the mandrel 1 abuts against the inner race of the bearing without loading (without moving) the balls and excluding the possibility of damage to the separator and the raceways of both races. It is important.
In general, you should remember the main simple rule: when a bearing is pressed into the housing (crankcase) of something, the mandrel (sleeve) must press on the outer race, and when the bearing is pressed onto the shaft of something, the mandrel must press on the inner race.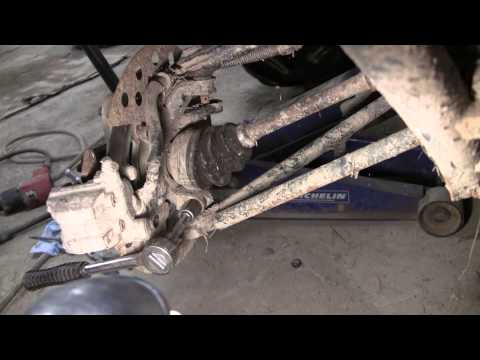 This is the only way to avoid damage to the new bearing.
One last important reminder. A hub nut with a M22x1.5 thread (it may differ slightly for different machines), this nut is a one-time spare part and it is not advisable to install it in place a second time. A new nut is not expensive and having bought it, we screw it on and tighten it with a moment of 14 - 16 kgf m and tightening it, now we press the locking belt into the grooves of the trunnion with a not sharp power screwdriver. About the tool for the correct tightening of fasteners, we read here.
Well, if the bearing seat on the hub breaks due to the rotation of the bearing, then you can restore the hub as described in this article.
I understand that in order to make these devices, you need to contact a turner and spend a little money on turning. But believe that it is worth it, because a branded bearing is not cheap, and it will be much easier for you to change it with the help of these devices. In addition, where is the guarantee that the bearings will be changed in the car service exactly as described above.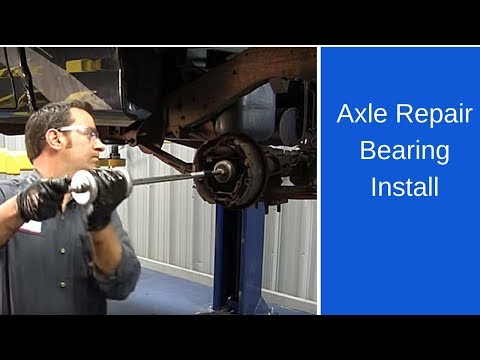
And if after a replacement in a car service, a bearing buzzes after a couple of hundred kilometers, they will simply tell you that you bought a low-quality product, which is now on the market in darkness. In general, do not dig. Therefore, it is up to you to decide what is more expensive - turning or constantly updating wheel bearings, success in repairs.
suvorov-castom.ru
Hello, I saw one of the ways to press in a wheel bearing without a press For everyone who wants to support the channel: 4276 0218 8043 4373
, 10 11 12 13 14 15
2108 2109 21099 2110 2111 2112 2113 2114 2115
how to change the front wheel bearing on front-wheel drive cars without removing the rack and without a press.
If you have alloy wheels, first remove the center cap.
We find out the diameter of the central nut that secures the CV joint.
We take a very powerful head, in this case I have a 30 nut here, so the head is 30, respectively.
Then you will either need an assistant to apply full force on the brakes, or you will need to place wheel chocks under all four wheels.
Before starting to unscrew the wheel, turn it a little.
This is done so that when unscrewing the crowbar does not rest against the car body.
I put chocks and you can try to unscrew.
Wheel bearing replacement may vary from vehicle to vehicle. Modern vehicles may be equipped with various easily damaged electronic devices that must be removed when replacing a bearing. Therefore, if you are not a highly qualified car mechanic, it is better to entrust this work to car service masters.
It is also worth doing the alignment after replacing the wheel bearing. The set camber will improve the car's road holding on turns and straight lines, remove vibration, as well as reduce tire wear and fuel consumption. Vibration can also occur due to a crookedly inserted bearing.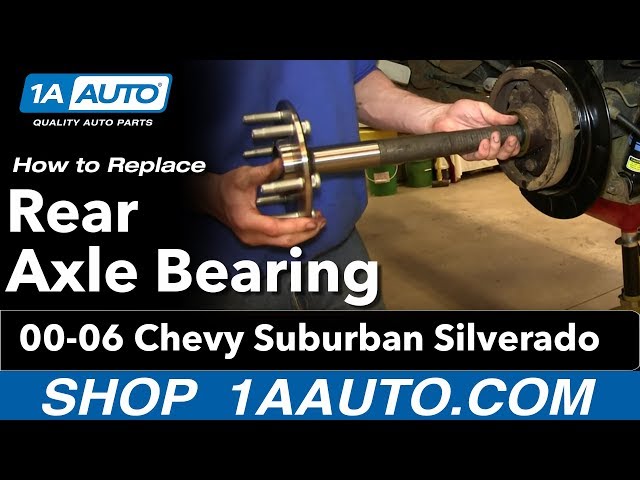 To eliminate it, you need to knock out the bearing again and check the tightness of the wheel nuts.
An error has been detected. If you do not know the reasons for the error, try to refer to the help topics.
You do not have access to this page or feature. If you are not logged in, you can do so using the form below and then try again.
The bearing is a small element of the vehicle's technical equipment. At a certain interval, it requires replacement, and all repair work is carried out according to the regulations, otherwise it will be difficult to decide how to remove the bearing and replace it on time. With self-repair, you can encounter a lot of difficulties, thinking not only how to remove the bearing, but also unscrew this or that nut first. There are times when the fasteners do not lend themselves, you have to use force or additional leverage. But in everything you need to have a measure, not to damage the parts that will be difficult to find later, to adapt to a car of a certain brand.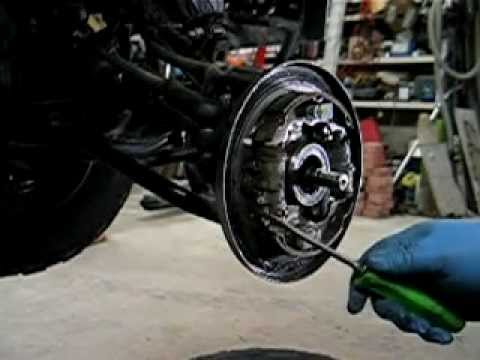
If it is not possible to apply the first method when deciding how to remove the bearing with a puller, then use the third method. It will require skill and the use of force, auxiliary tools. What is the course of action?
Thus, the third method is used in the event that the bearing is completely worn out, does not come out of its seat, therefore, it is necessary to apply force. There are times when it is difficult to solve the problem of how to remove the rear bearings from the shaft, so they simply have to be cut out. Experienced craftsmen resort to such a radical method, who got a completely worn-out running system for repair, and there is no other way to get a bearing to replace it. Beginners are not recommended to use the third method, because they simply cannot cope, but can damage other elements of the running system. In this case, an elementary bearing replacement will cost a pretty penny.
The ATV is a powerful 4-wheel vehicle with high flotation. Owners really appreciate it for undemanding and reliability. This type of transport can be used to transport fairly solid goods, only this requires a specialized trailer. Help in the economy from such an acquisition will be decent, since the power of the all-terrain vehicle is enough to transport goods weighing almost one ton. There is only one task left - the trailer. A trailer for an all-terrain vehicle can be made even with your own hands. In addition, you can make a design that will meet the functionality, absolutely all the necessary technical requirements and economic needs.