Home » Misc » How to set the timing on a taotao 250cc atv
How to set the timing on a taotao 250cc atv
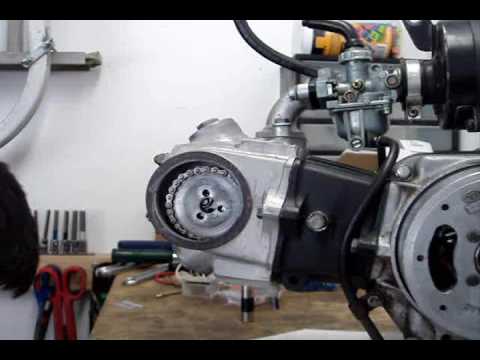
Adjusting the Intake & Exhaust Valves on a TaoTao Engine
Checking Valve Clearance/Valve Adjustment
If you have had your machine for a long time or you notice your machine just isn’t running right it might be time for a valve adjustment.
You are going to want to make sure that you have the engine cool and at TDC (top dead center) when you are adjusting the valves. To accomplish this you will need to uncover the cam gear on the side of the head (saucer shaped cap on the side of the head) that will be held on on the opposite side of the head by a 10MM bolt, along with the service caps on the left hand side of the engine to reveal the fly wheel.
Take a 14MM socket and watch the timing marks on the cam gear and the fly wheel. The dot with the letter “JD” by it will need to split the two head bolts (1 on top and one on bottom). Check the top of the fly wheel, there should be a letter “T” that you can see through the top service cap hole.
If these timing marks do not match up turn the engine one more time to make sure you weren’t on the wrong stroke. If the marks still don’t coincide with one another then your engine needs to be timed.(Covered elsewhere)
Once you have made sure that your engine is at TDC you will want to take off the valve covers. These will be the two 17 MM caps that thread into the head, one on tope (intake) and one on bottom (exhaust).
Grab the rocker and try and tap it on the head of the valve. One of three things will happen here, one you will be able to move the rocker ever so slightly which is what you want. You don’t want it to be super tight but also not super lose at the same time. Two you will be able to tap the rocker on the valve head meaning the valves are loose, or you won’t be able to move the rocker at all indicating that the valves are tight. Either way if the valves are loose or tight use your feeler gauge (.07MM exhaust & intake) to set them to the correct clearance.
There is a valve adjustment tool that can make adjusting the valves much easier but if you don’t have this you can do it with a wrench and needle nose. Loosen the jam nut on the pin (normally a 9mm jam nut) and turn the pin to the correct clearance. It should pinch the feeler gauge, you should be able to slide it through but you also want it to drag a little bit. Tighten jam nut to spec,
Once you get the valves set to the correct spec you are now ready to button the machine back up and start it and make sure you don’t get any flaws in your work. The most important thing is to make sure you are always at TDC when adjusting of messing with the valves. As long as you emphasize getting to TDC this will be a cake walk for you and you should see some improvements if you were having issues with hard starting especially.
How To Tell ATV Jumped Time? (In 4 Steps) – ATVFixed.com
Engine timing is mission-critical. Getting this stuff wrong can spell big trouble. If you suspect timing is out, best not to run the motor.
Checking ATV engine camshaft and crankshaft timing marks is the correct way to verify timing. It’s a simple 4 step process:
Remove spark plug
Remove camshaft cover
Set engine to TDC on compression stroke
Check camshaft sprocket marks align correctly
The Five Biggest Sports Clubs In Th...
Please enable JavaScript
The Five Biggest Sports Clubs In The World
By the end of this post, you’ll understand clearly how to check your ATV engine timing marks, why timing jumps and how to fix it, and also other causes of bad timing.
Page Contents
Timing
Symptoms of Bad Timing
Checking Timing
But Why is the Timing Out?
Resetting Timing
Timing
Timing is everything, every component of your engine has an important job to do, and some components have to do it at a very precise moment in the engine cycle. Doing their job too early or too late can make the difference between an engine on full song and no singing at all.
The bottom end of your engine (crankshaft) coordinates the top end (valve train). It employs sprockets, chains, tensioners, and guides rails to keep everything in time. The valves positioned in the cylinder head open and close sequentially, allowing fuel in and spent gases out.
The spark plug needs to fire at the correct time. Ordinarily, when the engine is idling, the plug fires when the engine is at TDC, and it signifies the beginning of the power stroke.
As the engine speeds up, though, the plug is fired earlier. Know as BTDC (Before Top Dead Center), this is because the spark plug takes time to produce a spark. Starting the process early, therefore, means the plug continues to fire at the sweet spot in the engine cycle.
The firing, advancing, and retarding of the spark plug is controlled by the trigger (aka pulse, pickup, or crankshaft sensor (CKP)) and the CDI box (Capacitor Discharge Ignition).
An ignition timing issue may be caused by a faulty CDI box or an incorrectly positioned pickup sensor.
Your ATV engine is a four-stroke simply because it has four clearly defined stages in its operation.
The piston moves down the cylinder and draws fuel mix in through the open intake valve.
The piston moves up the cylinder, compressing the air-fuel mix (valves closed).
Plug fires and the piston moves down the cylinder powering the crankshaft (valves closed).
The piston moves back up the cylinder forcing spent gases out the open exhaust valve.
And the cycle starts over.
Symptoms of Bad Timing
There may be lots of reasons why your ATV engine doesn’t sound or operate like normal. Timing is not one of the first items checked unless it suffers from some of the following symptoms:
No power
Popping in the carburetor
Backfiring
No start
Engine binding on crank
Poor idle
Long crank
Won’t rev
Hot starting issues
Don’t rule out some of the simple causes first and they include the following:
Fouled spark plug
Wrong plug type
Bad gas (common cause of issues)
Valve lash needs adjusting
Faulty CDI
Faulty coil
Faulty or misaligned pickup
Faulty stator
Flywheel magnet position fault
Sheared flywheel key or missing
Checking Timing
Checking your timing is a straightforward procedure, but you’ll likely need to remove a few items to gain access. This guide guesses that your engine is an Over Head Cam found in most modern ATVs. I’ve included a single and a twin-cam, your timing markings will likely be different but not to worry, from the timing diagrams below, you’ll get the picture.
The process goes like this:
Step 1
Start by removing the spark plug, this makes cranking over the motor a ton easier.
Locate and remove the timing inspection hole.
Step 2
Rotate the flywheel counter-clockwise slowly using a suitable socket and ratchet. The timing mark “T” or equivalent will appear in the inspection window. This indicates Top Dead Center (TDC)
You may need to remove the pull starter assembly (if fitted) to locate the timing inspection hole.
Step 3
Go ahead and remove the camshaft inspection cover or remove the cam cover.
This is a single cam engine with the crankshaft set to TDC.
Go ahead now and check your marks on the cam timing sprocket. It should align with the mark on the cylinder head.
For twin-cam engines, the process is similar, with just an extra sprocket mark to line up. Typically, both sprocket marks align with the horizon plain of the cylinder head (marked as red lines below) and some sprockets may have an additional mark (not in the pic below), and typically they point straight upwards (90°).
Step 4
If you don’t see the cam sprocket timing marks align, rotate the flywheel counter-clockwise one full turn.
Position the “T” or equivalent TDC crankshaft mark in the inspection window once again.
The sprocket mark(s) should now be aligned on the head (horizon plain of the cylinder head, (Twin-cam)) and the additional cam marks pointing upwards 90° (if applicable). The engine is now set to TDC on the compression stroke.
If all cam timing marks don’t align, your timing is out and will need to be reset.
But Why is the Timing Out?
The timing chain and valve train are all mechanical and require adjustment and maintenance for trouble-free service.
The more usual causes of jumped timing include:
Worn or faulty hydraulic chain tensioner
Worn timing chain
Worn sprockets
Worn chain guide rails
Stretched chain
Low oil level
Poor quality oil
Sheared flywheel key
Over revving engine
Resetting Timing
Resetting the timing can be a pain in the ass, but you do need to get it correct. If the timing isn’t correct, the piston could impact the valves, causing some very expensive repairs. Your very first job is to find a manual for your engine. The process, torque specs, and tightening sequences vary from engine to engine.
Critical information and tools
You’ll need to know your timing marks, torque specs, fastener sequences, and you’ll need a torque wrench. You’ll find a list of all the tools I use here on the ATV tools page.
This guide will give you a general flavor of the job ahead.
Remove cam covers and set crank and cam sprockets to TDC on compression stroke
Remove the tensioner
Remove the chain from the top of the sprocket(s) and hold
Realign the sprocket(s)
Refit the chain
Reload the tensioner – screw-back to reload
Fit tensioner plus new gasket and torque to spec
Fire the tensioner by tapping usually
Check timing marks
Rotate the flywheel counter-clockwise two full turns and check timing again.
A full inspection of the chain, sprockets, guides, and tensioner is advised. A failing tensioner is a very common cause of jumped timing, and obviously, if root causes aren’t fixed, timing will jump again and maybe with costly consequences.
You may find these posts useful:
How often to service an ATV?
ATV parts page
ATV won’t jumpstart
Air-cooled ATV white smoke
Will ATV start with a bad stator?
About the Author
Latest Posts
John Cunningham
John Cunningham is a technical writer here at ATVfixed.com. He’s a Red Seal Qualified Service Technician with over twenty-five years experience. He’s worked on all types of mechanical equipment, from cars and trucks to ATVs and Dirt bikes.
ATV Carburetor Adjustment
How to adjust the carburetor on an ATV? What to pay attention to? What are the signs of misuse of the device? About this today in our article. Using the proposed instructions, you will be able to set up the carburetor step by step without the help of specialists.
Why Carburetor Adjustment Is Necessary
For stable operation of the ATV, it is necessary that the engine receives the optimal amount of combustible mixture corresponding to its rev range. Otherwise, the following problems may occur:
Difficulties with the plant, constantly stalling engine.
Weak power characteristics, sluggish throttle response.
Poor dynamics during acceleration from the bottom, accompanied by spontaneous jerks when driving.
Dips observed mainly during acceleration.
High fuel consumption.
Excessive formation of soot on the walls of the combustion chamber and, as a result, overheating of the motor.
What needs to be applied in this case:
Adjust the idle speed with the mixture quality screw and the number of revolutions.
Adjust the quality of the mix with the needle.
Adjust the fuel level.
Important! Carry out tuning only when the carburetor is cleaned outside and inside, as well as when the engine is warmed up to operating temperature.
How to adjust carburetor idle speed on ATV
To get rid of the condensate that regularly appears in the carburetor, drain the fuel from the float chamber - close the fuel cock and unscrew screw No. 1 until it stops. Wait for the gasoline to merge completely, and tighten screw No. 1 back.
Start the vehicle and let it warm up for a few minutes.
Tighten the mixture quality bolt No. 2 until it stops. The engine will shut down at this point. If this does not happen, most likely, the tightness of the pipes of the air supply system is broken. Check. Then turn bolt #2 one turn. The enrichment of the mixture occurs in a clockwise direction, depletion - against.
Increase the idle speed with the #3 screw and start the ATV. The number of revolutions should be slightly higher than usual (in some models, the idle adjustment bolt is located on the right side of the four-wheel).
Loosen the fuel mixture quality screw No. 2 so that the power unit reaches maximum speed - approximately 2-2.5 turns.
Start to equalize the number of idle revolutions with the #3 bolt until you hear a smooth, strain-free sound of the engine running.
Press the throttle trigger a few times to check if the idle speed is stable.
Note. The location of the bolts on each carburetor model may vary, so read the instructions that came with your machine.
ATV carburetor mixture adjustment on the go
1. Start the ATV and test ride. Wait until the engine has completely cooled down.
2. Check the condition of the spark plug. To do this, unscrew the cap and inspect the candle.
What to look for:
A light brown coating around the entire circumference of the insulator is a sign of optimal carburetor performance.
Brown color on one side of the insulator - engine lean.
A hard black deposit on the spark plug insulator indicates that the carburetor is supplying too much fuel mixture while the ATV is running.
Absolutely black spark plug, insulator and electrode - too rich mixture, which gives excessively high fuel consumption and power reduction, as well as gas contamination of the chamber.
White insulator - lack of air and gasoline supply. Leads to overheating and increased fuel consumption.
All white plug - too lean.
Brick color - large amount of additives with a high metal content in the composition.
Lack of carbon deposits and simultaneous melting of the electrode - very lean mixture at high speeds.
Broken tip spark plug - broken center electrode with ceramic skirt.
Spark plug with oil deposits inside the electrode - a sign of used rings and valve stem seals.
Shiny inclusions and chips - destruction of the engine due to driving at high speeds.
Oxidation - problems with piston rings.
3. Unscrew the needle cover at the top of the carburetor. Pull the needle. This is the main element that regulates the supply of fuel to the combustion chamber, since the needle is connected to the gas trigger. When the trigger is pressed, the needle rises, slightly opening the hole for supplying the fuel mixture. This directly affects the growth of power and speed of the ATV.
4. Remove the cable, then press the needle to pull it out. The needle has 5 grooves and a retaining ring. By default, it is set to medium. The lower the retaining ring is located, the higher the needle is raised, which means that a lot of gasoline and little air is supplied. Accordingly, the higher the ring - the less gasoline and more air.
5. Reposition the circlip in the desired direction to optimize carburetor performance. Insert the needle into place.
6. Start the engine and press the throttle trigger. With proper adjustment, the engine should not stall from a sharp pressure.
And remember, you should resort to adjusting the needle only as a last resort, when adjusting the quality and quantity screw does not bring results.
Adjusting the fuel level in the float chamber of ATVs
The performance of a four-wheeler depends on the correct level of gasoline in the carburetor. An excessive amount will flood the candles, spill onto the ground and lead to unnecessary expenses. If there is too little fuel, the engine simply will not start.
How to optimize the fuel supply
4-stroke ATVs are equipped with carburetors with an opaque drain tube hanging down. Therefore, first of all, replace it with a transparent one.
Lift the free end of the hose up.
Loosen the drain screw next to the tube to get rid of excess fuel. By the amount of liquid entering the tube, determine the level of gasoline in the carburetor. The norm is the line (1-1.5 mm lower is allowed) of the connection between the housing and the float chamber.
To adjust the fuel level, open the float chamber and locate the tab covering the stop needle.
By bending the tongue down, you will increase the intensity of the fuel supply. Bending up - on the contrary, lower. Perform all manipulations with caution, as the design is quite fragile.
Order TaoTao Warrior 200 LUX ATV with delivery and assembly.
Order TaoTao Warrior 200 LUX ATV with delivery and assembly. Skip to content
Sale!
180,000 ₽ 169,000 ₽
Engine 200 cc (14 hp), automatic starter, USB port, passenger backrest, turn signals, LCD dashboard, LED headlight and more (see tab and more) “Detailed” )
ATV TaoTao Warrior 200 LUX A novelty with a new design, glossy and carbon inserts is suitable not only for adults but also for teenagers. Additional consecration is provided by Led-headlights (chandeliers). For safer movement there is protection of hands and the engine. The engine is started by an automatic starter. Automatic 1 + 1 gearbox with reverse will allow for comfortable driving with a high degree of cross-country ability. Disc, hydraulic brakes front and rear - maximum safety. The ATV is equipped with one of the most popular V-shaped wheel tires. Carburetor fuel supply system. It also has a parental control. Passenger back. Under the seat is 200 cu. 14 hp engine
Video Reviews
ATATAO Warrior ATV:
ATATO TAO TAO TAO TAO TAO TAO TAO 200 luxury
Parts
Detail
Specifications
Add. consecration Led headlight (headlight-beam, chandelier)

 Know as BTDC (Before Top Dead Center), this is because the spark plug takes time to produce a spark. Starting the process early, therefore, means the plug continues to fire at the sweet spot in the engine cycle.
 This guide guesses that your engine is an Over Head Cam found in most modern ATVs. I’ve included a single and a twin-cam, your timing markings will likely be different but not to worry, from the timing diagrams below, you’ll get the picture.
 It should align with the mark on the cylinder head.


 2 so that the power unit reaches maximum speed - approximately 2-2.5 turns.
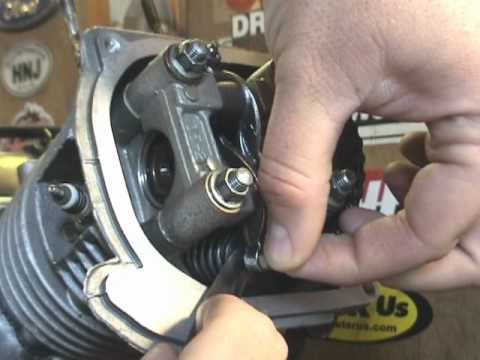
 When the trigger is pressed, the needle rises, slightly opening the hole for supplying the fuel mixture. This directly affects the growth of power and speed of the ATV.
  An excessive amount will flood the candles, spill onto the ground and lead to unnecessary expenses. If there is too little fuel, the engine simply will not start.
 Automatic 1 + 1 gearbox with reverse will allow for comfortable driving with a high degree of cross-country ability. Disc, hydraulic brakes front and rear - maximum safety. The ATV is equipped with one of the most popular V-shaped wheel tires. Carburetor fuel supply system. It also has a parental control. Passenger back. Under the seat is 200 cu. 14 hp engine