Engine timing is mission-critical. Getting this stuff wrong can spell big trouble. If you suspect timing is out, best not to run the motor.
Checking ATV engine camshaft and crankshaft timing marks is the correct way to verify timing. It’s a simple 4 step process:
By the end of this post, you’ll understand clearly how to check your ATV engine timing marks, why timing jumps and how to fix it, and also other causes of bad timing.
Page Contents
Timing is everything, every component of your engine has an important job to do, and some components have to do it at a very precise moment in the engine cycle. Doing their job too early or too late can make the difference between an engine on full song and no singing at all.
The bottom end of your engine (crankshaft) coordinates the top end (valve train). It employs sprockets, chains, tensioners, and guides rails to keep everything in time. The valves positioned in the cylinder head open and close sequentially, allowing fuel in and spent gases out.
The spark plug needs to fire at the correct time. Ordinarily, when the engine is idling, the plug fires when the engine is at TDC, and it signifies the beginning of the power stroke.
As the engine speeds up, though, the plug is fired earlier. Know as BTDC (Before Top Dead Center), this is because the spark plug takes time to produce a spark. Starting the process early, therefore, means the plug continues to fire at the sweet spot in the engine cycle.
The firing, advancing, and retarding of the spark plug is controlled by the trigger (aka pulse, pickup, or crankshaft sensor (CKP)) and the CDI box (Capacitor Discharge Ignition).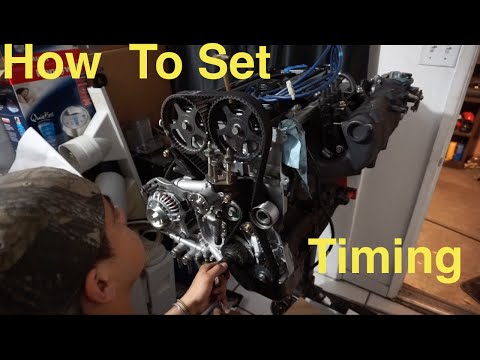
An ignition timing issue may be caused by a faulty CDI box or an incorrectly positioned pickup sensor.
Your ATV engine is a four-stroke simply because it has four clearly defined stages in its operation.
The piston moves down the cylinder and draws fuel mix in through the open intake valve.
The piston moves up the cylinder, compressing the air-fuel mix (valves closed).
Plug fires and the piston moves down the cylinder powering the crankshaft (valves closed).
The piston moves back up the cylinder forcing spent gases out the open exhaust valve.
And the cycle starts over.
There may be lots of reasons why your ATV engine doesn’t sound or operate like normal. Timing is not one of the first items checked unless it suffers from some of the following symptoms:
Don’t rule out some of the simple causes first and they include the following:
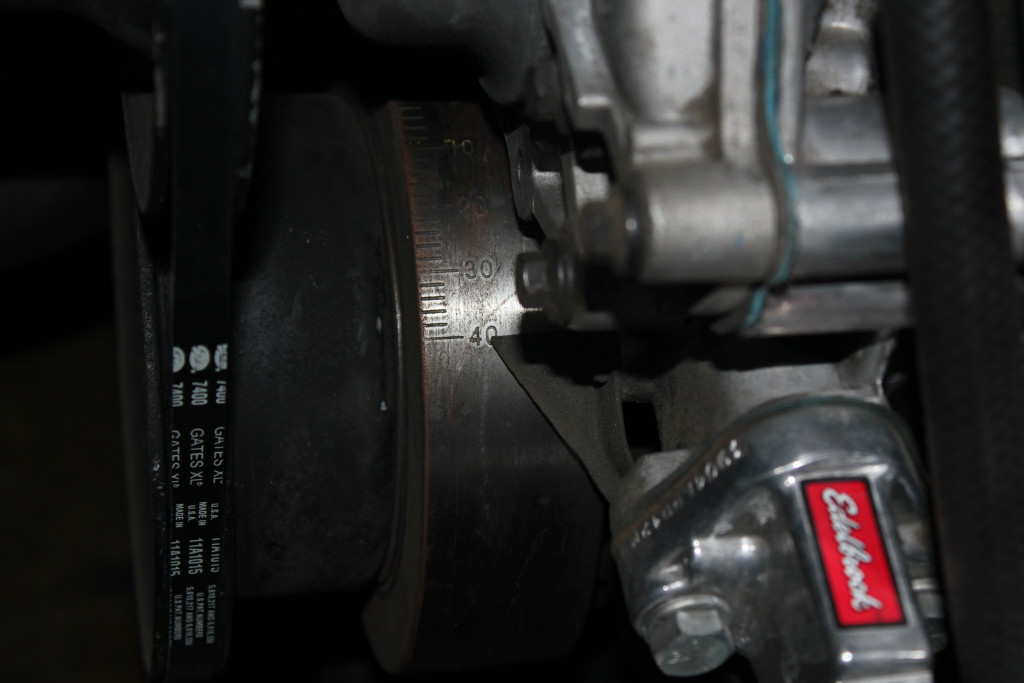
Checking your timing is a straightforward procedure, but you’ll likely need to remove a few items to gain access. This guide guesses that your engine is an Over Head Cam found in most modern ATVs. I’ve included a single and a twin-cam, your timing markings will likely be different but not to worry, from the timing diagrams below, you’ll get the picture.
The process goes like this:
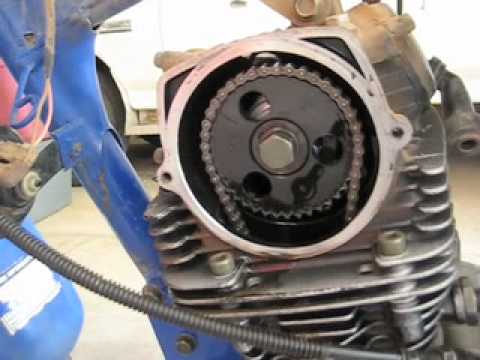
 It should align with the mark on the cylinder head.
For twin-cam engines, the process is similar, with just an extra sprocket mark to line up. Typically, both sprocket marks align with the horizon plain of the cylinder head (marked as red lines below) and some sprockets may have an additional mark (not in the pic below), and typically they point straight upwards (90°).
The timing chain and valve train are all mechanical and require adjustment and maintenance for trouble-free service.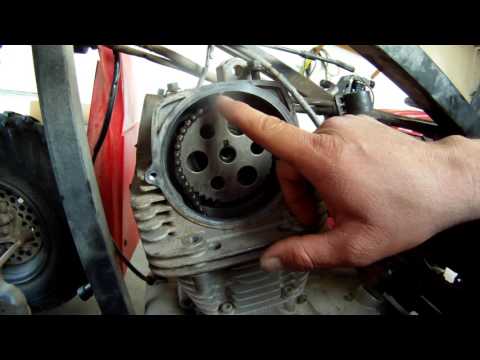
The more usual causes of jumped timing include:
Resetting the timing can be a pain in the ass, but you do need to get it correct. If the timing isn’t correct, the piston could impact the valves, causing some very expensive repairs. Your very first job is to find a manual for your engine. The process, torque specs, and tightening sequences vary from engine to engine.
Critical information and tools
You’ll need to know your timing marks, torque specs, fastener sequences, and you’ll need a torque wrench. You’ll find a list of all the tools I use here on the ATV tools page.
This guide will give you a general flavor of the job ahead.
A full inspection of the chain, sprockets, guides, and tensioner is advised. A failing tensioner is a very common cause of jumped timing, and obviously, if root causes aren’t fixed, timing will jump again and maybe with costly consequences.
You may find these posts useful:
How often to service an ATV?
ATV parts page
ATV won’t jumpstart
Air-cooled ATV white smoke
Will ATV start with a bad stator?
When an ATV will not start, there are many possible causes to check for. Today we will take a look at timing, its role in ATV mechanics, and how you can fix it to get your quad running again!
Timing on an ATV refers to the correct sequence of processes that need to happen for the motor to work. There are many moving parts involved in starting an ATV and them working in the right order is essential. If your timing is off by just one tooth, then the cam and valvetrain will not be able to sync with your crank and piston, resulting in a dead quad. In order to diagnose this, you need to get a look at your cam sprocket position by removing the spark plug and camshaft cover. If the cam sprocket is not aligned with the timing marks at TDC (Top Dead Center), then the quad jumped time. Setting the cam sprocket in the right position while making sure the cam lobes are facing down will solve the ATV timing off problem.
Wrong timing is one of the less common ATV problems, but knowing how to fix it is important for any off-roader. Get your toolbox ready and keep on reading to learn the exact steps to diagnosing and fixing jumped time.
How to Tell If ATV Jumped TimeThe most obvious sign that an ATV jumped time is that the engine does not start. Sometimes you can hear the motor turning over, but the quad will not start. Even though this is a symptom of bad timing, it can also be caused by a variety of other issues that are more common. This is why I recommend you start by checking other parts of the quad, such as the spark plug, battery, fuel filter, fuel pump, and carburetor.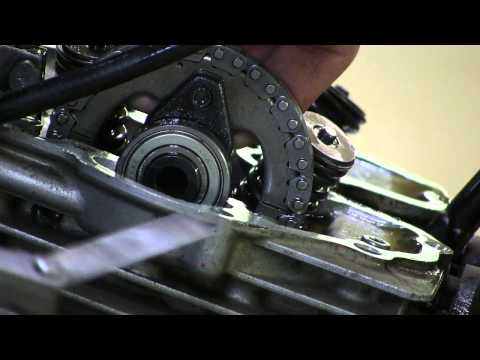 If you eliminate the most probable causes, then you can move over to the cam shaft to check timing.
The best way to do this is by getting your hands on a service manual for your quad and following the instructions there. The reality is that based on year, make, and model of your ATV, the engine can vary and so can the process of checking timing. If you do not have a service manual and are not mechanically inclined, it is best to leave this to a professional.
That being said, you can use the steps below to check jumped timing on most 4-stroke engines:
#1 Take out the spark plugLook for the position of your spark plug and remove it to make turning the crank easier.
#2 Take off the camshaft coverIn order to check your timing, you need to see the position of your cam sprocket in relation to the timing marks.
#3 Turn the crankRotate the flywheel until the “T” mark signaling TDC is in the window.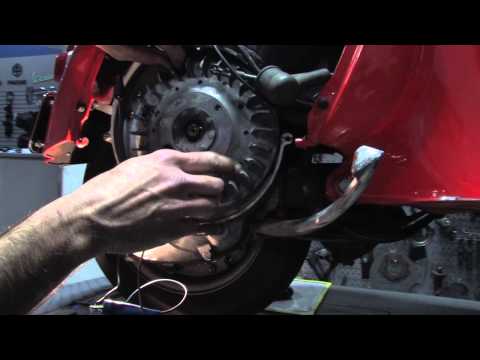 If the cam lobes are facing up, turn the crank one full turn until the “T” is visible again. The lobes need to face down to test the timing on the compression stroke.
By the way, you might be interested to know that I also wrote a guide that shows how to fix ATV stalling in 6 different ways. Every ATV beginner needs to know how to do this!
#4 Check timing marks on cam sprocketOnce you set the crank at “T,” check to see if the cam sprocket is lined up to the timing marks. There are usually two timing marks, either set at 90 or 180 degrees from each other. If they are not perfectly aligned, then you have found your problem.
Now that you know that your ATV jumped time, here are the next steps you need to take to fix your timing issue.
How Do You Set the Timing on a Four Wheeler?With your spark plug and camshaft cover off, follow the next steps to properly set the timing on your quad:
#1 Make sure you are on the compression strokeIf you did not follow the steps above exactly, you need to make sure that the cam lobes are facing down. If they are facing upwards, then you are setting your timing 180 degrees off which will not work on most engines. Rotate the crank counter-clockwise until you see the “T” mark and the lobes are facing down.
If the timing marks do not line up, then you need to lift up the cam sprocket in order to move the chain. If you have nimble fingers, you can also try moving the chain on the sprocket one tooth at a time until it is in the right position.
#3 Move the chain to line up with the timing marksMove the chain on the sprocket until you see the two timing marks lining up, then attach it back on the cam. Put everything back together then test to see if your ATV starts back again.
Will ATV Run if Timing is Off?As a general rule, an ATV will not run if the timing is off. There is only one exception to this rule that only applies to single cylinder and single cam engines. If the timing is 180 degrees off, then this motor will still run because it fires the spark twice. Even so, if you are setting the timing from scratch, it is best to set the timing correctly even on these types of motors.
To check if the ATV timing is off by 180 degrees, you need to remove the spark plug and camshaft cover. Turn the crank to see the “T” mark and check for the cam lobes to be facing up. If the lobes are facing up and your cam sprocket timing marks are lined up perfectly, then your timing is 180. To fix this, just follow the steps above to set your timing on the compression stroke, instead of the ex stroke.
Final ThoughtsTiming is vital to the proper function of an ATV. Even though today I shared the most common way to check your timing, keep in mind that this method is not universal for all types of motors. If you follow these steps and see some discrepancies between the guide and your quad’s engine, then it is best to check your service manual.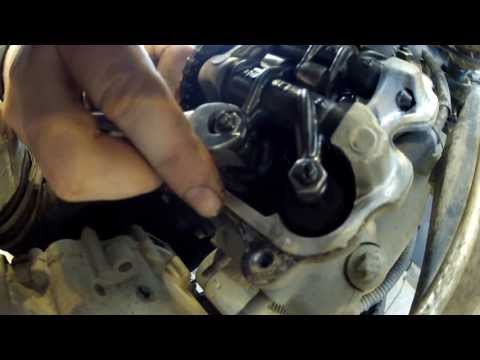
Regular maintenance will keep your ATV running safely and for a long time. Control, lubrication, cleaning, adjustment and replacement of parts are carried out according to the regulations or as needed. Without the appropriate knowledge and qualifications, these procedures are best carried out at official CFMOTO service centers.
First check the oil level and quality in the engine, gearbox, front and rear gears. Then proceed to other procedures:

ATV care includes:
Store the ATV in a cool, dry place, covered with an opaque tarp or cover.
For the engine - semi-synthetic oils CFMOTO G-MOTION 10W40 4T and 5W40 4T with a temperature range of application from -30 to +40.
For the gearbox, front and rear gearboxes - Gazpromneft 80W-90 GL-5 transmission oil.
G-MOTION engine oils are specially designed for maximum damping of loads on 4-stroke engines of CFMOTO ATVs, have an increased reserve of protective properties that allow for uninterrupted operation of the engine in all operating modes, including extreme ones, and increase the service life of equipment. The oil consists of high-quality base components and additives with an optimal chemical composition. Their use guarantees the maximum service life of the CFMOTO ATV.
Automotive ATV oils are not suitable. The use of fuels and lubricants that do not comply with the manufacturer's recommendations can disable the equipment with serious consequences for the budget.
Be trained and instructed before using the ATV. Persons under 16 years of age are not allowed to drive. It is forbidden to operate an ATV without protective equipment - a helmet, eye protection, gloves, boots, long sleeves and trousers. You cannot operate machinery while intoxicated.
Check the ATV for proper operation before using it. Hands should always be on the handlebars and feet on the footrests. Do not drive the ATV too fast - speed should be appropriate for the terrain, visibility and riding experience.
Do not walk on the ice of a frozen body of water. Do not cross water obstacles, the depth of which is higher than the level of the footrests of the ATV - this can damage the equipment. Carry passengers in seats and never in the trunk.
Take extra care when driving in unfamiliar terrain. Also, be extremely careful when reversing, slipping, overcoming obstacles.
Use only tires designed for your model and maintain the recommended pressure. Tuning the ATV only with branded accessories.
In the event of serious malfunctions, we recommend that you contact your nearest CFMOTO Service Center.
You agree that the maximum speed will be limited for safety reasons
Persons over 16 years of age are allowed to drive ATVs.
The total load on the ATV must not exceed 150 kg.
While driving, the driver must hold the steering wheel firmly, the passenger must hold the special handles.
When cornering, move (tilt) the body in the direction of the turn.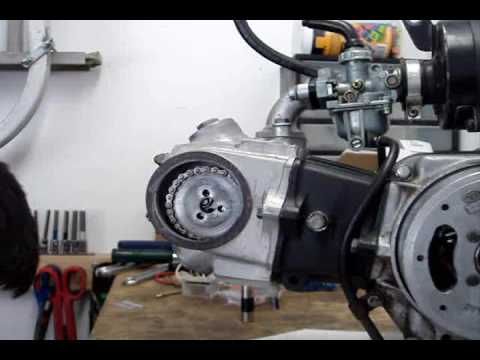
When tilting the ATV, move (tilt) the body in the direction opposite to the slope.
Always keep your feet on the footrests when moving, even when tilting.
We provide a free ATV driving instruction before you start using it.
If you notice fluid leaks and/or other problems, stop the engine immediately and notify your instructor.
If you detect the operation of signal signs on the instrument panel (during the initial briefing, you will be shown control devices that you should pay attention to throughout the trip), immediately turn off the engine and inform the instructor.
The ATV before and after the rental is checked in your presence for breakdowns and damages, after which the acceptance certificate is signed.
Ride on a quad bike, always wearing helmets only, protective suits are provided free of charge on request.
In the event of a breakdown or accident, inform the instructor or contact him by phone.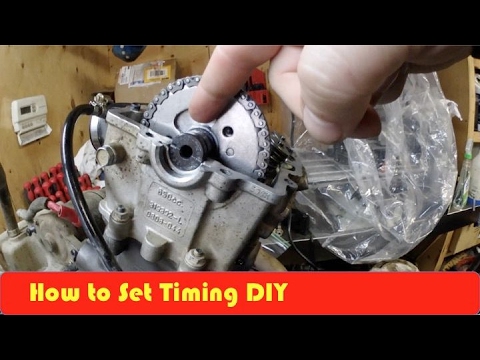
If the ATV is damaged due to your fault, you pay for the cost of repairs and spare parts.
The time spent during the trip to fix problems that occurred through your fault is not compensated.
You must be instructed in how to operate the ATV before you start using it;
You agree to follow the speed limit set by the guide (instructor).
Do not succumb to the provocations of other citizens to participate in races; clashes and other actions that can directly or indirectly cause damage to property and citizens;
Do not interfere with your actions or omissions to comply with these rules.
Drive onto highways and other public roads.
To tow other ATVs, or any other vehicles.
Leave ATV unattended.
Crossing deep water obstacles, driving over fires and areas with smoke or open flames is prohibited.
Gear shifting without stopping the machinery.
Drunk or drugged ATV riding.
Intentional collision with other ATVs.
Intentional collision with obstacles.
Provoking others to collide.
Overtake the instructor and the ATVs in front.
Deliberately fall behind the convoy and then overtake the convoy at high speed.
Do not follow the instructions of the instructor.
Touch moving parts such as wheels, drive shafts, variator pulleys, etc.
Talk aggressively, use profanity, and do anything that might disturb the people around you.
• Do not operate the ATV without a properly sized crash helmet. It is also necessary to wear eye protection, (protective mask or goggles).
• Do not consume alcohol or drugs before or while operating an ATV.
• Always follow the instructions and follow the recommendations of the Instructor.
• Before each use, make sure the ATV is in good condition and safe to ride. Always follow the rules and recommendations for driving given in the instruction.
• Always use extreme caution and drive slowly when driving in unfamiliar terrain.
• Always keep both hands on the handlebars and both feet on the footrests while riding the ATV.
• Do not operate the ATV on uneven, slippery, damaged roads until you have learned and gained the practical skills necessary to control the ATV on such roads. Always be extremely careful when driving in such conditions.
• Do not operate the ATV on slopes that are too steep for the vehicle and for your experience. Practice on small descents before moving on to difficult ones.
• Always follow the appropriate instructions from the Instructor when entering a hill, check the road surface first, never enter a hill on a road that is too slippery or has a damaged surface.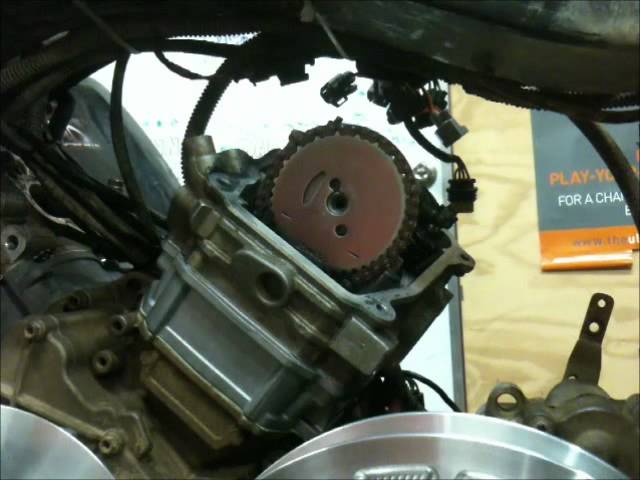 Shift your weight forward of the ATV, never suddenly open the throttle or change gears suddenly. Never drive up a hill at high speed.
• Always follow the appropriate instructions from the Instructor when descending and braking on the hill. Inspect the road carefully before descending. Shift your weight back, never go down a hill at high speed. Avoid going downhill at an angle that could cause the ATV to lean to the side. Go straight down if possible.
• Always follow the appropriate Instructor instructions for crossing inclines. Avoid slides on excessively slippery or damaged surfaces. Shift your weight to the side of the lift. Never turn the ATV around on a hill until you have mastered the turning technique. On level ground, avoid crossing steep hills whenever possible.
• To prevent the engine from stalling and the vehicle from reversing when entering a hill, use the appropriate gear and maintain a steady speed. If the engine stalls or the vehicle reverses, follow the Instructor's specific instructions.
• Always check for obstacles in the road before operating the ATV in unfamiliar terrain. Never try to overcome large obstacles on the ATV, such as large rocks or fallen trees. Always follow the Instructor's specific instructions for overcoming obstacles.
• Be careful when skidding or skidding when practicing at low speed on a flat, smooth road. On extremely slippery surfaces such as ice, drive slowly and be very careful to reduce the risk of slipping or skidding.
• Start decelerating some time before stopping.
• Be aware that wet brakes reduce stopping power. Check your brakes after getting out of the water, if necessary, wait a while for the pads to dry out.
• Always be sure there are no obstacles or people behind you when turning.
• Never exceed the ATV's stated load capacity. The load must be properly placed and securely attached.
• Never start the engine on a slope, as this may cause damage.
• Observe age guidelines: children under 16 are not allowed to operate an ATV.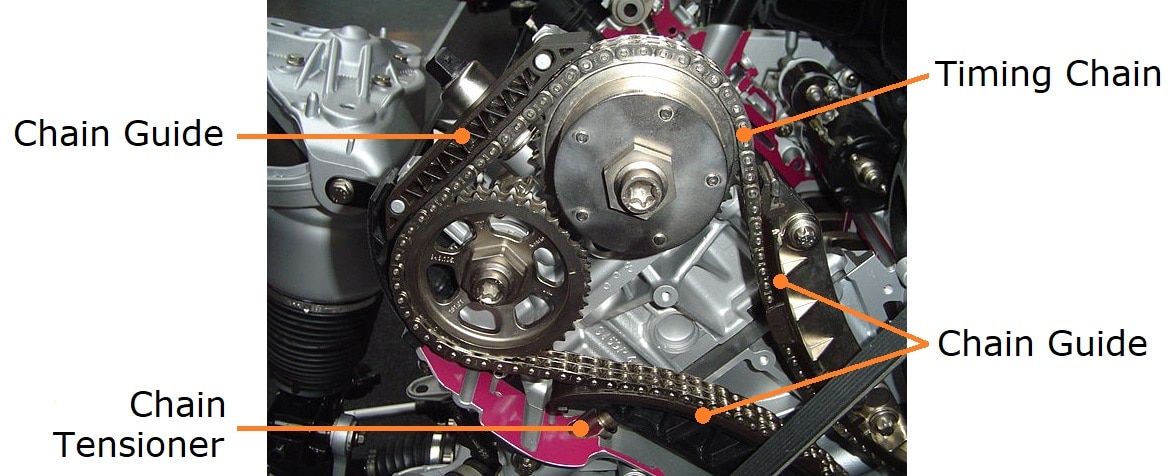 Do not allow a person who does not know how to operate the ATV in a safe manner to operate the ATV.
• Avoid ATV riding on paved roads, including driveways, sidewalks, streets, and parking lots.
• If you need to stop (frozen helmet glass, hands, etc.) do not wait for the group to stop. Raise your left hand up (stop signal for ATVs following you) and gently come to a stop.
The instructor has the right to stop the tour early in case of violation of these rules!!!
To prevent ATV riding from ending up in a long hospital room:
Do not drive too fast. A four-wheel drive ATV is not a car or a motorcycle. It doesn't respond as well to the driver as a car, it can't lean quickly into a corner like a motorcycle. Remember that when riding an ATV it is very easy to roll over on level ground or even crash into a tree at full speed. For example, if a stump comes across in a field under tall grass, the ATV can run into it, and then the rider will fly over the steering wheel, or at least hit it.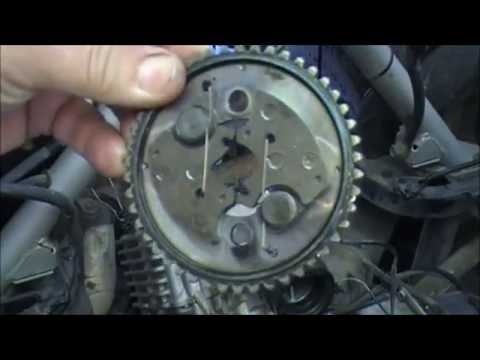
Never ride an ATV alone. It is best to ride with someone in a pair on two ATVs. There are a lot of situations when a partner is needed. For example, it is very difficult to put an overturned ATV on wheels, and if it covered you from above, then you won’t even be able to get out from under it alone. The second ATV can pull the first one out of the swamp or tow it to the camp in case of a breakdown.
When passing a difficult obstacle, it is better to get out of the saddle and, carefully working with the brake and accelerator, walk alongside. You should also not go too deep into the water - you can fill the motor.
Place both feet straight on the footrests and hands on the controls.
Start the engine, let it warm up. After that, holding the brake, engage the gear.
Select direction of travel.
Release the brake and slowly press the throttle with your right thumb to start moving.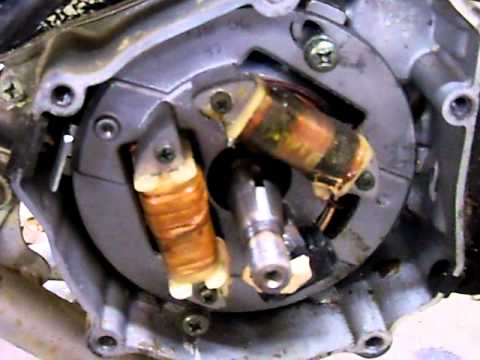 The speed of movement depends on how far the damper is open.
For starters, don't try to drive fast. It is better to learn how to maneuver, handle the brake system and throttle on level ground.
Turn the steering wheel in the desired direction. Tilt your upper body inward and rest your weight on the outside footboard. This will change the balance of traction between the wheels, and the turn will be made smoothly. Turns back are performed in the same way.
ATTENTION!!! ATVs are not designed to make sharp turns or turns at high speed!
When entering a slippery surface, slow down.
Avoid sharp and sharp turns, or the ATV will skid.
When skidding, turn the steering wheel in the direction of the skid and shift your body weight forward. Never slow down during a skid.
An all-wheel drive system can make driving on slippery surfaces much easier.
Climb up in a straight path.
ATVs are not designed to climb steep hills (over 25°).
When lifting, keep both feet on the footrests and shift your body weight forward.
Drive at a steady speed with the throttle open.
When ascending, be fully prepared for an emergency.
If the ATV has completely lost forward speed, raise yourself up and apply the front brake. If there is a complete stop, apply the rear brake as well, and then set the gear selector to park.
If the machine rolls backwards, raise yourself up and apply the front brake. After a complete stop, you can also apply the rear brake and move the gear selector to park mode.
ATTENTION!!! Crossing hills on an ATV is very dangerous! If possible, try to avoid hills when riding an ATV.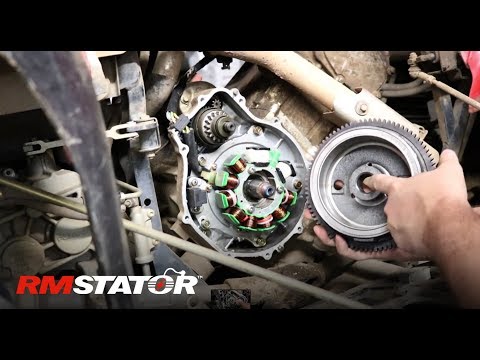 Any incorrect action while crossing a hill can cause serious injury, or even death!!!
If you still need to cross a hill with an ATV, please follow these rules:
Drive at low speed.
Lean your torso towards the hill to transfer the weight of your upper body towards the slope. But be sure to keep your feet on the footboards.
In order not to lose direction, the machine must be steered slightly uphill.
If the ATV begins to tip over, quickly turn the front wheel downhill or leave the vehicle immediately.
When descending a slope, you need:
Move in a straight line.
Transfer the weight of the torso to the rear of the machine.
Drive at a slow speed, applying the brakes lightly.
Know how to operate the rear auxiliary brake lever.
If the machine stalls while lifting, do not let it roll down.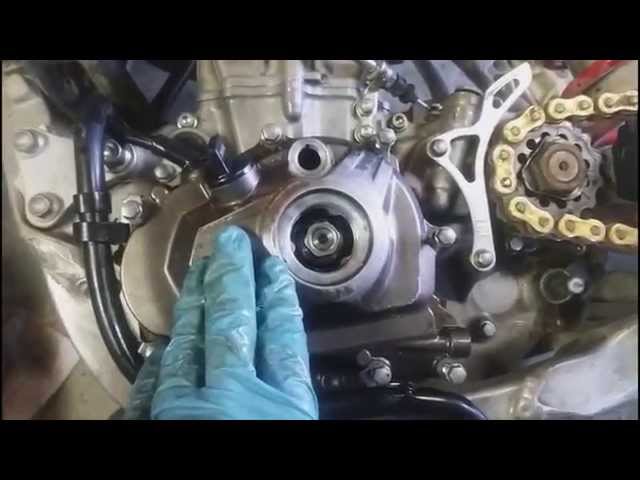 Do the following:
Stop and put the gear selector in park mode, raise yourself up.
Turn off the engine.
Get off the ATV on the side that is on top. If the ATV is pointing up in a straight line, then you need to get off on the left.
Stand at the top of the machine and turn the steering wheel fully to the left.
While holding the brake lever, place the shifter in first gear and allow the ATV to circle slowly to the right until the vehicle is across the slope or turns slightly down.
Shift the shifter to park and mount the ATV from the top side again while supporting your body weight.
While holding the brake lever, start the engine while shifting the gear selector to first gear.
After releasing the brake, drive slowly until the ATV is on level ground. Control the speed with the brake.
You can cross shallow water on your ATV (the depth should not exceed the level of the footrests).