When your ATV doesn’t start, it could have a problem with the starter or starter solenoid. However, the symptoms of a bad starter or starter solenoid are not always enough to conclude what’s wrong.
Before spending money on new parts, it’s usually worthwhile to do some testing to identify the root cause.
This guide covers troubleshooting the entire ATV starting system circuit, including testing the starter motor and the starter solenoid.
The starter circuit consists of these main components that all need to work for the ATV to start:
When the starter behaves strangely or doesn’t work, all of these components are on the list of possible suspects.
Many modern ATVs have non-serviceable starter units with a protective coating that will lead to premature component failure if removed. If your testing verifies that the starter is bad, you should replace the starter motor and solenoid assembly.
However, some starters are serviceable and can be disassembled for cleaning or replacing worn-out brushes.
The best way to test an ATV starter and starter solenoid is through a process of elimination, beginning with the smallest effort items and working your way through the circuit until you identify the culprit.
Often you will find that the starter unit works fine, but there is an issue with one of the supporting components, preventing the starter from operating normally.
To narrow down your search, you can note how the starter behaves when you try to start the ATV.
Depending on your findings, you might be able to skip one or more of the troubleshooting procedures as outlined below.
Caution: Always wear eye protection when working on the electrical system.
Before you do anything, ensuring the battery is in good condition and holds a sufficient charge is a good idea.
Use a multimeter to read the battery’s state of charge.
If the battery voltage is low (below 12.4V), give it a proper charge to eliminate a low voltage condition from the list of possible causes.
If you suspect your battery is going bad, here is how you can test the condition of the battery.
Also, ensure the battery terminals are on tight and not corroded or damaged.
The fastest way to eliminate or identify an electrical issue is to test for power at the solenoid battery terminal and ignition key terminal.
The starter is cylinder-shaped, about 3×5 inches big, and connects to the engine on either side by the flywheel.
Often you need to remove a plastic side cover or the seat to get to where the starter and solenoid are mounted.
There are two main types of starters, and ATVs use both.
The easiest way to find a separately mounted starter solenoid is to start by the positive battery terminal and trace the biggest wire down towards the starter.
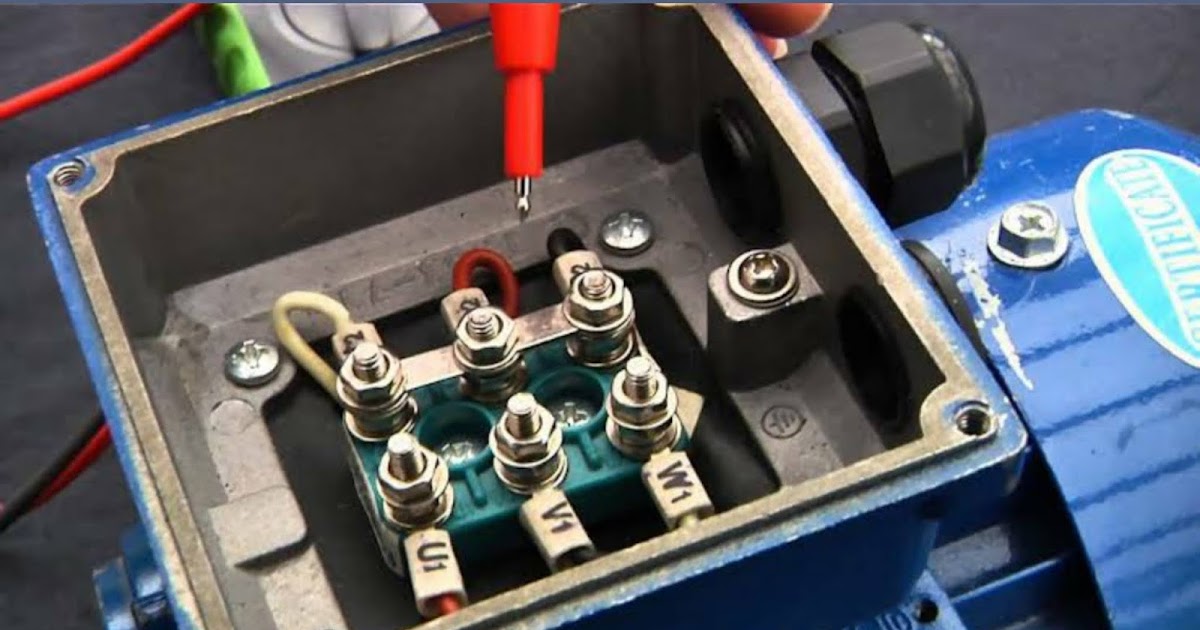
The solenoid typically has two large terminals and one or two small terminals. The terminals and connectors are usually covered by rubber boots.
The solenoid battery side terminal should always have power. The solenoid ignition key switch terminals should have power only when pressing the starter button.
Before you begin testing, ensuring your test light is working is a good idea. Connect the test light alligator clip to the negative (-) battery terminal and put the test probe to the positive (+) battery terminal. The test light should come on.
To test for power on the solenoid, leave the test light connected to ground and put the test probe to the solenoid battery cable terminal. The test light should come on.
If the test light did not come on, you likely have a dead battery, loose, damaged, or corroded battery terminal connectors, or damaged battery cables.
Leave your test light or multimeter connected to ground and put the test probe to the solenoid ignition key switch terminal.
Press the starter button. The test light should come on, indicating that the key switch circuit works.
Suppose you don’t get power to the key switch terminal. You probably have loose or damaged key-switch wiring or a faulty key switch, starter button, transmission (neutral) switch, or starter diode.
Check the wiring between the solenoid and the ignition switch for continuity using a multimeter to identify any breaks in the wiring.
Test the various switches for continuity as well to ensure they work.
The starter diode is like a one-way valve in the starter circuit. You likely need a vehicle-specific wiring diagram to see where it is located.
Use a multimeter to measure between the diode connections. Continuity should flow only in one direction.
Inside the solenoid is a plunger operated by an electromagnet.
When pressing the starter button, a small current activates the electromagnet that shifts the steel bar, connecting the two large solenoid terminals.
When releasing the starter button, the electromagnet shuts off, and the spring moves the steel bar to its normal position, away from the two terminals, to break the circuit.

The click sound you hear when activating the starter is the electromagnet shifting the plunger.
If the solenoid gets power but does not click, it may be faulty or seized due to internal corrosion.
To verify a faulty solenoid, you can use a screwdriver or a heavy gauge cable to bridge the two large solenoid terminals briefly. Bridging the terminals should cause the starter to turn.
Caution: Ensure the ATV is in park (P) or neutral (N), and wear safety glasses to protect you from the sparks. Use a heavy gauge screwdriver with an insulated handle and be careful not you touch any metal parts, including the screwdriver shaft.
If there is current on the starter side of the solenoid, but the starter does not turn on, the starter motor might be faulty, the ATV engine might be seized, or the starter circuit might have poor grounding.
A voltage drop test as described below, can help very an internal connectivity problem with the solenoid.
A quick way to test if the starter brushes are sticking in the brush holder or beginning to wear out is to gently tap or bump the starter housing while pressing the starter button to see if this frees it up.
The wooden handle of a hammer or a plastic or rubber hammer works well for this test. Do not hit the starter housing too hard or with anything metal, as the aluminum housing can easily crack.
Often you’ll find that this helps the starter kick in, and the ATV will start as normal. However, this is only a temporary solution. What caused the starter to turn is still there and needs to be identified and fixed for a permanent solution.
A voltage-drop test can help identify poor connections or excessive resistance in an electrical circuit.
Poor connections or excessive resistance anywhere in the starter circuit can prevent the starter from working.
The test sounds complicated, but it becomes relatively straightforward when you understand how it works and what it tells you.
When troubleshooting a starting circuit, we typically voltage drop test the following parts of the circuit:
To do this test, you’ll use a multimeter set in the 20V DV setting, connected in parallel with the part of the circuit you’re testing (for example: from the battery to the starter solenoid).
When the starter is not engaging, the circuit has no load, and the meter should read either 0V or 12V (battery voltage).
When activating the starter and the circuit is under load, the meter will read the difference in voltage between the two test leads. All wiring has some resistance, and a difference up to 0.3V is acceptable.
If you read more than 0.3V, an issue in the circuit prevents it from handling the current.
Move the lead up the circuit one connection at a time until the value drops below the 0.3V threshold. Once the value changes, you’ve isolated the problem area and can inspect and repair the issue.
The test can be used to test any part of an electrical circuit. Always put the test leads directly to the terminals and not on the connectors or exposed wire for a good result.

When the key is off (no load), the meter should read 0V. When activating the starter, the meter should read no more than 0.3V.
When the key is off (no load), the meter should read 0V. When activating the starter, the meter should read no more than 0.3V.
When the key is off (no load), the meter should read 12V (battery voltage). When activating the starter, the meter should read no more than 0.3V.
When a mechanical issue causes the ATV engine to seize or prevents it from rotating freely, the starter motor might not have the power to turn the engine. You might hear a buzzing sound from the starter motor when you press the starter.
If your ATV has been sitting or you don’t know the motor’s condition, this issue might be worth looking into.
Testing typically requires some disassembly to access the flywheel to the crankshaft. You should get a vehicle-specific service manual if you decide to do this at home.
Remove the starter from the ATV to inspect the gears for wear or damage.
This is how you remove the starter:
On some ATVs, the starter pinion gear engages directly with the flywheel ring gear, called the drive coupler.
Other bikes, typically older or budget-friendly models, use a bendix starter gear to engage the starter with the engine.
Damages to look for:
To better understand how your starter sounds and behaves, you can test its operation on your workbench.
You will need a fully charged battery, jumper cables, and alligator clip test leads.
Caution: Remember to wear safety glasses and to keep clear of the starter pinion gear.
Also, measure the resistance of the copper windings inside the starter.
Testing an ATV starter and starter circuit may seem overwhelming at first, with so many things could prevent the starter from working properly. But, by applying the systematic approach outlined above, I hope you managed to identify the root cause of your starting problem.
If you could not find a problem with the starter, maybe you missed one of the many other possible causes that can prevent an ATV from starting.
When you try to start your ATV and you hear a click instead of the engine roaring to life, it’s more than annoying. Instead of joining your friends as they go mudding, you now need to figure out how to make your quad start. So, what can you do when your ATV doesn’t start?
Your ATV most likely clicks when you try to start it because of the battery. The reasons for this are numerous, from loose connections to a current draw that drains the battery. If the battery is not the cause, the ATV probably has a faulty starter solenoid.
Your ATV is meant to be ridden, not sitting in the driveway, so let’s get to troubleshooting.
This is an easy solution to check for and fix. Examine the connections to the battery and the starter. Sometimes the connections get knocked loose, especially if you’ve ridden some rough trails. Also, check for corrosion on the battery terminals, and if you find some, clean it off.
If the connections are clean and tight, then it’s time to move on to the next possible problem.
Battery problems are the number one reason ATV owners hear the dreaded click when trying to start their quads. ATVs give batteries a workout, so it’s not uncommon for one to go bad after a couple of years.
Your climate, how well you maintain it, and the quality of the battery affect its longevity. If you bought a cheap battery, do not expect it to last for more than a year or two.
One sign that the battery doesn’t have enough of a charge is multiple clicks in rapid succession. If there is a single click, then you may have another problem with your ATV—the starter solenoid. We will talk about that in a bit. For now, we’ll assume the battery is the issue.
Here are a few reasons this could be happening:
To test for this, unplug the battery and charge it completely. Then measure the voltage using a multimeter. Let the battery sit unused for a day or two and recheck the voltage. Significant loss of voltage means you most likely it is time to replace your battery.
Before you go out and buy a new one, you might want to do some additional troubleshooting. Check out, How To Keep an ATV Battery Lasting for more info.
Let’s say you charged up your battery. After riding for a couple of hours, you stopped. When you tried to start your ATV, you heard the click (or silence).
If your battery can’t hold enough of a charge, then you should do a load test. For this, you need a multimeter and a load-tester if you want the most accurate results.
First, charge your battery to at least 75% (typically 12.4 volts). Use a multimeter to check the levels.
Reconnect your battery. Try to start your quad and check the battery’s voltage. A number below 9.6 volts means your battery doesn’t hold a charge.
Perhaps you made sure your battery was charged in the evening, but it is dead the next morning. Something in your ATV is using current. Parasitic amperage draw is the term for when a vehicle’s component is drawing electricity when it shouldn’t (i.e., the engine is off.) Typically this is due to a bad relay or fuse.
This used to be a more common problem when most ATVs had lead-acid batteries. If your quad has one of those batteries, then a fluid check is required. However, most ATVs come with an AGM (absorbed glass mat) or SLA (sealed lead-acid) battery, which cannot be topped off.
If you need to check fluid levels, clean the outside of the battery first to keep crud and dirt from falling into the battery.
Open the covers and check for the fluid levels then fill the battery cells so that the plates are covered and replace the cover.
Charge the battery and see if it can hold its charge. If not, buy a new one. And when you do, buy a higher quality AGM or SLA.
Another problem with lead-acid batteries is they suffer from poor performance in cold weather. Since you can’t do much about the weather, once your lead acid battery no longer performs well, you have to replace it.
Here’s a helpful video showing how to test an ATV electrical system:
Have you left your four-wheeler sitting idle too long? Cars use an alternator that charges the battery while it is running. But most ATVs use a stator, which is designed to provide electric power.
Unlike alternators, stators do not recharge the battery. This is why a four wheeler’s battery needs to be charged while a car’s does not.
So if you forgot to charge the battery, it might have a little juice left, but not enough to start your vehicle.
In that case, you need to charge the battery. You can do this with another ATV battery or a car battery. Do not turn on the car if you use a car battery. You will risk frying your ATVs’ electronics.
If you haven’t already invested in a jump box, like the NOCO Boost Plus (link to Amazon) this is a good time to do so. Jump boxes are designed to connect safely to 12-volt batteries. The USB ports are handy for charging phones and other devices as well.
Since the number one cause behind an ATVs failure to start is the battery, keeping your battery healthy is essential. Follow these tips to keep your battery healthy:
 Get in the habit of plugging the battery into a jump box or battery tender.
How To Charge an ATV Battery will walk through all the steps to keep your battery charged and lasting a long time.
I like to use the Ctek Smart Charger found here on Amazon if the ATV is going to be sitting for more than a couple weeks. That way the battery is good to go when I need it.
If you have checked the battery, charged it, or replaced it and the ATV still does not start, it could be due to a bad solenoid. Also called a starter relay, the next most common reason an ATV doesn’t start is a bad solenoid, also known as a starter relay.
A solenoid provides the contact point between the battery and the starter. It works like this: when the starter switch is activated, amperage is sent to the solenoid. The amps cause the armature inside the solenoid to move, which completes the starter and battery circuit.
When you try to start your ATV and hear a single click, chances are good your starter relay is the problem. But there are a few other signs that the solenoid is the cause of the clicking.
You will have to replace it. The starter solenoid will have two wires going from the battery and a pair of smaller cables going to the fuse housing. Before taking it off, make sure the battery is not hooked up. Otherwise, you are risking getting shocked.
ATVs with an electric starter can sometimes be jumped with the wrench trick. Locate the two wires coming from the electric starter. They should be positioned in such a way that you can use the wrench to jump-start your quad.
The number one reason an ATV clicks and doesn’t start is the battery, so you should troubleshoot that first. If your battery is functioning correctly, the next common source is the starter solenoid or a bad starter motor. Occasionally you could have hydro-locked your engine, or the fuses have failed.
The good news is that isolating battery problems is usually straightforward and replacing them is easy. The hard part will be parting with your hard-earned cash.
Sharing is caring!
You left the ATV in the garage on a trip or out of town, and when you return after a few weeks, you can no longer start it. Common situation? Even after adding a spark and fresh fuel, the engine only stops for two to three seconds. What could be the effect? After all, before the ATV, he had no problems: it was enough to pass a periodic thorough inspection.
Don't panic: in this case, you can say with almost 100% certainty that the problem is only in gasoline, and not in ATVs. Like any hydrocarbon gas, petrol mixture is volatile and should not be relied upon for a long time. Some of its fractions evaporate, and the remaining gasoline liquid loses its ability to ignite and is no longer a fuel mixture. So your ATV didn't want to ride after a long break.
No response starter after turning the key

 Try to see if the bike starts on a different battery. Check the ignition system: the contacts are dry, the cables are in order, the ground is secure.
  g. due to burnt stator or armature coils: contact a qualified technician.
 ATV stalls : Starter relay clicks but engine does not start
Loose starter cord or short circuit due to broken wire: check connection, remove rust, check current with multimeter.
 The engine starts reluctantly, at low speeds there is little power.


What needs to be done to improve the situation? At the bottom of the carburetor there is a screw that is screwed in horizontally (the guide can serve as a return pipe with a fitting next to it). This screw must be unscrewed so that the old gasoline drains. The liquid will be cloudy, yellowish. As soon as it turns into pure gas, the fuel must be drained. To do this, just tighten the screw.
Now you can try to start a quad: most likely there will be no problems. Therefore, before leaving the ATV in the garage for a while, you need to drain the gasoline left in the carburetor. When you return, it is filled with fresh fuel, so you can safely continue driving the quad bike.
Posted by by MotoDoctor
One of the problems with starting the engine on an ATV is found in the electrical system. To start the engine, we need to turn on the ignition and press the "Start" button (if the ATV is in gear, you need to additionally press the brake pedal). All ATV owners are familiar with this startup process. But here is the problem itself, after the actions performed, your ATV does not even make any sounds. Of course, first of all, we check whether the battery is holding a charge. If the battery is good, we proceed to check the wiring connections. Sometimes at the factory, when installing electrical equipment, the connecting chips are turned on, but not fixed with a lock. So sometimes, due to unscrupulous assemblers, these chips are disconnected and the contact naturally disappears. It is not very difficult to identify such a malfunction; it is enough to inspect the entire electrical wiring circuit and determine where there is no reliable connection. True, for this it is often necessary to dismantle plastic elements, so that there would be access to all electrical equipment connections. If it's plastic on a Chinese ATV, be extra careful as he is very fragile.
 But in rare cases, the power relay itself is working properly, but the power that should come to it is missing and naturally the relay will not work. This is where you will need a control or multimeter to check whether power is supplied (+) and (-) (12 volts) to the starter relay. In some ATV circuits, the starter relay constantly receives (-) and (+) is supplied when the (start) button is pressed, and in others, vice versa, you can determine all this with the help of instruments. For example, you have determined that the power is not going to the relay, then we recommend that you check the start button for serviceability. But as we said, the first thing to check is all electrical wiring connections. And now let's consider the option if power comes to the starter power relay and the relay itself works but the electric starter is silent, then here it seems to be faulty. In this case, you need to unscrew the mounting bolts and remove the starter from the ATV launcher. In this state, turn on the button (start), if the electric starter does not start working, then the malfunction is in it.