Unsure how to tie a tie? Follow our easy step-by-step instructions on how to tie different knots including Windsor and double Windsor.
Whether for business or social occasions, certain ensembles look better with a tie. Located underneath the shirt collar and knotted at the throat, a straight tie brings a level of professionalism and elegance to a suit, vest, or shirt and slacks. Although clip-on ties may seem like the easiest route, hand-tied straight ties are the most attractive option. Knowing how to tie a tie can open up a number of new styles and looks. With six tie knots to choose from, there's something for every neck size and shirt style. If you prefer an easy knot, we suggest starting with the full Windsor. Our how to tie a tie videos and simple instructions allow men and women to sport a polished tie in minutes. People should practice tying knots in front of a mirror for best results.
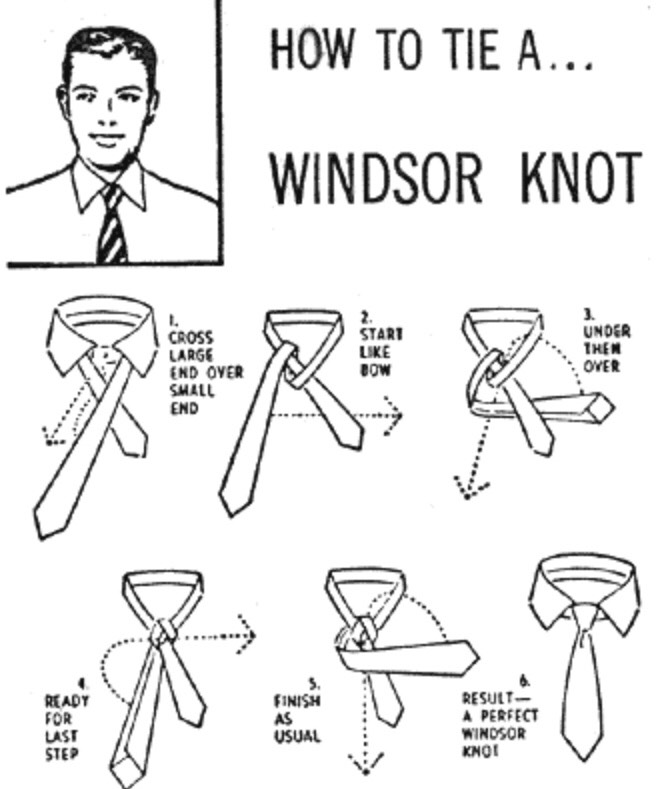
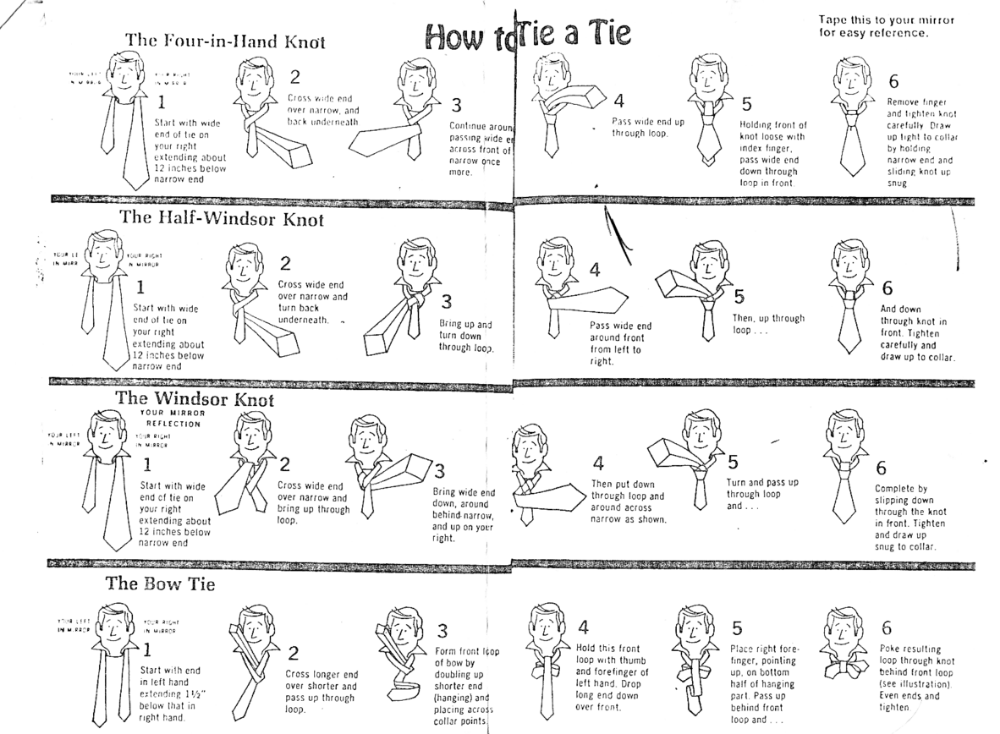
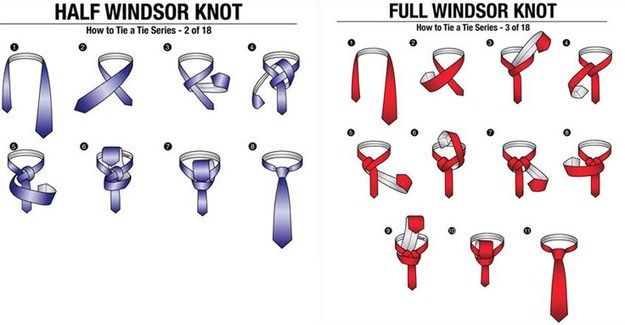
Featuring a polished triangular shape, the Windsor knot offers a good option for job interviews, presentations and social occasions. Because of its wide appearance, this knot looks best with a spread-collar shirt. Although it may appear complicated, tying the full Windsor knot is accomplished without much difficulty.
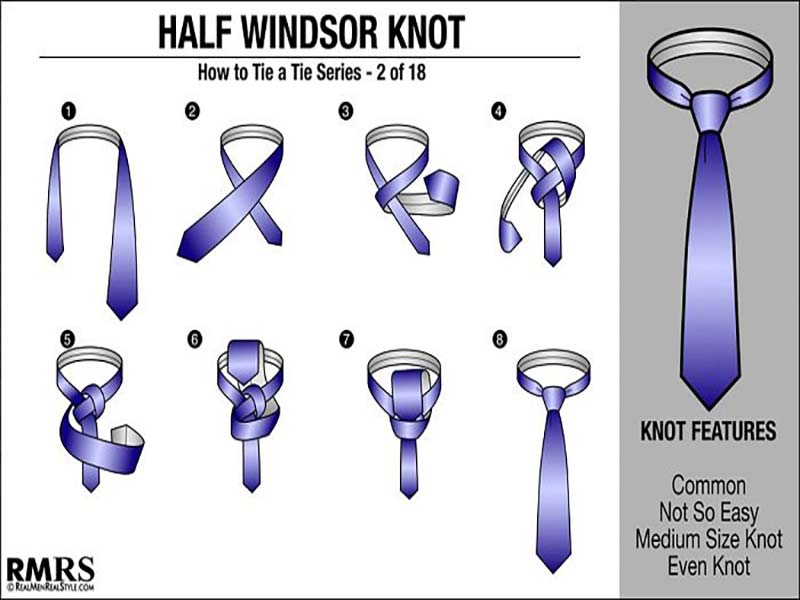
Understanding how to knot a tie can give you a wealth of options to choose from when getting ready. Variations only further extend the possibilities. The half Windsor knot offers a triangular and symmetrical shape for a classic presentation. Because it's smaller than the full Windsor, it works best with wider, medium-weight ties and pairs well with any dress shirt. With a few simple instructions, the half Windsor knot comes together easily.
As with the full Windsor knot, begin the process by raising the shirt collar. Drape the tie around the neck so the wide end is on the right and extends roughly 12 inches below the narrow end.

The four-in-hand knot works well for wide neckties in heavy fabrics. Learn how to knot a tie in this style if you're hoping to dress up a traditional look. It looks most attractive when worn with a standard button-down dress shirt. With a few easy steps, people can tie the four-in-hand knot in a matter of minutes.
As you get more comfortable with the basics of how to tie a tie, you can graduate to more sophisticated options. The Trinity knot offers a stylish look patterned after the Trinity symbol. With a more complex design than the Windsor and four-in-hand knots, tying the Trinity knot is a little more complicated, but it makes a fashion statement for formal functions.
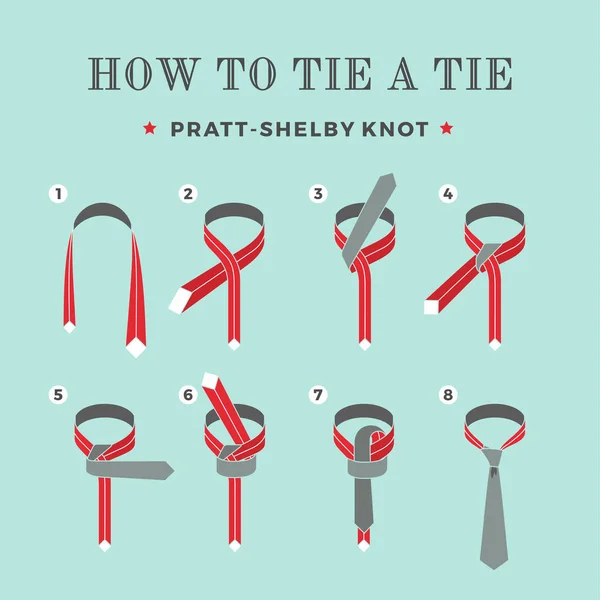
Also known as the Shelby knot, the Pratt knot offers a stylish look for any dress shirt. Because this knot is thinner than the Windsor knot, it works well when fashioned with lightweight to medium-weight ties.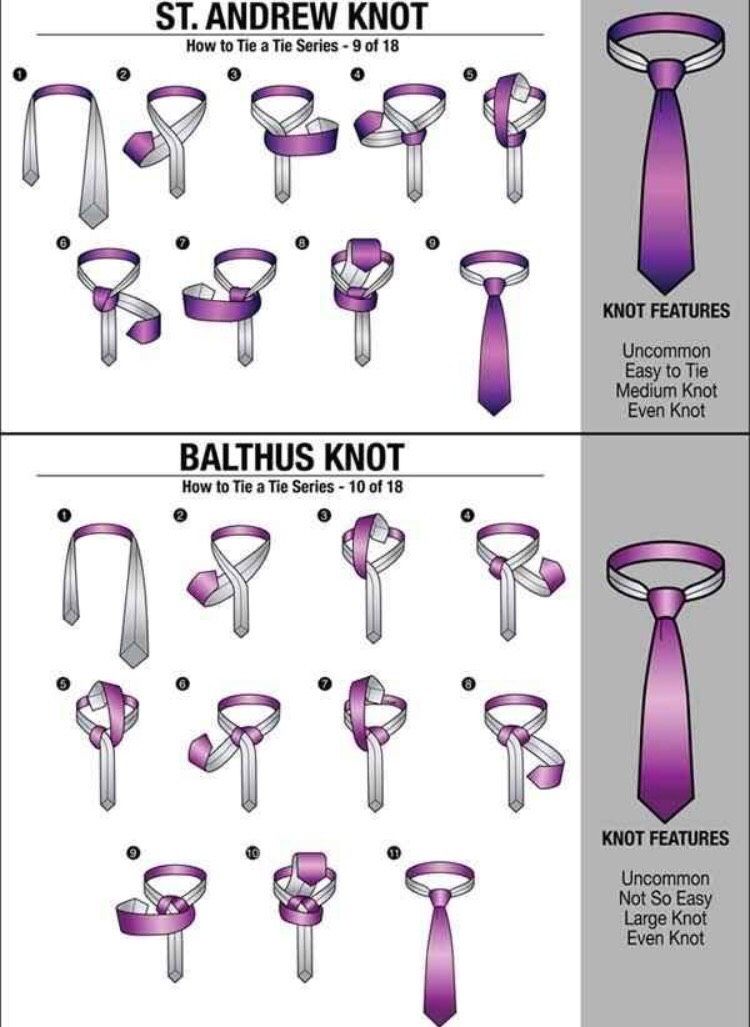 The Pratt knot requires just a few simple steps to master.
This uncommon knot will certainly set you apart from the crowd. Thankfully, Kelvin knots are easy to learn and create an even, polished look. Follow a few basic steps, and you'll be a Kelvin knot expert in no time.
 Hang your end two or three inches lower than where you hope to complete the tie.
With its intricate design, the Eldredge knot makes a bold statement. Fair warning: learning how to knot a tie in this style can take time. While tying this knot involves a variety of steps, the process is not as complicated as it seems. While some knots are created with the wide portion of the tie, this knot is fashioned entirely from the narrow portion.
Eager to go beyond the basics of how to tie a tie? Men or women who wear ties may wish to enhance function and fashion with tie accessories. People can choose from various types of tie accessories to keep ties in place and add a hint of style. These options are great for anyone hoping to create a signature look or elevate their typical fashion.
By presenting a polished look for work or social occasions, neckties enhance the wardrobe of men and women. Straight ties come in an array of patterns, colors and fabrics for every season and situation, and a variety of different tie knots keep them looking sharp.
Up Next
Showing slide number 1 out of 10
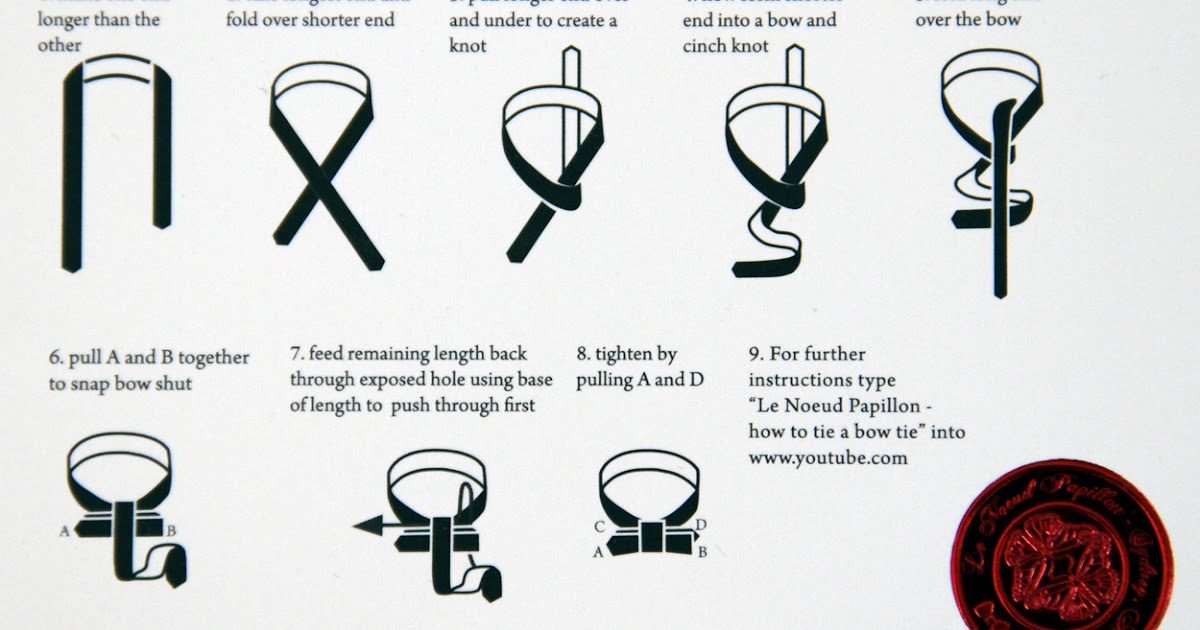
How to Tie a Bow Tie: Easy Step-by-Step Video
7 Stunning Ralph Lauren Celebrity Wedding Dresses
Yes, we're still dreaming about Priyanka Chopra's veil.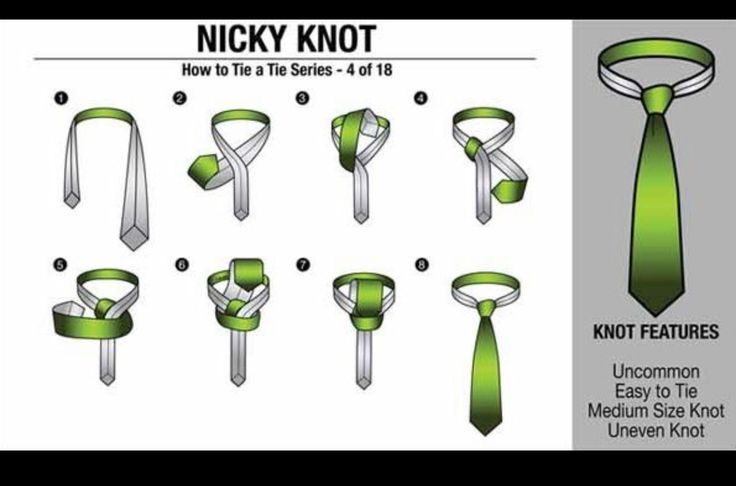
Updated Nov 21, 2022
Famous Couples We Love to Love
From the pages of history books, scripts, celebrity gossip columns and more, we've rounded up the memorable matchups whose love makes us swoon.
Updated May 20, 2020
The Weddings and Wives of Donald Trump
Fact: Melania walked down the aisle with rosary beads.
Updated Nov 10, 2020
Hailey Bieber's Hollywood Bachelorette Party Guide
We've got the scoop on where to stay, what to do, and how to party like Mrs. Bieber.
Updated Nov 17, 2022
What to Know About Bruno Mars's Longtime Girlfriend
The couple has been together for nearly a decade.
Updated Aug 04, 2020
All About Princess Margaret's Wedding & Love Story
Their relationship was chronicled, in part, on The Crown.
Updated Feb 02, 2022
Everything to Know About Blake Lively's Wedding Dress
Including how a sparkler burn on her dress became a favorite memory.
Updated Jun 18, 2020
Inside Patrick Mahomes & Brittany Matthews Relationship
The athletic power couple, who welcomed their first child together last year, got married in March 2022.
Updated Oct 05, 2022
Kyle Richards' Daughter Is Engaged
The 'Real Housewives of Beverly Hills' mom is celebrating a future family wedding.
Updated Nov 30, 2021
Love Is Blind's Alexa & Brennon Share Marriage Details
Plus, they share how the pods prepared them for life as a married couple.
Updated Nov 09, 2022
View All
This article will show you how to tie a tie in 18 different ways.
Want to signal power?
What about trust in a business relationship? Or casual approachability?
One subconscious signal can give this.
The tie knot.
Why?
It’s a subliminal message that speaks to our attention to detail.
Don’t believe me?
Look at nearly every President. The full Windsor knot.
Look at less formal business outfits. The four-in-hand or half Windsor knot.
Each style sends a different message and suits a different shirt collar and neck. There are tie knots for tall guys, short guys, big guys and skinny guys.
Yet most men use one tie knot their entire lives.
I'm showing you 18 ways to tie a necktie, so you will be able to tie all the best tie knots – starting with the quickest and easiest tie knot, the Simple or Oriental Knot.
Learn how to tie a tie: The Simple Oriental Knot:

Click here to watch the YouTube video – The EASIEST Knot To Tie
Now you know how to tie a necktie the easiest way… are you ready for a challenge?
Learn how to tie a Four In Hand Knot:
The four in hand knot is one of the most popular necktie knots for beginners learning how to tie a tie. Not only is it easy to learn, but it's also one of the oldest – British horsemen are said to have invented it to tie scarves while holding the reins of four horses in the other hand.
This knot requires less of the tie’s length, making it a great choice for tall men trying to tie a regular length tie.
The narrower shape is perfect for narrow spread collars and button-down collar dress shirts.
Learn how to tie a Half Windsor Knot:
 You may need to adjust the horizontal loop to make sure it’s flat and even.
Along with the Four-In-Hand knot, the Half Windsor is most suited to guys just beginning to learn how to tie a tie.
This knot is the perfect choice for medium-width and thick ties. It is the most versatile and popular tie knot.
Because the half Windsor requires less of the tie’s length than the larger Windsor knot, it is also a great choice for big and tall men trying to wear a regular length tie.
Learn how to tie a Full Windsor Knot or Double Windsor Knot:

When I'm asked how to tie a tie, the Full Windsor Knot is always mentioned. Also known as the Double Windsor, the Full Windsor has a large, triangular symmetric shape and is perfect for wide spread collars, and on men with a large neck.
Additional tie length is required for the Windsor knot because of the two wrappings. Tall men with a larger neck size will need a tie that measures between 61 – 64 inches.
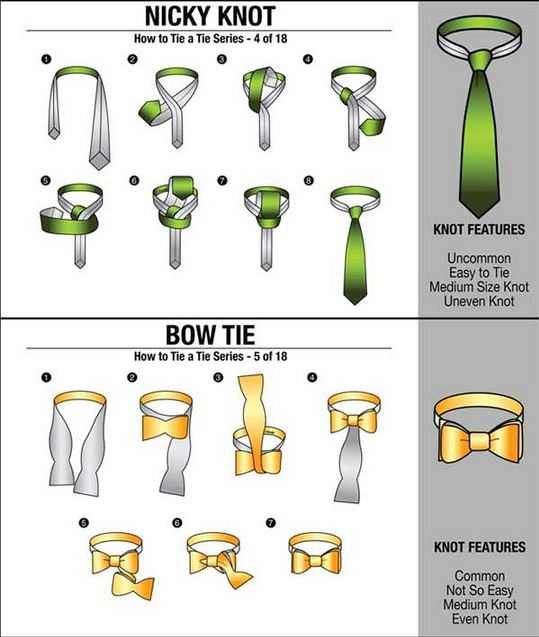
Learn how to tie a Nicky Knot:
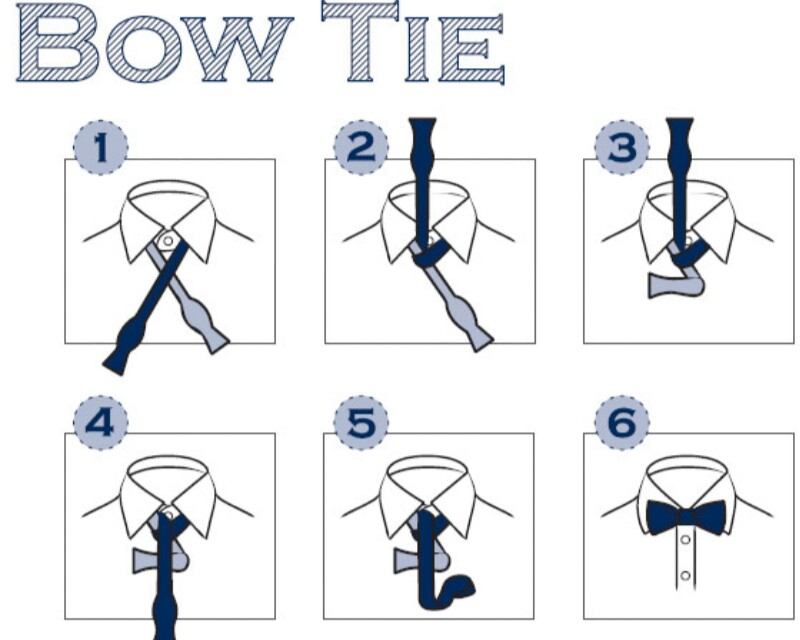
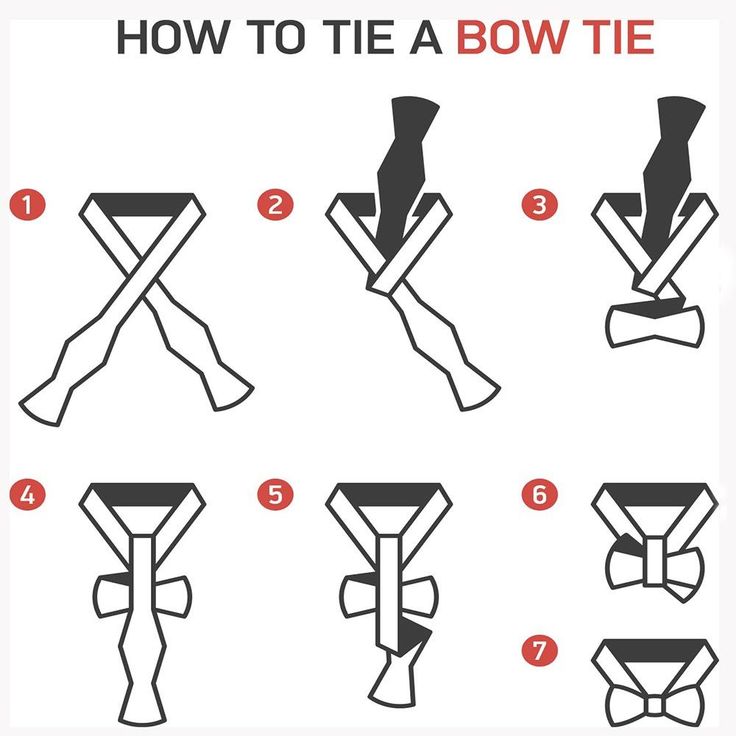
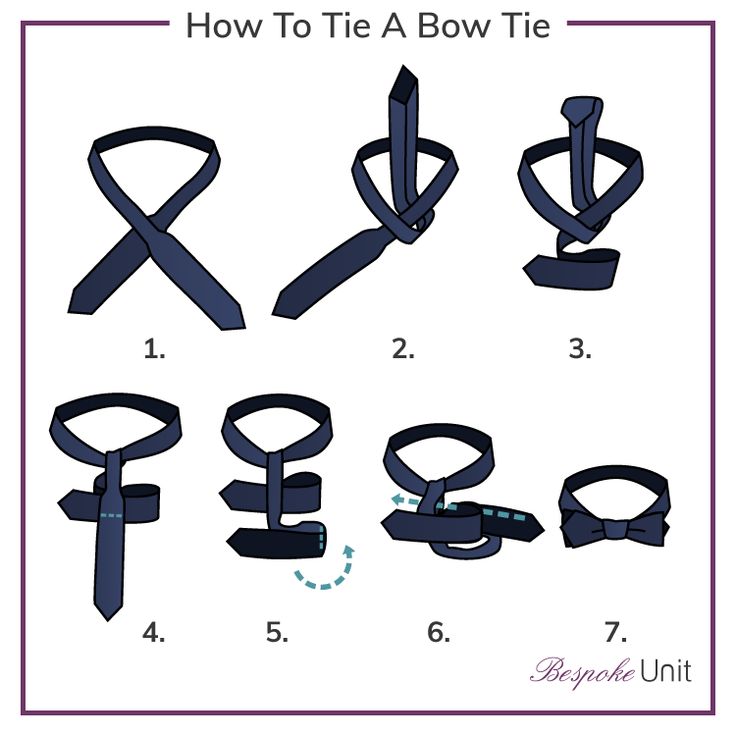
Learn How To Tie A Bow Tie Knot:

Learn how to tie a Kelvin Knot:

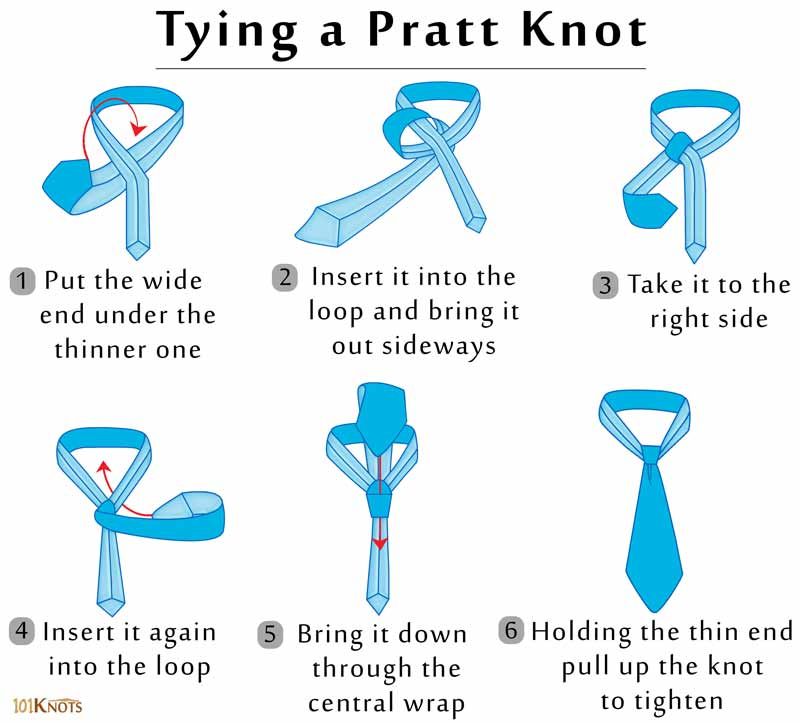
Learn how to tie a Pratt Knot:

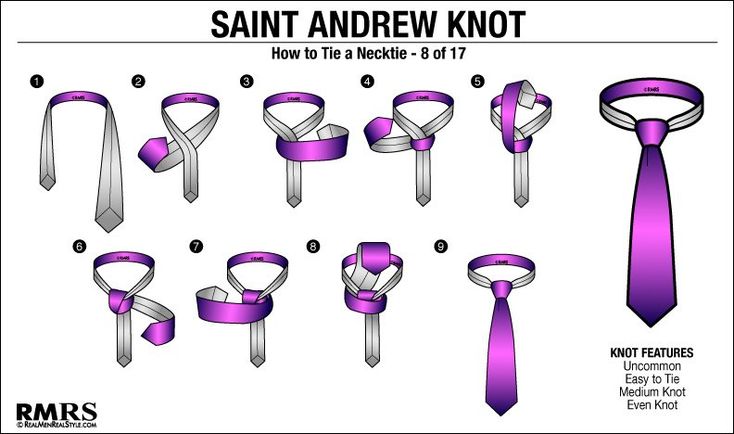
Learn how to tie a St Andrew Knot:

Learn how to tie a Balthus Knot:
 The thick end should hang at least to mid-thigh and the thin end to the center of the chest.
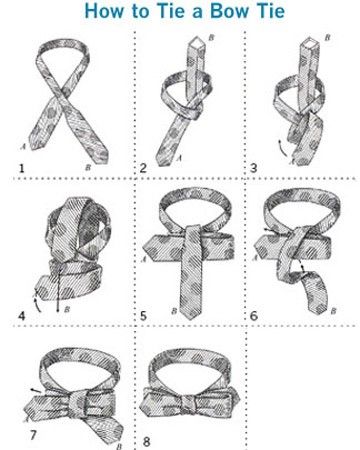 Ideally, the tie beneath the knot should be quite wide but still fall to your beltline.
The Balthus knot is highly recommended for any fancy events – make sure you wear it to those fine dining dinners, theater and art events.
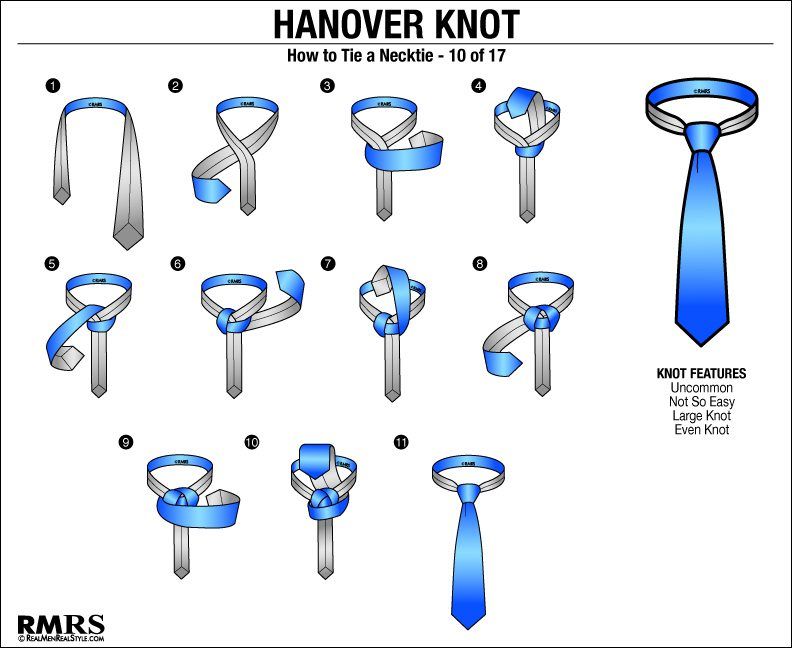
Learn how to tie a Hanover Knot:
Learn how to tie a Plattsburgh Knot:
Learn how to tie a Grantchester Knot:
Learn how to tie a Victoria Knot:

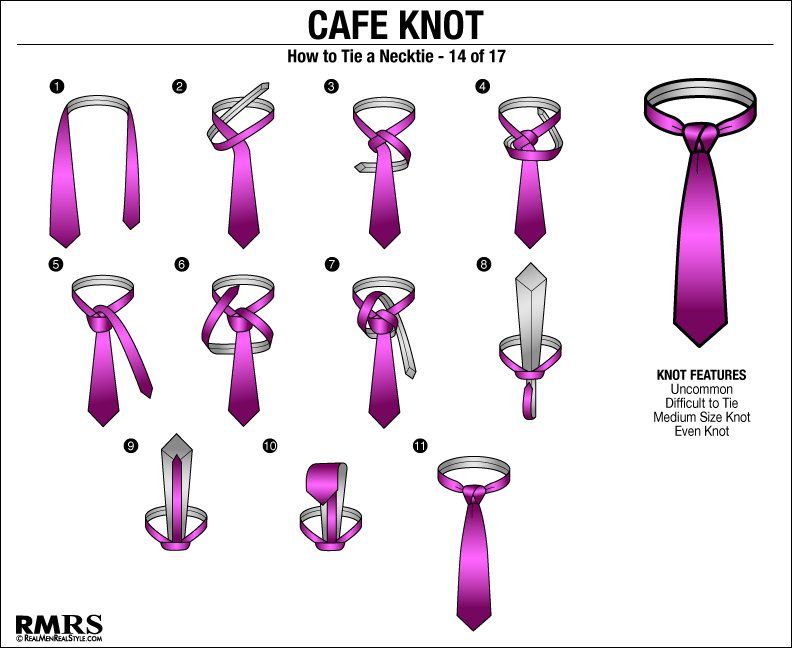
Learn how to tie a Cafe Knot:
 You can toss it over one shoulder.
The Cafe Knot is a difficult one. Don't try it until you're very familiar with the basics of how to tie a tie.
Learn how to tie an Eldredge Knot:
 Tighten if needed by pulling the thick end and adjust each diagonal band to roughly the same width.
This is a very complex tie knot that says you REALLY know how to tie a tie… and you're not afraid to show it off.
Learn how to tie a Trinity Knot:
 Slip a finger underneath the horizontal band this creates.
Learn how to tie a Christensen Knot:
 Now tug gently on the thin end with the other. Use your finger to tease out the diagonal folds until the X shape of the knot is very clear.
Now that you know how to tie a tie knot, here's an article on why you need to know how to tie a bow tie.
Click any of these 17 tie knots to find out if it's right for you and get step-by-step instructions.
If you're still struggling to learn how to tie a tie, you can get a larger poster size image of the best 18 tie knots along with step-by-step instructions when you grab my bestselling Men's Necktie Book on Amazon.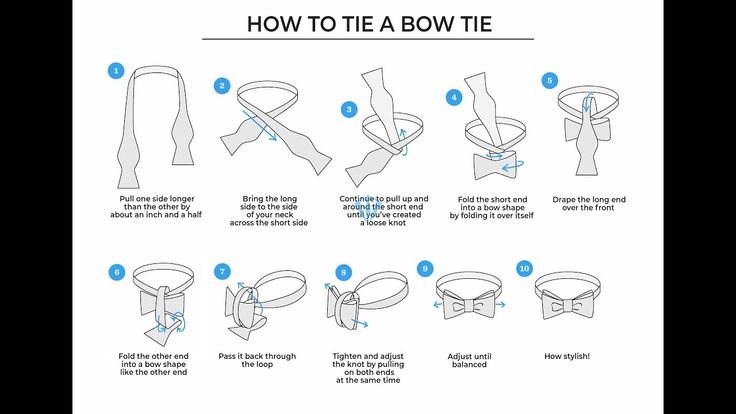
And there's more… I don't just show you all the cool ways to tie a tie and types of necktie knots, click here to view all of my Men's Style Amazon Bestsellers!
Don't own a kindle – Click Here to grab Amazon's FREE reader here for your Computer or smartphone!
Magic tricks are a great decoration for any children's holiday, because kids love fairy tales and magic so much! Any parent can learn a few simple tricks to please a little birthday boy.
For children under the age of 5, it is better to choose tricks that are simpler, but at the same time effective. Simple tricks based on the laws of physics, sleight of hand, and little home tricks, such as color-changing water or a non-popping balloon, are best. The main advantage of such tricks is that they can be easily taught to a child in order to ensure him the general attention and delight of his peers.
Magic tricks for children from 1 year old differ in that the participation of parents plays a huge role in their success. At this age, kids still cannot master and perform the trick on their own, and their mom and dad should help them with this. An adult should prepare everything necessary for the performance, so that later to perform the “miracle” it remains to do only one or two simple actions. Before the performance, it is necessary to show the child a trick and, having told his secret, perform it together several times. Magic tricks for babies, ideally, should be very simple and contain some element of the game, so as not to tire the child and prevent embarrassment if he suddenly forgets or mixes something up. Therefore, it is best to choose tricks that do not require special knowledge or care from the child.
The magic trick looks very spectacular, during which ordinary transparent water, with one wave of the magic wand of a young magician, changes its color. To do this, take several jars with tight-fitting lids and pour water into them halfway. Paint the lids on the inside with watercolor paint.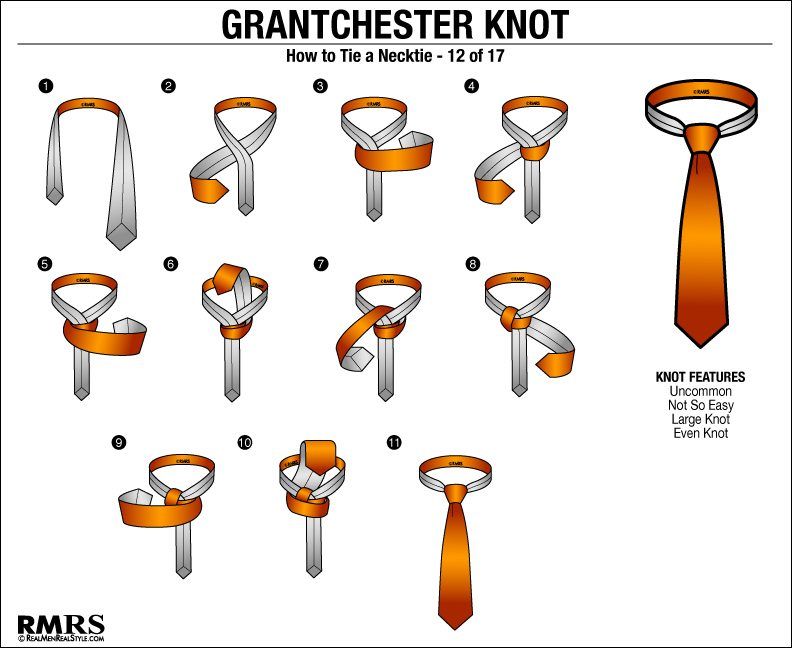 It is better to do this shortly before the performance so that it does not have time to dry.
This is important! Be sure to explain to your child that he must not shake or turn the jars before the trick begins.
It would be useful to teach a child a simple rhyme or “spell” so that when he turns over the “magic jar”, the guests will have the impression of a real miracle. If you want to make the trick more successful, then watercolor can be replaced with food coloring by pouring transparent soda into jars instead of water. In this case, the kids will be able to drink a wonderful drink!
Children seem to find any magic tricks especially interesting if miraculous transformations take place with delicious fruits, which can then be eaten. Therefore, at any children's holiday, a simple trick with turning an orange into apples will be appropriate. You show the guys an orange, cover it with a scarf, wave a magic wand - and now you have a ripe apple in your hands!
The secret of this trick is very simple.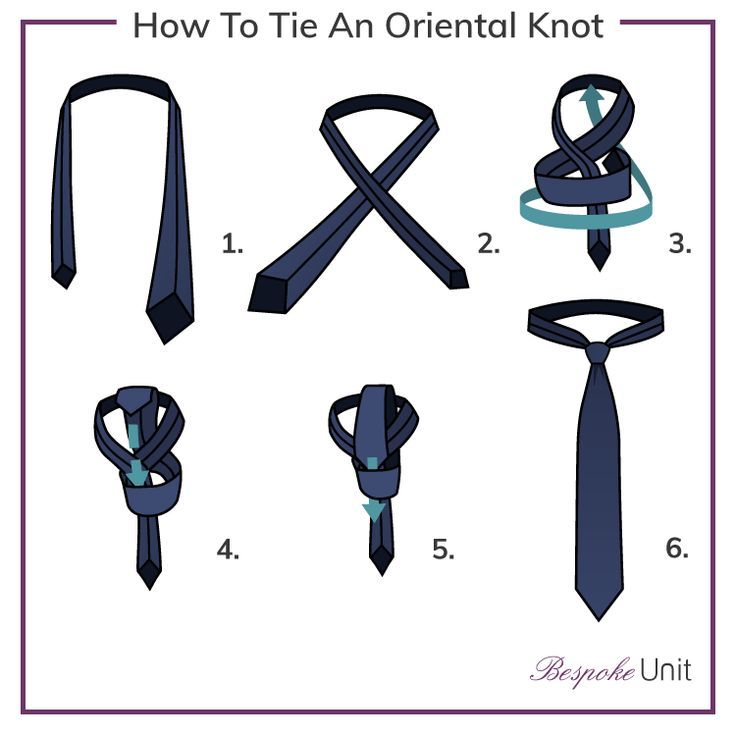 You just need to very carefully remove the peel from the orange - so that from the outside it looks intact. Now take a slightly smaller apple and put it in the orange skin.
For the success of the trick you will need a beautiful large scarf. Cover the fruit with it, say a "spell" and pull off the handkerchief along with the orange peel. The transformation is done! And the magic apple can be cut and distributed to small spectators.
This trick is great for kids who can already draw. The friends of the birthday boy will be amazed when a flower drawn with a simple pencil suddenly blooms with bright colors. Of course, not just like that, but with the help of magical water that your child will pour onto paper.
To prepare this trick you will need:
Draw flowers on a sheet of paper with a simple pencil: on one side clearly, on the other - barely outlining the contours so that you can see them only by looking closely. After that, place a cardboard stencil on the side with a clear pattern so that the cut flower matches the pencil borders. All this volume will need to be filled with dye: the flower is red, the stems and leaves are green. You can use several shades to make the drawing more "alive".
After a few minutes shake the powder off the paper and turn it over to the other side. Now the child can draw safely. After that, it will be enough for him to carefully pour a little water onto the picture: the dyes will quickly dissolve and, having soaked the paper, will color the picture.
This is important! To make the trick a success, explain to your child that he must draw exactly along the contours of the future "flower garden". It is best to do this trick several times with the child so that he remembers all his actions well.
Even the smallest children, of course, know that glass is hard and should not be eaten. So you have a great opportunity to put on an interesting performance: invite your baby to tell his friends that he can eat a glass glass.
To make the trick work, you will need to make fake glasses in advance. They are made from ordinary sugar syrup: when it solidifies, it becomes transparent, and in appearance it is almost indistinguishable from glass.
Such tricks for a child will become even more interesting if you prepare them in secret from him. Place a candy glass in front of the birthday boy and invite him to try to bite off a piece of it. There will be no limit to his delight - after all, in addition to unusual fragility, this “glass” will also be very tasty!
But, of course, you will definitely need to reveal the secret of this trick to your little guests so that they do not get hurt trying to repeat it at home. And delicious dishes will serve as an excellent treat for little sweeties.
After teaching a child a few simple tricks, you need to think about his appearance.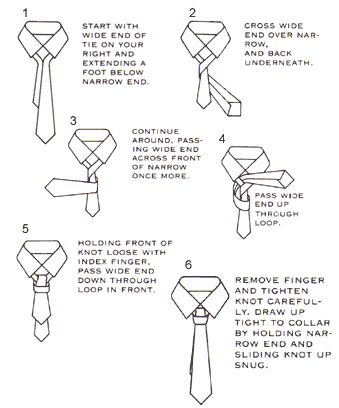 You can buy a wizard costume for him, or sew it yourself, decorating it with sparkles and stars. If your kid's outfit involves a bow tie, then you have a great opportunity to turn the young magician's first outing into a real performance.
Ask the guests what part is missing from the wizard's outfit. Of course, a tie! It's okay, it can be fixed with one wave of a magic wand. One movement of the child - and the missing tie miraculously appears in its place, to the delight of all the guests.
The clue to this trick lies in the special design of the tie. He, of course, is already put on the child, just for the time being he is not visible. You just need to sew a thin long elastic band to it. Pass it under the shirt, securing the other end to the belt. Now the "butterfly" can be pulled back and hidden under the arm, and it will not be visible. At the right moment, the child will have to raise his hand - and the released tie will easily return to its place, creating the impression of appearing out of nowhere.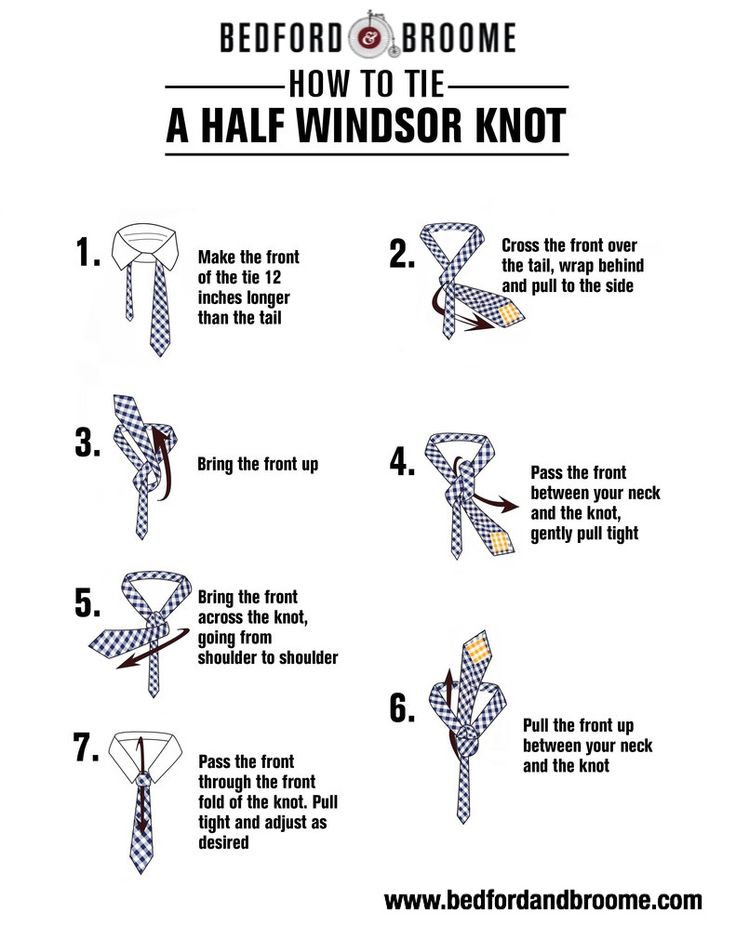
This trick will require a bit of artistry from the child, so it's best to work out the trick in advance so that it looks really impressive. Make him a magic wand so that the baby has the opportunity to wave his hand without arousing suspicion. You can learn some short funny rhyme with him, or come up with an unusual spell.
In this video you can see some beautiful magic tricks for a children's party:
Beautiful magic tricks for children under 5 years old are as interesting as the opportunity to participate in them yourself. Therefore, if possible, it is better to involve young viewers in the performance so that they can feel like part of a fairy tale.
Was the article helpful? Share it on social networks:
Typography Director's blog Hanging in the air
20.02.2018
I wanted to dedicate this blog to a report from the Second Printing Forum, which took place in February in the Moscow region.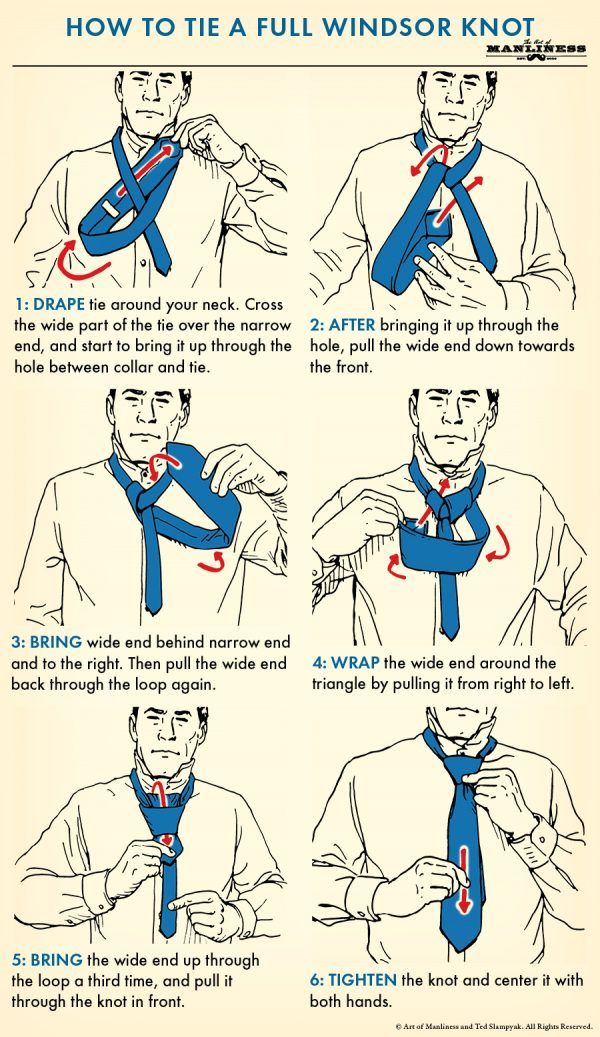 But I began to write and realized that the topics of the Forum bring me back to one old unsolvable dilemma. Such a theoretical (practically philosophical) "director's" dilemma. About the entrepreneur's focus. And printing in this reasoning - as a special case.
Therefore, I decided to break my blog into two parts: “philosophical” and reporting. And the reportage somehow divided itself into three parts ...
I hope not to bore the reader :)
I. Football Pelé vs Chemistry Liebig
I'll start with theory. There is such a law of "minimum", formulated already in 1840 by the German chemist Justus von Liebig. If you are not afraid of abstruse formulations, then read: "For the survival of an organism (or system), the most significant factor is that which deviates most from its optimal value."
On the example of business, the law can be deciphered as follows. The survivability of an enterprise (as a system) depends on many factors: the right business model, the ability to clearly position itself in the market, the ability to work with personnel, competent production technology, the competent construction of a sales system, financial accounting, the presence of a unique selling proposition, and so on and so forth.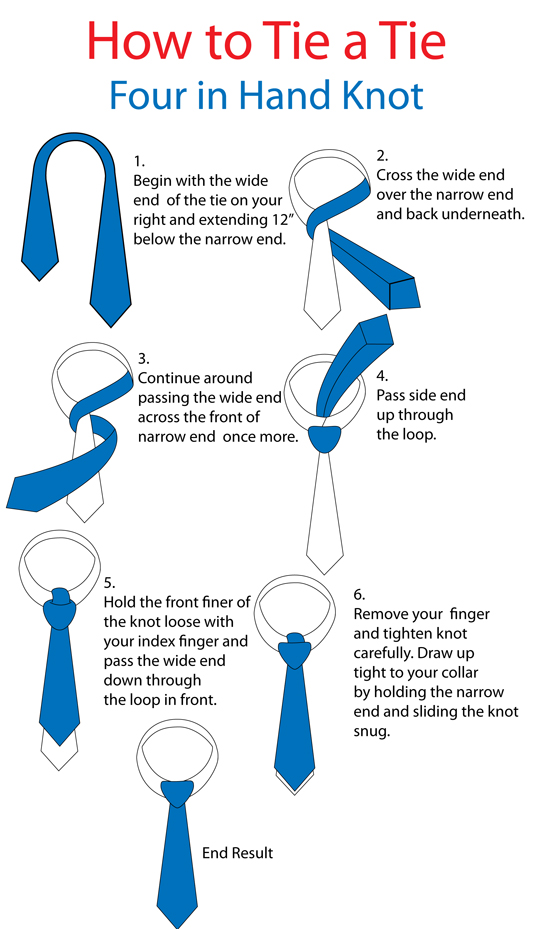 other. If any one of these factors falls far short of a digestible average, then the business will go downhill, despite the fact that other factors are in perfect condition.
On the basis of this law, a visualization in the form of "Liebig's Barrel" was invented. We take a barrel, consisting of wooden boards, compressed with iron hoops. The barrel is not new - some of the boards on top are broken. broken at different heights. Pour water into the barrel. And you can’t pour water above the most broken, smallest board - it merges onto the ground. Let us suppose the following dialogue between Liebig and the director of the printing house:
- Buddy, the height of the rest of the boards is not important - anyway, you will not fill the barrel to the top, - the chemist recited measuredly, - The smallest board is the very factor that deviated most from the normal value. Think about which board you have the shortest?
- That is, master, you want to say that if my printing house, for example, has a sales system in its ass, then it doesn’t matter how ideally the automated production control system is set up.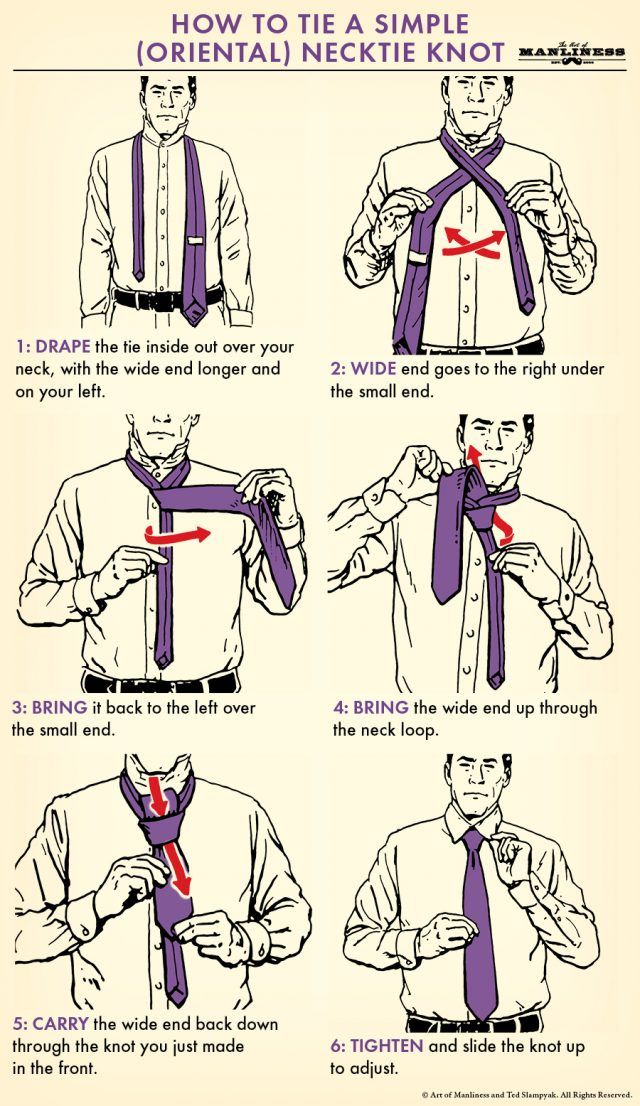 My brainchild flies into a ditch!?
- Yes exactly! And the repair of the barrel must begin precisely from this "board" - from the sales system, - summed up Liebig.
And intuitively this approach is correct. A chain is as strong as its weakest link. The method of "strengthening the weak link" should be adopted by the director of any enterprise at any time.
But! Now consider another equally well-known concept. I will illustrate it through an interview with the "king of football" Pele.
What do you work on the longest in training? the journalist asked.
- 90% of the time I spend on dribble training, - answered the "king".
- So this is what you know how to do best in the world? Why are you working on this? the interviewer was taken aback.
- That's why I'm working on this, this separation from competitors makes me the best football player in the world, - Pele grinned.
Let's translate into the language of business.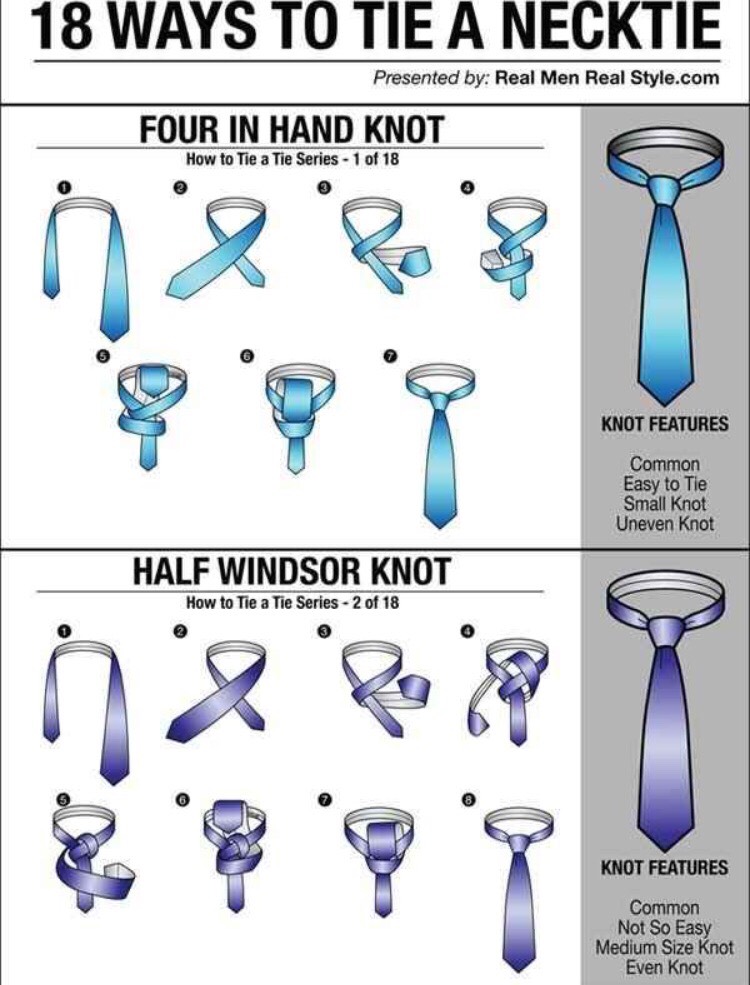 There are different types of directors. There are mechanical directors who have other directorial functions, but their strong point is knowledge of printing presses. There are technologists who love printing technology. There are marketing directors who feel the market best. There are sales directors, there are psychologist directors, there are financial directors. For example, I consider myself something between a PR director (it's a pleasure to promote a printing house) and a director - "gambling Paramosha", who can easily get into loans and invest in a new piece of iron. In general, different mothers are needed, different mothers are important. And all the "moms" manage to put their printing house on a sustainable growing trajectory. And according to the "Pele's thesis" you need to develop your "crown" property again and again, sit on your "horse" and drive it uphill. And this thesis, it seems, also does not cause rejection.
Here is the dilemma! Here is the question! Who is right: Liebig or Pele?! I don't have the right answer.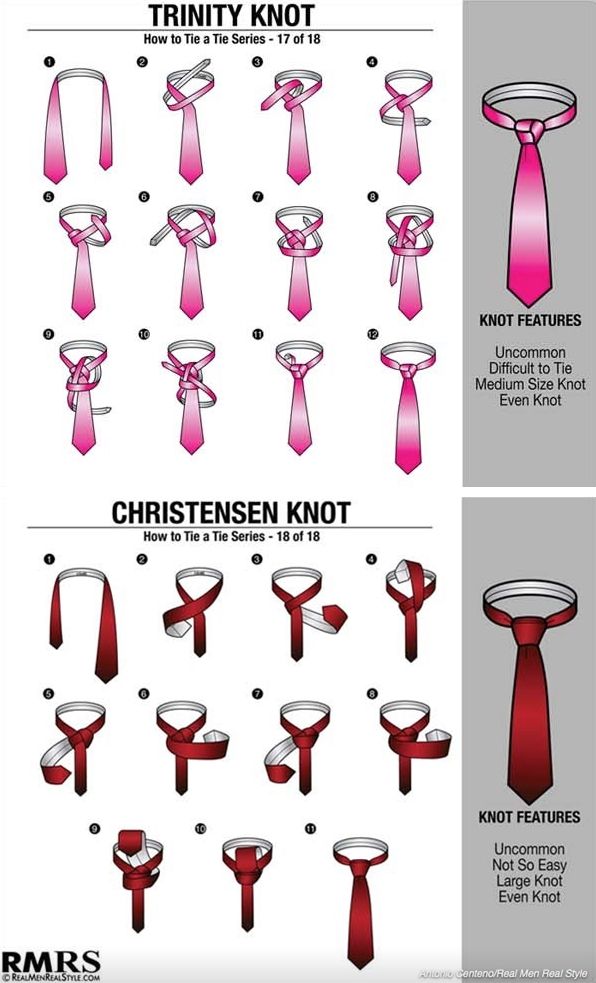 ..
..
There is, of course, the theory of Yitzhak Adizes about the stages of development of the company. At different stages, different competencies, different recipes are needed. With a start-up, first of all, entrepreneurial veins are important, then the “come on, come on” stage follows, where you need to turn on the afterburner on the “selling front”, and after 15 years - administrative skills. But this theory resolves the Liebig-Pele dilemma only partially.
II. Get up you lazy bastard
The topics discussed at the Printing Forum, which took place in February in the Moscow region, are, as they say, "hanging in the air." I'll list them right away:
automation of workflow management,
business specialization,
business diversification, creation of a "full cycle" printing house,
Inclusion of digital technology in offset production
They are discussed at all conferences, including meetings of our St.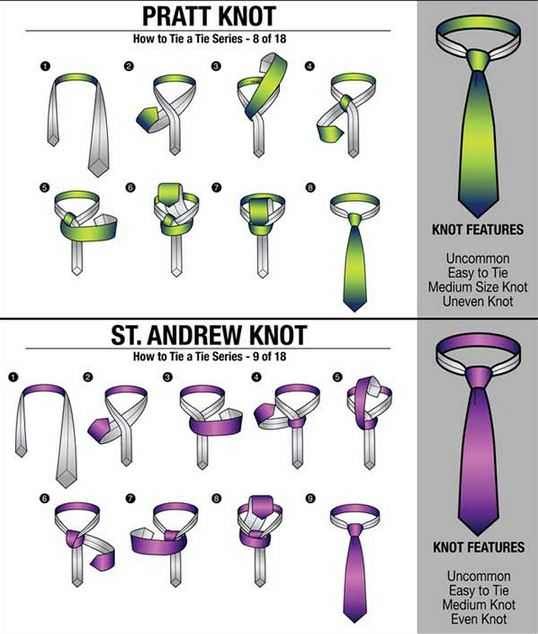 Petersburg Digicam Club (see my previous blog).
It is clear that the marginality of the printing industry has been falling “rapidly and irrevocably” over the past decade. And what to do with it? Or put up with it and just increase turnover (moving towards diversification and adding digital “spice” to your “diet”), or not put up with it and fight for the return of profitability to decent indicators (working with costs through automation or specialization)?
Let's look at these topics from the point of view of the Pele/Liebig dilemma I proposed. The very discussion at the Forum proceeded from the priority of the Liebig barrel concept.
It is clear that the “Pele method” is simpler and more pleasant: everyone knows his own “horse”, and it is more pleasant to ride and spur on it. In life, everyone moves this way - he does not know the other. Yes, and there is a good phrase that justifies Pele's method: "Everyone should mind their own business!". Finding the "worst board" in your "Liebig's barrel" . .. you won't find it right away. You can be wrong. Yes, and patching it up does not deliver erotic pleasure (if it did, it would not become the worst board).
But no, director, you are not looking for peace for yourself! You're fighting with yourself, you lazy bastard! Went to the Forum. So you're curious about Liebig. So now listen! Find out what ideas the community has accumulated about your rotten boards in Liebig's barrel. Explore fashion trends in today's business environment. And act!
As a report - a couple of phrases about the format of the event. He deserves attention.
The format of this Forum was different from just a conference. And this is also a trend of modern life - the search for new forms of communication, creating interactivity in the presentation of content. At our Club of Directors of St. Petersburg Digital Printing Houses, we tried to test the idea of a “battle”. It didn't quite work out. And now, a few weeks later, a new attempt at a new format in the Moscow region.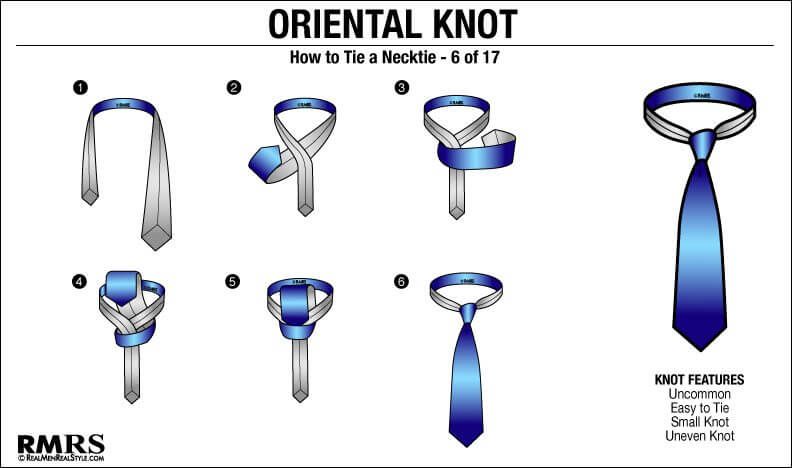
The composition was as follows: the entire audience (and these are mainly top managers of printing houses) was divided into four groups, each group was located in its own separate room, four topics were proposed for discussion, each topic had its own moderator. The moderator with "his" topic organizes the discussion for an hour. Then there is a change in the auditorium: the moderators move in a circle to another audience and there again for the next hour they discuss the same topic with another group. And so four times an hour. It turns out that all participants will participate in discussions about all four stated issues. And the topics themselves are discussed four times. But every time the discussion takes a turn, because the “accelerating” word is given to another printer who talks about his example.
This is the non-standard format. Depending on how the discussion goes in a particular room (and it went on with completely different levels of intensity and intelligence), the problem may “open up” or go into a boring spectrum.
Has the Forum shown the way to happiness? The ideas that emerge from the discussions will, I am sure, be discussed in the industry press. I will focus on a couple of theses that were curious to me, and even in the discussion of which I myself took the floor.
III. Specialization must win over diversification.
We build a logical chain: I chose my favorite product - found my specialization - gained high-quality competencies in it - automated production - reduced staff - reduced costs - was able to give a competitive price - pulled over all market orders for this product. And happiness looks in your window.
But not everything is so simple! There are three arguments against.
The first - a collision in the brain "what to do with other orders"? Refuse?! They bring you orders along with money, and you refuse? What an idiot?
The second is the fear of being left without a job. And suddenly this segment, the product that you have chosen, will be blown away.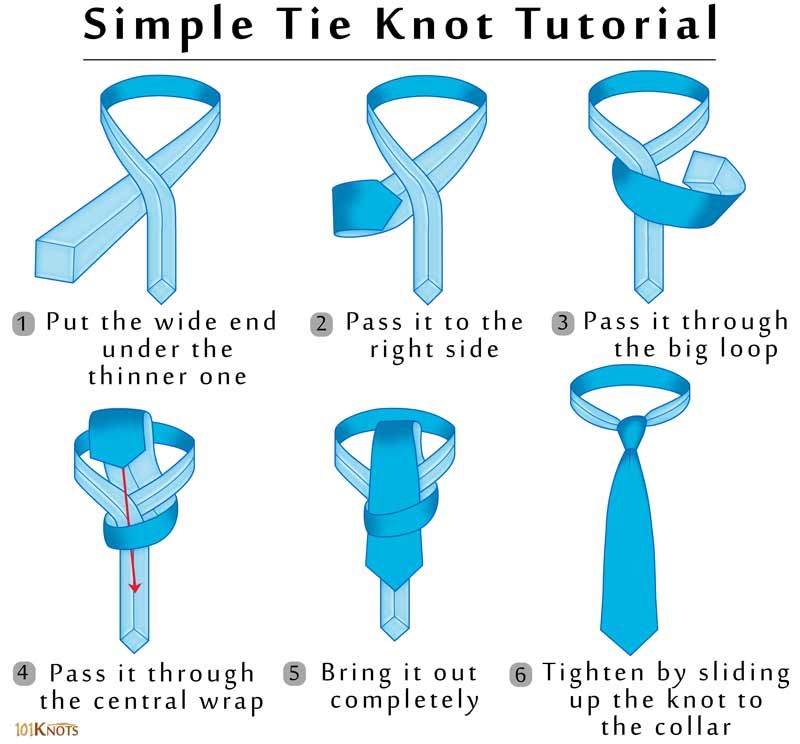 And the printing house will remain without work - you have already managed to refuse other orders.
Third . The regional printing houses have such a small printing market in general that it is possible not to get a specialized order to load their equipment.
And these arguments are currently defeating the "logical chain". The history of Russian printing shows that there are still some trends in specialization. In the 90s, all printing houses were universal. Then, in the zero years, printing houses specializing in packaging began to stand out. Then digital advertising. Now times have become tougher, and the pendulum has gone in the opposite direction: many people are returning to the packaging market in search of work, buying digital equipment. But a new subject appeared in this party - the state. With its administration, it presses us to become “socially responsible”, which means that this will lead to a reduction in staff. And, as a result, specialization.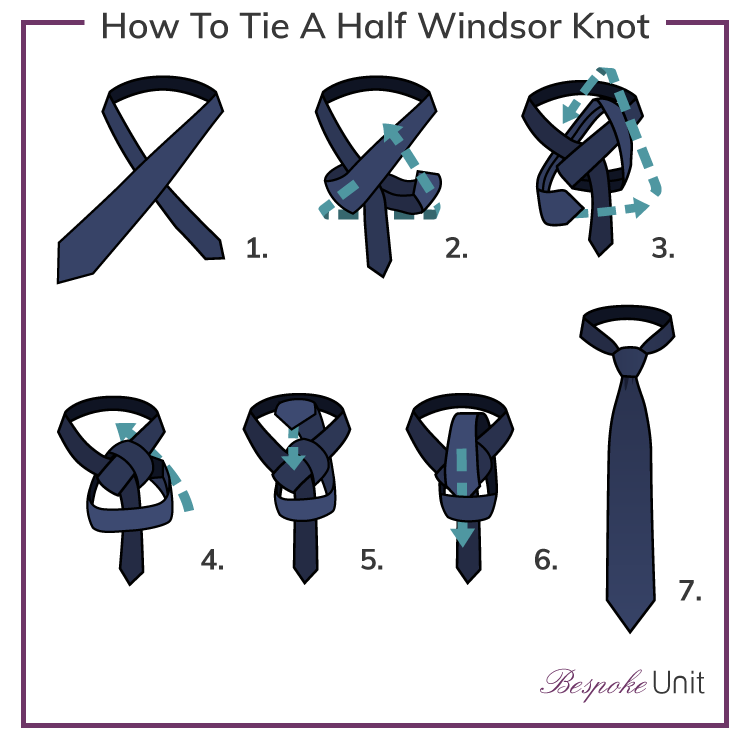
Let's see what trend will prevail in the coming years?!
IV. "Digital spice" in the diet of offset
Will offsets go digital or not? I was struck by the following thought at the Forum - in order for digital technology to penetrate offset, you need to change the mentality of the head of the printing house.
I'll try to decipher. At the Forum, in one of the audiences, one of the leaders of the T-8. Publishing Technologies” Boris Makarenkov. I will not describe this project - most printers are aware of it. But listening to Boris, I clearly understood that a printer could not create such a project! We printers have a different brain. We consider printing to be the main business of our life. And when it “goes not first, but second number” in business, then for this we need to “rise above the fray”. What we cannot do. Printing house T-8 was created not by printers, but by publishers. For them, the first number is (let's call it that) "platform" - an IT scheme for receiving and transferring orders to production.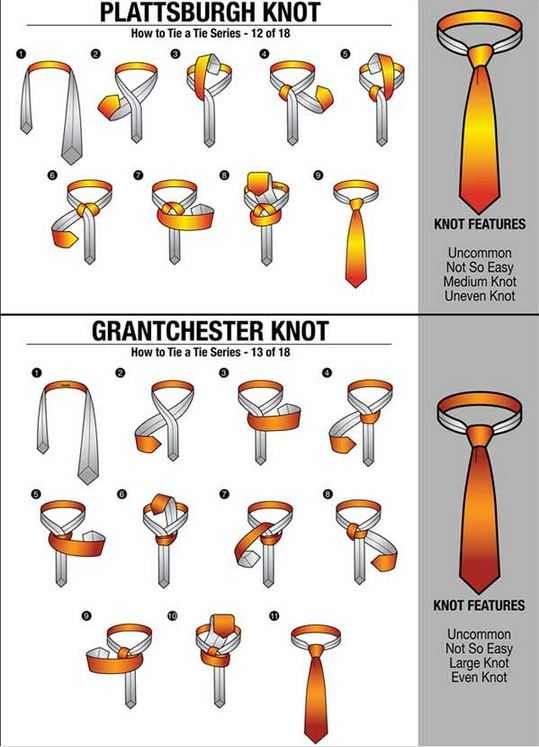 And in second place is logistics. Printing, at its best, is in third place. They consider printing itself a “service”! Horror! And it's called typography!.. The word "service" to us, classical typographers, seems to be somehow different. For example, to offer to match the color of the lace to the color of the customer's tie. :)
I remembered one business trip to Holland organized by Xerox several years ago. We were shown the former printing houses. More precisely, what remains of the once offset printing house. Business owners are tired of this mouse fuss - price wars for an extra guilder. They transformed the business into a marketing agency, where printing (already digital) performed the service function of printing personalized enticement cards for clients' clients. For example, a travel agency was a client of such an agency. And already the clients of the travel agency were sent personalized postcards with an offer of hot tours, and ... passwords for registering in their personal account on the site.