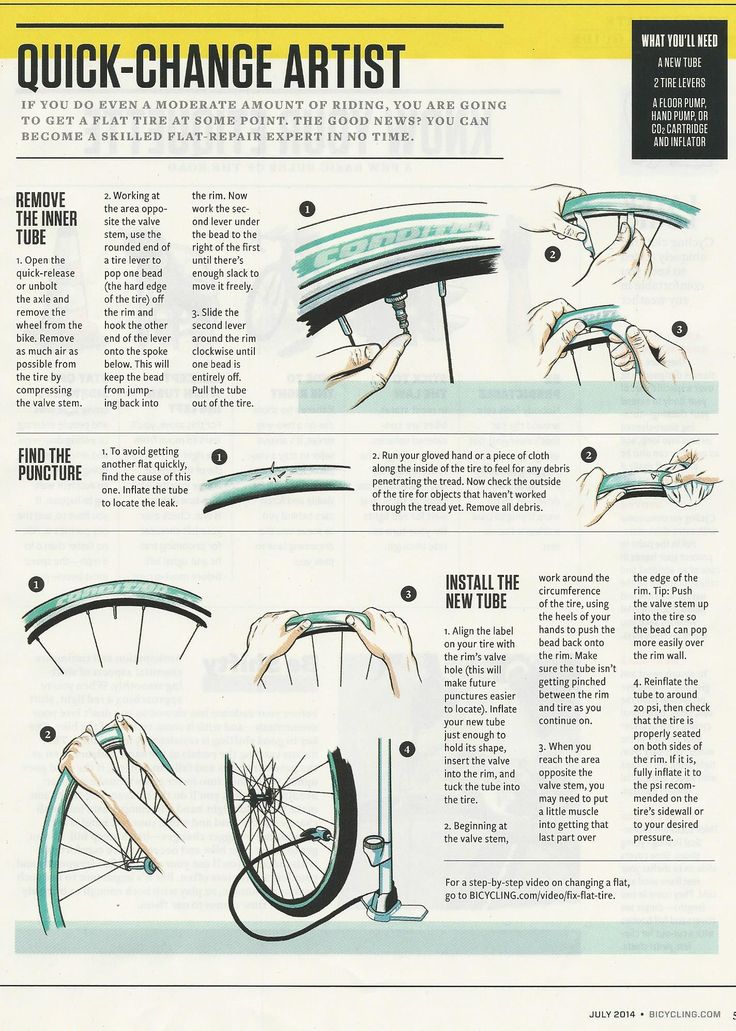
Getting a flat tire is an inevitable part of cycling, and there’s only so many times you can get away with walking your bike into a shop or having a buddy on a group ride fix it for you. An essential part of knowing how to fix a flat is also knowing how to use tire levers, so there’s no time like the present to learn.
If you don’t have tire levers, don’t try using other available tools (like a flathead screwdriver) as substitutes. They could easily damage the tube, tire, or worse, the rim. Tire levers are designed specifically for removing and installing tires without damaging anything in the process, so stick with those to be safe.
Below, we explain how to use a tire lever, along with tips for dealing with tricky tires.
Join Bicycling All Access for more tips and tricks
Many tire levers are made out of hard plastic and sold in sets of two or three. You can also find levers made out of steel or with a steel core for tires that are harder to remove. All tire levers feature a curved end for slipping under the lip of the tire; depending on the brand, it could be fully rounded or squared. Many tire levers, though not all, come with a small hook on the other end so you can secure it to a spoke for leverage.
Trevor Raab
Start with the tire deflated. Pick a spot along the edge of the rim that lines up with a spoke. Pull back the tire away from the rim and fit the curved end of the lever under the edge of the tire. With the tip of the lever under the tire’s edge, press down on the lever using the rim for leverage and secure the hooked end onto the spoke. The lever should lift the edge of the tire up and over the outside of the rim and hold it in place.
Take a second tire lever and fit the curved end under the tire’s edge in the gap created by the first lever.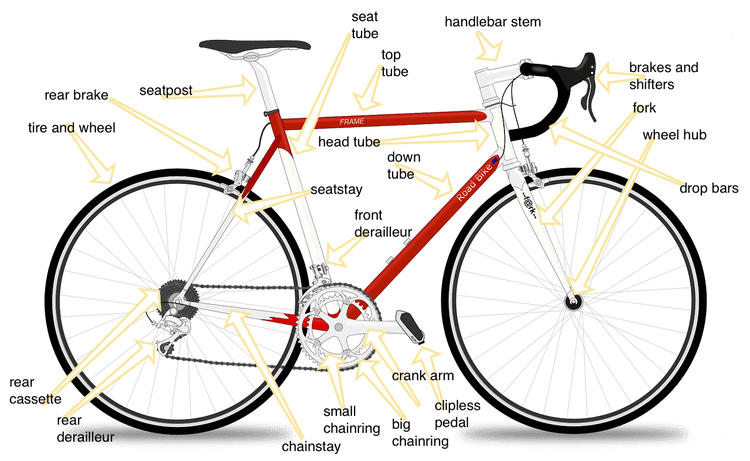 Work the second lever along the edge of the rim by sliding it laterally with the end under the tire lip until the tire comes free of the rim on one side. This step can be hard to do with tight tires—try pushing on the second lever with both thumbs.
Trevor Raab
Trevor Raab
If the tire won’t budge using the second lever, check out our tips below. You don’t want to risk injuring yourself by using so much force that your hand slips off the lever. Alternatively, sometimes a tire can be removed using just one lever. If the tire seems loose enough after freeing the initial section with the first lever, go ahead and see if you can easily push the lever around the rim to remove the rest of the tire.
Putting a tire onto a rim is typically a bit easier than removing one, but using a tire lever might still be necessary. Fit one side of the tire onto the rim first. (If you’re using a tube, you’ll want to put that in next. ) Now, start fitting the other side of the tire onto the rim. You’ll reach a point where this becomes difficult to do because the final section of tire is too tight, leaving a small section outside the rim. You should try to intentionally leave the final section of tire to be mounted on the rim by the valve if possible.
The next step is where your lever comes in. Place the curved end of the tire lever under the remaining section of tire with the curve facing down, hugging the inside of the rim. Lift the opposite end of the lever up while keeping the curved end planted firmly on the inside of the rim, pulling the rest of the tire onto the rim.
If there’s a larger section of tire stuck outside the rim after installing what you could with your hands, you’ll have to repeat this step on smaller sections.
$20 at Competitive Cyclist
Credit: Park ToolOur go-to for stubborn, tight fitting tires
$8 at Amazon
Credit: Pedro'sAn affordable and popular favorite
$26 at Competitive Cyclist
Credit: Park ToolThese 8-inch levers are for tough DH and Freestyle tires
$14 at REI
Credit: TopeakThese dual-purpose tire levers double as chain powerlink pliers
Still having trouble installing or removing a tire? Some tires are especially stubborn. To make it easier on yourself, here are some tricks you can try (or don’t try).
→ First, what you shouldn’t do: You may have heard of some weird tricks that supposedly help with stretching a tight tire, such as throwing it in the dryer for a few minutes or using another heat source. That can end up doing more harm than good.
“Unless you know at exactly what temperature the tire’s bonding agents, rubber, and nylon start to delaminate, etc., you should not do this,” says Bicycling mechanic Joël Nankman. Instead he suggests using a little soapy water to help slip the tire into place. Just don’t get it on your hands.
→ Another pro tip from former Bicycling test editor Dan Roe: “A mechanic once showed me that you should make sure the bead core is sitting deep into the rim, rather than just resting on the hook. That makes the diameter of the rim slightly smaller and can make the difference with a really tight bead.”
→ Misplaced your tire levers? You can sometimes just use your hands with the right technique and practice, especially with tires that aren’t very tight. Seasoned pros like mechanics might hardly ever use tire levers. The trick here is to use the palms of your hands to work the tire off or on instead of your thumbs since they’re stronger, Nankman says.
Still, injuring yourself this way from slipping, especially with sweaty hands during a midride tire repair, is no fun. (Trust us, we’ve been there.) So it’s best to have a set of tire levers on hand anyway. Of all the bike tools out there, they’re one of the most affordable and easily portable options to keep in a saddle bag or in your toolbox.
Jessica Coulon
Service and News Editor
When she’s not out riding her mountain bike, Jessica is an editor for Popular Mechanics.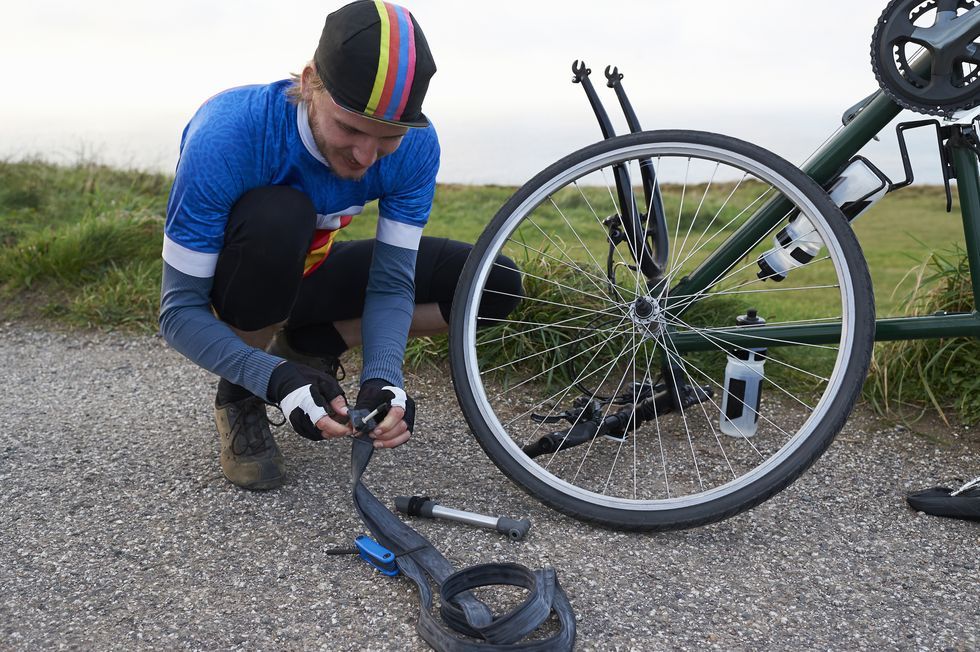 She was previously an editor for Bicycling magazine.
This content is imported from OpenWeb. You may be able to find the same content in another format, or you may be able to find more information, at their web site.
Dolors Borras
Don’t be the rider that gets caught out! Salvage your bike rides and save on the embarrassing calls home by knowing how to use tire levers to help you with puncture repairs.
It’s happened to us all once – you get a flat tire on a solo ride and can’t replace the inner tube because you cannot remove or reinstall your tire. Knowing how to use your tire levers will make those pesky puncture repairs fast and failsafe!
Read our guide to using tire levers so you’re never left calling a cab or phoning for mum again.
Ensure the inner tube is completely flat by bleeding any air out of the valve.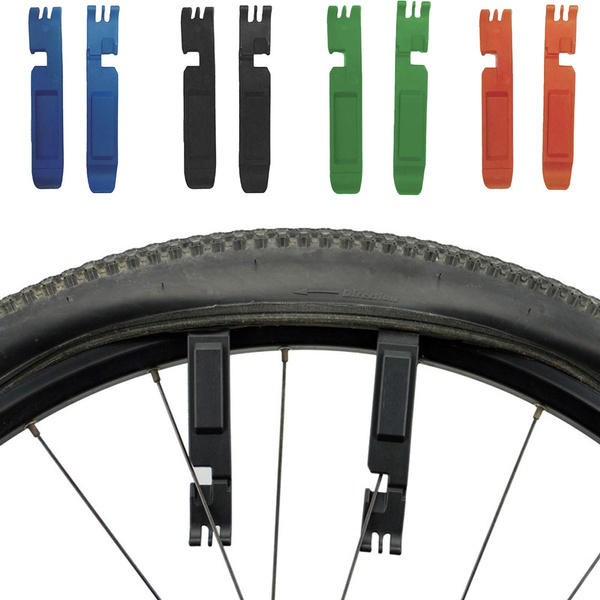
Use one hand to push the tire away from the wall of the wheel’s rim slightly. Dig the curved tip of the tire lever between the flat tire and the wheel rim, and scoop the curved section beneath the tire’s bead (the thick edge of the rubber).
Aim to do this in line with one of the wheel’s spokes so that you can hook the other end of the lever to a spoke in the later step of the process.
Leave the lever lodged between the tire bead and wheel rim for now.
Take a second lever and repeat step one at a point approximately 5-10 inches around the wheel from where you inserted the first lever. Again, leave this second lever lodged into the bead in preparation for step 3!
Grab both levers that are stuck into the tire’s bead and ‘lever’ the tire over the rim of the wheel. This requires you to push the end of the levers down (toward the centre of the wheel), using the wheel’s rim as a pivot point.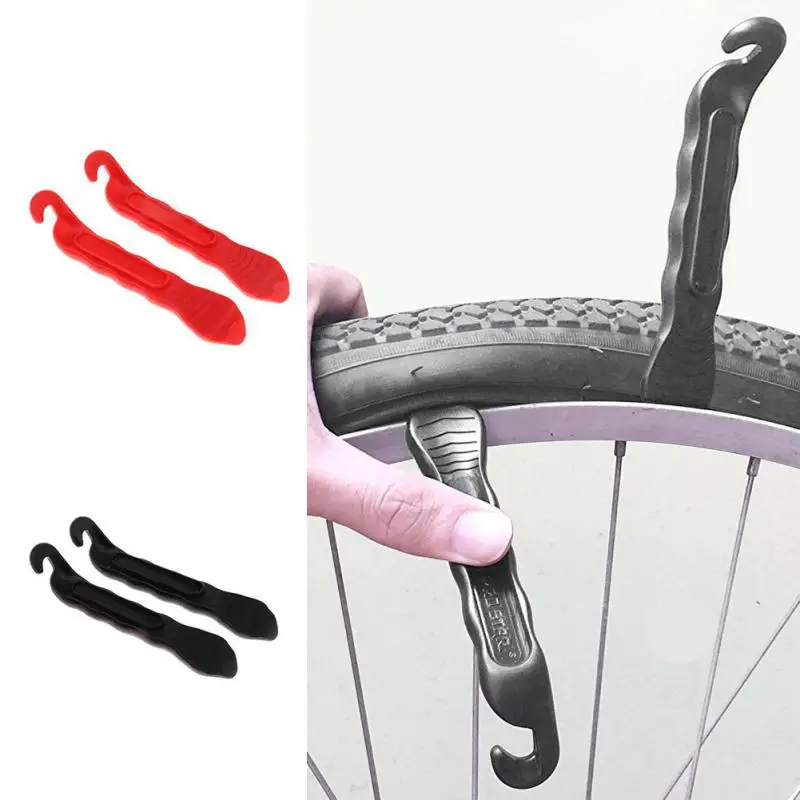
This will pop a section of the tire out of the wheel.
You can then hook the opposite ends of the lever onto the spokes of the wheel. This will keep the tire pulled over the wheel’s rim.
One end of each lever will now be beneath the tire and the opposite end will be hooked onto a wheel spoke.
With two levers securely fastened, the tire should be almost ready to remove.
For more supple rubber, you may be able to finish the job by popping the remaining part of the tire out of the wheel with your hand.
If the tire is quite tight, take your third lever and dig it into the rim near one of your two clipped levers. Then slide this third lever around the remaining part of the tire that has not yet popped over the wheel rim. The tire should come free without you breaking a sweat!
With the tire now off the wheel rim, you can pull out the punctured inner tube and insert a fresh new one.
Don’t inflate the new tube yet!
With the new tube now inside the wheel, it’s time to pop the tire back in place.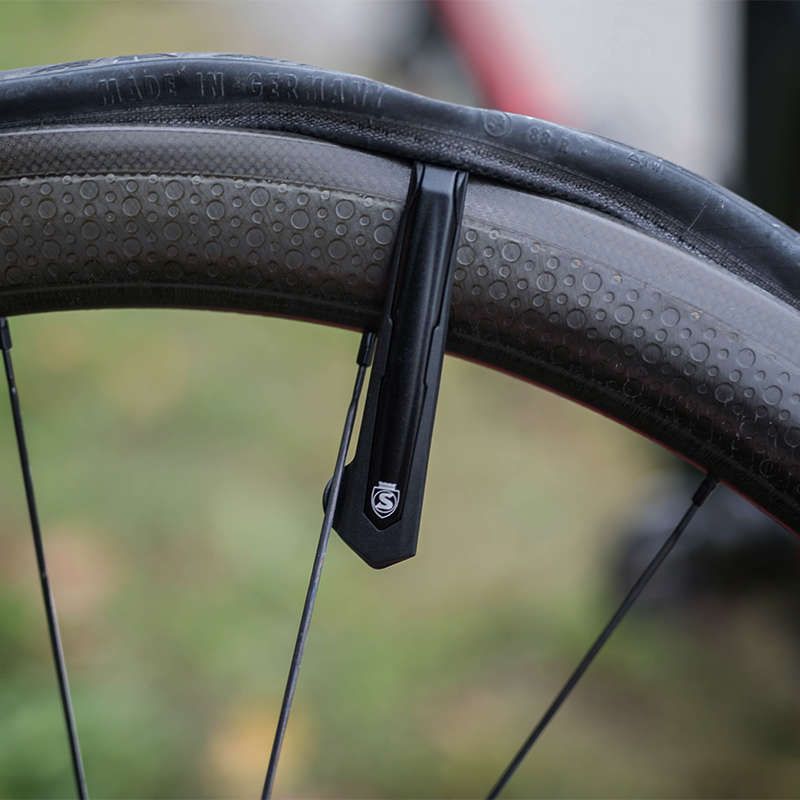
Firstly, ensure that one side of the tire is fitted to the rim. This should be an easy process you can do with your hands.
For looser rubber, you can then use your thumbs to push the second side of the tire over the wheel’s rim and back into place – meaning your tire is now fully installed.
Tighter rubber may require you to use a lever to install the second side of the tire. In these cases, use your hands to get as much of the tire in place as possible. You may then find yourself with around 1/6 of the tire left to pop back over the rim.
Now take the ‘digging’ end of your lever and carefully push it between the un-mounted tire and the wheel rim. Use the curved tip to hook the lever onto the edge of the wheel rim. Now lift the opposite end of the lever up so that the tool pivots on the wheel rim, sliding the tire into the wheel.
In many cases you will now be done and the whole tire will be fully installed!
If you had a large section of tire stuck outside the rim, you may need to repeat this process on another section of the rubber before the process is complete.
Now you can pump up your inner tube and get on with enjoying the rest of your ride!
A short sentence describing what someone will receive by subscribing
Your email
100% free, Unsubscribe any time!
Follow us
90,000 size of bicycle tires and their replacementホーム
Bicycle service
The size of the shines and replacement of tires
Bicycle tires 3000 km か Location for replacing rubber that deteriorates due to temperature, humidity, sunlight, etc., so it is recommended to replace it if it is more than a year old, even if it looks clean.
To display tire size 26 x 1.95 is labeled Inch type と, 700 x 32C millimeters. Tire compatibility is determined by rim size. Thus, the tire diameter and width designations are not interchangeable, even if the dimensions are the same.
The tire width is expressed as a fraction of inches. Without format and in decimal format H / E Then even the same 26 inches are not compatible.
Inch and French bead spacing and bead diameter marked ETRTO Compatibility can be confirmed at size Compatible tires with the same bead diameter Yes
tire width
times the width
rim as reference And the tire width that can be used depends on the rim.
In addition to the tire size, there are also types of pipe valves, and the main ones are rice style Buddhist style 英式 There are three types, and the most common air pumps are compatible with all valves with an adapter.
Tires, tubes and rim tape are required for full replacements, not partial replacements, and road and cross bikes have levers to attach and remove tires, but MTB style bikes and adult bikes require a ratchet wrench to work with wheels.
Since conventional cross bike tires are lever type, they are easy to install and remove.
To remove the tire, simply lower the lever.
Loosen the brake cables front and rear to leave space between the brake pads and tires.
There is a chain on the rear wheel so push the pin towards you to let the chain slack.
Remove the chain from the sprocket and then remove the bar.
Use the tire lever to remove the tire from the rim.
Since the tire only gets stuck inside the rim, insert the flat side of the tire changer arm into the gap between the tire and the rim and pull it out of the rim. Once hooked, insert the other tire changer arm and turn it.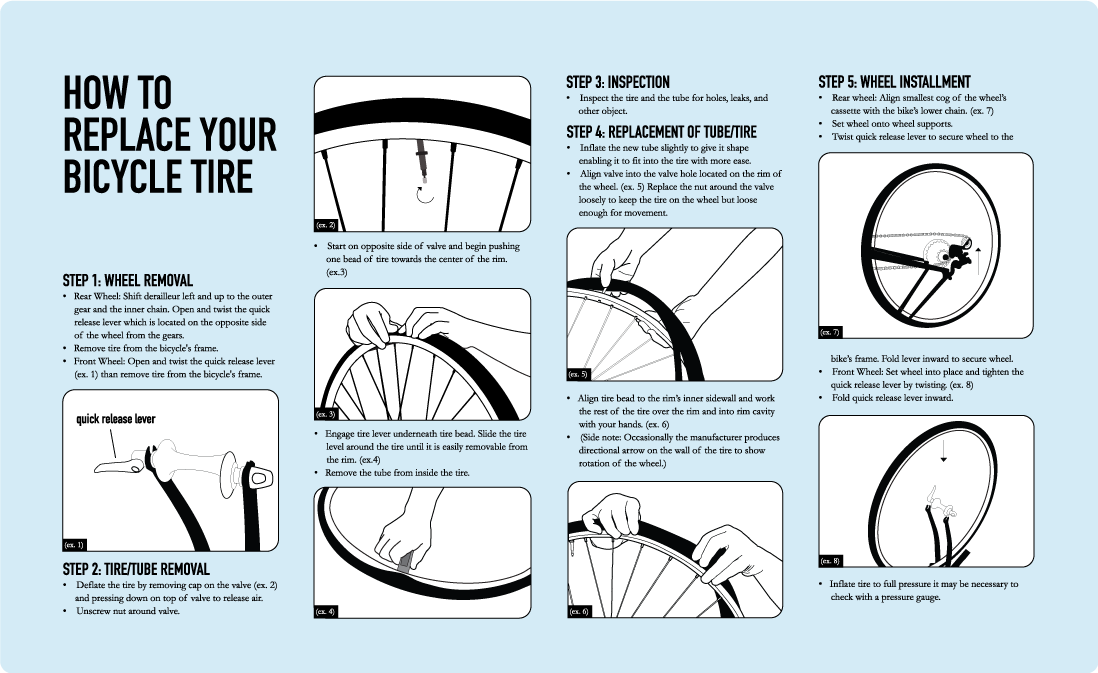 around the rim so that the tire comes off the rim.
After removing the tire, tube and rim tape from the rim, attach the new rim tape, insert a screwdriver into the holes in the rim tape and rim, secure it, and then slide it along the rim.
Omit the valve.
Press the valve that was skipped so that it comes back with your finger. , swim in a tube.
After completing this work, the chamber of the valve part will go inside the tire.
If the valve is not pressed in, the tube will not fit and the tire will only inflate near the valve, and if you drive in this condition, there is a risk of a puncture.
Temporarily lock the valve while it is retracted.
Screwing to the root is strictly prohibited.
Check tire direction.
Install the tire on one side of the rim before the tube passes over the rim.
Lightly inflate the tube and let it follow the rim as if it were in the tire.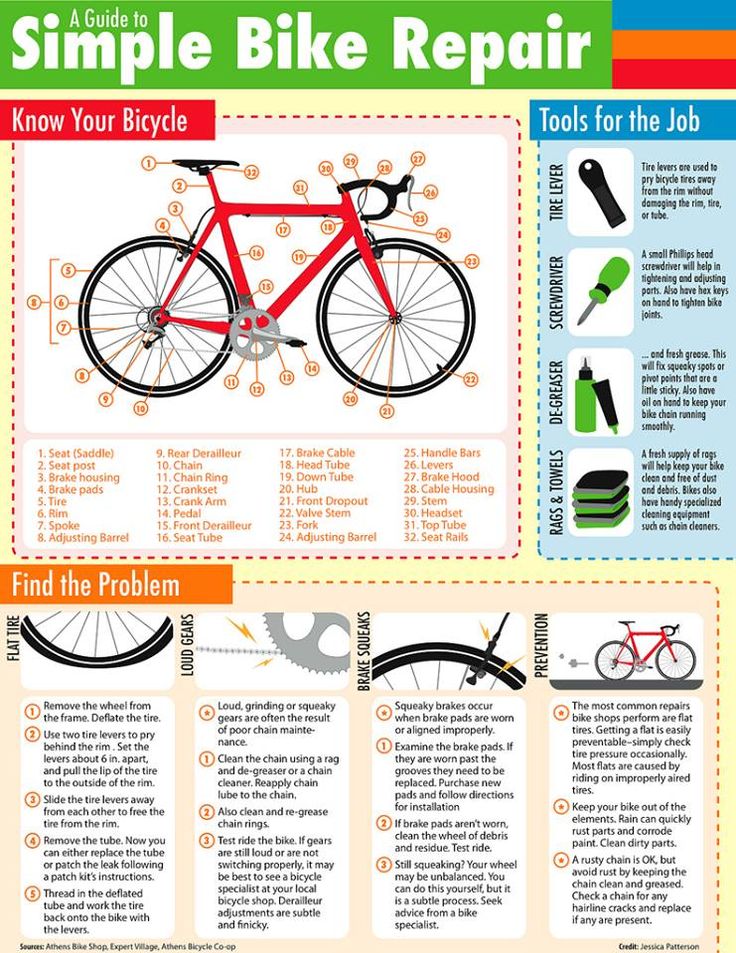
Be careful if you add too much air it will be difficult to work.
After inserting the inner tube, insert the tire into the rim while kneading the tire so that the air in the inner tube is evenly distributed. come back in a few see
After the tire is mounted on the rim, check if there is a partial bulge in the tire or if the tube is trapped between the rim and the tire.
When you change tires for the first time, it is difficult to press the tire into the rim. Especially in winter, the rubber of the tire is hard, so even if you try so hard that you lose grip, the tube will bite or the tube will twist inside and the tire will distort. It is inflated, but you will get the hang of it while you remake it.
Check the running direction of the tire and install it all the way.
For rear wheels such as MTB cars and city bikes (mamacari) 14mm bolts are often used and wrench of this size is not found in conventional tools, so an adjustable wrench or a special tool is required for wheel work.
Since the mold is a normal bolt, a wrench can be used instead of a special tool.
The bars are simply inserted into the U-pieces so you can easily remove them by removing the chain.
Loosen the brake cable and remove the chain before changing the rear wheel.
Replace the rim tube and attach the tire to the rim.
I tried to fit the tires under normal conditions, but I couldn't fix them well, so I flipped the bike over.
It's hard to get the bike into a U-shape without flipping it over, but it can be easily fixed by flipping it over.
As with the rear wheel, remove the 14mm bolt and work the front wheel in the same way as the rear.
Easy seat and handlebar replacement even for beginners and front extension procedure. Bicycle parts are relatively inexpensive, but in many cases, special tools are required for installation, and hobbyists enjoy the job, including child adjustment errors […]
Cross bike tire size and tire replacement years of use. Rubber deteriorates due to temperature, humidity, sunlight, etc., so even if it looks clean, after 1 year [ …]
Cross bike chain replacement When using a bicycle chain, the pins and pin holes wear out and a gap forms, and it stretches by the amount of the gap, and the teeth of the sprocket and chain do not mesh with each other, causing the teeth to jump. […]
Replacing and adjusting the rear derailleur and motocross bike shifter Although the rear derailleur is not a frequently replaced part, it should be regularly […]
Motocross bike bottom bracket and changing the cranks pedals, and its size depends on the frame used.
Bicycle maintenance
Easy innovation zone
We welcome cyclists of all ages!
In this most interesting section of our site you will find articles about bicycles carefully collected and written by us. They reflect all the most necessary technical knowledge about bicycle technology, advice from professionals from the world of cycling, interesting facts and many other entertaining things.