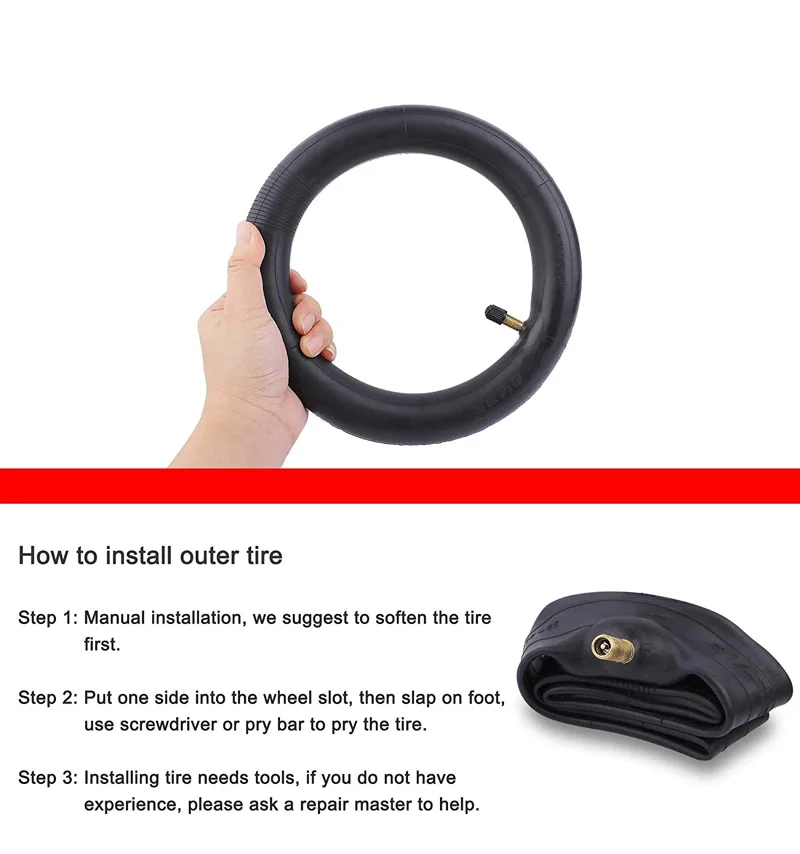
So, you have a flat tire or one that’s leaking air. It’s not the end of the world. Luckily there are safe and cost-effective ways to properly repair most tire punctures. The purpose of this article is to show you the difference between a safe, permanent repair and a temporary string, plug or patch repair.
According to the National Highway Traffic Safety Administration (NHSTA) and the Tire Industry Association (TIA), the only method to properly repair a tire puncture is to fill the injury with a repair stem and back the stem with a repair patch. This is commonly known as a combination repair or a patch/plug repair.
Patch/plug repairs are most often performed using a one-piece repair unit that combines the repair stem and cap (or patch) into one unit. However, special circumstances may require the use of a two-piece combination repair (ex. If the angle of the puncture exceeds 35 degrees). The repair is then permanently bonded to the inside of tire and through the injury channel using a cold, chemical vulcanizing process.
The repair essentially becomes part of the tire, creating an air-tight seal that keeps air in and moisture and contaminants out (more on this procedure below).
Emergency roadside plug repairs are NOT intended to be a permanent tire repair. Plugs and string repairs are designed to get you back up and rolling long enough to get home or to the nearest service center to perform a proper tire repair.
The common misconception with plug and string repairs is that because they hold air, they are safe to use. While it is true that many plug repairs do a great job of keeping air in the tire, that’s only part of the equation. Because they’re not completely sealing the injury, plug repairs may allow air and moisture to penetrate the body of the tire. Over time, this could lead to a dangerous (or even deadly) blowout.
A Patch-Only Tire Repair Leaves Your Tire Susceptible to DamageA tire repair that uses only a patch is also NOT considered proper or safe. A properly installed patch will do a great job of allowing the tire to hold air. However, similarly to the plug-only repair, the patch does not fill the injury channel. Therefore, air and moisture could seep into the tire from the tread surface and eventually damage the tire.
Only a proper patch/plug repair completely seals the puncture from inside the tire and through the entire injury channel. There are a few extra steps necessary to perform a proper tire repair in accordance with industry guidelines. We’ve developed a simple acronym to help organize and remember the steps: R.E.P.A.I.R.
 It can also be determined if the puncture did any significant damage to the cords or belts.
 The over-buffed area of the inner liner is treated with a thin layer of rubber sealant, and the excess repair is trimmed to approximately ¼” above the tread surface.
There are a number of factors that may determine whether or not your tire is safe to repair. These factors fall into three main categories:
 Excessive wear, casing separation, impact damage and other conditions may make it unsafe to properly repair your tire. For a more comprehensive list of repairable vs. non-repairable conditions visit our blog Can Your Tire Be Repaired?
The occasional flat or leaky tire is an unavoidable part of life. But, taking shortcuts to repair it can be dangerous to you and your passengers. Take the time and do the research to do the job right and/or find a reputable tire repair shop trained in proper tire repair procedure.
| How-To - Wheels and Tires
Tires—sometimes even the best go flat, especially when you use your 4x4 off-road or on back roads. We recently picked up a 4-inch lag bolt in one of ours, and when it came time to fix the leak we thought we'd shoot a quick video on the topic so you could see the process.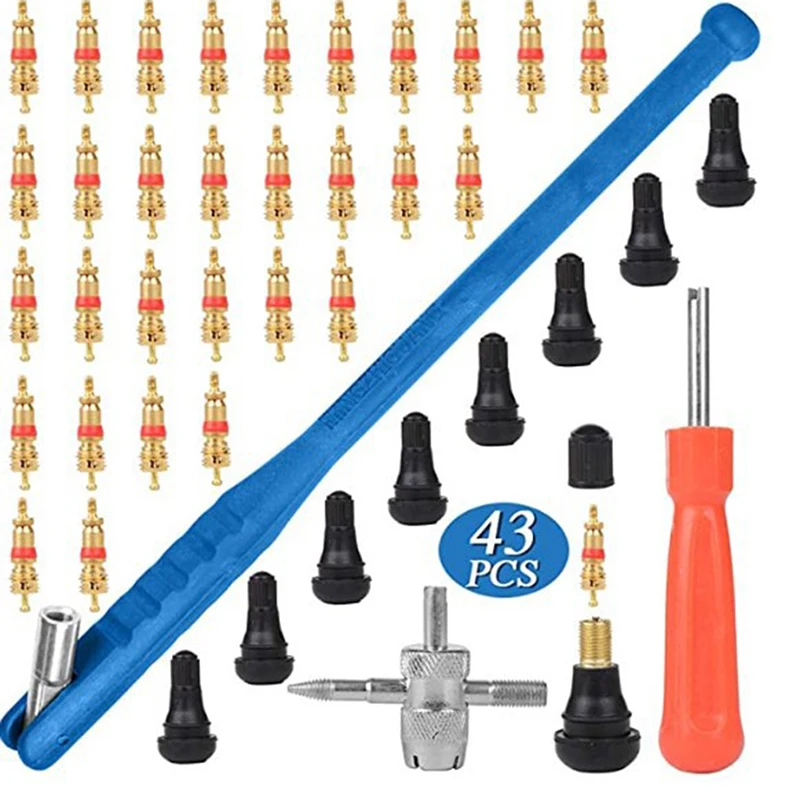 Using a plug, you can fix a tire almost anywhere, and having the tools and knowledge to plug a tire can save your bacon as it did ours. Check it out!
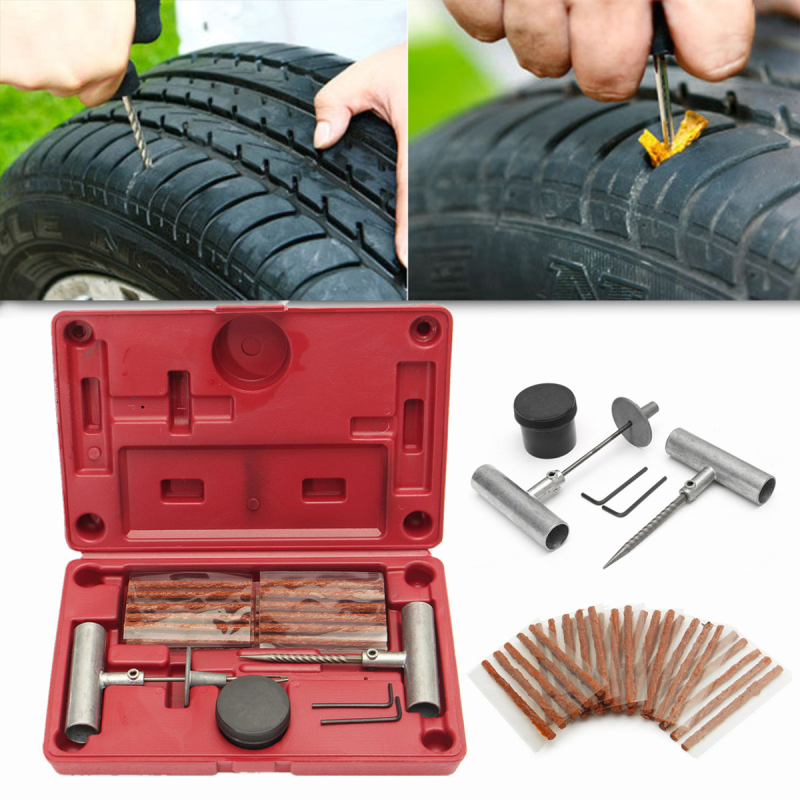
There are several tools that will make fixing a tire on the side of the road possible. When we found the bolt in our tire we had on hand a tire plug kit, a bevy of hand tools, and a portable air compressor. Our tire plug kit is from Power Tank and is known as the Pro Series Tire Repair Kit, but we also like the Safety Seal Tire Kit from our friends at Premier Power Welder. Our air supply is the ARB Twin High Performance Portable Compressor for 12-volt systems, but a charged Power Tank would work well, or even a can of compressed air would do in a pinch. We also needed a pair of locking pliers, although the Power Tank tire repair kit comes with some needle-nose pliers that would work for many jobs.
Procedure for Plugging a TireNeedle-nose pliers help get the plug into the plug insertion tool.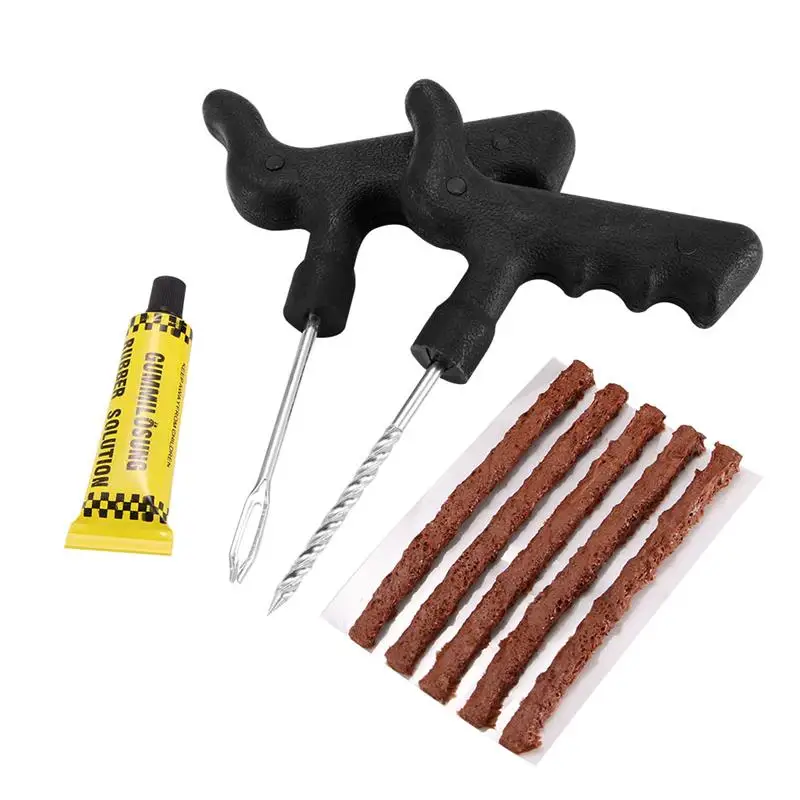 You want to center the plug in the tool before inserting it into the tire.
You can now pull out the object that has created the leak. You can add air before or after inserting the plug, but a little air pressure will help keep the tire firm and help you get the plug or plugs in.
If the hole is big you may need more than one plug. Several plugs may come out more easily than one would, as they will add more weight that will want to exit when the tire spins fast.
With the plug pushed into place you can quickly yank out the insertion tool. You may need to add more plugs to seal up the hole. Be careful when adding subsequent plugs so you don't push existing plugs into the tire.
You'll want to trim the excess plug material flush with the surface of the tread.
This Pro Series Tire Repair Kit from Power Tank is old and tattered but still does the job. It's one of the best because it's small and portable but has everything you need and more.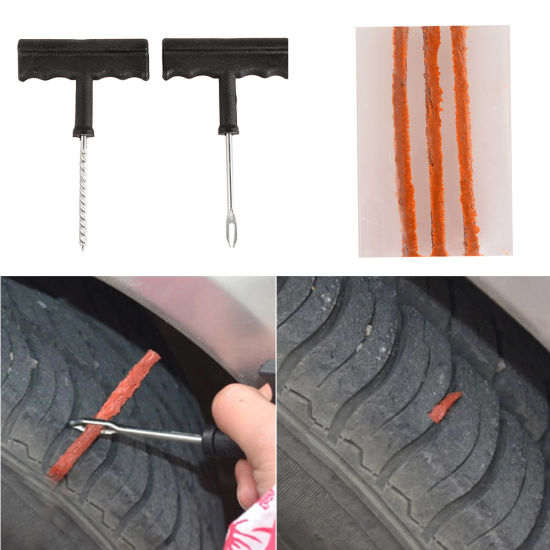
Tire plug insertion tool and reamer.
The kit also comes with some handy needle-nose pliers, a valve core tool, a couple of extra valve stems with valve cores, some lubricant that can be helpful for getting multiple plugs installed, a small knife to trim the excess plug material, and more.
This kit also comes with a valve stem installation tool and a length of wire you can use to try to stitch up any larger cuts or tears in a tire if you must. With the tire stitched up, ideally you can then shove plugs in the remaining holes to help plug the tire until you can get back to someplace where you can be rescued. Don't drive on the road with a very damaged tire—that can be very dangerous.
First you need to find the source of the leak. In our case it took some looking but eventually we noticed a big old bolt head in one of the tread blocks. Once you find the leak, get your tire repair kit out and thread a tire plug through the insertion tool.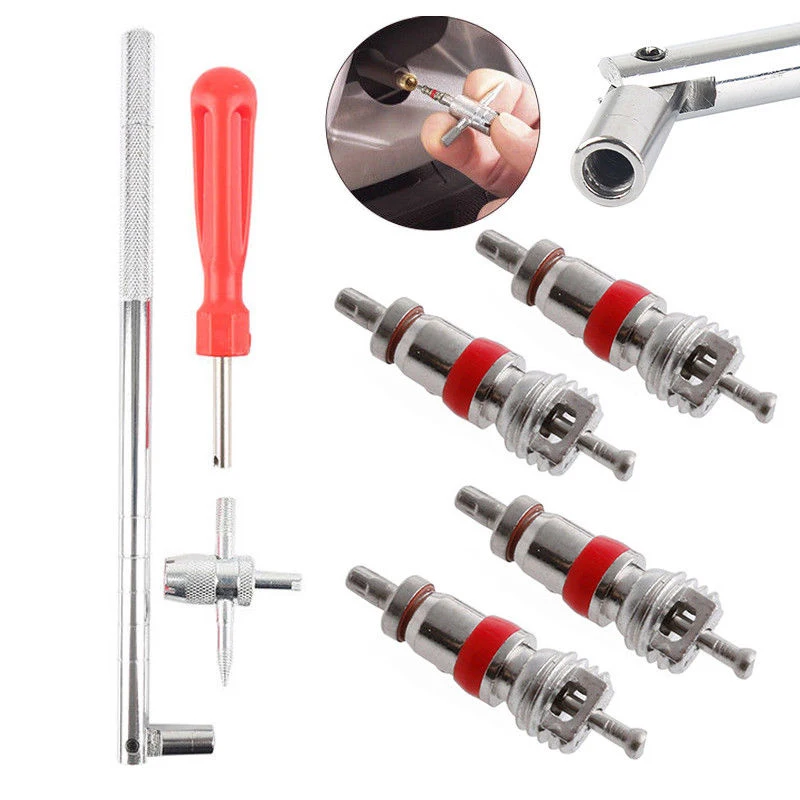 Pliers will help with this. You want the plug to be centered in the tool. Then, pull out the object creating the leak and quickly shove the plug in the hole. You can add air before, during, or after the plug is inserted, but having some air pressure in the tire will help you get the plug in place. Once the plug is in the hole, you will pull the tool out quickly, and hopefully leave the plug in the hole.
Some plug tools have a collar that helps keep the plug in place when you remove the tool. If the hole is big, you may need to install two or more plugs in the hole. Some kits come with a reaming tool to help make the hole round to accept plugs, and most kits include some lubricant to help with inserting the plugs, but this can also help them self-eject when you don't want them too. With the plug or plugs in place and the leak sealed you will want to trim off the excess tire plug material flush with the surface of the tread. Now the tire is plugged, but that doesn't mean the plugs won't come out when you are driving home or to the tire shop.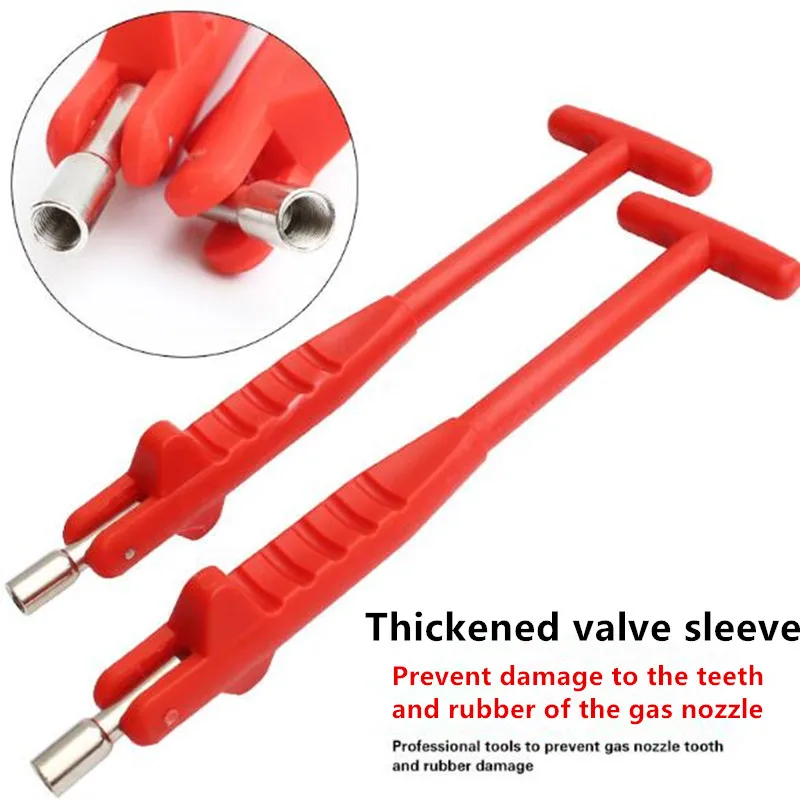 A tire shop can make a more permanent repair to many holes in tires, although not all holes in all tires can be fixed.
Sources:
Expand
| Tool name | Quantity |
| Power drill | 2 |
| Electric drill | 1 |
| Cordless screwdriver | 1 |
| Electric angle cutter | 1 |
| SDS adapter with keyless chuck | 2 |
| Riveting gun | 2 |
| Construction level bar 1.5m | 1 |
| Toolbox | 2 |
| Bench hammer 400 gr | 2 |
| Sledgehammer | 1 |
| Percussion tool set (chisel, bolt, punch, center punch) | 1 |
| Hacksaw | 1 |
| Metal shears | 1 |
| Pliers | 1 |
| Side cutter medium | 1 |
| File set | 1 |
| Carbide screwdriver set | 1 |
| Wrench set | 1 |
| Universal ladder 4-fold | 1 |
| 3-section universal ladder (more than 6m) | 1 |
| Silicone gun | 1 |
| Tester | 1 |
| Electric soldering iron 60 W | 1 |
Electric extension cord min.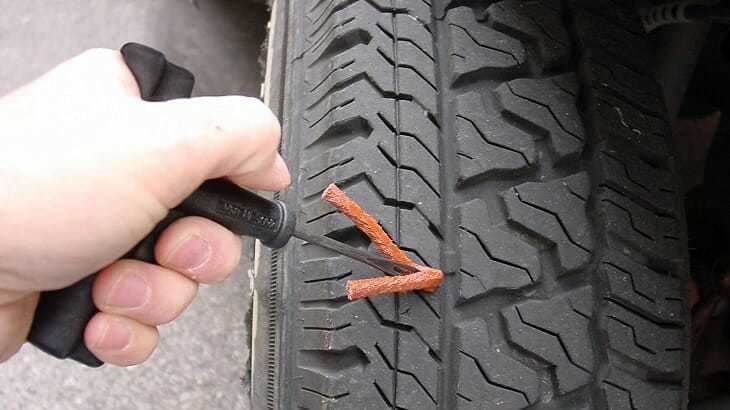 30 m 30 m | 1 |
| Electric screwdriver indicator | 1 |
| Tape measure 5 m | 1 |
| Caliper 125 mm | 1 |
| Goggles | 2 |
| Construction helmet | 3 |
| Universal first aid kit | 1 |
| Metal standard drill set | 1 |
| Concrete drill O 6 mm L=160-200 mm | 2 |
| Concrete drill O 8 mm L=200-260 mm | 2 |
| Concrete drill O 10 mm L=550 mm | 2 |
| Concrete drill O 12 mm L=550 mm | 2 |
| Concrete drill O 14 mm L=750 mm | 2 |
| Concrete drill O 16 mm L=950 mm | 1 |
| Concrete drill O 18 mm L=550 mm | 1 |
| Concrete drill O 20 mm L=550 mm | 1 |
| Note: The recommended number of assembly team - 3 people: electrician - 1 person, fitter - 2 people. 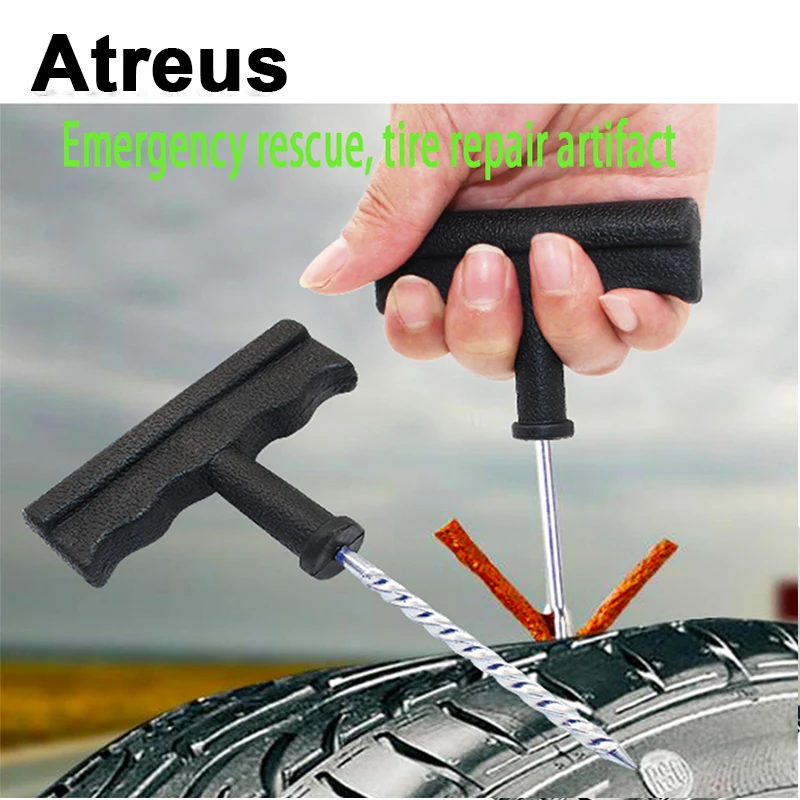 | |
Before proceeding with the installation of the roller shutter, it is necessary to check that the complete set is complete.
The surface where the guide rails and the protective box will be installed must be even and smooth, without cracks and sagging from the plaster.
fig.1 Surface mounting.
For surface mounting, it is necessary to take the guide rails and attach them to each other with blind sides. Mark the places for fastening with a marker, the distance between the fasteners is approximately 450-550 mm, the upper and lower fasteners should be located at a distance of 100-150 mm from the tire cuts.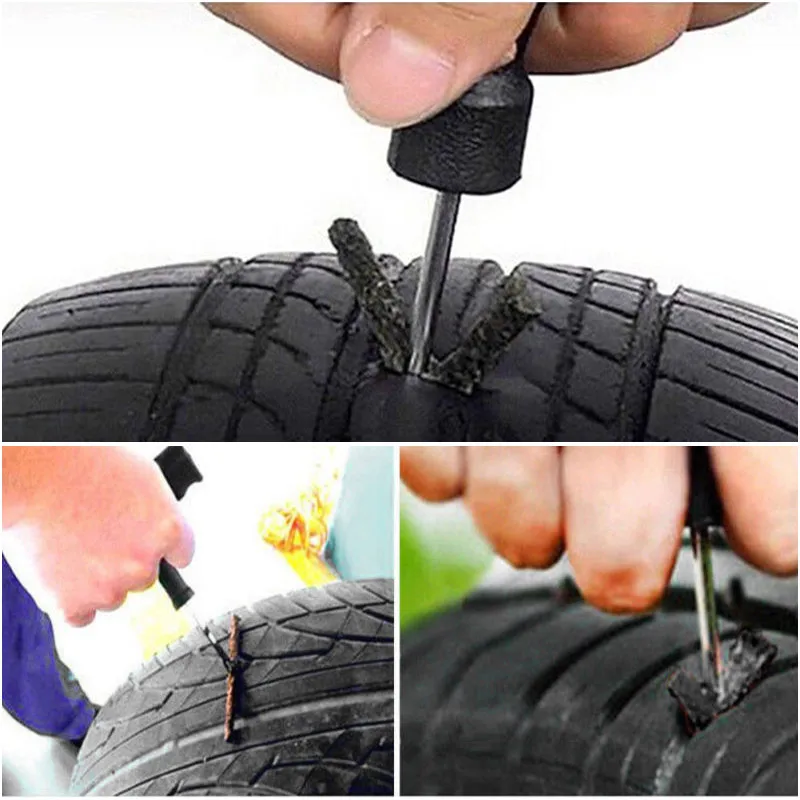 Drill holes Ø12 mm for subsequent installation of plugs.
Note: Do not drill through the bar!!!
fig.2 Integrated installation.
For recessed mounting, lay the busbars edgewise and drill holes in the stiffener at the same distance as for surface mounting, using the same spacing of 450-500mm between the holes, with a Ø 12mm drill.
Note: do not drill through the bar!!!
fig.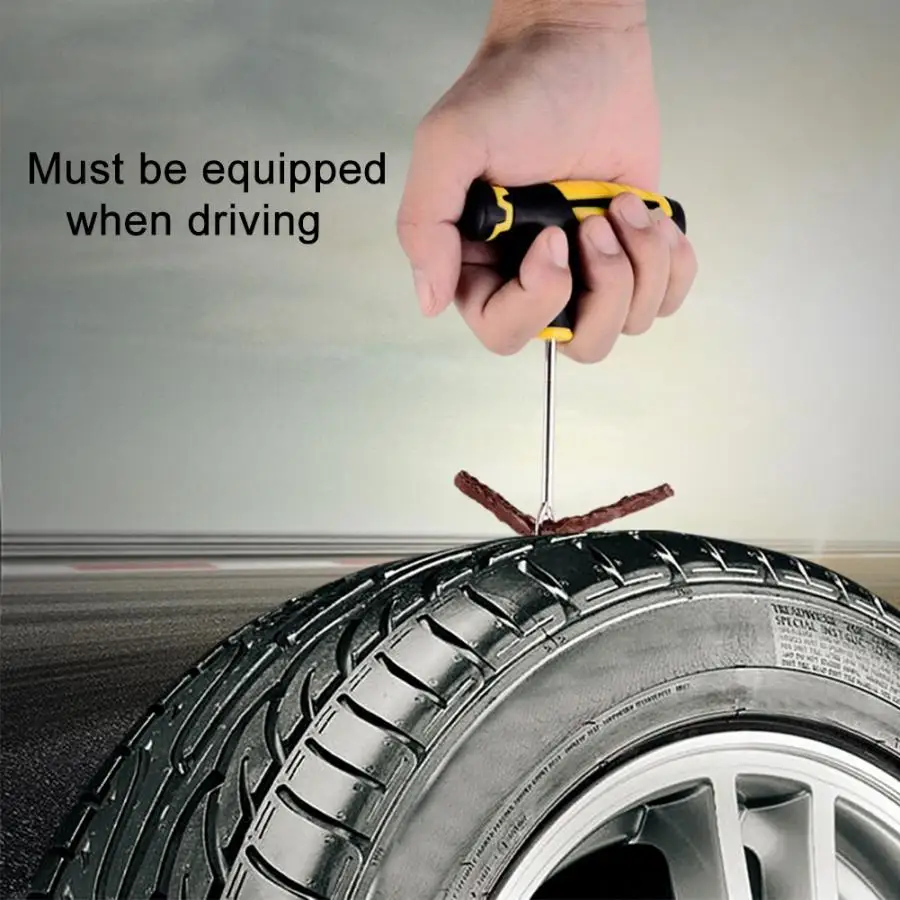 3 Surface mounting.
fig.4 Built-in installation.
Note: action (fig. 5) for outdoor mounting for the output of cardan, tape, cord, cord or electric drive wire.
fig.5
The next step is to fit the two guides into the side covers, and insert the guide rails into the legs of the side covers (fig.6).
fig.6
Apply to the frame of the opening.
fig.7
Install inside the opening.
fig.8
Roller shutter frame must be level. The guide rails and the protective box of the roller shutter must fit snugly against the plane of the opening along the entire height and width.
Valid for surface-mounted structures.
fig. 9
After leveling the structure, mark the location of the hole for further output of the controls:
Install the safety spring for the cord or the tube (Fig. 10) for the cord in the drilled hole.
fig. 10
fig.11
fig. 12
Remove the protective film from the roller shutter box and place the frame in place. It is recommended to drill holes for installing dowels with a long drill to avoid damage to the roller shutter elements.
When carrying out fastening, it is necessary to periodically check the correct installation using the mounting level.
The frame must be securely fastened and not pose a potential hazard to human health and life. For fasteners, it is forbidden to use silicone, wooden plugs or mounting foam.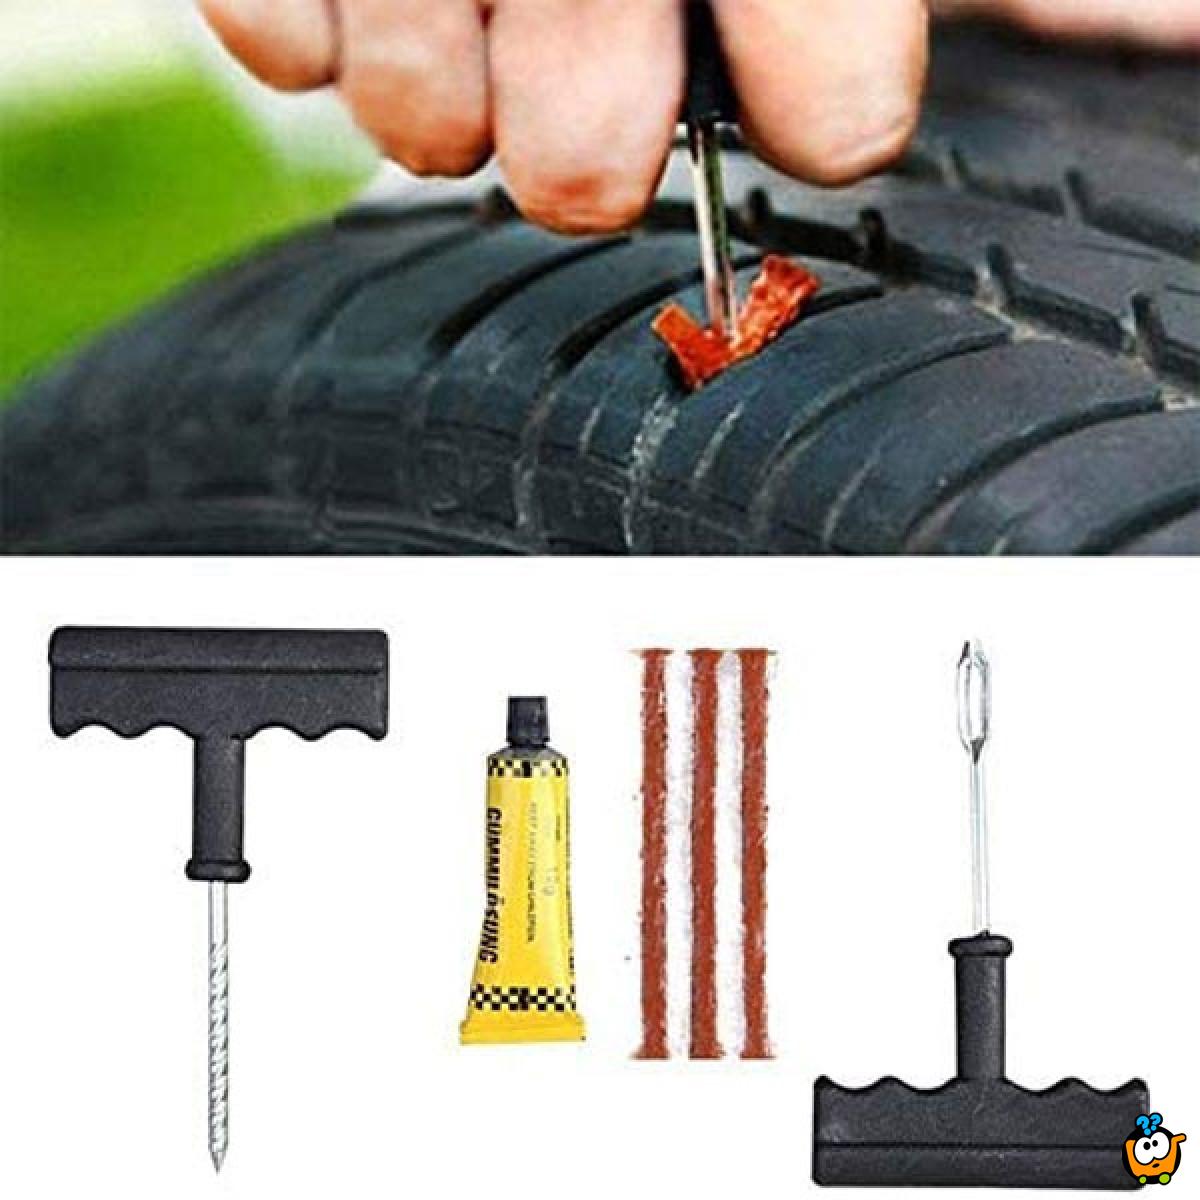
When installing a motorized roller shutter, it is necessary to connect the cable to the switch terminals in accordance with the instructions for connecting the roller shutter motor.
When installing a mechanical type of roller shutter drive - thread the tape, cord or cord into the guides.
fig. 13
fig. 14
Insert the motor cable or tape into the previously drilled hole in the wall (surface mounting). The cord cable or cord must be threaded into the safety spring or tube and secured.
Attach drive mechanisms: cardan, cord, cord or belt.
fig. 15
fig. 16
In case of built-in installation, the drive mechanisms are fastened to the guide rail using self-tapping screws or rivets.
Installing the curtain must be led behind the shaft from the rear of the protective box into the guide rails (Fig. 17). To avoid damage to the blade coating, wrap the roller with a rag.
fig.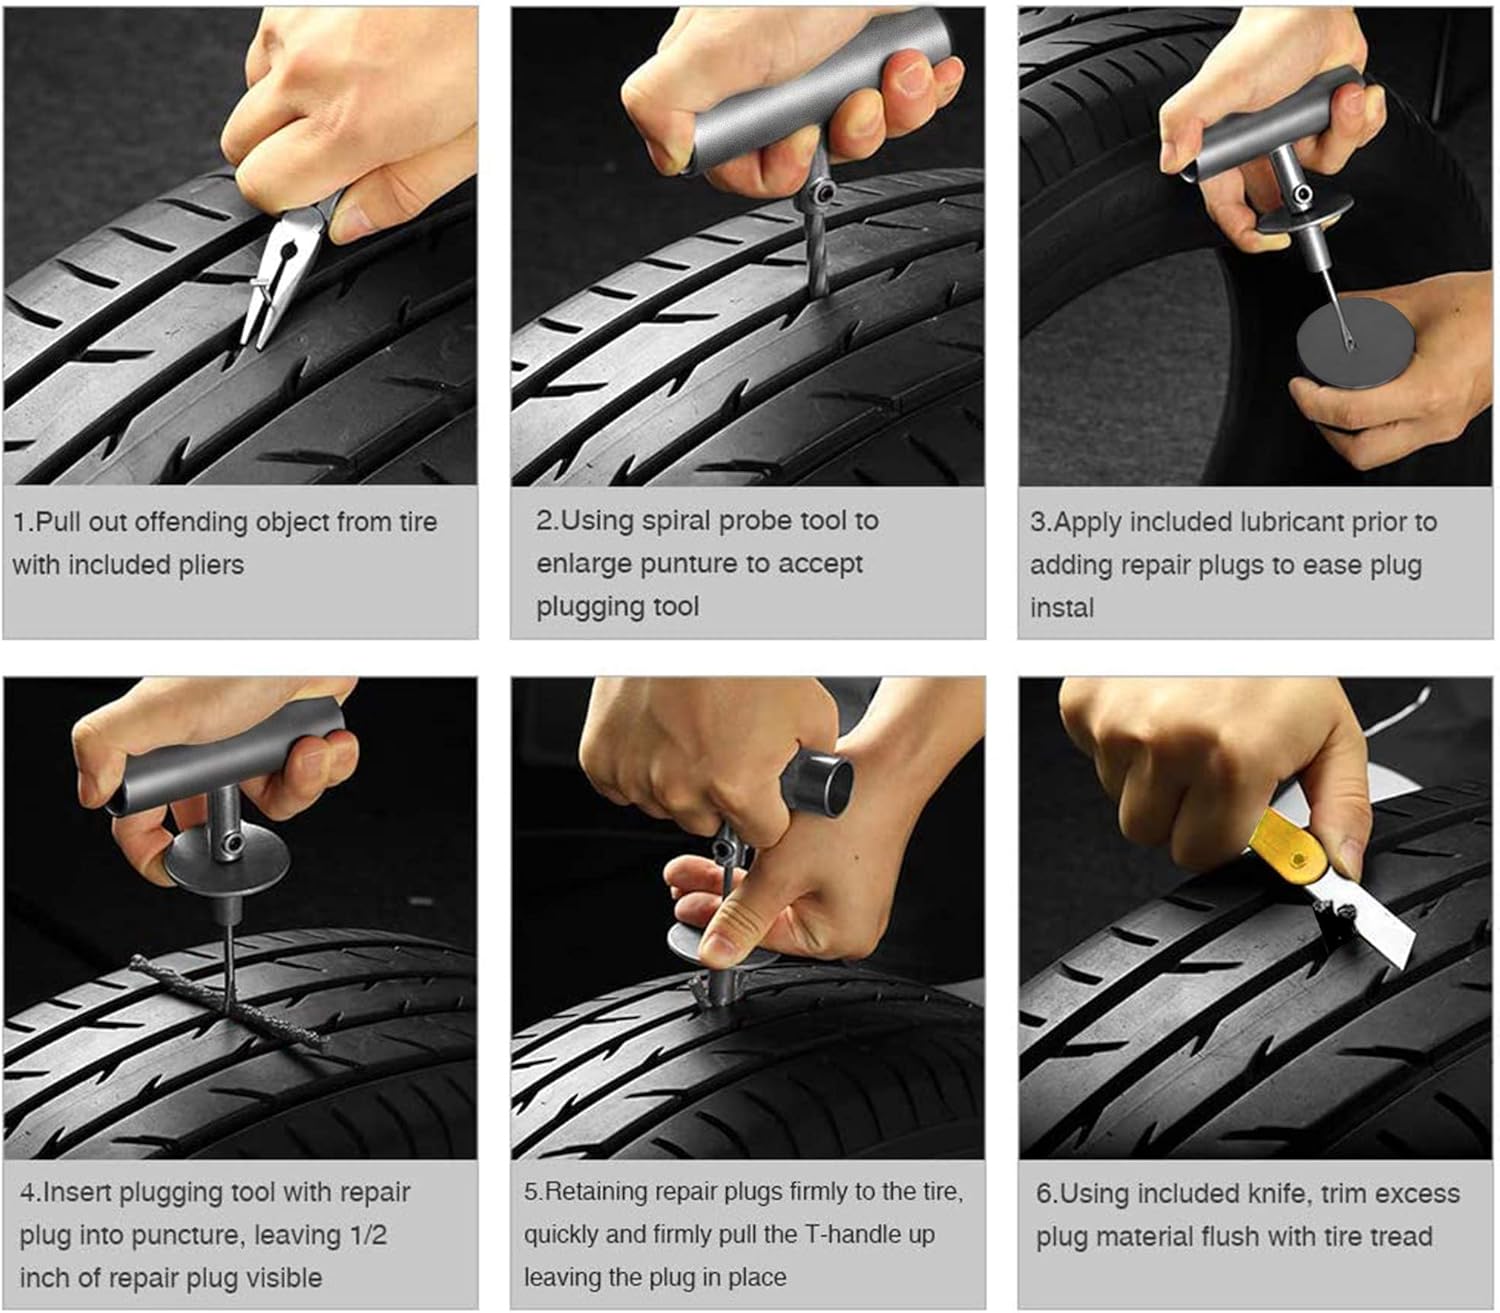 17
17
When mounting a roller shutter with mechanical drives, attach a cord, tape or cord to the pulley (Fig. 18). By rotating the shaft, wind the traction element on the pulley to further control the web.
fig. 18
The next step is to fasten the roller shutter leaf with the suspension mechanism (Fig. 19, 20) (crossbars or traction springs). Lead them from the side into the upper lamella of the canvas.
fig. 19
fig. 20
Place the locking bolt on the shaft and fix it with the bolt rings, press the rings together until they stop. The crossbar must fall into the mounting holes of the rings. In this position, the rings must be fixed with self-tapping screws. It is not necessary to drill the shaft, it is not necessary to install the self-tapping screw, the self-tapping screw is installed in the hole of the crossbar ring and is screwed all the way into the wall of the shaft.
fig.21
fig. 22
Traction spring is attached to the shaft perforations.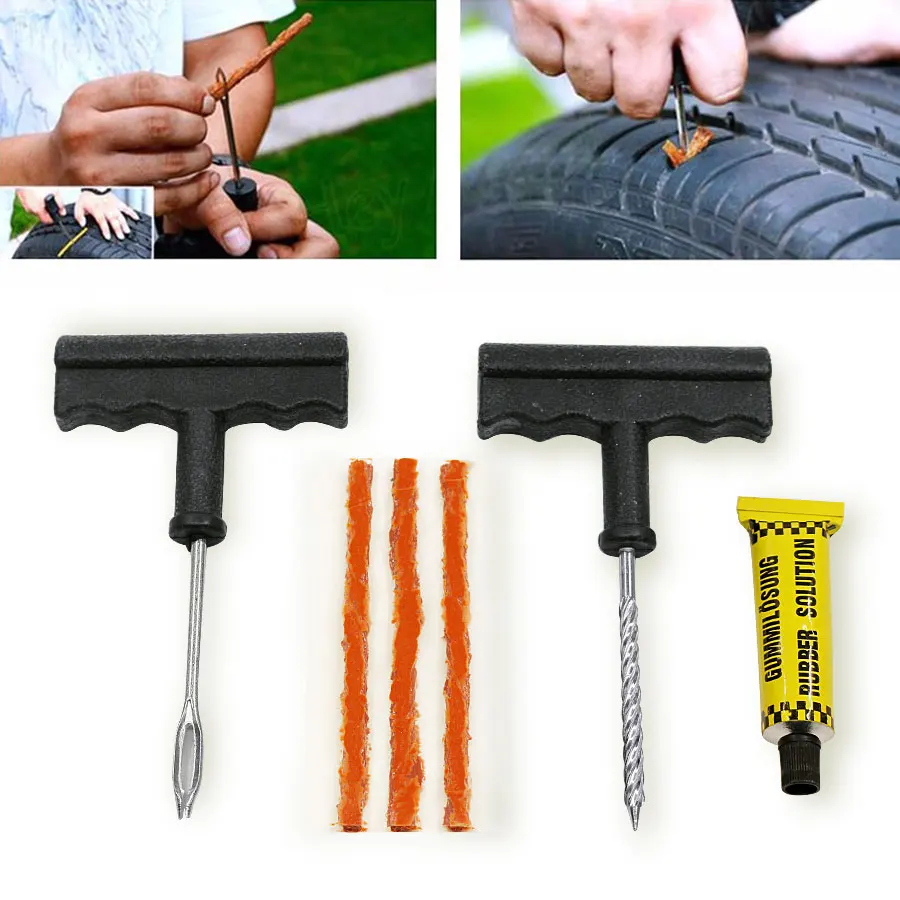 It is necessary to compress the end of the traction spring and insert it into the shaft.
fig. 23
To limit the lifting of the curtain, you need to install a stopper in the bottom bar. Drill through holes in the end plate at a distance of 50-100 mm from the guide rails. Install a locking bolt through the lining into the holes and screw the stopper to it.
fig. 24
For the design with PIM (spring-inertial mechanism) after installing the curtain in the guide rails, and installing the traction springs, it is necessary to tighten the spring installed in the shaft, rotating the shaft away from you (if the open part of the box is looking at you) . While holding the shaft, install the traction springs in the perforations of the shaft.
Hold the blade by the stopper to check the operation of the PIM.
If necessary, add or reduce the number of spring turns.
fig. 25
Guided by the instructions for connecting the electric drive, connect to the network and adjust the end positions of the roller shutter leaf.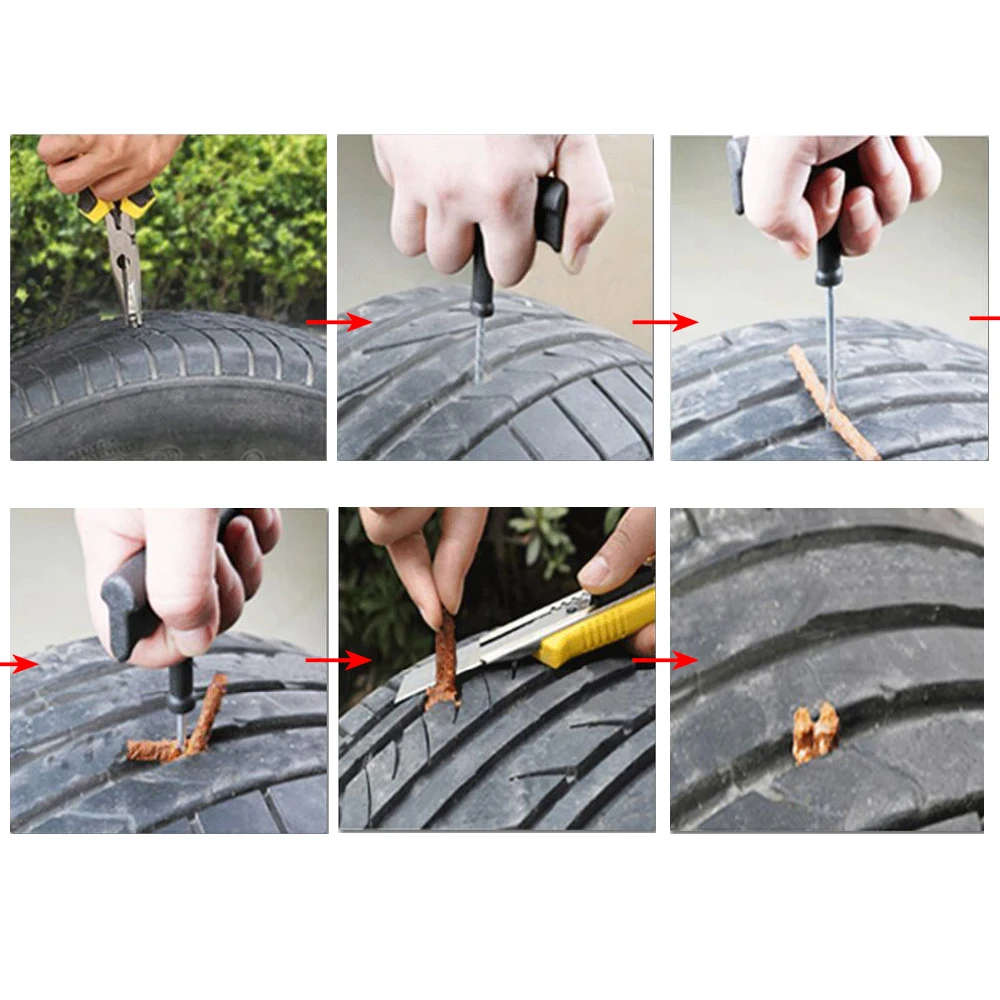
Install the protective cover of the box into the groove and fix it with rivets or self-tapping screws.
fig. 26
To prevent unauthorized opening (unscrewing) of the structure and gain access to the controls, at the end of the installation it is necessary to drill out the slots of the heads of self-tapping screws, screws, screws.
Access holes on the guide rails (for surface mounting) are closed with plugs.
Download (PDF 1,2 Mb)
Contents
Types of inserts Installation of stretch ceilings is a laborious process, starting with the installation of a profile. However, at the end of the work, there is often a feeling of incompleteness of the design. The reason for disharmony is the gaps that remain between the canvas and the walls. Inserting a plug for a stretch ceiling will help solve this problem. We have a wide range of products at affordable prices.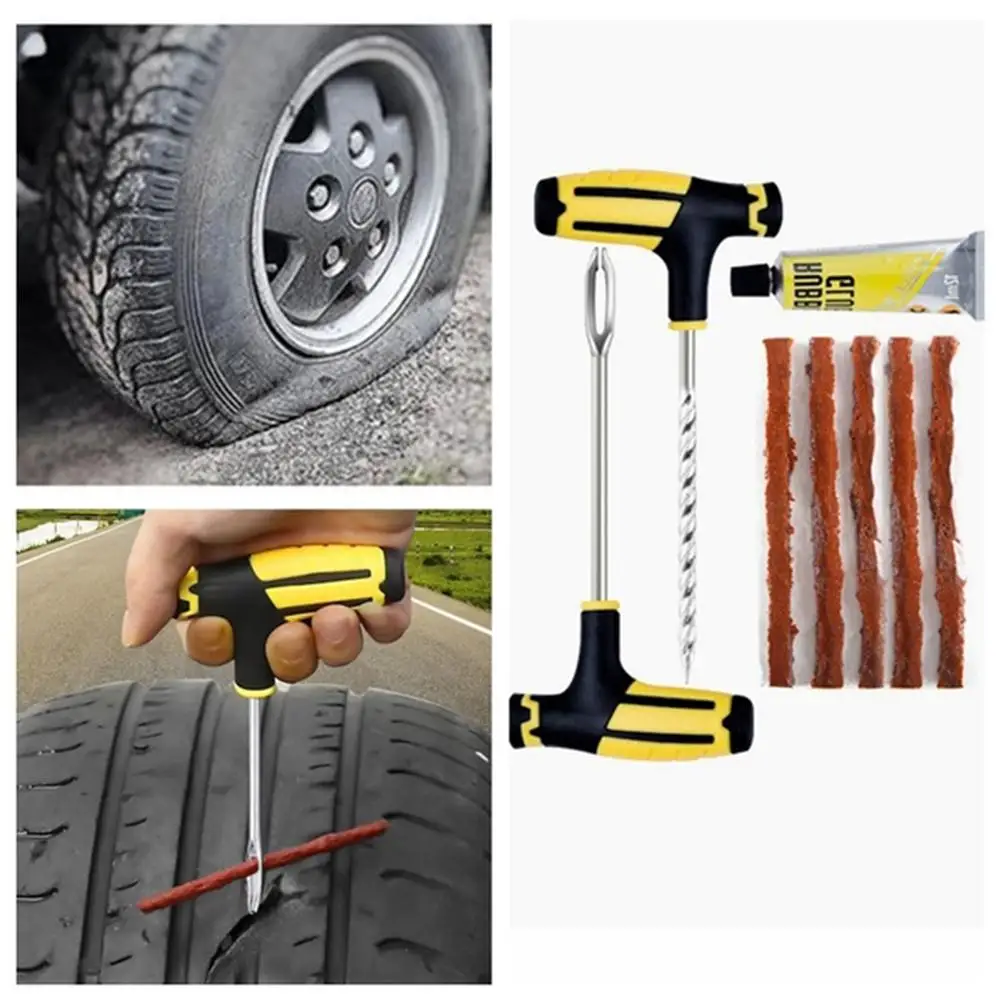 Contact us if affordable price and high quality are important to you.
The insert is, first of all, the element responsible for the visual appeal of the ceiling. In its absence, the canvas does not look aesthetically pleasing. On the other hand, the plug is also a sealant for stretch ceilings, which is responsible for the safety and reliability of the structure. Also, inserts are used to connect canvases of different textures. In order not to disturb the composition, you need to choose a suitable insert. Stubs differ from each other in a number of ways. The most popular of them are the shape, texture, entry features and material.
The main advantage of the stub is that for any situation you can find a suitable option. If you need to hide the curvature of the surface, then it is best to use a baguette. You can hide the gap between the canvas and the wall in rooms with a complex configuration using an edging cord. The main advantage of the method is the variety of colors and textures.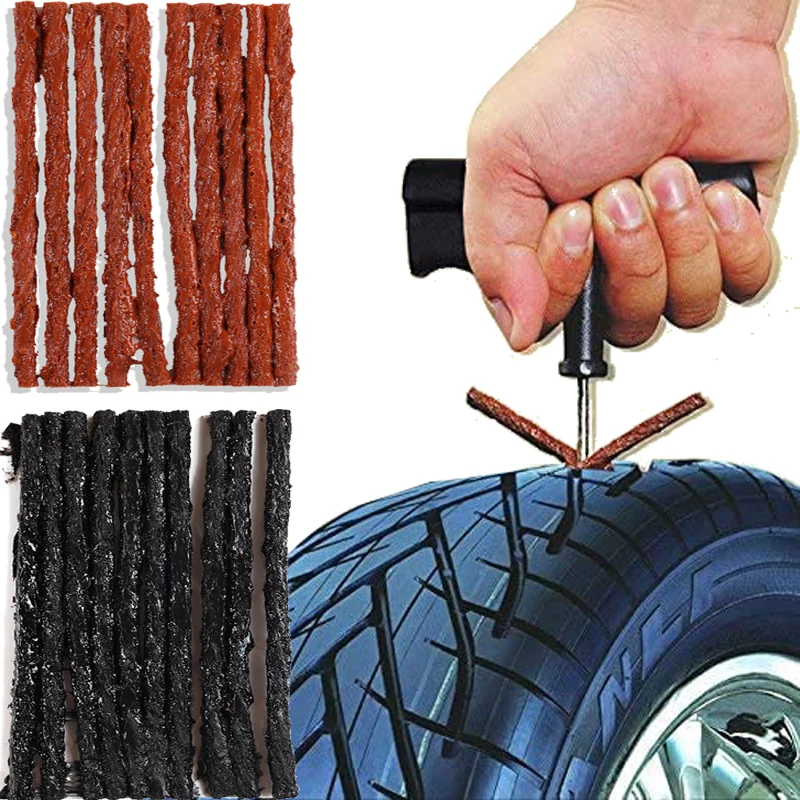
If the installation of the inserts is not difficult, then a masking tape for a stretch ceiling is perfect. This option is acceptable in rooms with straight ceilings.
When choosing an insert, you also need to be guided by how it will be fixed. The end cap must be selected according to the characteristics of the profile. The following options are possible:
T-pads. They are used only for mounting harpoon profiles in rooms with flat ceilings.
L-shaped insert (corner for stretch ceiling). Due to its flexibility, it can be used in rooms of complex configuration. According to external signs, the corner resembles a ceiling plinth.
F-linings. They are used as masking tapes under the eaves. Only suitable for plastic profiles.
SL overlays. Suitable for both PVC and aluminum profiles. The main difference is the elongated lower part, which creates an imitation of a smooth transition from the canvas to the walls.
The choice of material for the plugs depends on the characteristics of the ceiling and the complexity of the installation. The most popular option experts call foam moldings. They have a relatively low cost and are suitable for mounting canvases with backlight. Rubber molding is no less popular. Its advantage is versatility. Inserts made of this material are suitable for mounting ceilings, even in rooms with a problematic configuration.
It is best to hide the gaps between the levels of straight ceilings by using plastic inserts. Polyurethane corners and masking tapes guarantee greater durability.
If the edge is also needed in order to emphasize your individual style, then you can opt for thread and wooden inserts. These are rarer options, but they can transform any room beyond recognition.
Since the insert performs an aesthetic function, its texture should be chosen especially responsibly.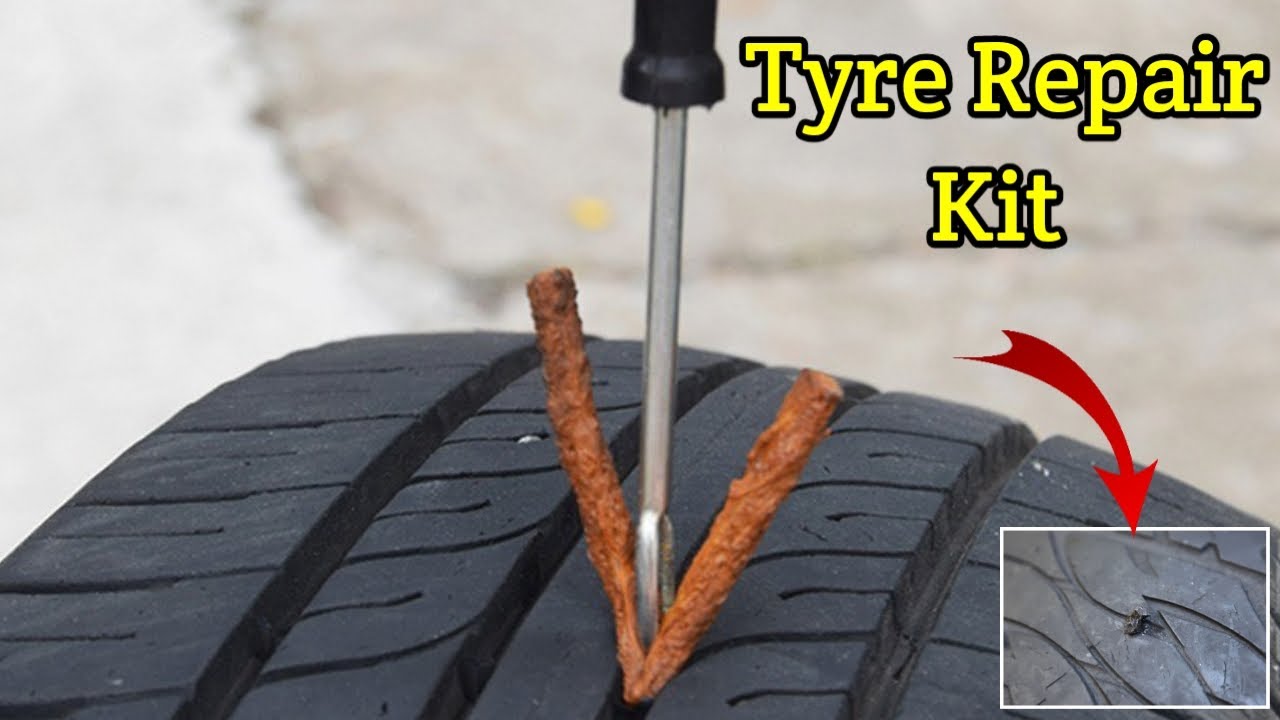 Plastic corners can be glossy and matte. In the choice of colors, buyers are not limited: the cap can be either color or black and white. Another option is a embossed pattern. The main thing is to choose the texture of the plug so that it blends harmoniously with the ceiling and walls.
When installing two-level ceilings, dividing profiles are used. Most often, they are painted white. To hide the joint between the canvases, in this case, an insert of one of the following forms is used:
Installing a plug, regardless of type, does not involve the use of glue. The substance can damage the material, spoil the appearance of the ceiling and complicate future repairs.
The installation of each type of plugs has its own characteristics. The easiest option is to mount the cord. In order to install the edge, you need to take the following steps:
Select a starting point, that is, a corner.
Gently press the tape into the slot (until it clicks).