“A tire only loses air if it’s punctured.” This is a common misconception that we have all had or heard and yet the reality is quite different. Indeed, a tire can lose air even without a puncture, as for example in the case of a crack in the valve that is used to inflate your tires. A punctured valve is difficult to detect, and not taking care of it in time can have real consequences for your tire, but also (and above all!) for your safety. Blackcircles Canada, your online tire specialist, offers below a complete guide to the causes and consequences of a punctured valve, and how to repair a leaking valve stem.
A valve is a pin located on the outside of the tire, through which the tire can be inflated/deflated. It has a mechanism consisting of a spring-mounted valve that closes tightly with the air pressure inside the tire. Over time, the stem valve may become brittle and cracked, which may increase the risk of air leaking through it.
When the stem valve leaks, the affected tire is no longer able to retain air. Depending on the extent of the damage, the air will leak out slowly or more quickly. In both cases, the valve must be replaced.
If the air leakage is slow, you will be subject to the problems encountered by drivers driving with underinflated tires. Internal damage that can shorten the service life of the tire by up to a quarter, increased fuel consumption due to higher rolling resistance: the tire will damage faster, and your energy-efficiency will be significantly lower. The tire will also have poorer traction and the stability of your car will be reduced when cornering, not to mention the more pronounced deformation of the tire that increases its internal temperature, which can cause it to burst. Finally, an under-inflated tire increases the risk of hydroplaning. Tire pressure is thus very important!
 Here’s how to do it!Step 1: Make sure it’s your valve stem that’s leaking.
First of all, make sure it is the tire valve stem that is leaking. To do so, there’s a very simple trick! Apply a mixture of water and dishwashing soap to the valve with the cap removed. If bubbles start to appear, your valve is leaking. If this is not the case, and there is a definite air leak, it will be located elsewhere on the tire.
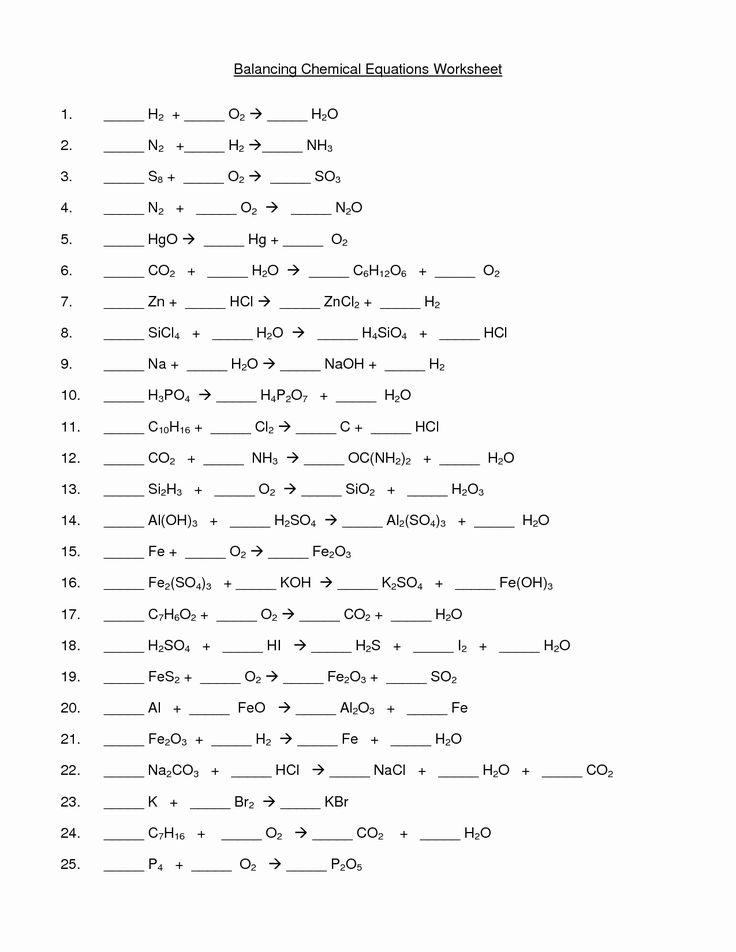
Step 2: Gather the right tools before you start!Before you begin, make sure you have all the necessary equipment to complete the replacement of the faulty valve stem.
For this, you will need the following:
You are now ready to start the process!
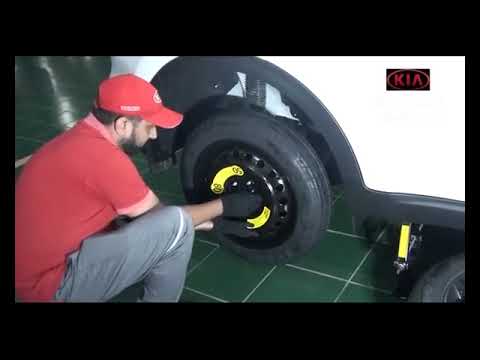
Step 3: Loosen the nuts on the wheel you are going to work on.
To do so, use the wrench mentioned in the previous step to loosen each of the lug nuts holding your wheel in place. Do this while the car is still on the ground.
However, for certain models of vehicles, it is possible that the wheel nuts have an anti-theft ring. If this is the case, you’ll have to use the appropriate special key to remove the locking nut(s).
Step 4: Raise your vehicle with the jack and then remove the wheel.First and foremost, make sure the handbrake is applied so that your vehicle is completely immobilized. Then, use your jack to lift your car. Be sure to position it on the right part of the chassis so that the car is properly supported. This will prevent any damage to the car and any bodily injury. Once your car is lifted, secure it on jack stands. Unscrew the wheel bolts completely, then remove the wheel. Finally, place the wheel on the ground flat, with the outside of the wheel facing up.
Step 5: Remove the valve stem core with the removal tool and let the tire deflate.
If you have not already done so, remove the valve cap. Then remove the valve stem core using the valve stem removal tool to release the air from the wheel, which should normally deflate completely on its own.
Step 6: Separate the tire’s bead from the wheel.For this step, use the sledgehammer in the following way: hit the tire sidewall with the sledgehammer in the same spot until you hear a crack or popping sound, and see the inside lip of the tire visibly break loose from the rim. This means that the tire has been successfully detached from the lip of the wheel.
Once the tire bead has been broken, continue hitting with the sledgehammer around the tire to detach the sidewall around the entire circumference of the wheel.
Step 7: Remove the tire from the rim.Once the sidewall of the tire is separated from the outer edge of the rim around the entire circumference of the wheel, insert your tire iron between the edge of the rim and the inside lip of the tire, and then pry upward to pull the lip of the tire over the edge of the wheel.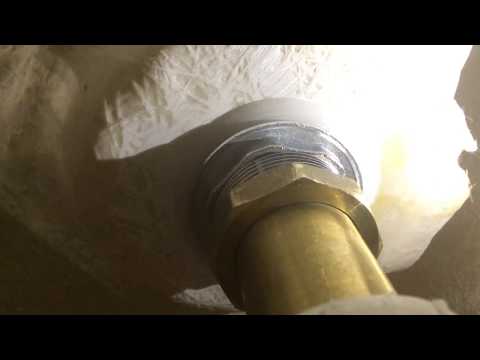 Once you have pulled the lip of the tire over the edge of the wheel, work the tire iron around the rim until the entire lip of the tire is off the rim.
Once the sidewall of the tire is completely above the wheel, grab it by its removed lip and pull it upward so that the opposite lip that was at the bottom of the wheel is now touching the top edge of the rim. Use your tire iron again by inserting it between the tire’s lip and the edge of the wheel and pry upwards to pull the lip over the edge of the rim. As before, work the tire iron around the edge of the wheel until the tire is removed from the wheel.
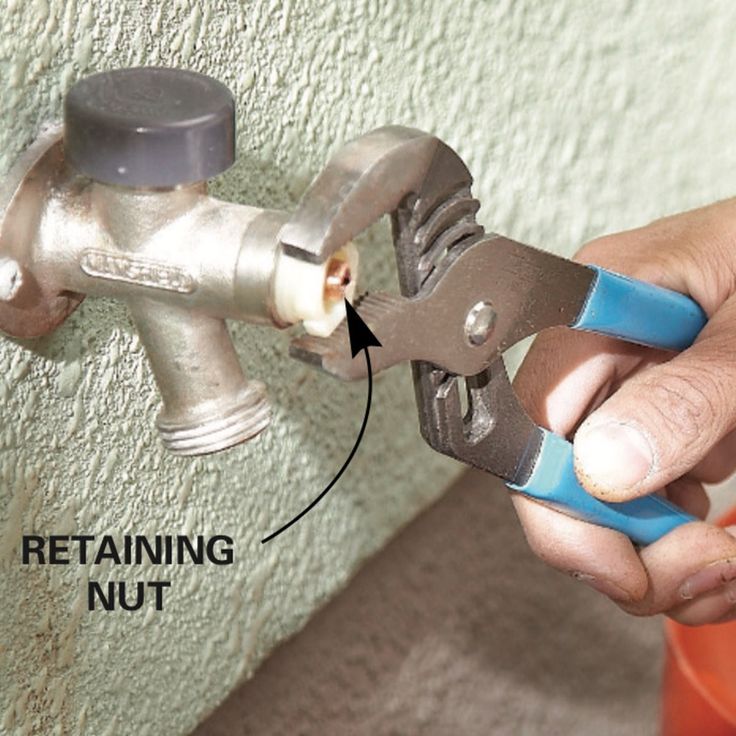
Step 8: Remove the defective valve stem and replace it with the new one.Once the tire is separated from the rim, it is time to remove the valve stem. To do this, first pull out the valve stem free from the wheel using the needle-nose pliers. Once this has been done, install the replacement valve stem from the inside of the wheel. Once it is in position, use the needle-nose pliers again to pull it through into its right place on the wheel.
Once the stem is in place, it is time to put the tire back on its rim. To do this, start by pressing the tire down over the rim until the bottom bead clears the edge of the rim. The aim here is to return the lower sidewall of the tire to its original position on the wheel.
Then press the upper sidewall of the tire down underneath the edge of the wheel. Then tuck your tire iron between the tire sidewall and the rim edge and use it to make the opposite movement to the one you used to pull the tire sidewall out of the rim. Once the bead clears the lip of the wheel, use the tire iron to work your way round the entire wheel until the tire is completely installed on the wheel. Then inflate it to the correct pressure using the air compressor.
Step 10: Make sure there are no other leaks, and mount your wheel back on!Once the tire is inflated to the correct pressure, check for other leaks. If all is well, mount the wheel on your vehicle and bring it down by lowering the level of the jack stands until the repaired wheel touches the ground and you can safely remove them.
Ultimately, it is very important to make sure your tires are free of air leaks to maintain proper air pressure at all times. In the case of a slow air leak, the consequences can be dramatic. If the air leak is due to a faulty tire valve, you will definitely need to replace it. You can either follow the above procedure on how to repair a leaking tire valve or take it directly to a specialist. If, on the other hand, you need to change the entire tire, consult our selection of tires adapted for your car directly online on our website!
Tire Installation 101: When and how to change your tires?
I just filled up my tires and, two days later, my right tire is losing pressure.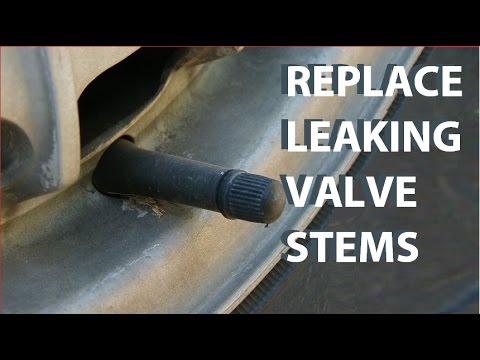 I’ve checked the tire for leaks and don’t think the tire itself needs replacing, so my next guess is the tire valve stem is leaking. How do I fix a tire valve stem leak?
Rachel Juillerat · Answered on Feb 18, 2022
Reviewed by Shannon Martin, Licensed Insurance Agent.
Fortunately for you, fixing a tire valve stem leak is both easy and cheap. You just need to purchase a replacement tire valve stem and a valve core tool. A pack containing both of these items is on Amazon for less than $5!
To replace the leaking tire valve stem, do the following:
Note: If you notice corrosion on the old stem, be sure to clean the interior threads of the tire stem on the tire.
While this is an easy and cheap fix, there are some car fixes you may need assistance with, so it’s always a good idea to invest in a solid car insurance policy.
Jerry makes finding the right policy for you easy. Jerry compares personalized rates from more than 50 top providers and delivers the best deals to your phone in minutes for free. The average Jerry driver saves $887 a year on car insurance.
MORE: Will insurance cover a flat tire?
Car RepairCar Tires
WHY YOU CAN TRUST JERRY
Jerry partners with more than 50 insurance companies, but our content is independently researched, written, and fact-checked by our team of editors and agents. We aren’t paid for reviews or other content.
Browse More Content
What To Do If Your Emergency/Parking Brake Not Working
What To Do If Your Steering Wheel Vibrates or Shakes
Electronic Ignition Pickup Replacement
What To Do If Your Headlights Are Dim
What To Do If Car Starts and Then Dies
Chevrolet Impala Super Sport Insurance Cost
Dodge Caliber Sxt Insurance Cost
Gmc Envoy Denali Xl Insurance Cost
Toyota 4Runner Limited Insurance Cost
Suzuki Aerio Insurance Cost
Ravencliff Car Insurance
Kingsport Car Insurance
Troutman Car Insurance
Halls Car Insurance
Shelton Car Insurance
I’ve loved Lamborghinis since I was a kid.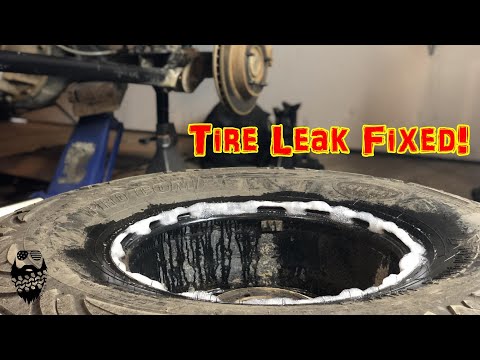 They’re sleek, they’re fast—they’re my dream car! I’m already saving up to buy one someday. How much does car insurance for a Lamborghini cost?
Melanie Johnson
Feb 18, 2022
I got a ticket yesterday and I’m so bummed. I’ve never gotten a ticket before—I was just zoned out and didn't realize I was going 10 over. Can I ask the judge to reduce my ticket?
Melanie Johnson
Feb 18, 2022
I’ve been sitting on my old car that no longer works and I’m ready to move on and clean out. Where can I sell it?
Pat Roache
Feb 18, 2022
Browse All Questions
Some cars are cheaper in Mexico, but it depends on the vehicle and consumer demand.
Matt Nightingale
Apr 19, 2022
To get WiFi in your car you can use a smartphone hotspot, purchase a dedicated mobile hotspot device, install an OBD-II wifi device, or install a modem/router.
Matt Nightingale
Mar 09, 2022
Speeding
driving record
Car Body Repair
Car Reviews
FS-1 Form
Collision Coverage
Car Loans
No Fault State
Emergency Insurance
State Farm
Young Drivers
Cheap Auto Insurance
Full Coverage Insurance
Car Prices
driving record
Travelers
Natural Disasters
Save Money
Title Transfers
Donating a Car
Fleet Sales
Identity Theft
Chrysler
Mitsubishi
No long forms
No spam or unwanted phone calls
Quotes from top insurance companies
Find insurance savings — it's 100% free
Car Insurance
Cheap Car Insurance
Car Insurance Quotes Online
Types of Insurance
Toyota
Hyundai
Mercedes-Benz
Subaru
Chevrolet
Mitsubishi
ALAKAZARCACOCTDEFLGAHIIDILINIAKSKYLAMEMDMAMIMNMSMOMTNENVNHNJNMNYNCNDOHOKORPARISCSDTNTXUTVTVAWAWVWIWY
Every household craftsman should know what to do if the faucet in the kitchen or bathroom is leaking. A zealous owner needs to be able to quickly and accurately determine the cause of a malfunction. After all, because of such a minor problem, it is simply ridiculous to call a plumber and pay him money. Do you agree?
A faucet repair kit usually consists of screwdrivers, a set of open end wrenches, an adjustable wrench and fum tape. This kit, along with the necessary seals and accessories, will help anyone deal with most leaky faucet problems on their own. Here you will learn how to use them in practice.
We will tell you how to diagnose shut-off valves, mixing devices and adjacent elements of the water supply system. For independent craftsmen, we have dismantled and outlined all the options for carrying out repair operations.
Let's start with the fact that, depending on the design features, two groups of sanitary faucets are distinguished.
Mixer valve
Important information! The repair process depends on the type of dripping plumbing faucet. But we will talk about this in more detail a little later.
As a rule, it is easy to determine the cause of a leak by orienting yourself on the spot. Below are the most common causes of this problem.
Poor installation of the device
If the installation or assembly was carried out incorrectly, with errors, this will inevitably cause a leak (sooner or later). For example, if you tighten the nut very tightly during the process, the sealing gasket will be damaged because of this, which means that it (the gasket) will wear out faster. And the inlet hose, which is not tightly fixed, will cause a leak under the tap.
Clogged ball cartridge
The ball mixer has a far from ideal design - internal parts that fit very tightly do not respond well to various impurities in the liquid. To fix the leak in this case, the valve will have to be completely disassembled and thoroughly cleaned.
Worn oil seal
The main disadvantage of the stuffing box (or, as it is also called, stuffing box) is rapid wear. It is easy to identify such a problem: if the tap is closed, then there are no signs of a malfunction, but if it is opened, water will immediately begin to flow from under the valves. This suggests that the reason is the wear of the gland.
Faucet wear and tear
All plumbing fixtures have a limited lifespan, so over time, users will experience problems such as wear on the threads or locking mechanism. In such a situation, nothing can be achieved by replacing individual parts or tightening the nuts - it is necessary to change the entire mixer as a whole.
Wear of the rubber gasket
Repeated switching on/off of the tap leads to wear of its elements (including the gasket). There is a deformation of the material, a change in its size, cracks appear on it. And if your faucet is dripping in the closed position, then the gasket is probably the problem (it needs to be replaced).
Let's just say that in most cases there are no difficulties with replacing a leaking faucet, but beginners still often encounter some problems. Nevertheless, the preliminary preparation and strict adherence to the step-by-step instructions will help to cope with the leakage and significantly increase the life of the mixer.
In principle, repairing the mixer yourself is not such a difficult task.
First, turn off the water supply to the faucet. After that, open the faucet to drain the remaining water and relieve pressure. It remains to prepare tools and accessories. You will need:
If it is necessary to replace the gasket in the valve assembly, proceed as follows.
Replacing the gasket in the valve mixer
Step 1 . First, disassemble the valve - remove the plug, unscrew the screw under it, then, using an adjustable wrench, unscrew the core (necessarily counterclockwise!) To remove the valve box.
Step 2 . Replace the gasket, fix it in the box.
Step 3 . Now it remains only to install all the removed elements back.
Gasket replacement steps
The diagram shows in detail how to properly replace the ceramic gasket in a traditional two-valve mixer. You will need a Phillips screwdriver and wrench
Note also that if there is a leak in the shower faucet, then you must unscrew the shower hose (using the same adjustable wrench), replace the gasket, and then connect it (hose) back. Similarly, you can replace the seal under the gooseneck nut.
Unscrewed shower hose
Leakage from under the clamping nut of the gooseneck
In case of a mixer leak caused by a worn stuffing box, you can solve the problem in one of two possible ways:
Replacing the gland in the faucet
If the work has been done correctly, the flow should stop and the valve should scroll smoothly.
In the case of a ball valve, for repair it is necessary to disassemble and clean the device, and if necessary, completely replace the locking mechanism. The algorithm of actions should be as follows.
Crane disassembly steps
Step 1 . Unscrew the screw, remove the lever.
Step 2 . Then unscrew the threaded screw.
Step 3 . Remove the mixer dome (including its plastic part).
Step 4 . Remove the ball, carefully inspect it. If you find damage or defects, then the ball will have to be replaced.
Step 5 . Dismantle the seals, check if they are worn out and if there is any plaque on them.
Step 6 . Remove plaque and dirt on the seals, apply a special lubricant to the elements.
Ball mixer repair and assembly procedure
Step 7 . Reinstall all parts, check if the connections are tight.
Non-contact (sensor) taps. Disadvantage - complex repair. We do not recommend doing this yourself. It is better to try to find a specialist who understands this issue.
If you assemble the faucet correctly, there should be no leakage, and temperature adjustment will be done with a slight turn of the lever.
Master class. Installing a built-in faucet in the bathroom
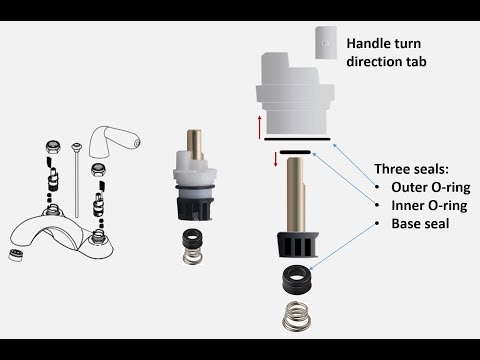
As noted earlier, it is much more convenient to use cartridges than crane boxes, but if the first ones fail, then the entire mechanism will need to be replaced at once. The sequence of actions is given below.
Cartridge replacement quick guide
Step 1 . First, unscrew the plug on the lever, and then unscrew the fixing screw itself.
Step 2 . Remove the decorative elements, unscrew the nut holding the cartridge.
Step 3 . Remove the mechanism, look at the condition of the gaskets on its end.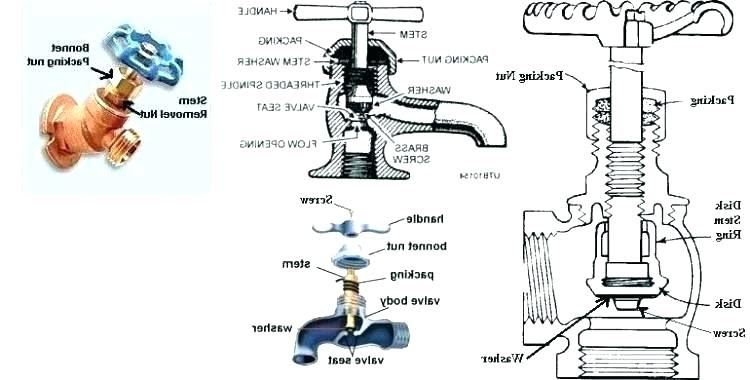 You can try replacing them.
How to remove the cartridge
Step 4 . If the seals cannot be replaced, install a new disc element in the valve.
Step 5 . Assemble all elements of the mixer back.
Another example of replacing the faucet cartridge
In this case, there is only one procedure: you need to dismantle the installed mixer, go to the store where it was purchased, and get the damaged equipment replaced.
Only professional plumbers can eliminate manufacturing defects at home with the help of improvised means, and even then not always. In all other cases, with sufficient patience and perseverance, the independent elimination of a tap leak is completed quite successfully.
Replacement of the gooseneck in a two-valve faucet, in the standard way; the old element is unscrewed and a new element is installed.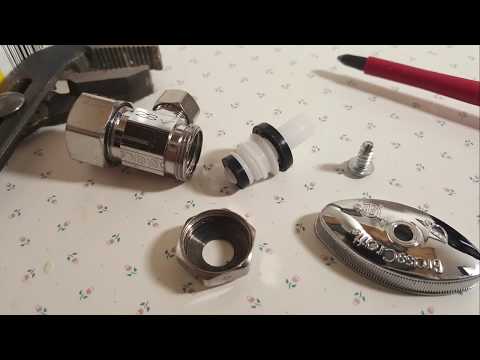 In the single-lever version, the gander is installed in the body, so it is impossible to remove it - you need to completely replace the mixer or repair the current ebb.
Cold welding, epoxy resin and other building materials are used to seal gaps and cracks in the body of a damaged sill.
Since the castings are made of metal (copper alloys, brass) that lends itself well to soldering, soldering is the best and most effective way to restore them. Before work, the top layer of the chrome coating is removed with sandpaper and the cracks in the gander tube are sealed with a high-power soldering iron.
There are situations when the water pressure in one of the taps drops significantly. The reason for this problem is an aerator clogged with scale and other debris - a strainer screwed into the end of the gander. To eliminate this problem, it is enough to unscrew the aerator, rinse with water and clean the filter mesh with a needle or a thin awl, screw it into place.
A clogged strainer causes a decrease in water pressure.
The considered malfunctions and methods for eliminating various leaks will allow you to repair taps with your own hands without calling a plumber. Many types of leaks and breakdowns can be avoided if you treat your plumbing with care. The quality of the mixers and the degree of mechanical water purification are also important, so the installation of coarse and fine filters is necessary.
Bath faucets equipped with a shower head have the same problems as conventional models. The only exception is the breakdown of the watering can itself. They are usually caused by the destruction or wear of the sealing glands and are solved by replacing them.
Failed faucets with tap changers can be repaired by replacing them. And in models with a removable switch - by the way, it is called a divertor - you can change it too. Relevant parts are sold in stores and are affordable.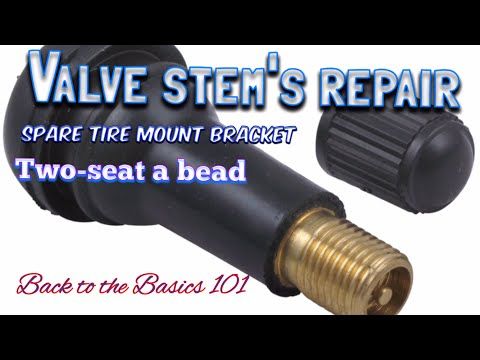
The cause of the leak is related to the failure of the stem seals or valve box due to deposits in the water and natural wear. You can fix this by replacing the rubber bands or all assemblies.
This type of diverter is easily identified by the valve-like switch that must be pressed or pulled to redirect flow between the faucet and the shower.
Method 1: Replace seals
Close the taps on the faucet and remove the switch cap by turning it counterclockwise. Carefully unscrew the valve and then the nut from below. Remove the stem with sealing glands. Pick up the same ones in the store and install them in place of the old ones, smearing them with soap. Insert the stem into place and wrap the valve in the mixer. Put on the cap and check the operation of the diverter.
Method 2. Replace the switch
If the diverter is removable, you can simply remove it by unscrewing the nut, pick up a similar one in the plumbing store and install it instead of the old one.
If the flow between shower and faucet is switched using a lever or knob that rotates around its axis, you have a diverter with a faucet box. In this case, you need to replace it.
Pry off the cover of the switch and remove the fixing screw with a screwdriver. Using an adjustable wrench, unscrew the faucet box from the mixer body and select an analogue that is suitable in size in the store. Install a new part, wrap it with a key and put on the switch. Fix it with a screw and replace the decorative cap.
Another failure of the switch caused by worn seals or faucet box.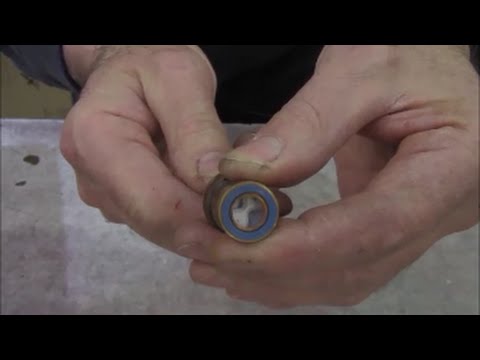 It is corrected by replacing damaged elements - as described in the previous paragraph.
Touchless bath and shower faucets are considered more reliable than other types of faucets - single lever and valves. This is not surprising, because they simply do not have mechanisms that are mechanically acted upon by the user. For contactless models, manufacturers give a guarantee of at least 5 years. But there is a downside: if such a mixer fails, it will not be easy to find a good master, because not every plumber is able to figure out the device of a non-contact mechanism and find the cause of the breakdown.
During operation, over time, the sensors responsible for turning the water on and off when hands approach the tap may become unusable. In this case, it is better to resort to the help of a specialist, but it is easy to break the aerator yourself, based on the instructions for repairing other types of mixers.
The disassembly and assembly of mixer parts is almost entirely done by hand. Twisted connections are slightly tightened with keys. Excessive tightening forces can lead to the destruction of parts.
With patience and perseverance, you can quickly learn to understand the reasons for the flow of water in the tap. Understand how to repair a faucet. if water drips. Plumbers advise how to make sure that the faucet does not drip in the future.
It is better to take actions that will protect the faucet from damage:
 After three years of operation of the mixer, consumables must be replaced.
 Installation of a new faucet is best left to plumbers. The plumber will check the conformity of the diameters of the pipes and seals.
Incorrect installation often results in water leaks. Any product will fail for this reason and you will have to decide how to fix a leaking faucet.
Sources:
 ru
ru March 22, 2020LikbezDo it yourself
This guide will help you fix valve or button failures, water leaks and other malfunctions.
Share
0 The toilet consists of a toilet bowl, a cistern and a seat with a lid. The bowl serves as a base and is fixed to the floor with screws. It contains a siphon, which is connected through a cuff or a flexible corrugation to the sewer. The main function of the siphon is a quick flush due to the gravity of the flow and the pressure difference. This part is constantly filled with water and works as a water seal, preventing unpleasant odors from spreading.
The main function of the siphon is a quick flush due to the gravity of the flow and the pressure difference. This part is constantly filled with water and works as a water seal, preventing unpleasant odors from spreading.
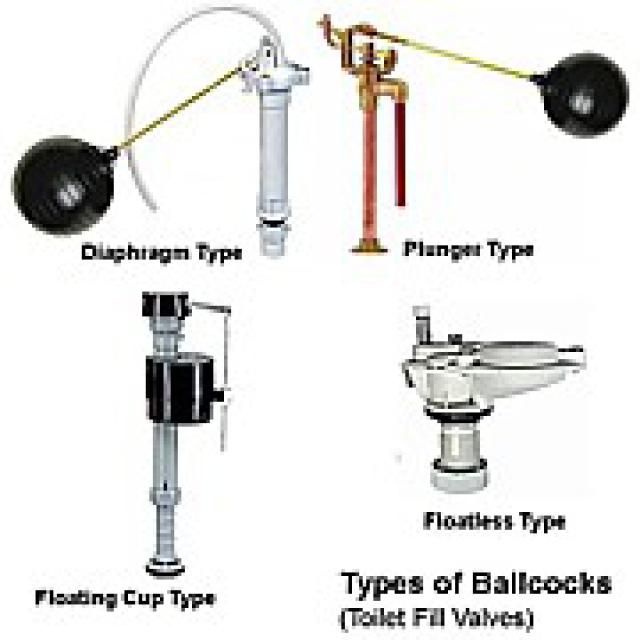
The flush cistern is either mounted on the bowl shelf in compact toilets or fixed to the wall in older sanitary ware. From the side or from the bottom, the container is connected to the water supply with a flexible connection, which is connected to the filler fittings. The latter, in turn, is equipped with a float valve that controls the filling of the tank with water to the desired level.
In the same place, inside, there is a drain valve responsible for draining water. It is to it that a button is attached through a special mechanism, with which we control the flush. To protect against overflow, the drain valve has an overflow pipe. Through it, in the event of a malfunction of the float valve, water flows into the toilet, and not onto the floor.
Reading now 🔥
Most of the malfunctions are related to the drain and fill mechanisms. To eliminate such breakdowns, you need to disassemble the tank. So let's first look at how it's done.
In older toilets with a plastic cistern, the lid is held on by clips and removed by moving upwards. Sometimes you additionally have to pry its edges with a screwdriver or other sharp object.
In today's compact toilets, the lid simply rests on the cistern and is fixed only by a button. Therefore, to remove the part, you must first unscrew the bezel of the button counterclockwise and remove it.
In some toilet models, the button mechanism is secured with a screw hidden inside. In this case, pry off the top of the button with a sharp knife or thin screwdriver, and then unscrew the screw and remove the button.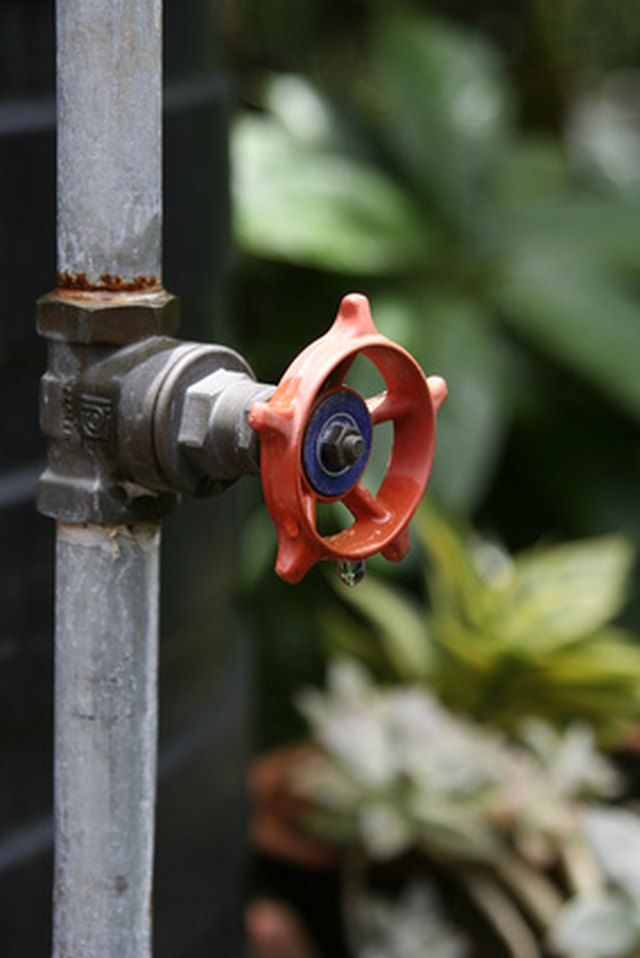
There are also drains equipped with a stem with a handle that lifts up. To remove it, you need to lift the ball and unscrew it counterclockwise, holding it by the stem.
First, turn off the water at the inlet to the toilet bowl, and then grasp the flush mechanism with your hand and, turning it slightly counterclockwise until it clicks, lift it up. Sometimes there is a latch on the armature that needs to be pushed back before removing the mechanism.
To replace the drain valve with fittings of a different design or manufacturer, the mechanism, including the seat, must be completely removed. To do this, remove the tank and unscrew the large nut from the bottom.
The filling valve with side connection is very easy to remove. It is enough to remove the cover and disconnect the flexible hose, and then unscrew the fixing nut from the outside and pull out the mechanism.
Bottom fitting is more difficult. First, remove the flexible hose and tank cap.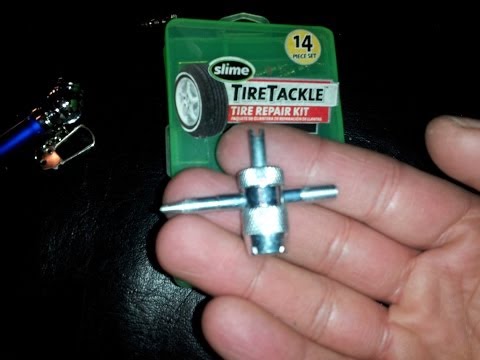 Then wash off the water and remove the drain valve. Next, unscrew the nut with which the filling valve is attached from below, and take it out. If the water has not drained completely, it is better to substitute a basin or other container so as not to spill everything on the floor.
In older toilets, it is plastic and can be removed quite easily. First, they shut off the water supply and wash off the residue, and then lift the lid and unscrew the screws that secure the tank to the wall. After that, unscrew the flexible hose and the nut of the drain socket at the bottom of the tank.
On compact toilets, the tank is attached to the bowl shelf, so it is taken apart differently. The first step is to turn off the water and press the flush. Then remove the cover, remove the drain and fill fittings and remove the remaining water with a sponge or cloth.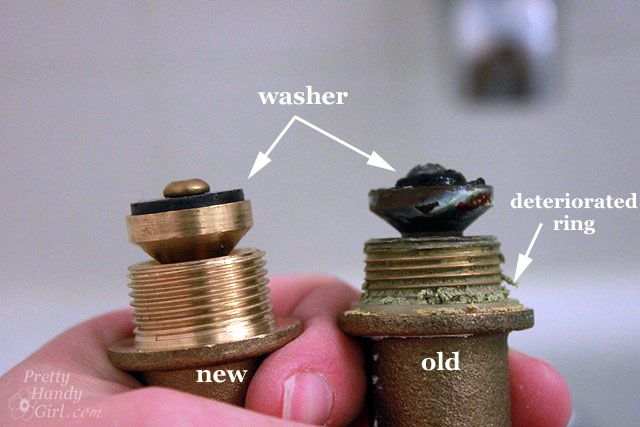 Next, a flexible eyeliner is unscrewed, as well as the fixing screws of the tank from the bottom of the toilet bowl.
If a puddle forms in the area of the connection to the sewer socket or at the outlet of the toilet bowl itself, the cause lies in the drying of the cuff or a break in the flange of the flexible corrugated pipe. With a rigid connection on plastic pipes, there are practically no such problems.
This is corrected by replacing the corrugation with a new one, while it is important to carefully install it without kinks and kinks. As a temporary solution, you can treat the joint around the pipe with silicone sealant, after wiping and drying this place.
There may be several reasons for such a problem, but they all boil down to the fact that there is some kind of barrier that prevents water from entering the tank.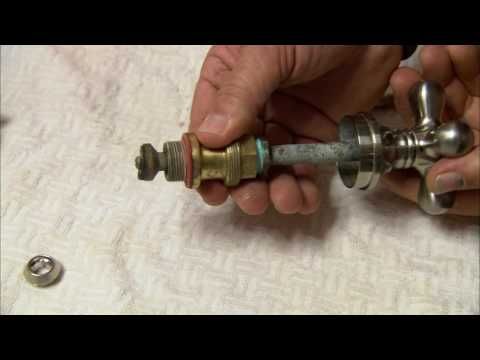 It is better to start the search with the simplest options and gradually move towards the more complex ones.
The first step is to turn off the water and remove the flexible hose from the side or bottom of the toilet. If there is a blockage, clean it and check the pressure by opening the water and lowering the hose into a basin or other container. If the jet is good, the next step is to check the filter inside the supply valve.
It has the appearance of a plastic mesh insert. You need to get the filter, clean it in the presence of dirt and rinse under the tap. Then the part is installed in place and checked if the situation has changed. It should be borne in mind that some valves may not have such a filter.
If cleaning did not help, you need to remove the tank cap, remove the filling mechanism and, having unscrewed the valve nut, carefully examine the contamination under running water, clean the channel with a thin wire, remove deposits from the rubber membrane.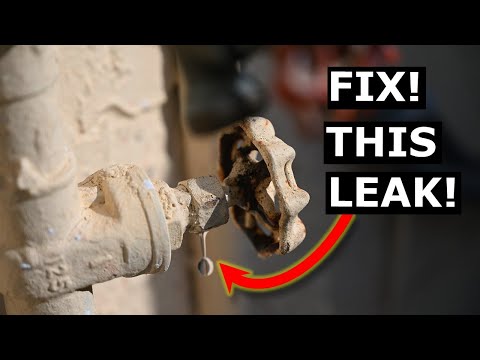 After that, everything is assembled in the reverse order and installed in place.
If water is still not drawn in, most likely the valve itself is faulty and will have to be replaced with a new one.
Noisy filling is usually a problem with cisterns with side connection. Due to the design features, the valve is located on top and a jet of water, falling to the bottom of an empty tank, creates noise. To reduce it, special muffler tubes are installed at the valve outlet, reaching the bottom, along which the flow flows.
Often such tubes fall off, and sometimes they are completely absent. Therefore, as a solution, you need to return them to their place or select and install new ones of a suitable diameter on the valve outlet. The length of the hose should reach the very bottom or even lie on it.
If water is constantly flowing into the bowl in a thin stream, then the fill or drain valve is not working. If the first one breaks down after filling the tank, the water does not shut off, but if the second one is faulty, the collected water is not retained by the valve.
To determine which valve is not working, you need to press the drain and watch:
In very rare cases, both mechanisms do not work at the same time. Also, overflow can occur due to improper setting of the filling valve - how to adjust it is described at the end of the article.
To eliminate the problem, you need to remove the reservoir cap and remove the filling mechanism. Next, you need to unscrew the valve nut and carefully remove the rubber membrane from it. From it, as well as from the valve seat, remove rust and scale deposits with a toothbrush, then rinse well with water. If the channel inside is clogged, clean it with a thin wire.
In older tanks, remove the cap from the valve, pull out the rocker shaft and remove the problematic part. With a thin knitting needle or wire, you need to clean the channel, and then rinse with water.
After cleaning and assembly, everything should work. If this does not happen, the diaphragm or the entire filling valve assembly will have to be replaced.
Gaskets for this mechanism are rarely sold separately. Therefore, just try to turn the old one upside down: it will still serve for some time. Alternatively, you can sand it with sandpaper, and then stick a circle of bicycle inner tube or other thin rubber on top.
First of all, you need to turn off the water, drain the liquid from the tank and, removing the residue with a sponge or rag, remove the drain valve. Next, you need to remove the gasket and clean it from rust deposits. If possible, it is better to replace the gasket with a new one.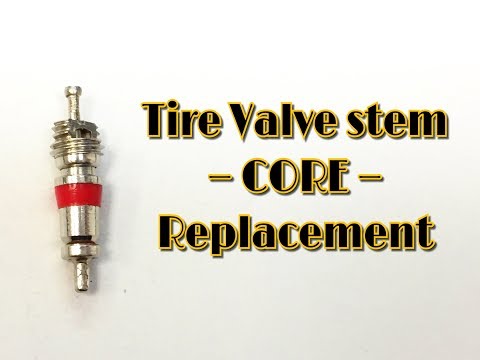
If you can't find one, try flipping it upside down, or placing some kind of weight, like a large nut, on top of the valve to help the diaphragm press against the seat better. If all else fails, you will have to change the entire drain mechanism entirely.
Sometimes fillers with a float inside the cup get stuck due to rust due to rust. This leads to the fact that when filling the tank, water enters the glass from below, and not overflowing over its edge. As a result, the valve closes ahead of time and the tank is not filled to the desired level.
To solve the problem, turn off the water, flush out the residue and remove the filler mechanism. Next, remove the bracket and pull the plug valve out of the glass. Then it is necessary to clean the part and its seat from plaque, and also make sure that the plug fits well on the glass and moves freely.
Leakage from the bottom of the cistern can occur if the cone gaskets of the mounting bolts or the large rubber ring between the toilet bowl and the cistern have failed.
In both cases, turn off the water and press the flush, and then remove the cover, remove the filling and drain fittings. After removing the remaining water, unscrew the mounting bolts and carefully inspect all seals for cracks.
It is advisable to replace the gaskets with new ones. If you can’t find the same ones, you can thoroughly clean them, dry them and install them in place, having previously lubricated all joints with silicone sealant.
A problem with the flush button is usually caused by the fact that when fully pressed, the stem catches on the valve mechanism and jams. In this case, often replacing the button itself does not give anything. There are several solutions.
The simplest thing is to unscrew the button, press it a little, sinking a couple of millimeters, and then put it back in place, holding it in this slightly pressed position. So the part looks a little recessed, but due to the reduced stroke it will not jam at the extreme point.
For the same purpose, you can cut a ring 2–3 mm high from a plastic bottle cap and place it under the button. To do this, use a screwdriver to press the latches on the sides of the mechanism and pull the button out of the case.
The rubber cuff that connects the cistern pipe to the toilet outlet dries out over time, loses its elasticity and starts to leak. Toilet repair in this case consists in replacing the problematic part. First you need to turn off the water and rinse.
If a new part cannot be found, a 50/40 mm rubber reduction can be installed instead. Unlike the cuff, it is inserted inside the toilet bowl, and is not put on top of it. Otherwise, there is no difference, and this will not affect the operation of the mechanism in any way.
As a temporary solution, you can carefully remove the old cuff, clean and dry it, and then install it, treating the joints with silicone sealant.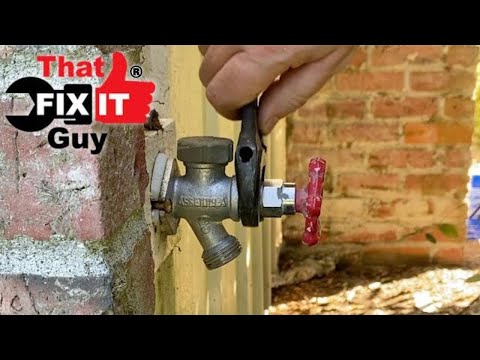
Water is leaking from the drain pipe nut due to a gasket installed inside the tank. Often it is cut by burrs from casting defects on the nozzle or shifted to the side when twisting. Also, the membrane itself may be of poor quality.
To eliminate the defect, turn off the tap at the inlet to the tank, rinse off the water and remove the drain valve, first unscrewing the decorative nut on the socket, and then the clamping nut. Next, you need to clean the burrs with a sharp knife along the entire plane of the gasket and assemble everything in the reverse order, securely holding the pipe with your hand when tightening the nut.
If this does not help, the gasket itself is most likely of poor quality. In this case, you need to cut a new one from a suitable piece of rubber 2–2.5 mm thick, using the old part as a template or tracing the nozzle with a pencil.
Water leakage at the junction of the nozzle and drain is due to poor fit or deformation of the cone gasket. And it needs to be replaced with a new one. If such a gasket is not at hand, you can temporarily seal the joint with FUM tape.
To do this, turn off the water supply to the tank and empty it. Next, unscrew the decorative nut, slide the cone gasket down a little and wind three or four turns of the FUM tape into the resulting gap. Then the gasket must be lifted up, tighten the wound tape, and then tighten the decorative nut, holding the pipe with your hand so that it does not turn.
The flush and fill valves must be properly adjusted for the toilet to work properly. Otherwise, flushing will be poor, due to the fact that the tank is not filled enough or the water does not drain properly.
In valves with a float inside the glass, it is necessary to remove the lid of the tank, shut off and drain the water. After pressing the glass latch, you should set it at such a height that the upper edge of the part corresponds to the mark on the overflow pipe (usually about 2 centimeters from its top).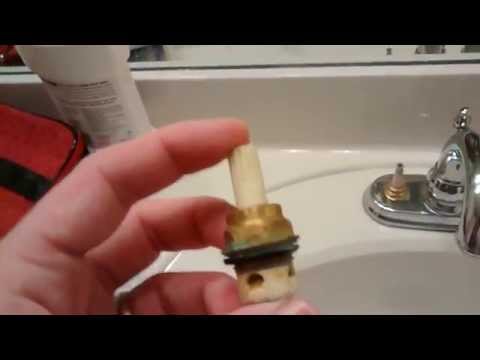 Then snap off the adjusting rod, lower the float to the bottom of the cup, make sure the bracket rests on the bottom, and then click the rod to fix the position of the float.
In mechanisms without a glass, everything is much simpler. The height of the float and, accordingly, the amount of water in the tank is adjusted by twisting and unscrewing a long threaded pin. The higher the float, the more water is collected, the lower - the less.
To adjust, unscrew the button, remove the cover and remove the drain fitting, having previously flushed the water and turned off the tap at the inlet. Next, you need to return the lid to its place and measure the distance from its top to the bottom of the tank with a tape measure.
Remove the cap again and replace the drain valve. Then tighten the button, release the rod lock and adjust the height of the mechanism so that the distance to the bottom of the button corresponds to the previously measured one. The missing millimeters are easy to catch due to the thread of the button, without wrapping it all the way.
The next step is to set the frame of the mechanism at an angle downwards and fix it in this position with the rod lock. At the same time, the button moves freely in the guides, and the pusher does not raise the frame so that the valve does not open slightly.
In the neutral position, the drain valve is closed and should fully rise when the button is pressed. If the adjusting rod rests against the bottom of the tank, it should be cut off.
Finally, it is important to make sure that the frame of the mechanism does not hit the overflow tube when the button is pressed. If this happens, you need to remove the mechanism and lower the frame below. To do this, unscrew the nut, carefully slide the ring gasket and, sinking the tube a few millimeters, tighten the nut.
In older toilets with a plastic cistern, the water level can be easily adjusted.