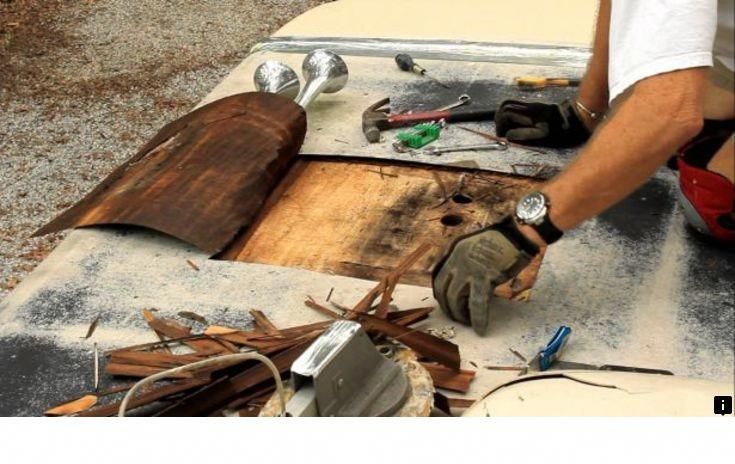
(Image credit: Getty)
Getting a flat tyre anywhere or anytime is annoying, but if you don't know how to fix it, it can be a scary predicament.
Not knowing how to get your wheel re-inflated and back on the road can make riding solo an un-nerving and ride limiting.
Even with a pair of the best road bike tyres, ideal gravel bike tyres or even best puncture-proof tyres, you can never guarantee against a flat wheel.
It's not just tyres either, take some time to get to know your rubber and Schrader vs presta valves in our guide on bike inner tubes which explains all about them.
However, with our guide for how to fix a puncture and mend an innertube, you'll soon be super confident in your own abilities to keep safe and get home from any bike ride.
We've explained the easy steps in the video above, and there's a picture guide that takes you through the steps underneath. However, as with everything in life, practice makes perfect. Once you've watched or read, make sure you spend some time having a go yourself.
Always make sure you try out your new skills at home in the warm and dry before setting off on your next adventure where the added elements of weather, light and time may be against you.
Step 1: remove the wheel from the frame
Make sure you are in your smallest sprocket before removing removing your rear wheel.
(Image credit: Getty)
Front wheel removal
Once you realise you have a flat, the first job for fixing a bike puncture is to remove the wheel.
It's a simple job of pulling down and unscrewing your quick release until you have enough slack to remove the wheel. If you are using Thru Axles, you'll need to either just unwind the leaver and remove the bolt entirely.
Some bike's don't have a tool free quick wheel release, so it's really important to check what system your bike is using.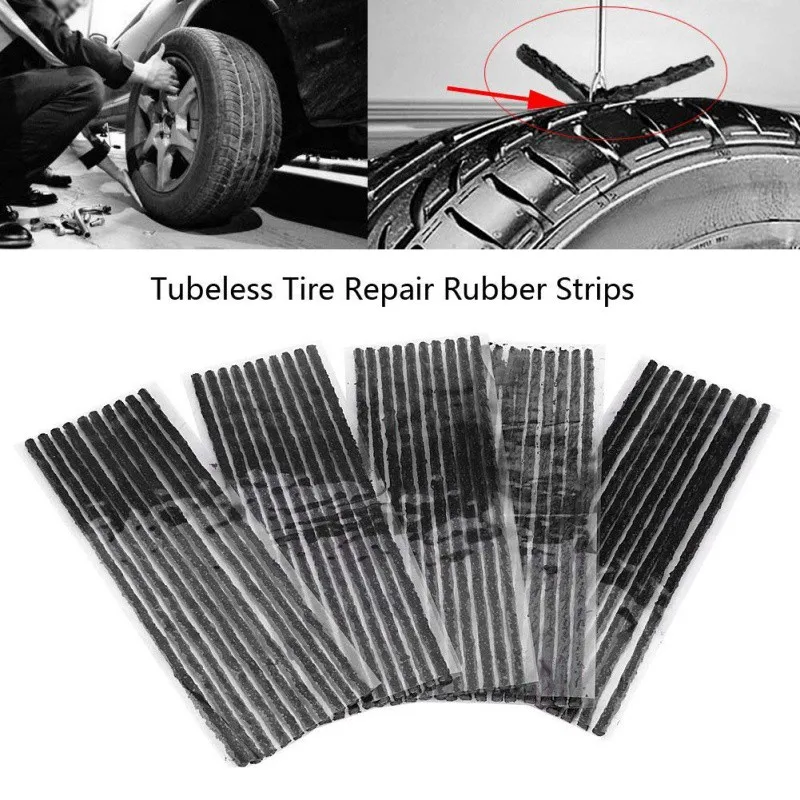 You might discover that it requires you to carry the correct size allen key for some Thru Axels
Some commuter bikes uses wheel nuts - if this is the case, you'll need a spanner - often 15mm - to loosen these off before you can remove the wheel.
If you have disc brakes you can simply pop the front wheel out and gently lower the bike down on it's forks.
To let off a caliper brake, lift the leaver, on the left hand side in this image from down to up.
(Image credit: Future)
If you are using rim brakes, you'll need to let off the brakes.
On caliper brakes, like the one above you can just lift the little leaver from down to up, which will slacken the cable to open the brakes enough to allow the wheel and tyre to come out.
How to fix a puncture: remove the wheel
If you have cantilever or V-brakes, as in the image above, you will just need to squeeze the brakes together and pop the cable out of it's housing, again to allow the brakes to open wide enough to allow the wheel and tyre to pass through.
Rear wheel removal
If it is a rear wheel puncture, you need to take all the above steps, but ensure you have adjusted the bike gears so that the chain is on the smallest chainring on the crankset and the smallest sprocket on the rear cassette. This makes rear wheel removal easier as the chain is at it's slackest.
Step 2: remove the valve cap and retaining nut
Take the dust cover off the valve
Take off the valve cap (the little piece of black plastic over the valve) and unscrew the valve retaining nut (the round ring siting against the rim) if there is one. Push the end of the valve to fully deflate the tube if it's not already empty of air.
Step 3: use tyre levers to loosen the tyre
Use tyre levers to prize the tyre from the rim
Check the outside of the tyre for any clear causes of the puncture. If you see any debris stuck in the outside of the rubber, remove it and make a mental note of where it is in relation to the valve.
Bear in mind you might not find anything, but DON'T check by rubbing the palm of your hand on the tyre as it could be glass or metal, and the last thing you need when trying to repair a puncture is a cut on your hand!
Gently insert two tyre levers between the tyre and the wheel rim - directly opposite the valve (you can start anywhere but the further you are from the valve the easier it'll be).
Pull the tyre away from the rim using the tyre levers, one at a time. If you have three levers, hook the first two under the spokes and remove some more of the tyre with the third lever.
By now the tyre should be loose enough to simply run a tyre lever around the wheel rim to remove the rest of the tyre. With experience, you may only need one tyre lever.
It's worth noting here that this can be easier said than done, and that some tyres and wheel combinations are notoriously tight.
The ease to which a tyre pops of a wheel rim can also depend on the rubber compound. In general, the more robust a tyre, the harder it will be to remove.
The key here is to find the sweet spot of a tyre that you can remove, while limiting the chances of puncturing in the first place.
Ask around as most local riders will have their go to brands of tyres, as the kinds of roads and terrain will play a part in what works for your style of riding.
If in doubt, opt for a all/ four season tyre. This should be mailable enough to pop off the rim with a bit of encouragement, but will limit the risk of puncturing as much as possible.
Remember, if you can't remove it at home without assistance, you won't be able to remove it on your own out on the bike in all weather, times of the day and temperatures. So if you need to swop tyres, swop them!
Step 4: remove the tyre if you need too
Take the tyre off the rim if you need too.
Pull out the inner tube, and, if you need too, take the tyre off the wheel completely.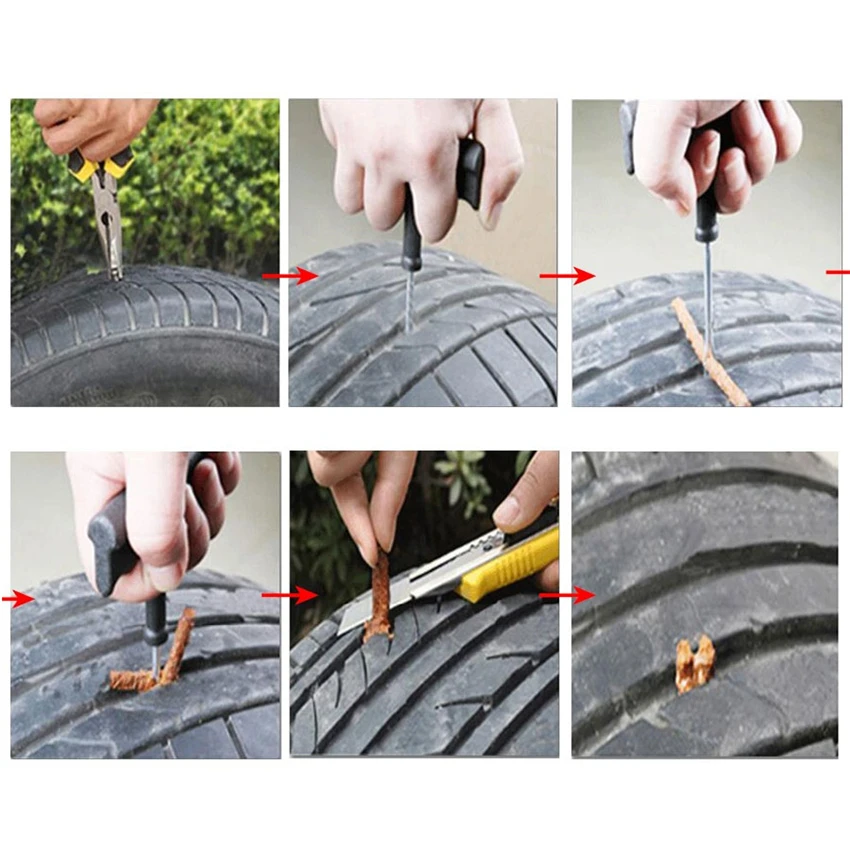
If the cause of the puncture was obvious, a thorn for example, you can probably leave one side of the tyre seated on the rim of the wheel, remove the object and then continue to the decision on new tube or or repair the tube below.
If it's not quite as clear why you have a bike puncture, then it's worth removing the tyre completely, as per step 5 below.
Step 5: check the tyre for debris
Gently and carefully run your fingers along the tyre, checking for thorns or glass
If the perpetrator is unclear, turn the tyre inside out and having a good inspection before attempting to insert another tube.
If there is a puddle close to hand, you could always re-inflate the old tube and submerge each section looking for the bubbles of escaping air to help locate the site of the puncture. You can then cross reference this to the tyre and focus on finding the cause.
Check that there are no further holes in your inner tube. Then carefully run your fingers around the inside of the tyre to check there is nothing else penetrating the tyre - if you find anything (small pieces of glass, thorns, gravel), remove it.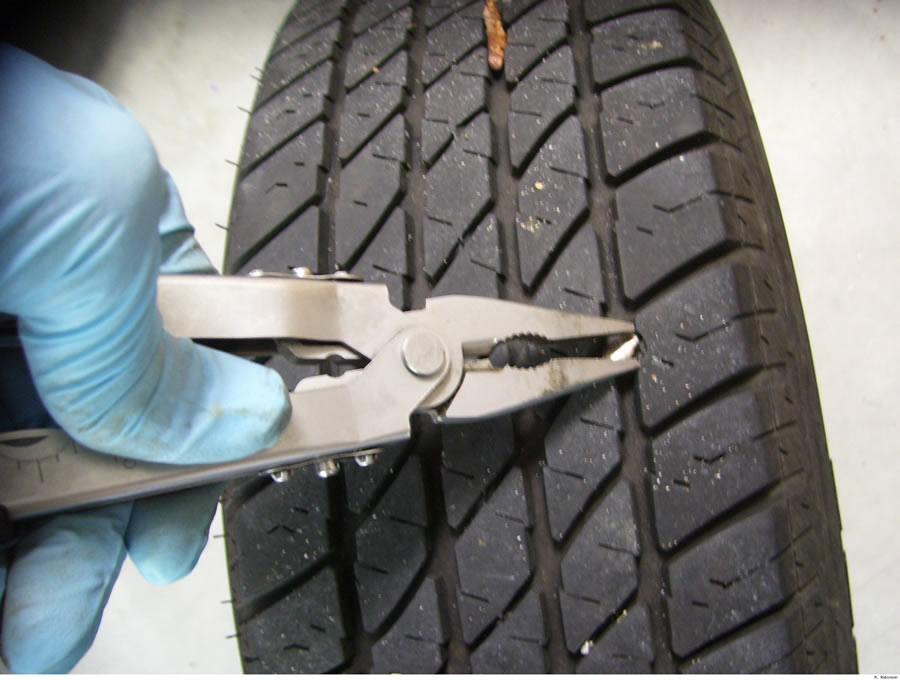 Not doing so can result in the dreaded double puncture. It’s usually possible to make a visual check of the tread while doing this.
Step 6: decide on replace or repair
At this point you've got two choices - to mend the inner tube and replace it, or simply use a brand new one/ a pre-mended tube.
It's usually easier to use a new or pre-mended tube out on the road. This cuts the time of the roadside down and gets you back rolling as swiftly as possible.
We cover how to mend the punctured inner tube below for when you get home and can do an unrushed job.
Always ensure that the spare tubes you carry have a valve long enough for the depth of the wheels you are rolling on and a valve type that is compatible with one of the best bike pump or best Co2 inflators that you should be carrying.
Step 7: put a little air in the tube
Add a little air to the tube
Inflate the (patched or replacement) inner tube slightly so it just becomes round in shape.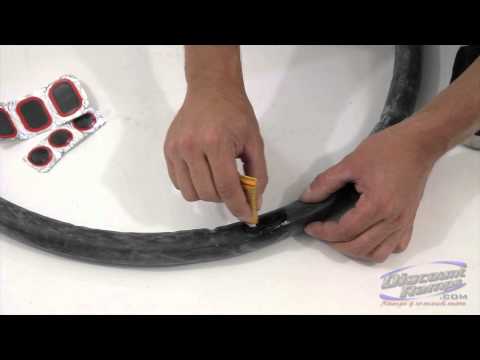 This helps stop it pinching against the rim when you put it back in.
Step 7: refit the tyre on one side and insert the tube
Refit the tyre
If you did remove the tyre completely, it's now time to refit on one side. Make sure the tread is pointing the right way.
Some tyres have arrows on the sidewall indicating the ‘direction of travel’, other's are unidirectional and can be fitted in any direction.
Put the valve in the valve hole, and tuck the inner tube into the space between the tyre and the wheel rim.
Step 8: refit the tyre completely
Seat the tyre back into the rim by pushing with your thumbs
When the inner tube is all in, ease the tyre back into place.
Starting at the valve, grip the rim of the wheel and push the tyre on to the rim, lifting at the same time to prevent the semi inflated tube getting pinched.
Try to finish directly across from the valve as the tyre will be looser there. If it gets difficult, let a little air out of the inner tube. Check there are no inner tube bulges from under the tyre, or that the tube isn't pinching under the tyre bead.
You can use tyre levers to help with the last section, where the tyre is tightest - but if possible avoid this as they can pinch the tube and cause you to have to start all over again.
The tougher and newer the tyre, the harder this will be - by contrast well used, supple summer tyres are usually much easier to get back on the rim.
Step 9: fully re-inflate the tube
Attach the pump to the valve and pump it up
(Image credit: Getty )
Pump up the tyre to as close to the you ideal pressure, it's worth checking our guide to what's the correct road bike tyre pressure if you are unsure.
Ideally this would be done before you reinsert and refit the wheel into the bike securely, this just allows you to double check it's seated properly before full inflation.
If you are using a mini pump, you are unlikely to be able to inflate to full pressure, and even with CO2, you'll have to make a rough guestimate at the pressure.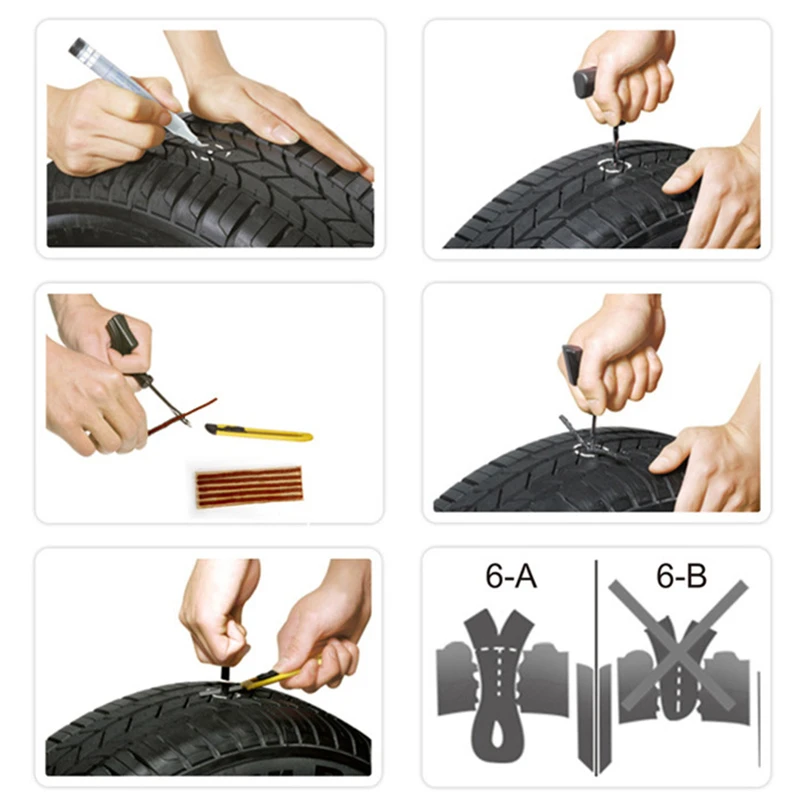 So be comfortable with getting the squish feel of your tyres at different pressures, so you can adjust your riding accordingly.
Once the wheel is back on the bike, close the brake quick release lever or reattach the brake cable if needed. If you have mended a rear wheel puncture, get someone to hold the bike up, and go through the gears. Check that the wheel spins freely and the brakes work correctly.
Apply a patch to the inner tube if you're mending it
Inner tubes can be quite expensive, and they're easy to fix so it's a good idea to mend them instead of simply replacing one and chucking the old rubber.
If the puncture is not obvious, pump up the inner tube. Once inflated, it is usually easy to hear the air escaping. If not, run the inner tube past your lips to sense the escaping air.
If you are still struggling to find the culprit, you can always submerge a re-inflated tube in a bucket or sink of water, and (like the puddle approach mentioned above) you should see the tell tale signs of bubbles where air is escaping.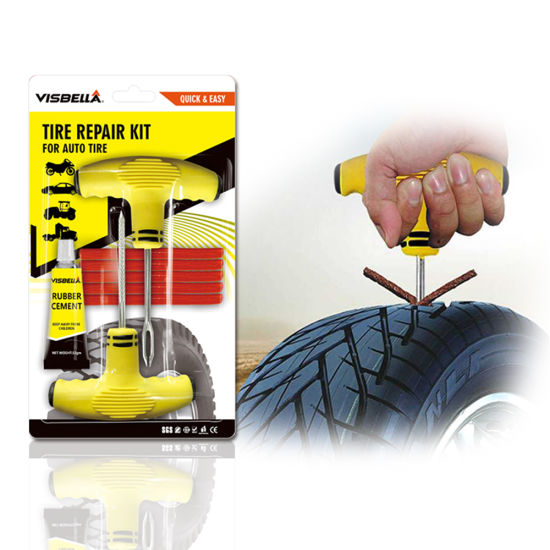
Once located, roughen the area around the hole thoroughly with the emery paper in your puncture outfit.
Remove any excess emery or tyre dust and apply enough glue to cover an area a little bigger than the repair patch that you’ll use.
Do this a couple of times, allowing the glue to dry between applications. After the last application of glue, take a patch, remove the backing, and stick it on the inner tube. Press it home, working from the centre outwards. When you are confident that the glue is dry, carefully remove any further film attached to the patch.
There are patches that are self adhesive, which negates the glue faff so if you're time poor, these do speed things up a little, and are also a good option for a road side repair emergency.
What are the different tubes and valve types?
In general there are two types of valve, Presta and Shrader Valve.
A Shrader valve is the same as you’ll find on a car tyre and to inflate it you simply have to use a pump with a compatible adapter.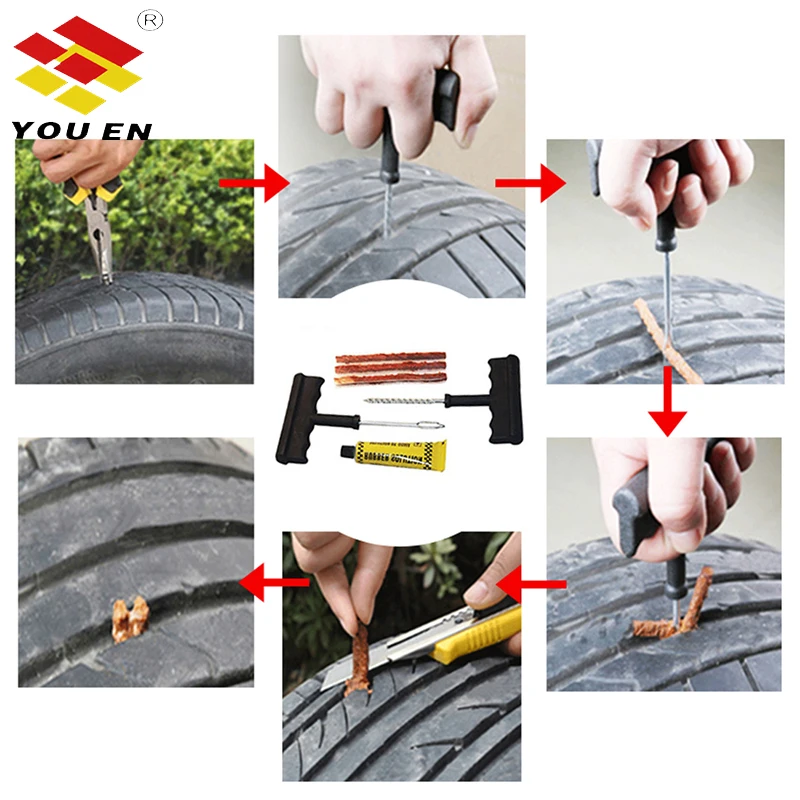 To deflate it you have to push a little pin found inside the valve.
Presta valves are thinner with a small captive nut found near the top. To inflate you need to unscrew the captive nut fully before using a pump with a suitable adapter. To deflate you unscrew the captive nut, then push it ‘in’ towards the base of the valve.
There are several different types of tubes on the market, which vary in material, rubber or latex for example, or in puncture protection level.
Check your spare tubes have the correct valves and that they're long enough for your rims. People often upgrade wheels to deep section rims, but forget to get new spare tubes with longer valves.
Finally, also check you have a compatible pump or inflator. Most will cater for both presta valves and shrader valves, but it's better to be safe than sorry.
We mentioned it above, but do check out our guide on bike inner tubes to help you navigate to the correct choice for you.
How can I stop getting flat tyres on the bike?
If you find you're getting regular punctures, it's a good idea to check your tyres are still in good condition and appropriate for the type of riding you're doing.
Choice of tyres is almost as important as the wheels or frame. First of all your tyres need to be the correct size to fit your wheels. They need to be pumped up the appropriate pressure, as mentioned above.
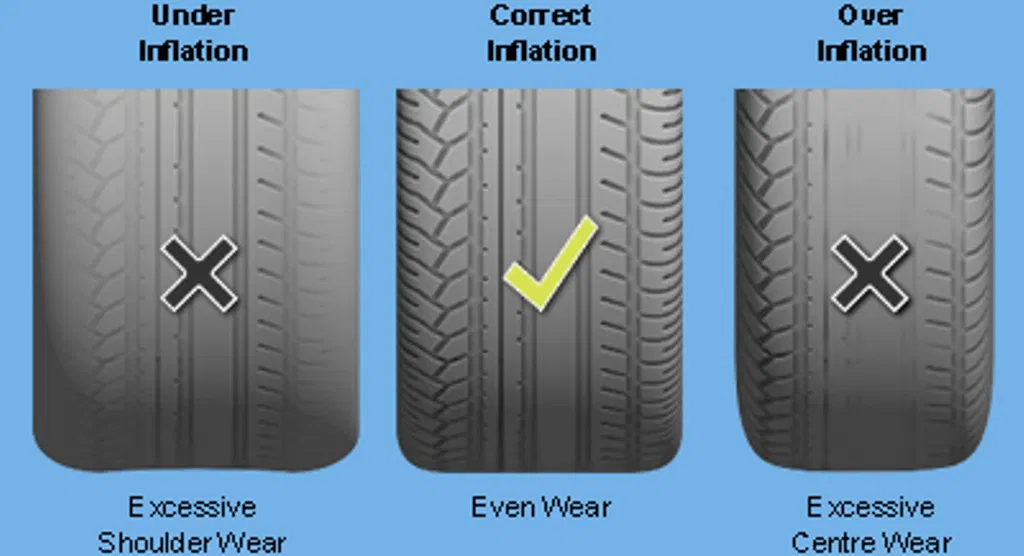
Too much pressure could blow the tyre off the rim and too low a pressure will allow pinch punctures and tyre wall, or rim damage.
It’s also best if they are the right tread for the surface that you are riding on, the time of year and what riding you'll be doing.
Tyres that are smooth because they are worn out are useless and dangerous. Tyres that have a series of tiny cracks in the sidewalls or between the tread blocks need replacing too.
From time to time, a tyre may have some internal damage which results in a bulge somewhere around its circumference; this is another occasion when the only remedy is a new tyre.
Finally, the inner tube: make sure any replacement inner tube is the right size for the tyre, and you have the right type of valve to fit through the hole in the wheel rim.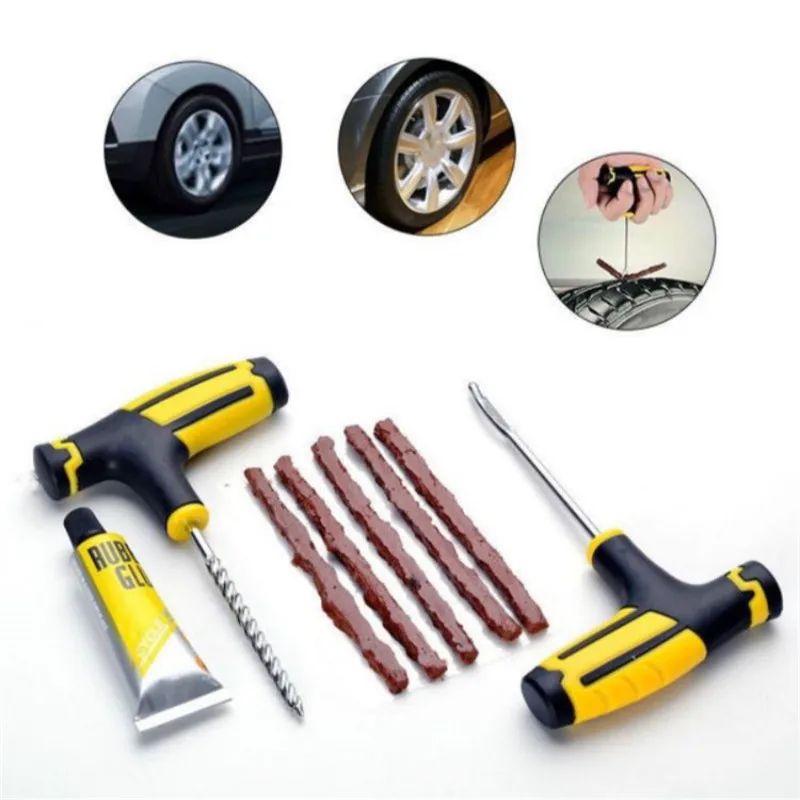 See below for valve types.
Can I ride a bike tyre with a hole in it?
If the hole in the tyre is large, this may cause the inner tube to bulge through the gap, like a hernia. If this is the case, replacing the tube will just result in another puncture.
The solution is to reinforce the hole, with an old piece of tyre from the inside. In desperate situations we have even seen energy gel wrappers used for this purpose. This solution is an emergency fix however, and should only be used to get you home or to your nearest bike shop.
Don't ride on determined to hit your mileage target only to get more stranded when the tyre completely fails.
Hannah is Cycling Weekly’s longest-serving tech writer, having started with the magazine back in 2011. She has covered all things technical for both print and digital over multiple seasons representing CW at spring Classics, and Grand Tours and all races in between.
Hannah was a successful road and track racer herself, competing in UCI races all over Europe as well as in China, Pakistan and New Zealand.
For fun, she's ridden LEJOG unaided, a lap of Majorca in a day, won a 24-hour mountain bike race and tackled famous mountain passes in the French Alps, Pyrenees, Dolomites and Himalayas.
She lives just outside the Peak District National Park near Manchester UK with her partner, daughter and a small but beautifully formed bike collection.
❚ The products mentioned in this article are selected or reviewed independently by our journalists. When you buy through links on our site we may earn an affiliate commission, but this never influences our opinion.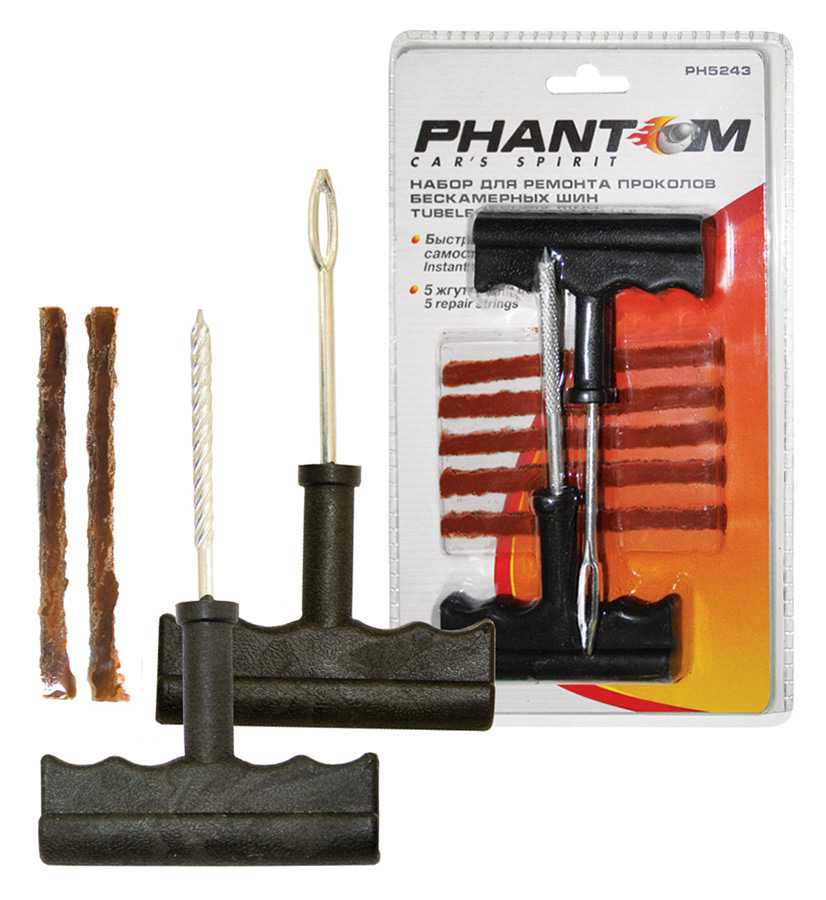
Knowing how to repair a puncture is an essential skill that every cyclist needs to master. It can be daunting for the inexperienced but only takes a few minutes once you know what you’re doing.
In the following guide and videos below, we’ll talk you through how to repair a punctured inner tube on either a road or mountain bike in a simple, step-by-step walkthrough guide.
 Find the puncture
 Use the valve as a starting point when looking for the source of the puncture. That way you will have a point of reference to return to.Simon Bromley/Immediate Media
Using the valve as your starting point, closely inspect the tread of the tyre to find the cause of the puncture.
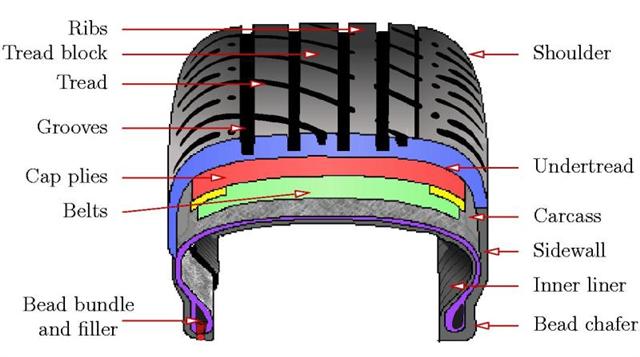
Pay close attention to the sidewalls (the non-treaded portion on the side of the tyre where the pressure and size information is printed/moulded) to make sure there are no tears or holes.
Remove any glass, grit or other debris that you spot. A small flat-head screwdriver or awl is the best tool for this, but be careful not to dig too deep. A small set of pliers can also be useful for removing embedded thorns.
Even if you find one possible cause of the puncture, continue checking the tyre thoroughly until you get back to the valve because there could well be more.
Use a tyre lever – or two, if required – to lift one side of the tyre off the rim.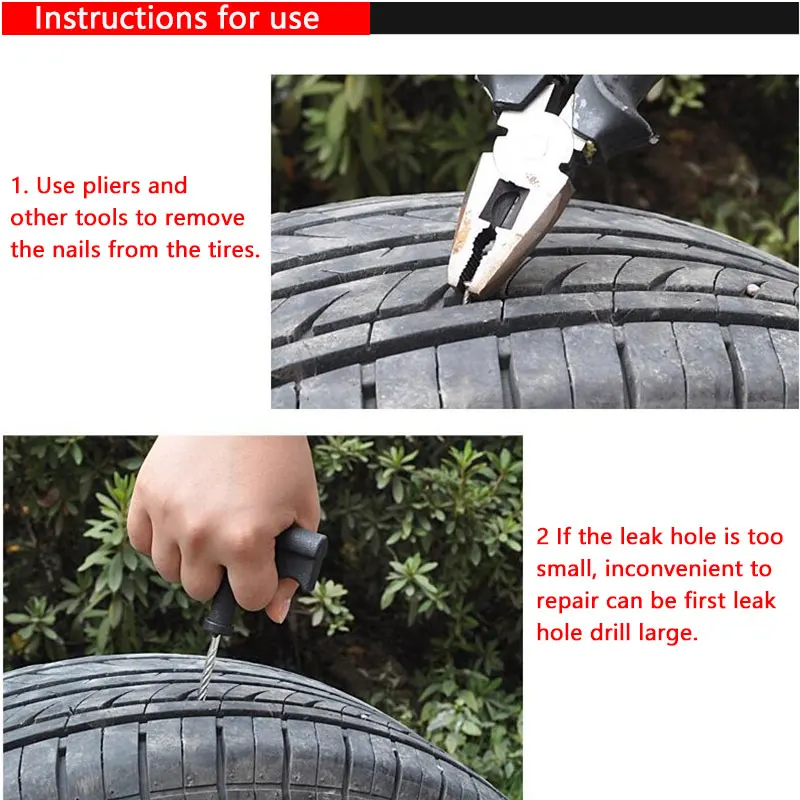 David Caudery / Immediate Media
Let the air out of the inner tube and push the valve up into the tyre, unscrewing and retaining the valve lockring if fitted.
On the side of the wheel opposite the valve, slip a tyre lever under the tyre’s bead and a further tyre lever about roughly 5cm away.
Pull the nearer tyre lever towards you, lifting the tyre’s bead over the edge of the rim. Continue until one bead of the tyre is completely free of the rim then pull the tube out.
Remove the tyre completely from the rim – with most tyres this can be done by hand unless they are exceptionally tight.
Inflate the punctured tube and rotate it around close to your face to find the hole.BikeRadar
If you are just going to replace the inner tube, skip to step 6.
If you want to patch the inner tube – and you ought to, it’s not that hard! – inflate the tube and listen for air escaping.
If you’re struggling to find the hole by listening alone, try passing your lips over the top of the tube.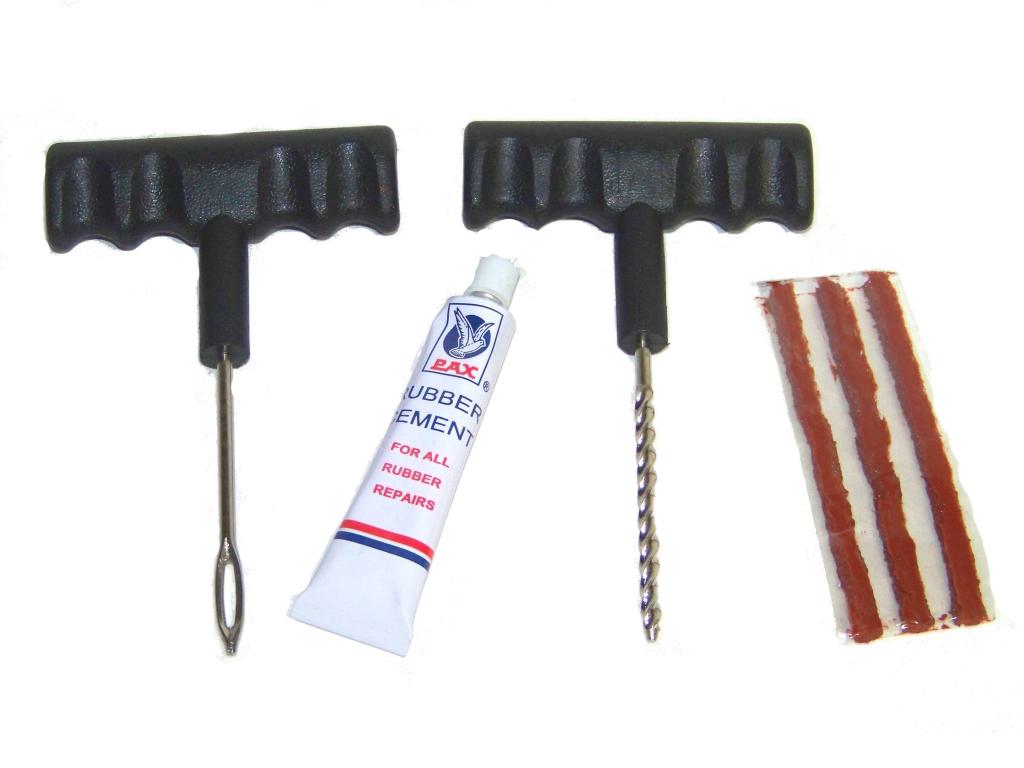
If the hole still can’t be found, re-inflate the tube and pass it through a bowl of water, or rub the tube down with soapy water, until you spot escaping bubbles. Be sure to dry the tube before proceeding to the next step.
Sand down the area around the hole to aid adhesion.BikeRadar
Select an appropriately sized patch – if in doubt, err on the side of caution and use a bigger rather than smaller patch.
Roughen the surface of the tube around the hole with sandpaper (usually included with any good puncture repair kit).
Ensure that any moulding marks on the tube are completely flattened down because these can cause issues when glueing. Thoroughly brush off any rubber ‘shavings’. Cleanliness is key when repairing a puncture.
If you’re using glueless patches, you can apply them directly after cleaning the area around the hole.BikeRadar
If you’re using pre-glued patches – such as Park’s popular GP-2 patch kit – you can now patch the hole.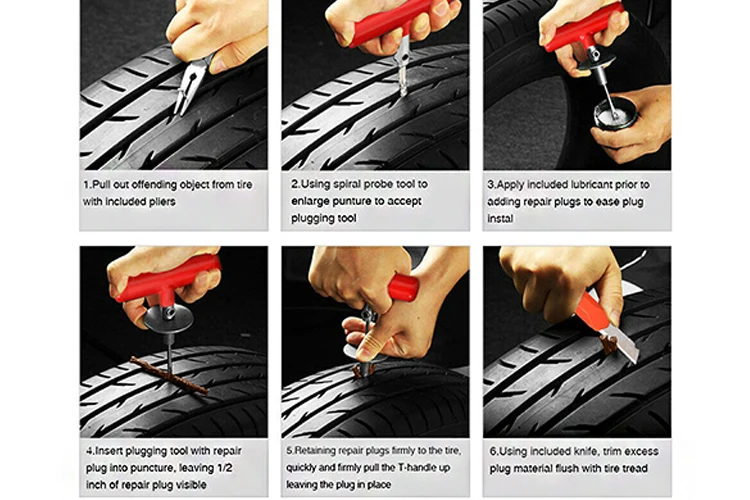 Thoroughly press down on the patch to ensure it’s fully in contact with the tube.
Once the glue has dried to a matte finish, apply the patch.Amanda Thomas
If you’re using a ‘traditional’ glue-on patch kit, start by applying a generous drop of glue – or rubber cement by its proper name – to the tube and spread this across an area slightly larger than the patch you intend to use. Allow this to dry.
Similarly, apply a second, thinner layer. Once again, allow to dry – when the glue is dry, its surface will change from a shiny to a matte finish.
The key to ensuring a good long-lasting puncture repair is patience, so don’t rush this step.
Make sure the whole of the patch is in contact with the tube.Amanda Thomas
Firmly press the patch into place after removing the backing foil – cleanliness is also key to a good repair, so leave removing the foil to the very last moment.
If there’s a thin cellophane backing on the patch, it can be left on.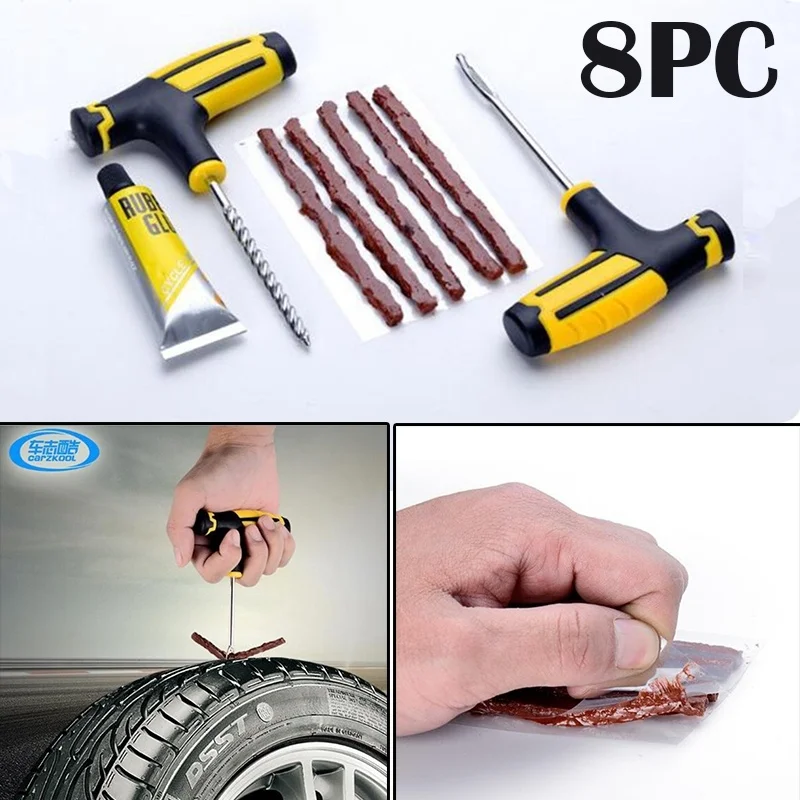 It’s good practice to dust any stray glue with chalk, talcum powder or fine road dust to prevent it from sticking to the inside of the tyre casing.
Thoroughly check the casing of the tyre for any other debris that may cause another puncture.Amanda Thomas
Before refitting the tube, thoroughly double/triple-check the inside of the tyre casing – there’s nothing more frustrating than going to the effort of patching a tube only to puncture it again with a stray thorn you may have missed.
Thoroughly check your rim tape to make sure it fully covers all spoke holes.David Caudery / Immediate Media
It’s also good practice to check the rim tape. If a hard plastic rim strip – often found on cheaper bikes – is torn, it leaves a sharp edge that can easily slice a tube.
Likewise, if your rim tape has slipped, it can leave eyelets or spoke holes exposed, which can also puncture a tube.
If you have persistent problems with your rim tape puncturing your tube, try swapping it out for something like a roll of good ol’ Velox cloth tape or similar. This stuff lasts forever, costs very little and can be reused if you’re so inclined.
Push the tyre bead back onto the rim with your thumbs, taking care not to pinch the tube.BikeRadar
After repairing the tube and thoroughly checking the tyre, refit one side of the tyre – one bead, to use the correct term – to the rim.
Slightly inflate the tube (just enough to give it structure) and refit it to the wheel, putting the valve through its hole first.
Starting at the opposite side of the rim to the valve, use your thumbs to lift the tyre’s bead over the rim. Work your way around the rim until there’s just one small section of tyre left.
Push the valve up into the tyre and then, using your thumbs, ease the remaining section of the tyre’s bead over the edge of the rim.
If the tyre is particularly tight, avoid the temptation to use a tyre lever to push the last section of the tyre onto the rim – you’ll almost certainly pinch your inner tube doing so.
If you’re struggling to pop the tyre onto the wheel, try putting the tyre on the ground, holding it in place with your feet and rolling the bead back toward you – heavy gloves really help here. This takes a little practice, but should work with even the most stubborn tyres.
‘Massage’ the tyre into the well of the rim, ensuring the tube isn’t being pinched by the bead of the tyre.Amanda Thomas
Check that the tube isn’t trapped between the rim and the tyre bead by working your way around the tyre, pushing the bead into the well of the rim.
If the tube is trapped, try ‘massaging’ the tyre to encourage it to seat properly. Pumping it up a small amount may also help to seat the tube properly.
Inflate the tyre, ensuring that it is seated evenly around the wheel.BikeRadar
Inflate the tyre to a point where it feels soft but has maintained its shape. Then check that the moulding mark around the tyre follows the rim evenly all the way around.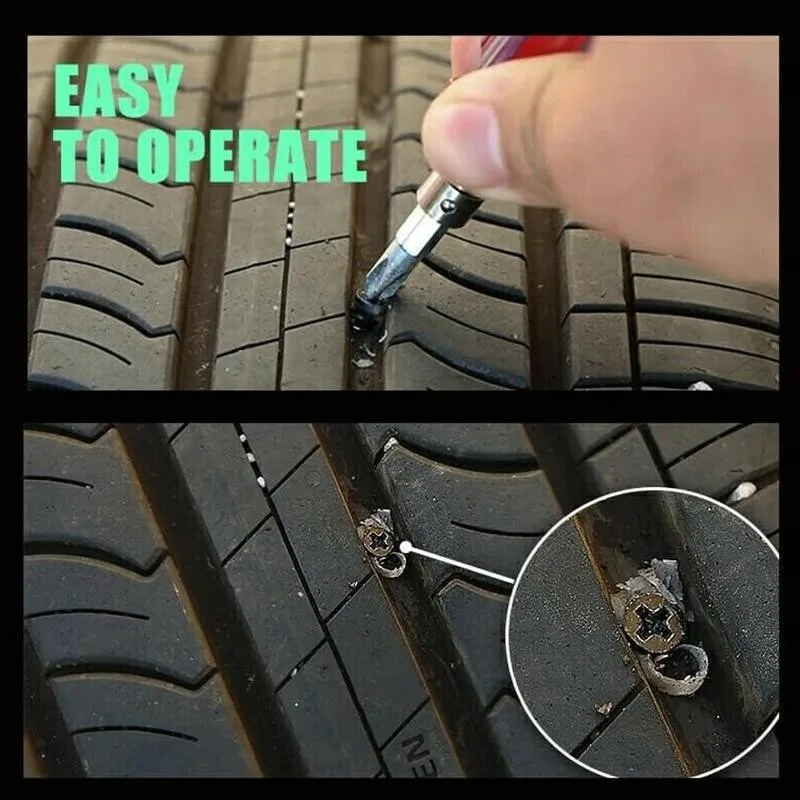
If not, deflate a little and ease any high spots down and pull low spots up until the bead is fitted evenly.
Inflate fully and check once again that the tyre’s bead is still seated evenly and that the tyre isn’t lifting off the rim at any point, then adjust your pressures to suit.
Regular or ‘point’ flats are caused by debris piercing the tread of the tyre. BikeRadar
A ‘regular’ puncture is usually caused by debris – glass, thorns, wire, nails etc. – entering the tread of the tyre and piercing the inner tube.
There’s little you can do to avoid these types of puncture beyond opting for puncture-resistant tyres. While effective, these are best saved for town or commuting bikes because they tend to weigh a lot more than regular tyres and really dampen the ride quality of a bike.
Those unfortunate enough to get punctures regularly may have noted that they tend to get more flats during wet weather. This is because surface water essentially acts as a lubricant, allowing anything sharp to enter the tyre more easily.
Wet weather allows debris that would otherwise stay on the ground to stick to your tyre more easily too, with the rotation of the wheel slowly driving it into your tyre.
Pinch flats are most often caused by running too low a pressure in your tyres.BikeRadar
Two small holes in a tube placed fairly close together indicate a pinch – or snakebite by its other name – puncture.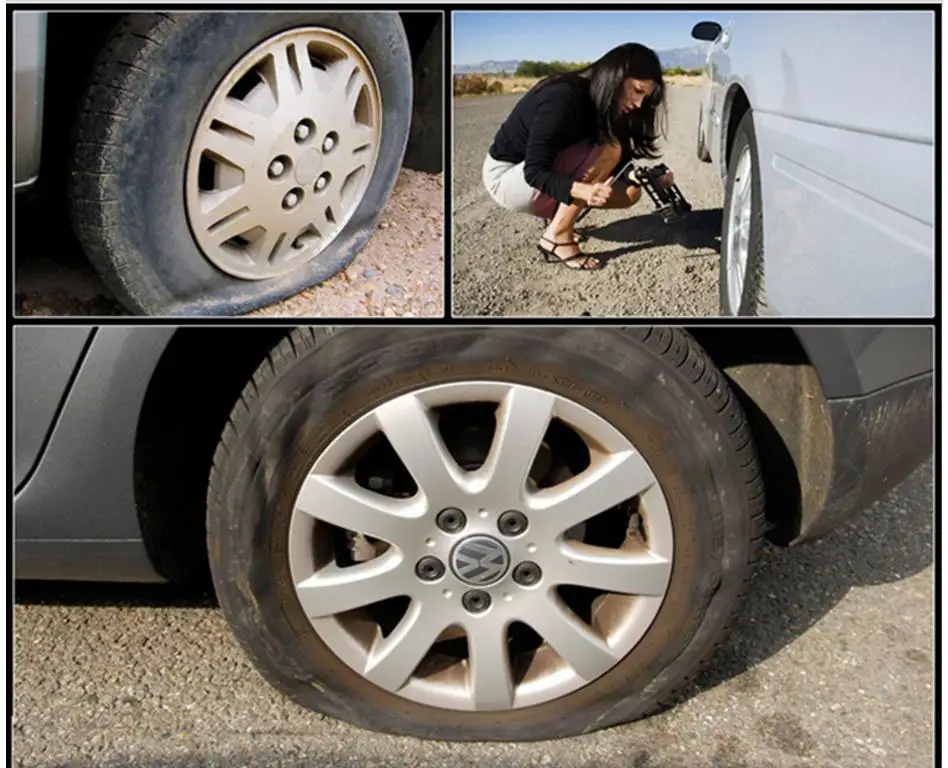 This is caused by the tube getting trapped between the tyre and the rim when riding over a hard-edged object, such as a prominent rock or a kerb.
Tyres that are not inflated enough are the most frequent cause of this. If you consistently get pinch flats, particularly on a mountain bike, it may be time to convert to tubeless.
If you have a pinch flat, be sure to check that the tyre’s sidewall isn’t cut as well.
A hole on the inner side of the tube indicates that the puncture was caused by something around the well of the rim, usually a rough edge on a spoke hole or torn rim tape if it is made of hard material.
Check around the inside of the rim to ensure that the rim tape properly covers the spoke holes and that all spoke holes are free of swarf – if you find any sharp edges, these can usually be filed down.
A less common cause of a puncture is a rough edge around the valve hole. A puncture here will occur at the base of the valve and will not be repairable.
The puncture-fixing brigade is divided into two distinct camps: those that insist on using an old-school, glue-on patch kit and those that prefer pre-glued patches.
In our experience, traditional glue-on patches are more reliable in the long run, but pre-glued patches are far, far more convenient.
What you prefer to use will largely be down to personal preference and likely dictated by your temperament – is stopping for five minutes to fix a tube properly and enjoying the view an opportunity to be relished or an unwanted distraction?
Park’s GP-2 patches are our favourite option.BikeRadar
For those that want pre-glued patches, Park’s GP-2 patches are our favourite.
It’s hard to find fault with Nutrak’s super-simple repair kit.BikeRadar
For an old-school style patch kit, it’s hard to beat the exceptionally cheap Nutrak P3 kit.
Yes, it’s possible for a patch kit to look good. Velo Vitality
For those after a more Gucci patch kit – yes, such a thing exists – you can bring a bit of French charm to your saddle bag in the form of this handsome patch kit from Rustines.
Whichever patch kit you buy, if it comes with one of those nasty little multi-tools that feel as though they’re made from cheese rather than metal, please put it into your nearest recycling point. Trust us when we say that they’ll do more harm than good to your bike.
It’s also a good idea to pack a pair of gloves with any repair kit. Braking surfaces, particularly rim brake surfaces, will make an absolute mess of your hands and nobody wants to inadvertently grab a stray patch of dried-out dog poop on a tyre with bare hands.
Pedro’s tyre levers came out on top in our grouptest.BikeRadar
Believe it or not, not all tyre levers are made equal.
Thankfully, we’ve done the hard work for you, whittling down a selection of the best tyre levers out there, with Pedro’s levers coming out on top.
Never leave the house without a mini pump!Steve Behr
While a mini pump is a great option if you’re out on the road, do yourself a favour and get a decent track-style pump for use at home – these take far less effort to use than a mini pump and will allow you to get your tyres up to much higher pressures.
If you prefer to take a CO2 inflator with you, check out our round-up of the best CO2 inflators.
Check your tyres for cuts in the tread, swelling in the sidewall or serious wear.
Tyres with severe cuts, swelling or casing visible through the tread must be replaced. Remove any grit or glass embedded in the tread with a fine pick.
Regularly check your tyre pressures with a proper gauge. Tyres inflated to the correct pressure will have fewer punctures and a longer life.
We’ve got full guides to road bike tyre pressure and mountain bike tyre pressure, so you can optimise your setup to balance speed, comfort, grip and puncture resistance.
Deputy editor
Jack Luke is the deputy editor at BikeRadar and has been fettling with bikes for his whole life. Always in search of the hippest new niche in cycling, Jack is a self-confessed gravel dork, fixie-botherer, tandem-evangelist and hill climb try hard. Jack thinks nothing of bikepacking after work to sleep in a ditch or taking on a daft challenge for the BikeRadar YouTube channel. He is also a regular contributor to the BikeRadar podcast. With a near encyclopaedic knowledge of cycling tech, ranging from the most esoteric retro niche to the most cutting-edge modern kit, Jack takes pride in his ability to seek out stories that would otherwise go unreported. He is also particularly fond of tan-wall tyres, dynamo lights, cup and cone bearings, and skids. Jack has been writing about and testing bikes for more than five years now, has a background working in bike shops for years before that, and is regularly found riding a mix of weird and wonderful machines.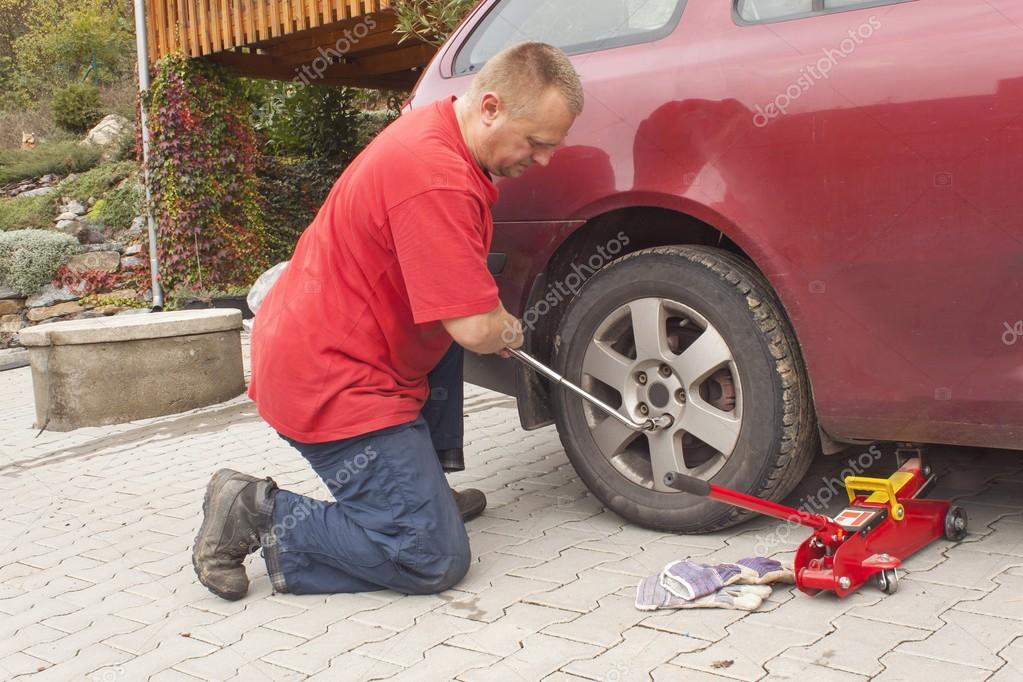 Jack can also often be seen zooming about with his partner aboard their beloved tandem, Cecil.
Author: Aleksey Kokorin
Experienced drivers are not surprised by such a trifle as a puncture, but for the first time beginners usually get confused in the sequence of actions, forget about important details and do not know what to do with a punctured wheel even in a tire shop - especially if they start offering choose from several options or intimidate with expensive repairs. Let's set up an operation algorithm when a flat tire is detected and figure out what to do right away and what to choose later.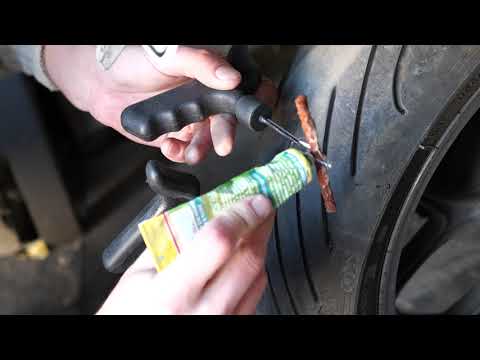 nine0013
What to do when you find a puncture
Having found a flat tire, first of all you need to stop in a safe place, turn on the alarm, assess visibility and, if necessary, set an emergency stop sign: according to traffic rules, it is installed at least 15 meters from the car in the village and at least 30 meters outside the settlement. When choosing where to stop, consider the space to the side of the vehicle to handle a flat tire. You should not stop right on the road and in places where stopping and parking are prohibited: even if a punctured wheel belongs to the conditions of a forced stop, it is quite possible to drive several tens of meters on it to choose a safe and convenient parking place. At night or in conditions of limited visibility (for example, in fog or rain), it is imperative to wear a vest with retroreflective elements - this is required by clause 2.3.4 of the SDA and common sense. nine0013
Now you can start working on the wheel. We will sequentially consider several options for action, and then move on to ways to repair a damaged tire.
The most obvious solution to a flat tire is to replace it. If you have a spare tire that you are sure is in good condition, the best option is to install it and visit a tire shop to repair a punctured tire - such repairs will be more reliable and of high quality than doing it yourself.
If you don't have a suitable spare tire, but you do have a pump or compressor, you can assess the damage to the tire and try to pump it up again to get to the tire shop. It is better to start searching for an air leak with a valve (aka “nipple” or “nipple”): often a faulty spool becomes the cause of a flat tire. It is easy to check it: unscrew the protective cap (if there is one), pour water on it (or slobber it, as in childhood): air bubbles will leak. In this case, you can try to replace the spool valve by unscrewing it and screwing in a new one, but if there is no new valve, as well as a store nearby, you can try just unscrewing and screwing it back in. Regardless of whether it helped or not, you need to visit a tire shop to replace the entire spool or valve. nine0013
If the valve is tight and the tire is flat, it is most likely a puncture. The easiest way to find a puncture that is free of foreign objects is to pour water on the tire while looking at the surface: the damage will reveal itself as air bubbles. However, often the cause of the puncture can be found along with it: a self-tapping screw, nail or other arbitrary object sticking out of the wheel will clearly indicate the place of depressurization. In this case, you do not need to immediately remove the foreign object from the tire: it partially seals the hole, and if the pressure loss is slow, you can try to pump up the wheel and drive to the tire shop. nine0013
The same goes for wheels that are leaking from the rim or from a faulty valve. Usually, in this case, the air is bled slowly, and you can pump up the wheel and have time to get to the place of repair. By the way, rim leakage can occur due to disk deformation upon impact - for example, when hitting a pit with sharp edges.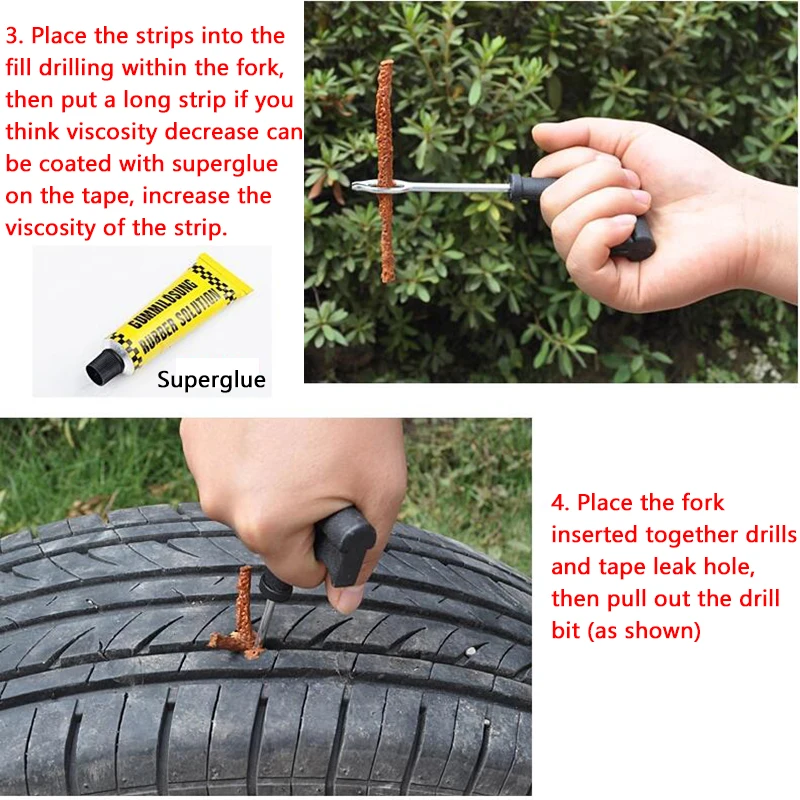 Such situations are fraught with damage to both the disk and the sidewall of the tire, in which case the disk will need to be corrected, and the tire repaired or even replaced. To avoid rim leaks, you need to inspect the rims every time you change tires. The loss of tightness occurs either due to corrosion or due to disc deformation, and not only steel, but also light alloy wheels can corrode. So if you see paint blistering or rust on the rim, the tires need to be put on rim sealant: when changing tires, this will be cheaper than the subsequent removal and re-tire to fix a leak on the rim. nine0013
If you find a puncture, but there are no foreign objects in it, and you do not have a spare wheel and tire repair kits, there is another popular method of temporary "repair". You can screw a self-tapping screw into the found hole - if, of course, you have one. In extreme cases, you can look for a self-tapping screw in the cabin by unscrewing it from some interior detail. This method cannot be called reliable: it is unlikely to ensure complete tightness of the wheel, but at least it can help you get to the nearest tire shop. nine0013
And a couple more useful remarks. If the wheel is completely flat, then it is easier to inflate it without a spool: the latter must be unscrewed, then the tire must be inflated and quickly screwed back in. The fact is that the spool itself, when inflated, resists the compressor, and in the event of a loose fit of a flat tire to the disk, the power of a simple magazine compressor may not be enough, and the absence of a spool helps to increase air flow and facilitate the operation of the compressor. If this does not help, you can jack up the car by hanging a flat tire: this will improve the fit of the tire to the disk, and the chances of inflating the tire will increase. nine0013
On-Site Repair Methods
Now let's look at options for repairing a tire yourself using special materials that you should carry with you or, if a puncture caught you in the city, buy it at the nearest auto shop.
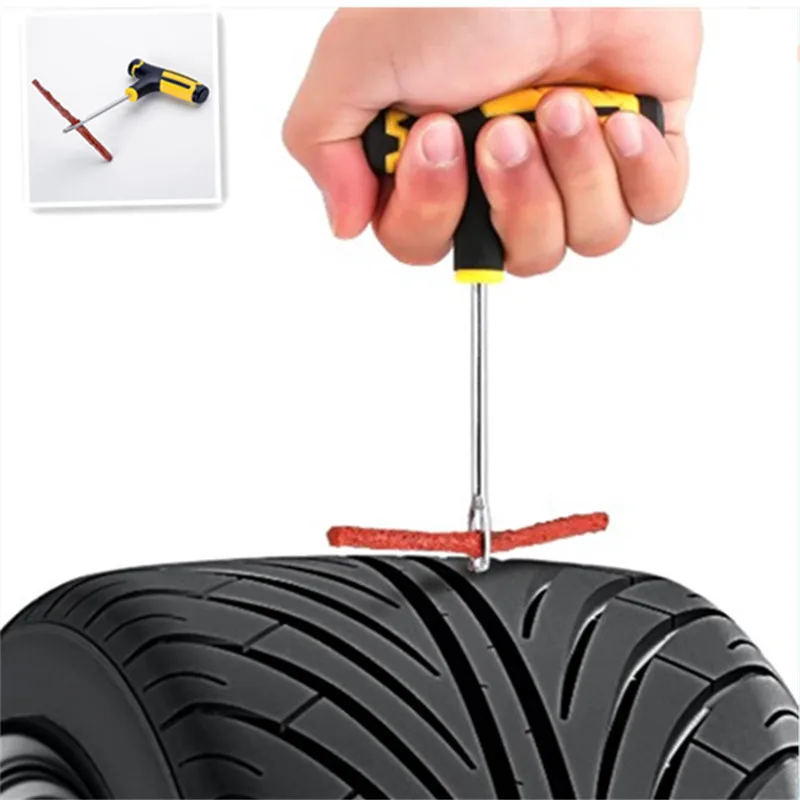
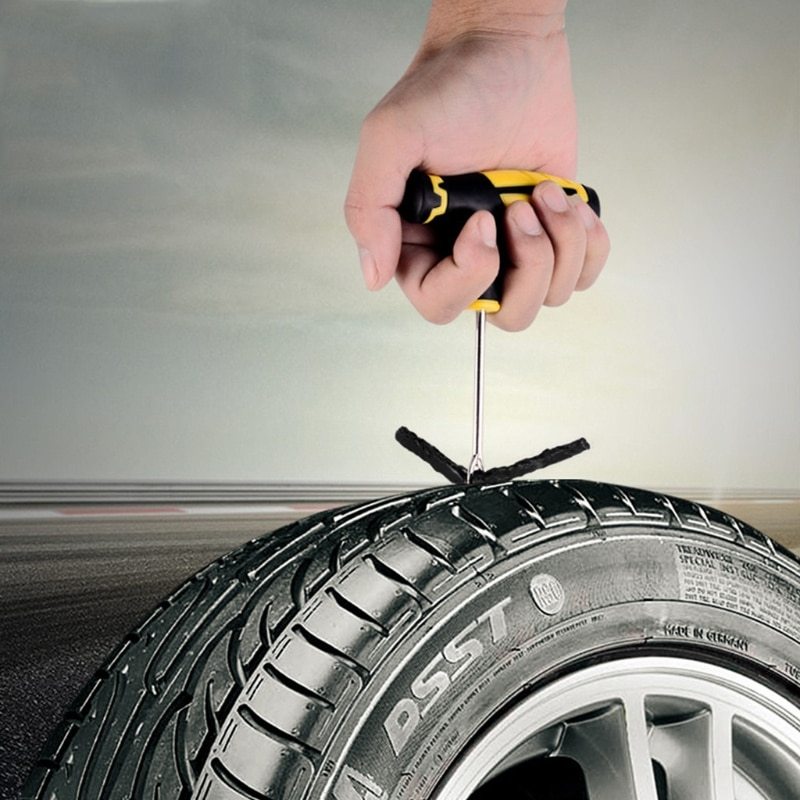
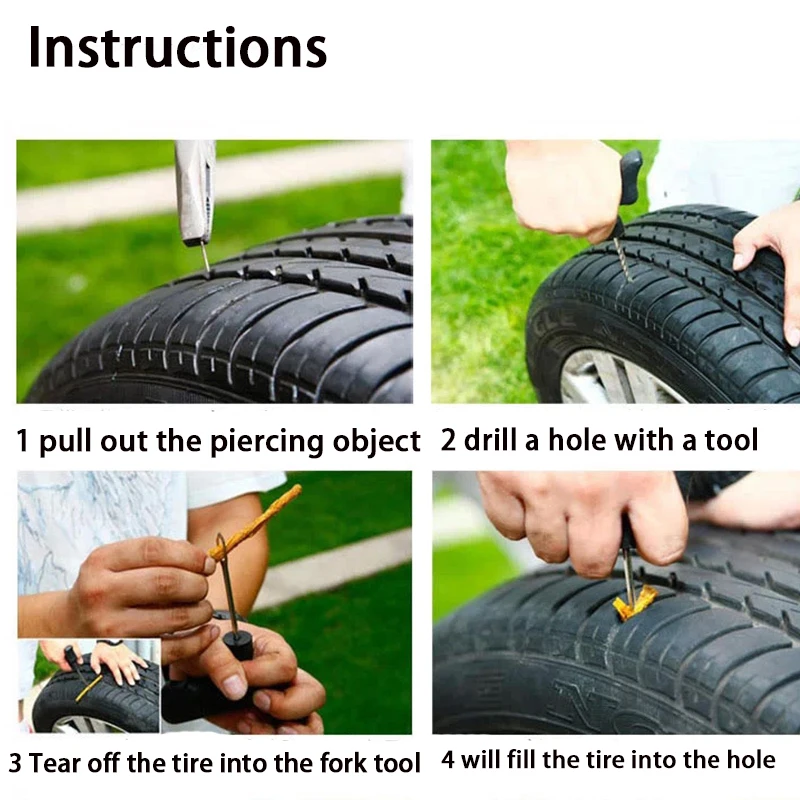
1. The most common, cheapest and easiest way to do it yourself is to install a raw rubber band.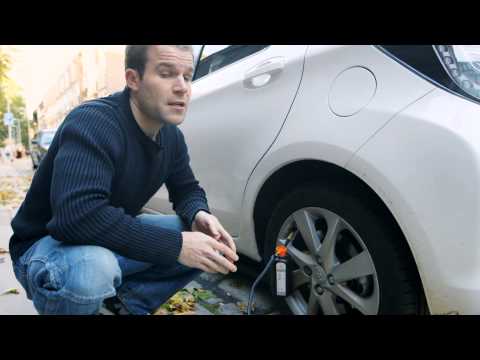 The harnesses are sold complete with an abrasive awl to expand the hole in the tire and improve the contact of the repair harness with its edges, as well as a needle for installing the harness and an adhesive to fix it and at the same time seal the puncture. When choosing a repair kit in a store, you should pay attention to the following nuances:
Install the harness in the following order. First, the found hole is expanded with an abrasive awl - you need to insert and remove it several times into the puncture site. Then the tourniquet is inserted into the eye of the needle, and glue is applied to it. After that, the needle with the tourniquet must be inserted into the hole in the tire and pulled out sharply - so that the tourniquet remains in the hole, and the needle comes out without it. If everything worked out, it remains only to cut the end of the harness flush with the surface of the tire and pump up the wheel. nine0013
The advantages of repairing with a harness are quite decent reliability, simplicity and low cost. On a well-repaired tire, you can drive for a long time, and if the repair site starts to poison, you can either replace the harness or have the tire repaired in a quality service. Among the minuses is the possibility of damaging the cord during installation, as well as lower reliability compared to “full-fledged” repair methods in a tire shop. Strictly speaking, a tourniquet is still a temporary repair, so if it is possible to pump up a wheel and get to a tire fitting, then it is better not to enlarge the hole in the tire and get to the experts. nine0013
2. The second repair option is aerosol liquid sealants sold in cans. To repair a punctured tire with sealant, you need to remove the foreign object from the puncture site, then pour the sealant into the wheel through the valve, twist it to distribute the composition inside the tire, pump up the wheel and drive several kilometers at low speed for the final uniform distribution of the sealant.
Among the advantages of this repair is the simplicity and less labor intensity compared to installing a harness. However, there are also disadvantages: the larger the hole, the higher the chance that the sealant will not be able to eliminate it, and such a repair can affect the wheel balance. Compared to a tourniquet, it can be considered even less reliable and preferable, but simpler. nine0013
Repair options at a tire shop
If you put on a spare tire and brought the wheel to a tire shop, you may also be offered several repair options. Consider the most popular with an indication of the advantages and disadvantages.
1. The first repair method is the same harness installation as described above. As we remember, the tourniquet refers to a temporary repair, so among tire specialists this method is considered bad form, but many workshops do not exclude it from the list of services. All the advantages and disadvantages are the same here: such a repair will be the fastest, simplest and cheapest, but less reliable than other methods. It is worth choosing it in cases where the price and / or speed of the procedure is more important to you than anything else. If quality is a priority, then it is better to fork out for the options listed below. nine0013
2. The second option for repairing a puncture is to install a patch on the inside of the tire, the so-called cold vulcanization. In this case, the tire is removed from the disk, the surface around the puncture is treated with an abrasive, and the damage is sealed with a special patch. This is a more preferred repair method than a tourniquet: it is more reliable and durable, especially in the case of side punctures, when not the thick tread part of the tire is damaged, but the thinner sidewall. Among the minuses, only a higher cost can be noted: in addition to the actual tire repair, you will have to pay for the removal and installation of the wheel (or do it yourself), tire fitting and balancing. nine0013
3. The third option is a "complex" of the first and second: installation of the so-called repair "fungus".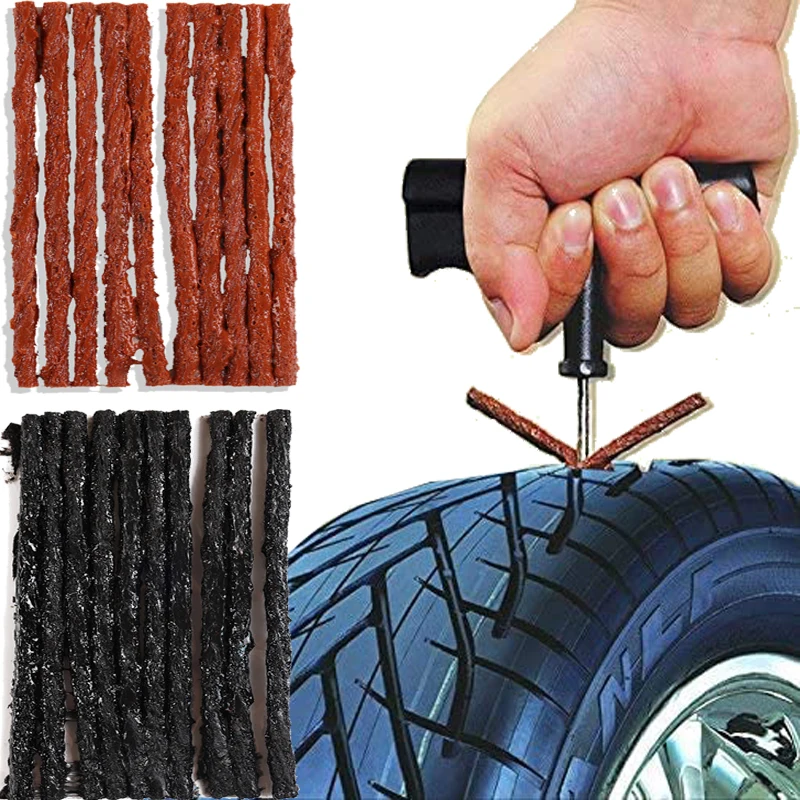 The “hat” of the fungus is a patch, and the “leg” is threaded from the inside of the tire to the outside. After gluing the patch, the excess part of the leg is cut off, as in the case of the tourniquet. Thus, not only the inner surface of the tire is closed, but also the hole itself. The advantages and disadvantages of this repair method are generally the same as those of a patch.
4. An extreme, “emergency” measure when repairing a punctured wheel is to install a camera in it. Typically, this method is used for tires that are no longer worth repairing, or “for reliability” after repairing a complex puncture. It should be understood that almost all modern tires are tubeless, that is, they are not designed to install a camera, so it’s not worth driving a wheel repaired in this way for a long time. Installing a tube is a temporary solution for riding until a new tire is purchased, and sometimes such wheels are left as spares. So this repair method can be kept in mind as a backup. nine0011
Finally
We have deliberately left out of this text such methods as combined repair of tires with a tourniquet and a patch and hot vulcanization. The first is used quite rarely and for specific damage, and it is enough just to know about its existence. Well, the second is used to repair serious side cuts, and it is not only rare, but also very expensive. The cut site in this case is prepared, filled with raw rubber and processed with a hot press for vulcanization. Equipment for this procedure is not available in every tire shop, and the cost of repair can be about half the cost of a new tire. nine0013
interesting popular questions
Articles / Interesting 5 Reasons to Buy and Not to Buy a Honda Civic IX Honda in general, and the Civic in particular, have a mixed reputation. It seems that the car does not break down too often, but the cost of maintenance seems to many to be too high. Looks good, but... 257 0 one 12/18/2022 nine0011
Articles / Statistics Air Filter Index: 2022 results Since mid-spring, we have been watching the price changes for basic consumables, oils, tires and some rare parts. Time to take stock of the year and give a cautious forecast for 2023. Spoiler: there is x... 444 0 one 12/17/2022 nine0011
Articles / Practice No need to save: why ignition coils fail too quickly We have already written a lot about how to properly operate a car in winter, and how to determine why the engine suddenly began to "troit", and how different types of ignition coils are arranged, and even how to replace .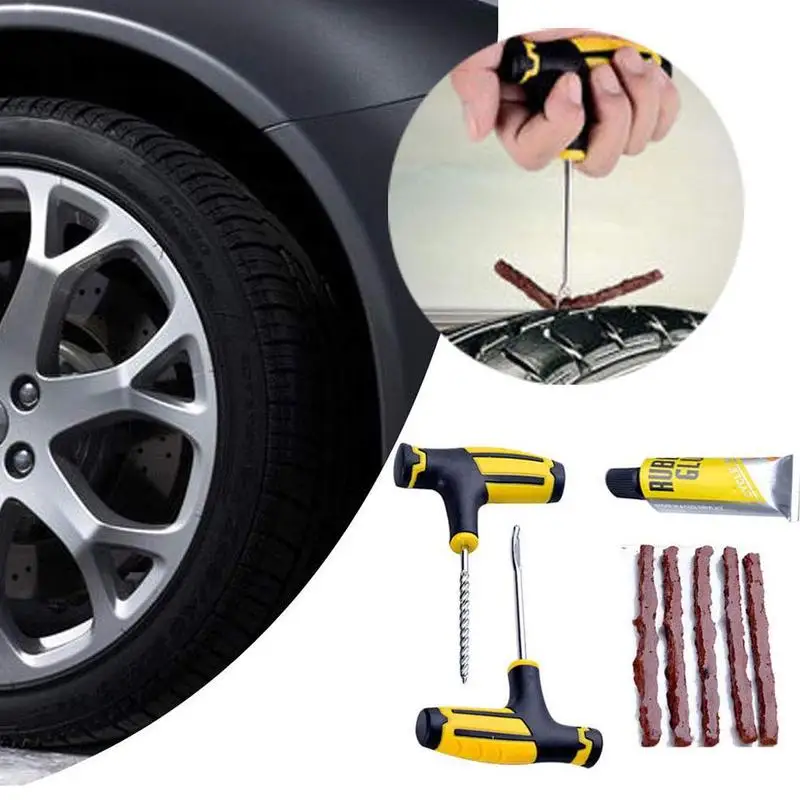 .. 1187 0 2 16.12.2022 nine0011
Test drives / Test drive Haval Dargo vs Mitsubishi Outlander: the dog is barking, the stranger is coming In the Haval dealership in the south of Moscow, life is in full swing: buyers look at cars, communicate with managers and sign some papers. While I was waiting for the test Dargo, the same cross... 19268 7 205 13.09.2022
Test drives / Test drive Motor from Mercedes, emblem from Renault, assembly from Dacia: test drive of the European Logan 1.0 It would seem that what's new can be told about the second generation Renault Logan, known to every Russian taxi driver, as they say, up and down? However, this car has.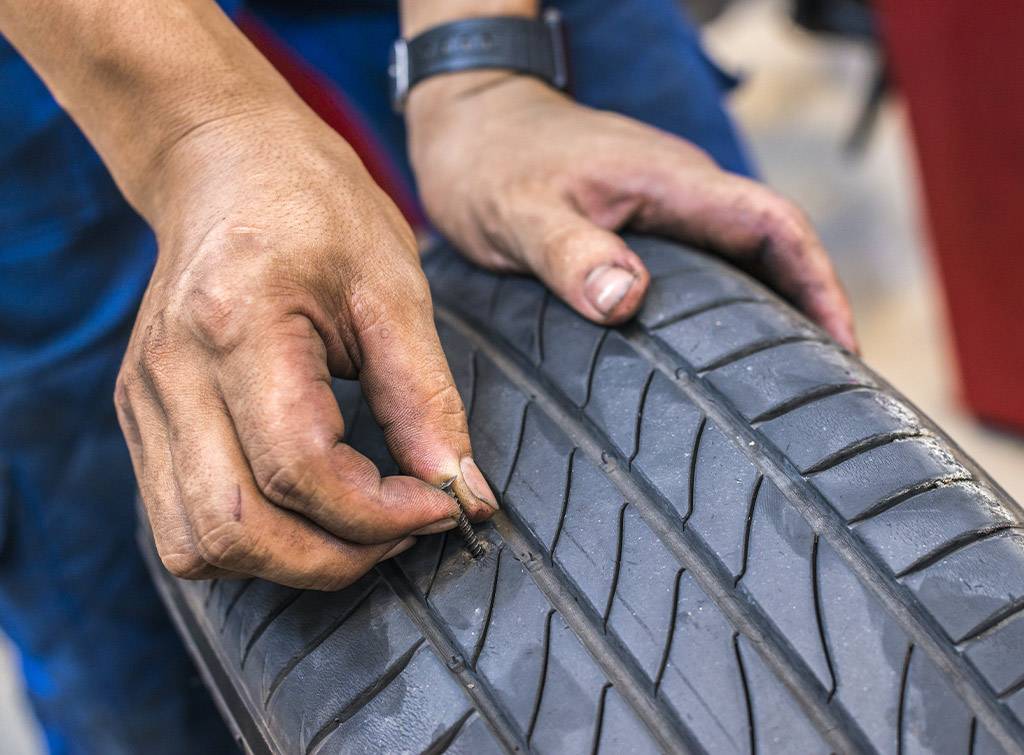 .. 15191 10 41 08/13/2022 nine0011
Test drives / Test drive Geely Coolray vs Haval Jolion: Free Cheese? If! Do you want to buy a car today with a full warranty, on credit at an adequate rate, without wild dealer markups? Now this is still a task, because a full-fledged chain of "representation - s... 12621 26 thirty 08/10/2022 nine0011
02/22/2018
Despite the objective importance of the spare tire, not all drivers always have it with them. Some do not carry a spare tire out of hope or belief that their tires are invulnerable. Others deliberately take this step, as they stocked up with a special tool in advance, which, if necessary, can eliminate a tire puncture along the way. What else can be used and how to do it right? Let's figure it out. nine0011
Contents of :
Conventionally, all methods for express tire repair can be divided into two categories:
Consider ways to restore a damaged tire on the road. The first three methods are temporary. The latter, with the right approach, allows you to completely restore the tire.
 While driving, it is inside the wheel in liquid form. If the tire suddenly loses its tightness, then this composition, leaving together with the air, clogs the slot in a few seconds. This method is relevant if you have a long trip under time constraints. nine0004
 The old grandfather method is applicable if the puncture has a small diameter, and there is no foreign object left in the tire body. A simple screw or self-tapping screw (preferably larger in diameter than the size of the puncture) is taken and screwed into a hole on the surface of the tire. The self-tapping screw can be borrowed from the fender liner or plastic interior elements. This method will not eliminate the air leak, but will allow the car owner (perhaps with several swaps) to get to the nearest tire service. nine0004
 After removing the foreign object, the hole is processed with an awl with abrasive edges: this tool must be inserted into the puncture and cleaned and developed with intensive reciprocating movements several times.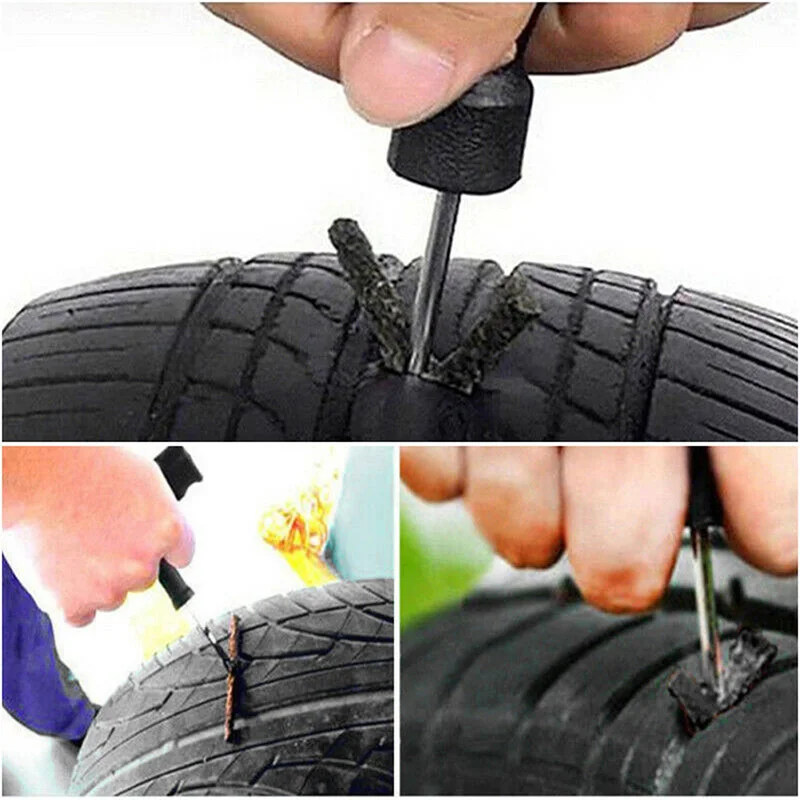 Then the raw rubber tow is removed from the package and inserted into the eye of the second awl so that both ends are the same length. The hole in the tire and the raw rubber is treated with an activator. Next, the awl is inserted into the puncture in such a way that small ends of the tourniquet, about a centimeter long, remain outside. After 5 minutes, the excess remaining on the surface is cut off. This method can also successfully eliminate small side cuts. nine0011
There is a technique that allows using wire and several bundles of raw rubber to get rid of even extensive side damage to tires. However, it is quite difficult to implement and not every driver will be able to implement it.
Consider a few well-known tools that are most widely used to repair punctures:
 It works in the same way as most sealants: the container is thoroughly shaken, after that a hose is attached, and the contents from the container are completely pumped into the tire. The maximum diameter of the repaired hole is 4.5 mm. This is almost always enough to repair punctures caused by nails and screws. nine0004