For drivers who explore remote trails or even city streets, you are bound to get a flat or leaking tire eventually. Having a quality tire repair kit as part of your everyday carry is not a bad idea.
Tire repair kits can be picked up for under $50 and offer much needed cheap insurance.
There are many options to choose from when it comes to off-road tire repair kits. Two notable brands are Safety Seal and the ARB Speedy Seal Tire Repair Kit. Both are going to offer many of the same features, however, ARB comes with a few more items including pliers and a few other accessories including a steam repair kit.
The highlight of Safety Seal is that their products are made in the USA. Not a huge benefit over ARB because we all know ARB makes high-quality products and both have great reviews. Either option (the ARB or Safety Seal) is going to be a must-have in my opinion if you frequently explore offroad.
Tire Repair Kits:
Smittybilt also makes a pretty nice kit that comes in a zip case that doesn’t take up as much room as the ARB and Safety Seal kit.
If you want a more compact solution, look at the Smittybilt. It comes in a smaller zipper case and can be condensed down into your tool bag or tool case much easier than the larger ARB or Saftey Seal case.
If I had to purchase over again, I would consider the Smittybilt for this specific reason.
UPDATE: 12/3/2019
I now own two Smittybilt tire repair kits. The materials are not as “quality” but the compact case with more bells and whistles really sold it for me. We should have a review coming out soon on these.
The large plastic cases just waste a lot of space in the recovery bag/tool bag. You can also take all the items out of the Saftey Seal kit and create your own small MOLLE case as well. Maybe an idea for another post.
For an overview straight from Safety Seal, check out their video.
Using a soapy water bottle, coat the entire tire until you find the leak. The leak pictured above is on our “new to us” 2016 4Runner that has had a slow leak for some time.
The owner who had it before me mentioned there was a slow leak so I set off to find it. It took about 20 minutes to find to obnoxious little leak. If you have a small leak, be patient and you will find it.
If you are not able to find the leak in the tread, check the sidewall, and stem for leakage using the same method.
After locating the puncture remove the object (if any) in its path. We had a very slow tire leak with no object (nail, screw, pin, etc.).
Safety Seal recommends:
If the puncture is larger than a quarter-inch, if there is evidence of excessive carcass damage or if the puncture path is not straight, the tire must be removed for internal examination.
If the whole is this big, you have bigger problems on your hand and should take the tire to a shop.
You don’t need to worry about the direction of the path of the puncture.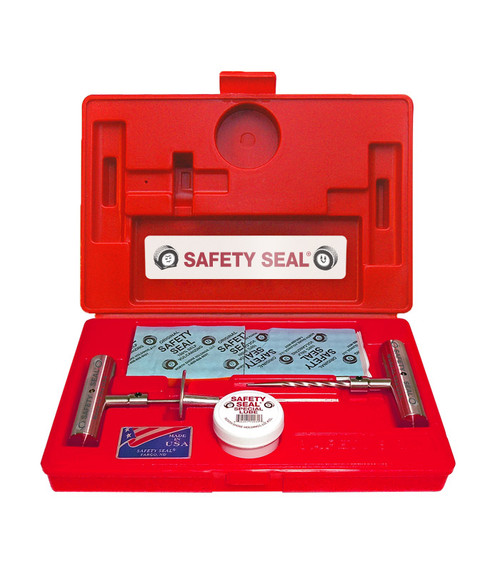 Insert the needle with a small amount of lube and the needle will follow the path without creating a new hole.
The Insertion probe tool opens the hole up allowing the tire repair Insertion needle tool easier access.
To repair the puncture, first, remove the safety seal plug/string buy peeling back the corners of the protective blue paper down away from the opposite side of the paper.
Then, insert the Safety Seal plug into the needle so that equal parts are visible on each side of the needle.
Places a small amount of lube on the tip of the insertion needle.
Having located the puncture, insert the safety seal into the puncture. Only one safety seal repair should be used in a single puncture.
With extremely firm pressure insert the safety seal needle with the repair string into the tire until the sleeve touches the tire.
If more pressure is required, the safety seal probe may be needed again (*See the section below on repairing small punctures).
Grip the edge of the sleeve and hold it against the repaired area remove the needle by pulling away while holding the sleeves secure against the tire. Do not twist the tool when removing.
The sleeve has allowed the safety seal to release from the needle leaving the repair now in place.
Excess tire plug/string may now be trimmed away with the blades provided.
Reinflate the tire to manufacturers’ recommended air pressure. Check for leaks with your leak detector of choice.
If you still have air seepage, this may indicate inside tire damage or an additional puncture somewhere outside the original puncture area.
If this is the case, you may want to dismount the tire, take to a tire repair shop and have them check for further punctures.
For repairing small punctures in tires you will need to use the safety seal probe. For repairing small punctures in steel-belted radial tires, use the safety seal probe that spreads the steel cords without damaging the tire or removing any rubber.
Lube the tip of the probe and insert it into the puncture carefully following the puncture path. This is only to be used if the puncture in the tire is up to 1/8 of an inch.
You may not need to use the probe when using slims (slims are smaller versions of the standard plugs/strings).
You can use the insertion needle (repair needle) as a probe but the probe will allow the rubber in your tire to stretch more, allowing for an easier repair. Once the probe is fully inserted approximately a half-inch of the probe needle, rotate to handle is indicated in a circular motion.
This rotating displaces the steel chords allowing for easier insertion of the safety seal repair. No rubber is removed nor is the actual puncture enlarged. Probes are available from your safety seal salesman of choice at any local tire store.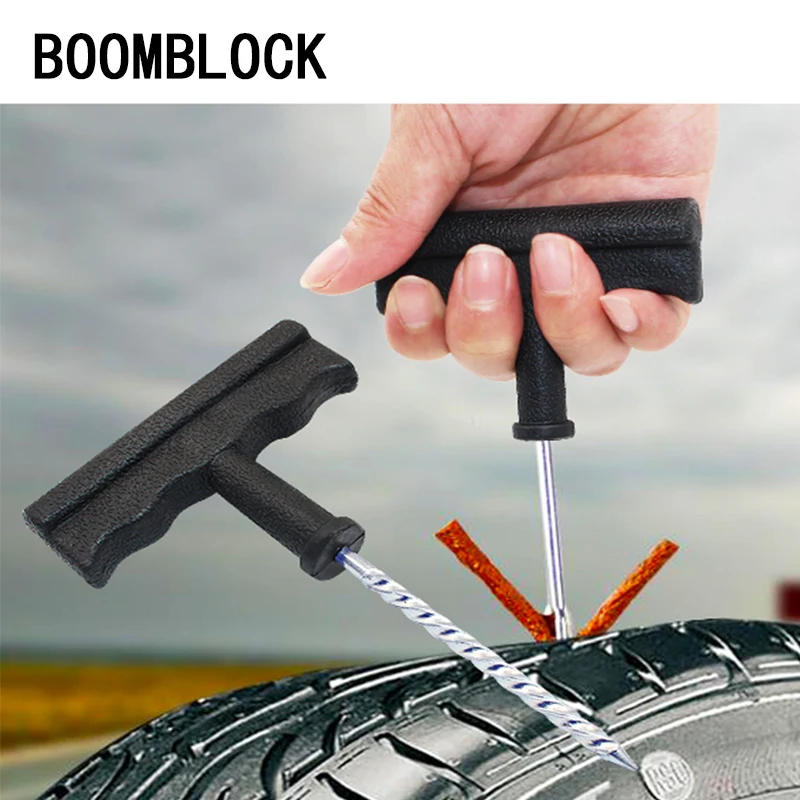
If you don’t already have a tire repair kit, you may want to consider picking one up.
These kits are inexpensive and you can see how they will come in useful when you need them most. Tire repair kits will come in especially useful off-road when you are miles away from city roads.
In any case, hopefully, this helps someone understand how to use a tire repair kit or how to repair a slow leaking tire.
Brenan is the founder of Trail4R.com, Toyota guy through and through, verified nature lover, lightweight photographer, exploration enthusiast, and certified serial blogger.
Shop by Manufacturer...31 Inc.3D ProductsA-1 CouplingACME AutomotiveAcro Plastics Inc.Active ToolActive ToolsAllbrite Car CareAlligator VentilfabrikAllpart Supply (Haweka)AME InternationalAmerican Forge & FoundryAmermac Inc.Amrep Inc.Aronson Mfg.Ascot Supply Corp.Associated EquipmentAstro PneumaticAteq USAAUTELB & J Rocket America Inc.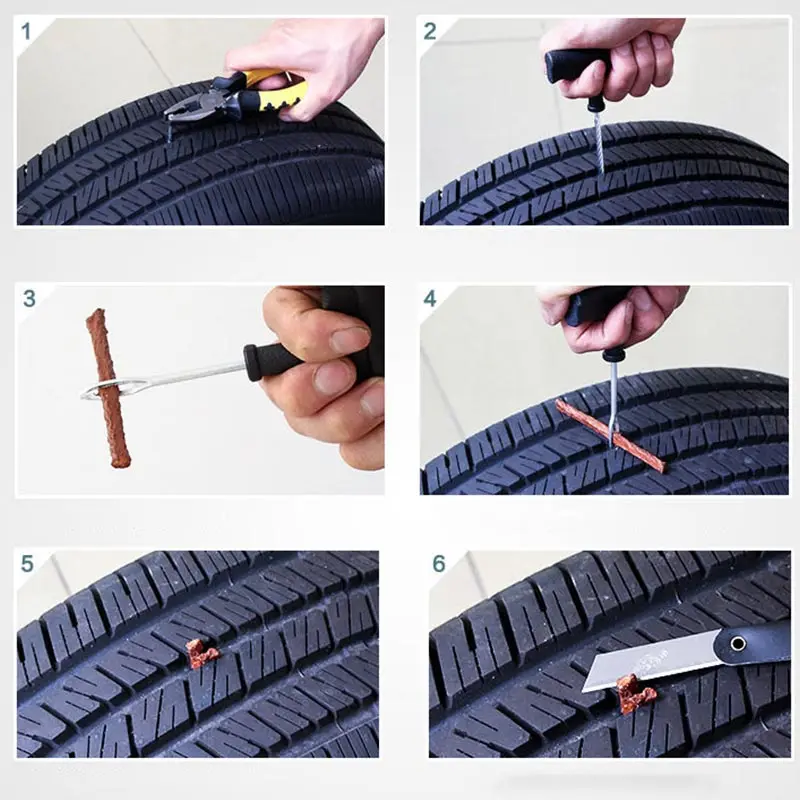 Badac EquipmentBalcranck ProductsBartec USABattenfield Grease & OilBeicoBlackJack Tire RepairBlasterBorg Equipment & SupplyBoss ManufacturingBrake Drum ToolBranick IndustriesBurke EnterpriseCalifornia Tool Co. Inc.CEMB USACEMB USA (BL Systems Inc.)Central Tools, Inc.Challenger LiftsChannellock, Inc.Chicago PneumaticCliplight Inc.Cordova Safety ProductsCORGHI USACounteractCoxreels (Northern Tool + Equi..CPS ProductsCRC IndustriesCrushproof Tubing Co.Custom LeatherCraftDavenport EnterprisesDell Corning Corp.Delta First Corp.Dexter-Russell, Inc.Dill Air ControlsDixon TiconderogaDual DynamicsDuallyvalveDuro Manufacturing, Inc.EATON - Hansen CouplingElrick Industries Inc.Elwood Corp.ESCO - Equipment Supply Co.Everhard ProductsExcalibur Wheel AccessoriesExten, Inc.Fejes ToolsFreylubeGaither Tool Co.Gardner DenverGator Corp.Gojo Industries, Inc.Great Lakes PartsGrey Pneumatic Corp.H.L. BoutonHALTEC CorporationHardwareHein-Werner AutomotiveHennessy Ind. AMMCO/COATSHofmann Corporation (Snap-On)Hosetract IndustriesHunter Engineering Co.
 Ideal Heated Knives, Inc.Imperial Western ProductsIngalls Engineering Co.Ingersoll-RandInstant Tools Inc.International Marketing, Inc.ISN - Integrated Supply Networ..Jackco Transnational IncJET ToolsJohnDow IndustriesJTM Products, Inc.K-Tool InternationalKen-ToolKex Tire RepairKTB Products Corp.LA-CO / Markal Co.Laitner Brush Co.Levin's Auto SupplyLincoln IndustrialLiquiTubeLisle CorporationLock Technology (LTI)Loomis Root Inc.M.L. Bernie Co.MAHLE Industries, Inc.Maken Material HandlingMartins IndustriesMaster PneumaticMcCourt Marketing GroupMechanix Wear Inc.MEDCO CorporationMilton Industries, INC.Milwaukee HydraulicsMinder Research, Inc.Mohawk Rubber SalesMoMax Sales, Inc.Morton Safety CompanyMotion Industries, Inc.Mov-It Tire Products, Inc.Nathan Kimmel Co.Niagara Lubricant Co.Norbar Torque Tools Ltd.Norco Industries, Inc.Northstar Manufacturing, Inc.Novus Device CorporationOmega (Shinn Fu)Orbit Manufacturing, Inc.OTC ToolsP.C. Products InternationalParkerPerfect Equipment Corp.Petersen Supply Co.
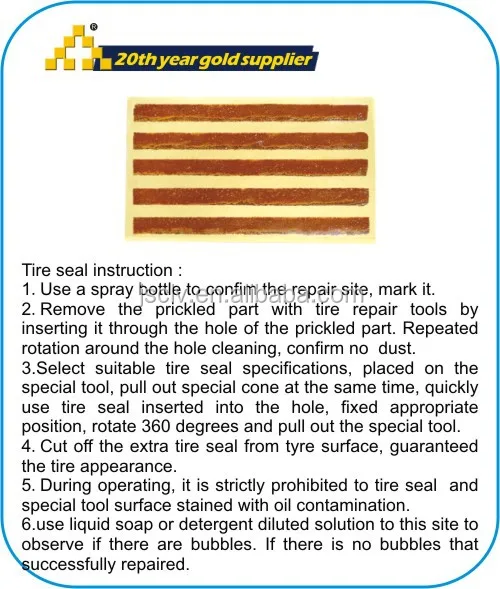 Pincott International Pty Ltd.Plews & Edelmann (Amflo)PlombcoPrecision Instruments, Inc.Prema Products, Inc.Protoco Enterprise, LLC.Reading Technologies, Inc.Reelcraft IndustriesRELS DistributionRema Tip TopRidgerock Tools, Inc.Ringers Gloves USARobbins LLCRobinairRock-n-Road ProductsRolair SystemsRSC Sales CompanyRTI Technologies Inc.Safety Seal (North Shore Labs)SAS Safety Corp.Schrader InternationalShark Industries, Ltd.Shepard Brothers., Inc.Sirco Industries, Inc.SlickSpecialty Products CompanySt. Louis PneumaticStandard AbrasivesStellar Industries, Inc.Storm Industries, Inc.Sunex ToolsSVI International, Inc.TECH Tire RepairTechnical Chemical (TCC)Texas Refinery Corp.The Main Resource (TMR)Tire Equipment Corp. (TEC)Tire Service Equipment (TSISSG..TITAN Professional ToolsTo-Air Inc.Todd EnterprisesTracer ProductsTTS ProductsTuffy ManufacturingTunstalloy - Universal CarbideVacula Automotive (Cejn)VIAIR CorporationWeiler CorporationWest Coast Wheel AccessoriesWestern Lift-Western Hoist, In.
 .Western SupplyWestern WeldWicking ProductsWinner FoundriesWTD - Weiss ToolZinko Hydraulic Jack
* When taking tires for repair, carefully check their general condition. Explore all tires for hidden defects. Particular attention must be paid on the condition of the boards.
* To achieve a quality repair the following conditions are required: - organized in accordance with sanitary standards and workflow process places; - appropriate lighting sanitary standards; - past training and certification of personnel; - all materials must be recommended for use by the company “Thermopress” and tested for compliance with the warranty term. - storage of materials and equipment must be carried out with compliance with the relevant requirements, set out in the accompanying instructions and accompanying documents. nine0003
* The manufacturer reserves the right to any changes for the purpose of technical improvements.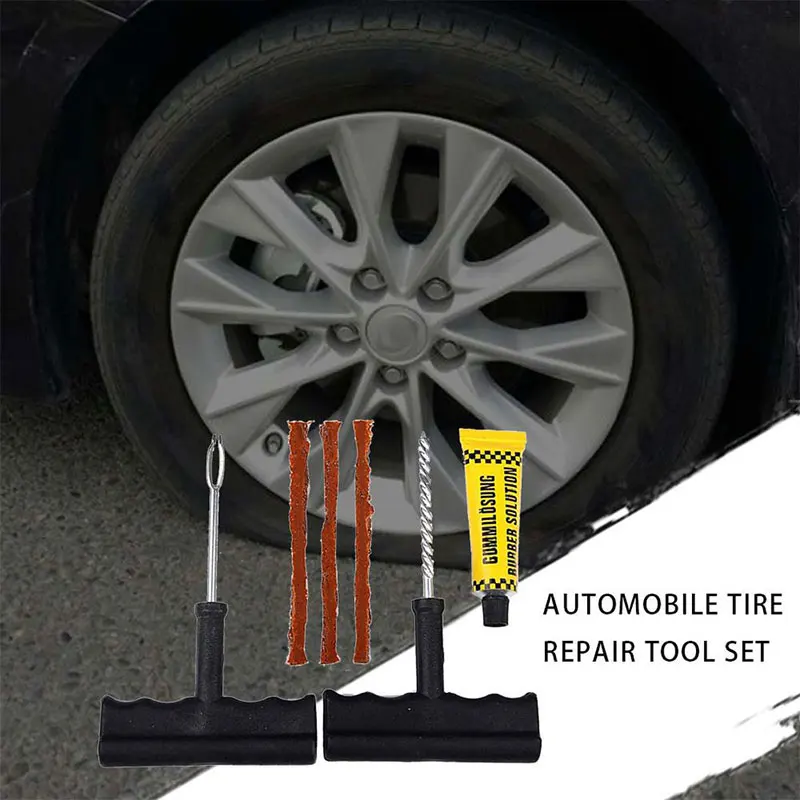
* When choosing plasters, tools and equipment, use valid tables and instructions.
Attention: For car repair tires by hot vulcanization should use special thermocouples with black adhesive layer and index "t°" in designation.
Safety note:
* When working with tools, observe the requirements of the relevant regulations for safety, where it is necessary, use protective equipment such as safety goggles, gloves, respirators, etc.
* When handling solutions, observe safety measures indicated on the labels, exhaust ventilation is required.
* Operate only on serviceable equipment, use the correct tool.
For car tire repair hot vulcanization recommended use vulcanizers "Complex""
Solutions listed in this manual can be supplied in packaging other than from that listed in the catalog.
This manual introduces repair work that is carried out on the sidewall. Running track and tire shoulder are being repaired similarly.
1. When taking tires for repair, carefully check their general condition. Explore all tires for hidden defects. Pre-determine maintainability tires, for this measure the dimensions damage, and according to the table previously select patch number. nine0003
Measure the distance from the edge of the damage to the edge of the tire bead. The size must be greater than or equal to the value specified in the patch selection table.
If the damage exceeds allowable standards, then repair the tire it is forbidden.
2. The tire must be be dried thoroughly. Tire drying it is recommended to produce in a dry heated room. To speed up allowed to dry the damaged area a lamp or a jet of heated air using a fan heater (art. no. 05 010), while heating must not be allowed rubber above 80 ° C.
Wear safety goggles!
3. Treat the damaged area with inside and outside cleaner Liquid Buffer and use a scraper to remove pollution.
4. Cut out the damaged rubber with a knife or cap cutter (art. no. 04 008…04 0012). Remove damaged cord ends (Fig. 2). When repairing a treadmill remove loose, damaged or rusty breaker wire with wire cutters.
5. Round off the ends of the cracks with sharp pin rougher (art. no. 04 110) or a specially sharpened tube. nine0003
6. Treat the damage funnel in steel cord zone with a cut-off disc (art. no. 04 420) (fig. 3) or grinding cone (art. no. 04 400) and then process rubber surface with a rougher rings (art. no. 04 160) so that cup-shaped funnel (fig. 4)
ATTENTION! Finished rubber surface should be rough (by no means smooth). During processing, do not burn rubber, for this final roughening perform at low tool speeds (up to 750 rpm)
7. Properly Prepared Funnel damage (Fig. 5).
ATTENTION! Do not contaminate the stripped surface and do not treat with cleaner Liquid Buffer. Do not allow intermediate storage to avoid contamination and surface oxidation.
8. Measure the size of the damage. At repairing bias tires find the number PR (number of cord plies) indicated on tire side wall. Choose the one you want patch in accordance with current tables and mark the patch number on chalk tire. To calculate the time vulcanization measure the maximum wall thickness at the site of damage and make a mark on the surface of the tire. nine0003
9. For the correct installation of the thermal patch swipe on the inside of the tire in the center of the place of repair auxiliary lines in radial and axial directions (Fig. 6). When repairing the sidewall of the diagonal tires must use special side patches with the index “B”, which allow you to install them closer to the edge sides. For ease of use, spread tire bead with bead expander (art. no. 06 003).
10. Apply in the center of each side patch auxiliary lines (Fig. 7). nine0003
11. Install the thermal patch (arrow in the direction of the edge of the bead) to the inner side of the tire at the point of damage so that so that the auxiliary lines on the bus and patch matched.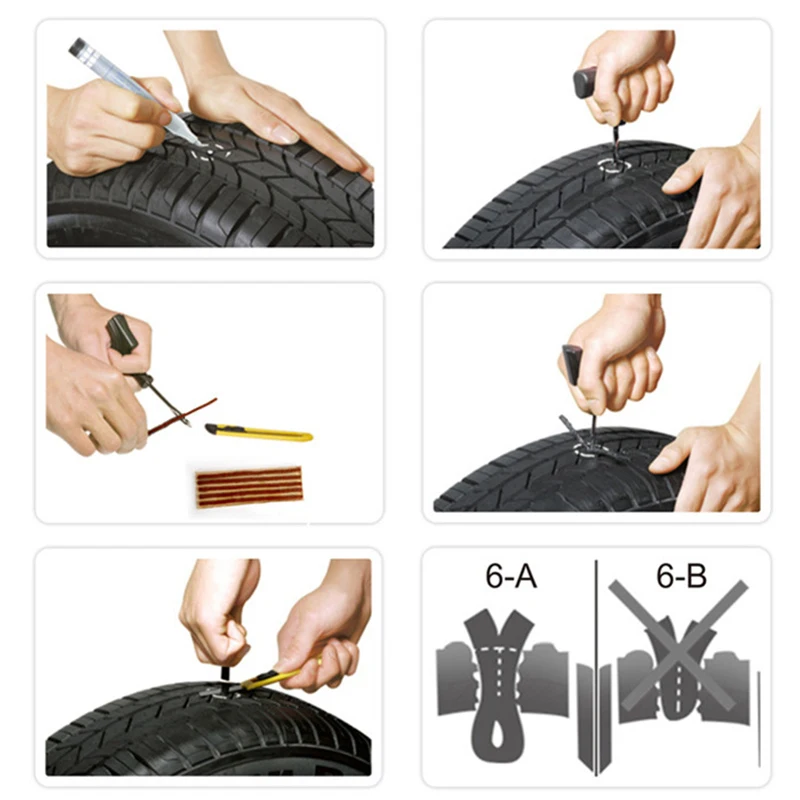 Circle the thermal patch along the contour with an allowance of 5-10 mm
12. Cases of damage. Sketches 8 a, b, c show the installation of a thermal patch on the principle of alignment of the center of damage and the center of the thermal patch. Sketch 8 g shows the possibility of repair damage near unrepairable zones, while the center of damage is not coincides with the center of the thermal patch. AT In this case, the edge of the patch should overlap as close to the edge as possible sides. nine0003
13. On the inner surface of the tire in repair site must be carefully Apply Liquid Buffer Cleaner to area larger than the selected thermal patch, carefully remove dirt with a scraper (art. no. 04 022). At the same time, avoid getting Liquid Buffer on the treated surface funnels (see warning to item 7).
Rotate the tire so that the repair turned sideways, and give dry for 10-15 minutes.
14. Process the tire inside the marked plot (Fig. 9) using contour circle (art. no. 04 300) or round metal brushes (art. no. 04 340). When repairing tubeless tires must be completely removed loose sealed layer to a layer of dense rubber.
ATTENTION! Processing very carefully so as not to damage cord threads.
15. Remove dust and crumb rubber inside and outside the tire at the point of repair using sweeping brush or vacuum cleaner (Fig. 10).
Do not clean with compressed air containing oil or moisture. nine0013
16. Check the quality of the rubber layer on treated area. Completely remove soft, rolling when peeled off rubber particles.
ATTENTION! Finished rubber surface should be rough (by no means smooth). During processing, do not burn rubber, for this final roughening perform at low tool speeds (up to 750 rpm) with a wire brush (art. No. 04 340).
17. Apply evenly to the prepared for installing thermal plaster surface tires first layer of thermal solution (art.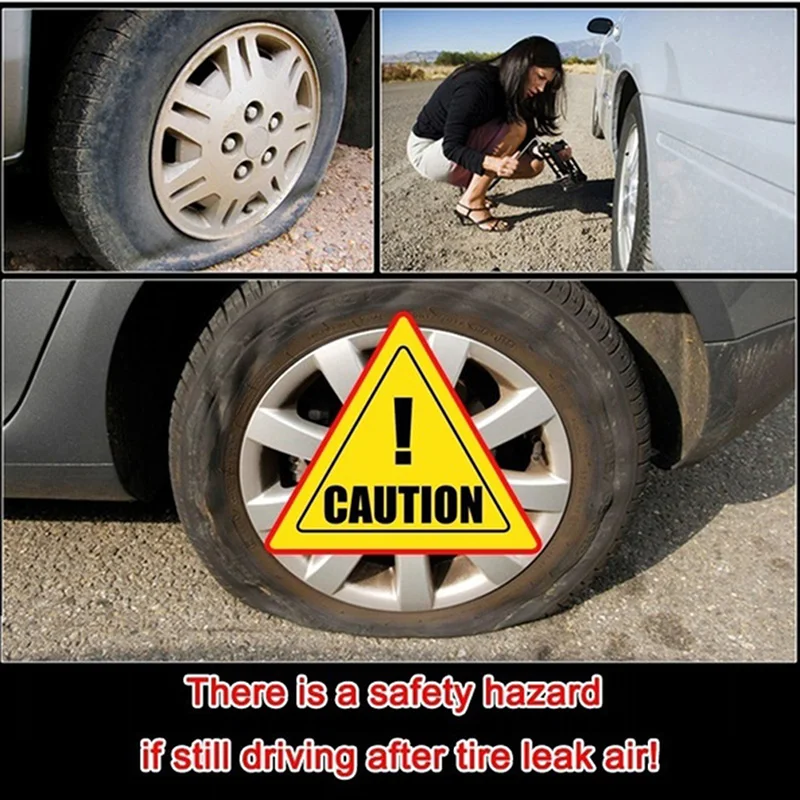 no. 10 600). Drying time - 60 minutes (rear side of the finger - sticking should not to be).
18. After the first coat has dried thermal solution on the surface of the tire apply a second layer. Drying time of the second layer 15-20 minutes (sample back side finger should feel light adhesion). For timing use timer (art. no. 11 001)
19. Remove the protective film from the side adhesive rubber from the middle approximately 5-7cm in both directions (protective film from the top side of the thermocouple must be left).
20. Remove the onboard expander. Patch with free middle zone apply to the place of repair, combining auxiliary lines on the patch and splint. Roll on middle of patch with roller
21. Remove both parts of the protective cover one by one. adhesive films. With and without effort roll the entire surface patch with a roller (art. no. 05 002). nine0003
22. When repairing tubeless tires, remote during roughening the sealed layer inside the tire around the thermal patch needs to be restored. For this you need to cut strips of raw rubber (1 mm) and roll them with a roller around the perimeter plaster in such a way as to cover buffed tire surface around patch.
23. Coat the surface of the funnel with two thermal solution layer (art. no. 10 600). Time drying - 60 minutes (sample with the back side finger - sticking should not be). After the first layer has dried, apply second layer. Drying time of the second layer 15-20 minutes (test with the back of the finger you should feel a slight stickiness) (Fig. 12). To keep track of time, use timer. nine0003
ATTENTION! To reduce the time the first layer is allowed thermal solution simultaneously to the surface under the patch and on the damage funnel.
24. To fill the funnel damage tires cut strips of raw rubber (3mm) 10-15mm wide and heat them for special plate (art. no. 11 011) (Fig. 13).
25. Do a serial filling the funnel with strips of raw rubber (3mm), carefully rolling them to each other with the help of roller, preventing the formation of air bubbles (Fig. 14). nine0003
26. Trim the bumps with a knife, while the level of crude rubber filling funnel, must exceed the overall level tire surface by at least 3 mm for tires L / A and 5 mm for tires G / A (Fig. 15).
27. Vulcanize the site repair with vulcanizers "Complex-1", "Complex-2" or "Complex-3" providing mode simultaneous vulcanization of the patch and funnel damage.
Follow instructions for the operation of vulcanizers! nine0013
Tire curing time at temperature vulcanization 140 ° C develops from: - 30 minutes to warm up heaters - 5 minutes each millimeter of tire thickness, taking into account the thickness patch. - when repairing tractor and all-terrain tires with a deep profile it is necessary to increase the curing time by 50%.
28. After the curing regimen the tire must cool down under pressure to t = 90°C.
29. Remove repaired tire from the vulcanizer. nine0003
30. After vulcanization check the quality of the repaired surface. Rubber surface at the repair site should be dense, without air pores. The presence of air pores indicates insufficient pressure in the process vulcanization.
31. Sand the outside of the place repair to the level of the main surface tires. Use the tool to grinding (art. no. 05 003; 05 004) (Fig. 16). At grinding rubber should not stretch and roll into lumps - it happens in case the rubber is not enough vulcanized. Need to increase vulcanization time. nine0003
32. On tube tires, powder the edges patch with asbestos-free talc (art. no. 11005).
33. When repairing a treadmill, restore tread pattern with cutter protector (Fig. 17).
Before commissioning (installation) re-check the quality of the repair!
34. Mount the tire on the disk, pump up and check for leaks.
Tire allowed 3 hours after the end of the process vulcanization. Refurbished tires should only be installed on the rear car axle! nine0013
According to history, one day in 1888, an English veterinarian and cyclist, John Dunlop, tired of shaking through the countryside of Britain on molded rubber tires, glued a piece of water hose with a ring and pumped it up with a football pump - this is how the first pneumatic tire appeared.
History is silent when it was pierced for the first time - but most likely it happened in the same year. So the need for tire repair appeared simultaneously with their appearance. nine0003 Puncture required cut with burr
Over the past 124 years, tire repair technology has been brought to almost perfection. For several decades (after tubeless tires in the vast majority have given way to tubeless ones), the procedure for repair has practically not changed.
This procedure is outwardly quite simple - and car owners (as well as part of the workshop workers offering this service) have the false impression that it is not particularly important to follow the prescribed technology exactly - they say, "it will do." And many "specialists" do not really know the technology. And therefore they sincerely believe: why do we need all sorts of "extra" actions? Why take the tire off the rim when you can keep the wheel off the car at all? The client is in a hurry - so you can plug a puncture (and a cut) with a cord, as they say, “on the go”. Does not poison the air, and everyone is happy. By the way, some workshops that promise “repair of punctures and cuts” do not have anything at all, except for cords and an awl for their installation. nine0003
In fact, each stage of tire repair technology is, as they say, "written in blood" - like military regulations and safety instructions. And this is not an exaggeration: what threatens a sudden rupture of a wheel at speed is not worth saying - if people do not die, then they are very lucky ...
We asked our expert, one of the heads of the Russian representative office of the German company "REMA TIP-TOP GmbH" Alexander Akhapkin, to talk about tire repair technology and those common mistakes (or even outright hack work) that car owners have to face. nine0003
- Tire repair, in general, comes down to a simple and understandable action: you need to plug the resulting "hole" in it. It sounds simple - like the instructions for skydiving: stepped out of the plane and pulled the ring. Only now, no one jumps with a homemade parachute, especially one packed according to rumors and advice from neighbors. Although the consequences of such a jump and improper tire repair are quite comparable.
So let's go in order: how to do it!
So, the first step: determine the type of damage - is it a puncture or a cut? nine0003
The difference, of course, is in size. Roughly speaking, if no more than 1-2 cord threads are damaged, then this is a puncture. Anything more is a cut.
If it is a cut, it is important to determine its size. Tires have speed categories - and the higher it is, the smaller the amount of damage that can be repaired. For example, it is allowed to repair the tread of a category Q tire (not higher than 160 km/h) if the damage is not more than 20 mm. If the tire category is S (up to 180 km / h), then the size of the permissible damage is not more than 12 mm. And on a category H tire (up to 210 km / h), only a puncture with a diameter of not more than 3 mm can be repaired.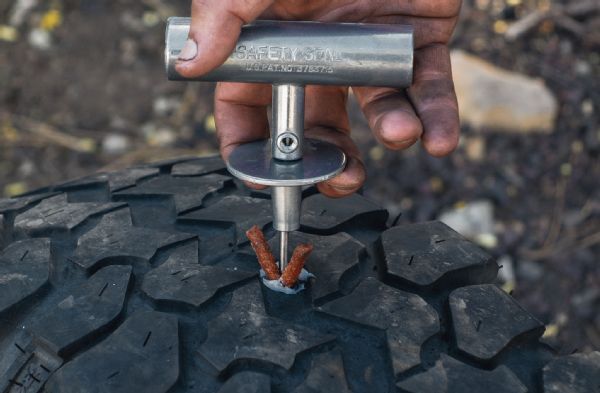 nine0003
In general, damage limits depending on their location, size and speed category of the tire are given in special tables RemaTipTop, compiled according to the results of tests and tests.
When repairing with a cord, it is necessary use adhesiveFor example, regarding damage to the shoulder of a category Q tire (up to 160 km/h), repairs are allowed if the “injury” does not exceed a diameter of 8 mm. And damage to the sidewall can be repaired if it is no more than 35 mm long (along the side height) and up to 20 mm wide. nine0003
Second step: what kind of repair is needed? To get there - or capital? The fact is that the most common repair of a puncture with a cord is actually exclusively temporary - just to get to the station and overhaul the tire. And often the car owner asks to fix an expensive tire with a cord, which he puts on an expensive car - and stops there. And at the stations they “go forward” to him: they say, the consequences are at the expense of the customer . ..
..
But even with such a repair, some "masters" manage to cheat. The cord, before placing it in the puncture, is not even smeared with glue. There is a category of cords made of "raw" rubber (they are also called "snotty"). And it is mistakenly believed that glue is not needed for them. No - it's a must! nine0003
In addition, when repairing with a cord, it is necessary to form a hole with a burr to enter the repair material. And this is very often not done (on the principle - and so it will do!). For ten kilometers, maybe it will “get off” ...
Step three: puncture overhaul, after which the tire will reach its physical wear.
Fungi are installed at "vertical" punctures Here the choice of repair tactics depends on the location and area of damage. If the puncture axis runs perpendicular to the tread surface, then it is preferable to seal it with a fungus. If the puncture axis runs at an angle of more than 12 degrees from the surface, then a plug must be used. nine0003
Tire repair fungus is preferred, but if the puncture is at an angle, the fungus head will not be able to fit snugly against the inside of the tire. And over time it can come off - which, of course, is unacceptable.
In principle, all actions of the wizard when using both fungus and cork are the same. The puncture is drilled with a burr with a diameter of 3 mm or 6 mm. The repair area from the inside of the tire is processed with a roughening tool - this is done so that the glue applied to the fungus cap or patch (if cork is used) firmly adheres to the surface of the tire. nine0003
But this is followed by an outwardly simple but obligatory operation - the dust formed after drilling and roughening is carefully removed with a brass or coconut brush, and then vacuumed. Moreover, simple “blowing” or brushing with a rag is unacceptable!
Processing with a special solution - required! Then the repair area is smeared with glue (the Germans call it "cement" - that's what it says on the containers with it. In fact, this is a high-tech adhesive system) and a fungus or cork is introduced into the hole - from the inside of the tire! Moreover, until the moment of installation, it is impossible to remove the packaging from the fungus or cork - it can be easily removed when they are introduced into the hole to be sealed. After installing the cork, its excess is cut off - and the repair area is smeared with glue. A patch is applied on top. nine0003
Next, the fungus cap or plaster is rolled on. And it remains only to cut off the excess fungal stem or cork from the outside of the tire.
It is very important to use materials from only one company for temporary repairs with a cord and a major fungus or plug! The fact is that the adhesives themselves are spilled: there are those produced on the basis of hydrocarbons, and there are those based on trichlorethylene. In addition, adhesives from different companies, even on the same basis, differ in composition. And therefore, in case of confusion, a reliable connection will not work - at best, it will last for some time.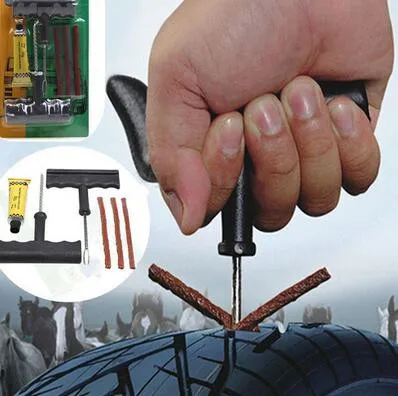 But - a little time ...
Fourth step: overhaul of large damage. Let me remind you that damage that exceeds a puncture, but does not exceed the maximum allowable, is considered large. With such damage, the tire is only scrapped - it is no longer possible to achieve the necessary reliability.
The technology of such a repair is simple - but there are no "extra" steps and steps in it. Outside, the place of damage is cut "under the funnel" - part of the damaged rubber is removed, the remains of the cord. From the inside, the place under the patch sticker must be roughened. nine0003 The plaster is a high-tech article
Then the dust must be carefully removed after processing with a vacuum cleaner - and this operation must not be skipped!
Next, the “funnel” is treated with a special solution: in the case of using the “Tip Top” technology, this is “MTRThermopress”.
And filled with raw rubber of the same brand as on the tire - heated strips or a special extruder.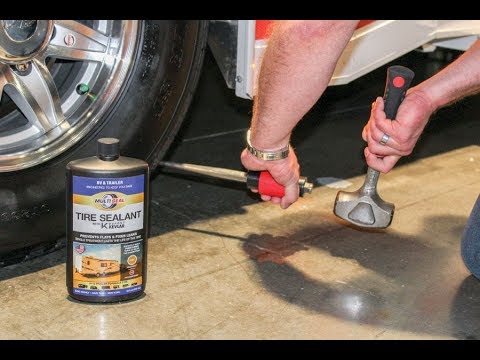 Raw rubber is treated with the same solution. And immediately closed with insulating foil for subsequent vulcanization. nine0003
Please note - do not skip a double treatment with mortar, nor cover the vulcanization site with foil!
A plaster is applied from the inside of the tire to the damaged area. And be sure to roll with a special rolling - this stage also cannot be skipped.
Something about Band-Aids: Don't try to save money by replacing your branded Band-Aid with the first piece of rubber you find! In fact, a patch is a rather complex rubber product reinforced with synthetic or steel threads that coincide with the direction of the tire cord threads. nine0003
Patches are produced separately for bias and radial tires. For their correct orientation (it is very important!) Arrows are applied on each of them, which are directed to the sides. You cannot cut the patch "to size" - it cannot be cut at all due to the complex internal construction of the cords. Companies produce several sizes of patches - and you need to choose from them using the Type Top damage table.
Naturally, the use of patches and adhesives with which they are glued, produced by different companies, is unacceptable - “cement” is applied to the surface of the patch, which needs to be smeared on the surface from the inside of the tire: only in this case the connection will be reliable and durable.
Step five: vulcanization. In order to vulcanize a “sandwich” of raw rubber, a tire and a plaster, it must be heated. But the problem is that vulcanizers, whose power allows you to warm up the entire volume of the repaired area, are expensive and consume a lot of electricity. In addition, they are bulky - the area of \u200b\u200bthe heating plate must exceed the size of any patch. So not every workshop can afford such a vulcanizer. nine0003
There is another solution - the so-called "two-stage" repair method. This is when a vulcanizer that is more affordable and consumes less electricity is only the site of damage.