HALTEC
Country of Origin China. Country of Origin is subject to change.
Heat-Resistant Core can be used in most cars, trucks, and buses that have a standard bore.
Tap image to zoom.
Roll over image to zoom.
HALTEC
Country of Origin China.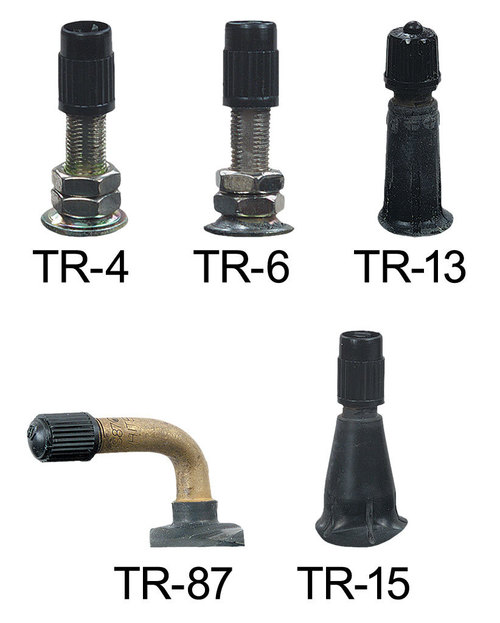 Country of Origin is subject to change.
Heat-Resistant Core can be used in most cars, trucks, and buses that have a standard bore.
4.3 out of 5 stars 1,645 ratings
Brief content visible, double tap to read full content.
Full content visible, double tap to read brief content.
Updated other options based on this selection
See all 5 options
Alloy Coated Thread - 2
Hexagon Style - 4
Alloy Coated Thread
Bullet Style
Granade Polished
Hexagon Style
Impaler Spike Style
Piston Style
Hexagon Style - 2
See available options
Hexagon Style - 3
See available options
Meshed Style
See available options
Updated other options based on this selection
See all 11 options
| Color | Red |
| Material | Aluminum |
| Brand | Auto Dynasty |
| Fit Type | Universal Fit |
| Vehicle Service Type | Passenger Car, Truck |
See more product details
Note: Products with electrical plugs are designed for use in the US.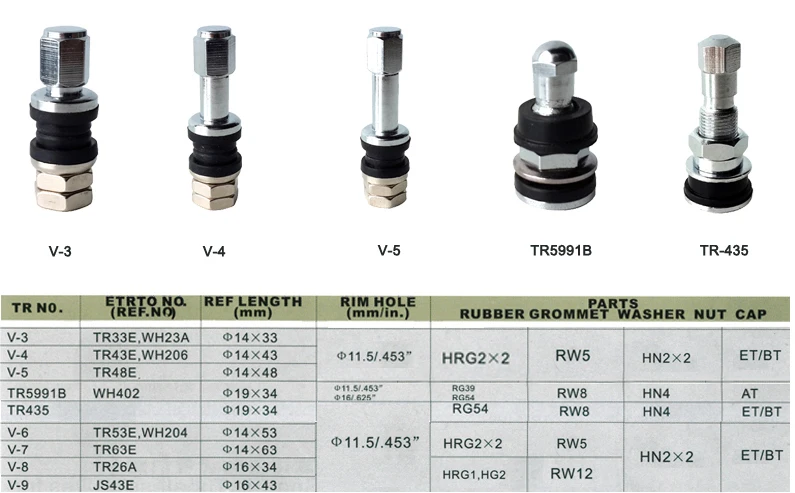 Outlets and voltage differ internationally and this product may require an adapter or converter for use in your destination. Please check compatibility before purchasing.
For the past two decades, tire manufacturers have exclusively used the tubeless design of their products, because, as practice has shown, if the tube on the wheels is damaged, when the tire beads do not fit too tightly to the disk, they almost instantly blown away, often with rubber rupture.
In the case of tubeless tires, the deflation of the wheel occurs evenly, which almost completely eliminates the instant loss of vehicle stability on the road. Of course, the valve for tubeless tires has a structure different from its outdated predecessors.
Wheel valveContents
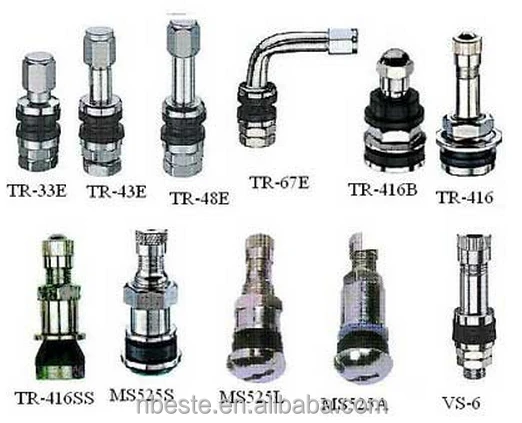
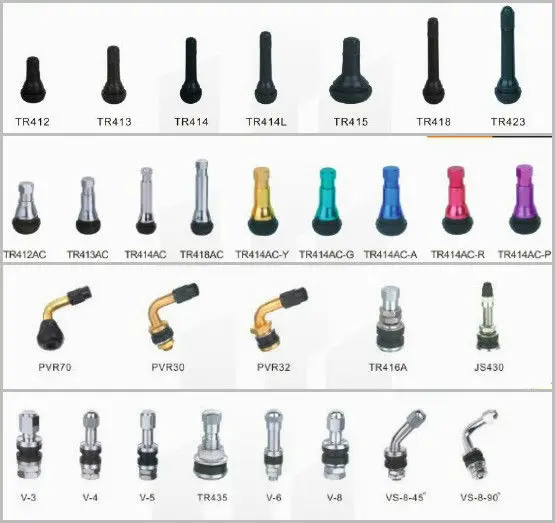
 At the same time, the valves located on the inner side of the rim are of several types.
 The main difference lies in the appearance of the valves, which are of three types:
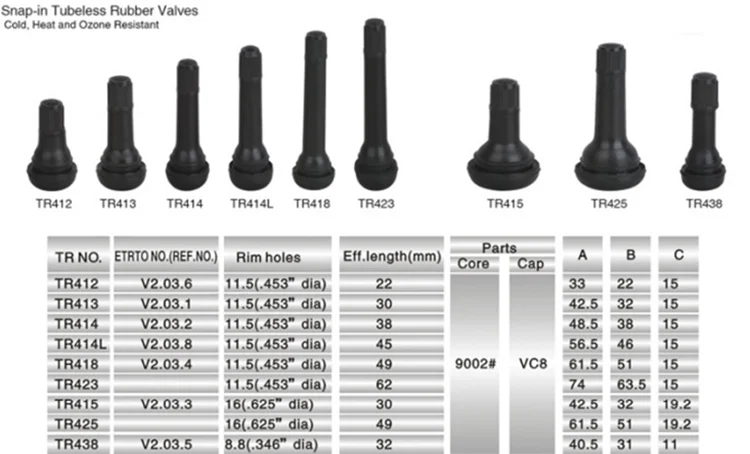
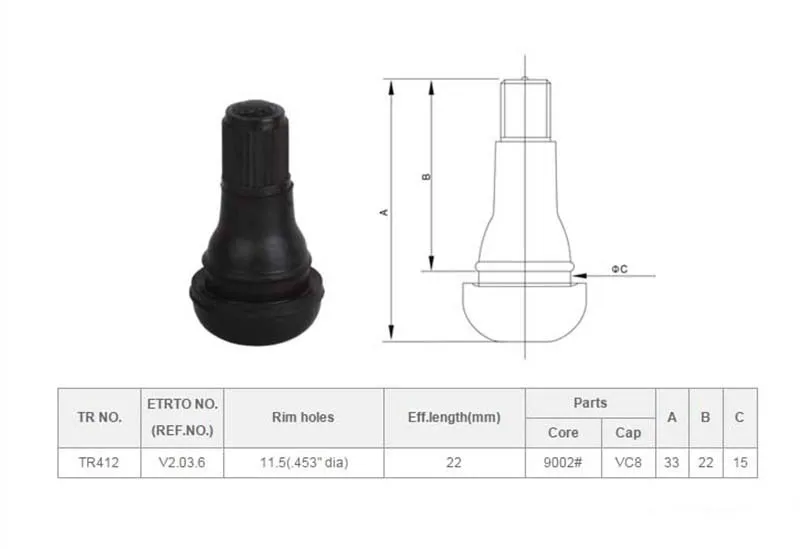
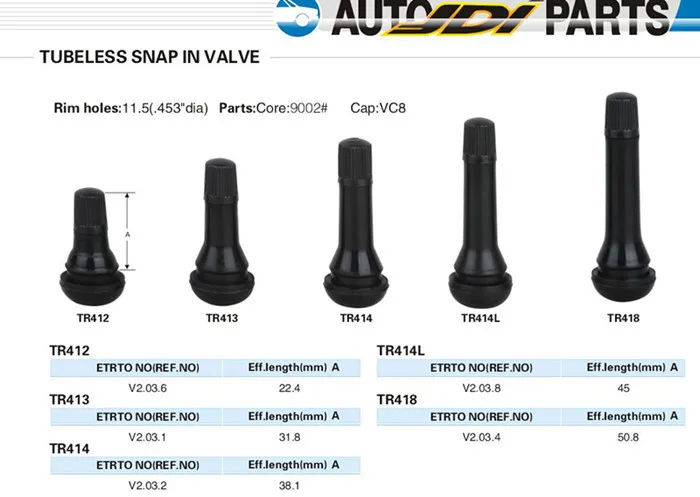
All standard valves have a uniform length, which varies depending on the wheel size and vehicle class, and the dimensions of the products are 33.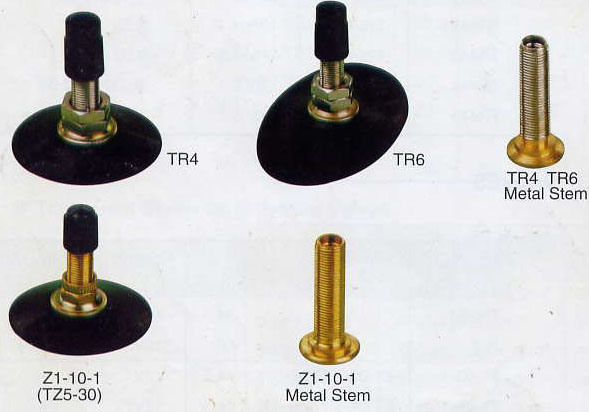 0, 42.5, 48.5 or 60.5 mm, which corresponds to a certain serial number on the surface of the product. Other lengths are available either with a handicraft version of the valve, or in exclusive cars.
The last difference between tubeless valves is the diameter of the hole provided by the manufacturer to install this product and securely fix it. The diameter of this hole is 11.3 mm or 15.7 mm, which also depends on the dimension of the wheel and vehicle.
Rubber-metal valveImportant!
The valve is not of any particular value and in case of the slightest damage, in order to prevent loss of pressure in the wheel during the operation of the car, it is simply replaced by any tire fitting master.
In the life of car enthusiasts, there are situations when they need to purchase a valve for their wheel on their own. In order to make the right choice and the product fit and function normally, the owner of a car needs to know some technological subtleties:
Important!
To correctly select a valve for a wheel, the driver also needs to know all the geometric characteristics of the product that has become unusable: the length of the protruding part and the diameter of the hole in the rim of the rim, because any other dimension may simply not be suitable.
Steel valve Given that the valve on the wheel disc is considered a consumable item, it changes quite often, and when the first signs of wear appear, the old product must be immediately disposed of and a new nipple installed in its place.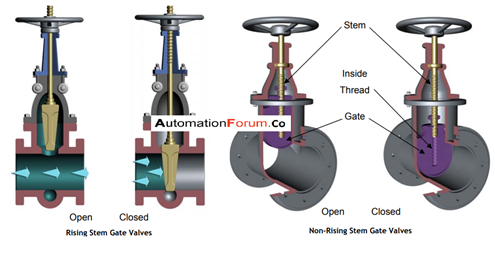 To understand exactly when its service life has expired, the owner of the car must pay attention to the characteristic features.
If the driver prefers dynamic and aggressive driving, he needs to check the tire pressure at least once a week and, if he finds the slightest sign of its loss, go to the tire shop, where an experienced master, not finding a hole in the wheel, will surely say that you need to change the car valve .
If a motorist loaded the car at least once with an unintended load, the valve may not withstand, the rubber valve in the nipple will break, and the air will start to come out, which also indicates the need to update the product.
Driving in mud or deep snow may damage the protruding part of the product in a purely mechanical way, which will be visible to the naked eye. Of course, in this case, the operation of a wheel with such a nipple is unacceptable.
The last thing that can damage a valve on a wheel is the aggressive environment.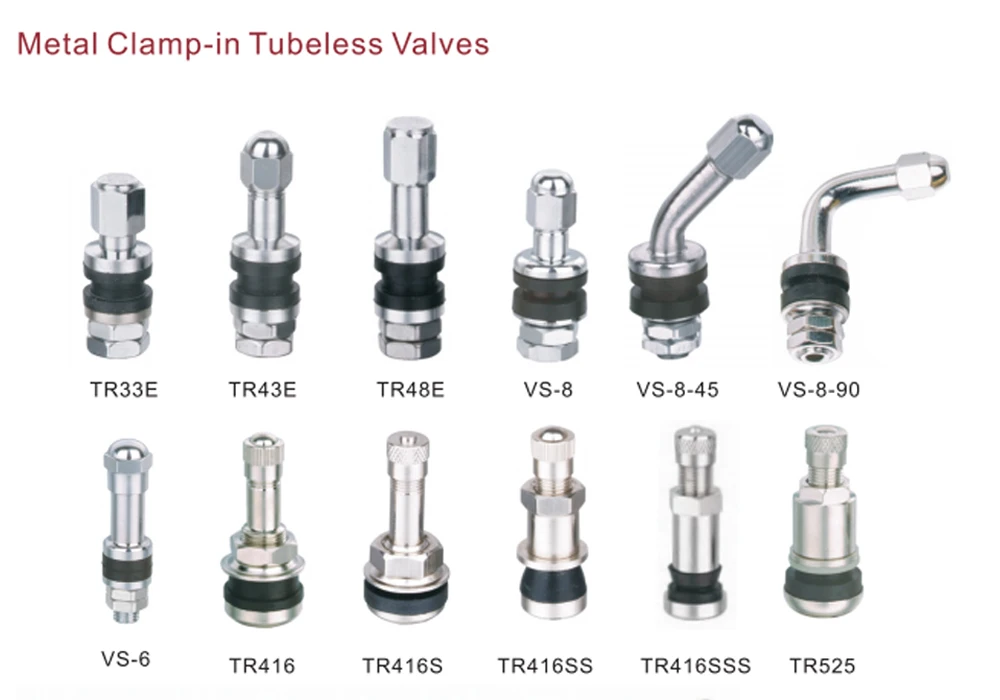 Active ultraviolet rays, frequent sudden temperature changes, the presence of salt-based reagents in the winter, and other factors contribute to the destruction of polymer parts and corrosion of the metal components of the product, after which the valve becomes unusable.
Thus, when the car has been operated without complaints for more than 5 years, then the nipple must be changed along with the tires, at least for preventive purposes.
Important!
Many vehicle owners turn to tire fitting too late, when not only a relatively cheap wheel valve, but also “eaten” rubber, and sometimes the entire wheel assembly can be replaced.
Checking the operation of the valve Replacing the entire valve on tubeless tires as an assembly is impossible without removing the rubber from the wheel, and this procedure is performed exclusively within the walls of the service station, since a private person almost never has professional equipment to carry out this work . Important! To prevent a new valve from being damaged again, the car must be operated as gently as possible, exposed to aggressive external influences as little as possible, and the owner must not overload it. However, as a rule, it is not possible to follow all the rules in life, and sooner or later the motorist will have to repeat this procedure and, at the slightest sign of a defect, he will be forced to supply a new product. Replacing a nipple is a rather responsible procedure that can not only harm the rim and tire, but in the end turn out to be ineffective, because, without knowing all the intricacies of the procedure, a motorist can install the product with a warp, press it against the rim not tightly enough, or make other mistakes. Thus, in order to achieve the required quality and durability in the use of the product, you should still contact tire fitting professionals, as they not only have extensive experience in solving these problems, but also have the necessary equipment, which ultimately guarantees quality and saves the owner of the car from unnecessary expenses. No one is immune from the fact that during car repairs or in other working situations, damage to the threaded connection may occur. Many craftsmen use the traditional method, the essence of which is to drill a hole with a larger diameter drill and tap a new thread with a tap. However, after such a repair, it will be necessary to use a mating element (bolt, stud, candle) of a larger diameter, which is not always possible. This method is also not suitable if the supply of the “body” for reaming is insufficient. At present, a simple and reliable method of thread restoration has been found, which has been used all over the world for quite a long time. In our country, unfortunately, it is slowly gaining popularity, both due to our ignorance, and due to the inability to purchase special spring inserts and auxiliary installation tools in stores. Thread Repair Tool Kit Many well-known manufacturers are engaged in the development and manufacture of inserts. Damaged threads are repaired in four easy steps. Step 1: Drill the old thread using the drill size recommended on the thread repair kit package. The tap shank also shows the recommended tapping drill size. Don't forget to clean the hole from metal particles. Step 2. In the drilled hole, cut the thread with a special wire insert tap, which has some differences from the standard tap and is indicated by the letters STI (HeliCoil system). Step 3 Install the threaded insert using the installation tool. Mounting tool for installing the screw driver Screwing in the futorka One of the reasons why this threading technology does not work is because the threaded insert is not properly seated. The main rule of thumb is that the top of the wire insert should be 1/4 to 1/2 of the thread pitch below the surface of the workpiece. One easy way to determine the installation depth is detailed below. Before you begin the installation process, take a close look at the entry threads cut with the STI tap into the hole. Pay attention to the place where the thread begins to enter the hole. Make a small temporary reference mark on the body surface 3/4 of a turn away from where the thread enters the hole. This mark will be used to determine the insertion depth of the screw. Install the threaded insert flush with the housing surface and align its end with the reference mark. Then turn it another 1/4 turn to plunge 1/4 step (0.25 P) below the body surface. If a deeper fit is required, turn the setting tool an additional 1/4 turn. Step 4: Remove the leash tab Why does this technology require a special STI tap? What is an STI tap? Can a standard tap be used instead? STI Tap Marking The repaired female thread is designed for standard size fasteners. After installing the spring insert, its turns are installed with the same pitch as the thread of the fastener for which the threaded hole is intended. The entry threads for threaded inserts are formed with special taps (also known as STI) designed for use with these repair systems. Threaded insert taps differ in size from standard screw taps. But they are marked according to the final result, which will be obtained after installing the liner. Let's look at the difference between STI and a standard tap with a specific example: The standard tap used to thread 1/2"NF fasteners has a 0.500" base diameter in 20 TPI pitches. The corresponding STI tap has the same 20 TPI pitch but a slightly larger base diameter, in this example it is is 0.568 inches. Is there any way to more securely lock the insert onto the thread, rather than relying solely on an interference fit to hold it in the threaded hole? To securely fix the insert in the part body, it is recommended to use additional fixing methods: Chemical lock. Apply a thin layer of threadlocker to the outside of the threads of the insert before screwing it into the hole. Do not apply too much of this compound, and after installation, be sure to wipe the resulting internal thread so that the fasteners screwed into it do not stick. Mechanical stop. Using a punch and hammer, lightly flare one thread of the body where the threaded end of the installed nut is located. The purpose of this method is to slightly deform or compress the body threads to make it difficult to unscrew the insert when removing the fastener. Spring inserts are available in inch and metric sizes. According to published data, inserts are available for screw sizes from #2 to 1 1/2" and M3 to M42. Their length is indicated by 1d, 1.5d, 2d, etc., where d is the diameter of the spiral, and this is the length in the mounted state and without the installation tongue (they are shorter in the free state). For example, for an M6, 2d futor, the length will be two diameters, that is, 12 mm. Repair sleeves are available in a variety of thread types and pitch configurations, including UNC, UNF, metric coarse and fine threads, UNEF, UNS, and pipe threads. For the manufacture of threaded inserts, especially strong high-quality steel is used, mainly stainless steel with a hardness of 425 - 550 HV (according to Vickers) grades A2 and A4. For special purposes, manufacturers produce them in materials such as Nitronic 60, Inconel X heat-resistant alloy, titanium and phosphor bronze. The use of spring inserts opens up new possibilities for design, gives freedom in choosing the material and size of fasteners. The ability to quickly repair a threaded hole eliminates the need to replace an expensive part. If necessary, repair inserts can be dismantled using all the same tools included in the "system". Helpful Hints Updated: 14.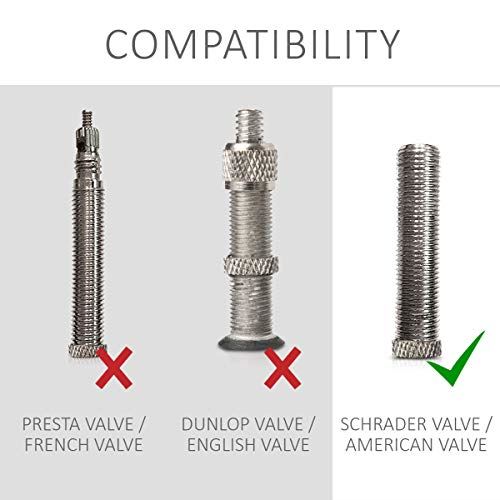 However, when extreme conditions oblige the driver to do the whole process himself, he should be guided by the following step-by-step instructions:
How do I repair a stripped internal thread?
 How to restore the functionality of a seemingly failed thread?
 How to repair a thread while maintaining its original diameter?
 Products from different companies may vary slightly in name (screws, fittings), design and material, but the principle of operation and installation technology is the same for everyone. On sale you can find not only sets of screw drivers of various lengths, diameters and thread pitches, but also entire sets for thread restoration, which, in addition to inserts, include drills, taps, an installation tool and a mandrel for breaking off the mounting leash. Such solutions are offered by the German manufacturer of metal-cutting tools Volkel and the Russian Delo Tekhnika. Some brands call this technology and tool a “system”, for example:
How it works?
 On the inside of the futor, the threads form a new standard 60° thread. The free outer diameter of the bushing is larger than the receiving thread, so the coils of the helix are compressed when it is screwed into the body. Like a spring, the compressed coils try to expand relative to the walls of the threaded hole in the body. The resulting tightness at the seat helps hold the installed liner and prevents it from being unscrewed.
 Spring insert installation process:
For threads with coarse (regular) pitch:
Fine thread:
Thread Repair Tip:
FAQ:

Size range:
Thread types:

What metal are the inserts made of?
Benefits of using repair inserts:
Video demonstration of installation of
screws