Changing a bike tire after getting a flat is a relatively easy fix—as long as you know how to handle it. Whether you ride on smooth pavement, rough gravel, or rocky singletrack trails, it’s bound to happen eventually, so you might as well prepare yourself with both the necessary tools and the bike repair knowledge you need address the problem.
Below, we detail everything you need to know about how to change a bike tire, including the bike tire repair tips you need to succeed.
First things first though—for tools, you should always carry tire levers, a correctly-sized spare tube, and an inflation device, be it a mini pump or CO2 cartridge. You may also want to consider a patch kit or tire plug, which can come in handy for certain riders. And if you run tubeless tires, scroll down to skip to the tubeless section. When you’re ready to go, here’s your step-by-step guide.
Start by removing the wheel. Keep your bike upright, and if it’s a rear-wheel flat, shift your drivetrain into the hardest gear. If your bike has rim brakes, which many bikes still do, you may also need to loosen the brake.
Next, position yourself on the non-drive side of your bike (opposite the chain) and either open the quick release or unthread the thru-axle to remove the wheel.
Now you can remove the tire. Hook the rounded end of one tire lever under the bead (the outer edge) of the tire to unseat it. Fix the other end to a spoke to hold the lever in place and keep the unseated tire from popping back into the rim. Then hook the second lever under the bead next to the first, pushing it around the rim clockwise until one side of the tire is off. You don’t need to completely remove the tire.
Once the tire is loose, pull out the old tube (if applicable) and look for the source of the flat, which could be a thorn, piece of glass, or some other sharp object. Carefully run your fingers along the inside of your tire and rim, making sure nothing sharp is left behind; otherwise, you risk getting another flat. Also inspect the outside of the tire, again looking for any foreign object that might still be stuck in the rubber.
If you’re using tubes and want to do a little detective work, pump some air into the old one to find the leak. Two holes side by side indicate a pinch-flat, where the tube gets pinched between the tire and rim. A single hole is a sign that your flat was most likely caused by a sharp object. By lining the tube up with the tire using the valve as a point of reference, you can double check the area where the hole is to ensure the culprit is removed.
If you’re the thrifty type who likes to reuse old tubes, or if you’ve gotten multiple flats on your ride and have no more spares, then you can patch your tube with a patch kit. If you have a new tube, skip to the next section.
Start by cleaning the punctured area and roughing the surface with an emery cloth. For a glueless patch, simply stick it over the hole and press firmly. For a patch that requires glue, add a thin layer of glue to the tube and patch. Wait for the glue to get tacky, then apply the patch and press firmly until it adheres.
If you prefer to reuse old tubes or ran out of spares, you can try to patch the hole with a patch kit.
Katja Kircher//Getty ImagesNow inflate your new or patched tube just enough so that it holds its shape. This makes it easier to place inside the tire. Next, with the valve stem installed straight through the rim’s valve hole, position the tube inside the tire. Work the tire back onto the rim with your hands by rolling the bead away from yourself. Try not to use levers to reseat the tire, as you could accidentally puncture your new tube. When you get to the valve stem, tuck both sides of the tire bead low into the rim and push upward on the stem to get the tube inside the tire.
Check to make sure the tire bead isn’t pinching the tube by gently pushing the tire to the side as you work your way around the rim. Then inflate to the appropriate PSI and check that the bead is seated correctly.
$50 at Amazon
Credit: Silca$8 at Amazon
$6 at Amazon
Credit: Park Tool$40 at Walmart
Credit: REIIf everything looks good, reattach your wheel, making sure the quick release or thru-axle lever is on the opposite side of your drivetrain.
If you had a rear-wheel flat, lay the top of the chain around the smallest cog on your cassette and carefully push the wheel back into the frame.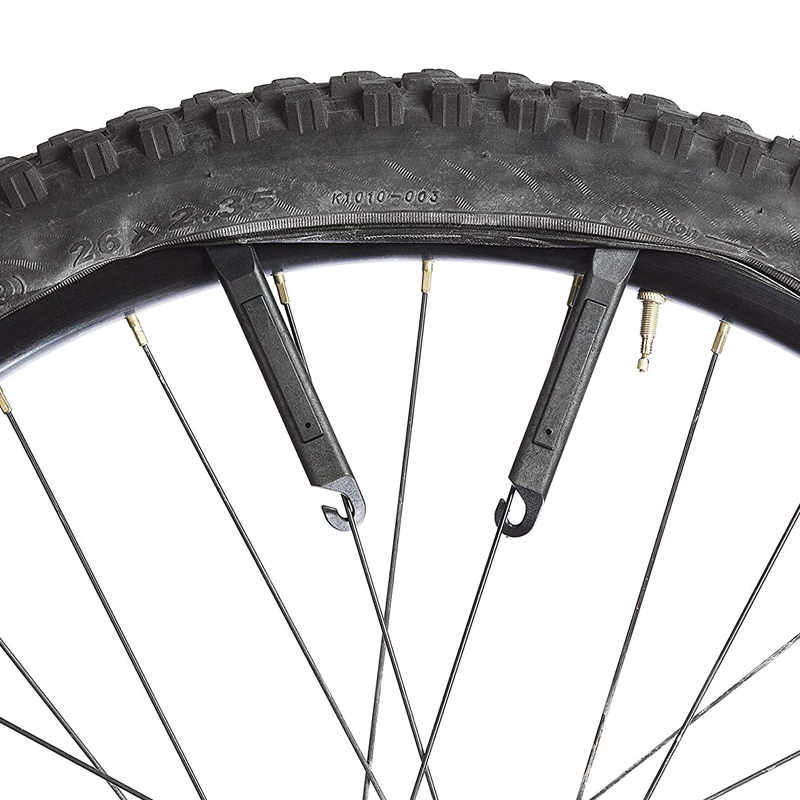 Close your quick release (and rim brakes if applicable) or insert the thru-axle back into the frame and hub and thread it closed.
Finally, lift the rear wheel and spin your cranks once to make sure everything is back in place and operating smoothly. If all is good to go, get back on your bike and enjoy the rest of your ride.
Trevor Raab
For tubeless setups—all but standard in mountain biking and becoming increasingly popular on gravel, cyclocross, and even some road bikes—your sealant should do the trick without you even realizing it. Be sure to check your sealant regularly (about every three to six months) to make sure the tire has enough and that it hasn’t dried out.
But in the event of a bigger puncture or side-wall tear, you may need a tire plug to stop air loss. Plug kits come with a small strip of rubber and an insertion device, which allow you to plug the hole without even removing the wheel.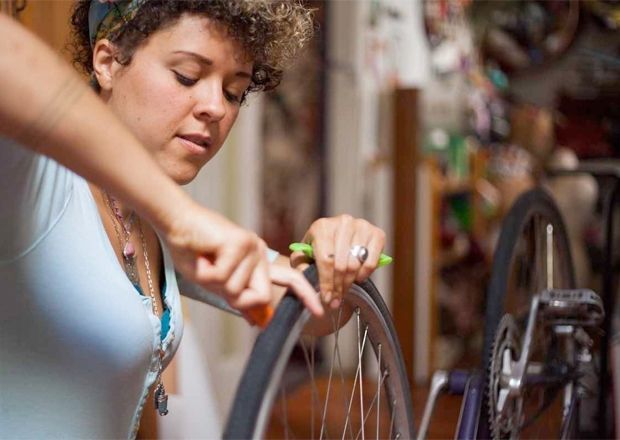 Once you find the puncture and insert the rubber plug, re-inflate your tire to the appropriate pressure to see that it’s holding air. If so, start riding again, and check the repair every so often to make sure it’s holding fast. You could also add more sealant, but you’d need to carry a valve core removal tool and a small bottle of sealant.
Trevor Raab
If air loss is coming from a puncture bigger than a plug fix, you could try a patch or a boot on the tire. But fair warning: It’ll likely be difficult to get a patch to adhere to your sealant-coated tire without thoroughly cleaning the area. Adding more sealant or a patch could create another problem, too, by letting all the air out and breaking the seal between the rim and tire. It’ll likely be difficult to reseat the tire bead onto the rim on the spot. The easiest way to ensure your tire holds air at this point is to simply use a spare emergency tube to get through the ride and address it at home or at a bike shop.
$155 at Trek Bikes
$63 at Amazon
Keep It Clean
$10 at notubes.com
Precisely measure sealant and install with no mess.
Mid-Ride Repair
$60 at dynaplug.com
Brass-tipped plugs make fixing bigger punctures easy.
Jessica Coulon
Service and News Editor
When she’s not out riding her mountain bike, Jessica is an editor for Popular Mechanics. She was previously an editor for Bicycling magazine.
Anyone who has been riding bikes for a while can tell you that sooner or later, you’re going to get a flat. Even with tube sealant that prevents flat tires for up to two years, it’s just an unavoidable occurrence.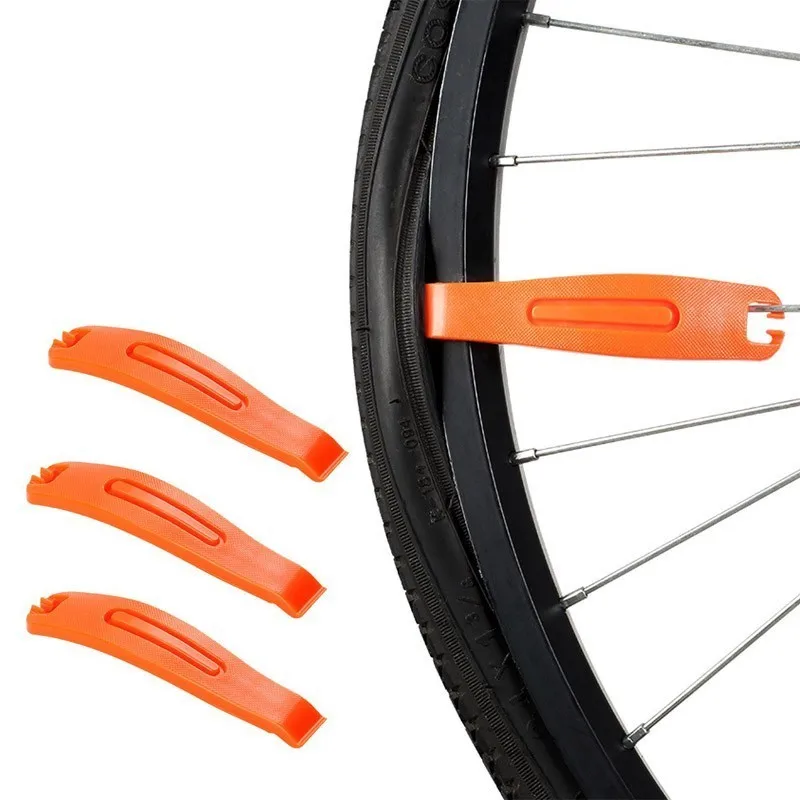 When flats occur, the best thing you can do is be educated and prepared to patch the tube so that you can quickly get back on the road. Let's get started:
Consider these different flat tire scenarios: The at-home repair scenario where you're walking your bike into the garage and notice that the back wheel is sagging a little bit—you have a flat. Or, the on-the-trail repair scenario where 20 miles into a 50 mile ride, you go down hard on a rock and get a nasty pinch flat.
We’re going to walk you through some of the materials you’ll need for either situation, and then how to use them for both. Here’s a list of some things you will need to repair your tube.
 In this case, a patch kit is going to be an essential tool to have whether you’re at home or on the road.
Follow these 4 easy steps to patch your bicycle tube and repair your flat.
Step 1. Remove Your Tire
Take your tire lever and hook it around the outer edge of the tire (the bead) to get it off of the rim.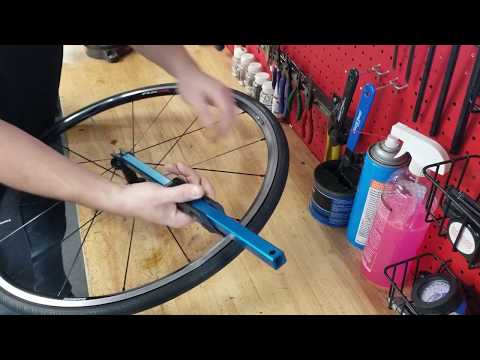 Once you have the tire lever under the tire rubber, hook the other end of your tire lever around one of your spokes to keep the tire elevated. With a second tire lever, work your way around the rim, taking the tire out of the bead until one side has been completely removed from the rim.
Step 2. Find the Leak
If the puncture or gash in your tube is not easily apparent, you’re going to need to fill the tube back up to locate where the air is escaping from. There are a couple of different ways to find the leak. The layman’s way would just be to run your hand along the tube and try to feel it out.
The bucket of water method that we mentioned earlier, however, is a more accurate way. If you’re at home, fill your sink or a large bucket full of water and submerge each end of the tube. Watch for air bubbles escaping from your tire to locate your problem area.
Make sure you submerge each side, as there may be more than one puncture. Be sure to check the inside of the tire to make sure that the puncture-causing object has been removed. Once located, mark that spot with your tire marking chalk.
Step 3. Patch the Hole
When patching the hole in your bicycle tube, make sure that the area around the puncture is clean so that the patch will stick. Using the scuffer from your patch kit (sand paper or emery paper will also do the trick), rough up the area around the puncture so that your adhesives have something to grip.
If your patches don’t require glue, simply press them firmly over the hole. For patches that do need glue, add a layer of glue and spread it evenly around the area. Wait for the glue to get a little tacky, and then press on your patch. If you have the materials available to you at home, some cyclists will sprinkle talcum powder on top of the patch so that that patch/adhesive doesn’t stick to the inside of the tire.
Step 4. Put It All Back Together
Put a little air into your tube and then put it back in the tire, making sure, again, that there are no foreign objects remaining in the tire. Be sure to insert the tube and tire back into the rim using only your hands, as the tire levers may pinch the tube and cause another flat (we certainly don’t want that after all your hard work).
Once you’ve pushed the tire back in and the valve stem is securely inside the tire, inflate your tube back to maximum pressure, being sure to check the tire one more time to make sure that the bead is installed snugly. Ready to ride!
The need for tire repair arises if the pressure in the cycle chamber is not maintained, drops at a noticeable rate. In this case, the rolling resistance of the wheel increases significantly, and the rim begins to hit the micro-roughness of the track. Unfortunately, from a puncture to
The need for tire repair arises if the pressure in the cycle chamber is not kept, it drops at a noticeable speed. In this case, the rolling resistance of the wheel increases significantly, and the rim begins to hit the micro-roughness of the track.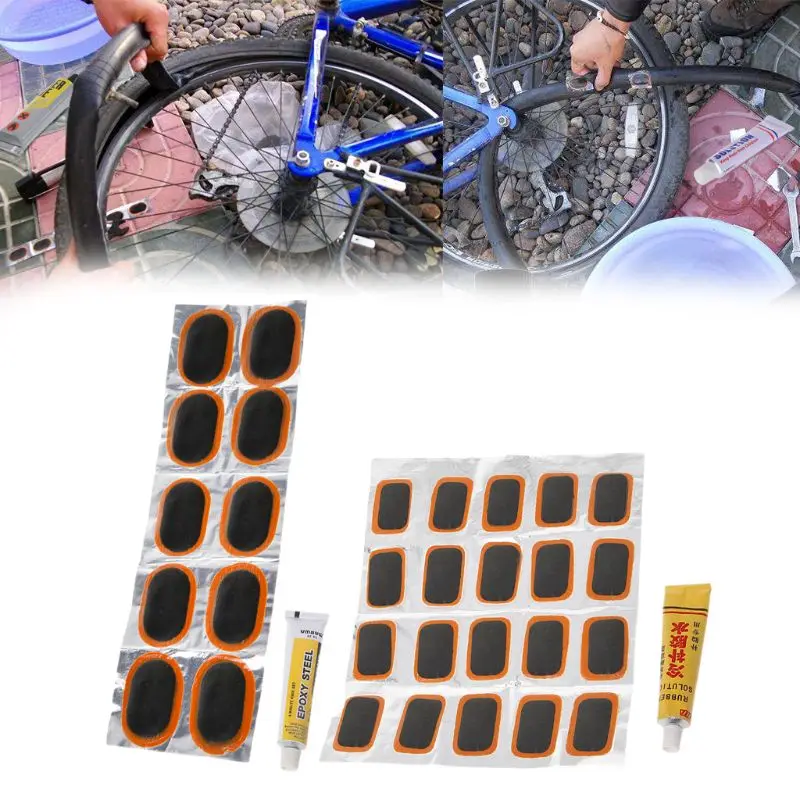 Unfortunately, no cyclist is immune from a tire puncture.
Tire failures can be caused by manufacturing defects and mechanical damage. Mechanical damage includes cuts and punctures. The following damages are the result of manufacturing defects: stratification of the thread, rupture of the thread, rupture of the seam at the single-tube, delamination of the tread. A piece of wire, a sharp stone or a piece of glass, a nail, and the like can pierce the tire and the chamber. The chamber can be cut by the wheel rim when it hits an obstacle hard. Sand that has fallen under the tread will eventually lead to a hole in the bike chamber. If this happens far from home, during a trip or a tourist run, then you have to rely only on your own strength. With a certain skill, it is possible to repair the bicycle wheel chamber in 15-30 minutes. To do this, you must have at least a complete first-aid kit. However, of course, only in the workshop will they be able to guarantee a high-quality result of the repair.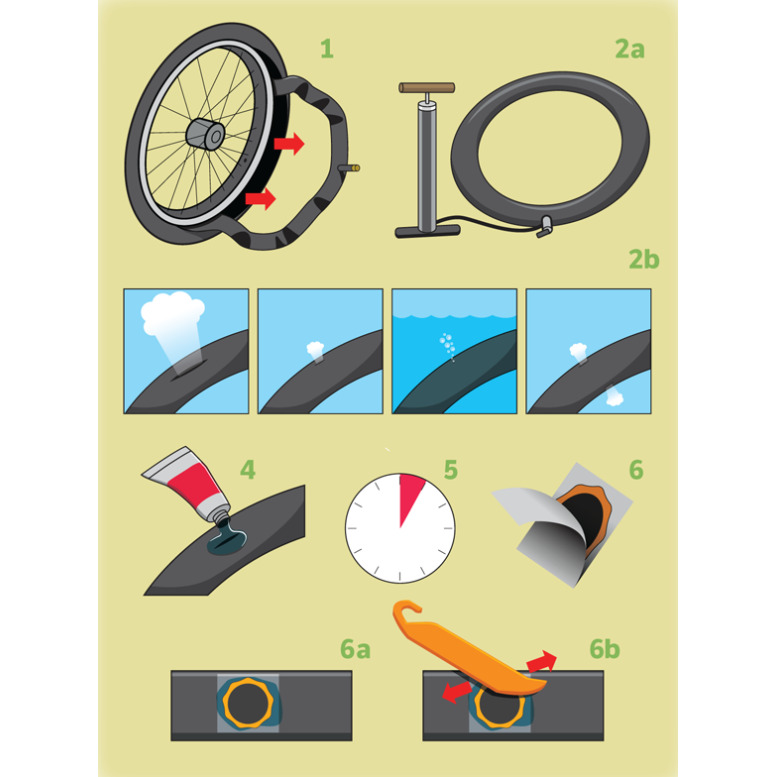
Procedure for repairing the inner tube

Depending on the nature of the damage, the repair of bicycle tires may have a different procedure.
Sport mountain bikes with tubeless tires are very popular. These are UST and BST wheels. The peculiarity of such wheels is that compressed air is pumped directly into the cavity between the tire and the rim. The most widely used wheels of the BST standard. They must use a sealant that ensures tight contact between the rim and the tire. The same sealant also seals possible punctures directly in the movement of the bicycle. At the same time, high-quality repair of a tubeless bicycle tire can be carried out in a stationary or mobile workshop. This is not easy to do in the field. Poor repair of a bicycle tire can lead to the fact that when the wheel slips sideways, the tire can fly off, and the consequences can be very serious.
In our bike workshop you can repair not only traditional tires and tubes, but also repair tubeless mountain bike tires. We carry out scheduled preventive maintenance of bicycles, we make repairs with a guarantee.
Tire failures can be caused by mechanical damage and manufacturing defects. Mechanical damage includes punctures and cuts caused by foreign bodies that have entered the tire. The following damages are the result of manufacturing defects: stratification of the thread, rupture of the thread, rupture of the seam at the single-tube, delamination of the tread.
Significant damage penetrating the outer surface of the tire is easily detected by inspection. Other damage is determined by inspecting the tire after it has been removed from the wheel rim. To speed up the location of small punctures, in which the air from the chamber is released gradually, the tire mounted on the wheel is immersed in water. At the puncture site, traces of air escaping from the tire will be visible. It is necessary to immerse not the entire wheel in water, but only part of the tire so that the surface of the water barely covers the inner surface of the rim.
Having found the place of the puncture, mark it on the tire with an indelible pencil, remove one edge of the tire from the rim and remove the chamber from under the tire. Having slightly pumped up the chamber, they find the puncture site by ear or by immersion in water and mark it with a pencil, and the chamber is freed from air. At the puncture site, the surface of the chamber is cleaned with a rasp, a file with a large notch or sandpaper with a large grain. On a separate piece of rubber 1-1.5 mm thick (cut from the old chamber), a surface equal to the section of the cleaned surface of the chamber is cleaned, and a patch is cut out of it with scissors, giving it a round or oval shape. From the camera and the patch, remove the dust and traces of emery remaining after stripping with a brush or a clean rag. A thin layer of rubber adhesive is applied to the surface of the chamber and the patch. The glue is allowed to dry for 15-20 minutes, and then a second layer is applied, which is also allowed to dry. After drying, the patch is applied to the damaged area of the camera, pressed tightly and rolled with a roller or lightly pierced with a wooden hammer, placing the camera on the palm of the hand.
If the chamber has large gaps that are difficult to seal; the best way is to repair by inserting a piece of the old chamber with the same cross-sectional profile. To do this, a piece with a length of at least 120 mm is cut out from the repaired chamber, on which there is a gap. A piece 60–100 mm longer is also cut out of the old chamber (an allowance of 30–59 mm for each joint).
Gluing joints is most conveniently done using two mandrels, which are (Fig. 68 a) segments of a thin-walled steel pipe, the diameter of which is selected so that the chamber to be glued is put on the mandrel with a slight tension. The length of each mandrel is taken equal to 80-100 mm. The wall of the mandrel is cut through along the generatrix of the cylinder.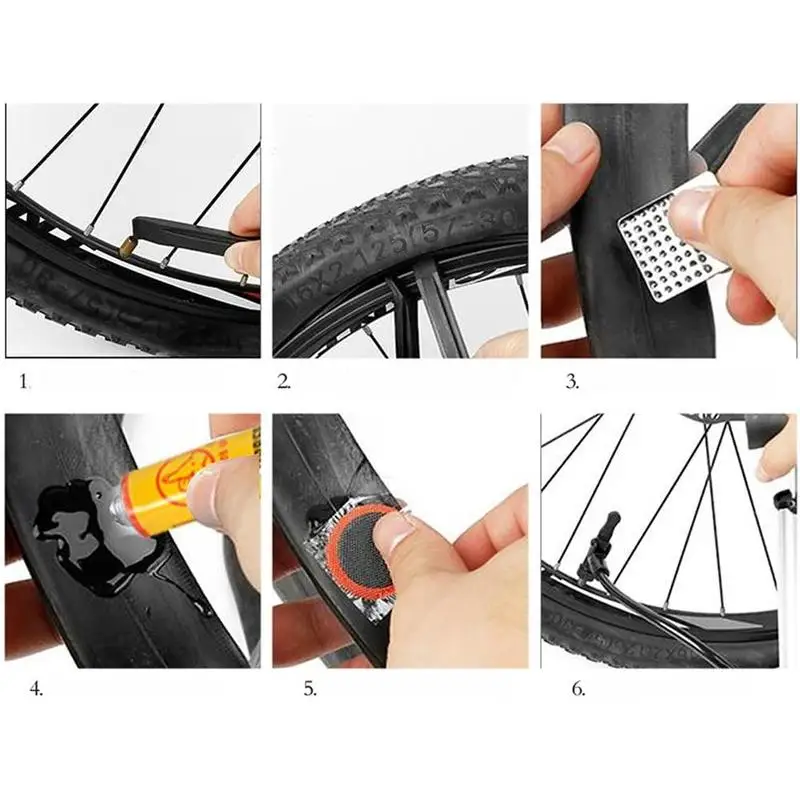
The end 1 of the rubber tube of the mating chamber is first passed inside the mandrel 2, and then turned inside out and pulled on the mandrel so that the latter is under the lapel. The same is done with the end 6 of the inserted piece of the chamber and the second mandrel 7. (Fig. 68 b). The end of the chamber, which will be internal after gluing, is turned out again with the outer surface up.
Fig. 68. Docking chamber
The length of the lapels must be equal to the allowance provided for gluing.
The outer surface 3 of the first end and the turned-out inner surface 4 of the second end of the chamber are thoroughly cleaned. An even layer of rubber adhesive is applied to the cleaned surfaces, and after drying, a second layer is applied, which is also allowed to dry for 15-30 minutes. After that, the ends of the chamber and the insert are joined end-to-end, and with the help of a thin wooden plate 5 placed under the lapel of the rubber tube, it is carefully turned back so that it lies on the surface of the second end smeared with glue over the entire area without folds or wrinkles.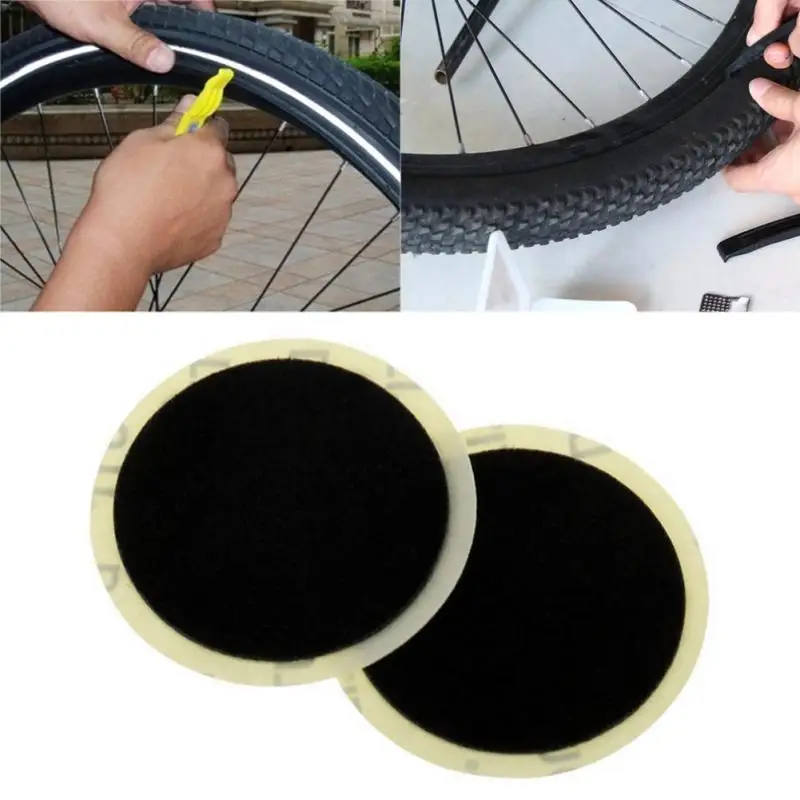 When the gluing process is completed, one end of the rubber tube will be inside the other. The place of gluing is pressed by hand.
After gluing the first joint, the mandrels are removed and the second joint is glued in the same way, connecting the chamber into a closed ring. After that, the mandrels are easily removed from the chamber due to the cut of the wall.
If the puncture hole is large and several threads of the tire thread are damaged, the hole in the latter must be sealed. The patch in this case is made of rubberized fabric, which is available in the bike kit. On the damaged area on the inside of the tire, the surface is cleaned with sandpaper, several layers of rubber glue are applied at intervals of 15-20 minutes to dry. After that, a patch smeared with glue and dried is also applied to the place of damage and it is well rolled to the tire.
In case of significant cuts in the tire, it is best to repair it by hot vulcanizing in the workshop that performs this work.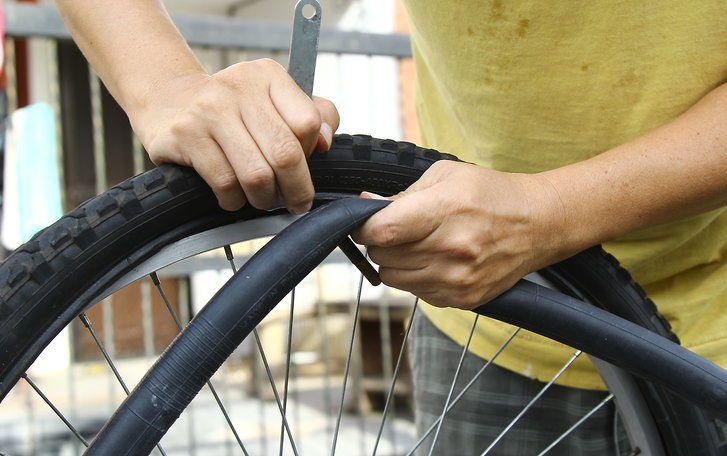
Repairing a damaged racing single tube is somewhat different from repairing a road tire and requires more care and attention. It is not recommended to submerge the racing single tube in water to find the puncture site. The puncture is determined by ear or, if this is not possible, soap foam is prepared, as for shaving (only not hot), and applied with a brush to the sides of the single-tube along the entire circumference; Foam will begin to bubble at the puncture site. The puncture site is noticed, and the foam is removed from the sides of the tire with a dry cloth.
The single tube is emptied of air and removed from the rim. To remove the chamber from the tire, you need to carefully tear off the keeper tape glued to it from the tire frame, which closes the butt seam. The tape is torn off the tire in a fairly significant area. Being careful not to cut through the chambers, cut the threads of the butt weld; the incision is made so long that you can freely remove the camera. After that, the edge of the safety tape is undercut so that it is possible to freely remove the camera and repair it.
Damaged tire carcass fabric must be sealed during a puncture, otherwise the thin wall of the chamber, drawn into the puncture hole in contact with the road surface on which the wheel moves, will be pinched or rubbed. The puncture hole in the tire frame is sealed with a piece of bicycle thread from an old single tube; you can also seal the hole with a dense canvas from a parachute or balloon.
The method of sealing a racing tire tube is the same as the described method of sticking a road tube, but since the thickness of the walls of the tube and the patch is only about 0.3 mm, and sometimes less, they must be cleaned with fine-grained sandpaper.
After the repair of the tire and the inner tube, the latter is inserted into the tire and sutured end-to-end with a cross stitch. The crosslinking process is shown in Fig. 69. Then the seam is sealed with a keeper tape.