An ATV that has a clutch is considered a manual transmission ATV, unlike an automatic transmission ATV that does all the shifting for you. Driving a manual ATV is actually pretty easy once you get the hang of it. After a while it becomes second nature and you will be able to ride without even thinking about it too much. You will need to be able to coordinate between your hands and your feet to shift. I will go over step by step exactly how to start, get into gear, and shift with a manual ATV.
First, lets go over the components you will need to know to drive an ATV with a clutch.
It’s best practice to start the quad when it’s in the neutral gear. It is possible to start the ATV in any gear as long as you hold in the clutch lever. Remember, when you pull in on the clutch lever, you’re essentially putting the quad in neutral, as long as you’re holding in the clutch.
If you start your quad in gear, you need to pull in on the clutch and start the engine. Be careful though, if you let go of the clutch with the engine running and the transmission in gear, you will stall and could do damage to your transmission. I only start mine in neutral so that way I can let off the clutch and the quad will idle, and I suggest you do the same.
To get into neutral before starting the quad, you need to pull in on the clutch lever and use your left foot shifter to find neutral. Neutral is usually located between 1st and 2nd gear. You typically won’t be able to get into neutral from 2nd gear though. You should shift to 1st gear by clicking down on the foot shifter, all the way down to 1st gear. Then lightly shift a half click up into neutral. A full click up from 1st gear will put you into 2nd gear, a half click up will put you into neutral.
This is the part that everyone gets hung up on, I know I did when I first learned. It’s really not that hard once you get the hang of it though, it takes some practice. Don’t let yourself get discouraged too easily and you’ll be just fine.
Start off by being in neutral with the engine running. Pull in the clutch lever and hold it in. Now shift into 1st gear by pressing down on the shifter with your foot. To start accelerating, you need to give it some gas with the throttle while you slowly let out the clutch. You have to do these at the same time, that’s what usually gets people.
When you feel the clutch engage, the quad will start to move forward and you can let go of the clutch all together. You’re now in 1st gear moving forward. Be careful though, if you come to a stop without pulling the clutch back in, or getting back into neutral, the ATV will stall.
It may help to just practice getting the quad moving in 1st gear using the clutch and throttle for a bit. Every quad is a little different so it’s hard to say how much throttle to give, and how far to let the clutch out before it grabs. A good starting point though is to try about half throttle, and let the clutch out slowly until you get a good feel for it.
If you keep stalling your engine, you’re either not giving enough gas or you’re letting the clutch out too quickly. If the front end lifts up on you, you’re probably giving it too much throttle when you let the clutch out. It may take patience to get the hang of, but just take it easy and practice.
Once you’ve got the ‘start driving’ part down you’ll want to go faster. Luckily this isn’t as hard as getting the quad moving in the first place. To shift up a gear you want to be about 75% or more of the rpm range for your engine. You typically want to shift up in the higher rpm ranges or you will just bog down the engine. For example, being in 4th gear but only going 5mph will give you no power, and you might even stall.
To shift up, you have to let off the throttle and pull in the clutch lever all the way. With your left foot, pull up on the shift lever into the next higher gear then let the clutch out and give it throttle. Keep in mind when switching from 1st to 2nd you need to do a full click up to shift, a half click will put you in neutral.
If you feel more comfortable slowly letting the clutch out and giving gas at the same time like you did to start in 1st, that’s fine. It is not necessary though. That’s why I think shifting between gears is easier than starting out in 1st. Because you can just let off the gas, pull in the clutch, shift, let go of clutch all together, and give it gas again. You’ll be able to do this faster with time, and it becomes second nature after a while.
To downshift you do the same steps except press down on the shifter with your left foot. Keep in mind that if you down shift at a high speed you will red line your engine and could cause damage. Downshifting is only really needed when you’re slowing down. What I do is just hold the clutch in whenever I’m slowing down, and once I’ve slowed to the speed I want, I shift down into the gear best suited for that speed, and let the clutch out.
You really do need to know what gear is best for the speed you’re going. Unlike shifting up through gears, you can shift down through multiple gears at a time depending on how much you slowed down. If your ATV doesn’t have a speedometer, the best you can do is just get a feel for what speed you’re going and what gear you should be in.
This is the easiest part, but the most important, you should definitely know how to stop before you even try riding an ATV with a clutch. To come to a complete stop simply let off the throttle, hold in the clutch, and apply the front and rear brakes until you’ve stopped moving. You can down shift while you’re slowing down or wait until you’ve stopped to down shift all the way to 1st gear. Either way, it’s important that you hold the clutch in this entire time. Once you’re into 1st gear, do a half click shift up into neutral. Now you can let off the clutch and the engine will idle.
The front brake is applied by using the front brake lever on the right side of the handle bars.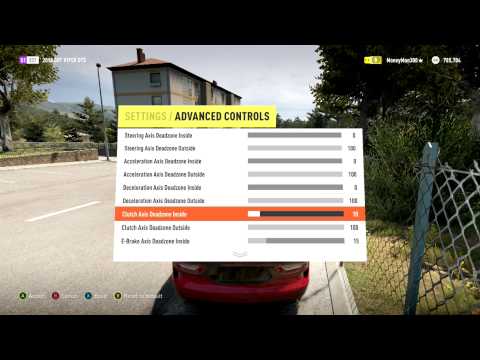 The front brake is typically about 3/4 of your stopping power. Some people never even touch their rear brakes at all, which is fine. To use your rear brakes apply the foot brake by your right foot. The rear brake becomes more useful when you start to learn more advanced braking and cornering, or if you just like to skid to a stop.
That’s it! now it’s time to practice, a lot. You’ll get the hang of it and you’ll want to start trying more advanced maneuvers in no time. As always, remember to wear proper safety gear. At the very least, make sure you wear a helmet, goggles, and a decent pair of boots. If you want to check out some gear I’ve tried, tested, and recommend myself, check out the Recommended Gear section of this site.
Sharing is caring!
Last updated on January 4th, 2021 at 11:11 am
MX vs ATV Alive was originally released in 2011, but has just had a new lease of life after being available as a free game for Xbox Live Gold Subscribers on the Xbox 360. But as a digital download, you might be struggling to pull off some of the tricks without the manual. So here’s how to perform stunts in MX vs ATV Alive
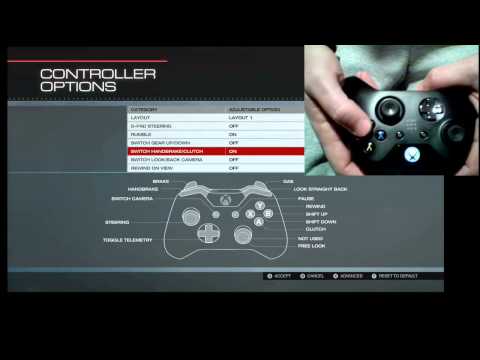
With the default controller layout (Xbox 360):
Move your rider left and right to make sharper turns and balance the motorcycle or ATV.
Move your rider forwards and backwards to keep your rear wheel planted and your vehicle balanced over whoops and small jumps.
Move your rider back and feed in the throttle to perform wheelies, and lean forwards with the brake on to perform stoppies.
Seat Bounce allows you to jump further. Whether you’re able to perform a seat bounce, the shock absorber on your HUD will turn yellow – and you should pull back on the right stick. If you’re successful, the shock will turn orange. And to get a maximum bounce, press the right stick while pulling back, and if you get it right, the shock will turn green.
Use the Seat Bounce appropriately – you want to be landing on the flat or the downside of jumps, and staying lower to the ground is faster as you’ll get your wheels on the ground more quickly and therefore be able to drive forwards.
Clutch: To get our of corners and landings from jump quicker you should hold LB to build up the revs. The further the metre is filled up, the longer your engine will put out peak power when the clutch is released. So pull in the clutch with LB when you’re in the air and release when you’re landing to power out of a jump for example, or when you’re not using the throttle to get around a corner.
Backflip: Just before you take off, hold RB and move the right stick down. Hold the right stick down until you complete your backflip – rider position, throttle and braking will control how fast you flip.
360: Before you take off, hold RB and then move the right stick either left or right, and then quickly down to start the rotation.
Whips: When airborne, move the right or left stick to the left or right to perform a whip.
Scrubs: To stay as low to the ground as possible on a jump, move the right stick hard left or right before you take off, and you can also add the left stick.
Top Tips:
See all of our MX vs ATV Alive coverage and news, here. You can still find MX vs ATV Alive for sale via the Xbox Marketplace, or find physical copies on Amazon.
Burnout - slip, in professional slang, means warming up the rubber on a car standing still, that is, slipping of the tires themselves and rubbing them on the asphalt . As a result of the contact of tires with a hard asphalt surface, they begin to warm up quickly and smoke appears from under them.
Burnout, the so-called slip, is used before races on the drag racing track for better tire grip, as well as for better and more stable handling of a very powerful car on a rally track. nine0005
From the category of a necessary action, burnout quickly moved into the category of a kind of entertainment, thus becoming an element of a certain show where its participants show a higher level of car control using all its capabilities.
For a burnout, i.e. for slipping, the following conditions are necessary:
nine0028
2. The car must be technically sound. During the application of this technique in practice, the loads on the engine, on the brake system, on the wheel bearings and on the suspension reach the most extreme values.
3. The car owner must be personally aware of the following fact: that such heating of the rubber can lead, and sometimes does lead to serious technical breakdowns.
Attention!!! The article is written for one purpose only, namely to show the basics of the burnout technique. It does not in any way call motorists to action. Any attempt to use this racing vehicle for any recreational or professional purposes may result in serious damage to the vehicle. Also, this type of activity can be dangerous both for the driver himself and for those around him. In no case should this slipping method be used in crowded places, as well as on public roads !!! This is a mandatory requirement for all motorists. nine0020
I. Make sure your vehicle is suitable for burnout. It must have enough horsepower. For this, such machines are usually suitable, in which the number of cylinders in fact is more than four, which are equipped with a manual transmission. And for a greater effect, smooth tires are also needed, which have a large area of \u200b\u200bthe so-called contact patch with the asphalt surface, which can give out a lot of effective smoke. nine0005
*If your vehicle is equipped with an automatic transmission, the use of burnout slip is strictly prohibited. It will lead to the destruction of the transmission and costly repairs to the car itself.
II. Engage first gear, then fully depress the clutch and gradually begin to increase engine speed. In a quick but smooth motion, start releasing the clutch pedal while still pressing on the gas. nine0005
Attention!!! To prevent the speed from going into the red zone, work with the gas pedal very carefully, you do not need to press it all the way to the floor. The ideal technique is shown in the following video (1.00 minute video). Play with the gas pedal, alternately pressing it harder, then weaker, while constantly keeping high, but also safe for the engine speed !!!
The average range of these revolutions should be between 3500 - 4500 thousand rpm. On modern vehicles, this range is closest to peak torque. nine0005
With the clutch fully released, place your left foot on the brake pedal. In order to press with the right force with your left foot on the brake pedal, some practice is required. From the first time (and sometimes from the tenth) it is very difficult to do this.
Braking force must be more than sufficient, and this is necessary so that the rear wheels of the car continue to turn freely, while the car itself remains in place or continues to move very slowly forward. nine0005
Attention !!! Trying to do a burnout for the first time will, of course, be initially unsuccessful over and over again, and this will continue until you learn to feel the smallest nuances of the car's behavior. In this case, there is a possibility of overheating of the clutch itself, up to its failure. So try to keep an eye on unusual and foreign smells that appear in the car interior, as well as on the behavior of the car itself, when you turn on the gearbox and squeeze the clutch, exactly at the moment the clutch discs converge!!! nine0020
III. Burnout is somewhat easier on front wheel drive than on rear wheel drive. To do this, you need to hold the parking brake, then raise the engine speed and just as smoothly and quickly release the clutch pedal. As a result of such a fast (almost instantaneous) increase in the speed of rotation of the front wheels, the car will not go forward and will not stall; remaining in one place, he will begin to release long-awaited and long-awaited puffs of smoke from under his tires.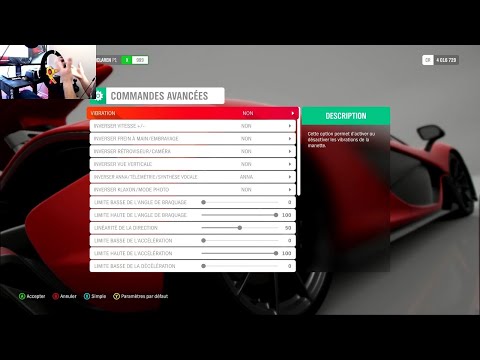 nine0005
Front wheel drive is much easier to burnout. But at the same time, there is one important nuance, namely: the handbrake of the car must be in good working order, it must be able to hold the car in one place.
IV. If the car does not have enough power for such experiments, then in this case, the connoisseurs have some tricks in store that help one hundred percent to break the wheels of the car into slipping. nine0005
1. Lighten your car, especially for rear wheel drive vehicles. There should not be anything superfluous in the trunk, not even a spare tire. Before you drive to the site, you need to take care of this in advance. The axle of the car will unload a little and it will be easier for her to break the wheels into slip.
2. Burnout Rolling back at low speed with the clutch depressed, you do almost everything the same as in previous times. Release the clutch, then press the gas, but no longer press the brake. As a result of the action of multidirectional forces, one of the forces will be directed downward, and the engine force will be directed in the opposite direction, that is, it will pull up and the car in this case will remain in place without the brakes being pressed. nine0028
3. Try this first on a wet surface. Grip on asphalt will be much weaker than it could be in dry weather, and this will definitely increase your chances of success.
V. And in conclusion. To reduce stress on the brake system itself, use the Brake line locking system, i.e. blocking. After installing it on the car and pressing the button, it will automatically turn off the rear brakes. This will simplify your task and keep the car in its original technical condition. nine0005
And a snack for all readers: Fail and Win compilations of burnout.
Home Guides Forza Horizon (FH) 5 Clutch Not Working: Fixes and Workarounds
Forza Horizon 5 supports various input methods. However, one of the most realistic racing experiences in Forza Horizon 5 is steering wheel controls. Unfortunately, in Forza Horizon (FH) 5, many players are facing an issue where the clutch is not working properly. Therefore, we will look at the best fixes and workarounds to solve this problem. nine0005
 After that, if the clutch works, go back to the control settings and select "Custom Wheel Profile 1".
 These are all the fixes that you can use to access the FH5 Clutch Not Working issue.