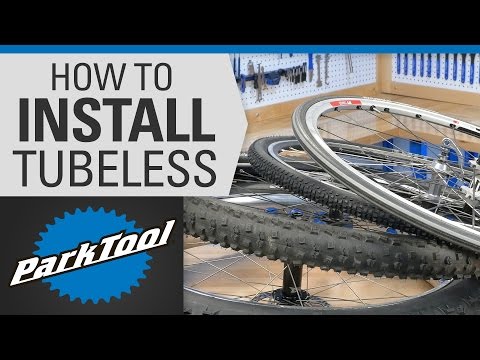
Lawnmowers will encounter all kinds of circumstances, tough, tall grass that may be full of weeds, twigs, and stones. In all this, the blade and tire rubber are the ones that face the hostility of the working environment. Therefore, at times, a lawnmower’s tire may get punctured or damaged. Then, repairing the tire becomes necessary because a mower can’t run on a flat tire. The most important part of fixing the tire is breaking the bead on it. Depending on the brand of the lawnmower, the tire sizes vary. But the common thing across the brands in the highly pressurized and tight tires. Hence, breaking the bead on a lawnmower tire can get a bit intimidating for someone who has no experience. Do not worry! In this article, we will explain different techniques to do the job using common tools and equipment.
How to break a bead on a lawnmower tire, these are your 5 different options:
These five options are all different techniques to break loose the connection between the tire and rim. Before you can use them, the tire first needs to be removed and deflated. These will now be discussed in more detail.
Contents
 6 ● Option 5: Using a Bead Breaker Tool to break the bad on a lawnmower tire
Lawnmowers have to run through rough terrains full of dirt and debris. Their tires make them heave through tall, dry, or even wet grass. So, at times, they may need replacement or repair. Breaking the bead on a lawnmower’s tire is something a passionate gardener should know about how to do.
Before removing the tire, you have to remove the tire from the mower, inspect it for errors and then carry on with the task. Follow this guideline to get a better insight.
For all methods, the first step is to remove and deflate the tire.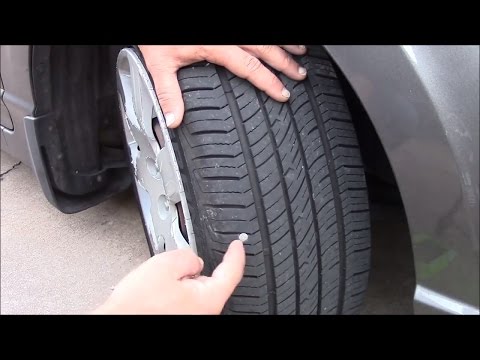 In small lawnmowers, they are fixed by a single bolt at the center. In larger tires of some riding mowers, they may have up to 4 bolts. Simple untwist them using a socket wrench to remove the tire. It would be best to use a scissor jack to lift the mower body by supporting the mower’s frame.
Then, remove the valve cap completely present on the tire’s rim. It passes through the hole to the tube. Remove it to remove the air out of the tire completely. You can deflate the tire using a valve core removal tool. This step can make your work a lot easier because the inflated tire demands double energy to break the bead. So it is recommended to deflate the tire first to save your time and energy.
After the tire is removed and deflated, we can look at the various methods to break the bad.
Place your wheel on a flat surface. Apply your body weight at different parts of the tire along the rim edges, not on the metal rim itself. Just put one foot on each side of your rim and press your foot. This will make the rim come off easily. This technique mostly works as the size and the weight are comparably small for a lawnmower tire. This is the most commonly used technique so far if you have no tools and want to get your work done immediately.
If you have tried to break the bead with your body weight, and it did not work. Then do not worry. There is another useful technique.
The first step is to place your wheel on the hard, plane, and smooth surface. Place the wooden block on the wheel’s edge try not to make contact with the metallic portion, i.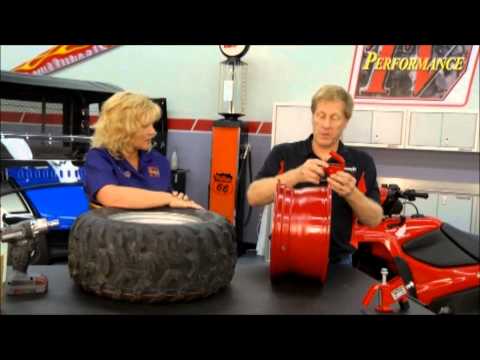 e., the rim. Using the wood, make a ramp. Use any vehicle that you have and drive over the board slightly. Then place it on the opposite edge and repeat the same process. In this way, the rubber portion of the tire will pop off immediately. Note that this process is for those tires that are stuck too bad with rust and debris. Also, note that your car’s tire starts rolling on the wooden board and not at all goes over the mower’s tire.
You can also get the same results with tools like a pry bar, tire spoon, or a big and long flathead screwdriver. This method is also quite efficient.
Place the mower tire on the flat and hard surface to avoid it sinking the tire into the surface. Place one of your feet on the rubber portion to support your effort. Place the tool at the point where the rim and the rubber part are connected on the opposite side of your foot. Try not to push your tool forcefully into it.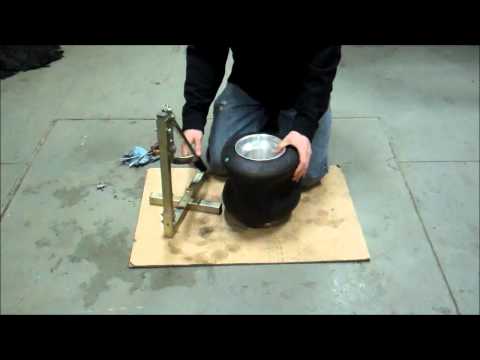 It will damage your rim part. With a wooden hammer, give the tiresome beating along the rim. There, try inserting the pry bar gently between the tire and the rim’s contact. Use it as a lever to break the connection. Repeat the process along the circumference of the tire.
Another effective way to use such tools is to use a bench vise and a metal rod. Use the bench vise to press the tire’s inside edges as it lies perpendicularly between the vise. Use the metal rod to spread the gap created by the vise throughout the ring. As the bead breaks, you can si ply remove the tire from the rim.
Breaking the bead can be done with a scissor jack. The tools required are the wooden slab, a scissor jack, and a power drill with a suitable socket.
Place the rubber tire on a flat surface. Place a wooden board beneath it and the scissor jack beneath the board. The process is simple. You have to raise the tire, and it will contact some hard surface that pushes the bead to open.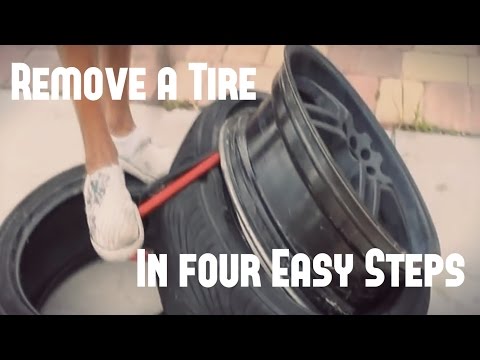 You can use the mower’s back frame or some strong metal support. Press the tire with the support and raise the jack either manually or by a power drill. This will require a few attempts, but the tire gets opened easily.
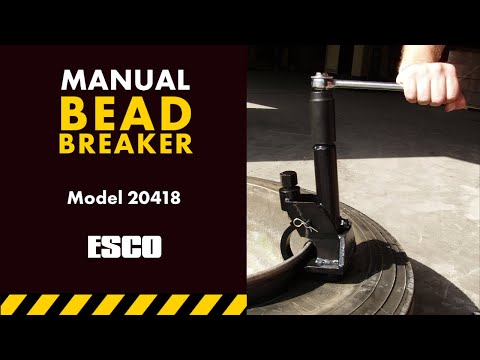
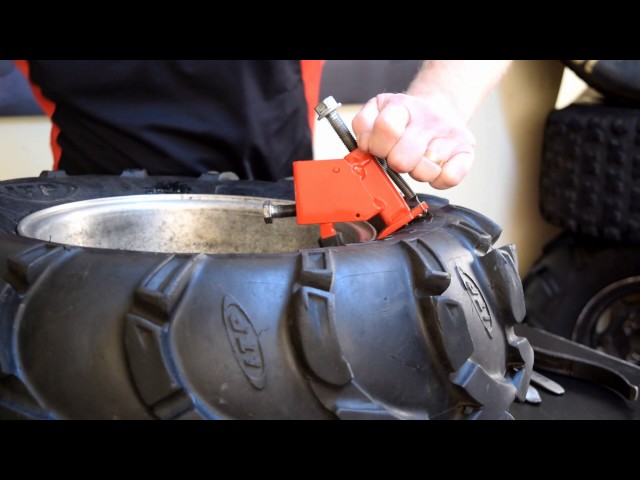
One of the professional ways of breaking the bead is to use the bead breaker tool. This tool mostly lies with the experts. However, if you have access to such a tool, this step is for you.
Place the mower tire on a flat surface. Then, strap the tire and the rim using some rope or straps. The straps should pass through the rim and go over the tires; clamp them onto a scissor jack. Next, by stretching the jack, tighten the straps. Use the bead breaker tool on the tire. This tool has a head that vibrates and kicks on at this end. Use it around the circumference of the tire near the rim and on the other side too. It takes some time, but it is the best method to keep the tire free from damage.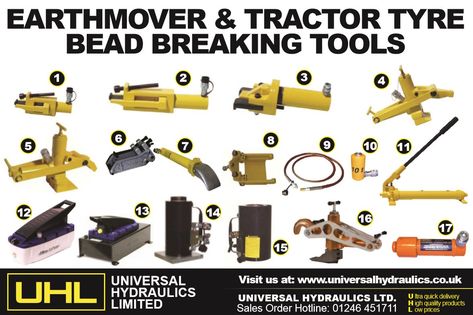 In the end, simply push the jack-up; it pulls the strap, breaking the bead.
It is recommended to deflate your tire so that it requires less effort in breaking the bead because the inflated tire has much pressure stored in itself. The pressure keeps the tire inflated and its edges tight. Therefore, it will demand double energy and make your work more challenging.
Firstly, place the tire over the rim, and it’s best to grease the top tire edge with some adhesive or gel. This keeps the connection tight. Fix the rim onto the tire’s topside using some blunt tools like the metal scale to fix it. Repeat the process on the other side of the tire. Fix the valve core. Inflate the tire and close the valve cap; the pressure will tighten the connections.
Lawnmower tire may be tubeless or with a tube. In any case, they are tightly concealed along the rim edges. This tight connection is due to both the tire and the bead’s geometry, the pressure, and the work requirement. This is called the bead of the tire. Breaking the bead means breaking this connection using some tools. This will make it possible to remove the tire from the rim.
Tire care when maintaining your lawnmower is not something you should forget. It is recommended to inspect your tires at the start and after every mowing season. In case they are punctured or worn-out, you will have to break the bead to repair or replace them. The task can be performed relatively simply, as explained in this article. One of the various methods should help you do it. If you still do not succeed, ask a professional for help.
Getting trash and rubbish inside tires happens quite a lot, especially with vehicle owners having many off-road trips. To be more specific, the trash will make its way onto and into the tire. And this is the reason why we need to break a tire bead.
Tire bead is the innermost diameter of the tire that connects with the wheel rim. Most people think that breaking a tire bead is common knowledge for every driver. However, not that many car owners know how to break a tire bead. As long as the bead stays intact, there is no gap to form between the rim and the outer edge of the tire. Basically, there is no way to fix the tire from the inside, which is another reason to learn how to break a tire bead. In this article, our car experts will tell you what tool you need to break the tire, as well as how to do it.
Bead BreakersBefore getting to know how to break a tire bead, it is essential to acknowledge your best tool. Bead breaker is the car tool with the purpose of separating tires from their rims. Different types of bead breakers have different ways of using. So let’s jump right into answering the question “how to break a bead on a tire“:
Plier Type MechanismThis bead breaker uses a plier-type tool in order to apply force between the bead and the rim’s lip. The tool has a spike to perform this task. To be more precise, this spike imposes a force on the bead and the sidewall of the tire to separate them. Therefore, it weakens and removes their connection. This plier type mechanism is amazingly effective and can get the job done very fast. However, it has its disadvantages. The spike is like a double-edge knife that might leave scratches on the surface and on the wheels themselves. Not to mention, this plier type mechanism is very heavy and big, which requires your full body weight in order to get the results.
Just like the name said, the shoe and lever mechanism has a shoe-shaped tool which can apply pressure on the sidewall of the tire. In order to break the connection between the bead and the rim, car owners must push the sidewall. This is, without a doubt, the most popular bead breaker among all, since it works amazingly well on motorcycle tires, new passenger vehicle tires, as well as trailers’ tires. The benefits of this bead breakers are quite a lot: First of all, it is very low cost, so anyone can purchase one for their vehicle. Second of all, the way to use it is quite simple and easy to follow. Last of all, it is made for passenger cars’ tires.
On the other hand, it does not work very well with old and hard-to-change tires. Since the shoe and lever mechanism is also large and bulky, this breaker can only be used on some particular types of tires.
Clamp and Ram MechanismLast but not least, the quickest and most efficient break beads of all time: Clamp and Ram Mechanism. If the first two mechanisms cannot solve the problem with difficult-to-replace tires, this bead breaker can deal with all of them. In order to make it work, this machine uses a pointed foot tool with the purpose of exploiting the space between the bead and the rim’s lip. Not to mention, this bead breaker also has a padded clamp.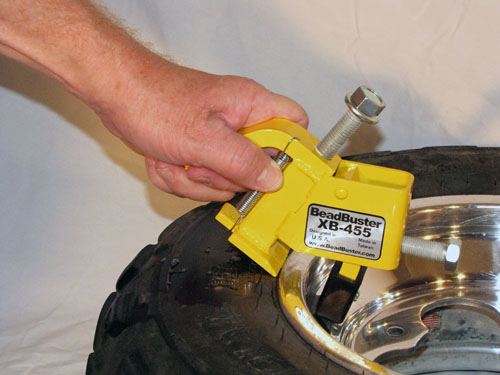 The part can go inside the sidewall with little effort. Long story short, not only this machine works with all types of tires with minimal human effort, it also causes no harm to the sidewall or to the tires. However, it is quite costly.
Knowing that you are already familiar with all the tools, let’s answer the question of “How to break a Tire Bead?”. In order to perform this task, car owners need to follow these steps:
Step 1: Prepare the ToolNo warrior goes barehand into the war. Here is the tool list that you need:
In order to start breaking tire bead, car owners need to be taken off the valve core to release air pressure out. This step needs to perform before and during the first stages.
Removing the core is the essential step in “how to break a tire bead” lesson (Photo Source: brilliantdiy)When the valve core is removed, car owners need to put the wheel under the brace.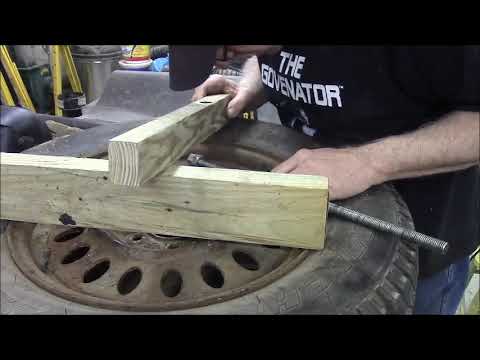 By performing this, the air will be pushed out and we can easily take the wheel off the rim. Just remember to wait until all the air pressure is lost in order to remove the wheel. A little tip to check the tire is to press your hands against the tire’s surface.
In this step, car owners need to lay the tire on a hard surface. After that, you should position the breaker bar between the rim and tire. Before proceeding to the following step, it is suggested to check if the tapered edge of the breaker bar is aimed toward the tire, not the rim.
Also, a solid surface is the necessary factor in this step, since it is capable of handling the pressure you are going to apply on.
SEE MORE
Inner Tire Wear: Causes And Fixes
Must Have Tools For Garage: A Comprehensive List
The next step of “How to break a tire bead” is to slide the breaker bar between the rim and the tire. It is essential to check if the pointed edge of the breaker bar points away from the tire’s rim. The reason for this is that the edge is highly sharp and might create scratches inside. For that reason, car owners might want to aim the bar to the tire, not the rim.
When the breaker is already steadying in the distance between the rim and the tire, it is time to hit it with a hammer with the purpose of breaking tire bead. Wait, we are not telling you to destroy the tire! The purpose of doing this is to drive the breaker inside. So keep hitting it and pushing the breaker bar toward the ground until the bead is broken and we can tell by a small pop sound.
Just take time with this, breaking a tire bead is no joke (Photo Source: bendpak)Step 6: Rotate Around the Tire’s InsideLast step of how to break a tire bead is to remove the tire of the rim. Car owners are recommended to rotate the breaker around the tire’s inside while continuing hammering from above. Keep doing that until the tire is off the rim, then turn around and do the same with the opposite side of the tire.
Many people might be wondering, why do drivers need to learn how to break a tire bead? One of the reasons is that the process is simple to follow, even with beginning car owners. All drivers need is thirty minutes and this instruction. Another reason that it provides a great help in cleaning up debris and dirt inside the tire. By breaking the bead, vehicle owners can remove the rubbish inside and reduce the future problems. The last reason is to save the cost of paying a car repairman, since you can remove the tire from its rim by yourself.
Ivan Petrov
father of many children from St. Petersburg
Author profile
to my grandmother, sometimes - on vacation abroad.
I think that all this is partly true, but not if you live in St. Petersburg and you like spending time with your children. nine0003
I just live in St. Petersburg, and I have three children. We spent the summer of 2021 with them in the city without getting out of the water: we rode on SUPs. At the same time, we improved the family budget quite well, combining business with pleasure: I also sold these glanders.
Sap is a modern take on the good old air mattress. There are several fundamental differences.
First, the SUP is more maneuverable, which is its great advantage. Even if you compare it with fishing boats, it gives odds to some hunting specimens. Many of my customers are avid fishermen, they call SUP a boat. Although in the SUP community, the term "board" is more often used. nine0003
Secondly, unlike mattresses and boats, sup is hard. It is inflated to 1 atmosphere, or 15 PSI. For comparison: the pressure in car tires is usually 2-3 atmospheres. Such rigidity is achieved not only due to the high pressure inside the SUP, but also due to the special design of polyester fibers, which seem to rise when inflated and create a rigid frame inside the rubber body of the board.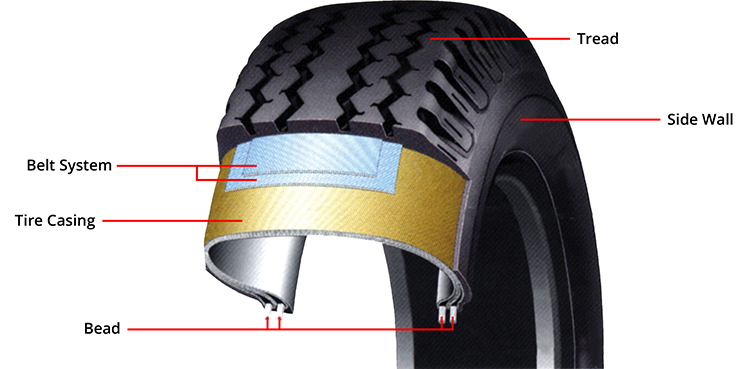
/supsurfing-experience/
“Supsurfing allows you to discover new places”: how I got on SUP and acquired a new hobby
This is what the SUP looks like from the inside. Source: sup-club.ruRepair shops do not recommend inflating SUPs to 15 PSI. If you pump up the board to the maximum values and stay with it in the sun for a long time, the pressure inside it will increase and the materials will stretch. At the same time, it makes no sense to blow off the SUP this summer, especially if you ride in the same body of water. If material tension goes above the factory maximum of 15 PSI - which can be as high as 16 or 17 PSI in the sun - the board's valve will fail and the cover materials will stretch. nine0003
The repair shop advised me to inflate the board to a pressure of 1 PSI per 10 kg. If I weigh 90 kg and I'm going to ride alone, 9 PSI is enough. If I swim on a SUP with children - this is plus 50 kg for three, then it is better to inflate the board to 14 PSI.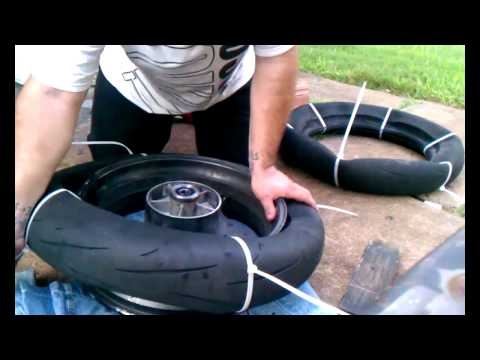
How to inflate and deflate SUP — article on the Trajectory blog
How to inflate SUP — video on YouTube
A pump will help determine the pressure inside the board: as a rule, most modern devices are equipped with a built-in pressure gauge. nine0003
SUP pumps - manual and electric
Here are the main parameters that you need to focus on.
The number of people, , who will sail on Sap. It varies from 2-3 adults to 5-7 children. As a rule, it is not the load capacity that is important here - for all boards it is about 80-150 kg - but the area of the SUP board so that everyone can comfortably and safely accommodate.
Board dimensions. They are measured in feet and centimeters: length - width - height. The main parameter is length. For example, 11.6 feet, or 353 cm, is a large board, two adults or 4-5 children will fit on it. A 9feet, or 274 cm, is a small board, it will hardly accommodate two children or one adult. The biggest saps I've seen were 14 feet or 426 cm long, and the smallest 6 feet or 182 cm, these are children's options.
Load capacity. It is usually declared by the manufacturer. The range of most boards is 80-150 kg, but children's models, which are mainly produced by the Bombitto brand, also come with a load capacity of 50 kg. The largest saps can hold up to 200 kg. Usually, manufacturers declare passport data on carrying capacity with a margin, that is, you can safely add another 5-10 kg to the value. nine0003
Number of layers. The manufacturer also declares it, and he has to believe, because it is impossible to know the number of layers without pasting the glanders. Now a two-layer board is becoming the standard: if you run into a sharp branch during rafting on such a sap, it will not start releasing air. However, even two layers will not save you from an iron pin.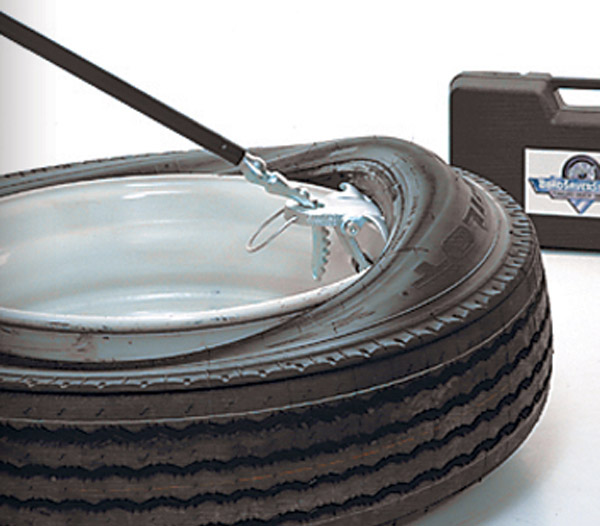
If, while swimming, you find that air is coming out of the sup, nothing terrible will happen. It is completely deflated in at least a couple of hours, so you have enough time to get to the shore. nine0003
Many modern SUPs have their sides glued with an additional third layer in the most vulnerable places.
The side of this board is glued in a separate layer - this is noticeable because it is orange in color, black dots are drawn on it closer to the sternMaintainability. Usually punctures have to be sealed in saps. They are repaired in approximately the same way both at home and in specialized services: the puncture is glued either with a home iron or an industrial one in the service. Also, the valve often fails - this is one of the most delicate parts of the board, so it must be protected: make sure that sand does not clog there and the fabric next to the valve does not bend during transportation. nine0003
In 8 out of 10 cases, the valve just needs to be tightened: there is usually a special wrench for each specific valve, which is included in the SUP repair kit.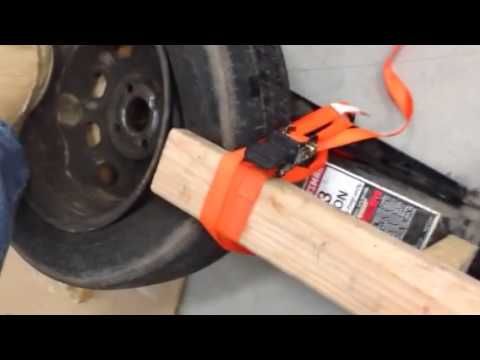 If it is not there, this is a big problem: instead of a half-hour procedure for 300 R, you will have to look for a new valve and pay several thousand for a replacement. Therefore, I strongly do not recommend buying a board that does not include a key for the valve in the repair kit. The only good news is that such saps are almost no longer sold.
Price. If we talk about used options, then the cost of such SUPs can start from 15,000 R. The coolest branded boards cost 80,000-100,000 R. The main parameters that affect the price are the brand and the length of the board: the more, the more expensive. In 2021, mid-range SUPs cost 25,000-35,000 R. If you want to buy a normal board, I advise you to focus on 30,000 R.
Number of fins and the ability to remove them The more fins a board has, the better. If they are not there, the supporter will have poor handling. If there is only one fin, that's good. Ideally, there should be three. nine0003
The central fin is responsible for the stability of the rider on the water: the larger it is, the less likely it is that a wave will knock you off your feet or flip your sup. Its function is similar to that of the keel in a conventional ship.
The side fins are smaller: they are needed for maneuverability, not stability.
The sap on the right has a large central removable fin and two small ones. The glanders on the left have a small central removable fin and two small ones. At the board in the center, all three fins are small and non-removable. Of the options presented, the best will be the sup on the right. Source: youtube.comIf the fins are not removable, over time they will bend during transportation and the board will not float exactly where you want.
The best option is a SUP with three removable fins, worse - with a removable central and non-removable side fins. Even worse is a board with three non-removable fins.
Approximately the same handling for SUPs and with one removable fin. If the board has one non-removable fin, it will be quite difficult to control it. If none, you bought a mattress, not a sapboard. nine0003
Brand. There are many brands in the SUP world, and they are quite difficult to understand. I would single out three segments - cheap, medium and expensive brands.
Cheap - the entire Chinese noname, Hydro Force, Triclicks, JS Board, Bestway, GQ, Itiwit - cost up to 30,000 R. As a rule, they are sold in supermarkets like Auchan or Lenta.
Medium - Koi, Hogger, Jobe, MySup, Fayean, Koetsu - cost 30,000-40,000 R. They are most often ordered in specialized online stores. nine0003
Expensive - Gladiator, iBoard, Van Gogh, Bombitto, Molokai, Aero, Stormline, Axper, Aqua Marina, PowerMax - cost more than 40,000 R. These boards are sold in branded stores.
I tried to list all the brands that I know, if you forgot something, add it in the comments.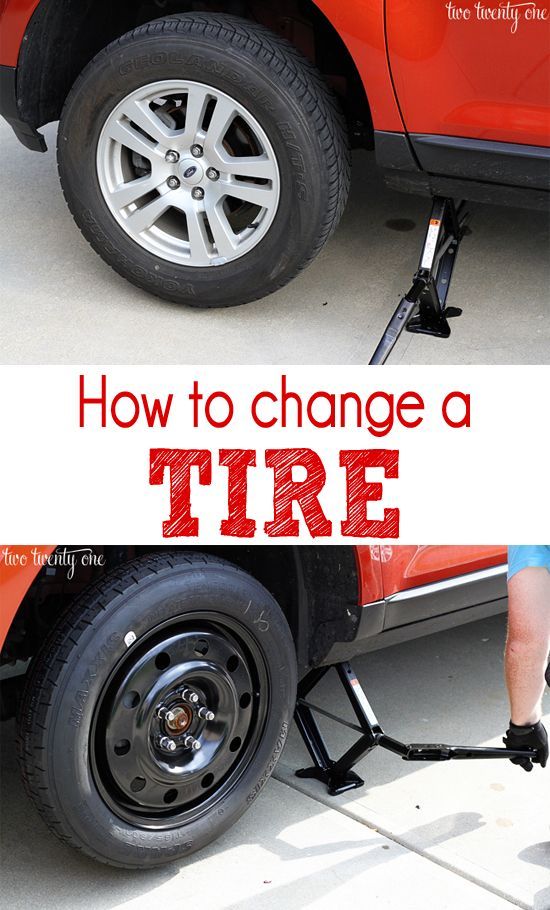
How one brand differs from another, who is better, who is worse - in my opinion, endless disputes. Some people care about the picture on a non-slip mat like Bombitto and Van Gogh saps, someone likes aerodynamic qualities like Aero, someone stands for the strength of materials like Gladiator. Every brand has its fans. nine0003
The correct answer is none. Probably, this is the main secret of the super-popularity of saps.
Even I, an experienced asthmatic and overweight, use the board without any problems, although it would seem that these are physical activities to which I have direct contraindications, especially on the water.
It is important to note that the board can be easily controlled even by children from about 6 years old or weighing more than 25 kg. But they must have a life jacket and a special paddle for children. nine0003
At the front of each SUP there are X-shaped ropes stretched over the rings - they are designed to hold on to the second rider. You can also fix the oar blade with them when you need to free your hands.
In general, an oar is the second thing that can sink when riding a SUP. The first is a mobile phone. Most models have long been waterproof, and it would seem that the need for additional cases has disappeared. But water resistance doesn't make a phone lighter than water. Therefore, I highly recommend having a case when riding SUP that can be attached to your neck when your hands are busy rowing. So you can take beautiful photos from the water and will not be left without your phone. nine0003 Such a waterproof cover can be purchased at any sporting goods store Our Triclicks board on the coast of the Gulf of Finland
SUPs give you a completely different perspective on your city. I live in St. Petersburg, and the launch is located 100 meters from my house, so walking on SUPs along rivers and canals is my favorite pastime.
As a rule, riders choose early weekend mornings for walks: at this time in St. Petersburg you rarely see a boat or a large vessel that creates big waves. Riding with waves in the narrow St. Petersburg canals is not only inconvenient, but often dangerous. nine0003
/list/sup-surfing-moscow/
Where to ride SUPs in Moscow: 5 parks with magnificent views
An example of my home route around the Petrograd side - I sail past the cruiser Avrora and the Peter and Paul Fortress, rostral columns and the old stadium « ZenithSupporters also helped me cope with professional emotional burnout. I went to a psychologist, and one of his tasks was to learn to just look out the window and not think about anything. It is very difficult.
And when there are only waves around you, it helps to relax. I fell in love on one hand, without a paddle, to swim a couple of kilometers into the Gulf of Finland and drift back downstream for several hours, lie on the board and sunbathe. It is very relaxing.
Sapboard is a real godsend for children: it replaces swimming sleeves, a diving board, and a boat. It's great to sunbathe on SUP if you don't want to get dirty in the sand, and rowing skills have a beneficial effect on physical health. The main thing is to be sure to wear a life jacket on a child who cannot swim. nine0003
From April to August 2021, my children and I traveled all over the Leningrad region, swam a little in the Pskov region, Novgorod region, and even visited Karelia. We didn’t get to the Vologda region.
/sup-lenoblast/
How much does it cost to ride SUPs with your family in St. Petersburg and the Leningrad Region
Here is where I recommend swimming on Sap in the Leningrad Region:
There are many ways, but there are three main ones.
The first is to rent SUPs. This is a fairly profitable business, and it can compete with taxi companies and electric scooter rentals, which must fight back for the season. Depending on the region, renting a SUP can cost from 500 R per hour or from 900 R per day to 1000 R per hour and 5000 R per day: I saw such prices at the Fontanka-SUP festival, which takes place in St. Petersburg in early August, and in Sochi.
Fontanka-SUP festivalThe second way is to open a full-fledged SUP station with instructions and training. A tour on boards along a route predetermined and worked out by an instructor can cost 2000-3000 RUR, skating training - from 1000 RUR per hour. nine0003
The third way is to simply sell sups. I chose him.
In 2020, I was engaged in renting SUPs, and this is another full-time job that takes a lot of time: the boards constantly need to be washed, punctures appear in them from time to time - they have to be repaired, sometimes they are idle. In general, the profit is good, but it takes a lot of nerves and effort - you can’t relax in the summer.
That is why in 2021 I was only selling SUPs.
It all depends on the sales volume and your desire. In addition, initial capital will be required: it is almost impossible to trade SUP boards on order, the goods must be in stock today and now. I have credit cards with an interest-free period in two banks for a total amount of about 700,000 R, so I used free borrowed funds. It was only necessary to have time to wrap the goods and return the money to the bank before the end of the grace period.
In 2021, my income from the sale of one SUP ranged from 3,000 to 13,000 R.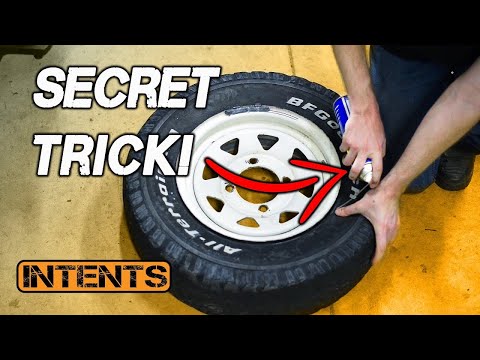 This was influenced by the cost of purchase, delivery and additional equipment, and there is a lot of it: these are paddles, phone cases, pressure bags, valves, and so on. From the sale of the board, I earned an average of 5,000 R, and with additional equipment, the amount reached 10,000 R.
From April to August 2021, I sold 79 boards and earned approximately 790,000 rubles. From this amount, it would be correct to subtract, for example, the cost of advertising on Avito and the cost of gasoline that I spent when delivering the boards, but I forgot to do it. Therefore, 790,000 R is a dirty profit.
790,000 R
I made money selling SUPs for 5 months in 2021
One of the main problems is to find a supplier who has a warehouse in Moscow. Often boards are brought from China. When ordering from there, there is an opportunity to win in price, but if the cost of the goods is from 200 € (17,388 R), this amount will be eaten by customs clearance when crossing the border. That is, in the case of saps, this almost always happens. At the same time, delivery times from China of 30-40 days during the short summer season immediately knock you out of business. nine0003
How I worked. The scheme looked like this: I published ads for the sale of SUPs on Avito, Yulia and Yandex Ads only on those days when I could deliver SUPs.
Surprisingly, advertising an advertisement for the sale of a stand-up board on Avito costs almost 50% less than advertising an advertisement for rent. I don't know what it is
You can't live on bulletin boards alone, so most of my sales came from word of mouth: I like to instruct, explain, help, create added value. People also like it, and they wrote me reviews with gratitude on Avito, which motivated me to work further. nine0003
In addition, I had a couple of regular customers in the form of boat stations and wake parks. They took 4-5 boards at once, in order to rent them out later.
When the order came in, I grabbed the kids, jumped in the car, and drove to the address.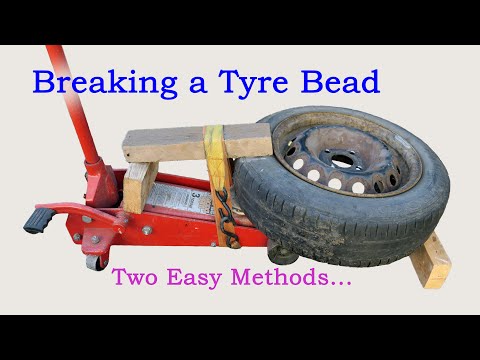 In most cases, delivery was ordered outside the city: people want to sail right away, this is a very understandable desire. I brought the board to the client, pumped it up, immediately took out my own - and the children and I went to ride in the same reservoir where the client planned to swim. At the same time, water tests of his board were carried out. nine0003
When there were 3-4 deliveries in one day, it was not easy. But between transfers, the children slept in the car, and when we arrived at the place, they joyfully ran into the water, so I would not say that it was hard for them. Rather, it was some kind of incredible adventure - each time trying a new body of water. I made at least a three-hour interval between deliveries, so that at each point we could take a leisurely swim, dry off and rest.
/kupila-prodala/
How do I sell things online
Reviews on "Avito" about my SUPs Such ratings motivate me to work further A big problem for a buyer who is looking for a board is to call 10-20 ads and find out that it is not available anywhere in the season, everywhere only on order. I positioned myself as a seller who will bring it on the same day. Sometimes I was able to deliver a board to a client within a few hours. If I couldn't deliver the sup on the same day, I just didn't post the ad. I always had 3-4 glanders in the trunk of a car: you never know when you will have to deliver them. nine0003
It is useful to have a few spare boards in the trunk, because sometimes even new SUPs have defective valves. Therefore, it is highly advisable to inflate the board before buying and make sure that the valve does not poison. If it was defective, I simply changed the board to a spare one.
The procedure for tightening the valve is very simple, they charge 500 R for it in services. The only problem is that in the season the queues often stretch for two weeks, because there are many people who want it. I just set aside the defective boards and then took them to the service 3-4 pieces at a time, so as not to waste time. I also shot a video where it was noticeable that the valve was poisoning, and sent it to suppliers.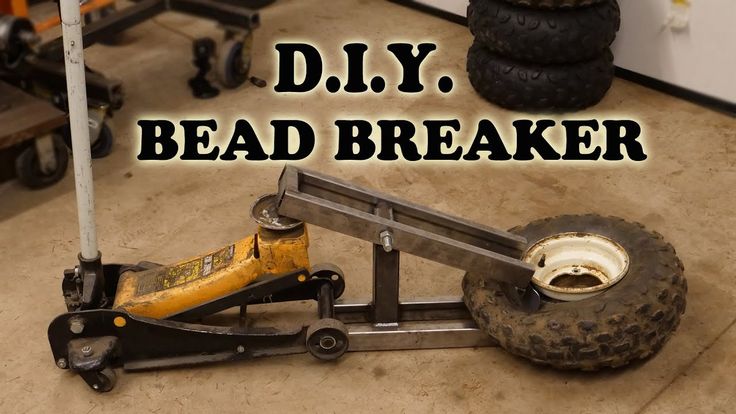 They always compensated around 30—40 $ (2198—2931 Р) for each board with defects.
500 Р
the valve is tightened in the service
Oar with two blades, if it is not provided in the kit. It costs from 1500 R. It is necessary if you are going to row while sitting, so that each time you do not throw the oar to the other side, because it is physically quite difficult. In addition, if you are swimming together and rowing with an oar with only one blade, the rider sitting in front of you will fly into their heads every time. nine0003 For example, it could be such a paddle. Source: "Kometasport"
Repair kit. Usually it comes with the sap itself, but inexpensive boards are also sold without it. The repair kit costs from 500 RUR.
Waterproof case for the phone, which is fixed on the neck. The price is from 300 R, they are sold in any sports store.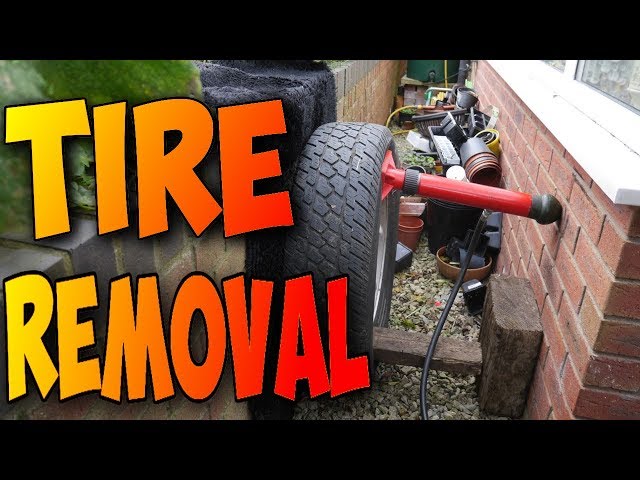
Spare valve, it costs from 500 R. In case yours suddenly starts to poison, it is always better to have a spare.
This valve costs 850 R. Source: Michel watersportWetsuit. Swimming without additional thermal protection in Russia is possible only from May to August: the season is very short. If you want to swim from March to November, you can buy a wetsuit, it costs from 10,000 R. They also ride on SUPs in a small minus: they are designed for such temperature loads.
Life jackets. They cost from 1000 R and are necessary for children who cannot swim. But if you ride in the city, then vests are required for adults as well. nine0003
Seatbag - you need it if you take some things with you and do not want them to fall into the water. You can also put food in it if you are planning a long swim. Price — from 1000 RUR. Its price is from 5000 R.
Sail and seat - if desired, saps can be turned into a kind of windsurfer.
How to set up a sail on a SUP - YouTube video
Hermetic backpacks are also called simply germs. Source: "Ozone" An example of an electric pump for glanders. Source: sup-club.ru On "Aliexpress" you can buy a very simple sail for 1228 R. Source: "Aliexpress" Full-fledged sails and mounts for them are much more expensive. Source: doskasveslom.ruNext year, most likely, new boards will come out, there will be a fashion for new designs, materials, and devices for SUPs. Therefore, in my opinion, the best thing to do with the board at the end of the season is to sell if you consider sups as a business. nine0003
If you just plan to swim, then it is better to find your seller and buy a board or upgrade.
I will give examples of prices. In July 2021, at the height of the season, it was impossible to find SUPs in St. Petersburg for less than 27,000 R, and already in August there were ads for the sale of used boards for 15,000 R.
Therefore, if you want to save money and are ready to buy ahead of time, I recommend waiting for October and buying a used board in good condition next year. This way you can save a lot. Moreover, new SUPs are only getting more expensive every year. nine0003
Or you can wait until the next spring and buy SUP. For example, in April 2021, just before the season, Lenta hypermarkets sold Chinese no-name boards for 13,000 R. They were sold out in almost a couple of days. Many of these saps later appeared on Avito with a good markup.
With the proceeds from the sale of SUPs, by the end of the season, we took our daughter's "growth" apartment in a mortgage in one of the sleeping districts of St. Petersburg. That's what we called it - sap-apartment.
/posovetoval/
How to choose apartments for investment
A fragment of our mortgage repayment schedule for this apartment My daughter, who is just learning to swim and dive, is very sorry that the season is ending and our outings will be more and more rare.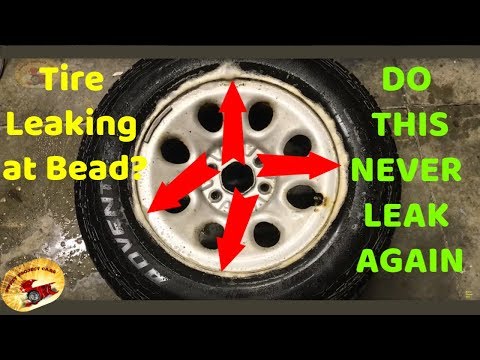 She says she wants to "dip into the Gulf of Finland and not get washed away."
What I wish you too - "dive into the world of glanders and not die out."
October 4, 2018, 08:40
Photo: masterok.livejournal.com/4813777.html
Baltic states) there is a traditional problem of "changing shoes" for winter cars on studded tires. But is it necessary to do it?
"After all, Western scientists (see British ones) are able to turn scientific research around in such a way that you no longer know what to think - is it a joke, or I don’t understand something in this life," masterok writes in his LiveJournal - Just imagine what they will tell you that, as a result of scientific research, it was found out that winter studded tires take more lives than they save.0003
Well, yes, there is a debate about the effectiveness of friction rubber and studs on different surfaces.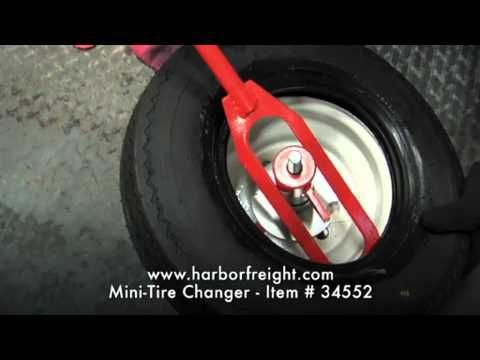 There are adherents of Velcro, and there are people like me who, apart from thorns, do not recognize anything. So how does studded tires kill people?
Three researchers at Chalmers University have looked into this issue - Anna Furberg, Sverker Molander and Rikard Arvisson. They took a systematic approach to analyze the impact of studded tires on public health throughout their life cycle.
To weigh the positives and negatives of studded tires, the researchers took into account the number of lives they save, the dust they produce as a result of road wear, and the emissions they produce. In addition, they examined the statistics of road accidents at a small mining operation in the Congo that produces cobalt, an important element for the production of studs.
Cobalt is in great demand and is one of the reasons for the hostilities in the region, which was also taken into account. nine0003
According to researchers, with a broader definition of the life cycle of studded tires, their use in Sweden saves a total of 60 to 770 years of human life, while taking away from 570 to 2,200 years.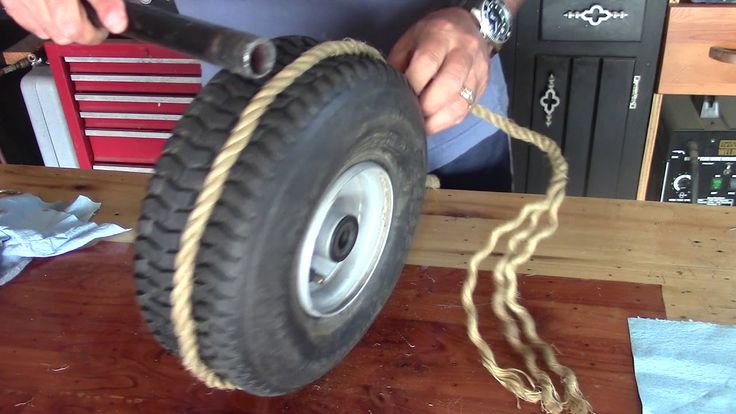
"The bottom line is clear: studded tires take more lives than they save," says Sverker Molander, professor in the Department of Management and Economics at Chalmers University. The most significant damage is caused by emissions produced when the road surface is damaged. This phenomenon alone, in its negative impact on public health, outweighs all the advantages of such tires. If other factors are taken into account, the final conclusion is obvious. nine0003
"Small-scale mining, where there are many accidents and accidents, is the second largest contributor to the negative impact of tires on health. Mortality due to war in the Congo is the smallest part, but many aspects of this conflict were not included in the study , and it undoubtedly affects the whole society. Few people realize that such tires contribute to the difficult situation in the Congo," says Anna Furberg.
The positive effects of winter tires are mainly seen in Scandinavia, while the negative health effects are seen outside.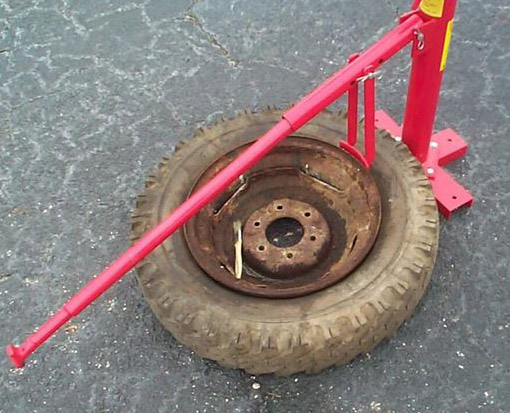 “This clearly shows what the globalization of production leads to, when the profit of some is obtained at the expense of others. It is not those who benefit from the product who take the negative consequences,” says Sverker Molander. nine0003
So what should be the reaction of consumers to this study? Anna Furberg and Sverker Molander believe that the alternative is winter tires without studs, combined with careful driving, as well as alternative modes of transportation. "Of course, how you drive is important, and snow removal must be done properly. Most vehicles are equipped with an electronic anti-skid system to ensure safe driving at high speeds. But our work shows the need for further research into alternatives to studded tires, which did not lead to would lead to negative health consequences," says Anna Furberg. nine0003
The Swedish Road and Transport Research Institute (VTI) looked at the difference in grip between studded and conventional tires in two long reports. They report that studded tires have clearly better grip when driving on ice. But when driving on snow, the difference is much less. If the road is damp, there is salt on the pavement and the temperature is around zero, then it turns out that the braking and handling of studded and conventional wheels are about the same.
According to a Norwegian study, studded tires reduce car accidents by 2% on dry roads and 5% on snow or ice compared to winter tires without studs. nine0003
According to the Swedish Transport Authority, good winter tyres, the correct speed and a driving mode that is suitable for the road surface are the basis for safe winter driving. The management emphasizes that a car equipped with an anti-skid system, with conventional non-studded winter tires, provides a sufficient level of safety.
In some Scandinavian countries, studded tires are generally prohibited. In Finland?"
"It seems that people ride spikes in Scandinavia, - comments john_f_nash. - And they are banned in Germany and other countries with a strange winter.