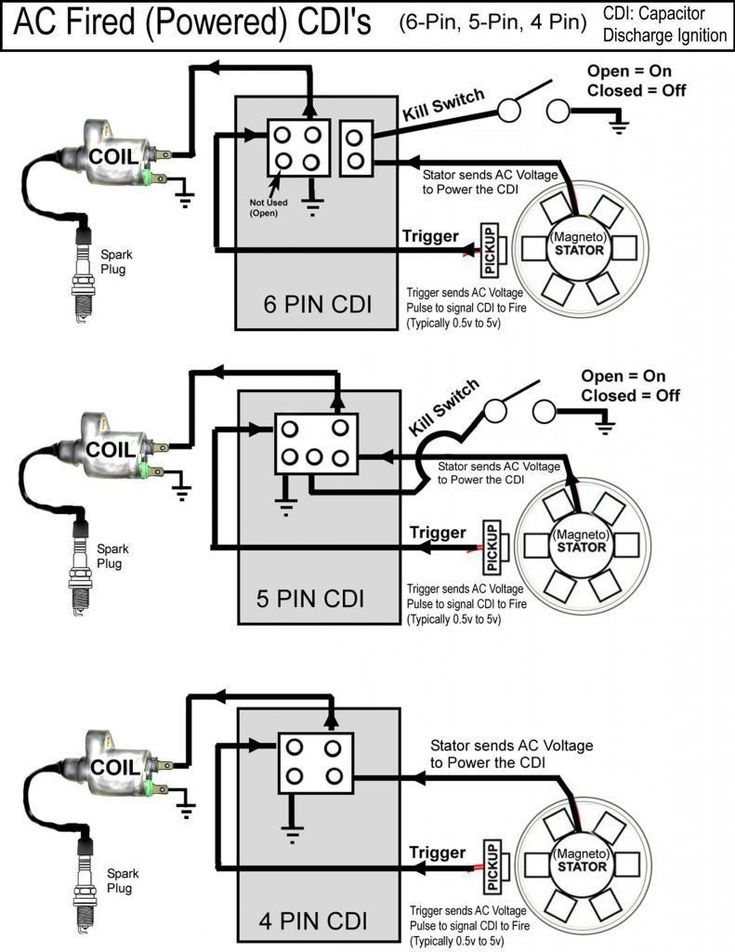
Without getting into boring technical detail, let me just say that a CDI box is an important part of the engine ignition process. It stores energy, or, rather, an electrical charge, much like a battery, and starts an ignition. Initially, capacitor- discharge ignition boxes were invented to avoid overly long charging times. These units are mostly found in bikes, boats, and, of course, ATVs.
Now, if the sparks aren’t strong enough, and/or if the motor is struggling to start, chances are, it’s the CDI acting up. So, what should you do? Can you bypass a CDI box to figure out what’s causing the malfunction? The answer is yes, you can, but there are strict instructions to follow. In this guide, I’ll tell you everything about bypassing the box without damaging the ignition system. Let’s get right to it!
Flammable liquids inside of the bench can lead to rather bad consequences. So, the first thing that you should do is to make sure the bench is crystal clear. Even if there’s a tiny bit of fuel left in the engine chamber, chances are, the bench will “light it up”. Next, test the battery unit. If it can’t reach a full charge, maybe it’s time to replace it. Batteries are often the cause of bad starts, and the sooner you figure out the faulty part of the ignition system, the better.
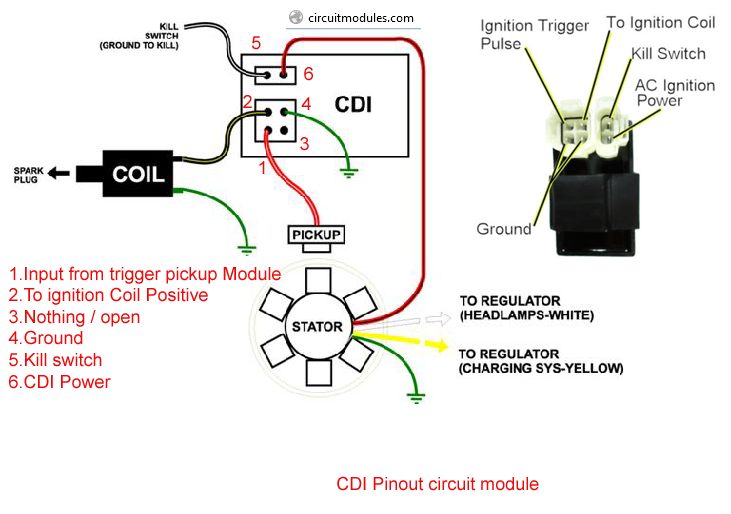
Now for the main event: the CDI box is usually colored black and has a pair of plugs. You should also see a bullet connector: remove it to be able to work with the electronic components. I highly recommend getting your hands on the service manual, because to get everything right, you’ll need to follow the provided instructions. Most likely, the ATV came with a detailed user guide. It will answer the question – how do you bypass a CDI box?
This isn’t rocket science, though: all you’ll have to do is cut the right wires so that the CDI isn’t “in business” anymore. Some quad vehicle drivers even go the extra mile and take the box out completely, cutting all the wires and leaving a hole in its place.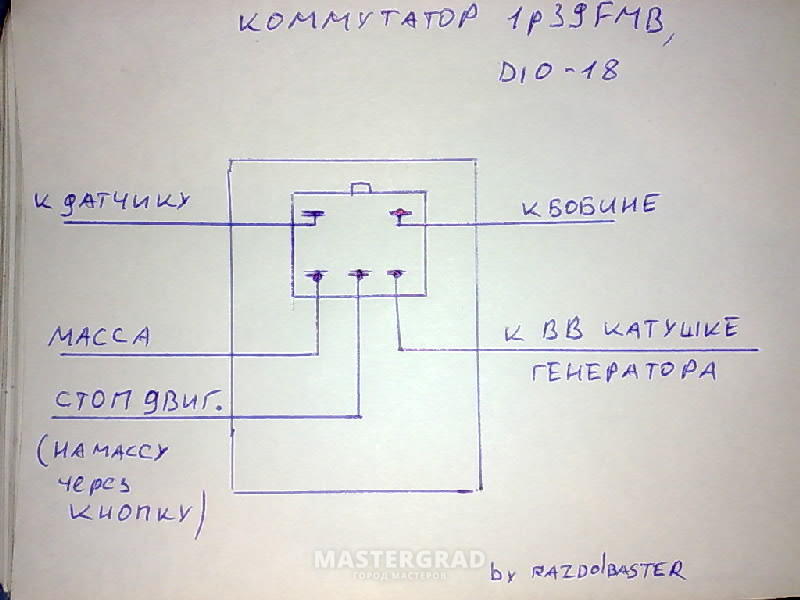 You shouldn’t do that, however, because if you learn that the box isn’t the issue, you’ll still have to pay a pretty penny for a new one.
And before you do anything with the electronics, turn the vehicle off and let it cool down for a while. I’d say wait for at least a couple of hours – ATV engines are known to stay warm for quite some time.
To figure out the exact resistance of the ignition box, use an ohmmeter. It is a pretty straightforward, intuitive device. This is important: although most ATVs are designed and manufactured to universal standards, they still have different electrical resistance. I’m talking about the coil, of course. So, what you should do is make sure your vehicle’s coil meets the resistance levels that are specific to your four-wheeler.
If it doesn’t, then I bet you’re dealing with a damaged coil that needs to be replaced as soon as possible. Again, refer to the service manual for the resistance specs.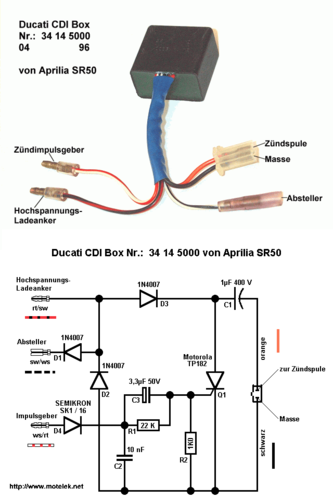 If you can’t find it anywhere, look for it online. Search for your ATV’s EXACT make, model, year, and engine.
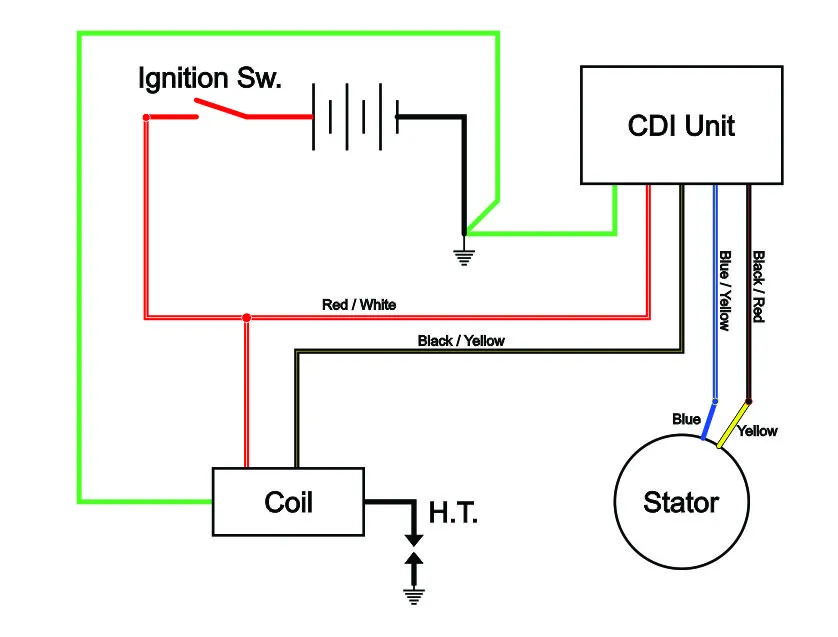
With that out of the way, go ahead and ground the wire that’s running from the stator (a component of the CDI box) to the motor. Then, disconnect the main ignition box wires. Double-check this, because if you forget to take care of the wires, you may end up creating a short circuit and ruining the capacitor discharge ignition box, the engine, and the battery altogether.
I know we just used the ohmmeter to check the coil’s electrical resistance, but that’s not it yet. What you must do next is measure the coil’s winding resistance. And remember: to do everything properly, measure both the primary and the secondary coil resistance. Start by touching the contacts coming out of the distributor. For the secondary resistance, locate the ignition coil’s outer and inner contacts.
You should be able to see the distributor connecting to the main wires – that’s the spot. The ohmmeter takes very little time to do its job. So, go ahead and compare both resistance measurements with the vehicle specifications we discussed earlier. They need to be a 100% match. If they’re not, the ignition box needs to be replaced. A damaged/malfunctioning CDI box can cause you a lot of trouble. So, again, replace it the first chance you get.
There’s nothing worse than rushing yourself, especially when trying to fix something in your all-terrain vehicle. Take a slow pace; read the service manual a couple of times to really know what you’re doing. Always be super careful when dealing with electronic components, as they can be pretty dangerous. I already mentioned that the engine needs to be turned off and cooled down.
On top of that, make sure to wear protective gloves and at least some sort of protection for the eyes. And if you’re not sure that you’re up to the task, I advise letting a professional handle it. Good news: mechanics usually don’t charge a lot for bypassing the ignition box, as the whole process takes 30 minutes tops.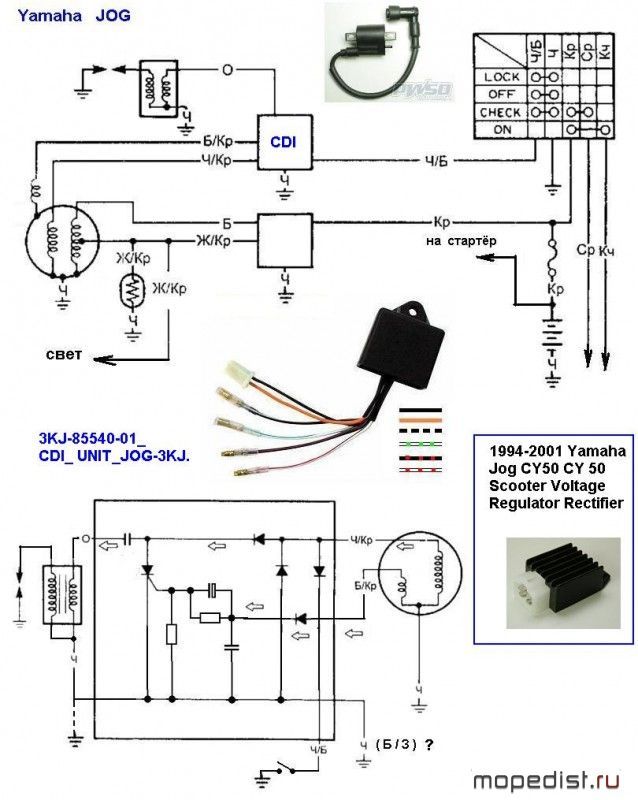
A quick note: CDI boxes are pretty sturdy and long-lasting, but they do fail sometimes. Mostly, this is due to the “abuse” and beating. All the vibration, branches and bushes, and the heat cause these devices to break down. The electronic components are pretty fragile, so, take proper care of them.
CDI boxes have one important job: they receive voltage from the battery and discharge it to start the ignition and fire up the engine. Now, a brand-new CDI usually costs a lot, which is why it would be wise to troubleshoot it first before buying another igniter box. Misfires, engine stalling, rough running – these can all be symptoms of a bad CDI box. Today, we learned how to bypass it to figure out which component is acting up.
While this isn’t a procedure for the amateurs, if you followed my guide closely, I bet you know your way around the CDI module by now. Still got some questions left you’d like to find answers to? Don’t hesitate to send me a message or start a conversation in the comments section. I’ll see you out there!
We didn't find the posts for that URL.
While many people utilize drones for recreational purposes, others employ them for other objectives. When choosing which drone to buy, the drone's payload capacity is frequently overlooked by buyers. However, …
Read More about How Much Weight Can A Drone Carry? Find Out Here
Although flying a drone is exhilarating, they are not just toys for fun. You can use your drone to generate income in several reliable ways. Whether you sell aerial photos/footage, …
Read More about How To Make Money With A Drone [Reliable Options Explained]
If you are good at DIY projects, then building a drone from scratch is something that you want to try out. Building a drone allows you to decide on your …
Read More about How To Build A Drone [Complete Beginner's Guide]
After purchasing your drone, the next question will be whether or not to get insurance for your UAV. Getting insurance coverage for your drone is important as it has numerous …
Read More about Should You Get Insurance For Your Drone? [You Need To Know]
How far can a drone fly while maintaining a viable signal range from the controller? This is a common question that many drone enthusiasts ask themselves before investing their money …
Read More about How Far Can A Drone Fly? [TOP MODELS REVIEWED]
For many people, drone flying has grown to be a significant hobby. It is for more than just people who enjoy flying things that can be operated remotely. Even though …
Read More about Can You Fly A Drone In Your Backyard? [IS IT WORTH IT?]
In addition to being able to operate a drone successfully, drone mapping requires a variety of talents.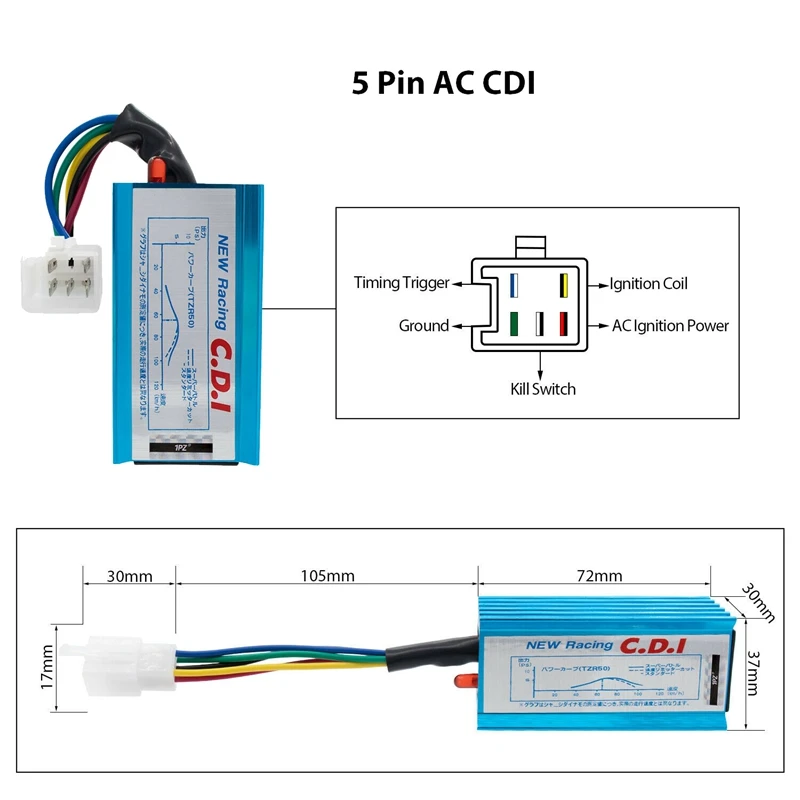 You will require strong organizational abilities, surveying experience, and a working knowledge of …
Read More about The Best Free Drone Mapping Software: [Reviewed]
Once the snow accumulates in your yard or walkways, your ATV or UTV will be instrumental in helping you clear the mess. Moreover, plowing snow with an ATV is fun …
Read More about Plowing Snow With ATV & UTVS: How To Plow Snow With An ATV
While flying a drone at night can deliver excellent nighttime photography and outstanding experience, the guidelines governing the entire process should be clear. Having an explicit understanding of the law …
Read More about Can You Fly A Drone At Night? [WHAT YOU NEED TO KNOW]
It is challenging to decide which DJI drone bargain is the finest. However, as the industry leader, they provide a wide variety of drones. They have also made it known …
Read More about Which DJI Drone Is The Best You Can Buy? [MODELS REVIEWED]
 rf - a project dedicated to the universal ignition system for ATVs
 ATTENTION!!! DO NOT SWITCH ON THE IGNITION WITHOUT THE HIGH WIRE, THE PLUG, OR IF THE PLUG IS NOT TWISTED INTO ITS PLACE OR IS NOT RELIABLELY EARTHED TO THE ENGINE BODY!!!
THE COIL WILL COME WITH A PROBABILITY OF MORE THAN 50 PERCENT!!!
IN THIS COIL, THERE IS A BREAKDOWN INSIDE THE COIL AND THE INTERTURN SHORT CAN APPEAR!!! THE PRESENCE OF THE INTERTURN CLOSURE OFTEN DOES NOT INTERFERE TO WORK AND THE SPARK IS PRESENT, BUT NOT FOR LONG - AT THE END OF THE END THE COIL DIES AT ALL.
To connect the ignition control unit (BUZ) to the ATV's on-board network (only connector 1 is used), disconnect the standard CDI unit from its connector (on some models, the standard unit is not disconnected, see clarifications in the descriptions) or disconnect the DPK connector, disconnect the BB wire of the standard ignition coil from the spark plug, to the “signal” wire (most often it is a blue or white-blue wire) of the DPK, connect the input of the BUZ (blue wire) ,)
the DPK wire (let's call it "-" DPK) (most often green) is connected to ground (sometimes it is connected to ground only in the CDI unit, sometimes directly in the generator itself, if not, we connect it to the "-" battery, the yellow wire of the BUZ to + Battery after the ignition switch (most often it is a black wire), white wire to the “-” terminal of the ignition coil, Terminal “+” of the ignition coil through a 15 amp fuse to + battery, BB wire to the coil and spark plug.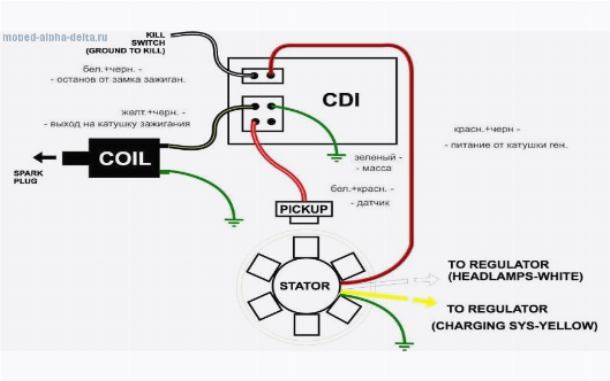
Everything, you can start. As wound up, you should adjust the speed of the twentieth.
To return to the standard ignition system: disconnect connector 1 BUZ, the standard CDI unit into its place in its socket, the BB wire from the standard coil to the spark plug.
Connector number 2 is optional, add. functions are activated by shorting the desired wire to MASS !!! If they are not needed, insert a chip into the connector anyway so that WATER does not get in !!! it is necessary !!!
There are a few things to pay attention to when installing and starting up the system. Here is a list of what caused the ignition to work poorly on different quadrics:
 In fact, the ignition coil will work whenever it is connected, but for contact systems it is turned on exactly the opposite and there is some confusion in the marking of the terminals. You don’t have to think much about this issue, if the engine starts but it immediately starts to sausage right from idle - change the wires on the coil in places.
  (once they forgot to connect the second wire from the induction sensor to ground - naturally, nothing worked and the blue LED did not light up ... not in all quadrics it is shorted to ground directly in the generator ...)
 Almost all carburetor engines of ATVs and motorcycles are traditionally equipped with a CDI (Capacitor Discharge Ignition) ignition system. In this system, energy is stored in a capacitor and at the right moment it is discharged through the primary winding of the ignition coil, which is a step-up transformer. A high voltage is induced in the secondary winding, which breaks through the gap between the electrodes of the spark plug, forming an electric arc that ignites the mixture of gasoline and air.
To synchronize the ignition operation, an induction crankshaft position sensor is used - DPK, which is a coil wound on a permanent magnet core:
The mark is the tide on the iron housing of the generator rotor (popularly called the flywheel):
When the tide sweeps past sensor core , it changes the magnetic flux through the coil , thereby inducing a voltage across the coil 's terminals . The waveform is as follows:
i.e. two pulses of different polarity. On almost all engines, the polarity of switching on the sensor is such that the first is a positive pulse corresponding to the beginning of the tide, and the second negative - the end of the tide. For normal engine operation, ignition must occur a little earlier than top dead center - TDC, so that the maximum pressure of the combustion products reaches just at TDC. This “slightly earlier” is commonly called the Ignition Advance Angle - UOZ and is measured in degrees, which are left to turn the crankshaft to TDC. When starting the engine, the UOZ should be minimal, and with an increase in speed, it should increase. As mentioned above, the WPC produces two synchronization pulses - the beginning of the tide and the end of the tide. In simple (not microprocessor) CDI systems, the end of the tide corresponds to the pre-set UOZ - this signal ignites when the engine is started and at idle.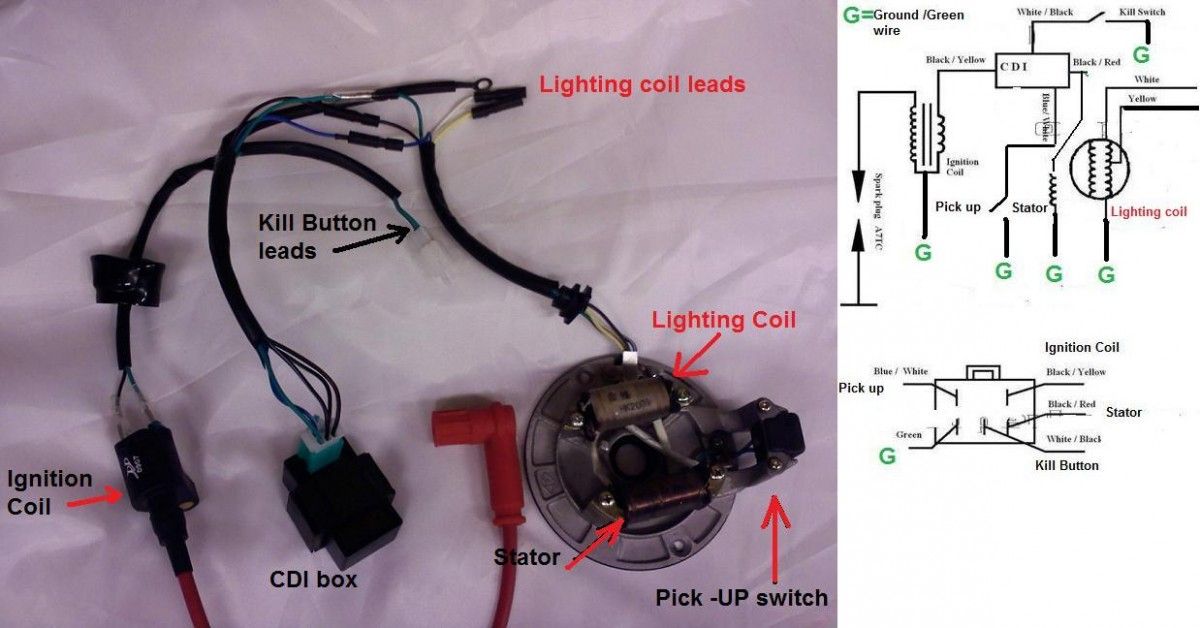 The onset of the tide corresponds to the SPD at high speeds. Most often in such systems, the end of the tide is set to 10-15 degrees ahead, and the “length” of the tide is from 20 to 30 degrees. At the same time, advanced CDI units smoothly change the moment of sparking from the “end of the tide” to the “beginning of the tide” in the range from 2000 rpm to 4000 rpm, while the cheap ones simply jump to the beginning of the tide with increasing speed. In CDI microprocessor systems, the length of the tide is much longer - from 40 to 70 degrees, while its end, as before, corresponds to the preset UOZ, and the beginning is the starting point for the microprocessor, which, depending on the speed, sets the desired UOZ.
In different engines, the “length” of the tide is different, therefore CDI blocks, even with the same connectors, are most often not interchangeable!
It should also be added that high voltage is needed to power the CDI units, because. the time of energy accumulation in the capacitor is limited; its capacity is taken small and it is charged with a high voltage - several hundred volts.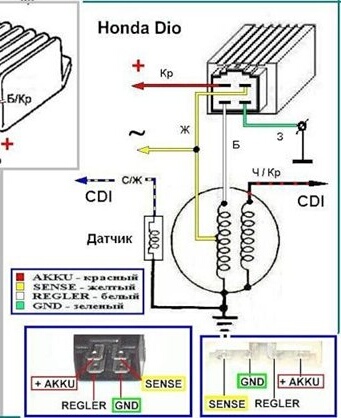 For this, in simple systems, the generator has an additional high-voltage winding. The power of this winding is small, so the spark in such systems at engine start is weak, which makes winter operation difficult. To avoid this problem, so-called DC-CDIs are used, in which the capacitor is charged from a battery-powered boost converter. In such systems, the power of the spark does not depend on the speed and starting the engine in cold weather is much easier.
Now for the disadvantages of CDI ignition. The most important disadvantage, which cannot be eliminated for little money, is a very “weak” “short” spark. It is impossible to build a powerful CDI system without significant material costs.
For example, CDI for domestically developed car engines cost more than a thousand dollars, and imported ones, which are installed on racing cars with high-speed engines, can cost more than one thousand.
The larger the volume of the cylinder in the engine, the stronger the effect of the lack of spark energy. This is expressed in incomplete combustion of fuel, loss of power, very high fuel consumption. When CDI first appeared, it was put on mopeds, motorcycles, most often the engine size of which was 50 cubes. Such a small amount of air-fuel mixture was easily burned out by a weak CDI spark. With the increase in cubic capacity, it became clear that something needed to be changed and DC-CDI appeared. But the cubic capacity continued to grow, and with it the amount of gasoline that literally flew into the pipe grew. They even came up with systems that burn gasoline in the exhaust pipe! :about) I don’t understand what the manufacturers of motorcycles were thinking all this time, because at the same time, a different ignition system was used on cars for a long time, with the accumulation of energy in an inductor, which made it possible to get hundreds of times more spark power for the same money and solve everything ignition problems. Of course, CDI is no longer installed on the injection engines of modern motorcycles.