Please enable javascript to view the website ..
Repair help > Front-Engine Lawn Tractor repair > Front-Engine Lawn Tractor repair guides
January 1, 2015
Lyle Weischwill
This step-by-step repair guide explains how to change a front tire on a riding lawn mower if the old tire is damaged beyond repair. Replacing the front tire is fairly easy; you just need a few tools and a manufacturer-approved riding mower part.
Follow the steps in this repair guide and video to replace the front tire on Craftsman, Husqvarna, Toro, Troybilt, Ariens, Poulan, MTD, Murray, Snapper, Yard-Man, John Deere and Weed Eater riding mowers and lawn tractors.
If you'd rather use tire sealant to repair the tire, the video How to Repair a Riding Lawn Mower Tire shows how.
Quick links
Tools required
Floor jack or bottle jack
Jack stand
Slot screwdrivers
Pry bars
Pliers
Valve stem core removal tool
Liquid detergent
Water
Wood blocks
Work gloves
Safety goggles
Compressor air supply
Repair difficulty
Time required
60 minutes or less
Repair difficulty
Time required
60 minutes or less
Replacing a front tire on a riding lawn mower
This video explains how to replace the front tire on a riding lawn mower.
01.
Park the riding mower on a level surface and set the parking brake.
Turn the ignition switch off and remove the key.
Wear work gloves to protect your hands and safety goggles to protect your eyes.
Lift the riding lawn mower hood and disconnect the spark plug wire.
Lower the tractor hood.
Tip: Disconnect both spark plug wires if your engine has 2 cylinders.
PHOTO: Disconnect the spark plug.
02.
Block the rear tires to keep the riding mower from rolling.
Position the jack under the frame and jack up the riding mower to raise the front wheel.
Place a jack stand under the frame to support the riding mower.
Remove the jack.
PHOTO: Block the rear wheel.
03.
Pull off the axle cover.
Remove the retaining ring and then pull off the washers.
Pull the tire off the axle.
PHOTO: Remove the front wheel.
04.
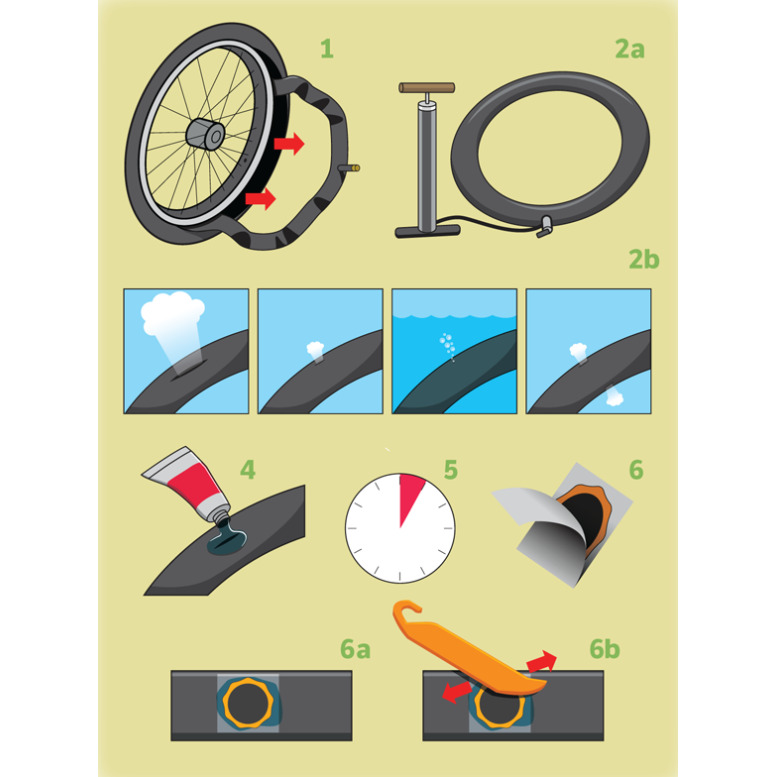
Remove the valve stem cap.
Remove the valve stem core, which lets any remaining air out of the tire.
Break the tire bead and pry the tire off the wheel rim on one side.
Pry the tire off the rim on the other side.
PHOTO: Pry the tire off the rim.
05.
Clean the wheel rim.
Set the new tire flat on a work surface.
Lubricate the top tire bead with liquid detergent.
Pry the rim into the top side of the tire.
Flip the rim and tire over.
Lubricate the tire bead with liquid detergent.
Pry the remaining side of the tire onto the rim.
Warning: Use blunt tools to pry the tire to avoid damaging the new tire bead.
PHOTO: Lubricate the bead.
06.
Fill the tire with air to seat the tire bead.
Reinstall the valve stem core.
Fill the tire fully with air.
Tip: If the tire didn't fill with air, install a ratcheting tension strap around the center of the tire tread, tighten the strap to force the beads outward, and fill the tire with air to seat the tire bead. Carefully release and then remove the strap.
Tip: If the bead doesn’t seal, check the rim and replace it if you find damage.
PHOTO: Shoot air into the tire.
07.
Slide the wheel on the axle.
Reinstall the washers and snap the retaining ring onto the axle.
Push the axle cover onto the wheel.
PHOTO: Reinstall the wheel.
08.
Push the jack under the frame and raise the riding mower, and then pull out the jack stand.
Lower the riding mower to the ground.
Remove the wood blocks from the rear tires.
09.
Raise the tractor hood.
Reconnect the spark plug wire and lower the hood.
Tip: Reconnect both spark plug wires if your engine has 2 cylinders.
Warning: Undertaking repairs to appliances can be hazardous. Use the proper tools and safety equipment noted in the guide and follow all instructions. Do not proceed until you are confident that you understand all of the steps and are capable of completing the repair.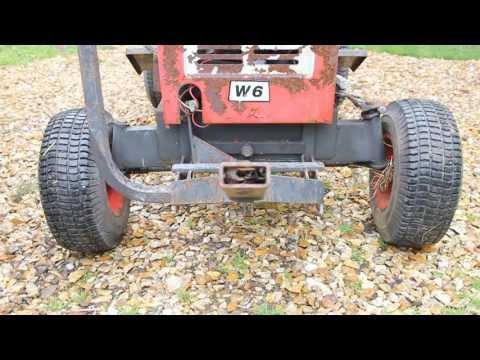 Some repairs should only be performed by a qualified technician.
Choose a symptom to see related riding mower and lawn tractor repairs.
Main causes: punctured tire or inner tube, leaky valve stem, damaged wheel rim
Read moreMain causes: worn or broken ground drive belt, bad seat switch, transaxle freewheel control engaged, transaxle failure, dirty carburetor
Read moreMain causes: shift lever needs adjustment, neutral control needs adjustment
Read moreMain causes: worn or broken blade belt, broken belt idler pulley, blade clutch cable failure, bad PTO switch, damaged mandrel pulleys
Read moreMain causes: damaged cutting blade, worn deck pulley, damaged mandrel pulley, loose fasteners on mower deck components
Read moreMain causes: engine overfilled with oil, leaky head gasket or sump gasket, damaged carburetor seals, cracked fuel pump, broken fuel line
Read moreMain causes: clogged carburetor, damaged flywheel key, dirty spark plug, stale fuel, improper valve lash, engine needs a tune up
Read moreMain causes: faulty battery, bad alternator
Read moreMain causes: unlevel mower deck, dull or damaged cutting blades, worn mandrel pulleys, bent mower deck, engine needs tune up
Read moreThese step-by-step repair guides will help you safely fix what’s broken on your riding mower or lawn tractor.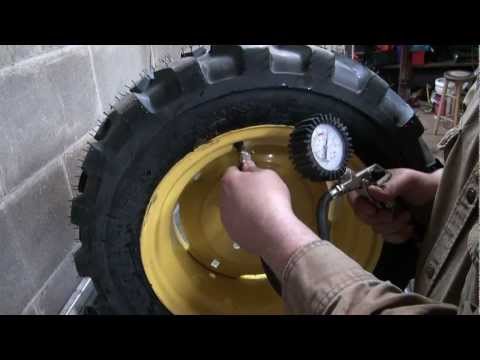
January 1, 2015
Lyle Weischwill
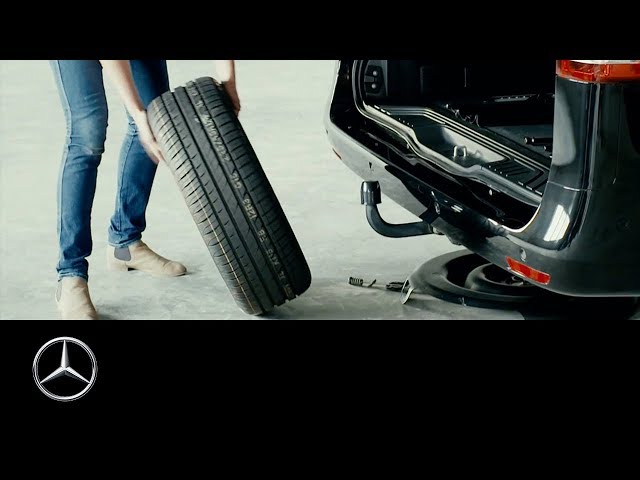
Your mower can’t run on a damaged rear tire. Here’s how to install a new one.
Repair difficulty
Time required
60 minutes or less
Read moreJanuary 1, 2015
Lyle Weischwill
If a blade on your mower is dull or bent, replace it following the steps in this repair guide.
Repair difficulty
Time required
30 minutes or less
Read moreJanuary 1, 2015
Lyle Weischwill
Help your mower run better by replacing the fuel filter during your riding mower's annual tune-up.
Repair difficulty
Time required
15 minutes or less
Read moreUse the advice and tips in these articles and videos to get the most out of your riding mower or lawn tractor.
August 6, 2020
Lyle Weischwill
Learn how a blade removal tool makes replacing the blade easier and safer
Read moreApril 9, 2019
Kim Hillegass
Keep these 6 things on hand to keep the mower season running smoothly.
Read moreMarch 1, 2016
Lyle Weischwill
Learn how to use a battery charger if your mower battery is dead.
Read moreDryer
Samsung DVE52M7750V/A3-00 dryer parts
Electric Range
Shop GE JBP70WK4WW electric range partsShop Maytag MET8885XB02 electric range partsShop Kenmore 79096419406 electric range parts
Electric Wall Oven
Shop KitchenAid KEBS177YAL2 electric wall oven parts
Front-Engine Lawn Tractor
Shop Model #917274961 Craftsman lawn tractor
Furnace
Weatherking Furnace Repair Parts
Garage Door Opener
Shop Craftsman 13953918D garage door opener parts
Gas Range
Shop Magic Chef 83EY-1 gas range partsShop Model #NX58K3310SS/AA-00 Samsung gas slide-in range
Gas Snowblower
Shop MTD 31AS6HEG799 gas snowblower parts
Miter Saw
Shop Craftsman 137212290 miter saw parts
Parts
Refrigerator Door Bin DA63-08646A
Refrigerator
Refrigerator Parts CraftsmanNorge Refrigerator Repair Parts
Snowblower Attachment
Craftsman Snowblower attachment Repair Parts
Speaker
Kenwood Speaker Replacement Parts
Top-Mount Refrigerator
Shop Roper RT18HDXJW00 top-mount refrigerator parts
Toys & Games
Shop Model #6209SR Roadmaster sidewalk wagon
Wet/Dry Vacuum
Craftsman 12512008 wet/dry vacuum parts
We want to help you remove and install your tractor’s front wheels.
If you do not feel that you understand these steps, or can perform them safely, consult your tractor dealer or local mechanic. Also always consult your tractor owner’s manual for model-specific information.
Time to get started.
Reason:
1. Park the tractor safely and securely.
2. Shut off the engine.
Place chocks (A, Fig. 1) on each driving direction of the front and rear wheels.
A - Chock (8 pieces)
NOTE:
3. Loosen the front wheel bolts.

A - Wheel bolt (4 pieces)
B - Front wheel
Note:
4. Remove the front wheels.
- Place suitable lifting equipment (B, Fig. 3) underneath the front axle (C, Fig. 3).
- Raise the lifting equipment until both front wheels are above the ground.
- Place suitable jack stands (D, Fig. 3) underneath the left and right portion of the front axle.
- Slowly lower the lifting equipment to settle the front axle onto the jack stands.
- Remove the wheel bolts (E, Fig. 4).
- Put the wheel bolts on a safe place.
- Remove the front wheel.
- Roll the front wheel safely away to a safe place.
A - Front wheel (2 pieces)
B - Lifting equipment
C - Front axle
D - Jack stand (2 pieces)
E - Wheel bolt (4 pieces)
Warning:
Note:
5. Install the Front Wheels
IMPORTANT: Avoid damage!

- The installation of the front wheels on the tractor is the reverse of the removal procedure.
NOTE:
If you need any further help or have any questions about wheels, tractors, implements, or anything else, please contact your dealer, local mechanic, or call us at 602-734-9944. Please ask about our current new and used tractor supply.
Team Tractor Ranch - #1 Tractor Dealer in Arizona. We sell and service most major brands of tractors including Yanmar, Kubota, John Deere, TYM, Mahindra, Kioti, Case, New Holland, Massey Ferguson, Ford, Deutz, Case IH, Farmall, International Harvester, Branson Tractors, LS, Shibura, Claas Tractor, McCormick Tractors, Valtra, Solis, YTO, Montana, and Nortrac.
Tractor tires are selected based on operating conditions. Tractors of the Minsk Tractor Plant (MTZ) are universal and are used very widely: when clearing snow on the streets, plowing fields and harvesting, etc. Accordingly, there is no universal “rubber” option for them. It all depends on how the equipment will be used: on what soil, in what speed mode, etc. The model also plays a role - it is obvious that a heavy tractor needs larger and stronger tires than a compact “mini”, and the pressure in tires MTZ 82 will be different than in the chambers of a forest tractor type L82.2. Sets for the front and rear axles are selected separately.
The MTZ 82 tractor tire consists of a chamber and a tire. The chamber serves to hold air in the inner cavity of the tire. The chamber walls and tires filled with compressed air perceive the loads acting on the tire. The tire consists of a tread, carcass, breaker, beads and sidewalls.
The carcass acts as the main strength of the tire, whose characteristics determine its load capacity and strength. The frame is made of several layers of special rubberized cord fabric, whose layers are tightly superimposed on each other. The tread is a running part of the tire made of a three-dimensional rubber layer, tightly fitting the carcass. The lugs and tread depressions form a pattern, the shape of which determines the grip of the tire with the ground surface. The breaker is a cushion layer made of soft rubber and serves to soften the impacts transmitted from the tread to the carcass. The sidewalls of the tire have much thinner covering layers of rubber and serve to protect the sidewalls of the carcass from damage. On the rim, the tire is fixed with the help of the beads. Inside the boards are wire rings wrapped with the ends of the carcass cord layers. Wire rings increase the rigidity of the tire beads and prevent them from stretching.
Pneumatic tire MTZ 82:
The chamber is filled with compressed air through a valve with a spool installed on it, which is a reverse-acting valve. The design of the tire valve for the rear wheels of the MTZ 82 tractor allows you to connect to it a device for filling tires with water or a similar liquid for ballasting the tractor.
Usually MTZ 82 rear tires are 15.5R38, front tires are 11.2-20. For each MTZ model, the manufacturer has established the recommended sizes of "rubber". Dimensions are selected according to the inner size of the tire, it must match the outer diameter of the rim. Otherwise, the owner has the right to choose between low- and high-profile tires, based on working conditions and financial capabilities.
Rear tires size 15.5-38 are distinguished by a reinforced breaker and radial placement of cords in the carcass. Tires, whose carcass has a diagonal arrangement of the carcass cord thread, form a tire profile plane with an angle of 50-54º, and tires with a radial design - their angle does not exceed 5º. The radial arrangement of the cords gives the tire better flexibility. Also, these tires improve the traction and grip qualities of the tractor, compact the soil and slip less, and have a longer tread wear life.
Operation and maintenance of MTZ tractor tires 82
The technical condition of the tires affects the traction and coupling qualities of the tractor, its fuel consumption, throughput and performance. Thus, we can safely say that tires largely determine the productive and economical operation of the tractor. In addition, tires are expensive and wear parts of the tractor, the cost of which is about 12% of the cost of the tractor itself. Tires are changed 3-4 times during the entire life of the tractor, therefore, the cost of operating tires is approximately 20% of the total cost of operating the tractor.
The service life of a tire is affected not only by compliance with the rules of operation, but also by the conditions in which they are used: air humidity and temperature, road surface and soil properties. When using the tractor in the field, the service life of the tires is about 6000 hours, and when performing transport work, they wear out much faster. On stony soils, in mountainous areas, the tire life is reduced by 25-35%, and on winter snow cover, on the contrary, it increases by 25-30%.
The front drive tires MTZ 82 wear out faster than the rear ones. This is due to the fact that the rolling radius of the front tires is 1.7 times less than that of the rear ones. Passing the same path, the front tires make more revolutions.
Recommendations for inner tire pressure, kgf/cm2
| Type of work | rear wheel tires | front wheels |
| General types of work | 1.4+0.1 | 1. 1 |
| For working on soft soils and plowing | 1.0+0.1 | 1.4+0.1 |
| For working with heavy agricultural equipment | 1.6+0, 1 | 2.5+0.1 |
Violation of the norms of internal pressure in tires significantly reduces their service life. An internal pressure that is 20% lower than the norm reduces the service life by 15%, and an increased pressure reduces the service life by 10%. When performing certain types of work, temporary tire overload is permissible.
Due to the fact that there are many varieties of MTZ-80 for different tasks, the tire, respectively, can be different and differ in structure. The frame plays an important role, because all the effort and load falls on it. The correct carcass should evenly distribute the load, which increases the life of its tire and performance.
Fortunately, correct tire pressure and maintenance on your tractor will make changing a tire a breeze. According to statistics, for the entire life of the tractor, it is enough to replace the rubber 4 times. The agricultural tractor has a small feature related to the size of the wheels. For example, the diameter of the wheels is smaller in front, the rear wheels are an order of magnitude smaller. The pressure in the tractor tires on different wheels may differ, but in extreme cases, you can adhere to the indicator 1.4 kgf / cm2
I must say that the radiality of the front wheels R20, installed on this model of the Belarusian tractor, is optimal for standard operation.
However, the machine can also be used in winter, in conditions of high snow cover, as well as when working in quarries, swamps and in other more difficult conditions.
That is why the manufacturer allows independent intervention of drivers and the choice of wheels of other recommended parameters.
When installing wheels of an off-design radius, the driver should be prepared for more frequent maintenance work to repair the suspension, bearings in the hub, change the oil and other procedures, since an off-design load on all systems provokes rapid wear of all parts. 82
In some cases, on the most inaccessible sections of the road, the classic rear or all-wheel drive of the tractor cannot cope with a thick layer of dirt and return back to its track.
However, this does not mean at all that the equipment will not be able to overcome such a section, since the driver just needs to change the mode - turn on the center differential lock and brake, which will make the wheels rotate simultaneously and the tractor driver will be able to pull the car out of almost any mud.
This locking system has the following fairly simple design and principle of operation:
Tractor tire rupture The mechanical wheel lock, although simple in execution and reliable in operation, is difficult to manage and non-functional. Therefore, on modern models of Belarusian technology, a more advanced system is installed - a hydraulic locking drive, which is different in that it no longer requires effort and a long arm to actuate the mechanism, since the traction force increases many times under the action of compressed oil in the piston. However, such a system can cause leakage in the piston when overloaded and more time-consuming and costly repairs to the equipment.
Often, on various Internet forums, owners and operators of MTZ-82 tractors complain about the problem when, while driving on a hard surface, their wheels become loose and start to “run”, which causes discomfort in cabin, and also causes damage to mechanisms.
The reason for these problems lies in several possible breakdowns of various systems at once, and the most common of them are listed below:
Tire fitting for the MTZ 82 tractor Any problem with the smoothness of the movement of agricultural equipment requires a thorough check, since later it can easily result in more serious breakdowns. In addition, the operator or owner of the tractor should choose the nearest service center for himself and carry out periodic maintenance of the undercarriage of his unit at least once a year if there are no problems, and also regularly check and, if necessary, adjust the pressure in the MTZ 82 tires. Only with such equipment will serve for decades and does not require large investments.
The front wheels on the MTZ-82 tractor must be replaced exclusively in pairs, since the purchase of only one tire may result in a loss of effective operation. That is, one side will cling to the dirt more efficiently, while the old tire will begin to slip. All this will lead to incorrect operation of the traction rail, motor and unbalance of the entire mechanism.
December 05, 2017
Surprisingly, many buyers of agricultural tires know almost nothing about the technical data of a tire (excluding size). Yes, and some sellers sometimes give out something that causes bewilderment among professionals (for example, they talk about the 650 / 75R32 tire - “tire of the 32nd radius”). But from the linear parameters of the tire - the outer and landing diameter, the width and height of the profile, the rolling length, etc. - depends a lot. Let us dwell in more detail on one of the most important tire parameters - radius .
Distinguish between dynamic and static tire radius. Dynamic - distance from the axis of rotation of the ROLLING wheel to the surface. In this case, circumferential and lateral forces, as well as dynamic load, act on the wheel. This is a variable value, it is impossible to accurately measure it. But static radius (Rc; Static Loaded Radius, SLR) is a definable parameter. This is the distance from the centerline of the wheel on which the tire is mounted to the ground at the maximum allowable rated load and pressure when STILL.
The static radius of the tires determines the height of the tractor and the ratio of the rear and front wheels to each other. It is from this ratio that the manufacturer of the tractor determines the Rc of tires that can be installed on the tractor, which means the appropriate sizes of wheels and tires. As a rule, in one standard size, the difference between manufacturers and models of SLR is small, but it exists. Therefore, it is recommended to install tires of the same manufacturer and model on the front and rear axles.
The most important factor that affects the static radius is the interchangeability of wheels (tires). Wheel replacement is made for such purposes as:
In all these cases, the rear to front tire ratio of the tractor must be taken into account first. And you can determine this number just using the static radius. Let's explain with an example. On a New Holland T 8.39 tractor0 tires 520/85R42 and 420/90R30 Mitas AC85 are installed from the factory. The static radius of the rear tire is 896 mm, the front tire is 681 mm. Ratio ratio = 896/681= 1.316. It should be borne in mind that the error in the ratio number is allowed no more than 0.05 and only downwards (1.27 is possible, 1.34 is not). Narrow tires should be installed on the tractor for inter-row processing of beets no wider than 270 mm. We select the rear tire closest to the "native" one - 270/95R54 BKT RT 955, Rc = 878 mm. Knowing the optimal ratio number, we determine the required Rc of the front tire: 878 / 1.316 \u003d 667 mm (or a little more). Tire 270/9 fits this parameter5R38 Kleber Super 3, Rc = 682mm. We check the ratio: 878/682 = 1.287 - everything is within the normal range.
It is necessary to check this coefficient at any replacement of tires for sizes not specified by the factory. It should also be taken into account that a smaller radius tire travels a shorter distance per wheel revolution. With a decrease in tires, the fuel consumption of the tractor will increase.
The static radius for each tire is indicated in the manufacturer's technical booklets and catalogs.