The CV joint, the half-axle, the half-shaft, the axle, or even the drive shaft are some of the many names of this mechanical part. It is a very important part in a motor vehicle, but it is also, in fact, a very simple mechanism. Let’s demystify this mechanical assembly.
First thing first, let’s agree on a name. In reality, we are talking about a half-wheel axle. A few joint variants are used in the assembly of a half-axle. Two mechanical principles are the most often used: the universal joints and the constant velocity joints.
The universal joint (U-joint)
The universal joint is extremely simple and is an excellent economical choice. The Italian inventor M. Cardano perfected this technique to couple two rotating shafts that are not aligned or when the angular positions relative to each other vary. In the ATV industry, it is mainly used on drive shafts and more rarely on half-axles.
Composed of a cross-section and yokes that are very economical to replace, this mechanism also has a downside. Its operation results from a non-linearity of rotation. To counter this phenomenon, a second U-joint must be installed on the same shaft, at the same angle, and synchronized by a quarter turn. Another dark facet is its vulnerability to water which will disintegrate it.
Example of non-linearity of the universal joint
The constant velocity joint (CV joint)
The constant velocity joint is a much more advanced mechanism. Its linearity is almost perfect, which results in smoother operation. As it is more complex, it is also much more expensive. Its design requires grease to lubricate it as well as to dissipate heat. A simple intrusion of water or sand into the assembly will contaminate the grease and inflict fatal punishment on the joint. As it is protected by a flexible bellow or boot, you can easily guess the importance of it being kept in good condition.
Periodic check of your half-axle boots
A simple visual inspection of the CV joint boots can tell you if you need to take action. The presence of grease outside the boot indicates that immediate repair is needed. Traces of wear or cracks on the bellows are signs of repair intervention in a near future.
Choice of replacement boots
There are four choices of replacement CV boots on the market. That of the manufacturer of your ATV (OEM), the replacement “jobber” boot (aftermarket), the universal boot, and the replacement kit sold in two parts to be bonded together.
The latter is a real joke and I don’t recommend it. This replacement boot is split into two parts which must be assembled around the constant velocity joint and then bonded with glue. Cleanliness and very good dexterity are a must in this case. Repairing a CV boot with this kit is, indeed, really not as easy as it seems.
The third solution, the universal boot, can be interesting. This bellow does not require disassembly of the constant velocity joints. You have to stretch the boot and pass it over the joint. The boot composition is usually very flexible, but is also more fragile to the impact of branches and other objects encountered on the trails
The OEM and aftermarket replacement boots are, in my opinion, the best choices. Those are the ones I recommend.
Replacement boot assembly
Replacing a half-axle boot
ATV used: CFMoto CForce 1000
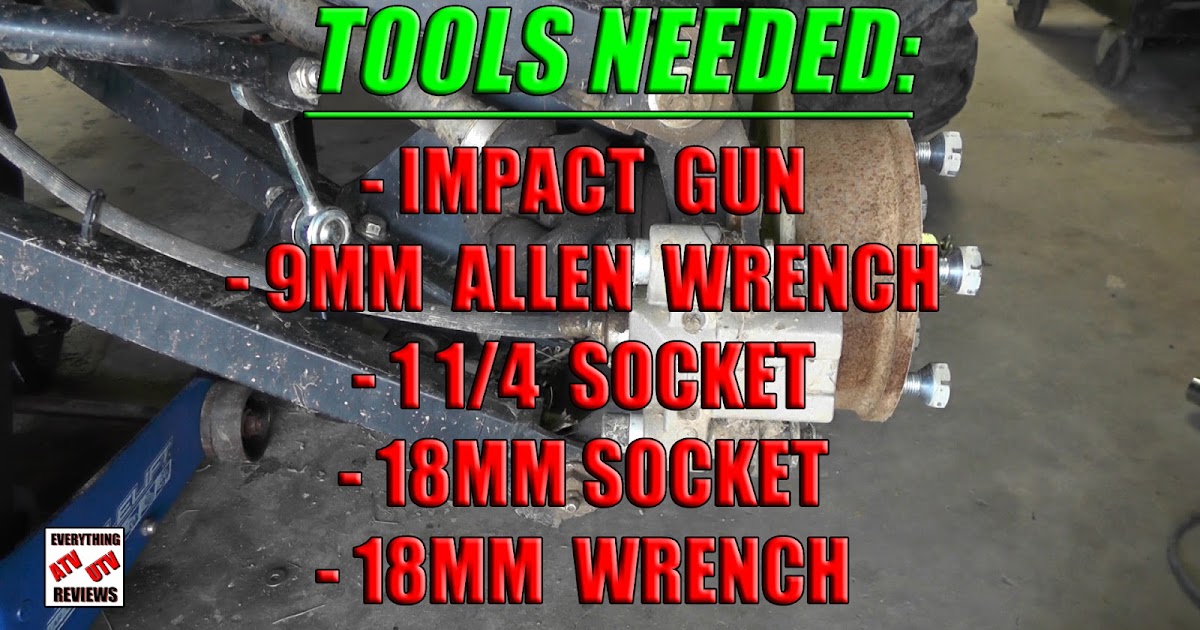
Required tools
Removal of the wheel and disassembly of the brake caliper will be necessary. Unscrew the nut from the end of the half axle. Remove the retaining bolts from the ball joint suspension links on the steering knuckle. Release the assembly and set aside the knuckle.
Remove the half axle from the differential by pulling it firmly. It may be necessary to use a lever between the differential and the half-axle. Take care not to damage the differential seal.
Remove the clamps from the boot to be replaced using sharp wire cutters. Cut the old boot and set it aside. Inspect the grease in the CV joint. If the grease is not contaminated with water, sand, or dust, that is good news: the CV joint may still be in good condition. If, on the other hand, the grease is discolored or contaminated, the joint is likely damaged. In other words, even if the boot is replaced, a premature CV joint failure is to be expected.
To separate the CV joint from the half-axle, it will be necessary to use a hammer to hit it with a few light strokes. Use a brass punch and strike only in the central part near the half-axle. Note its installation position, it should not be reversed. Once the parts are separated, remove as much of the old grease as possible. Inspect the condition of the CV joint. If there are scratches or traces of abrasion, unfortunately, the joint will have to be replaced.
Damaged CV joint
Reassembly of the CV joint
First, put the small clamp on the half-axle. Then slip the CV boot. Pour some of the grease supplied with the replacement boot onto the constant velocity joint. Now reinstall the joint on the half axle. Make sure that it is properly locked in place. Pour the rest of the grease into the boot and put it in place over the CV joint. Install both clamps and tighten them using the boot clamp pliers.
CV Boot clamp pliers
Now you just have to reinstall the half-axle by reversing the procedure. Position the C-lock in the center of the half-axle, this will facilitate its insertion into the differential. If some oil has leaked out of the differential during repair, simply fill up the oil level. Make sure to respect the tightening torque of the wheel bearing nut.
In conclusion, a CV boot repair is a relatively simple operation. If there is any doubt as to the condition of your CV joint, it is possible to get a replacement unit without replacing the whole half-axle. However, in most cases, the cost of both parts (boot and CV joint), will exceed that of a full replacement half-axle assembly. Check the two options.
Corn stubble, rocks, wear and tear, whatever the cause, a torn CV boot if neglected, gets more expensive. Always better to repair a torn boot asap; a worn half shaft is dangerous.
To repair a torn ATV CV boot, remove the following components in these eight steps:
1 Remove driveshaft
2 Remove old boot clamps
3 Remove outer CV joint and boot
4 Clean and inspect
5 Fit new clamps and boot
6 Refit CV joint
7 Pack with grease
8 Tighten boot clamps
ATV Brake Pedal Stuck
Please enable JavaScript
ATV Brake Pedal Stuck
In this post, you’ll learn how to replace an ATV CV boot, you’ll learn about the tools you’ll need and techniques required to nail the repair the first time.
Page Contents
Removing the driveshaft is necessary to fit a CV boot. Removing isn’t that difficult, and you won’t need any special tools. I wrote a whole post on the subject which you might find helpful, check out “ATV driveshaft removal.”
The procedure requires the removal of the following components:
1 Wheel
2 Drive nut
3 Brake caliper
4 Steering arm
5 Upper ball-joint
6 Lower ball-joint
CV boots only last so long, so unless your boots are pretty new, I’d go ahead and replace both inner and outer. Boots, clamps, and grease aren’t expensive, but your time is valuable. You don’t want to revisit this corner of your ATV.
There are a couple of different type clamps employed, the reusable type and the one-time-only fit. Either way, you’ll have a new set with your new boots.
You’ll need a crimp tool to fit the one-time-use mushroomed type clamps.
CV joints (outer at wheel) are fixed to the shaft with either a hidden snap ring or a snap ring that needs squeeing. Inner joints are usually held in place with a circlip, however not all inner joints are removable.
Either way, both inner and outer boots can be replaced by removing just the outer CV joint.
A hidden snap ring on the outer joint is most common.
Using a plastic hammer or a drift, sharply tap the inner CV splines ring, where it meets the shaft.
The CV joint will slide from the shaft and drop to the ground, so place some old packaging on the ground to break the fall. With the CV joint removed, you are free to slide the old boot off. If the inner boot needs to be replaced, go ahead and slide it off now too.
Clean as much of the old grease off as possible. A torn boot attracts grit and debris that will damage the CV joint. If your CV joint is noisy or has free-play, you’ll need to replace the CV joint or the whole half shaft.
With the old grease cleaned from the drive and joints, slid on the new boot(s) and clamps. We’ll need to keep the boots and joints mating surface grease-free.
Refitting the CV joint is easy. Just be sure you have all the boots and clamps assembled in the correct order. Pack the center of the CV joint with the CV boot grease (Molybdenum disulfide grease) supplied.
Position the CV joint in the vice with the CV joint side facing upwards. Position the shaft square over the CV joint end and strike the drive end with a plastic hammer (a metal hammer will damage the drive).
Pack additional grease into the boot(s). Clean the boot, and joint mating surface, grease on these surfaces may cause the boots to slip off. Position the boots in place.
Slide clamps onto boot collar and align centrally. Using your channel locks or crimping tool, tighten boot clamps. When tight, it won’t be possible to slide the clamp left or right.
That’s it, refit the half shaft. Job done!
You may find these posts helpful:
Does tire width matter?
How to check ball joints?
John Cunningham
John Cunningham is a technical writer here at ATVfixed.com. He’s a Red Seal Qualified Service Technician with over twenty-five years experience. He’s worked on all types of mechanical equipment, from cars and trucks to ATVs and Dirt bikes.
A constant velocity joint, that is, a CV joint or a grenade, is one of the components of the chassis of the car. Through the CV joint, torque is transmitted to the wheels. Accordingly, the failure of this part will lead to the fact that the car will not be able to continue moving.
It goes without saying that a CV joint does not break in one second. First, there are signs indicating that the grenade's "life" time has begun to count down. They can go unnoticed only if the driver is extremely inattentive and always drives with loud music turned on. In all other cases, the attention of the car owner is certainly attracted by a characteristic crunch, which intensifies when accelerating, passing obstacles and cornering.
Another thing is that not all drivers rush to a car service, as soon as they diagnose a CV joint breakdown by ear. Someone pretends not to notice an unpleasant sound and postpones the replacement of the part (namely, the replacement, since the CV joint repair is impossible) until better times, someone looks at the tachometer and waits for it to show 100 thousand kilometers. Why? Because theoretically, the grenade replacement schedule falls exactly at this mark, but in fact the replacement time may come up even after six months of operation of the car and even the next day after its purchase, because a manufacturing defect of a part or an error made during assembly of the unit is always possible.
In addition to warranty failures, the service life of the CV joint is affected by driving habits. Aggressive driving with constant acceleration and emergency braking, sharp cornering and frequent off-road driving (as, in fact, on Russian roads) literally kill a grenade before our eyes. Many drivers are forced to change the CV joint two or three times a year.
Another factor that determines the life span of a constant velocity joint is the integrity of its anthers. Many car owners do not consider the boot to be too important a spare part, and in vain. Anthers are a kind of hoods that cover especially vulnerable mechanisms, in particular, CV joints, from dust, dirt, reagents and debris flying from the road. If the anther is rubbed or torn - and this happens quite often - the mechanism is defenseless. Small particles that get into it become abrasive, and moisture exacerbates the failure process. Therefore, replacing the anther is the most correct thing to do if you notice its damage - it will cost much less to replace the CV joint.
What will happen if, at your own peril and risk, you continue to drive with a crispy grenade? Roller bearing needles may fall off. This is dangerous because they will fall into the box body, and from there, together with oil, under pressure, they will rise to the gears and disable the unit. Then you will have to change not only the CV joint, but also the box, which is much more expensive, longer and more difficult.
An even worse scenario when driving with a crunchy CV joint: sudden jamming. This is a very common consequence of driver frivolity, which can occur at any speed and in any place. Imagine for yourself what will happen to cars, the driver, passengers and other road users if the wheel of the car jams at a speed of 80, 100, 150 km / h?
There can be only one conclusion: monitor the condition of the grenade - check and change the anthers in a timely manner, listen to the sounds coming from the wheels and do not delay replacing the CV joint if such a need declares itself.
SHRUS - a module that ensures the correct transmission of the moment of force. The torque is supplied to the drive wheels from the transmission side. Hinges can have an internal or external format, and they themselves are integral components of modern cars. The design of the "grenade" is quite simple. The assembly includes a cup-shaped base, special sphere-shaped clips, annular-type separators, and 6 steel balls. The normal operation of the machine requires several hinges. At the same time, the external ones provide the rotation of the wheels, and the internal ones are responsible for supplying the incoming rotations.
CV joint is a fairly reliable device. But he also has problems. You can solve them by contacting our specialists. Each CV joint replacement takes us a minimum of time, we act with a guarantee and always bring the work to its successful completion. Leave repairs to the professionals. You will surely be satisfied with the result of our intervention.
Determining the fault is not particularly difficult. But you need to remember about the division of hinges into internal and external. The former do not experience the influence of the steering wheel, but only transmit the moment of force to the box and further along the chain. And the outer ones perceive a certain impact with a strong eversion of the wheels. Moreover, their design features ensure the transfer of the moment of force even if the steering wheel is turned to the maximum point.
If there are certain defects on the teeth, then the hinge begins to slip. All this takes place against the backdrop of an unpleasant crunch. Problems with the outer joint appear when the wheels are turned out as much as possible. If they are straight, then problems should be sought in the internal hinges. There may also be vibrations and hum in the checkpoint area. In any situation, you should not postpone a visit to a car service to fix the problem as soon as possible. After all, if you ignore the breakdown, the hinge can fall apart right on the go.
Node failures can be caused by various factors. Although he himself has a rather impressive period of operation, and his resource is designed for 100,000 kilometers and even more. And among the main provoking factors, the following deserve the closest attention:
It is necessary to carefully monitor the condition of the anthers and the integrity of their base. The presence of fatty deposits on the cover is a direct indication of the presence of a lubricant leak. In this scenario CV joint boot must be replaced immediately. Indeed, in this case, the probability of saving the node remains quite high. It is difficult to compare the cost of the hinge with the price of the anther. Moreover, on some models of machines there is no possibility of separate replacement. It requires the replacement of the entire axle shaft at once. Such repairs will cost quite an impressive amount. And don't forget about the associated labor costs.
To do this is quite simple. You just need to carefully monitor the condition of the hinges and their tightness. Contamination of the problem node should be excluded as much as possible. This is especially true of the area under the cuffs. And the part should be changed if there is even minor damage. And don't skimp on accessories. After all, only high-quality cuffs can last for a long period. Low-grade analogues become unusable after a rather insignificant period of time.
It is worth taking into account the quality of the connection of the main gear with the shaft. If there is a weak tightening of the bolts, then very soon the outer hinge will begin to move away from the shaft. In this case, specific tapping will immediately occur in the transmission area. The slightest delay in this case may lead to the need for a complete replacement of the “grenade”.
For replacement, it is necessary to place the car on the stand and fix it carefully. Replacing the external joint involves the initial dismantling of the wheel, hub nut, disc with caliper, steering module tip and ball joint. After that, you can proceed to the removal of the hinge itself. Instead, a serviceable element is placed, and the mechanism is assembled in the reverse order.
To replace the internal hinge, the machine is placed on a lift or inspection hole. All fasteners are removed from the part, it is taken out and changed to a new one. But the visual simplicity of the process is deceiving. Such work requires experience and professional skills. Therefore, self-replacement should be abandoned. It is better to entrust the work to professionals who will complete the task quickly and with a guarantee.
The replacement of the hinge will cost inexpensively, and the calculation of the exact price tag is carried out taking into account a number of certain factors. First of all, the type of vehicle and the specific model of car are taken into account. The price is affected by the type of the hinge itself, the complexity of its replacement and the efficiency of the range of required work. But in our service you don't have to think about it. After all, everyone can afford our prices.-Step-7-Version-3.jpg/aid39746-v4-728px-Write-a-CV-(Curriculum-Vitae)-Step-7-Version-3.jpg)