Knowing how to change a tire is a necessary skill for all drivers. If you rely on a cell phone to save you in a roadside emergency, there’s always that chance you will forget to charge it, be out of range, or leave it at home. Flat tires can happen anywhere, and a cell phone is no substitute for knowing how to change a flat tire.
Thankfully, changing a tire isn’t all that hard! Just adhere to the following guidelines to be prepared in case you have a flat.
These items should have come with your vehicle:
Jack
Lug wrench
Fully inflated spare tire
Vehicle owner’s manual
If you have misplaced any of these items, or if your car did not come with these items, you should purchase new ones right away. And be sure you’re regularly inflating the spare tire to your vehicle manufacturer’s recommended PSI. You should check the spare’s air pressure every time you check your other tires.
Remember to check pressure every month and before long trips or carrying extra load.
Here are some items that don’t come with your vehicle but that you should stow in your trunk or glove box in case you have to change a flat tire:
Flashlight with working batteries
Rain poncho
Small cut of 2"x6” wood to secure the jack
Gloves
Wheel wedges
As soon as you realize you have a flat tire, do not abruptly brake or turn. Slowly reduce speed and scan your surroundings for a level, straight stretch of road with a wide shoulder. An empty parking lot would be an ideal place. Level ground is good because it will prevent your vehicle from rolling. Also, straight stretches of road are better than curves because oncoming traffic is more likely to see you.
Never attempt to change your tire on a narrow shoulder near oncoming traffic. Keep moving (slowly) until you find a safer spot. While driving on a flat risks ruining your rim, replacing a rim is better than being hit by an inattentive driver.
Make sure to consult your owner’s manual and review their specific steps on how to change a flat tire for your vehicle
Your hazard lights or “flashers” will help other drivers see you on the side of the road. To avoid an accident, turn them on as soon as you realize you need to pull over.
Once stopped, always use the parking brake when preparing to replace a flat tire. This will minimize the possibility of your vehicle rolling.
Wheel wedges go in front of or behind the tires to further ensure the vehicle doesn’t roll while you fix the flat tire. If you’re changing a rear tire, place these in front of the front tires. If your flat tire is at the front, put the wheel wedges behind the rear tires.
Bricks or large stones will work just as well as “real” wheel wedges. Just be sure they’re large enough to stop the car from rolling.
If your vehicle has a hubcap covering the lug nuts, it’s easier to remove the hubcap before lifting the vehicle with the jack. If your lug nuts are exposed, you can skip ahead to Step 6.
Use the flat end of your lug wrench to remove the hubcap. This will work for most vehicles, but some hubcaps need a different tool to come off. Consult your owner’s manual for proper hubcap or wheel cover removal procedures.
Using the lug wrench, turn the lug nuts counterclockwise until you break their resistance. You may have to use force, and that’s ok. Use your foot or all of your body weight if necessary.
Loosen the lug nuts about ¼ to ½ of a turn, but don’t remove them completely yet. Save that for when it’s time to remove your tire/wheel from the vehicle.
The right place for the jack is usually beneath the vehicle frame alongside the tire that’s flat. Many vehicle frames have molded plastic on the bottom with a cleared area of exposed metal specifically for the jack. To safely lift and avoid damage to the vehicle, follow the instructions for jack placement in your vehicle owner’s manual.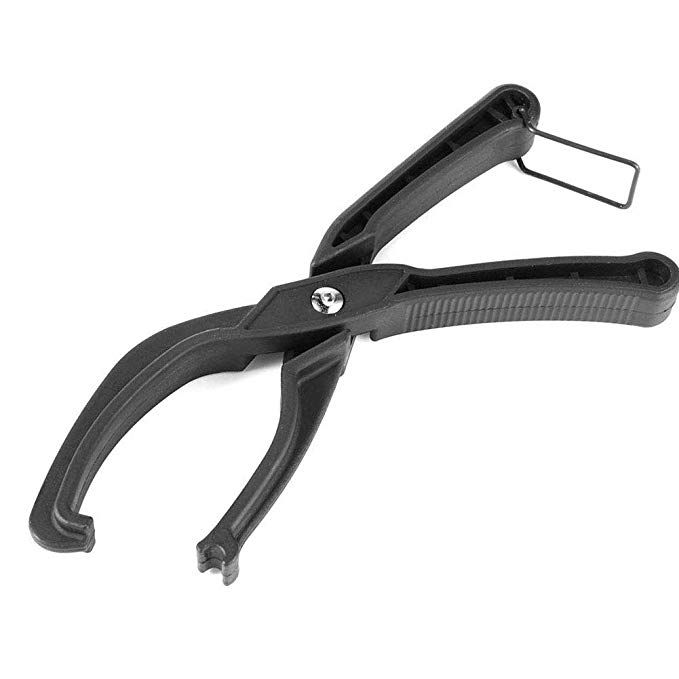
To prevent the jack from settling under the weight of your vehicle and coming off balance, place a small cut of 2x6” wood beneath it before attempting to raise your vehicle. This tactic is especially helpful on asphalt.
With the jack properly positioned, raise the vehicle until the flat tire is about six inches above the ground.
Never put any part of your body under the vehicle during or after raising the vehicle with the jack.
Now it’s time to remove the lug nuts all the way. Since you've already loosened them, you should be able to unscrew them mostly by hand.
Gripping the tire by the treads, pull it gently toward you until it’s completely free from the hub behind it. Set it on its side so that it doesn’t roll away.
Now place the spare on the hub by lining up the rim with the lug bolts. Push gently until the lug bolts show through the rim.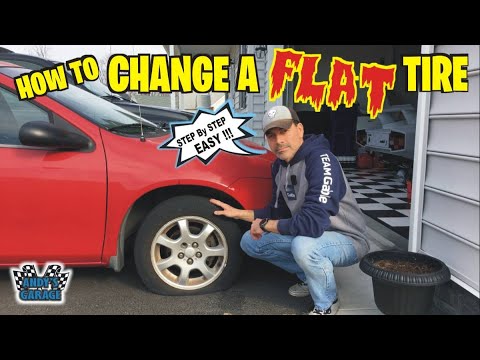
Put the lug nuts back on the lug bolts and tighten them all the way by hand. Once they are all on, check each one again, tightening as much as possible. You will tighten them with the wrench after lowering the vehicle to the ground.
Use the jack to lower the vehicle so that the spare tire is resting on the ground but the full weight of the vehicle isn’t fully on the tire. At this point, you should tighten the lug nuts with the wrench, turning clockwise, as much as you can. Push down on the lug wrench with the full weight of your body.
Bring the vehicle all the way to the ground and remove the jack. Give the lug nuts another pull with the wrench to ensure they’re as tight as possible.
If the hubcap you took from the flat tire will fit your spare, put it in place the same way you removed it initially. If it doesn’t fit, stow it away with the tire when you stow your equipment.
You have before you a jack, a lug wrench, wheel wedges, your flat tire, and possibly a hubcap. Don’t forget to put all of them in your vehicle before driving away.
You should check the tire pressure of the spare tire to make sure that it is safe to drive on. “T-Type” temporary spares, also called “mini-spares,” require 60 psi (420 kPa). If the tire needs pressure, drive (slowly) to a service station immediately.
Temporary spare tires aren’t made to drive long distances or at high speeds, so drive cautiously until you’re able to visit a tire technician. A professional should be able to determine whether your tire needs a repair or if it’s time to replace it.
Aside from taking your tire to a professional, the above procedure shouldn’t take more than 15 to 30 minutes to change a tire. Just be sure you don’t leave out any steps.
It’s beneficial practice changing a tire in your garage or driveway to ensure you’re ready to handle this situation if it ever happens to you.
Knowing how to fix a flat tire is great, but regular tire maintenance is even more important. In addition to reviewing this guide regularly, remember to do the following:
Keep your tires properly inflated
Rotate your tires according to the manufacturer’s guidelines
Monitor for tread wear
All of these precautions will extend the life of your tires and reduce the likelihood of a flat. While there’s no way to prevent flat tires completely, proper care can improve performance and ensure your tires last as long as possible.
There’s never a good time for a flat. That’s why Bridgestone DriveGuard tires are masterfully engineered to keep you moving for up to 50 miles at speeds up to 50 MPH without disruption.
There’s never a good time for a flat. That’s why Bridgestone DriveGuard tires are masterfully engineered to keep you moving for up to 50 miles at speeds up to 50 MPH without disruption.
See Details Find Your Fit
Automotive>Tires & Brakes
May 20, 2019
A tire blowout is one of the scariest experiences you can have while driving. Impact damage, a large cut with rapid air loss, or even an unnoticed small puncture that allows the tire to slowly lose air over time can all cause tire failure.1 A flat tire can seem overwhelming when you are on the road, but there are five steps you can follow to switch to your spare and get home (or to the nearest tire shop).
Learn How to Fill Your Tires with Air to help prevent a flat tire.
Before you exit your vehicle, you need to pull over or find a place away from the rush of traffic on the road. Stay calm and aware of your surroundings while you look for a place to stop the car. While you don’t want to damage the metal rim by driving more than several yards on a flat tire, your safety comes first.2 When you pull over, remember to put your hazard lights on when on the side of the road, turn off the car, and apply your parking brake. When you’re ready to investigate the damage, try to exit on the side of the car away from traffic and no matter what, make sure you watch for oncoming traffic before opening the door. Keep children and other passengers calm and comfortable inside the vehicle. If you have them, place flares or reflectors every 10 feet and at least 300 feet behind your vehicle on the right edge of the main roadway to oncoming traffic where your vehicle is parked.3 Apply wheel wedges or find large rocks to apply behind wheels on the opposite side of the car to prevent the vehicle from rolling.
Once you are in a safe location, locate all the necessary tools to change your flat tire. Your owner’s manual should tell you where the tools are located, but most are in the trunk with the spare or in the floor of an SUV. A basic tire changing kit should include:
1. A jack to easily lift the car
2. A lug wrench with a socket on one end and a pry bar on the other
3. A spare tire to replace the flat tire4
Some vehicle models may require additional tools like a wheel lock or extension bars for lowering the spare tire so be sure to consult your vehicle's owner’s manual before you attempt to change to your spare. It is also important to note that while fixing something yourself can feel empowering, if you don’t feel comfortable changing your flat tire, it’s a good idea to call a trained expert to help.
If you have a hubcap or wheel cover, carefully remove it. Use the lug wrench and socket to loosen the lug nuts, but don’t remove them just yet. Stop turning if the socket slips around the lug nut. Constant slipping could damage the nut by stripping it, making it more difficult to remove. Next, refer to your owner’s manual to find the correct location to use the jack. The correct location is reinforced so It won't do damage to your car’s frame or undercarriage. Putting the jack anywhere else could cause damage to the frame of the car, or even worse, could cause the car to fall off the jack while you are working on it, seriously injuring you. Once you identify the correct location, use the jack to slowly lift your vehicle until the wheel spins freely, but not far enough for the car to slide off the jack.
Without losing track of them, remove the lug nuts and pull the tire off the car straight towards you. Place the spare tire on straight and reattach the lug nuts with your hands while holding the tire still.
Learn more about how to keep your tires healthy by avoiding these 5 Ways to Avoid a Flat Tire.
Use the jack to slowly lower the car back down. Once all four tires are touching the ground, use the wrench to tighten the lug nuts all the way. Be sure to tighten the nuts in a diagonal pattern rather than a circle so the tire will stay straight.
Once the flat has been safely removed and replaced with a spare, you still need to purchase a true replacement tire or get the tire repaired. Driving on the spare faster or longer than the owner’s manual recommends could cause even more damage to your vehicle.
Find a shop near you that accepts Synchrony Car Care TM and take advantage of promotional financing* on purchases of $199 or more.
Read more about Why You Shouldn’t Just Replace One Tire.
Find a shop near you that accepts Synchrony Car Care TM and take advantage of promotional financing* on purchases of $199 or more.
Apply Today
Find a Location
*Subject to credit approval. Minimum monthly payments required. See merchants or mysynchrony.com/carcare for promotional financing details and merchant locations.
Disclaimer: We include links to another website in this article for your convenience. We do not endorse any content on these sites.
All product names, logos, and brands are property of their respective owners. All company, product and service names are for identification purposes only. Use of these names, logos, and brands does not imply endorsement.
This content is subject to change without notice and offered for informational use only. You are urged to consult with your individual business, financial, legal, tax and/or other advisors with respect to any information presented. Synchrony and any of its affiliates (collectively, “Synchrony”) make no representations or warranties regarding this content and accept no liability for any loss or harm arising from the use of the information provided. Your receipt of this material constitutes your acceptance of these terms and conditions.
© 2022 Synchrony Bank.
For the normal operation of the vehicle, it is necessary to periodically replace and install high-quality tires. This is an almost simple process, but not all motorists can handle it, especially for beginners.
Usually replacement is carried out for certain reasons:
To carry out competent work on replacing rubber, it is necessary to follow the recommendations and rules. Otherwise, it can lead to a wheel out on the track and a serious accident.
First of all, you need to know that the tires to be installed must comply with the general dimensions and characteristics recommended by the car manufacturer. There may be small differences, but not more than 2%.
General properties and dimensions are specified in the vehicle's instruction manual. If these are not available, use the recommendation of the car dealer.
The next step is to find out the load index of the tire being installed, as well as the speed characteristics. They should not be less than the parameters specified in the instructions from the manufacturer.
Tire changes can be made with higher index values, but not with lower requirements. Typically, indexes are indicated in the operating instructions for the car.
Next, analyze the air pressure characteristics of the tires. The indicators must be completely identical with the factory settings. Otherwise, the wheel may be severely deformed and burst when driving a passenger car.
If the tires are over-inflated or, on the contrary, have less air, this will negatively affect the stability of the vehicle and its high handling characteristics. Tire pressure indicators are indicated in the operating instructions for the car.
Now let's highlight another important rule that beginners and experienced car owners should use when installing a complete set of tires: when purchasing sets of tires, you need to make sure that the characteristics of the landing and offset of the disk correspond to the factory parameters of the vehicle.
If these properties do not match, then this will negatively affect the handling of the car and quickly lead to deformation of the car suspension. General departure and landing characteristics are specified by the tire manufacturer and the factory where the vehicles are produced.
On any type of passenger car, the front tires are most often deformed, since most passenger vehicles have front drive axles. Accordingly, the rear wheels on them are subject to less wear.
Many owners often try to regularly change the front tires, and leave the rear tires for a few more seasons.
But in this situation, every car enthusiast should know that the absolute indicators of safe and reliable driving will only be achieved by using all 4 tires with the same tread.
Naturally, tires are expensive products and not everyone can afford to regularly replace products, especially in a complete set.
In such a situation, the installation of tires can be divided into two stages. To begin with, the front tires are replaced and after a certain period of time the rear tires are installed. However, all processes are recommended to be performed only with identical pairs of tires.
If the installation of new tires has to be carried out urgently due to deformation of the old ones, then you should know a certain rule. Regardless of the model or brand of tires, the thickness of all four treads must be identical to each other.
If only one tire is damaged and cannot be repaired, at least a pair of new ones should be used.
You can only replace one damaged tire if the set is brand new and has only been driven a few hundred kilometers.
In this situation, the owner of the vehicle can purchase only one similar tire and install it instead of the damaged one, without fear of losing the quality of control and safety while driving.
When a motorist has traveled more than 1000 km, it is no longer possible to replace only one tire. The protectors wear out quickly enough, and balance will probably be lost when installing only one new one.
Just before installing a new tire on a wheel, a detailed check of its condition is required.
The disc is checked for serious defects, warping, and wear on the flanges and rim. It is recommended to remove additional weights balancing the wheel and valve at the time of replacing the old rubber.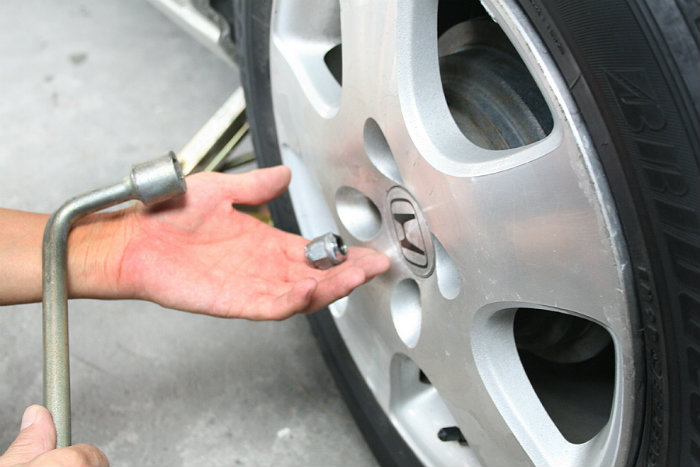 This procedure is performed only in the situation when the tire does not have a chamber.
When installing a new tire, it is advisable to take into account the marking in the form of colored marks applied to its surface. They indicate the main direction of rotation in the form of an arrow on the side.
Easier and easier mounting of the tire is directly related to the application of individual spots on its beads or the use of soapy liquid. However, do not overdo it with lubrication, as the rubber will begin to slide on the disc rim.
Installation of new rubber on the disc is carried out in the opposite direction with respect to dismantling. First you need to put the tire on one side of the disc rim, and then insert the inner tube. Moreover, the valve should fall into a small hole in the rim. The next step is to install the second sidewall of the rubber.
Thus, the tire fits well on the rim, after which the air pressure should be reduced to the desired parameters. Here it is important to take into account the fact that the pressure is measured at the moment when the tire is installed on the wheel, subject to the car weight.
For tubeless tyres, this process is a bit more complicated. A simple pump for pumping or a special compressor cannot be used until the rubber beads are completely leaning against the disc rim, since air actively penetrates through the gap between it and the tire.
You can use an alternative method: inflate the vehicle tire to four atmospheres. Then we remove the hose and install one of its ends on the valve of the mounted rubber.
First unscrew the nipple and insert a part of the hose with a special fitting into the inflated tire.
Then, once the fitting is installed, most of the air will enter the tubeless tires and set them in place by stabilizing the pressure. At car service stations, original compressors with large receivers are used to inflate wheels.
However, this task can be done by yourself, if you show a little skill and logic. Also, do not forget that after installing new rubber, the wheel is balanced.
Every owner and experienced motorist knows that front tires should be changed at the very beginning. Since the car is subject to a lot of skidding when driving on worn rear tires, there is a great risk of deformation and rupture of the front wheels.
In a situation where the tires on the front wheel burst, accidents without serious consequences can no longer be avoided.
The main causes of severe front tire wear are associated with maximum axle loads and regular steering turns.
Since the front wheels are regularly subjected to severe impact and subsequently ruptured, higher requirements are placed on them in terms of increased strength and reliability.
To reduce the risk of punctures and warping, front tires should be replaced in pairs. The level of controllability of the car depends on the competent choice of tires.
Has a different tread pattern. In the summer, it is not recommended to ride on tires - wear will increase.
You can easily check the health of the tires. They must not: 1. Have "bald" parts.2. To be with inflated sidewalls.3. Have a tread depth of less than 1.6 mm (established by law).4. Differ in size from the tire on the other side of the axle.5. Have cracks.6. Used for over 6 years.
When it's time to change tires, you have to choose which tires to buy. All tires are divided into chamber and tubeless, radial and diagonal. All have their pros and cons. What you need exactly depends on the purpose for which you use the car.
There are three ways to change tires:
1. You will bead the wheels yourself. This is a very labor intensive process. It takes a lot of time and effort. It is not for everyone.2. You are contacting a service. They will do it quickly, the main thing is timely treatment. It happens that in the off-season queues of people wishing to change tires accumulate.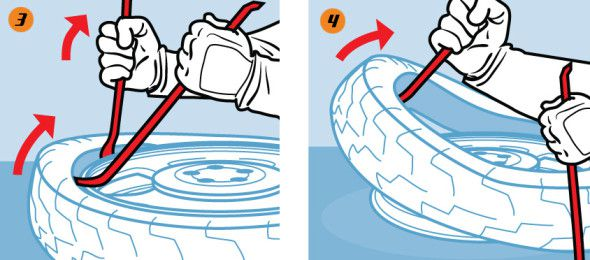 3. You buy tires along with rims. Expensive, but the replacement is very easy to handle yourself.
Most importantly, when buying, carefully inspect the tires. They should not have cracks. Also make sure that all spikes are present.
Related article
What should be the sign "Spikes": dimensions and color of the sticker according to GOST
Sources:
The tread pattern on car tires has 4 main types: asymmetric non-directional, asymmetric with a directional pattern, symmetrical non-directional and, accordingly, symmetrical with a directional pattern. Each type of pattern on wheels has its pros and cons. It all depends on the type and pace of driving that the driver prefers, as well as on the car itself.
Relatively recently, directional tires appeared on the market, which immediately became very popular, although the price jumped significantly.
Directional pattern is much more common.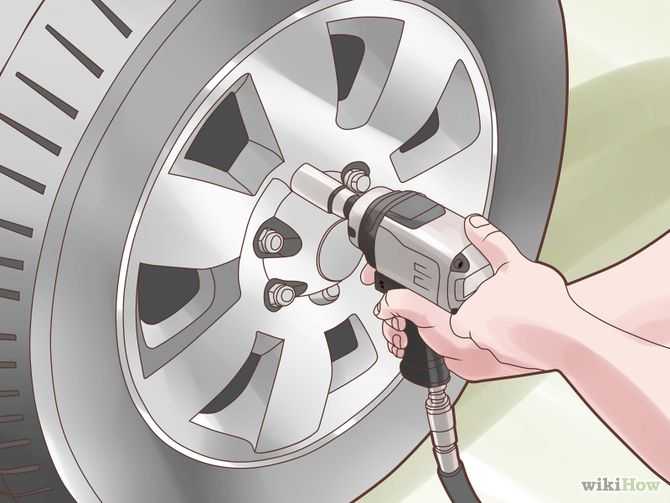 In such wheels there are special channels through which water is squeezed out when the car is moving at the moment the tire contacts the roadway. They have a corresponding name - "rain protectors". On a wet road, they do their job perfectly, but on a dry surface, the performance deteriorates, as the channels for draining water reduce the area of \u200b\u200bcontact with the road. The Rules of the Road clearly indicate the installation of such wheels, since with the wrong direction of rotation, water accumulates in the central part of the tread and creates a water wedge, the so-called "hydroplaning", even at slow speeds.
Tire hydroplaning is a phenomenon in which the wheels (tires) of a car lose contact with the road, and instead of a solid road, a thin film of water forms under the wheels, on which the car slides.
The most expensive are directional asymmetric tread patterns. Such wheels require special conditions and technologies in the production of rubber, because of this, the price differs from other types.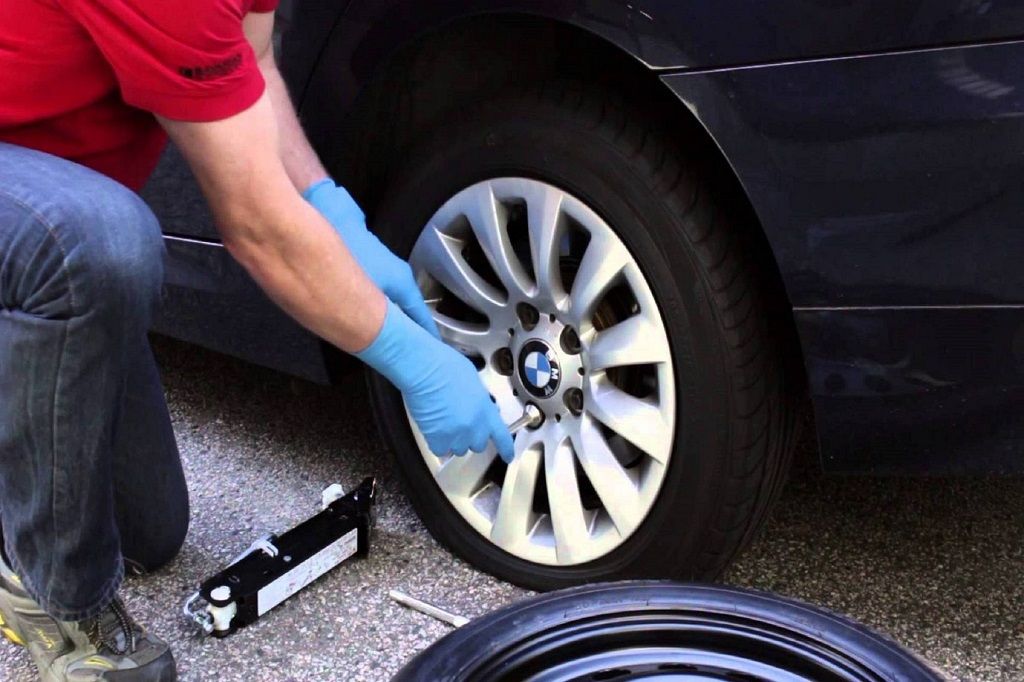 Usually they are put on sports cars or premium cars. The bottom line lies in the fact that the inner part of the wheel provides traction, and the outer one cleans the tread from water, snow and dirt. The installation of such wheels requires taking into account both the direction of rotation and the axis of the vehicle.
Related article
Sources:
The tread is a protective element that is necessary to prevent damage to the tire and the inside of the tire. Such protection is applied to the outer part of the tire in the form of a specific pattern, each of which has its own distinctive features and advantages when operating at certain times of the year.
The main purpose of any tire tread pattern is to provide the most comfortable vehicle flotation. The drawings differ, as a rule, in the direction of the incisions, their depth and number. It is believed that stiffer treads are the best option for summer driving, while less pronounced and narrow patterns, supplemented with special spikes, are more suitable for winter.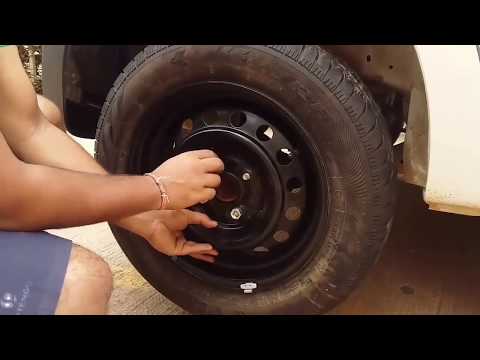 The cuts are filled with mud, snow, water and thus improve the conditions for cross-country ability.
There are several classifications of tread patterns. In a broad sense, they are divided into off-road, universal and smooth. The first category of protectors is characterized by a massive pattern. These tires allow you to move comfortably on almost any terrain. Universal drawings are designed for driving on asphalt roads, mainly in the summer. Smooth treads are only suitable for perfectly packed trails.
Directional patterns are applied according to the principle of inclination of the incisions towards the inside. The difference between symmetric and asymmetric treads is that the patterns on them are the same in the first case, and in the second, the two lines are radically different from each other. For example, one tread band may have a directional pattern, while another may have horizontal notches.
Directional patterns for maximum driving safety in bad weather conditions. The tire resistance to wet asphalt in this case increases several times. The vehicle is much more stable on the road, and therefore it is much easier to drive.
Symmetric directional tread patterns are most commonly used for rear wheel drive vehicles. The advantages of such a set are obvious. The front wheels come into contact with the asphalt during intensive rotation, due to the directional pattern, the effect of “drying” the surface is created. That is why the rear wheels provide a safe ride, in contact with the already prepared road.
The non-directional tread pattern is applied predominantly in a horizontal pattern. Such options are the most common both on sale and in use by car owners. The main features of such cuts are considered to ensure maximum ride noiselessness, comfort in driving, as well as high safety performance.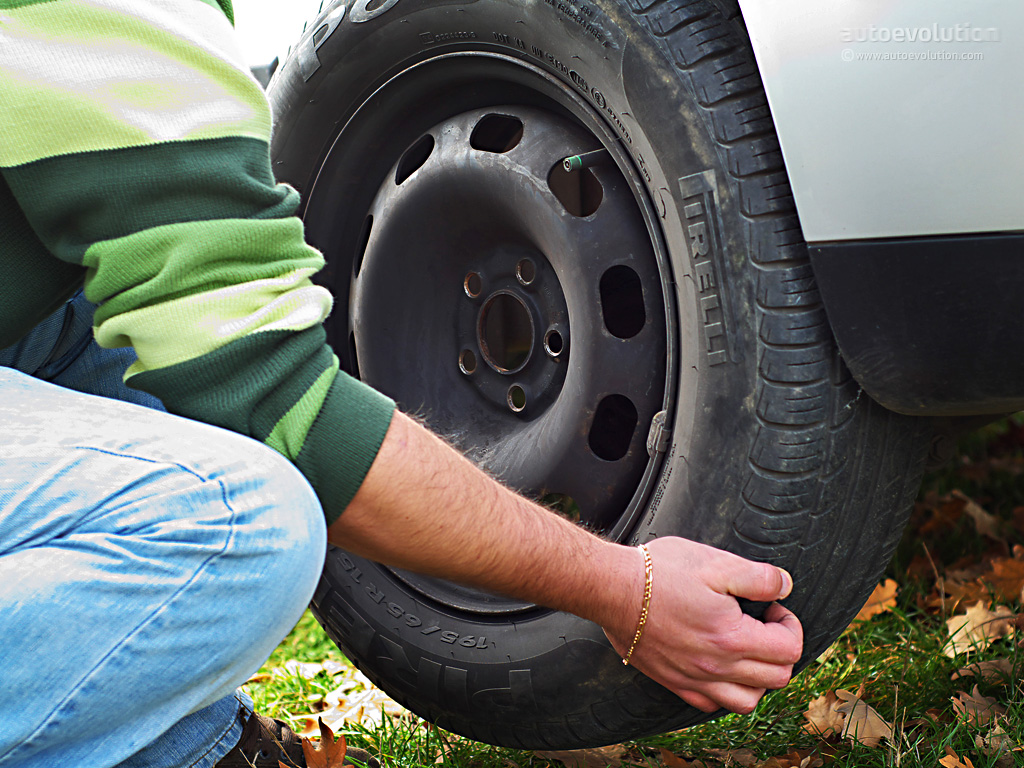
Non-directional tread patterns are only suitable for drivers who are not fans of fast driving. As a rule, such tires are an integral part of the factory equipment of most car brands.
A symmetrical non-directional pattern is applied evenly over the entire surface of the tire, an asymmetric one consists of two stripes that slightly differ from each other in the direction of the notches. The main advantage of such tires is versatility - the wheels can be swapped in any sequence.
Car tires play an important role in vehicle operation. They provide comfort while driving, make the movement in the car safe, provide reliable traction in adverse weather conditions. And the first thing to remember for both a novice and an experienced motorist is the need to control the level of tire pressure.
Why is this so important? It is the pressure indicators that determine the readiness of the wheel for road confrontation in all weather conditions. Thus, a decrease in tire pressure leads to an increase in fuel consumption. And in a critical situation, it can cause loss of controllability and stability of the vehicle. So is it worth the risk if regular tire pressure checks will help you avoid a lot of the hassles associated with the operation of the car?
Before mastering the tricks of tire fitting with your own hands - in a garage or outdoors, it is important to study the theoretical part of the process. To begin with, it is worth deciding on the complete set of an automobile wheel, consisting of a tire and a disk with a rim on which it is put on.
All types of modern car tires are divided into several categories with their own design features:
In addition, tires are divided into:
 Such tires were originally designed for operation in the winter period and contain components that protect the rubber compound from loss of performance properties at low temperatures;
 Car tires are graded according to the type of arrangement of threads in the cord base. It can be radial - at a right angle relative to the sides, or diagonal, with threads crossing from sidewall to sidewall diagonally.
The ability to dismantle and install a car wheel is a great advantage for a car owner. You can be calm in the most non-standard traffic situation, and in the conditions of an urgent seasonal tire change. And if you have not yet mastered all the wisdom of automaking, it is never too late to take the first steps in the right direction. The main thing is to learn the procedure.
To remove/install a car wheel, you will need:

After completing the preparations, proceed in stages:
A removed wheel must be replaced with a spare. To do this, a pre-prepared "reserve" is placed in the place of "landing" of the wheel, installing it with the help of studs or guides - depending on the design.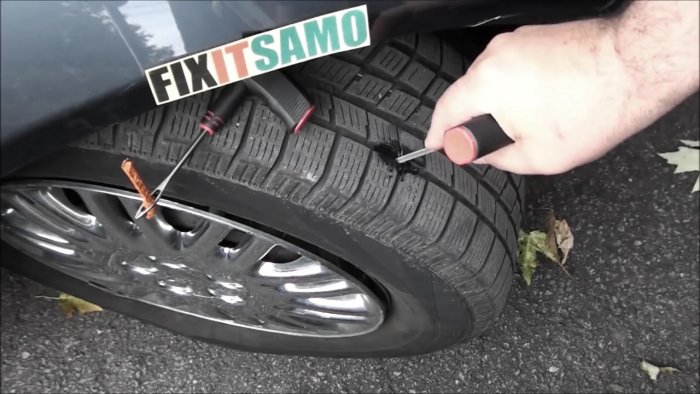 And then they are fixed (not completely) with the help of previously dismantled fasteners, checking the reliability of fixation (the nuts must be screwed in order of priority, starting from the topmost, in a diagonal sequence - this ensures proper centering).
The final tightening of the nuts is done only after the vehicle has been lowered from the jack. Upon completion of the installation procedure, it is necessary to check the tire pressure (normally it should be from 2 Bar or more) and, if necessary, bring its indicators to the desired values.
Sometimes a tire fitting procedure requires more than just a temporary fix by replacing a wheel, but much more decisive action. In particular, replacing a tire on a car disk, which even in a garage does not look like a simple matter. What does it take to change tires yourself?
Do-it-yourself wheel beading is a process that requires a certain endurance. It is necessary to separate the tire from the rim as carefully as possible, gradually pressing the rim. With paddles between the rim and tire, use the soapy solution as a kind of lubricant, making it easier to release the tire bead from under the rim.
It is important to note that during the dismantling process you need to work slowly, gradually moving along the rim. On average, in the absence of special equipment and skills, it will take about 30-40 minutes to dismantle one tire.
The process of changing a tire is the same. With the help of the blades, the tire is gradually placed in place, gently tucking under the wheel rim.
Upon completion of the tire mounting process, our wheel is ready to be mounted on the car. To do this, it is placed at the attachment point and fixed with bolts, and then removed from the jack and the fasteners are fixed in the mounting sockets to the maximum. Upon completion of installation, the tire pressure must be brought to standard values.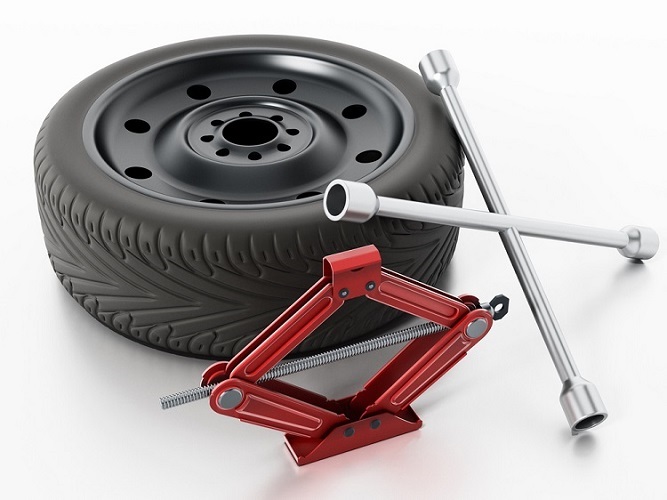
We bring to your attention a video lesson "How to change a wheel on a car":
Having mastered the basics of tire fitting with your own hands, you can always cope with an emergency tire change in traffic situations without resorting to the help of specialists, and seasonal replacement of summer tires with winter ones will not cause serious problems.
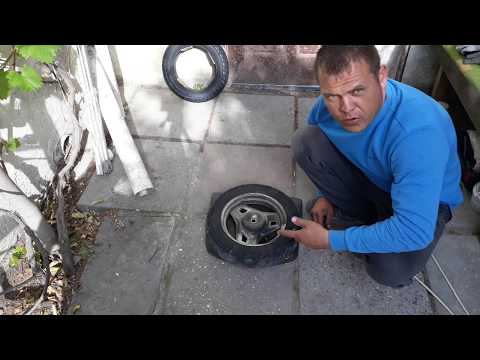
Punctured wheel... This malfunction can unexpectedly overtake any driver, regardless of his status, gender and vehicle class. Of course, manufacturers of modern tires are increasingly using technology in their products that allows even with a punctured tire to get to the nearest tire service. However, in life it may happen that there simply will not be a place where specialists can change the wheels on a car within a radius of several tens of kilometers. And no technology can withstand a long run on flat tires, especially on our roads. There is only one way out in this situation - to change the wheel yourself.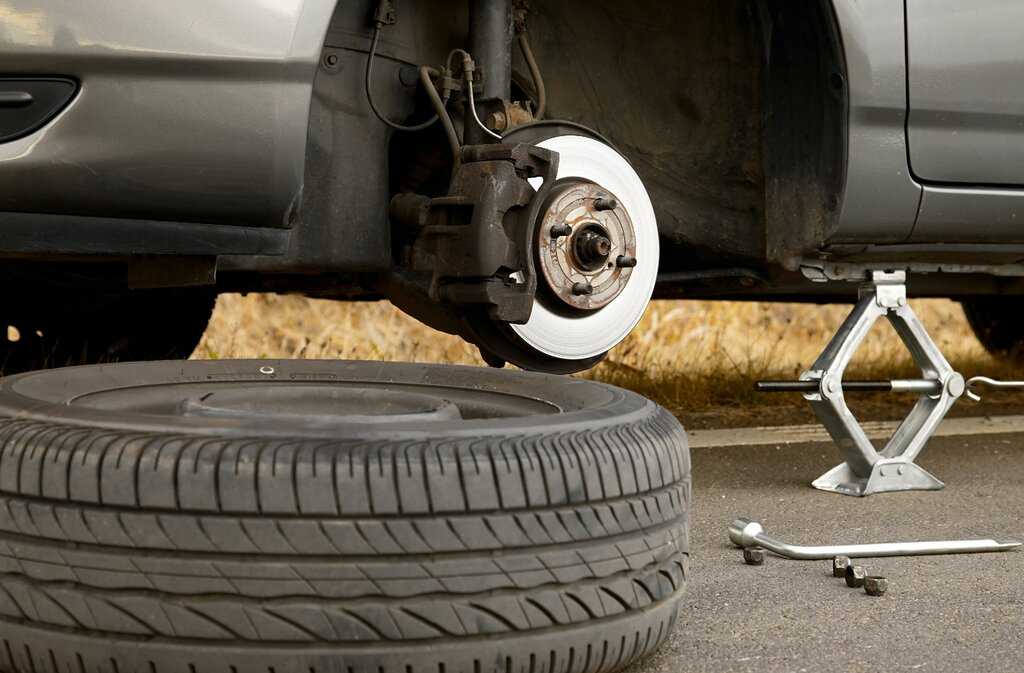
And this is where motorists who are far from nuts and keys, from ignorance of how to change a wheel on a car, may have problems. Although there is nothing super complicated in this. Only before proceeding with the elimination of the malfunction that has arisen, you need to perform a number of necessary measures that will help prevent much more serious troubles.
It goes without saying that every car should have a spare wheel and a tool kit for changing it, which includes:
There are also useful additions that, although not mandatory, can make the job easier, and whether to carry them with you or not is a personal matter for everyone.
 And it’s good if the wheel is not removed, otherwise the car will fall on the brake disc (drum), and deform it, and this problem is more serious than a punctured tire. The substrate should be small (approximately 40 x 40 cm), but strong.
 If all this is available, and there is also theoretical knowledge on how to change a wheel on a car, the process will not be difficult. The main thing is to follow the order of work, to be attentive, careful and accurate.
Remove the damaged wheel and put a whole one in its place - everything seems to be simple and clear, only this work has its own small nuances, ignoring which can end badly. Wheel vibration resulting from improper installation will gradually destroy the vehicle's suspension. In addition, the wheel nuts, again, due to vibration, will begin to unwind. As a result, the wheel can simply fly off, and this already threatens a serious accident.
Installing the spare wheel is done in reverse order. Let's see how it's done.
Before installing the spare wheel, its inner surface must be cleaned of dirt with a metal brush, especially in the area of contact with the surface of the hub. The same must be done with the hub itself. Otherwise, the dirt between the disk and the hub will not allow the wheel to sit tightly in its place, it will turn out to be a micropercos. Because of this, wheel vibration, uneven wear of the tread surface, and gradual loosening of the nuts may occur.
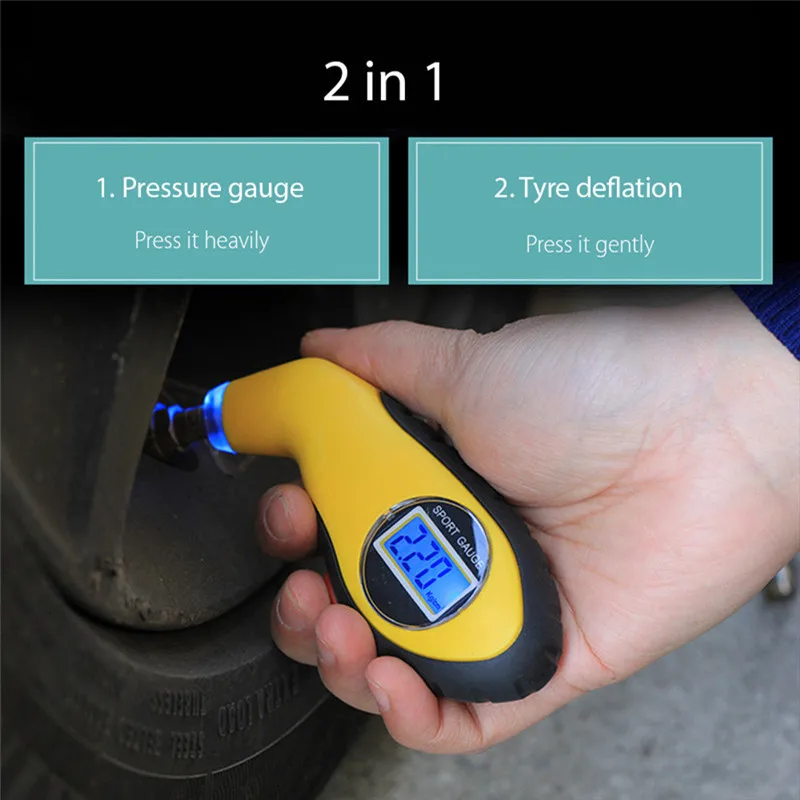
The next thing to do is to check with a pressure gauge whether the pressure in the spare tire is correct and, if necessary, inflate the tire (standard is 2 kgf).
Lightly grease the threads of the studs before fitting the wheel onto the studs. Twisting the wheel begins with the nut located on top. It twists all the way, but does not tighten. You need to do this according to the cross system. That is, after tightening one nut, the next one is the one on the opposite stud.
The machine is then lowered, the jack is removed and the nuts are tightened to the maximum. The tool, together with the punched wheel, is removed into the trunk.
Actually, on this topic, how to change a wheel on a car yourself, can be considered closed. This work is simple, and it will be possible for any motorist, even without experience with the tool, to perform it.
In addition to the above, I would also like to raise questions about how to change the wheels on a car from summer tires to winter tires, and how to increase the life of tires using the rearrangement method.
When changing tires seasonally, there is a very important point that must be observed. In this case, knowing how to change a wheel on a car will not be enough. Before this procedure, the wheels must in any case be balanced. It will be impossible to do it on your own, unless, of course, there is special equipment and proper qualifications. That is, the wheels will need to be shown to specialists. The only way you can save a little on this is to take the wheels to a tire shop, and after balancing, already at home, replace them yourself.
To prolong the life of already installed wheels, experts recommend swapping them. Then the tread will wear out more or less evenly, because on the leading elements the wear of its pattern occurs much more intensively than on the driven ones.
To change the wheels on the car yourself, you just need to know the process diagram and keep in mind the frequency. The rearrangement should be done every 10 thousand km. There are several such schemes, depending on the drive of the car and the type of tires. If the tires are of an asymmetric type, then it will be universal for any type of drive. In this case, the wheels are simply rearranged from one axle to another in parallel.
Swapping symmetrical tires on a front-wheel drive car is also quite simple. In this case, the wheels, having passed the allotted mileage, are rearranged diagonally relative to the axis of the car.
But here you need to remember that if during operation at least one of the wheels received serious damage, then it should only be on the rear axle (not leading), and further rearrangement with its participation can no longer be done.
Swapping symmetrical tires on a rear wheel drive car looks a bit more complicated than on a front wheel drive car.
In this scheme, the rear wheels are mounted on the front axle, the shift is carried out in parallel, but the front wheels are mounted diagonally on the rear axle.
The swapping scheme for 4WD vehicles is similar to that for RWD vehicles, only in reverse.
In this case, the front wheels are mounted parallel to the rear axle, and the rear wheels "move" to the front diagonally.
In conclusion, I would like to note that knowing how to change a wheel on a car, and applying this knowledge in practice, the driver can not only solve the problem with a punctured tire on his own, but also increase the life of the installed tires, thereby saving his time and money.
The article is a must-read for novice motorists, especially for beautiful ladies. "Cool" racing drivers do not need to read.
This action, for "experienced" and with experience, cannot even cause feelings similar to panic, but for a beginner, and especially if this is a girl, a lot of all kinds of questions arise.
Here, in this article, I want to put all the dots where it should be. So that there is no mockery of ill-mannered sellers of automobile wheels over lovely young ladies.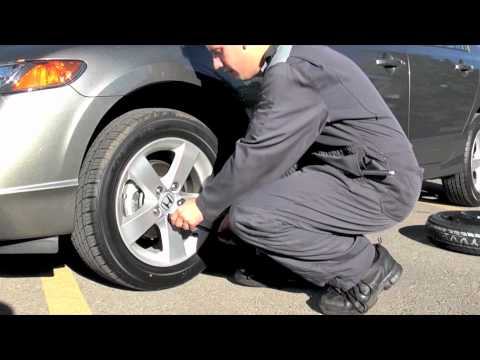
Summer tires are dangerous to drive in winter unless you live in Australia or banana-lemon Singapore.
"Oh, why?" - the inquisitive girl will ask a question.
"Yes, you drive! All last winter, I drove on my chisel on summer tires, ”says an ill-mannered young man with a driving experience of 2-4 years.
I answer both at once:
You can of course ride on summer tires in winter, if wisely, especially in large cities where snow is seen mainly on TV. But, sometimes, one such snowy day is enough to send your iron horse to a body repair. Not in vain, it is precisely such “snow-icy” days that are called “bodybuilder’s day”.
I hope the first question is answered.
If the first question was accepted almost unanimously, then we smoothly move on to the second - to install winter tires with or without studs?
If your car plows the stone jungle of the metropolis, and trips out of town, for example, skiing or going ice fishing, are not your forte, then you definitely do not need spikes on wheels.
Moreover, they literally completely demolish the road markings, which are so painstakingly, at night, painted with brushes by cunning traffic police.
Winter tires (without studs) in the city will come in handy when one day, driving into your yard, you will see that a caring utility tractor has piled a snowdrift where you usually park. Or, when you leave a warm apartment on a gloomy morning, you will be surprised to find that magic snow was falling at night and the same tractor formed a snowdrift along parked cars.
There is a little parable about this, or if you want an anecdote.
As you know, all people are divided into two categories: - motorists and others. The rest, leaving the house, rejoice at the snow that fell at night like children, saying with delight: "What an amazing and magical snow fell tonight!"
And only a tribe of motorists, running around the car with a clue, mutter angrily: "Heaped this fucking snow again!"
Residents of the vast northern expanses of Russia, I will not advise.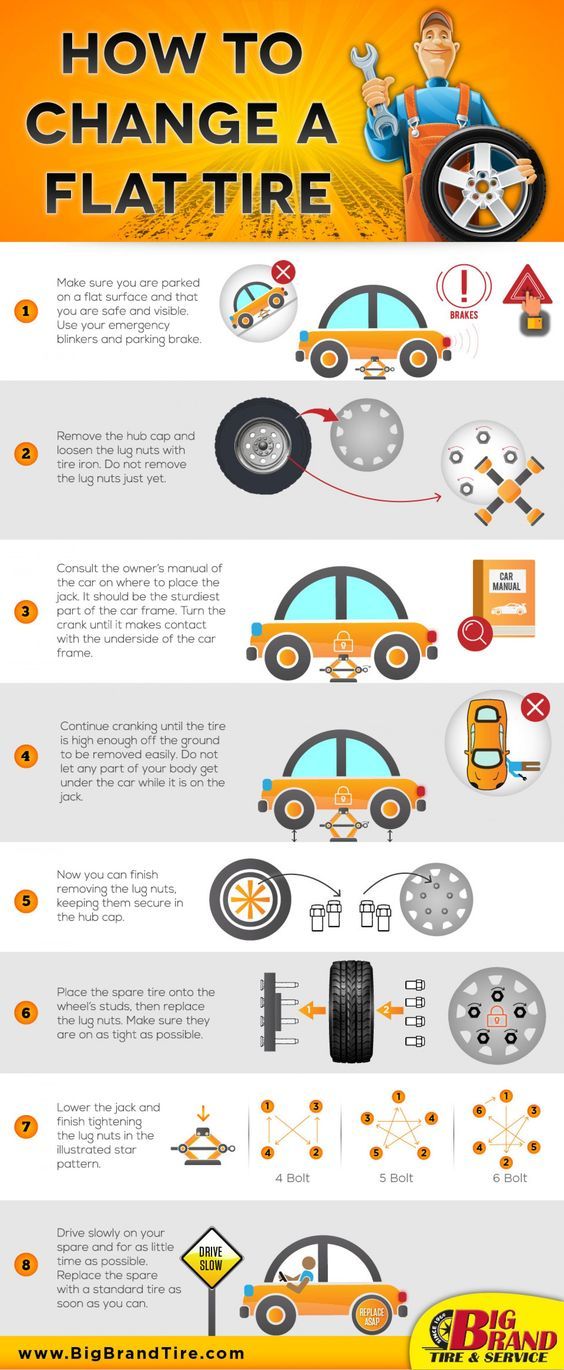 They already know everything. “What thorns are there for the devil,” they grumble, putting chains on the wheels.
Probably, even the most recent teapot knows that the diameter of the wheel is measured in inches (”) - well, that's how it happened. Accordingly, the disk under the rubber is selected the same.
A disk is selected under the 15” rubber, guess three times :), 15” is also correct.
The rim, as you know, is attached to the machine with nuts or bolts.
So, when buying rims, you should consider the size of the seat on the hub of your car and the number of these same holes. Here, measurements are already taken in millimeters.
For example:
mysterious numbers 4 X 10⁸, mean - four mounting holes and the distance between the centers of these holes is 108 mm.
There is also such a thing as the "removal" of the wheel (rim). A simpler explanation is how far the wheel, relative to the midpoint, is extended or recessed.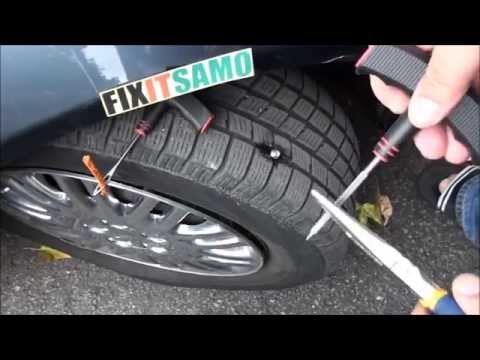 Yes... I bent it... So, now I'll try it even easier...
Well, the wheel either sticks out or hides in the wheel niche.
More detailed information can be found on the vast expanses of the Russian Internet, if you enter a phrase in a search engine, for example: “pick up wheels”.
 You need to wear such rubber on wheels accordingly.
 Of course, this is not all wisdom - only what I remembered .... Additional tips "experienced" are accepted in the comments.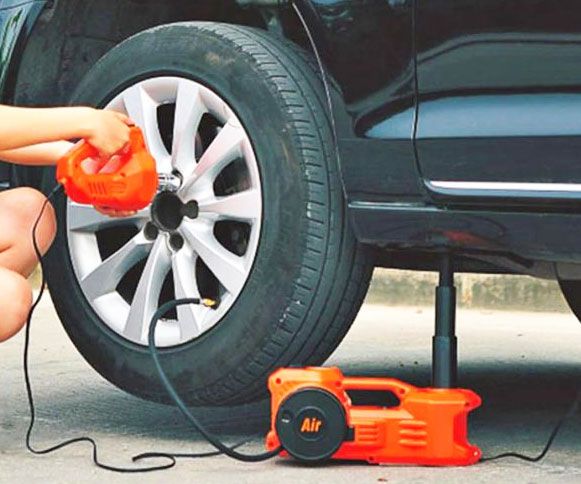
The most costly way is a trip to a wheel supermarket, sparkling with forged, alloy wheels and sweetly, for the smell of a car enthusiast, stinking of imported rubber. Here you will be kindly offered a discount on the installation of wheels, all sorts of discount cards. In what amount everything will result, only God and, probably, the senior seller knows.
You can, of course, wander around all sorts of markets and small shops. Buy tires and then wheels. Next comes the cost of tire fitting and wheel balancing.
In my opinion, the most reasonable and economical way to become the owner of a set of winter (summer) wheels is to search and buy them on the Internet.
Advertise on various Internet resources that you want to become the owner of a complete set of wheels (on cast or iron rims - this is already on the volume of your wallet and ambitions).
Do not forget to indicate the size and mounting dimensions. For example: “I will buy a set of winter wheels on alloy wheels R15 4x10⁸, little used”, and at the same time, do not forget to look through the ads of other sellers.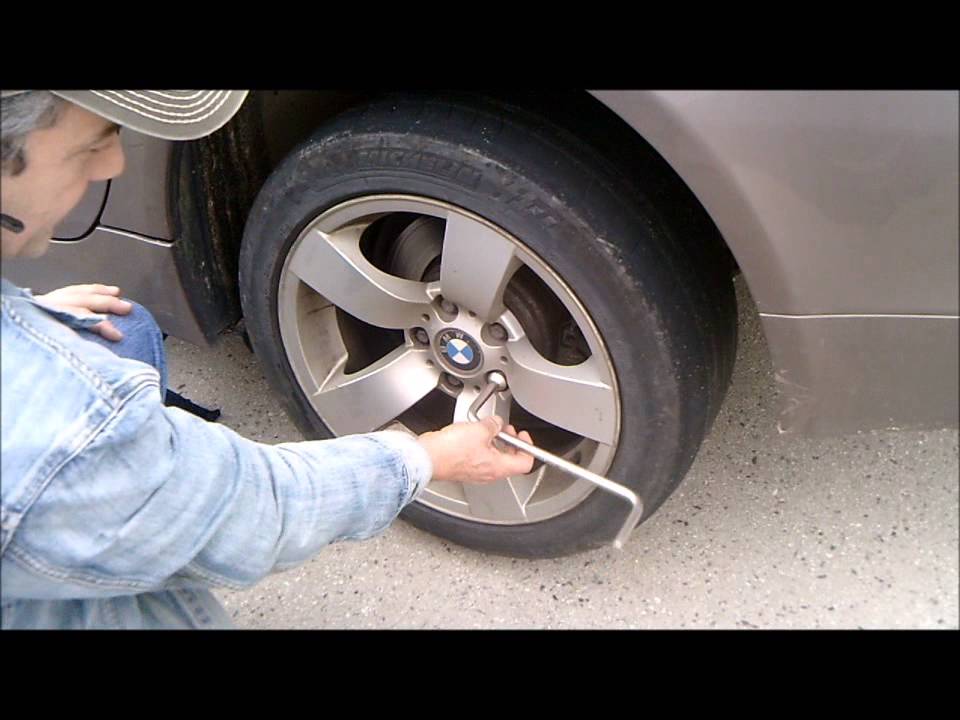
With this method, you can save up to 50% of the cost of the wheels. (Tested, works!)
To extract maximum savings - you should look and buy, of course, not in the season of changing wheels.
Draw conclusions for yourself.
Contents
 Non-puncture tires, new technologies.
Tires with ContiSeal and SSR technology. Recently there has been a huge demand for "puncture-free tires", which are made using ContiSeal and SSR technology.
The reason for this hype is that many drivers do not want to replace a damaged tire, especially if it is raining and muddy outside or at night.
According to a sociological survey, "puncture-free tires" are more needed by people who find it difficult to change a wheel with age, as well as people with physical disabilities.
Researchers have found that 70% of motorists can put a spare tire in place of a damaged one and continue driving. 30% fail, due to the poor condition of the spare, low tire pressure, lack of the necessary tools for replacement, or the absence of the spare wheel itself. Also, many simply do not know how to change the wheel.
In many countries, the roads are very bad, and the likelihood of a tire puncture increases many times. If you have tires with ContiSeal and SSR technology, you can go further if you get a puncture. The peculiarity of these tires is that they have a small layer of sealing compound on the tread, which has the ability to envelop an object that pierced the tire or tighten a punctured spot with a diameter of 5 millimeters. These tires allow the car to drive even if the pressure is zero.
ContiSeal technology tires are installed from the factory on some Kia, Hyundai, Volkswagen vehicles. They are marked on the side of the tire with a marking.
Airless tires closed.
Modern technologies are in rapid development, which is why the head of a simple layman sometimes refuses to understand new inventions as real ones. A tire puncture is a common, but always unpleasant event for every car owner. However, now such tires have been successfully created that are not afraid of punctures, and you never need to pump them up.
There are two types of airless tires for cars:
Open airless tires
1. Open. They have multiple advantages, and therefore it is not surprising that motorists love them the most. The wheels of the future have a simple structure, in general: strong polyurethane spokes are attached in a special order to the wheel hub. A special stretch collar is the edge of the wheel.
2. Closed. These tires are very similar to conventional pneumatic rubber. Inside them is fiberglass located on load bases. These slopes are cheaper, but they do not have so many advantages.
Today, airless wheels are already being installed on light vehicles and some household equipment. They can be seen on scooters, motor cultivators, lawn mowers and similar equipment. The open type of tires can also be used on rather heavy special equipment. Closed tires without air are often found on bicycles or wheelchairs.
Tires that are not inflated with air have the following advantages over ordinary tires:
1. It is easy to damage the product. An airless tire will serve as long as 70% of its components are intact.
2. The wheel will not explode on the track, causing an accident. That is, rubber will save your life!
3. Tires change their shape perfectly depending on changes in road surface topography. Pits, potholes and potholes are not a problem for such tires.
4. Tires are light in weight, and this reduces the fuel consumption of the car.
5. Damaged wheels are changed without using a jack.
6. Tires are placed on regular wheels.
7. The cost of airless products is practically the same as the price of pneumatic car tires.
8. Airless tires do not change their profile height over time.
9. For several years tires do not lose strength even with intensive use.
So far, there are no strong disadvantages of airless tires. We can only say that they can become a source of vehicle vibration when you drive a car at a fast speed. You will not adjust the degree of rigidity of the wheels by pumping, which is also sometimes not good. In addition, most airless tires are not yet designed for use on heavy vehicles.
However, airless tires should still take over the market in the foreseeable future due to a significant set of positive features.
Source
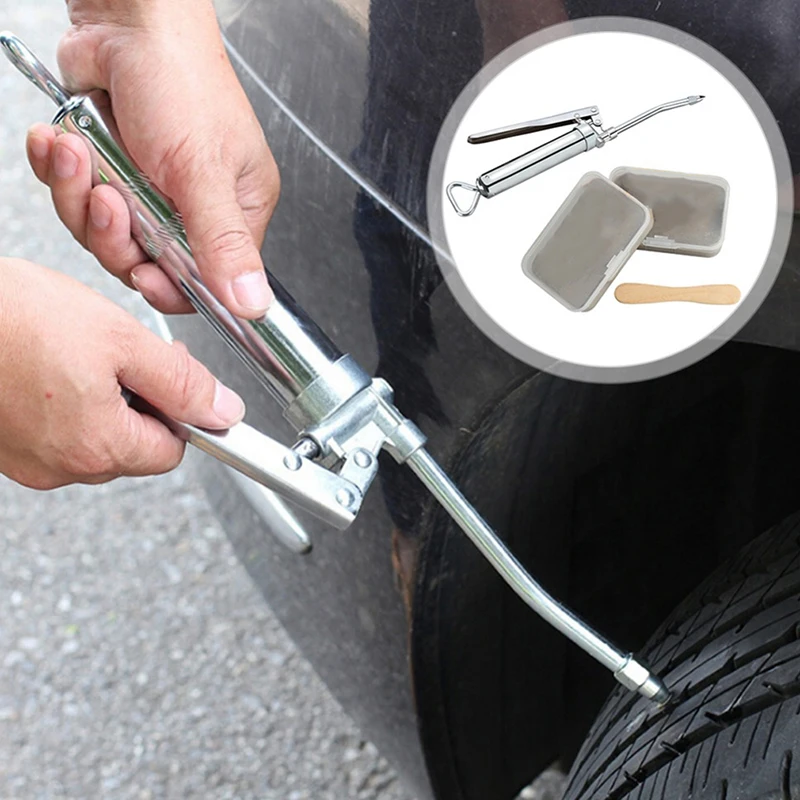
If you have to ride a bike on gravel, glass, thorns, nails and other obstacles, this greatly increases the risk of a tire puncture. Since such a problem came to the author of the homemade product quite often, it was decided to slightly upgrade the tires in order to reduce the likelihood of a chamber puncture. The modification is quite simple, but effective.
Bicycle modification process:
Step one. Removing the wheel
First, you need to remove the wheel from the bike, which needs to be modified. Most often it breaks through the rear wheel, since it bears the greatest weight. In order to remove the wheel, you will need to unscrew two nuts, most modern bicycles use 15 mm wrench nuts. On older bikes, you will need a 17 wrench. You also need to make sure that the hand brakes are off.
Third step. Preparing the old tire
Now we need to take the old tire. It must be cut so that it can fit inside the new (outer) tire of the wheel. As a result, a double tire is formed, which will be very difficult to break through to the chamber. The edges of the old tire must be removed with a sharp knife. As a result, only a flat section should remain from the old tire.
If the bar is too long, it will need to be cut to the optimum length. The resulting gap after placing the strip in the tire should be as small as possible.
After that, the wheel can be mounted on the bike and a test ride can be made. Significant changes in the dynamics of the bike should not be observed.
According to the author, now the wheel will be resistant to punctures, and this is very important when driving long distances.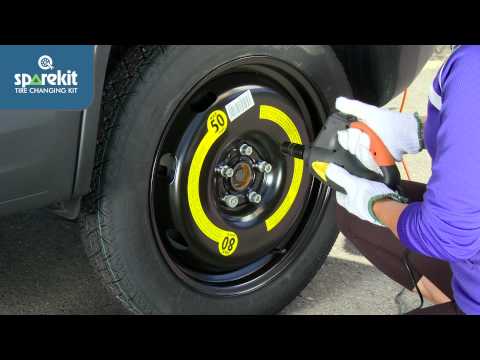 On top of all that, even if a tire punctures, the dual tire rental will still allow you to slowly drive to your destination or the nearest workshop where the wheel can be repaired. Also, such a wheel requires less air pressure, since the installed tab occupies the internal volume of the wheel.
If you want to protect the bike wheel even more, you can make several of these tabs, although this will affect the weight and possibly the dynamics of the bike. If weight plays a key role in this matter, then you can look for lighter materials for such purposes. If you need to get impenetrable tires at all, then they can be made tubeless, that is, there will be only one tire inside. This approach will be good for homemade carts, trailers and other equipment.
Well, ideally, such improvements should be done on both wheels of the bike. By the way, modernization is relevant not only for bicycle wheels, but also for motorcycle or even automobile wheels.
Source
The problem of tire punctures for users of modern mechanical equipment remains relevant and always causes just a lot of problems.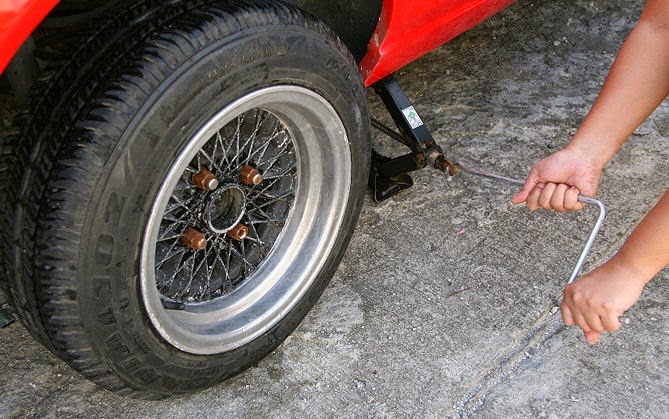 Surely each of you has already encountered this trouble. You drive calmly through the forest or along the road and then “boom”, and the tire starts to sniff and squelch, and you are already driving on a rim or disk. It is good when a puncture occurs near the house or there is a spare tube (or a wheel in the case of a car). But sometimes it can be very difficult to repair a breakdown on the road - adverse weather conditions do not allow you to change the camera qualitatively or the spare camera is already damaged. This has happened a lot in my cycling experience. A spare camera lies in a backpack and waits in the wings, and when the hour comes, it turns out that the camera is already pretty old and bursts from pressure.
The most common bike puncture is due to bad people (to say the least) breaking bottles on the road.
Whenever a tire punctures, you involuntarily begin to think - does modern technology really not allow you to make non-puncture tires ? Solutions to this problem have been proposed.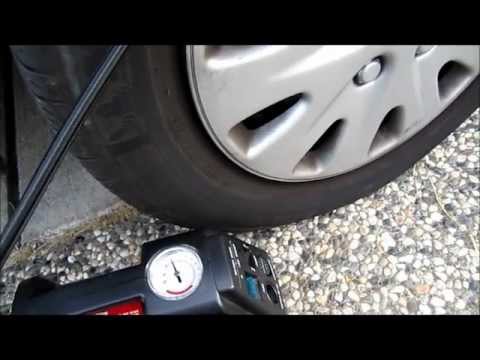 However, they have not yet received widespread distribution and have significant shortcomings.
Surprisingly, there is still no product in a suitable variant. Consider existing puncture-proof bicycle tires .
We take one old damaged bicycle inner tube, cut it along the inner diameter, and lay out a kind of protective layer inside the tire. This layer increases the resistance of the bicycle tube to punctures from glass or small sharp objects, and also eliminates snakebite (a kind of damage that occurs when using tires with low pressure, caused by cutting through the rim of the chamber). When using such a protective layer, it is important to evenly, accurately and evenly line the inside of the tube so that the new tube evenly fills the space in the tire. It is also important that the parts of the inner chamber are not pinched by the tire court. Next, evenly pump bicycle chamber to the correct pressure . The main thing is to do it slowly.
The main drawback is that the weight increases, and the camera still does not have 100% protection.
By the way, there is also a special puncture tape for bicycles. It can be laid between the tire and the camera.
The next (and easiest) step is using a thick wall chamber or using aggressive rubber (high spikes will not allow a chip or nail to damage the camera, because they simply will not reach the camera. Thick-walled tubes are used in extreme cycling disciplines and in the store you can find such an armored tube in the downhill parts section.
Obvious minus - a strong increase in the weight of the entire bike and poor rolling, which is important if you are more comfortable doing torsional disciplines and use the bike for long trips .
There is another standard technology - the use of a special sealant. You can implement this method of protection both on simple rubber and on tubeless. However, the technique was originally planned for use on tubeless bicycle tires.
Bicycle Sealant is a special substance that is poured into the inside of the tube and, in the event of a puncture, begins to be thrown out through the puncture. When interacting with the environment, the sealant instantly hardens (or, rather, turns into rubber) inside the puncture and seals the hole. It turns out a sort of express vulcanization. Tube Sealant is available in various forms and properties. But in general, this technology is quite reliable and devoid of obvious disadvantages. In commercials for such products, the operator pierces the camera with a huge nail and the camera is instantly self-sealed.
In practice, such a sealant copes with small punctures confidently, but a puncture from a nail will already tighten very conditionally, and additional sealing of the chamber will still be required .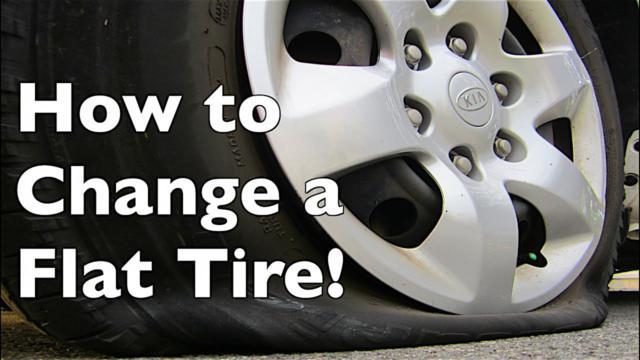 Although it will be possible to get to the nearest repair place on sealant.
The appearance of a puncture in any case will cause a decrease in pressure in chamber . So if you don’t have a pump, and the hole hasn’t seized yet, then you can completely lose one or two atmospheres inside the wheel. You will have to go further on under-inflated tires. Accordingly, be sure to carry the pump with you .
Disadvantages of the technique - high cost of sealant, slight increase in weight, inability to cope with complex punctures or snake bites.
Benefits - The most efficient technology available.
Recently, Vittoria teamed up with Korean brand Tannus, which makes "airless" solid tires.
This is another puncture-free camera technology. There is simply no camera in the tire. The entire space is occupied by a special porous material. It has high elasticity, elasticity and softness, but it cannot be pierced in any way. The tire is more like window insulation. If you remember the “friend” bike, then this option was used there. Of course, for serious use, the implementation of the variant is more advanced.
But this technique has a lot of drawbacks - weight increases, progressive compression of the chamber is a big question, there are some problems with the bike's controllability in difficult areas.
The proposed solution should eliminate the disadvantages of solid rubber and eliminate the vulnerability of standard tires.
Tannus has released armor for the camera. The insert is made of a soft porous material that has the properties of standard bicycle rubber, and its thickness is about 15 mm. The insert is integrated with the standard bus. It turns out a kind of combined rubber.
Thickness eliminates the possibility of puncture or snakebite, while the inner airbag reduces the overall weight of a solid tire and retains the progressive performance of a conventional airbag.
The company claims that in addition to puncture protection, this tire can be used at low pressures without the risk of punctures. This is useful for extreme disciplines.
The development is proposed to be used for motorcyclists, extreme disciplines of cycling and for ordinary bicycles to prevent punctures.
These tubes are relatively new to the market but have captured some of the market. The idea is that the material of the chamber is highly elastic and soft. Small punctures are tightened. Stuck sharp objects remain inside the hole and do not allow air to escape like a cork. In addition, the chamber itself is much more elastic and therefore it is more difficult to “catch” a puncture.
This thing is new and ambiguous, but it has some efficiency. Disappointing, perhaps, the high price.
Despite a large number of developments, the classic version of the bicycle tire still retains unprecedented popularity. All innovations still have a rather high cost and are not without drawbacks. Therefore, sometimes it is easier to use conventional tires the old fashioned way and carry a spare tube with you. Well, if there was a puncture, then read and remember how to properly seal the bicycle chamber .
Source
Wheel failure due to a puncture or cut has been one of the most frustrating situations for drivers for a hundred and fifty years. Ways to deal with this scourge have been sought since the early days of the advent of pneumatic tires - and it seems that a solution has finally been found. Sales of RunFlat tires now account for a significant share of the total supply of passenger car tyres. Such tires, also called self-supporting, account for about 5% of car tire sales. And it all started at 1973 from the Rover P6 and Austin Mini cars, for which the first Total Mobility Tire RunFlat tires were made, later renamed Dunlop Denovo. And this was the first experience of using such technology for purely civilian purposes on a passenger car, simply because the spare tire was very much in the way. Why you can’t do without air and how they tried to avoid punctures throughout this time - read below.
The first rubber tires, which replaced wooden and forged rims, were impenetrable and were not at all afraid of nails - moreover, in each wheel of a car then there could be several nails on a regular basis. However, rims assembled without a single nail or bolt were valued - this was considered the work of a master. But by the beginning of the motorization of the planet, all-wood wheels, covered with rubber, were no longer advanced technology: it was time for pneumatic tires.
The first patent for the familiar "pneumatics" appeared in 1848 and was taken in the name of Robert Thompson. The idea came to practical implementation, and tests convincingly proved the superiority of pneumatic tires over solid wheels: traction on hard surfaces decreased by 37%, and on gravel and soil - by 68%. And this is not counting the fundamental change in the comfort of movement.
After the expiration of the patent in 1878, the very famous John Dunlop made another attempt: in 1888 he again patented the pneumatic tire and began mass production of such tires for bicycles and horse-drawn vehicles. By the way, the times were harsh then, patent trolls and just searchlights already existed, so there were actually quite a lot of patents for this technology. But they all boiled down to simple systems with a chamber inside the tire or “air tube” - a chamber and a tire in one bottle.
Pictured: Lanchester. Model 1914
The problem of punctures was acute from the very beginning, troubles happened literally every hundred kilometers. This is not surprising, given how many nails were hidden in the dirt of dirt roads - after all, horses were the main traction force, and they were shod, and the horseshoes were fastened with nails. Both the cameras and the tires themselves were damaged. The cord was textile and very weak. The situation improved significantly only in the twenties with the use of nylon cord and viscose in the composition of tires, as well as with the transition to steel cord tires in the middle of the century. They fought punctures with simple methods - they sealed the holes, and the driver always had several wheels in stock. The racers, who went on long-distance "rally" raids, did carry dozens of "reserve" with them.
In the context of the already complete dominance of pneumatic tires on passenger cars, their use on heavy equipment and especially military vehicles was extremely limited. A heavy truck cannot be lifted by the axle by hand to remove a wheel and change a tire. And in combat, pneumatics are completely useless - they are easily pierced by bullets and shrapnel and damaged even by barbed wire, and an immobilized vehicle becomes an easy target. And to replace a wheel under fire, again, is extremely difficult.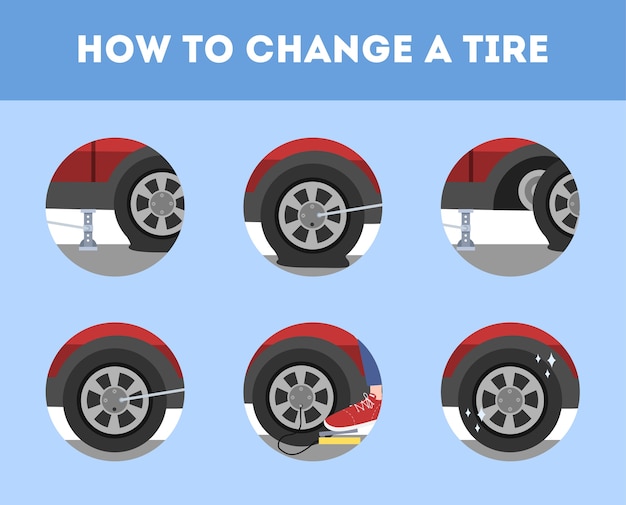 So it was the requests of the military during the First World War that became the main driving force in the development of impenetrable tires.
All-rubber rims weren't the best solution, but the engineers quickly found a variation that worked well for low speeds. Filled with an elastic mass in the form of foamed rubber or rubber bands, tires performed noticeably better than solid rims. On a hard surface, the traction force decreased by 20-30%, and on soft soils by 50% compared to an all-steel wheel and a rubber flash.
In the future, the progress of this kind of tires was determined precisely by the characteristics of the filler compound. Properly selected elasticity made it possible to obtain characteristics comparable to conventional tires on hard surfaces and moderate speeds. At the same time, the tire was not afraid of damage, even after being hit by a projectile, it remained on the disk, and the car could move.
Unfortunately, with increasing speed, the disadvantages of this type of wheels also appeared. The composition was noticeably heated during rapid movement, which led to swelling, ruptures and even tire fires. The rigidity of the composition along the rim inevitably fluctuated, and vibrations, as well as the high mass of the wheel, destroyed the undercarriage of the machines. Progress in the creation of fillers has allowed for a safe speed of 50 kilometers per hour, but it seems that this is the limit beyond which the design required serious complication.
Passenger cars saw little use of these wheels in the 20th century, with limited use on early trucks and buses due to the poor load-bearing capacity of pneumatic tires and the difficulty of changing wheels when punctured. But over time, the roads became better, and the pneumatics became stronger, and the civilian use of the gummatics was forgotten.
With the advent of new polymer compositions, it became possible to create effective solutions of this kind in the form of air-cooled cellular structures based on a frame made of polyurethane, carbon fiber and metal. The higher load-bearing capacity of modern plastics and the possibility of computer calculation of complex structures make it possible to create structures with a given modulus of elasticity in different directions, which can potentially be used for tires of ordinary "civilian" cars.
Bridgestone, Polaris and Hankook have also made their mark in the civilian non-pneumatic tire industry, with the latter pushing the technology forward with new prototypes. Michelin even promised serial tires of this kind by 2015, but, apparently, “something happened” ... However, it is quite possible that we will see such wheels in the near future - the technology opens up painfully interesting possibilities. On city cars, you can completely abandon complex suspensions, cardan shafts, CV joints, silent blocks and ball bearings - after all, such a tire has no stiffness in the longitudinal and transverse directions, which means that you can assign suspension functions to it without compromising handling and grip .
However, we are not finished with non-pneumatic rubber tires - they are sometimes hidden under the shell of ordinary pneumatics. We are talking about tires for armored vehicles, civil and not.
They tried to develop a hybrid of a pneumatic tire and a rubber tire a very long time ago, back in the 30s, tires were produced with a solid inner part, on which a multi-chamber tire was mounted. For example, Michelin introduced tires of a similar design in 1934. They were intended primarily for bank armored cars and scheduled trolleybuses. On Chrysler cars at 19In 58, Goodyear Tire and Rubber Company tires with a carrier rim appeared - this made it possible to solve the safety problem with a rapid loss of pressure in the chambered rubber, the car retained controllability when a wheel was punctured.
Before the mass introduction of tubeless tires, the problem was relevant, and such technologies sometimes appeared as additional equipment for expensive car models. In the seventies, these technologies were used in the tires of the Mowag Piranha armored personnel carrier: its high-profile wheels had a small insert inside, which made it possible to maintain mobility with a serious loss of pressure.
Now the heirs of this technology are, for example, Michelin PAX and Bridgestone Support Ring System, which are used on concealed booking machines of European and American manufacturers. A polymer ring is mounted on the wheel rim, and a pneumatic tire is put on top. In normal mode, when there is pressure in the wheel, the gap between the outer tire and the rubber rim is several centimeters, and the car moves like on ordinary wheels. And in case of a puncture or other damage to the wheel, the insert will ensure movement at speeds up to 80 kilometers per hour - of course, with some loss of controllability. Similar technologies are also used by the military, however, usually in combination with "self-tightening" tires and a centralized wheel inflation system.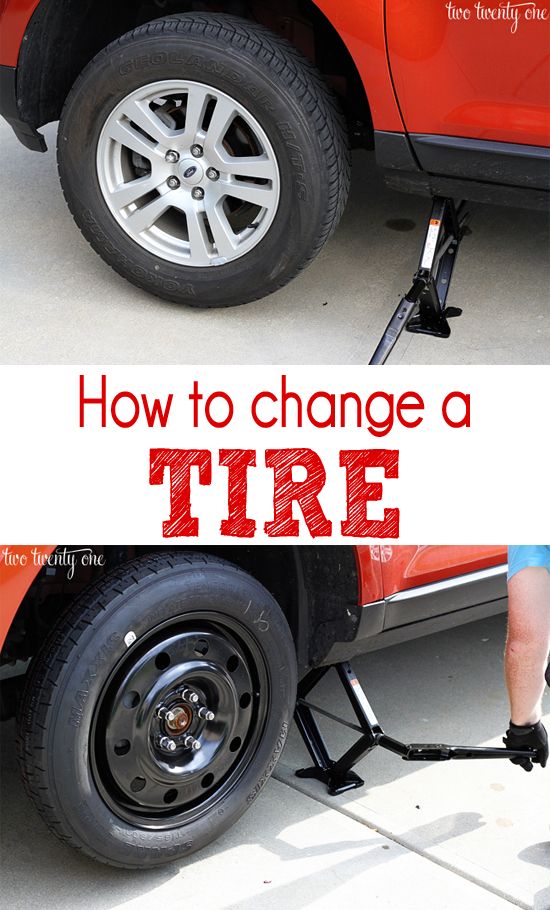
The growth in the speed of wheeled vehicles forced the military in the 50s to look for other solutions than gummatics. The aforementioned technology of self-tightening tires and the centralized tire inflation system gave an excellent combination of qualities. A self-sealing compound on the inner surface of the tire or a special liquid that polymerizes during a puncture, combined with a pumping system and emergency rims, like the Mowag Piranha, made it possible to postpone non-pneumatic technologies for several decades. But since we are primarily interested in “civilian” use, it should be noted that Continental produces tires with ContiSeal technology for ordinary passenger cars. The line includes tires of almost any required dimensions, but with an emphasis mainly on light sports cars - moreover, tires also exist in a winter version. The technology avoids pressure loss during punctures up to 5 mm in diameter or damage that does not penetrate through the additional layer, including shallow cuts in the sidewalls.
The alternative is familiar to many BMW roadster owners before the “RunFlat era”. A compressor in the trunk and a bottle of caulking compound worked very effectively to solve the problem of small punctures. But here the owner in any case had to stop. However, such an “improvement” is available to any motorist with a tubeless tire, and sealant is not at all necessary - sometimes you can put a repair harness on your own and pump up the wheel, or just pump it up and drive to the nearest tire service.
So why, after so many years of trying to make pneumatics puncture-resistant and releasing many different designs, is there finally a technology that can gain a foothold in the market? Of course, progress in technology plays a role here: a lot of water has flowed since 1973, and RunFlat has become much more convenient to use thanks to the emergence of new polymers that allow you to create a fairly soft sidewall with high load-bearing capacity, but this is not a determining factor. First of all, it should be noted that the reason, rather, is not in tire technology, but in the automotive market.
They try to use the mass and internal volume of the machine as efficiently as possible. A huge amount of service electronics, a large number of service mechanisms, an increase in body weight due to increased safety requirements and an increase in power force us to look for ways to at least save the total weight of the car by abandoning traditional reserves. And the weight of a spare wheel and a jack for a modern crossover is already a very significant value. Even the dokatka turns out to be cumbersome, otherwise it simply cannot be “put on” on huge brake mechanisms. In addition, the cost of modern high-tech wheels is a significant share in the price of the car, and a small improvement that contributes to increased reliability is only welcome.
An additional factor contributing to the establishment of safe tires has been the development of tire pressure monitoring technologies and improved suspensions. The TPMS (pressure monitoring) system avoids the indirect dangers of using RunFlat tires in the form of inconspicuous damage and the likelihood of overheating and complete destruction of the tire due to this oversight. And progress in the structure of the suspension allows you to maintain comfort and controllability in the car, even with a rigid sidewall, which is worse than filtering road roughness.
Otherwise, self-supporting tires are the easiest and most technologically advanced way to move from conventional tires to puncture-resistant ones. Differences in technologies for creating tires, wheels and tire fitting operations are minimal, and the effect is more than sufficient for countries with developed road infrastructure. The technology does not have an excess margin of safety, which is necessary for military and police use, such tires are not designed for damage from explosions, various barrier strips, and so on, but the price of the solution is relatively low.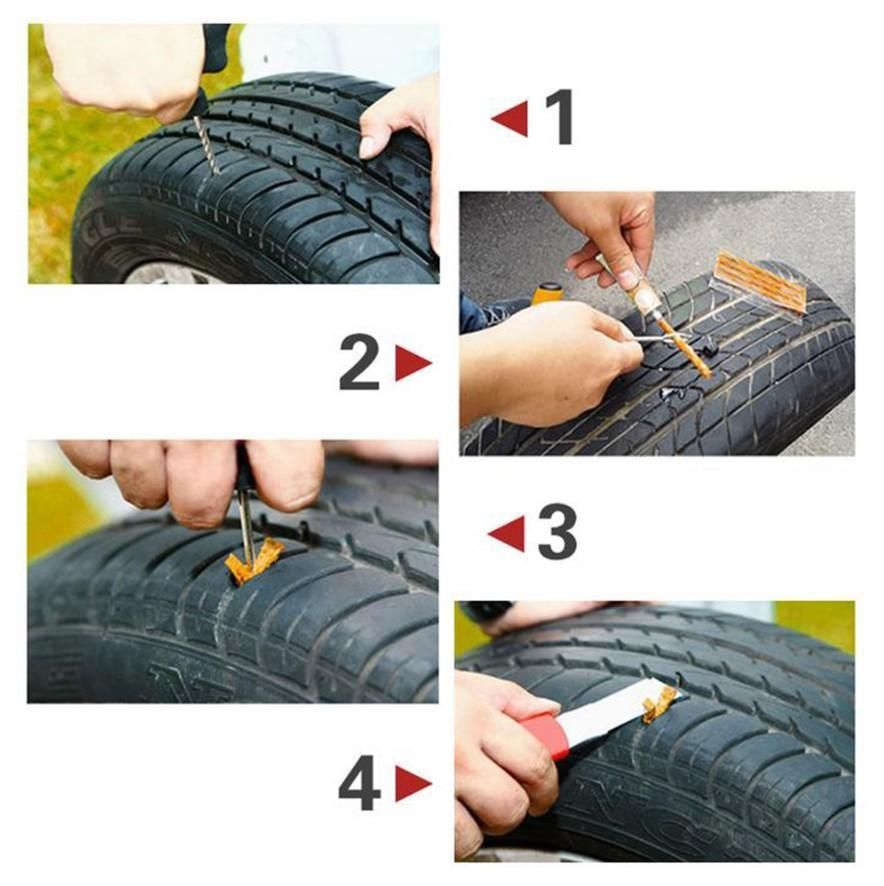
For so many years, manufacturers have been looking for ways to avoid or reduce the risk of punctures - and now the solution seems to be found. After all, 5% of the tire market is not so small, but at the same time, 95% are ordinary pneumatic tires. For 150 years, they have become tubeless, resistant to punctures, cuts, bumps ... They are so rarely damaged that the spare tire has essentially become useless. As a last resort, there is a cell phone and roadside assistance. Worst case, a tow truck. Now safety tires are of interest to the industry primarily because elastomers have progressive compliance characteristics that can be set over a wide range. And the success of RunFlat, most likely, will not change anything - such tires are simply needed by a very limited circle of buyers.
Source
NEUTRAL TIRE from GARAZH54
NEUTRAL TIRE WITH YOUR HANDS! video camera inside tire
Made Eternal WHEEL
NON-PURGEABLE TIRES
Airless bicycle tire.